Evolis tattoo rw User manual

USER GUIDE
Evolis Card Printer © 2009. All rights reserved. July 2014
Ref. KU11E B1

Copyright
Evolis Card Printer © July 2014. All rights reserved.
Copyright notice
Users must observe the copyright regulations applicable in their country. This manual must not be photocopied, translated, reproduced
or transmitted, in whole or in part, for any reason and by any electronic or mechanical means whatsoever without the express written
consent of the Evolis Card Printer company.
All the information contained in this document is subject to change without prior notice.
Evolis Card Printer cannot be held liable for any errors that may be found in this manual, or for any loss or damage arising accidentally or
as a result of dissemination or use of this manual.
Trademarks
is a trademark of Evolis Card Printer. All other trademarks belong to their respective holders.
Warranty
Refer to the warranty notice supplied with your printer for warranty terms and conditions and limitations.
Environmental information – recycling of end-of-life products
The manufacture of the equipment that you have purchased required the extraction and use of natural resources. It may contain
materials that are hazardous to health and the environment.
To prevent the dispersal of such materials into our environment and reduce the pressure on our natural resources, we recommend that
you use existing collection systems. These systems will appropriately re-use or recycle most of the materials in your end-of-life equipment.
The crossed-out dustbin symbol on your device is a reminder to use these systems.
If you need further information on collection, re-use and recycling systems, contact your local or regional waste management body.
Do not hesitate to contact us to nd out more by visiting our website at www.evolis.com or by emailing the following address:
1

About your new printer
Thank you for choosing an Evolis printer.
Using your new printer, you will be able to create a wide variety of high-quality cards and badges which can be printed in various
thicknesses, colours and styles. This printer uses consumables and accessories available from Evolis. For further details, visit our website at
www.evolis.com.
Warranty registration
Please register on line at www.evolis.com to receive our special offers and general information.
Once on the website, click on Drivers and Support and ll in all the elds, giving in particular the model and serial number found on your
printer.
Getting started
The purpose of this user guide is to guide you, step by step, through your printer and how it works. Take some time to read it in order to
better understand your printer and its features, and to save time during installation and use.
As with all Evolis products, a great deal of care has been taken over this manual. Should you nd an error, however, please let us know by
Contents
The bookmarks found top left of your screen can be used to navigate between the various sections in this user guide.
Icons
The following icons are used in this manual to highlight important information:
Information providing further details or depth about certain points in the main text.
Indicates that failing to take the recommended action is liable to damage your printer.
This symbol indicates that a video showing the procedure is available on the www.evolis.com website.
2

Getting started
1-1 Unpacking
Your printer is supplied with several accessories that we ask you to look at closely.
This list may vary depending on your location.
The printer is shipped in special packaging designed to prevent any damage in transit. If you notice any visible damage, do not hesitate
to contact the shipper and immediately inform your Evolis dealer, who will tell you the procedure to follow.
Evolis takes great care over the quality of its packaging and we ask that you keep this packaging somewhere clean and dry.
You will be asked for the full original packaging (outer box, inner wedges and protective bags) in the event that
the printer is returned. If the printer is returned without its original packaging and components are damaged in
transit, these components will no longer be covered by the warranty. You will be charged for new packaging
for shipping the printer back to you.
Accessories supplied with your printer:
lPower supply unit - VP ELECTRONIQUE or SWITCHBOX Type F10723-A or FDF0503-A.
lMains power cable.
lUSB cable.
lInstallation and documentation CD-ROM.
lStarter cleaning kit.
lQuick installation guide.
lWarranty notice.
lCompliance statement documentation.
If any of these components is missing, please contact your Evolis dealer.
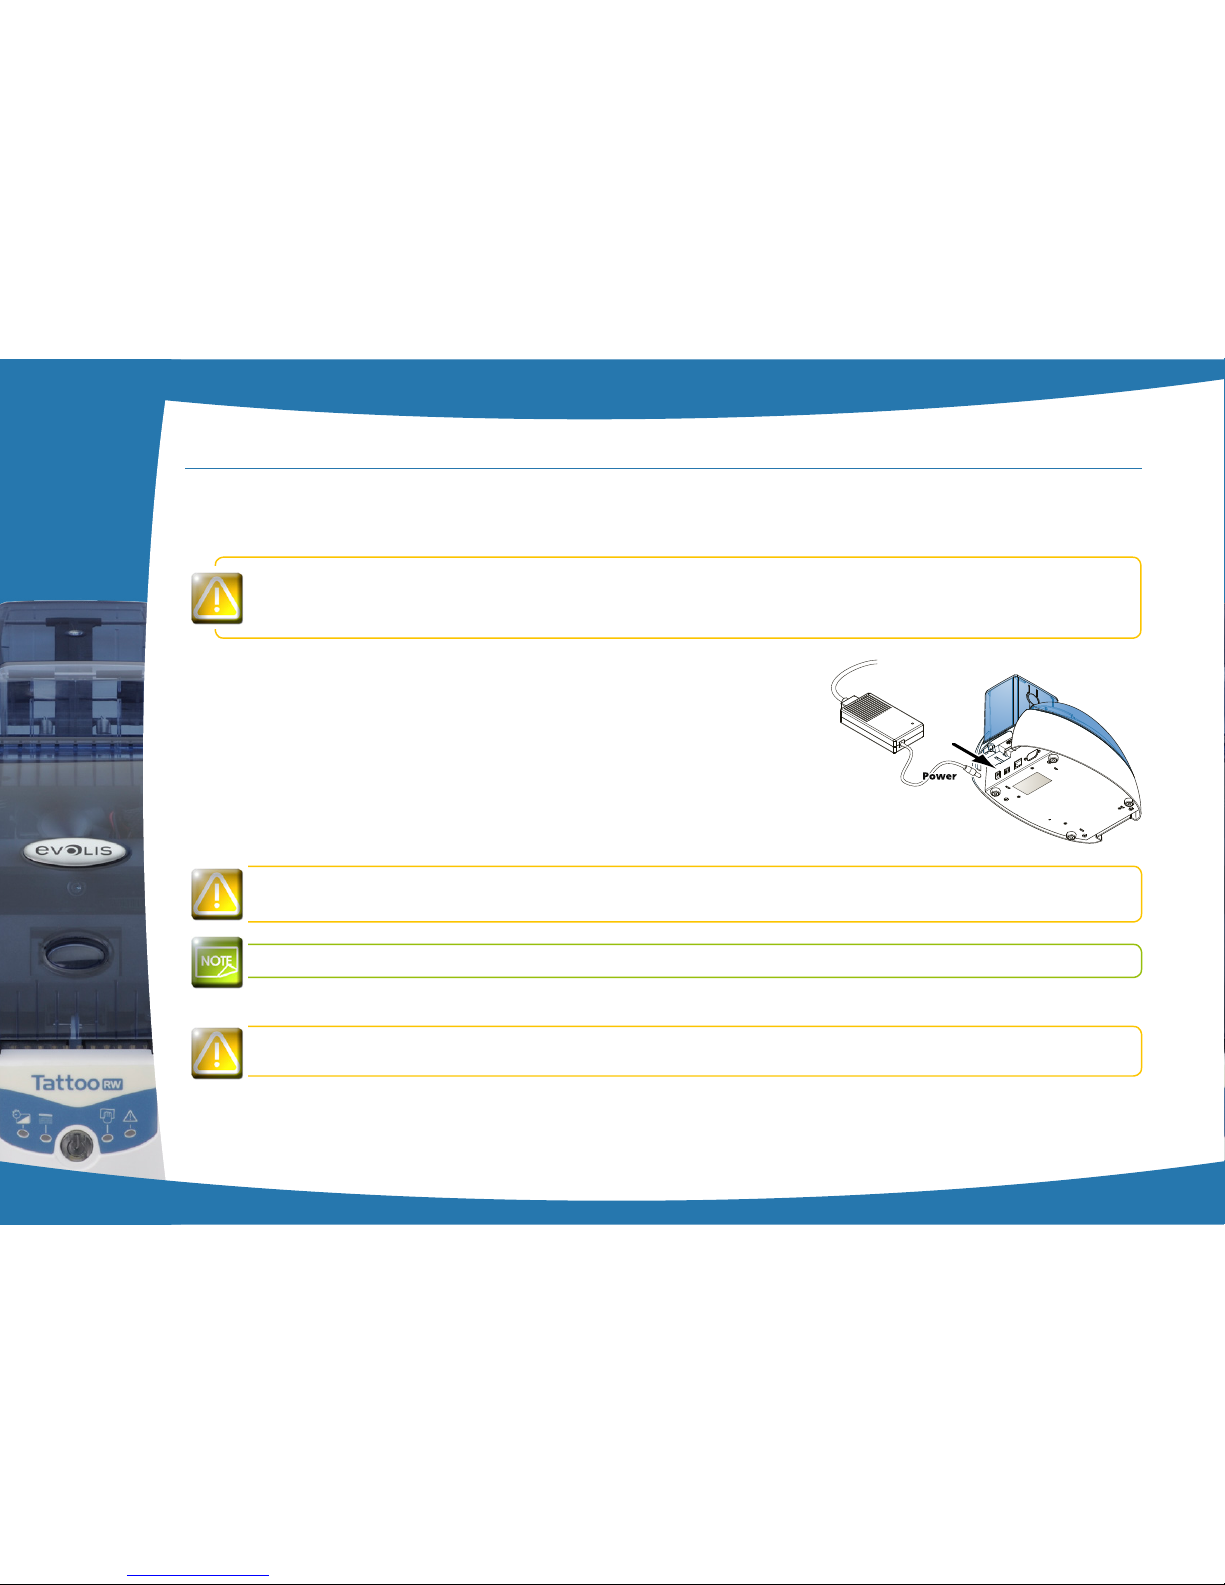
Use only the power supply unit supplied with your Evolis printer.
VP ELECTRONIQUE or SWITCHBOX Type F10723-A or FDF0503-A.
Use only the USB cable supplied with your Evolis printer.
The Evolis printer must be placed in a dry location, protected from dust and draughts but well-ventilated. Take
care to keep your printer on a at, sturdy surface able to bear its weight.
1
3

1-2 Description of the printer and its functions
1
4
Control
button
Card time
delay
CleaningNo cards
Cover
open
A- Cover opening button
B- Card input feeder
C- Output hopper
D- Control panel

1
5
E- Thermal print head
F- Magnetic encoder (option)
G- Control button
H- Cleaning rollers
I- Power socket
J- USB socket (standard)
K- RJ45 Ethernet socket (standard)
L- DB-9 connector (option)
M - Identication label

1-3 Installation
1-3a CONNECTING THE PRINTER
äConnection to the power supply
The printer must be connected to a properly protected and earthed electrical installation.
FI: Laite on liitettävä suojamaadoitus koskettimilla varustettuun pistorasiaan.
NO: Apparatet må tilkoples jordet stikkontakt.
SE: Apparaten skall anslutas till jordat uttag.
ÊConnect the power cable to the power supply unit, then plug the power
cable connector into the printer.
ËNext, plug the end of the power cable into an earthed power socket.
ÌThe printer is powered on, and the printer’s control panel lights up,
indicating that the printer is working properly. If the control panel does
not light, then either installation has not been carried out correctly or the
printer is not working properly. Check the installation.
Before attempting any maintenance, ensure that the power cable is always unplugged. For your personal safety,
ensure that the cable and power supply unit remain easy to access, especially in the event of an emergency.
To save energy, the printer will automatically switch itself to standby mode after 10 minutes of inactivity.
äConnecting the USB cable
Under no circumstances should you connect the USB data cable before installation of the printer driver is
complete.
Refer to the section on printer driver installation for further details, and follow the instructions carefully.
1
6

1-3b CARDS
For optimum quality, the cards used must be ISO 7810 certied.
Use only the card types recommended by Evolis.
Do not touch the printable surface of the cards in order to preserve print quality.
Do not use cards that have been damaged, folded, embossed or dropped on the oor.
Keep your cards protected from dust.
äCard types
Rewritable cards require no ribbon. The card itself contains a thermosensitive material which becomes visible when heated to a high
temperature, and disappears when a lower temperature is applied. This effect is reversible and the same card can be erased and re-
written up to 500 times.
The thermal printing process requires the card to be cooled before re-printing. Should this not occur, partial erasing of the previous image
is observed. A few seconds are typically enough. Similarly, standard contrast is reached a few seconds after the card has been printed.
If the cards are not at, the printing around the edges may be incomplete, especially if the cards are thick.
The problem is reduced after a few print runs. However, it may be impossible to print cards that are too out of
shape. New cards must be kept in a clean, dry environment, such as inside the printer card feeder. Dirty or dusty
cards may cause irregular or incomplete printing, or even premature wear and tear to the print head. A regular
cleaning schedule is recommended. See the “Maintenance” section for more information.
1
7

äLoading the cards
The printer accepts PVC cards between 0.50 mm (20 mil) and 0.76 mm (30 mil) thick. For optimum quality, the cards used must
meet the CR 80 standard.
There is more than one way to load and collect the cards. The print driver must be matched your requirements and choices.
Loading cards into the card feeder
Cards are loaded into the feeder as follows:
ÊRemove the card feeder from the printer as shown.
ËInsert the cards in the feeder as indicated, with the side to be printed facing down.
ÌPut the feeder back into the printer, pressing until a click is heard.
1
8
Ê Ë Ì

Loading a card manually
ÊInsert a card manually into the manual card feeder. The card will automatically eject after printing.
äRemoving printed cards
The printer is supplied with an output hopper with a capacity of 15 x 0.76 mm (30 mil.) cards. This hopper receives the cards once printed
and must be tted to the printer as follows:
1
9

Cards can be collected in two different ways:
ÊAutomatic ejection mode (in this case, use of the detachable output hopper supplied with the printer is recommended)
ËManual collection mode (the card needs to be retrieved after printing).
äAdjusting card thickness
The printer is equipped with an automatic adjustment system for card thicknesses from 0.50 mm to 0.76 mm.
1
10
Ê Ë

Printing
The information about the procedures described in this section refers to a Windows XP environment.
2-1 Installing the print driver
Conguration of the printer and its driver is a very important step and requires very special care. In fact, inappropriate settings are a
factor having a negative impact on the quality of card customisation. It is therefore essential to proceed in stages, changing settings only
when you are completely sure. Evolis offers the option to revert to the factory settings at any time if the adjustments made do not give
the expected results.
Your printer is delivered with a CD containing the print drivers for Windows and Macintosh platforms.
To install a print driver, insert the CD into your computer and select the print driver menu. A program will guide you through the entire
installation process.
Do not connect your USB cable to your computer until prompted to do so by the installation program.
For the connection procedure, see the section on Connecting the Printer.
Follow the installation procedure scrupulously. Some versions of Windows and Macintosh require the user to
have administrator rights to install the driver.
2
11

2-2 Managing the print settings
Before using your printer, it is essential to check and/or change the default print driver settings:
lRibbon* type
lCard type
l Card nish or treatment
l…
You will nd more detailed information about the cards recommended by Evolis in the ‘Evolis Genuine Product’
list of consumables.
Pay attention to the settings dened under the print driver Properties and do not hesitate to contact your Evolis
dealer for any advice and assistance needed before making any changes.
These print settings are accessible:
lFrom the Start button found bottom-left on the Windows task bar, select Printers and faxes.
lSelect your printer and double click.
lFrom the Printer menu, select Properties.
l The rst properties conguration screen for the equipment then appears.
l The main tabs used to dene the settings are “Graphics” and “Tools”.
* does not apply to rewriteable printers
2
12

ä“Graphics” tab
lRibbon* or card types
lFront/back printing
lChoice of methods for feeding and collecting cards
lCard orientation, portrait or landscape
lNumber of copies
ä“Tools” tab
lSetting and testing magnetic encoding options
lTest card printing
lCleaning the printer
lDialogue interface with the printer
We recommend that you print a test card when rst using the printer, and keep it. This card records information
such as the model and serial number which you could be asked to provide if you call technical support.
* does not apply to rewriteable printers
2
13

2-3 Printing a card
A large number of Windows applications allow documents to be printed (for example the tools in Microsoft’s Ofce suite, i.e. MS-Word,
MS-Access, Ms-Excel, MS-PowerPoint).
To gain familiarity with the layout of a card and conguring its formatting and printing, we suggest the following example.
äIn Microsoft®Word
After having set the Evolis printer as the default:
lStart the MS-Word application
l Click on the File in the menu bar, then on Page Setup
lThe Paper tab has a Paper Size option, select CR80 Card
lIn the Margins tab, set all margins to ‘0’, then in the Orientation section, select Landscape.
lClose the window by clicking OK.
Your Word window should now look like this:
You are ready to customise your card by adding the various items that go to make
up a card:
lLogo and Illustration
l Identication photo
lFixed and variable text
lBar code, etc.
Once ready, click on File and then on Print.
2
14

2-4 Connecting to a network (Ethernet)
All Evolis printers have the benet of a TCP/IP network connection mechanism. This feature is available as standard or as an option,
depending on the model in the range.
Out of the box, the printer comes congured in DHCP mode (Dynamic Host Conguration Protocol), which means that its IP address is
supplied by the network. In addition to these basic settings, the network administrator has the option of conguring the printer differently
in order to comply with the constraints imposed by the corporate LAN:
lPrinter connected in a subnet, in DHCP
l Printer connected within a subnet with xed IP address, with WINS resolution
l Printer connected within a subnet with xed IP address, without WINS resolution
The printer may be identied on the network in two ways:
lBy its hostname (NETBIOS)
lBy its IP address.
The user-denable settings are:
lThe printer’s IP address
lSubnet mask
lGateway
lWINS server.
Changing the printer’s basic settings, without prior knowledge of the layout of the LAN in question or without
genuine technical knowledge may result in a malfunction of the printer, and may even extend to a more
widespread failure of all or part of the LAN. Contact your System and Network Administrator before connecting
to or changing the settings for your local area network.
For further details, refer to the ‘Conguration of Evolis printers on a TCP/IP (Ethernet) LAN’ manual.
2
15

Maintenance
3-1 General warranty information
Your Evolis printer has been designed to give you long service and needs only minimal regular maintenance. Please comply with the
instructions given below to ensure that it runs satisfactorily.
Keep your warranty cover!
The manufacturer’s warranty is subject to strict adherence to the routine servicing and maintenance instructions,
and in particular the printer cleaning cycles.
Any failure to follow the maintenance and servicing procedures described in this section voids the print head warranty.
Evolis declines any liability where there has been a failure to carry out required maintenance on the printer.
The print head is a wearing part and an extremely sensitive printer component. Its useful life can be seriously curtailed by the presence of
dust, liquids or solids in the printer’s immediate environment, on the print head or on the cards. Users must take all necessary precautions
to insert only clean cards, free of dust deposits or foreign bodies, into the machine.
The frequency and quality of cleaning are decisive factors enabling users to extend the print head’s useful life and to ensure excellent
print quality. Particular care must therefore be taken with cleaning. Users must comply with the servicing and maintenance instructions
as fully described in this section.
In addition, the use of Evolis brand ribbons (Evolis Genuine Ribbons) also ensures that your equipment operates properly. Use of ribbons
not approved by Evolis may as a consequence affect the quality and reliability of print jobs, produce low quality printed output and
even affect the printer’s operation. The manufacturer’s warranty does not cover physical damage or quality problems caused by using
non-Evolis approved ribbons*.
Evolis provides replacement parts and consumables that you can refer to within this user guide or by visiting the website at
www.evolis.com.
* does not apply to rewriteable printers
3
16

3-2 Routine printer cleaning
The print head warranty is directly linked to routine cleaning of your printer.
If you do not carry out this cleaning at the required times, the print head warranty will cease to be valid.
Recommended cleaning cycle: whenever the ribbon* is changed
Mandatory cleaning cycle: when the cleaning warning is triggered
Servicing accessory: cleaning card
Your printer is tted with a cleaning warning system which is triggered after a certain number of cards have
been inserted, depending on the model of printer that you have (see table below).
You should proceed with the routine cleaning of your printer as soon as the warning is triggered.
If you continue to run the printer despite the warning and if the warning light starts to ash, the print head warranty
will be automatically voided owing to a failure to comply with your contractual maintenance obligations.
So for example for a Tattoo2 printer, if you insert 50 cards after the cleaning warning is triggered, you have only 50 more cards before
cleaning the printer and keeping your warranty valid.
* for rewriteable printers, please refer to the table on page 17
Printer Cleaning required after:
(warning light steady)
Number of cards remaining
before warranty voided
(warning light steady)
Warranty invalid after:
(warning light ashing)
Tattoo2 400 cards 100 cards 500 cards
Tattoo RW 400 cards 100 cards 500 cards
Pebble4 1000 cards 200 cards 1200 cards
Dualys3 1000 cards 200 cards 1200 cards
Securion 800 cards 200 cards 1000 cards
Quantum 900 cards 700 cards 1600 cards
3
17

Follow the procedure below:
Repeatedly running the cleaning card through the printer cleans the feed rollers, the cleaning rollers and the print head.
ÊRemove the card feeder from the printer.
ËRemove any cards found in the feeder.
ÌInsert the cleaning card into the feeder.
ÍPut the feeder back into the printer, then press on the upper section of the feeder until it clicks.
3
18
Ì
Ë
Í
Ê

ÎOpen and then close the printer cover.
ÏHold down the control button on the control panel for one second. Cleaning starts.
ÐThe used cleaning card is ejected into the output hopper.
Wait for 2 minutes after cleaning before using your printer.
3
19
Î Ï Ð
Table of contents
Other Evolis Printer manuals

Evolis
Evolis Primacy User manual

Evolis
Evolis DUPLIPASS User manual

Evolis
Evolis Pebble User manual

Evolis
Evolis New Pebble User manual

Evolis
Evolis Primacy User manual

Evolis
Evolis Dualys User manual

Evolis
Evolis TattooRW User manual

Evolis
Evolis The Tattoo Rewrite User manual

Evolis
Evolis Avansia User manual

Evolis
Evolis Zenius Use and care manual

Evolis
Evolis Badgy User manual

Evolis
Evolis Primacy User manual

Evolis
Evolis A5405 User manual

Evolis
Evolis Dualys User manual

Evolis
Evolis KC200 User manual

Evolis
Evolis Dualys User manual

Evolis
Evolis KU10E User manual

Evolis
Evolis KC ESSENTIAL User manual

Evolis
Evolis Tattoo Operator's manual

Evolis
Evolis Dualys 3 User manual