Fanvil BW320 User manual

Fanvil Product User Manual
IP Phone
Model: BW320
Version: V1.7.50.40 Feb 13 2009
© 2005 Fanvil technology Co,. Ltd
All rights reserved.
This document is supplied by Fanvil Technology Co., Ltd, No part of this document may
be reproduced, republished or retransmitted in any form or by any means whatsoever,
whether electronically or mechanically, including, but not limited to, by way of
photocopying, recording, information recording or through retrieval systems, without
the express written permission of Fanvil Technology Co., Ltd. Fanvil Technology Co.,
Ltd reserves the right to revise this document and make changes at any time and
without the obligation to notify any person and/or entity of such revisions and/or
changes. Product specifications contained in this document are subject to change
without notice.

2
Safety Notices
Please read the following safety notices before installing or using this phone. They are
crucial for the safe and reliable operation of the device.
zPlease use the external power supply that is included in the package. Other power
supplies may cause damage to the phone, affect the behavior or induce noise.
zBefore using the external power supply in the package, please check with home power
voltage. Inaccurate power voltage may cause fire and damage.
zPlease do not damage the power cord. If power cord or plug is impaired, do not use it, it
may cause fire or electric shock.
zThe plug-socket combination must be accessible at all times because it serves as the
main disconnecting device.
zDo not drop, knock or shake it. Rough handling can break internal circuit boards.
zDo not install the device in places where there is direct sunlight. Also do not put the
device on carpets or cushions. It may cause fire or breakdown.
zAvoid exposure the phone to high temperature, below 0℃or high humidity. Avoid
wetting the unit with any liquid.
zDo not attempt to open it. Non-expert handling of the device could damage it. Consult
your authorized dealer for help, or else it may cause fire, electric shock and breakdown.
zDo not use harsh chemicals, cleaning solvents, or strong detergents to clean it. Wipe it
with a soft cloth that has been slightly dampened in a mild soap and water solution.
zWhen lightning, do not touch power plug or phone line, it may cause an electric shock.
zDo not install this phone in an ill-ventilated place.
zYou are in a situation that could cause bodily injury. Before you work on any equipment,
be aware of the hazards involved with electrical circuitry and be familiar with standard
practices for preventing accidents.

3
Table of Content
1. INTRODUCING BW320 VOIP PHONE............................................................................................. 5
1.1. THANK YOU FOR YOUR PURCHASING BW320..................................................................................... 5
1.2. DELIVERY CONTENT.......................................................................................................................... 5
1.3. KEYPAD............................................................................................................................................ 6
1.4. PORT FOR CONNECTING .................................................................................................................... 7
2.INITIAL CONNECTING AND SETTING................................................................................................ 8
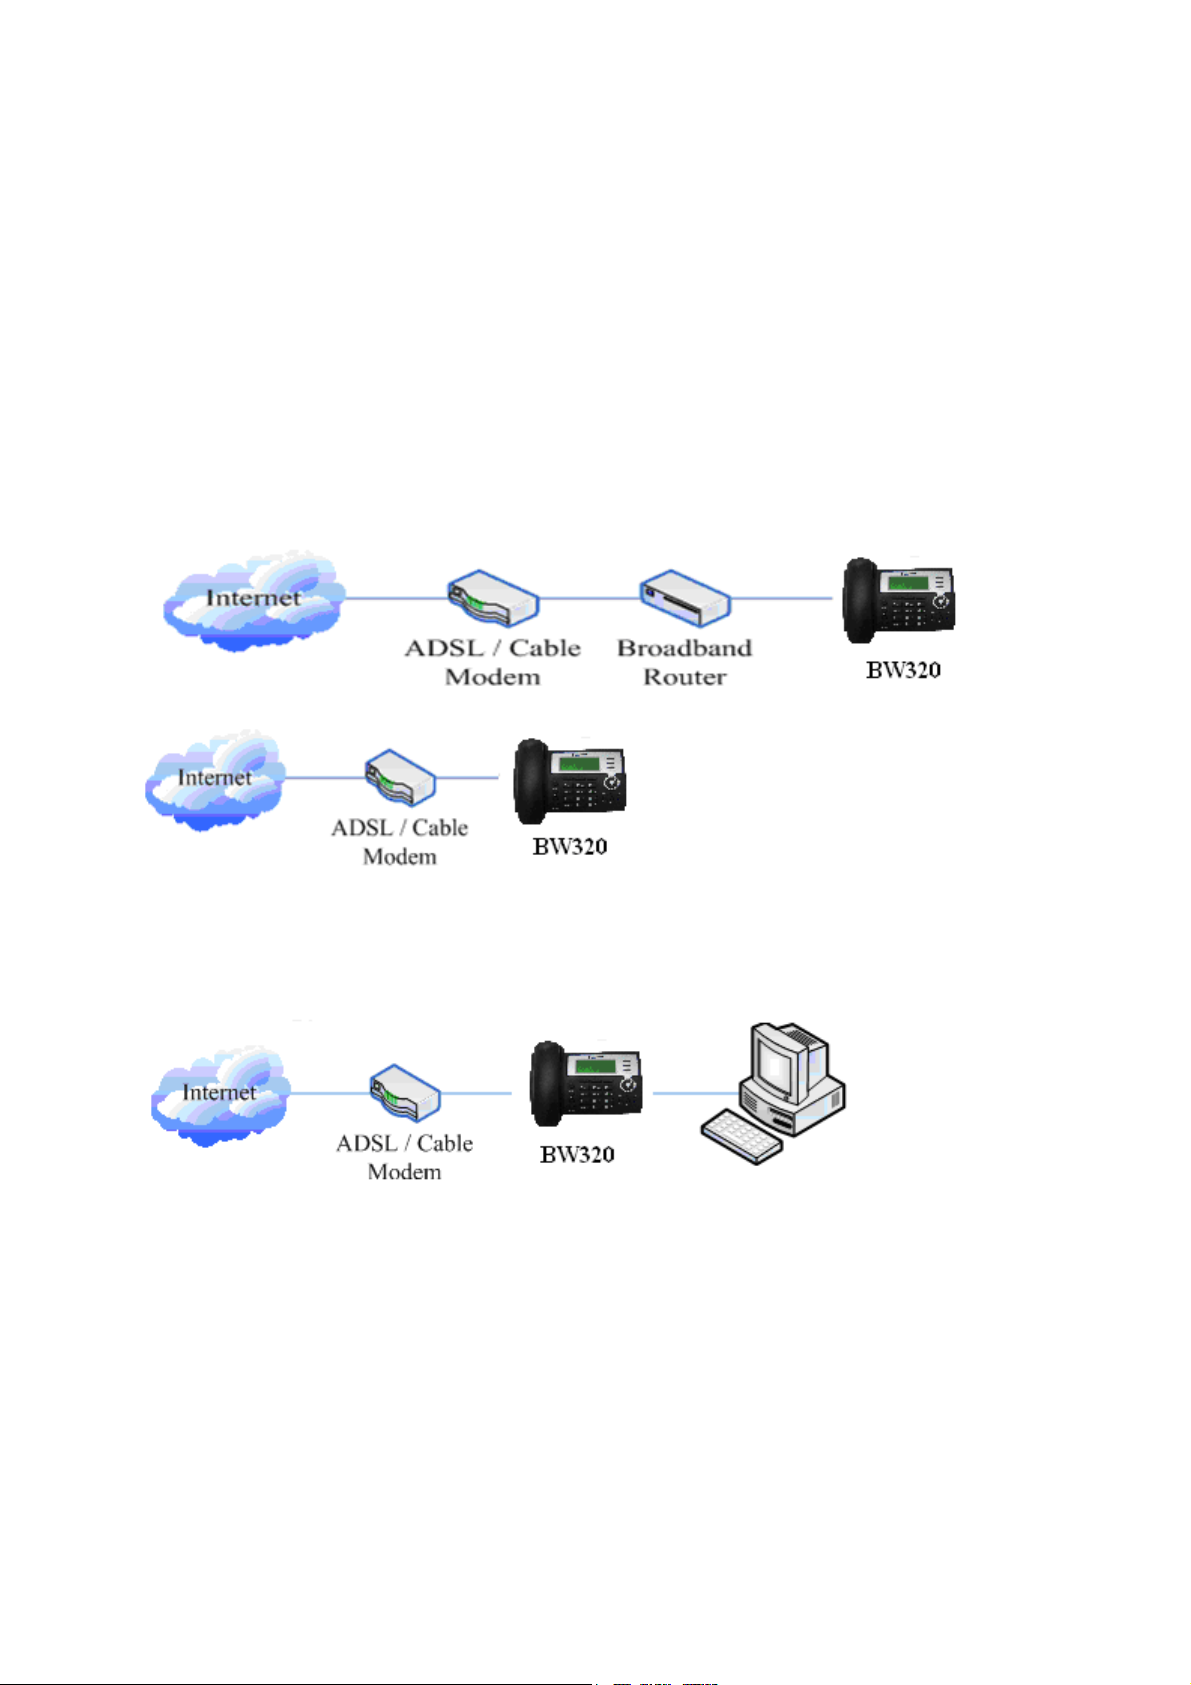
2.1. CONNECT THE PHONE ........................................................................................................................ 8
2.2. INITIAL SETTING................................................................................................................................ 9
2.2.1. PPPoE mode........................................................................................................................... 9
2.2.2. Static IP mode........................................................................................................................ 9
2.2.3. DHCP mode.......................................................................................................................... 10
3. BASIC FUNCTIONS ............................................................................................................................11
3.1. BASIC OPERATION............................................................................................................................11
3.1.1. Accepting a call.....................................................................................................................11
3.1.2. Making a call..........................................................................................................................11
3.1.3. Ending a call......................................................................................................................... 12
3.1.4. Transferring a call................................................................................................................ 12
3.1.5. Calling Hold.......................................................................................................................... 13
3.1.6. 3-way conference call.......................................................................................................... 13
3.1.7. Switchboard Operator feature............................................................................................ 13
3.1.8. Call records.......................................................................................................................... 13
3.2. THE HIGH-LEVEL OPERATION ........................................................................................................... 14
3.2.1. SMS function........................................................................................................................ 14
3.2.2. Memo function ..................................................................................................................... 14
3.2.3. SpeedDial function .............................................................................................................. 14
3.2.4. Realize Secondary Dial by Dialing for only one time....................................................... 14
3.2.5. Phonebook prefix function................................................................................................. 15
3.2.6. Function key......................................................................................................................... 15
3.2.8. join call.................................................................................................................................. 16
3.2.9. redial/unredial ...................................................................................................................... 16
3.2.10. click to dial ......................................................................................................................... 17
4. SETTING............................................................................................................................................. 17
4.1. INTRODUCTION OF CONFIGURATION.................................................................................................. 17
4.1.1. Ways to configure................................................................................................................ 17
4.1.2. Password Configuration ..................................................................................................... 17
4.2. SETTING VIA WEB BROWSER............................................................................................................ 17
4.3. CONFIGURATION VIA WEB .............................................................................................................. 18
4.3.1. BASIC.................................................................................................................................... 18
4.3.1.1. Status.............................................................................................................................................18
4.3.1.2. Wizard ............................................................................................................................................18
4.3.1.3. Call Log..........................................................................................................................................20
4.3.1.4. MMI SET.........................................................................................................................................20
4.3.2. Network................................................................................................................................. 21
4.3.2.1. WAN Config...................................................................................................................................21
4.3.2.2. LAN Config ....................................................................................................................................22
4.3.2.3. Qos Config.....................................................................................................................................23
4.3.2.4. Service Port...................................................................................................................................25
4.3.2.5. DHCP SERVER..............................................................................................................................26
4.3.2.6. SNTP ..............................................................................................................................................27
4.3.3. VOIP ...................................................................................................................................... 28
4.3.3.1. SIP Config......................................................................................................................................28
4.3.3.2. IAX2 Config....................................................................................................................................31

4
4.3.3.3. STUN Config..................................................................................................................................32
4.3.3.4. DIAL PEER setting........................................................................................................................33
4.3.4. Phone.................................................................................................................................... 36
4.3.4.1. DSP Config ....................................................................................................................................36
4.3.4.2. Call Service....................................................................................................................................37
4.3.4.3. Digital Map Configuration.............................................................................................................38
4.3.4.4. Phone Book...................................................................................................................................39
4.3.5. Maintenance......................................................................................................................... 40
4.3.5.1. Auto Provision...............................................................................................................................40
4.3.5.2. Syslog Config................................................................................................................................41
4.3.5.3. Config Setting................................................................................................................................42
4.3.5.4. Update............................................................................................................................................42
4.3.5.5. Account Config .............................................................................................................................43
4.3.5.6. Reboot............................................................................................................................................44
4.3.6. Security................................................................................................................................. 44
4.3.6.1. MMI Filter .......................................................................................................................................44
4.3.6.2. Firewall...........................................................................................................................................45
4.3.6.3. NAT Config ....................................................................................................................................46
4.3.6.4. VPN Config ....................................................................................................................................48
4.3.7. Logout................................................................................................................................... 50
4.4. SETTINGS VIA PHONE’S KEYBOARD.................................................................................................. 50
4.4.1. How to set via the phone’s keyboard.............................................................................................50
4.4.2. Phone menu......................................................................................................................................51
5. APPENDIX .......................................................................................................................................... 52
5.1. SPECIFICATION ............................................................................................................................... 52
5.1.1. Device specification.........................................................................................................................52
5.1.2. Voice Features..................................................................................................................................52
5.1.3. Network Features.............................................................................................................................52
5.1.4. Maintenance and Management.......................................................................................................53
5.2. DIGIT-CHARACTER MAP TABLE......................................................................................................... 53

5
1.Introducing BW320 VoIP Phone
1.1. Thank you for your purchasing BW320
Thank you for your purchasing BW320, BW320 is a full-feature telephone that provides voice
communication over the same data network that your computer uses. This phone functions
not only much like a traditional phone, allowing to place and receive calls, and enjoy other
features that traditional phone has, but also it own many data services features which you
could not expect from a traditional telephone.
This guide will help you easily use the various features and services available on your
phone.
1.2. Delivery Content
Please check whether the delivery contains the following parts:
The base unit with display and keypad
The handset
The handset cable
The power supply
The Ethernet cable

6
1.3. Keypad
The numeric keypad with the keys 0 to 9, *,
and # is used to enter
Digits and letters, additionally, the
following keys are available:
Key mapping:
Ke
y Key
name Function Description
Menu In idle state,press the MENU key to call up the
menu.
Phone Book In idle mode, press the Phone Book key to
check the record list and add new records and
revise the record. Press this key again will
return to idle mode.
Callers In idle/pickup/calling mode, press the Callers
key to Check the Income/Outgoing/Missed calls
records. Press this key again will return to idle
mode
LED LED blinks to remind user new voicemail.
Soft1
Soft2
Soft3
Use the Softkey to realize the various functions,
like
DND/SDial/Memo/Enter/Next/Del/Save/Quit/Dial/
Edit/Redial/EDial, etc.
Navigation Key
In idle mode, press DOWN key to check the
phone setting parameters. Such as network
mode, local IP and local Gateway IP address.
Press UP key to check the missed call log,
press LEFT key to check the incoming call log,
press the RIGHT key to browse the lines’
register status. When you pick up the handset
or during calling, you can use this key to turn
up or turn down the handset volume; when a
call comes, you can use this key to adjust ring
volume; you also can use this key to choose
item in the menu, callers or phone book.
MWI Use this key to read old or new message. User
can replace it with other functions, like pickup
key, record key, etc.
SMS Use this key to send and check the message;
Support the multilanguage input.

7
Transfer Use the key to realize blind transfer or attended
transfer please refer to 3.1.4.-call transfer for
more details).
Release
In menu, use this key to return to the idle state.
And when you are talking, you can use it to end
the call and then return to the idle state.
Hold Temporarily hold the active call during the
talking; press the key again to unhold the call.
(3.1.5-Calling Hold). In the idle state, press this
key to enable the DND, press the key again to
disable the DND.
mute Press this key in calling mode, you can hear the
other side, and the other side can not hear you
R/send In the hook off /hands-free mode, use the key to
dial the last call number; use this key to make a
quick dial as soon as you select your desired
number in phone book or callers. In the idle
state, use the key to browse the outgoing call
log.
Handfree Enter into hands-free mode.
1.4. Port for connecting
POWER Power switch Select ON/OFF
DC Power port Output: 5V/1.0A
LAN Network port Connect it to PC
WAN Network port Connect it to Network
The phone has two Network ports: The WAN port and the LAN port. Before you connect the
power source, please carefully read Safety Notices of this user manual.

8
2. Initial connecting and Setting
2.1. Connect the phone
Step 1: Connect the IP Phone to the corporate IP telephony network. Before you connect the
phone to the network, please check if your network can work normally.
You can do this in one of two ways, depending on how your workspace is set up.
Direct network connection—by this method, you need at least one available Ethernet port in
your workspace. Use the Ethernet cable in the package to connect WAN port on the back of
your phone to the Ethernet port in your workspace. Since this VoIP Phone has router
functionality, whether you have a broadband router or not, you can make direct network
connect. The following two figures are for your reference.
Shared network connection—Use this method if you have a single Ethernet port in your
workspace with your desktop computer already connected to it. First, disconnect the
Ethernet cable from the computer and attach it to the WAN port on the back of your phone.
Next, use the Ethernet cable in the package to connect LAN port on the back of your phone
to your desktop computer. Your IP Phone now shares a network connection with your
computer. The following figure is for your reference.
Step 2: Connect the handset to the handset port by the handset cable in the package.
Step 3: connect the power supply plug to the DC port on the back of the phone. Use the
power cable to connect the power supply to a standard power outlet in your workspace.
Step 4: push the on/off switch on the back of the phone to the on side, then the phone’s LCD
screen displays “Initializing…Wait LogOn…”. Later, a ready screen typically displays the
greeting word and the date, time and softkey name.
If your LCD screen displays different information from the above, you need refer to the next
section “Initial setting” to set your network online mode.
If your VoIP phone registers into corporate IP telephony Server, your phone is ready to use.

9
2.2. Initial Setting
This VoIP Phone provides you with rich function and parameters setting. If you have enough
knowledge about network and SIP protocol, it is better for you to understand many
parameters. But if you know little about network and SIP protocol, you can also easily make
initial setting according to the following steps to enjoy rapidly high quality voice and low
cost from this VoIP Phone.
Before make initial setting, please check if your corporate IP telephony network can work
normally, and you have finished “connect the phone”.
This VoIP Phone Supports DHCP by default. It will receive an IP address and other
network-related settings (Netmask, IP gateway, DNS server) from the DHCP server. If your
network supports DHCP, you can connect this VoIP Phone directly to the network. If your
network doesn’t support DHCP, you need change this VoIP Phone’s network connection
setting. According to the following steps, change this VoIP Phone’s DHCP network
connection setting into PPPoE or static IP which your network supports at present.
2.2.1. PPPoE mode
1. Please prepare your PPPoE account name and password
2. Press the MENU key, and press the key for twice, the LCD screen will display “3
Network”. Then press the Soft2(Enter) key, the LCD screen will display “1 WAN”.
3. Press the Soft2(Enter) key, and press the key for twice, the LCD screen will display
“3 PPPoE Set”.
4. Press the Soft2(Enter) key, the LCD screen will display “1 Account”, then press the
Soft2(Enter) key, there will display the account information; Press the Soft2(Edit) key and
press the Soft1(Del) key to delete and input your PPPOE account number then press the
Soft2(Save) key to confirm. With “Saved” displayed, screen will jump to show the account
information currently.
5. Press the Soft3(Quit) key to return to the previous menu, then press the key, the LCD
screen will display “2 Password”. Then press the Soft2(Enter) key, there will display the
password information (it will replaced by *). Press the Soft2(Edit) key and press the
Soft1(Del) key to delete and input your PPPoE’s password and confirm it by the
Soft2(Save) key, With “Saved” displayed, screen will jump to show the password
information currently(it will replaced by *).
6. Press the Soft3(Quit) key for twice and press the key, the LCD screen will display “1
Net Mode”. Press the Soft2(Enter) key and then press the soft2(Edit) key, you can choose
the network mode what you want by the navigation key. Now please choose the PPPoE
mode by the key, the LCD screen will display “<>PPPoE”, With Soft2(Save) pressed
again,screen will show “Saved” and then jump to show the net mode currently.
7. pressing Soft3 (Quit) four times/MENU key/Release key to quit to stand-by status and
pressing to shows “PPPoE”,phone tries to connect server to get IP. If there is shown
“Negotiating…”, it shows that the phone is trying to access the PPPoE Server, else it
shows that the phone has already get IP with PPPoE.
2.2.2. Static IP mode
1. Prepare the network’s parameters first. IP Address,Netmask,Default Gateway and DNS
server IP address are needed. Please contact the service provider or technician of
network.
2. Pressing MENU key,and key for twice,screen shows“3 Network”, then pressing

10
Soft2(Enter),screen will show “1 WAN”.
3. Pressing Soft2 (Enter),then pressing key, screen shows“2 Static Set”.
4. Pressing Soft2(Enter) to make screen show“1 IP”,press Soft2(Enter) and then press
Soft2(Edit) again, and Soft1(Del) to delete old parameter. Input your IP address and press
Soft2 (Save). After “Saved” shown, screen will jump to show the IP information currently.
5. Press key to show “2 Netmask”. Press Soft2(Enter) and press Soft2(Edit) again,and
then use Soft1(Del) to delete. Input your Netmask and press Soft2 (Save). After “Saved”
shown, screen will jump to show the Netmask information currently.
6. Press key to show “3 Gateway”. Press Soft2(Enter) and press Soft2(Edit) again,and
then use Soft1(Del)to delete,Input your gateway and press Soft2(Save). After “Saved”
shown, screen will jump to show the gateway information currentlly.
7. Press key to show“4 DNS”. Press Soft2(Enter) and press Soft2(Edit) again,and use
Soft1(Del) to delete. Input your DNS server address and press Soft2 (Save). After “Saved”
shown, screen will jump to show DNS information.
8. Press twice Soft3 (Quit) quitting. With key pressed,screen shows“1 Net Mode”.
Press Soft2(Enter) and press Soft2(Edit) again, and key,screen shows“<>Static”; with
Soft2(Save) pressed,screen shows “Saved” and then shows the net mode currently.
9. pressing Soft3 (Quit) four times/MENU key/Release key to quit to stand-by status and
pressing to show “Static”. If screen shows the IP address and gateway which are set
just now, it shows that Static IP mode is taken effect.
2.2.3. DHCP mode
1. Press the MENU key, and press the key for twice, the LCD screen will display “3
Network”. Then press the Soft2(Enter) key, the LCD screen will display “1 WAN”.
2. Press Soft2 (Enter) to show “1 Net Mode”. After pressing Soft(Enter) and Soft2(Edit),
using navigation
key to select until screen shows “<>DHCP”. Press Soft2(Save),With “saved” displayed,
screen will jump to show the net mode currently.
3. Press Soft3 (Quit) four times quitting to stand-by status. Press key to show
“DHCP”,if there is “Negotiating…”shown on screen, it shows that phone is keep trying to
search DHCP server or get IP; If there is IP address displayed, it shows that DHCP mode
has been taken effect.

11
3. Basic Functions
3.1. Basic operation
3.1.1. Accepting a call
BW320 will ring to indicate you when there is call incoming,below is ways to answer call:
zPick up handset to accept incoming calls.
zPress the button
zIf you need switch from a hands-free call to handset, please pick up the handset directly.
zIf you need switch from a handset call to hands-free, please press the button,
and then hang up the handset.
3.1.2. Making a call
zQuick-dialing
In idle mode, input the called number, and press Soft3(Dial) key or button, phone
will dial the call and use hands-free automatically.
zUse handset
Hook off (screen will show the current using line, or you could use key to
select), after getting dialing tone, you could begin to dial number. After finishing it, press #
and BW320 will send the number and call the number. When you hear a ringback tone and
screen shows the callee’s number, it shows that the person you called is ringing. If callee
answers the call, you can begin to talk and your phone will keep showing callee’s number
and counting time. Just hang up to finish talk.
zUse hands-free
Press (screen will show the currnet using line, or you could use key to
select), after getting dialing tone, you could begin to dial number. After finishing it, press #
and BW320 will send the number and call the number. When you hear a ringback tone and
screen shows the callee’s number, it shows that the person you called is ringing. If callee
answers the call, you can begin to talk and your phone will keep showing callee’s number
and counting time. Press again to finish talk.
zUse the phone book
press in stand-by mode, and then press Soft2(Enter),you will access to
phonebook. If there are many persons records stored in the directory, you can use
to search the person which you want to contact. Press to forward,and press
to backward. Press Soft2 (Dial) or press to dial the current number shown on the
screen.
zUse Callers
Press the key in stand-by mode, then select your desired phone number in
callers by the key, Press to forward,and press to backward. Press

12
Soft2 (Dial) or press to dial the current number shown on the screen.
zUse the R/send key
Please pick up or press the key. After you hear dialing tone, please press the
key or press the Soft3(Redial) to dial the last phone number. Note: after you reboot the
phone, the phone will delete callers and Redial will be invalid.
zMulti-line calls
BW320 supports 2 SIP lines max,that is user could use 2 SIP accounts to register and
make calls. System will use SIP 1 as default line to call. User can use the to
select the line to call.
There are most two calls at the same time. Screen will display the incoming call
number when user is keep talking. You can press the Soft1 (Answer) to accept it, and hold
the first one (if you want to use this function, you need enable Call Waiting of the phone first).
Use Soft1 (Switch) to switch the two calls to talk. User can also use Soft1 (Conf) to make the
second call when there is just an active call.
3.1.3. Ending a call
zHangs up by handset onhook.
zHangs up by press when in hands-free.
zHangs up a call in call waiting state.
When there are two calls,user might use Soft1(Switch)to switch to the call you want to
hang up first. Then press # or press Soft3(Close) key to finish talk, and phone will switch to
the other call automatically.
Note:it is no use to press # to finish talk, if there is only one current call.
3.1.4. Transferring a call
zBlind Transfer
During talk, press ,and then dial the number that you want to transfer to, and press #.
Phone will transfer the current call to the third party. After finishing transfer, the call you talk
to will be hanged up. User can not select SIP line when phone transfers call.
zAttended Transfer
During talk, press and input the number that you want to transfer to and press Soft2
(Send). After that third party answers, then press to complete the transfer. (You need
enable call waiting and call transfer first). If there are two calls, you can just talk to one, and
keep hold to the other one. The one who is keep hold can not speak to you or hear from you.
In this status, user can press * or Soft2 (Conf) to make calls mode in conference mode. If
user wants to stop conference, user can press Soft1 (Split). (User must enable call waiting
and three way call first).
Note: the server that user uses must support RFC3515 or it might not be used.
zAlert Transfer
During talk, press firstly, then press Soft2(Send) after inputting the number that you
want to transfer. You are waiting for connection, now, press Soft2(Transf) and the transfer
will be done. (To use this feature, you need enable call waiting and call transfer first)

13
3.1.5. Calling Hold
During talking, user could press to hold the current call. Press again to
unhold the call or switch the call active. This feature is also available in 3-way conference
call.
3.1.6. 3-way conference call
User can press Soft1 (Conf) to dial the line2 (press Soft1(Answer) to answer the call
directly if this call is from line2)during talking with line1. After line2 connect, user can press
Soft2 (Conf) or * to enter into conference mode. To back to line1 from conference, please
press Soft1 (Split); to end the call, please press Soft3 (End) or press .
3.1.7. Switchboard Operator feature
User can press Soft1 (Conf) to dial the line2(press Soft1(Answer) to answer the call
directly if this call is from line2) during talking with line1. After line2 connect, user can press
Soft1 (Switch) to select which line you prefer to transfer, then press to input the
number you want to transfer and press again to do the transfer.
3.1.8. Call records
BW320 supports 100 items of missed call, 100 items of incoming call, and 100 items of
outgoing call. If the records are full, the newest will replace the oldest. If phone’s power cut
or reboot, call records will be discarded.
zMissed call
Press , and screen displays “Missed Call”. Press Soft2 (Enter), phone will show the
number and time of missed call. User can also use to browse the missed call
records, or press Soft2 (Detail) to check the details of this record, then press Soft2 (Dial)
again to change the current number. Pressing Soft2(Dial) will call this number directly if user
don’t modify the number. If there is no missed call, screen will show “List Is Empty”.
zIncoming call
Press and switch the menu to “Incoming Call” by pressing . Press Soft2
(Enter), phone will show the number of incoming call. User can also use to
browse the incoming call records; or press Soft2 (Detail) to check the details of this record,
then press Soft2 (Dial) again to change the current number. Pressing Soft2 (Dial) will call
this number directly if user don’t modify the number. If there is no incoming call,screen will
show “List Is Empty”.
zOutgoing call
Press , and use to select to “Outgoing Call”. Press Soft2 (Enter), phone
will show the number and time of dialed call. User can also use to browse the
dialed call records; or press Soft2 (Detail) to check the details of this record, then press
Soft2 (Dial) again to change the current number. Pressing Soft2 (Dial) will call this number
directly if user don’t modify the number. If there is no dialed call, screen will show “List Is
Empty”. User can also press to check “Outgoing Call”.

14
3.2. The high-level operation
This VoIP Phone provides more advanced functions after setting at the permission scope of
SIP server.
3.2.1. SMS function
zSend message
The followings list several methods to send message:
1. Press in standby, then press Soft1 (new) key. After inputting SMS content, press
Soft2 (send)key to input callee’s number, next, press Soft2 again to send SMS.
2. Press in standby, then press soft1 (new) key. After inputting SMS content, press
soft2 (send) key, then pbook key to select your number to send SMS.
3. after inputting SMS content, user can press soft2 (send) key, then input “#” and “the
callee’s IP address” to send SMS.
zBrowse Message and reply message
When there’s new message, phone will ring and remind by a small envelope on top of
the screen, then press , and Soft2 (Enter) key to browse current new message. when
there are more new messages come in, user can choose by using up and down keys, then
press Soft2(Enter) key to check the sender’s number and message content, next, press
Soft2(Reply)key and input message content, finally, press Soft2(Send) again to reply this
message.
Note: while user browses the message numbers, new messages will be marked by “new”;
when user edits message, press # key that to switch input method, e.g. ABC (uppercase
English input), abc (lowercase English input), 123(digit input), Korean (Korean input(if your
phone’s firmware version supports Korean). PY,( if your phone’s firmware version supports
Chinese)
3.2.2. Memo function
Press soft3 ( Memo) key in standby, then Soft1(ADD) key, at this time, user can
configure the future date time in terms of Time format, next, press down key to input the
memo content, also can press # to switch input method, down key again to enter into
reminder ring tone and down key at the third time to enter into ring mode. You can press
right or left key to select your reminder ring tone after you enter into reminder ring tone, and
select your ring mode by pressing right or left key after entering into ring mode. There are
two ring modes, ring and text. Ring is reminder you by ring tone, text only show memo
content without ring tone reminder. Finally, press soft2 (save) key to save your memo.
Note: if there is memo notice when your phone is in call/off-hook/hands-free status, phone
does not reminder by ring tone, only shows memo content in screen.
3.2.3. SpeedDial function
User can pre-define numbers in these keys (numeric key 0-9). Hook off, press the
defined numeric key, then input “#”. Your pre-defined numbers will send out.
3.2.4. Realize Secondary Dial by Dialing for only one time
When you make secondary dial in off-hook/hands-free or standby pre-input mode,
press button to postpone input, and screen display will show ^. One stands for 2
seconds. For example, you input 123^45, the phone will send DTMF (45) 2 seconds after the
phone call 123. 123^^^45 will make phone send DTMF (45) at 6 seconds interval

15
3.2.5. Phonebook prefix function
At standby mode, press phonebook button, user can not only select his needed
number to call out but also he can add prefix to numbers, then call out. It is convenient for
user add prefix numbers that PBX need.
3.2.6. Function key
If function key is set as SIP Line key, user can select which lines will be used to make call
when dialing or make a 2nd dialing by this function key. Note that only the key which is
registered is available to be select to call.
This function key can be configured as “Key Event”, namely set as F_MWI. It can set relative
keys as Voice mail key, can check new and old voice mail; also can be set other function
keys like the following table:
Field Name Explanation
F_PBOOK Like the phonebook key.
F_REDIAL Like the redial key.
F_A_TRANSFER
or
F_B_TRANSFER
Like the transfer key.
F_PICKUP Pickup function
F_JOIN Join call function.
F_AUTOREDIAL Auto redials function.
F_UNAUTOREDIA
L Cancel redial function.
F_DND Do not disturb function.
F_MWI MWI (message waiting indication) function.
F_CFWD Call forward function.
F_CALLERS Like the Callers key.
F_MEMO Like the Memo key.
F_REC Record function (record on server).
User can implement BLF/PRESENCE/MWI/SPEED DIAL features by Memory Key.
z/b Busy Lamp Field: Based on Asterisk, it can be used to check the status (Idle, ring,
busy) of the pointed phones. It is helpful to operator to know the status of the phone
which he will switch to.
User can configure the BLF like: 300 is rogatory number, @1 means SIP1, of course, user
can configure as @2(SIP2); if don’t use this, simply says 300/b, it will use SIP1 as default. /b
means use BLF feature.
When this configuration enable, the phone will subscribe the status of pointed phone each
60s: LED off means Idled, LED flash means ring and LED on means busy.
z/m MWI (Message waiting indication), means the number of this key is the number of
voicemail
User can configure MWI function according to the above chart: 8000 is mailbox number, @1
is using SIP1, user also can configure @2(SIP2),the rest lines can be deduced by analogy, if
no use, is 8000/m,it will pass the SIP1 line in default,/m means MIW function is using.
If there’s new voicemail, LED will blink and shows new message, after receiving, server will
send current mail info to phone, after receiving new MWI order, LED will respond, if LED
light is off, it means no new voicemail.
z/p Presence means phone can check the status of other phone that has relevant
numbers.
User can configures presence function according to the above chart: 500 is number that

16
search caller, @1 is using SIP1, user also can configure @2(SIP2),the rest lines can be
deduced by analogy, if no use, is 500/p, it will pass the SIP1 line in default, /p means
presence function is using.
At this moment, press this button, it can show the corresponding phone’s status (on, off,
fail,) which LED don’t remind.
z/f speed dial, user configure it as same time as above attribute, after configuring, phone
will implement above function in priority, then considering to perform speed dial
z/i PUSH TO TALK, user presses this button in standby, the phone can call other phone
and the other phone will auto answer.
User can configure PUSH TO TALK according to the chart: 700 are number of callee.
After configuring, the phone can call 700 and make 700 auto answer by pressing this button.
3.2.7. Call pickup
Call pickup is implemented by simulating pickup function of PBX. it’s that, when A calls B, B
rings but no answer, at this moment, C can hook off and input an appointed prefix plus B’s
number, pick up A’s call and talk with A.
The following chart shows how to configure an appointed prefix in dial peer to have call pick
up function.
*1* means appointed prefix code. After making the above configuration, C can dial *1* plus
B’phone number to pick up A’s call. User can set prefix in random, in the case of no affecting
current dialing rules.
3.2.8. Join call
When B is calling C, A can join in the existing call by inputting an appointed prefix numbers
plus B or C number, if B or C also supports join call
The following chart shows how to configure an appointed prefix in dial peer to have join call
function.
*2* means appointed prefix code. After making the above configuration, A can dial *2* plus
B or C number to join B and C’s call, . User can set prefix in random, in the case of no
affecting current dialing rules.
3.2.9. redial/unredial
If B is in busy line when A calls B, A will get notice: busy, please hang up. If A want to
connect B as soon as B is in idle, he can use redial function at the moment and he can dials
an appointed prefix number plus B’s number to realize redial function.
What is redial function? A can’t not build a call with B when B is in busy ,then A will
subscribe B’s calling mode at 60 second intervals. once B is available, A will get reminder of
rings to hook off, while A hooks off, A will call B automatically. If at this time A is occupied
temporarily and unwilling to contact B, A also can cancel the redial function by dialing an
appointed prefix plus B’s number before making the redial function.
*3* is appointed prefix code. After making the above configuration, A can dial
*3* plus B’phone number to make the redial function.
*4* is appointed prefix code. After configuration, A can dial *4* to cancel redial function.

17
User can set prefix in random, in the case of no affecting current dialing rules.
3.2.10. Click to dial
When user A browses in an appointed Web page, user A can click to call user B via a link
(this link to user B), then user A’s phone will ring, after A hooks off, the phone will dial to B.
4. Setting
4.1. Introduction of configuration
4.1.1. Ways to configure
BW320 has three different ways to different users.
zUse phone keypad.
zUse web browser(recommendatory way).
zUse telnet with CLI command.
4.1.2. Password Configuration
There are two levels to access to phone: root level and general level. User with root level can
browse and set all configuration parameters, while user with general level can set all
configuration parameters except SIP (1-2) or IAX2’s that some parameters can not be
changed, such as server address and port. User will has different access level with different
username and password.
zDefault user with general level:
username:guest
password:guest
zDefault user with root level:
username:admin
password:admin
The default password of phone screen menu is 123.
4.2. Setting via web browser
When this phone and PC are connected to network, enter the IP address of the wan port in
this phone as the URL (e.g. http://xxx.xxx.xxx.xxx/ or http://xxx.xxx.xxx.xxx:xxxx/).
If you do not know the IP address, you can look it up on the phone’s display by pressing
button.
The login page is as below picture
※ :Input username and password, click “logon”, and you will enter setting web interface.
There is a selection menu on the left side of the web interface. Click on the desired submenu;
the current settings of this submenu will be displayed in the larger field on the right. You can
now modify and store the values by using mouse and keyboard of your PC. To save the
changes, click on the submenu “maintenance” and then click the “config” button and the
“Save” button on the right field.

18
4.3. Configuration via WEB
4.3.1. BASIC
4.3.1.1. Status
Status
Field name Explanation
Network Shows the configuration information on WAN and LAN port,
including the connect mode of WAN port (Static, DHCP, PPPoE),
MAC address, the IP address of WAN port and LAN port, ON or
OFF of DHCP mode of LAN port.
Phone Number Shows the phone numbers provided by the SIP LINE 1-2 servers.
The last line shows the version number and issued date.
4.3.1.2. Wizard
Wizard
Field Name Explanation
Please select the proper network mode according to the network condition. BW320
provide three different network settings:
zStatic: If your ISP server provides you the static IP address, please select this mode,
and then finish Static Mode setting. If you don’t know about parameters of Static

19
Mode setting, please ask your ISP for them.
zDHCP: in this mode, you will get the information from the DHCP server automatically;
need not to input this information artificially.
zPPPoE: in this mode, your must input your ADSL account and password.
You can also refer to 2.2. Initial Setting to speed setting your network.
Choose Static IP MODE,click【NEXT】can config the network and SIP(default SIP1)easily,
also can browse them too. Click【BACK】can return to the last page.
Static IP Address Input the IP address distributed to you.
Netmask Input the Netmask distributed to you.
Gateway Input the Gateway address distributed to you.
DNS Domain Set DNS domain postfix. When the domain which you inputted can
not be parsed, phone will automatically add this domain to the end
of the domain which you inputted before and parse it again.
Primary DNS Input your primary DNS server address.
Alter DNS Input your standby DNS server address.
Display Name If user set the display name, callee will show this display name.
Server Address Input your SIP server address.
Server Port Set your SIP server port.
User Name Input your SIP register account name.
Password Input your SIP register password.
Phone Number Input the phone number assigned by your VOIP service provider.
Enable Register Start to register or not by selecting it or not.
Display detailed information that you manual config.
Choose DHCP MODE,click【NEXT】to config simple SIP(default SIP1). You can browse it
too. Click【BACK】to return to the last page. Like Static IP MODE。
Choose PPPoE MODE,click【NEXT】to config the PPPoE account/password and
SIP(default SIP1). You can browse it too. Click【BACK】to return to the last page. Like

20
Static IP MODE。
PPPoE Server It will be provided by ISP.
Username Input your ADSL account.
Password Input your ADSL password.
Notice: Click【Finish】button after finish your setting, IP Phone will save the setting
automatically and reboot. After reboot, you can dial by the SIP account.
4.3.1.3. Call Log
You can look up all the outgoing calls through this page.
Call Log
Field name explanation
Start Time Display the start time of the outgoing call
Last Time Display the conversation time of the outgoing call.
Called Number Display the account/protocol/line of the outgoing call.
4.3.1.4. MMI SET
MMI SET
Field name explanation
Language Set Set the language of phone, English is default.
Table of contents
Other Fanvil IP Phone manuals