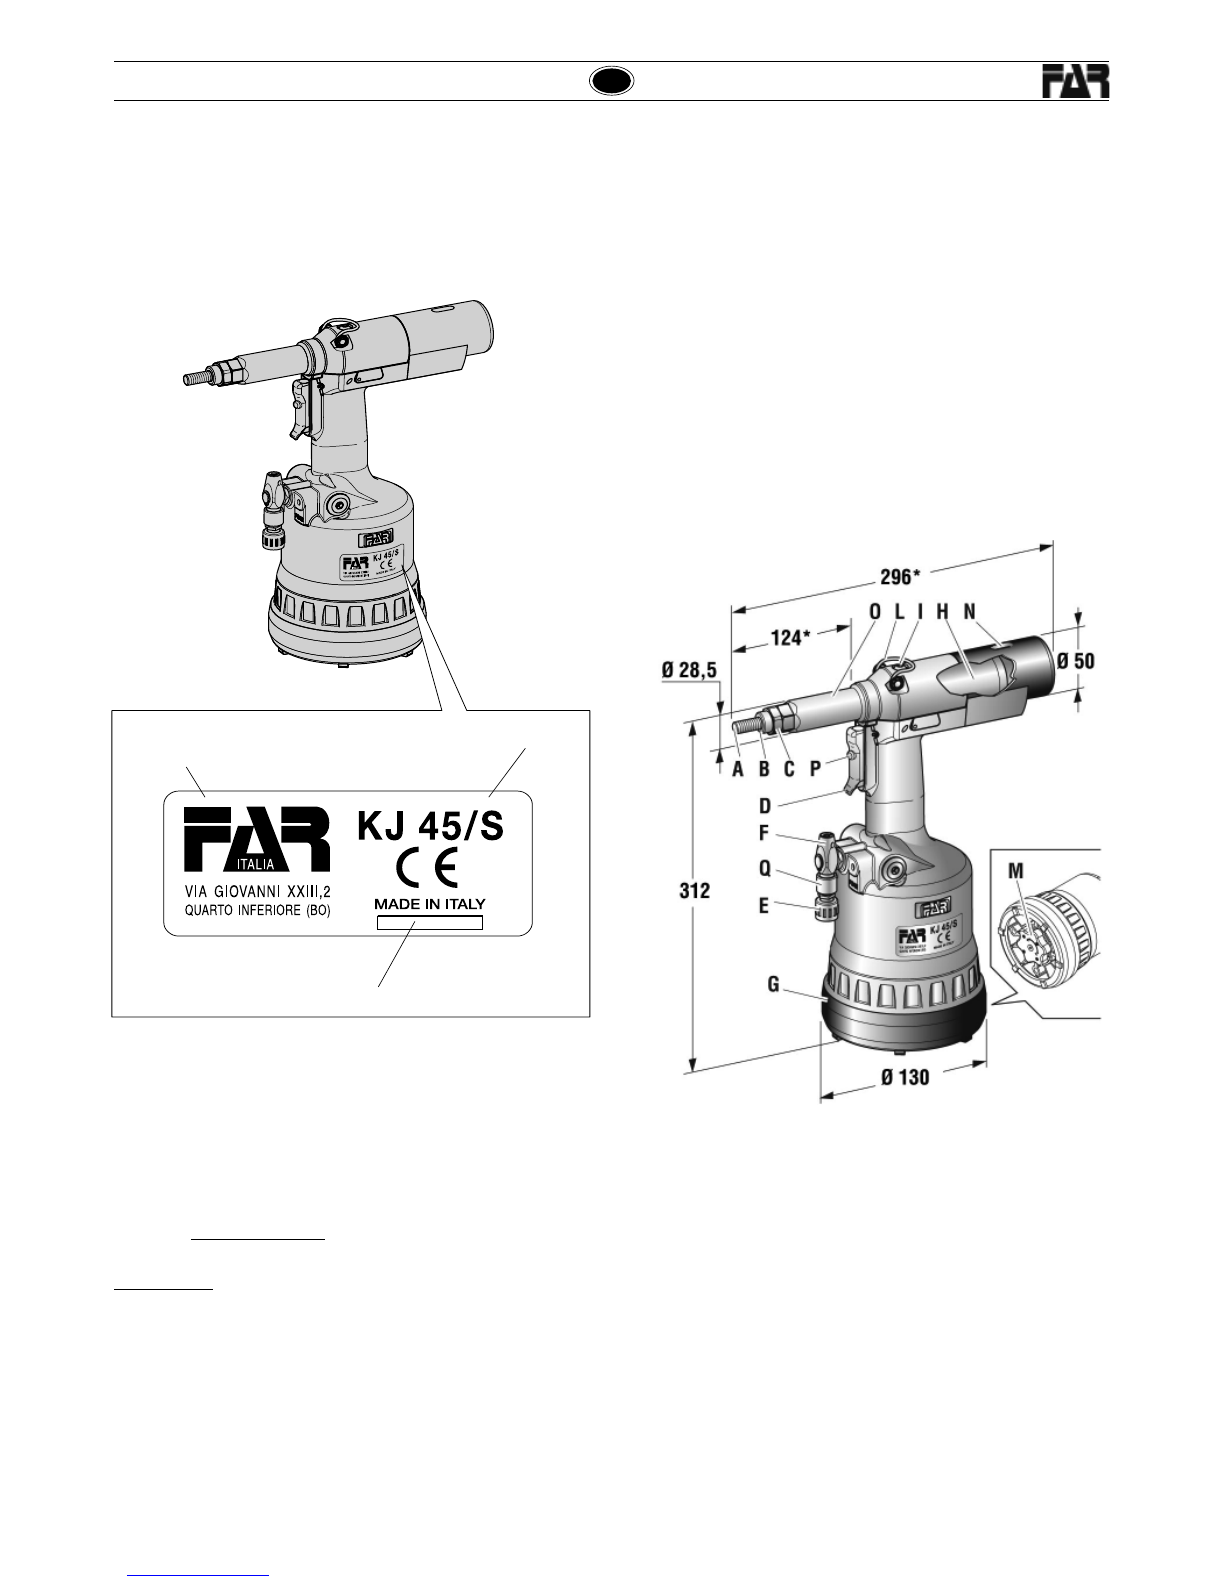
FAR KJ 45/S User manual

KJ 45/S
KJ 45/S
I
GB
F
E
D
- ISTRUZIONI ORIGINALI
RIVETTATRICE OLEOPNEUMATICA
PER INSERTI M4/M12
ISTRUZIONI D’USO - PARTI DI RICAMBIO
- TRANSLATION OF ORIGINAL INSTRUCTIONS
HYDROPNEUMATIC TOOL
FOR INSERTS M4/M12
INSTRUCTIONS FOR USE - SPARE PARTS
- TRADUCTION DES INSTRUCTIONS ORIGINALES
MACHINE A SERTIR OLEOPNEUMATIQUE
POUR INSERTS M4/M12
MODE D’EMPLOI - PIECES DETACHEES
- ÜBERSETZUNG VON ORIGINALANLEITUNGEN
PNEUMATISCH-HYDRAULISCHES NIETWERKZEUG
FÜR BLINDNIETMUTTERN M4/M12
BEDIENUNGSANLEITUNG - ERSATZTEILE
- TRADUCCION DE LAS ISTRUCCIONES ORIGINALES
REMACHADORA OLEONEUMATICA
PARA TUERCAS REMACHABLES M4/M12
INSTRUCCIONES DE USO - PIEZAS DE REPUESTO
- TŁUMACZENIE ORYGINALNEJ INSTRUKCJI
NITOWNICA OLEO-PNEUMATYCZNA
DO NITONAKRĘTEK M4/M12
INSTRUKCJA OBSŁUGI - CZĘŚCI ZAMIENNE
- ПЕРЕВОД ОРИГИНАЛЬНЫХ ИНСТРУКЦИЙ
МАСЛЯНО – ПНЕВМАТИЧЕСКИЙ ЗАКЛЁПЫВАЮЩИЙ АППАРАТ
ДЛЯ ВСТАВОК М4/М12
ИНСТРУКЦИИ ПО ИСПОЛЬЗОВАНИЮ - ДЕТАЛИ
PL
RUS

KJ 45/S
KJ 45/S
Far S.r.l. - Giacomo Generali
(Presidente del Consiglio di Amministrazione)
(Chairman of the Board of Directors)
(Président du Conseil d’Administration)
(Vorsitzender des Verwaltungsrates)
(Presidente del Consejo de Administración)
(Prezes Zarzadu)
(Председатель Административного Совета)
.............................................
La sottoscritta Far S.r.l., con sede in Quarto Inferiore (BO)
alla via Giovanni XXIII n° 2,
DICHIARA
sotto la propria esclusiva responsabilità che la rivettatrice
Modello: KJ 45/S - Rivettatrice oleopneumatica Utilizzo:
per inserti filettati M4-M12 alla quale questa dichiarazione
si riferisce è conforme ai requisiti essenziali di sicurezza
previsti dal D. Lgs. 17/2010 di recepimento della Direttiva
Macchine 2006/42/CE e successive modificazioni ed
integrazioni. La persona autorizzata a costituire il fascicolo
tecnico risponde al nome di Giacomo Generali, presso
la Far S.r.l., con sede in Quarto Inferiore (BO) alla via
Giovanni XXIII n° 2.
The undersigned Far S.r.l., having its office in Quarto
Inferiore (BO), Via Giovanni XXIII No. 2, herewith
DECLARES
on its sole responsability that the riveting machine
Type: KJ 45/S - Hydropneumatic tool
Application: for threaded inserts M4-M12
which is the object of this declaration complies with the
basic safety requirements estabilished in the law decree
Leg.D. 17/2010 of the Machinery Directive 2006/42/
CE acknowledge and subsequent amendments and
integrations.
The person who is authorized to create the technical
brochure is Giacomo Generali, c/o Far S.r.l., head office in
Quarto Inferiore (BO), via Giovanni XXIII n. 2.
LasociétéFarS.r.l.soussignéeavecsiègeàQuartoInferiore
(BO), Via Giovanni XXIII n° 2,
DECLARE
sous sa seule responsabilité que la riveteuse
Modèle: KJ 45/S - Machine à sertir oléopneumatique
Utilisation: pour inserts filetés M4-M12
à laquelle cette déclaration se rapporte est conforme aux
conditions essentielles de sécurité requises par la loi
17/2010 d'acceptation de la Directive Machines 2006/42/
CE et modifications et intégrations successives.
La personne autorisée à constituer le dossier technique
est Giacomo Generali chez FAR S.r.l., avec siège à Quarto
Inferiore (BO) – Via Giovanni XXIII. n.2.
DieUnterzeichnete,Fa.FarS.r.l.,mitSitzinQuartoInferiore
(BO), Via Giovanni XXIII Nr. 2,
ERKLÄRT
hiermit auf ihre alleinige Verantwortung, daß die
Nietmaschine
Typ: KJ 45/S - Hydraulisch-pneumatisches Nietwerkzeug
Anwendung: für Blindnietmuttern M4-M12
auf das sich diese Erklärung bezieht, den wesentlichen
Sicherheitsanforderungen des Gesetzesdekrets 17/2010
von Umsetzung der Maschinenrichtlinie 2006/42/CE
und den nachfolgenden Änderungen und Anfügungen
entspricht.
Der Berechtigte zur Bildung der technische Broschüre ist
GiacomoGenerali,beiderFirmaFarS.r.l.,mitSitzin Quarto
Inferiore (BO), via Giovanni XXIII Nr. 2.
LafirmatariaFarS.r.l.,domiciliada enQuartoInferiore (BO)
en via Giovanni XXIII n° 2,
DECLARA
bajo su exclusiva responsabilidad que la remachadora
Modelo: KJ 45/S - Remachadora oleoneumática
Empleo: para remaches roscados M4-M12
a la cual la presente declaración se refiere corresponde
a los requisitos esenciales de seguridad previstos por
el D.Lay 17/2010 de recepción de laDirectiva Maquinas
2006/42/CE y sucesivas modificaciones e integraciones.
La persona autirizada a constituir el fasciculo tecnico es
Giacomo Generali, cerca FAR S.r.l., con sede a Quarto
Inferiore (BO) – Via Giovanni XXIII n.2.
Firma FAR S.r.l z siedzibą w Quarto Inferiore (Włochy), Via Giovanni
XXIII,2
DEKLARUJE
na wlasna i wylaczna odpowiedzialnosc, ze nitownica
Model: KJ 45/S - Nitownica oleopneumatyczna
Zastosowanie: do nitonakretek gwintowanych M4-M12
do której odnosi sie niniejsza deklaracja, jest zgodna z wymogami
bezpieczenstwa przewidzianymi przez dekret legislacyjny 17/2010
implementujacy Dyrektywe Maszynowa 2006/42/WE wraz z
pózniejszymi zmianami i uzupelnieniami.
“Osoba upoważniona do utworzenia dokumentacji technicznej to
GiacomoGeneraliz rmy Far S.r.l.mającejsiedzibę wQuartoInferiore
(BO), via Giovanni XXIII nr 2.”
Нижеподписавшeeся Far S.r.l., с местонахождением в Quarto
Inferiore (BO) ул. Giovanni XXIII, 2,
ЗАЯВЛЯЕТ
под свою собственную исключительную ответственность, что
заклёпывающий аппарат
Модель: KJ 45/S – Масляно – пневматический заклёпывающий
аппарат
Использование:длявставоксрезьбойM4-M12ккоторомуотносится
настоящая декларация соответствует основным требованиям
безопасности, предусмотренными Законодательным декретом
17/2010 транспонирования Директивы по машинам 2006/42/CE
и последующими модификациями и дополнениями.
Уполномоченнымлицомдлясозданиятехническойдокументации
является господин Джакомо Дженерали (Giacomo Generali), в
головномофисекомпанииFarS.r.l.,которыйрасположенпоадресу:
Италия, Куарто Инфериоре (Болонья), ул Джованни XXIII, д. 2.
Quarto Inferiore, 23-03-2010
I
GB
F
E
D
PL
RUS

I
I
F
F
E
E
PL
PL
RUS
RUS
ISTRUZIONI D’USO.................................................4
INSTRUCTIONS FOR USE.....................................12
MODE D’EMPLOI..................................................20
BEDIENUNGSANLEITUNG.....................................28
INSTRUCCIONES DE USO.....................................36
INSTRUKCJA OBSŁUGI.................................................44
ИНСТРУКЦИИ ПОA ИСПОЛЬЗОВАНИЮ ..........................52
PARTI DI RICAMBIO .............................................60
SPARE PARTS.......................................................62
PIECES DETACHEES .............................................64
ERSATZTEILE........................................................66
PIEZAS DE REPUESTO..........................................68
CZĘŚCI ZAMIENNE......................................................70
ДЕТАЛИ...................................................................72
KJ 45/S
KJ 45/S
GB
GB
D
D

I
KJ 45/S
KJ 45/S
Date 01-2011 Revisione - 034
ISTRUZIONI D’USO I
INDICE
GARANZIA E ASSISTENZA TECNICA.....................................4
AVVERTENZE E MISURE DI SICUREZZA...............................4
IDENTIFICAZIONE DELLA RIVETTATRICE.............................5
NOTE GENERALI E CAMPO DI APPLICAZIONE.....................5
PARTI PRINCIPALI................................................................5
DATI TECNICI........................................................................5
ALIMENTAZIONE DELL’ARIA.................................................6
OPERAZIONI PRELIMINARI..................................................6
POSA IN OPERA DELL’INSERTO...........................................7
ANOMALIE DI FUNZIONAMENTO..........................................8
CAMBIO DI FORMATO ..........................................................9
REGOLAZIONE DEL GRUPPO TIRANTE TESTINA...............10
RABBOCCO OLIO NEL CIRCUITO OLEODINAMICO.............11
MANUTENZIONE.................................................................11
SMALTIMENTO DELLA RIVETTATRICE...............................11
ATTENZIONE!!!
La mancata osservanza o trascuratezza delle
seguenti avvertenze di sicurezza può avere
conseguenze sulla vostra o altrui incolumità e
sul buon funzionamento dell’utensile.
• Leggere attentamente le istruzioni prima dell’uso.
• Per le operazioni di manutenzione e/o riparazione affidarsi
a centri di assistenza autorizzati dalla FAR s.r.l. e fare uso
esclusivo di pezzi di ricambio originali. La FAR s.r.l. declina
ogni responsabilità per danni da particolari difettosi, che
si dovessero verificare per inadempienza di quanto sopra
(Direttiva CEE 85/374).
L’ELENCO DEI CENTRI DI ASSISTENZA È DISPONIBILE SUL
NS. SITO WEB: http://www.far.bo.it ( Organizzazione )
• Si raccomanda l’uso dell’utensile da parte di personale
specializzato.
• Durante l’impiego dell’utensile, usare occhiali o visiere
protettive e guanti.
• Per eseguire le operazioni di manutenzione e/o di regolazione
dell’utensile utilizzare gli accessori in dotazione e/o le
attrezzature commerciali indicate nel capitolo Manutenzione.
ATTENZIONE! In caso di urti violenti o cadute accidentali
occorre procedere alla completa revisione della
macchina.
GARANZIA E ASSISTENZA TECNICA
Le rivettatrici FAR sono coperte da garanzia di 12 mesi. Il
periododigaranziadecorredalladatadiconsegnaspecificata
sulla fattura o sulla ricevuta di consegna.
Lagaranziacoprel’utente/acquirentequandol’attrezzoviene
acquistatoattraversounrivenditoreautorizzatoesoloquando
viene impiegato per gli usi per i quali è stato concepito. La
garanzia non è valida se l’attrezzo non viene utilizzato e se
non viene sottoposto a manutenzione come specificato nel
manuale di istruzione e manutenzione.
In caso di difetti o guasti la FAR S.r.l. si impegna solamente
a riparare e/o sostituire, a propria discrezione esclusiva, i
componenti giudicati difettosi.
AVVERTENZE E MISURE Dl SICUREZZA
• Per le operazioni di carica olio, usare solo fluidi con
caratteristiche indicate nel presente fascicolo.
• In caso di perdite accidentali di olio che dovessero venire
a contatto con la pelle, lavarsi accuratamente con acqua e
sapone alcalino.
• L’utensile può essere trasportato a mano ed è consigliabile,
dopo l’uso, riporlo nel proprio imballo.
• Si consiglia ai fini di un corretto funzionamento della
rivettatrice, una revisione semestrale.
• Gli interventi di riparazione e pulizia dell’utensile dovranno
essere eseguiti con macchina non alimentata dall’aria
compressa.
• È consigliabile, ove possibile, I’uso di un bilanciatore di
sicurezza.
• In caso di esposizione quotidiana personale in ambiente il
cui livello di pressione acustica dell’emissione ponderata
A sia superiore al limite di sicurezza di 70 dB (A), fare uso
di adeguati mezzi individuali di protezione dell’udito (cuffia
o tappo antirumore, diminuzione del tempo di esposizione
quotidiana etc...).
• Mantenere il banco e/o l’area di lavoro pulita e ordinata, il
disordine può causare danni alla persona.
• Non lasciare che persone estranee al lavoro tocchino gli
utensili.
• Assicurarsi che i tubi di alimentazione dell’aria compressa
siano correttamente dimensionati per l’uso previsto.
• Non trascinare l’utensile collegato all’alimentazione tirandolo
per il tubo; mantenere quest’ultimo lontano da fonti di calore
e da oggetti taglienti.
• Mantenere gli utensili in buono stato d’uso e puliti, non
rimuovere mai le protezioni e il silenziatore dell’utensile.
• Dopo avere eseguito operazioni di riparazione e/o
registrazione assicurarsi di avere rimosso le chiavi di servizio
o di registrazione.
• Prima di scollegare il tubo di alimentazione dell’aria
compressa dalla rivettatrice, assicurarsi che quest’ultimo
non sia in pressione.
• Attenersi scrupolosamente a queste istruzioni.

Revisione - 03 Date 01-2011 5
I
KJ 45/S
KJ 45/S
IDENTIFICAZIONE DELLA RIVETTATRICE
La rivettatrice KJ 45/S è identificata da una marcatura
indicante ragione sociale e indirizzo, designazione della
macchina , marcatura CE e anno di costruzione.
In caso di richiesta di assistenza tecnica fare sempre
riferimento ai dati riportati nella marcatura.
NOTE GENERALI E CAMPO DI APPLICAZIONE
L’uso dell’utensile è finalizzato esclusivamente all’utilizzo di
inserti filettati con filetto compreso tra M4 e M12.
IlsistemaoleopneumaticoutilizzatodallarivettatriceKJ45/S
fornisce unamaggiorpotenzarispettoaltradizionalesistema
pneumatico su cui si basano altri modelli di rivettatrici. Ciò
significa una drastica riduzione dei problemi dovuti all’usura
dei componenti con conseguente aumento di affidabilità e
du r a t a . L e so lu z io n i te cn i che a d o t t a te r idu con o l e d i m en si o ni
e il peso della macchina rendendo la rivettatrice KJ 45/S
assolutamente maneggevole. Le possibilità di perdite
dal sistema oleodinamico sono precluse dall’impiego di
guarnizioni a tenuta che eliminano questo problema.
DATI TECNICI
• Pressione di esercizio .......................................... 6 - 7 BAR
• Diametro interno minimo tubo alimentazione
aria compressa .......................................................... 8 mm
• Consumo max aria libera, per ciclo........................... 9 nl**
• Forza massima...................................... 6,5 BAR - 27440 N
• Peso (con equipaggiamento per M10)..................2,860 Kg
• Temperatura di utilizzo...........................................-5°/+50°
• Valore medio quadratico ponderato in
frequenza dell’accelerazione complessiva (Ac)
a cui sono sottoposte gli arti superiori................< 2,5 m/s2
**nl = litri a 20°C, pressione atmosferica
• Pressione acustica dell’emissione ponderata (A))....74 dBA
• Pressione acustica istantanea ponderata (C) ....... <130 dBC
• Potenza acustica ponderata (A) ...............................86 dBA
*
con tirante per M10
PARTI PRINCIPALI
A)....................................................................Tirante filettato
B).................................................................................Testina
C)....................................................Ghiera bloccaggio testina
D).......................................................... Pulsante di comando
E) ............................................ Allacciamento aria compressa
F) ....................................................... Limitatore di pressione
G).........................................................Fondello di protezione
H).............................................................Motore pneumatico
I).............................................................Tappo serbatoio olio
L) .............................................................Attacco bilanciatore
M).............................................Pomello di regolazione corsa
N).................................................................. Indicatore corsa
O).........................................................Cannotto porta testina
P)........................................................Pulsante di svitamento
Q)...........................................................Valvola ingresso aria
Ragione sociale e indirizzo
del fabbricante
Designazione macchina
Anno di costruzione

I
KJ 45/S
KJ 45/S
Date 01-2011 Revisione - 036
1
2
4
53
3 m Max
ALIMENTAZIONE DELL’ARIA (fig. f1)
L’impianto deve prevedere dispositivi per la depurazione
dell’aria, per lo scarico della condensa e deve garantire una
pressionecostanteall’ingressodell’alimentatoredimin6bar.
Ilregolatoredeveessereimpostatoaunapressionedi6,5bar.
Collegare la macchina all’alimentazione dell’aria compressa
principaleseguendoleindicazionidelloschemainfigura(f1):
1)Rubinetto di arresto (utilizzato durante la manutenzione del
regolatore filtro o dell’unità di lubrificazione).
2)Punto di presa dall’alimentazione principale.
3)Punto di spurgo per l’alimentazione principale.
4)Regolatore di pressione e filtro (spurgare giornalmente).
5)Lubrificatore.
ATTENZIONE! La rivettatrice è dotata di una
valvola limitatrice (F) che entra in funzione
in caso di una pressione dell’aria compressa
nettamente superiore ai 7 bar.
ATTENZIONE! In caso di attivazione della
valvolalimitatrice(F),econseguentefuoriuscita
d’aria, bisogna verificare che la pressione
di alimentazione della macchina sia quella
dichiarata nei dati tecnici del presente manuale
(pag. 5).
f1
GRUPPO FRL
OPERAZIONI PRELIMINARI (fig. f2-f3)
Verificare che il gruppo, tirante filettato (A) e testina (B),
montatosullarivettatrice,siaadeguatoallamisuradell’inserto
che si vuole serrare; in caso contrario procedere al cambio
di formato (pag. 9). Il gruppo tirante filettato (A) + testina
(B) montato sulla rivettatrice in confezione, corrisponde ad
una filettatura di M10.
Pr i m a di u tili z z ar e la r i ve t t a t r ic e e d op o o gn i c amb i o d i f or ma to
occorreregolarelacorsainfunzionedelledimensioni,deltipo
di inserto e dello spessore del materiale da serrare. Prima di
compiere questa operazione ruotare il pomello (M) secondo
il senso della freccia, (+) per aumentare la corsa e (-) per
diminuirla. Considerando che all’aumentare della corsa -
rotazionedelpomello(M)-nelsensoindicatodalsimbolo(+),
ladistanza“h”(pag.7)diminuisceconconseguenteaumento
dell’azione di serraggio. Per verificare se la corsa è regolata
correttamente controllare l’indicatore (N), confrontandolo
con i valori della tabella (fig. f3).
NOTA: Prima della posa in opera definitiva dell’inserto è
bene verificare il serraggio che questo opera sugli spessori
interessati,compiendoulterioriregolazioni,comespecificato
a pagina 10 (le regolazioni riportate sono puramente
indicative; è consigliabile consultare i dati tecnici degli
inserti utilizzati).
ATTENZIONE!!! La regolazione non corretta
della corsa della rivettatrice può causare il
cattivo serraggio degli inserti e la probabile
rottura del tirante!
ATTENZIONE!!! Le operazioni sopraelencate
devono essere eseguite con macchina non
alimentata. Per visualizzare la corsa modificata
(N) bisogna alimentare la macchina.
f2
• Per alimentare la macchina, spostare il cursore della valvola
ingresso aria (Q) verso l’alto.
• Per scaricare la macchina dall’aria e bloccare l’alimentazione,
spostare il cursore della valvola ingresso aria (Q) verso il basso, e
solo a questo punto, effettuare le varie operazioni di registrazione
della corsa.
F
Q

Revisione - 03 Date 01-2011 7
I
KJ 45/S
KJ 45/S
f3
Corsa tirante min. Giri (M)
~ 2 mm 0
Corsa tirante Giri (M)
~ 0.4 mm 1
Corsa tirante max. Giri (M)
~ 8 mm 15
0
1
2
3
4
5
6
7
98
10
11
12
13
14
15
M12
1 ÷ 4
M
4
0
.
3
÷
4
M
5
0
.
5
÷
5
M
8
0
.
8
÷
6
M
1
0
1
÷
6
M
1
2
1
÷
7
/
M
6
0
.
5
÷
6
POSA IN OPERA DELL’INSERTO (fig. f4-f5-f6)
Verificare che il gruppo tirante filettato (A) e testina (B) montato
sullarivettatricesiaadeguatoallamisuradell’insertoche si vuole
utilizzare. Regolare la corsa come riportato (fig. f2-f3).
Inserirel’insertosultirante(A) e d e s er c i t ar e su di e ss o u n a l e g g e r a
pressione come indicato in figura f4, in questo modo l’inserto si
avvita automaticamente sul tirante filettato. Assicurarsi che la
testa dell’inserto vada in battuta con la testina (B) verificando
che il tirante (A) fuoriesca di 2mm dall’inserto.
In caso di ulteriore regolazione del tirante (A) procedere come
riportato a pag. 10.
E' possibile ora procedere alla messa in posa dell' inserto,
premendo il pulsante (D) (fig.f5) fino alla tirata completa dell'
inserto,perildisimpegnodeltirantepremereilpulsante(P)(fig.f7)
Perunacorrettaposaeduncorrettofunzionamentodellamacchina
è necessario che gli inserti utilizzati siano adeguatamente puliti.
Nota: Se necessario, in funzione del serraggio desiderato,
compiere ulteriori regolazioni della corsa della rivettatrice,
mediante la rotazione del pomello (M) (fig. f2-f3-f6).
Deformazione insufficiente = l’inserto potrebbe ruotare
all’interno dell’alloggiamento pregiudicandone l’utilizzo e la
resistenza.
Deformazioneeccessiva=possibilidanneggiamentidell’inserto
e tirante (A) con probabili rotture di entrambi i componenti.
D
M
f5
f4
Bf6
A

I
KJ 45/S
KJ 45/S
Date 01-2011 Revisione - 038
ANOMALIE DI FUNZIONAMENTO (fig. f7)
In tutti i casi in cui si verificano condizioni per le quali sia
necessarioottenereunosvitamentoforzatodeltirantefilettato
dall'inserto, premere il pulsante (P).
ATTENZIONE! Eseguire questa operazione
trattenendo saldamente la rivettatrice in modo
da impedirle eventuali bruschi movimenti che
potrebbero danneggiare persone o cose.
f7

Revisione - 03 Date 01-2011 9
I
KJ 45/S
KJ 45/S
CAMBIO DI FORMATO (fig. f8-f9 f10-f11)
La rivettatrice viene fornita con 6 coppie di tiranti filettati
(A), testine (B), trascinatori (R) e, solo per la serie di tiranti
da M4 a M6, di distanziali (S) (f8).
Per effettuare il cambio di formato procedere come segue:
• Svitare il cannotto porta testina (O) con una chiave
commerciale di mm 22 (f9).
• Togliere il tirante filettato, spingendolo e
contemporaneamente sollevandolo (f10).
• Dopo aver preparato il tirante filettato (A) della misura
desiderata,disporreesostenereicomponenticomeinf11
ed eseguire il montaggio, assicurandosi che i particolari
siano correttamente in sede, facendo ruotare a mano il
tirante (f11).
ATTENZIONE!
• Nel componente (R) il lato da inserire nella testa tirante
è calamitato per evitarne la caduta accidentale nelle
operazioni di cambio formato.
• Avvitare il cannotto porta testina (O) con una chiave
commerciale di mm 22 e serrare correttamente.
ATTENZIONE!
Le operazioni sopraelencate devono essere
eseguite con macchina non alimentata.
M8 - M12M4 ÷ M6
AR
B A R
BS
f8
22 mm
O
f11
f10
f9

I
KJ 45/S
KJ 45/S
Date 01-2011 Revisione - 0310
REGOLAZIONE DEL GRUPPO TIRANTE TESTINA
(fig. f14-f15-f16)
Al variare della lunghezza dell’inserto da serrare occorre
regolare la posizione della testina (B) rispetto al tirante
filettato (A).
Toglierel’alimentazionedell’ariacompressadallarivettatrice.
Avvitare manualmente un inserto della lunghezza desiderata
sul tirante filettato fino a che la testa dell’inserto vada in
battuta con la testina (B) della rivettatrice. La testina (B) è
regolata correttamente se il tirante filettato fuoriesce per
circa 2 mm dall’inserto avvitato su di esso. In caso contrario
sbloccare la ghiera (C) mediante una chiave commerciale di
mm 22 quindi avvitare o svitare la testina (B) fino a trovare
la giusta posizione, al termine bloccare la ghiera (C).
ATTENZIONE!
Le operazioni sopraelencate devono essere
eseguite con macchina non alimentata.
A
BC
B
f15
f16
f14
22 mm
C

Revisione - 03 Date 01-2011 11
I
KJ 45/S
KJ 45/S
RABBOCCO OLIO NEL CIRCUITO OLEODINAMICO (fig. f17-f18)
Il rabbocco dell’olio del circuito oleodinamico si rende
ne c es s ar i o d op o u n l u ng o p er io do d i l av o r o o qu an do s i a v ve r t e
un calo di corsa della rivettatrice. Procedere quindi come
segue:conrivettatricenonalimentata, ruotareilpomello(M)
verso il segno “+” sino al finecorsa, posizionare la macchina
in verticale, rimuovere il tappo (I) servendosi della chiave a
brugola di mm 4 (in dotazione). Durante questa operazione
prestare la massima attenzione per evitare fuoriuscite di
olio. Avvitare nella sede del tappo (I) il contenitore olio (T)
(in dotazione) preventivamente riempito con olio idraulico
di PANOLIN HLP ISO 32 .
Mantenendo la rivettatriceverticale,attivarel’alimentazione
dell’aria, premere il pulsante (D) facendo compiere
alla rivettatrice una serie di cicli fino a quando non sia
completamente cessata l’emissione di bolle d’aria all’interno
del contenitore (T), questa condizione sta a significare che il
rabbocco dell’olio è completato. A questo punto disattivare
l’alimentazione dell’aria e, con rivettarice sempre verticale,
svitare il contenitore olio (T) e richiuderlo. Procedere quindi
allachiusuradeltappo(I)verificando l’integritàdellarondella
ermetica e ripetere tutte le regolazioni per la posa in opera
dell’inserto riportate a pag. 6-7.
CAUTELA: È di estrema importanza attenersi alle istruzioni
sopra indicate ed effettuare le operazioni di rabbocco olio
muniti di guanti.
Nel caso di svuotamento completo del circuito idraulico,
recuperare tutto l’olio in un apposito contenitore e avvalersi
sucessivamente di una ditta autorizzata allo smaltimento
dei rifiuti.
MANUTENZIONE
Manutenzione giornaliera
- Controllare che il tirante filettato non sia danneggiato.
- Controllare il sistema di alimentazione dell’aria compressa.
- Controllare che la corsa dell’attrezzo sia adatta per inserire
l’inserto selezionato (vedere le istruzioni relative alla
regolazione della corsa, riportate a pagina 6).
- Controllare che non vi siano perdite di aria o di olio. In tal
caso sostituire eventuali raccordi o guarnizioni danneggiate.
- Controllare che la pressione di alimentazione dell’aria
compressa sia di max 7 bar.
Manutenzione settimanale
- Controllare il livello dell’olio verificando la corsa della
rivettatrice. In caso di necessità rabboccare per prevenire
malfunzionamentidellarivettricecomeriportato(fig.f18).
Revisione della rivettatrice
È consigliabile procedere ad una revisione completa della
rivettatrice dopo 600.000 cicli oppure ogni anno.
In questo caso rivolgersi esclusivamente a centri autorizzati
dalla FAR S.r.l.
SMALTIMENTO DELLA RIVETTATRICE
Per lo smaltimento della rivettatrice attenersi alle
prescrizioni imposte dalle leggi nazionali.
Dopo aver scollegato la macchina dall’impianto
pneumatico, procedere allo smontaggio dei vari
componenti suddividendoli in funzione della loro
tipologia: acciaio, alluminio, materiale plastico,
ecc.
Procedere quindi alla rottamazione nel rispetto
delle leggi vigenti.
ATTENZIONE!
Prima di scollegare il tubo dell’aria compressa
dalla rivettatrice accertarsi che quest’ultimo non
sia in pressione!
IMPORTANTE: Assicurarsi che il tappo di rabbocco
olio (I) venga serrato con una coppia pari a: Min.
5 Nm ÷ Max. 8 Nm.
Si raccomanda l’uso di olio PANOLIN HLP ISO 32
DIN 51524-2/HLP o simili
f17
f18

GB
KJ 45/S
KJ 45/S
Date 01-2011 Revisione - 0312
INSTRUCTIONS FOR USE I
INDEX
GUARANTEE AND TECHNICAL ASSISTANCE............................ 12
SAFETY MEASURES AND REQUIREMENTS ............................. 12
TOOL IDENTIFICATION ............................................................. 13
GENERAL NOTES AND USE...................................................... 13
MAIN COMPONENTS................................................................ 13
TECHNICAL DATA ..................................................................... 13
AIR FEED................................................................................... 14
PRELIMINARY OPERATIONS.................................................... 14
PLACING OF THE INSERT......................................................... 15
WORKING PROBLEMS ............................................................. 16
CHANGE OF SIZE ..................................................................... 17
ADJUSTMENT OF TIE-ROD/HEAD UNIT................................... 18
TOOPING UP THE OIL-DYNAMIC CIRCUIT............................... 19
MAINTENANCE ........................................................................ 19
DISPOSAL OF THE RIVETING TOOL ......................................... 19
CAUTION!!!
All the operations must be done in conformity
with the safety requirements, in order to avoid
any consequence for your and other people
security and to allow the best tool work way.
• Read the instructions carefully before using the tool.
• For all maintenance and/or repairs please contact FAR s.r.l.
authorized service centers and use only original spare parts.
FAR s.r.l. may not be held liable for damages from defective parts
caused by failure to observe what mentioned above (EEC directive
85/374).
The list of the service centres is available on our website
http://www.far.bo.it ( Organization )
• The tool must be used only by expert workers.
• A protective visor and gloves must be put on when using the
tool.
• Use equipment recommended in the maintenance chapter to do
any maintenance and/or regulation of the tool.
• For topping up the oil, we suggest using only fluids in accordance
with the features specified in this working book.
• If any drop of oil touches your skin, you must wash with water
and alkaline soap.
ATTENTION! In case of strong impacts or accidental
falls the machine should be completely overhauled.
GUARANTEE AND TECHNICAL ASSISTANCE
FAR riveting tools are covered by a 12-months guarantee.
The period of guarantee starts from the date of delivery
specified on the invoice or delivery note.
The guarantee covers the user/buyer when the tool is bought
throughanauthorizeddealerandonlywhenitisemployedfor
the uses it was conceived for. The guarantee is not valid if the
tool is not used or maintained as indicated in the instruction
and maintenance handbook.
In case of defects or faults FAR S.r.l. undertakes only to
repair and/or replace the components it considers faulty.
SAFETY MEASURES AND REQUIREMENTS
• The tool can be carried and we suggest putting it into its box after
using.
• The tool needs a thorough six-monthly overhaul.
• Repairing and cleaning operations must be done when the tool
is not fed.
• A safety balancer is suggested when it is possible.
• If the A-weighted emission sound pressure level is more than
70 dB (A), you must use some hearing protections (anti-noise
headset, etc.).
• The workbench and the work surface must be always clean and
tidy. The untidy can cause damages to people.
• Do not allow unauthorized persons to use the working tools.
• Make you sure that the compressed air feeding hoses have the
correct size to be used.
• Do not carry the connected tool by pulling the hose. The hole
must be far from any heating sources or from cutting parts.
• Keep the tools in good conditions; do not remove either safety
parts or silencers.
• After repairing and/or adjusting, make sure you have already
removed the adjusting spanners.
• Before disconnecting the compressed air hose from the tool
make sure that there is no pressure in the hose.
• These instructions must be carefully followed.

Revisione - 03 Date 01-2011 13
GB
KJ 45/S
KJ 45/S
TOOL IDENTIFICATION
The riveting tool KJ 45/S is identified from a marking
that shows company name and address of manufacturer,
designation of the tool, CE mark and year of manufacturing.
If any service is requested, please make reference to the data
shown on the marking.
GENERAL NOTES AND USE
ThetoolcanbeemployedonlyforthreadedinsertsM4÷M12.
TheKJ45/S/Shydropneumaticsystemassuresmorepower
thanthepneumaticsystemusedforothermodels.Thatmeans
a reduction in the problems due to the wear and tear of the
components,therefore,therewillbeanincreaseinreliability.
The technical solutions adopted reduce the dimensions and
the weight of the tool, which is very handy for these reasons.
The possibilities of leakage fromtheoil-dynamicsystem, are
eliminatedbysomesealedgaskets,whichsolvethisproblem.
TECHNICAL DATA
• Working pressure ....................................................... 6 - 7 BAR
• Min. int. diam. of the compressed air
feeding hose..................................................................... 8 mm
• Max free air consumption per cycle.................................9 nl**
• Maximum force ......................................... 6,5 BAR - 27440 N
• Weight (with equipment for M10)................................2,860 Kg
• Working temperature................................................... -5°/+50°
• Root mean square in total acceleration
frequency (Ac) to which
the arms are subjected ............................................. < 2.5 m/s2
** nl = litres at 20°, pressure of 1 atmosphere
• A-weighted emission sound pressure level ...................74 dBA
• Peak C-weighted instantaneous sound pressure .......<130 dBC
• A-weighted emission sound pressure ...........................86 dBA
*with M10 tie rod
MAIN COMPONENTS
A).........................................................................Threaded tie rod
B).......................................................................................... Head
C).............................................................Ring-nut clamping head
D)...................................................................Control push-button
E) ....................................................... Compressed air connection
F) ............................................................... Pressure control valve
G)......................................................................Protection bottom
H)....................................................................... Pneumatic motor
I)................................................................................Oil tank plug
L) ...................................................................Balancer connection
M)...............................................................Stroke-adjusting knob
N)......................................................................... Stroke indicator
O).................................................................... Tube carrying head
P).....................................................................Unscrewing button
Q)...................................................................... Air-entry valve
Company name and
address Designation of the tool
Year of manufacturing

GB
KJ 45/S
KJ 45/S
Date 01-2011 Revisione - 0314
AIR FEED (fig. f1)
The compressed air system must be provided with air
cleaners and condensation drains and must guarantee that
the air supplied to the feeder has a constant pressure of min
6 bars. The regulator must be set at a pressure of 6,5 bars.
Connect the machine to the main compressed air supply as
shown in the diagram (f1):
1)Cutoff cock (used during maintenance of the filter regulator
or of the lubricating unit).
2)Main supply inlet.
3)Main supply bleed.
4)Pressure regulator and filter (bleed daily).
5)Lubricating unit.
ATTENTION! The riveting tool is equipped with a
relief valve (F) starting when the compressed-air
pressure significantly exceeds 7 bar.
ATTENTION! If the relief valve (F) starts and the air
consequently escapes, we recommend to check if
the tool feed pressure corresponds to the pressure
value indicated under the technical data in this
handbook (page 13).
FRL UNIT
PRELIMINARY OPERATIONS (fig. f2-f3)
Check that the threaded tie rod (A) and head (B) couple
assembled on the riveting tool is suitable to the size of the
insert to clamp; otherwise change the size (page 17). The
tie-rod (A)/head (B) unit assembled on this riveting tool,
corresponds to a M10 thread.
Beforeusingtherivetingtoolandaftereachchangeofsize,the
stroke should be adjusted according to the dimensions, type
of the insert and thickness of the material to clamp. Before
carrying out this operation rotate the knob (M) according
to the direction of the arrow, (+) for increasing the stroke
and (-) for decreasing it. Increasing the stroke - rotation of
knob (M) - in the direction indicated with the symbol (+), the
distance “h” (page 15) decreases increasing the clamping
action.Toverifythatthestrokeiscorrectlyadjustedcheckthe
indicator(N)comparingitwith the valuesofthetable (fig.f3).
NOTE:Before the definitive placing of the insert, itsclamping
on the thicknesses involved should be checked, carrying
out other adjustments, as shown at page 18 (the specified
adjustments are just an indication, it is advisable to see the
technical data of the inserts used).
ATTENTION! The incorrect adjustment of the
riveting tool can cause a bad clamping of the
inserts and a possible break of the tie rod!
ATTENTION! The above-mentioned operations
must be done when the tool is not fed. For
visualizing the changed stroke (N) the tool
must be fed.
f2
1
2
4
53
3 m Max
f1
F
Q
• Move up the slider of the air-entry valve (Q) to feed the tool.
• Beforeregulating thestroke, dischargethe toolby theairand stop
the feeding, moving down the slider of the air-entry valve (Q).

Revisione - 03 Date 01-2011 15
GB
KJ 45/S
KJ 45/S
f3
Tie rod min. stroke Revolutions (M)
~ 2 mm 0
Tie rod stroke Revolutions (M)
~ 0.4 mm 1
Tie rod max. stroke Revolutions (M)
~ 8 mm 15
0
1
2
3
4
5
6
7
98
10
11
12
13
14
15
M12
1 ÷ 4
M
4
0
.
3
÷
4
M
5
0
.
5
÷
5
M
8
0
.
8
÷
6
M
1
0
1
÷
6
M
1
2
1
÷
7
/
M
6
0
.
5
÷
6
PLACING OF THE INSERT (fig. f4-f5-f6)
Check that the threaded tie rod (A) and head (B) couple
assembled on the riveting tool is suitable to the size of the
insert to be used.
Adjust the stroke as indicated (fig. f2-f3).
Introduce the insert on the tie rod (A) and push slightly on it
as indicatedinfiguref4, so as to make it clamp automatically
onthethreadedtierod.Makesurethattheinsertheadtouches
the head (B) checking that the tie rod (A) comes out of 2mm
from the insert.
In case of further adjustments of the tie rod (A) follow the
instructions of page 18.
It is now possible to place the insert pushing the button (D)
(fig.f5) until the insert is completely pulled, and push the
button (P) to release the tie rod (fig.f7).
For a correct placing and right working of the machine, the
inserts to be used should be properly cleaned.
Note: According to the desired clamping, carry out other
adjustments of the riveting tool stroke, rotating the knob
(M) (fig. f2-f3-f6), if necessary.
Insufcient deformation = the insert could rotate inside the
housing compromising its use and resistance.
Excessive deformation = possible damages of the insert
and tie rod (A) with eventual breaks of both components.
D
M
f5
f4
f6
BA

GB
KJ 45/S
KJ 45/S
Date 01-2011 Revisione - 0316
WORKING PROBLEMS (fig. f7)
Any time it is necessary to unscrew forcedly the threaded
tie rod from the insert, push the button (P).
ATTENTION! Carry out this operation keeping
the riveting tool firmly in order to avoid sharp
movements which could damage people or
things.
f7

Revisione - 03 Date 01-2011 17
GB
KJ 45/S
KJ 45/S
ATTENTION!
Disconnect the machine before carrying out the
above-mentioned operations.
CHANGE OF SIZE (fig. f8-f9-f10-f11)
The riveting tool is supplied with 6 pairs ofthreaded tie-rods
(A), heads (B), entreiners (R) and, spacers (S) only for tie-
rods from M4 to M6 (f8).
To change the size make as follows:
• Unscrewthecone-carryinghead(O)bya22mmstandard
spanner (f9).
• Extract the threaded tie-rod, pushing and lifting it at the
same time (f10).
• After preparing the threaded tie-rod (A) of the size you
need, arrange and keep the components as shown in f11
and assemble. Be sure that the components are correctly
placed, rotating the tie-rod by hand (f11).
ATTENTION!
• The side of the component (R) to be entered in the head
of the tie-rod is provided of a magnet to avoid accidental
fall during the operations of change of size.
• Screw the cone carrying heads (O) by a 22 mm standard
spanner and clamp correctly.
M8 - M12M4 ÷ M6
AR
B A R
BS
f8
22 mm
O
f11
f10
f9

GB
KJ 45/S
KJ 45/S
Date 01-2011 Revisione - 0318
TIE-ROD/HEAD UNIT ADJUSTMENT (fig. f14-f15-f16)
Changing the length of the insert to clamp, the position of
the head (B) compared to the threaded tie rod (A) should
be adjusted.
Disconnect the compressed air feeding from the tool.
Screw an insert of the desired length on the threaded tie
rod manually until the insert head touches the riveting tool
head (B). The head is adjusted correctly if the threaded tie
rod comes out of the insert screwed on it of about 2 mm.
Otherwise unblock the ring nut (C) with a 22 mm standard
spanner then screw or unscrew the head (B) up to the right
position, and block the ring nut (C).
ATTENTION!
Disconnect the machine before carrying out the
above-mentioned operations.
A
BC
B
f15
f16
f14
22 mm
C

Revisione - 03 Date 01-2011 19
GB
KJ 45/S
KJ 45/S
TOPPING UP THE OIL-DYNAMIC CIRCUIT (fig. f17-f18)
Theoil-dynamiccircuitshouldbetoppedupafteralongperiod
of work or when there is a power loss of the riveting tool.
Put the riveting tool (not fed) in a vertical position rotating
the knob (M) towards the sign “+” up to the end of stroke,
and remove the plug (I) by means of a 4 mm Allen wrench
(equipped). During this operation check the oil level in order
to avoid any overflowing. Then pour the oil PANOLIN HLP
ISO 32 into the oil container (T) (equipped) which shall be
screwed to its seat on the plug (I).
Whilekeepingtherivetingtoolinverticalpositionandstarting
air feeding, push the button (D) and make the riveting tool
carry out some cycles until air bubbles inside the container
stop coming out. This condition indicates that the topping
up of the oil has been fully achieved. At this point stop the
air feeding and while keeping the riveting tool in a vertical
position, unscrew and close the oil container (T) and the
plug (I) checking the soundness of the hermetic washer and
repeat all the adjustments for placing the insert as indicated
at page 14-15.
ATTENTION: It is very important to follow the above-
mentioned instructions and use gloves during oil topping up.
If you need to empty completely the hydraulic circuit, you
must puttheoilin asuitablecontainerandcontactacompany
authorized to dispose of wastes.
MAINTENANCE
Daily maintenance
- Check that the threaded tie rod is not damaged.
- Check the supply system of the compressed air.
- Check that the stroke of the tool is suitable for the selected
inserttoclamp(seethepertaininginstructionsforadjusting
the stroke, indicated at page 14).
- Check that there are neither air nor oil leakages. In this
case replace possible damaged connectors or seals.
- Checkthatthesupplypressureofthecompressedairdoes
not exceed 7 bar.
Weekly maintenance
- Checktheoillevelcontrollingthestrokeoftherivetingtool.
If necessary fill up for preventing failures of the riveting
tool as indicated (fig. f18).
Overhaul of the riveting tool
It is advisable to carry out a complete overhaul of the riveting
tool after 600,000 cycles or every year.
In this case apply only to centres authorized by FAR S.r.l.
DISPOSAL OF THE RIVETING TOOL
Follow the prescriptions of the national laws for
disposing of the riveting tool.
After disconnecting the tool from the pneumatic
system,disassembleandsplitallthe components
accordingtothematerial:steel,aluminium,plastic
material, etc.
Thenproceedtoscrapthematerialsin accordance
with current laws.
ATTENTION!
Before disconnecting the compressed air hose,
make sure that it is not under pressure!
ATTENTION: Make sure that the oil filler cap ( I )
is tightened at a torque corresponding to Min. 5
Nm ÷ Max. 8 Nm.
We recommend to use oil PANOLIN HLP ISO 32
DIN 51524-2/HLP or similars.
f17
f18

F
KJ 45/S
KJ 45/S
Date 01-2011 Revisione - 0320
MODE D’EMPLOI I
INDEX
GARANTIE ET ASSISTANCE TECHNIQUE.................................. 20
INSTRUCTIONS ET MESURES DE SECURITE........................... 20
IDENTIFICATION DE L’OUTIL DE POSE..................................... 21
CARACTERISTIQUES ET EMPLOI ............................................. 21
PARTIES PRINCIPALES ............................................................ 21
CARACTERISTIQUES TECHNIQUES.......................................... 21
ALIMENTATION EN AIR............................................................. 22
OPERATIONS PRELIMINAIRES................................................. 22
POSE DE L’INSERT.................................................................... 23
ANOMALIES DE FONCTIONNEMENT ........................................ 24
CHANGEMENT DE FORMAT...................................................... 25
RÉGLAGE DU GROUPE TIRANT ET ENCLUME.......................... 26
REMPLISSAGE DE L’HUILE DU CIRCUIT HYDRAULIQUE......... 27
ENTRETIEN............................................................................... 27
ELIMINATION DE LA RIVETEUSE.............................................. 27
tATTENTION!!!
Le non respect des instructions suivantes peut
avoir des conséquences désagréables pour
vous-mêmes et pour l’intégrité d’autrui.
• Lisez avec soin la notice avant l’usage.
• Pour les opérations d’entretien et/ou réparations, adressez-vous
aux centres de service après-vente autorisés de FAR s.r.l. et
n’utilisez que des pièces détachées originales. FAR s.r.l.
décline toute responsabilité pour les dommages dus à des
pièces défectueuses qui interviendraient suite au non-respect
de la notice ci-dessus (Directive CEE 85/374).
Lalistedescentresd’assistanceestdisponiblesur notresite
internet http://www.far.bo.it ( Organisation )
• L’outil de pose doit être utilisé par le personnel spécialisé.
• Pendant l’utilisation de l’outil utiliser des gants et des lunettes
de protections ou une visière
ATTENTION! En cas de choc violent ou de chute
accidentelle, procéder à la révision complète de la machine.
GARANTIE ET ASSISTANCE TECHNIQUE
Les riveteuses FAR sont couvertes par une garantie de 12
mois, à compter de la date de livraison indiquée sur la facture
ou sur le bon de livraison.
La garantie est accordée à l’utilisateur/acheteur quand la
machineestachetée parl’intermédiaired’unrevendeuragréé
et uniquement à condition qu’elle soit utilisée pour l’usage
prévu. La garantien’est pasvalidesi l’outil n’estpasutilisé ou
s’iln’estpasentretenucommeindiquédanslemoded’emploi.
En cas de défaut ou autre anomalie, FAR S.r.l. s’engage
uniquement à réparer ou changer, selon son choix, les
pièces défectueuses.
INSTRUCTIONS ET MESURES DE SECURITE
• Pour l’entretien et/ou réglage de l’outil de pose, se servir des
équipements indiqués dans le chapitre “ENTRETIEN”.
• Pour le remplissage de l’huile, il faut utiliser les fluides indiqués
dans ce dossier.
• En cas de fuites imprévues de huile (au contact de la peau), il
faut se laver soigneusement avec de l’eau et du savon alcalin.
• L’outil de pose peut être transporté à la main et il doit être remis
dans sa boîte après l’usage.
• Pour obtenir un bon fonctionnement de l’outil, nous vous
suggérons de le réviser tous les six mois.
• Les interventions de réparations et de nettoyages de l’outil doivent
se faire machine non alimenté en air.
• Si possible, il faudrait utiliser des équilibreurs de sécurité.
• En cas d’exposition quotidienne où le niveau de pression soit
supérieur à la limite de sécurité 70 dB (A), l’on doit assurer
la protection de l’ouïe (casque antibruit, réduction du temps
d’exposition quotidienne, etc).
• La table et le poste de travail doivent être toujours propres et
rangés. Le désordre peut causer des dommages aux personnes.
• Les personnes non authorisées ne peuvent pas se servir des
outils de pose.
• Il faut s’assurer que les tuyaux d’alimentation de l’air comprimé
soient appropriés (conformes) à l’utilisation prévue.
• Ne pas transporter l’outil de pose quand il est connecté à
l’alimentation. Le tuyau doit se trouver toujours loin de sources
de chaleur ou d’objets tranchants.
• Les outils de pose doivent être toujours en bon état. Ne pas
enlever les protections et le silencieux de l’outil.
• Après la réparation et/ou réglage, il faut s’assurer d’avoir enlever
les clés de réglage.
• Avant de débrancher le tuyau d’alimentation d’air comprimé de
l’outil, il faut s’assurer qu’il ne soit pas sous pression.
• Suivre scrupuleusement ces instructions.
Other manuals for KJ 45/S
3
Table of contents
Languages:
Other FAR Power Tools manuals
Popular Power Tools manuals by other brands

Parkside
Parkside PDSP 1000 A1 SANDBLASTER GUN Operation and safety notes

Grizzly
Grizzly T23107 owner's manual

Campbell Hausfeld
Campbell Hausfeld IN715601AV operating instructions

HBM Machines
HBM Machines 11172 manual

Bosch
Bosch GSC 160 Professional Original instructions

Coleman
Coleman powermate 024-0175CT instruction manual