5
FEATURES
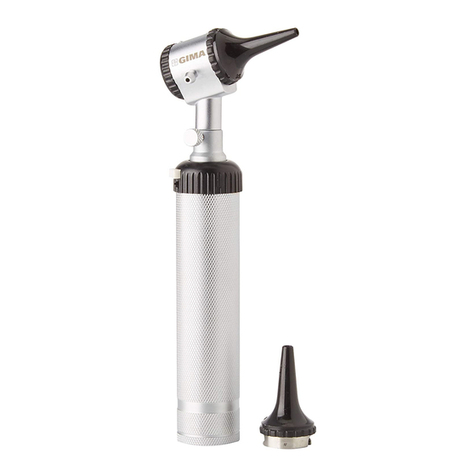
The otoscope PARKER is medical equipment suitable to directly examine the external acoustic duct and the tympanic membrane. The
otoscope is available in two different models.
The two models differ in the colour and type of connection between the head and the handle. The otoscope PARKER (cod. 31440) is
provided with a screw cap, while other models have got a bayonet cap and they are available in different colours: green (cod. 31435),
blue (cod. 31436) and yellow (cod. 31437).
Both models are equipped with a 2,5 V bulb and are supplied by two 1,5 V alkaline batteries type “C”.
The otoscopes PARKER are provided with a rheostat to adjust the intensity of light, a removable glass allowing a 3X magnication and
an output for air insufation to check the mobility of the tympanic membrane.
The otoscopes PARKER are delivered in an imitation leather case and are equipped with three autoclavable specula Ø 2,5 - 3,5 - 4,5
mm.
The product or its components cannot be used for purposes different from the one specied in the present manual.
PRESCRIPTIONS
The product shall be used exclusively with alkaline batteries type “C” correctly installed.
It shall not be dipped into water! When cleaning, make sure that the lamp socket or the battery compartment is not soaked
with water.
The product shall be used by qualied medical personnel only, in out-patients’ department. It is not conceived for the employment in
operation room. Due to its powerful luminous intensity it is unadvisable to directly point it at eyes.
Do not use the equipment in case it is damaged. Apply to your retailer.
Avoid precarious repairs. Repairs shall be carried out with original spare parts only, which shall be installed according to
the intended use.
Since the product is made of corrosion-proof materials suitable for the enviromental conditions foreseen for its normal use, does not
require special care, however it is necessary to store it in a closed place making sure that is protected from dust and dirt to assure
its hygenic conditions. Moreover, it is recommended to store the product in a place which can be reached easily by the personnel in
case of necessity.
UNPACKING
Always remember that packing elements (paper, cellophane, stitches, adhesive tape, etc.) can cut and/or hurt if they are
not carefully handled.
They shall be removed with adequate means and shall not be left at the mercy of irresponsible persons; the same is valid
for tools used to remove packages (scissors, knives, etc.).
After opening the packages, rst of all it is necessary to check all pieces and parts composing the product. Check that they are all
present and in perfect conditions.
INSTALLATION
Before using it, it is necessary to insert the batteries into the apposite compartment. Proceed as follows:
- Open the battery compartment. To do this clockwise turn the apposite ring nut located on the handle.
- Once opened, insert the batteries paying attention to the direction of poles (see picture).
- To close the battery compartment, clockwise screw down the ring nut and check that the batteries are in contact with poles.
- In case the otoscope head unit separates from the handle, proceed as follows:
- For PARKER versions with screw cap, it is necessary to slightly unscrew the knob located on the side and pull the head while tightly
holding the otoscope handle.
To reinstall the head unit on the handle, it is sufcient to insert it again into the apposite seat, taking care that the notch present on
the head bottom matches with the knob. At this point it is sufcient to exert a light pressure towards the bottom and screw the knob.
- For PARKER COLOUR versions with bayonet cap, it is necessary to hold the otoscope handle and head group, counter-clockwise
turn this last one until a click is heard, at this point it is possible to take the head off.
To insert the head, make the bayonet cap grooves match, push the head towards the bottom and clockwise rotate it.
- The operation necessary to remove and replace the speculum is very simple:
Counterclockwise rotate the speculum and draw it out of its seat. To reposition the speculum, insert it into the head group, make the
groove match with the small pivot and clockwise rotate.
To dis-assemble the Otoscope unit (with screw locking system) proceed as follows:
- For Otoscopes with screw locking system, it is necessary to slightly unscrew the knob located on the side and pull up the head while
tightly holding the otoscope handle.
- To reinstall the head unit on the handle, it is sufcient to insert It again into the handle, taking care that the notch present on the head
bottom matches with the knob. At this point it is sufcient to exert a light pressure towards the bottom and screw the knob.
In case of Otoscopes with bayonet locking system, proceed as follows:
It is necessary to hold the Otoscope handle and head in each hand and turn the head counter-clockwise until a click is heard. At this
point it is possible to take the head off. To re-attach the head, match the bayonet grooves on both the head and handle, push the head
down and turn the head clock wise.
ENGLISH
