Good Way Ream-A-Matic Manual

RAM-PRO-XL
VARI-SPEED REVERSING
REAM-A-MATIC TUBE CLEANER
WITH CHEMICAL DISPENSER
Operating and
Maintenance
Instructions
Read before operating.

RAM PRO XL 0321
2
CONTENTS:
IMPORTANT SAFETY INSTRUCTIONS.................................................................................................3
ELECTRICAL PRECAUTIONS ............................................................................................................ 3-4
OPERATIONAL PRECAUTIONS............................................................................................................4
THE RAM-PRO-XL REAM-A-MATIC................................................................................................. 5 -9
WIRING DIAGRAM...............................................................................................................................10
TROUBLESHOOTING....................................................................................................................10-11
EXPLODED VIEW AND PARTS LIST .............................................................................................12-13
Thank you for purchasing Goodway’s “RAM-PRO-XL” VARI-SPEED REVERSING
TUBE CLEANER . We appreciate your business and look forward to serving you in
the future. As with all Goodway products, you can be assured that the nest quality
components and workmanship have gone into this machine.
Please take a few minutes to read the following Operating and Maintenance
Instructions. By carefully following the instructions, you will obtain years of
trouble free service from this product. Please pay particular attention to the safety
instructions and exercise caution when using this machine
GOODWAY®TECHNOLOGIES CORPORATION
HVAC & FACILITY MAINTENANCE SOLUTIONS
For Sales Call: 1-800-333-7467
For Service Call: 1-800-370-2855

RAM PRO XL 0321 3
WARNING
SAVE THESE INSTRUCTIONS!!
Important Safety Instructions
1. Read all instructions before using unit. Failure to follow all instructions may
result in serious injury.
2. Keep objects, loose clothing, hair and body parts away from openings and
moving parts.
3. Do not overreach or stand on unstable support. Keep good footing and
balance at all times.
4. Stay alert – watch what you are doing!
5. Do not operate the product when fatigued or under the inuence of alcohol
or drugs.
6. Keep operation area clear of all persons.
7. Use personal safety equipment. Always wear eye protection. Dust mask, non-
skid rubber sole safety shoes, hard hat, gloves and hearing protection are
recommended.
8. Use only GOODWAY recommended accessories and replacement parts.
Electrical Precautions
•Never expose the unit to rain or the elements. Store unit indoors in a cool,
dry area.
• Make certain that the power source conforms to the requirements of
the equipment.
•DANGER: For proper protection this product must be grounded. Always plug
the power cord into a properly grounded receptacle. Improper connection
of the equipment-grounding conductor introduces risk of electrocution.
Check with a qualied electrician or service personnel if you are in doubt as to
whether an outlet is properly grounded. Never remove the grounding prong
from the power cord plug.
• This unit is equipped with a Ground Fault Circuit Interrupter (GFCI) at the plug
end of the cord for electrocution protection. DO NOT REMOVE THIS DEVICE!!
If replacement of the plug or cord becomes necessary, use only identical
replacement parts that include GFCI protection.
• Do not use any type of adapter with this product.

RAM PRO XL 0321
4
• WARNING To reduce the risk of electrocution, keep all connections dry and
off the ground. Do not handle the unit or electrical plug with wet hands.
• When unplugging the power cord, grasp the plug – not the cord.
• Unplug the power cord when servicing the unit or leaving the machine
unattended.
• Do not roll the machine over the power cord, pull the cord, close a door on the
cord or pull the cord around sharp corners. Keep the cord away from
hot surfaces.
• Do not use the machine if it has a damaged cord or plug.
Operational Precautions
• Maximum water pressure; 100 p.s.i.
• Water pressure relief – If water pressure exceeds 100 p.s.i., water will vent
under chassis.
• Do not use in an environment or on objects that are above 175°F (79°C).
• Do not use with ammable or explosive uids such as gasoline, fuel oil,
kerosene, etc. Do not use in explosive atmospheres.
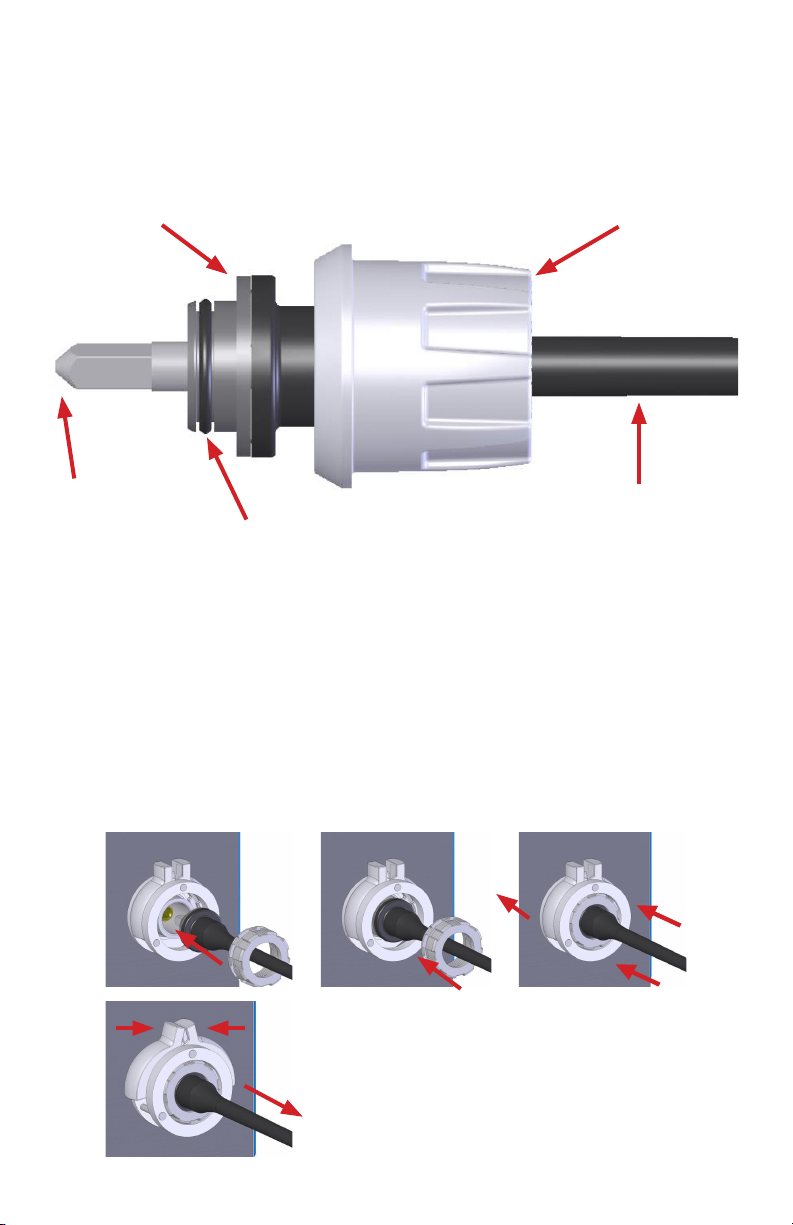
• Keep clear of moving shaft. Make sure the shaft will not catch on anything
while in use.
• Check exible shaft for weak or worn condition before each use. Make certain
that all connections are tight and secure.
• If the machine does not operate properly or is damaged contact Goodway
Customer Service.
• Disconnect the plug from the power source and turn off water supply
before disconnecting hoses, ttings, or exible shaft and before making any
adjustments or changing accessories. Such preventive safety measures reduce
the risk of starting the unit accidentally.
• Check for misalignment or binding of moving parts, breakage of parts,
and any other condition which may affect the tool’s operation. If damaged,
have the tool serviced before using. Many accidents are caused by poorly
maintained tools.
• If servicing this unit, use only identical replacement parts. Follow instructions in
the Maintenance section of this manual. Use of unauthorized parts or failure to
follow maintenance instructions may create a risk of electric shock or injury.
• Be sure to select the proper size exible shaft and tool for the job. Do not force
the tool. Use the correct tool for the application.
• WARNING Use only Goodway-approved chemicals in the dispenser-
incompatible chemicals can cause damage or unwanted reactions.
• INSPECT CHEMICAL CAP AND DISPENSER FOR DAMAGE AND WEAR—if any
cracks are detected or if cap thread diameter is less than 4.25 in., CAP and
DISPENSER MUST BE REPLACED.
• DANGER!! DO NOT OPERATE THE UNIT WITH COVER(S) REMOVED - WHEN
MOVING PARTS AND ELECTRICAL CONNECTIONS ARE EXPOSED!!!

RAM PRO XL 0321 5
The RAM-PRO-XL Ream-A-Matic
How It Works
The RAM-PRO-XL Ream-A-Matic uses a brush or other cleaning tool on the end
of a rotating, nylon-encased exible steel shaft. As the operator feeds the rotating
brush/shaft assembly through the tube, the brush or tool loosens any deposits
(mud, sand, etc) and water ows through the casing to ush them out. An electronic
valve automatically opens the water ow only when shaft is rotating. The RAM-PRO-
XL is designed for both enhanced-bore (internally “ried” or grooved) and smooth-
bore tubes with an inside diameter (ID) between 1/4" and 1" (6.4/25.4mm).
•Enhanced Tubes
The rotational speed of the cleaning tool controls the linear feed rate of the
shaft into the tube. It is important to minimize slip between the brush and the
grooves in the tube. Too much slip (rotational speed exceeds the natural feed
rate of the helix in the tube) won’t allow the brush bristles to reach into the
grooves, leaving them fouled. However, if the brush is not rotating fast enough
the opposite can happen and the operator can end up pushing the brush
bristles past some of the grooves.
• Smooth-Bore Tubes
The operator needs only to select a comfortable rotational speed.
Setting the Speed
• The rotational speed of the exible shaft is controlled by the Speed Control on
the unit’s control panel.
• For enhanced tubes start speed at 400 RPM. Increase speed as needed.
• For smooth-bore tubes set the speed at 800 rpm, change if necessary.
Power
Indicator
Circuit
Breaker
(push to reset)
Speed Control Knob
+-
Forward/Reverse Foot Pedal
• The direction the shaft rotates is controlled by the two-way foot pedal.
• Clockwise rotation is considered the “Forward” direction
• Position the foot pedal like the gas pedal of a car and rock your foot back and
forth to control direction.

RAM PRO XL 0321
6
Operation
• Connect water hose to water inlet of no more than 100 p.s.i.. Use clean water
supply. Make sure screen washer is in place.
• Make sure cap is on dispenser and machine is off so water does shoot out
of dispenser. One can add more Tablets with the machine unactivated for 5
seconds or more. When pressure in the dispenser vents through shaft, the cap
can then be removed.
• Open water supply line. Water will ow through the exible shaft assembly
only when the machine is running. DO NOT RUN THE UNIT DRY!!
• Plug electric cord into an outlet with appropriate voltage and amperage.
Test the GFCI by pushing the “Test” button and then the “Reset” button. The
“POWER ON” light should light up. If not, push the “Reset” button and
try again.
• Make sure drive manifold of the machine is parallel to oor.
• Select proper size cleaning tool and attach to end of exible shaft. Never use a
tool larger than I.D. of tube.
Note: Most tubes are rolled outward at tube sheet. Always measure I.D.
beyond roll or consult manufacturer’s manual for tube O.D. and gauge.
• Remove foot switch from storage compartment and place it in a convenient
position for operation.
• Uncoil exible shaft completely and arrange the shaft in the largest loop
possible to minimize “helixing” (shaft coiling on itself under power).
• GTC-701 thru -704 - Position the stop on the exible shaft so when the shaft is
inserted into the tube up to the stop the tip of the cleaning tool is clear of the
end of the tube.
• Check the direction of the spiral in the tube and start with the appropriate
direction using the foot pedal. “FORWARD” on the machine is clockwise
brush rotation when facing the tube. Use the opposite rotational direction
(“REVERSE”) when extracting the tool from the tube.
• Insert brush/tool into the tube. Press “FORWARD” foot pedal. Feed the shaft
into the tube. DO NOT FORCE SHAFT DOWN TUBE - Allow machine to do
the work. If resistance is felt, back off 2"-3" (0.50 - 0.75 m) and feed shaft again
until it goes easily. If resistance is too great, use a smaller cleaning tool or
check tube for blockage.

RAM PRO XL 0321 7
Chemical Dispenser
• Unscrew cap
• Remove cup and
dump remaining
water in cup – The
purpose of the cup is
to remove water so
new tablets will not
displace remaining
water in the chamber
onto the machine.
• If the cap will not
unscrew, wait a few
seconds for pressure
to bleed from exible
shaft – At running
pressure of about
35 psi there is about
500 lbs pushing up
on cap and it will not
unscrew.
• Place tablet in cup
• Screw cap on just to
snug – Do NOT over
tighten – cap will be
hard to remove.
Roll Cage/Handle
• To roll the RAM-PRO-XL using the build-in dolly wheels, swing the handle out
until it stops.
• To stow the handle, push down until handle is ush with roll cage.
(1) (2)

RAM PRO XL 0321
8
Connecting the SQC Flexible Shaft
• Select the proper size exible shaft for tube diameter and length to
be cleaned.
• Make sure the o-ring on the shaft insert is lubricated with appropriate grease
(compatible with “Buna-N” or “Nitrile”).
Shaft Insert
Square
Driver Strain
Relief
O-Ring
Shaft Nut
• Check manifold for debris and clean if necessary before attaching
exible shaft.
• Insert the square driver of exible shaft into the drive shaft of the machine
(inside the manifold). The shaft driver may have to be rotated slightly for
proper alignment.
• Push shaft insert with the o-ring all the way into the machine manifold.
• Push the shaft locking nut rmly into the quick connect latches until they click,
locking the nut in place.
• Make sure both latches are properly engaged by gently pulling on the shaft
Strain Relief.
• To remove, open latches by
pinching tabs together and pull
shaft out of manifold

RAM PRO XL 0321 9
Storage
Discard remaining chemical in cup and rinse. Then run clean water through RAM-
PRO-XL to rinse internal components. Disconnect water supply line. Disconnect the
exible shaft and use shaft lubricator, P/N GSL- 705, to prevent rusting of shaft. Do
not store machine where residual water in machine may freeze. Refer to Flexible
Shaft manual for exible shaft storage.
Maintenance
• Check all louvers and water drain holes for obstructions.
• Check for decaying hoses and wire insulation.
• Check for leaks.
Motor 1/2 HP, 90 VDC Motor
Optional
1/2, 180VDC Motor 230V @ 3A
Input Voltage
Requirements
115 VAC @ 8.35 Amps
Rotational Speed 200 – 1000 RPM
Water Line Connection 3/4” Standard Garden Hose
Maximum Water
Pressure
100 PSI (7 BAR)
Tablet usage Approximately 1 tablet per 3 hours
230V only

RAM PRO XL 0321
10
Wiring Diagram
Troubleshooting
PROBLEM PROBABLE CAUSE REMEDY
Runs for short
period of time
and stops
(power light
remains on)
• Leak in air control circuit
• Circuit Breaker Tripped
• Air switch leaking (rare)
• Disconnect power, remove
cover. Disconnect air hoses from
air switches to allow foot pedal
bellows to inate to full height.
Reconnect and tighten
all connections
• Push Circuit Breaker
button to reset
• Replace air switch
Runs in one
direction only
• Leak in air control circuit
• Faulty wire connection(s)
• Faulty Air switch
• Faulty Control Board
• See Above
• Disconnect power, remove cover.
Check all power connections
• Check air switches
• Call Goodway

RAM PRO XL 0321 11
Troubleshooting
PROBLEM PROBABLE CAUSE REMEDY
Water leaking
from base
• Leak in water circuit
plumbing
• Leak at shaft manifold seal
• Water pressure too high
• Disconnect power, remove cover.
Check hoses and ttings
for leaks.
• Check for leak where drive shaft
enters shaft manifold.
• Lower water pressure
Runs for short
period of time
and stops
(power light
off), GFCI trip/
won’t reset
• Electrical short to ground • If GFCI continually trips call
Goodway - there may be an
unsafe electrical condition!!
Motor jerks or
runs erratically
• Speed Control
• Control board
• Check speed control
potentiometer – check resistance
across outer leads (~5K ohms).
Check resistance between
middle and outer lead - rotate
speed control (0 to 5K ohms).
• See wiring diagram and check
trimmer pot settings.
Motor runs but
shaft does not
turn
• Loose motor/drive shaft
coupling
• Broken exible shaft
• Disconnect power, remove
cover. Check and tighten
motor/shaft coupling.
• Replace shaft ttings
and /or core.
No water
through exible
shaft
• Problem with water
supply
• Inlet screen clogged
• Main inlet solenoid valve
not working
• Water inlet inside
chemical dispenser
clogged
• Water supply not on, restrictions
in hose or hose too small, water
supply pressure insufcient.
• Remove hose and clean screen.
• Disconnect power, remove cover.
Check solenoid wiring
and connections.
• Unscrew chemical dispenser
cap. Remove cup and check that
the slots around the upper lip of
the cup are clear of restrictions.
Check the water inlets around
the upper edge of the chemical
dispenser for restrictions.
Problem
Not Listed
Call Goodway Customer Service: 1-800-370-2855

RAM PRO XL 0321
12
EXPLODED VIEW AND PARTS LIST
ITEM NO. PART NUMBER DESCRIPTION QTY.
1R7-01 BASE, R7 1
2R7-02 COVER, R7 1
3R7-03 SHELPF, ELECTRICAL, R7 1
4R7-04 CHEMICAL DIVIDER, R7 1
5R7-05 BRACE, MOTOR, R7 1
6R7-07 ROLL CAGE, R7 1
7R7-08 HANDLE, R7 1
8R7-09 SHELF, MOTOR, R7 1
9R7-10 HINGE, ROLL CAGE, R7 2
10 3101 MOTOR, 1/2 HP, 90 VDC 1
3101A 3101A MOTOR 1/2 HP, 180 VDC 1
11 979 SHAFT/DRIVER ASSEMBLY 1
12 SQC-01 RING, INNER, QC MANIFOLD 1
13 SQC-02 RING, OUTER, QC MANIFOLD 1

RAM PRO XL 0321 13
ITEM NO. PART NUMBER DESCRIPTION QTY.
14 SQC-03 MANIFOLD, SQC, 823 1
15 SQC-07 LATCH, QC MANIFOLD 2
16 SQC-06 SPACER, SS, QC MANIFOLD 3
17 HWS-1024-163-SC SCREW, 10-24, 1 5/8” L, SOCKET CAP 3
18 CD-CAP CHEMICAL DISPENCE CAP 1
19 CD-HOUSING CHEMICAL DISPENSING HOUSING 1
20 CD-CUP CHEMICAL DISPENSER CUP 1
21 TUBEGUALD-XL-2 TUBE CLEANING TABLETS 2
22 R7-12 DC MOTOR DRIVE 1
23 X2-05-02 HANDLE, ROLL CAGE, X2 1
24 R7-11 WHEEL, R7 2
25 1718 VENT ELBOW, 1/8 NPT X 1/4 BARB 3
26 9008 FOOT 10
27 HWS-1016H SCREW, #10-16 X 3/8” SLOTTED HEX HEAD 26
28 HWST-1037-P SCREW, #10 X 1/2", PANHEAD 6
29 X2-14 GROMMET, BLIND, 3/8” 6
30 HWS-25-1SH SCREW 1/4-20 X 1”, SOCKET HEAD 10
31 X2-05-03 STAR NUT, TUBE CONNECTOR 2
32 824 SEAL, WATER, 1” OD X 1/2" ID 1
33 825 BEARING, 1/2" X 1 1/8” 2
34 945 SPRING SPACER 1
35 826 SNAP RING 1
36 SQC-10 SPRING, TORSION, QC MANIFOLD 1
37 R7-13 MOTOR COUPLING, FLEXIBLE, 5/8 X 1/2 1
38 802 HOSE CONNECTOR 1
39 SBA-102 NOZZLE BUSHING 1
40 HWN50P ROMEX NUT 1/2 NPT 1
41 917 CLOSE NIPPLE, 1/4 NPT 2
42 933 BARBED FITTING, 1/4 BARB X 1/4 NPT 1
43 820X SOLENOID VALVE, 110V 50-60 Hz 1
44 823N NUT, MANIFOLD 1
45 HWOR-417 O-RING, VITON, 4” OD X 1/4” WIDTH 1
46 842 GFCI, 115V 1
842A GFCI 230V 1
47 834R-XL FOOT SWITCH, TWO DIRECTIONAL 1
48 834R-1 PRESSURE SWITCH 2
49 8947 CONTROL KNOB 1
50 9646 CIRCUIT BREAKER, 15A 1
51 X2-10 LIGHT, GREEN, 120V 1
X2-10A LIGHT, GREEN, 230 V 1
52 HWS-2520-125P SCREW, 1/4-20 X 1-1/4", PHILLIPS PHMS 6
53 HWW050 WASHER, 1/2 FLAT 2
54 HWS-3150H SCREW, 5/16-18 X 1/2", HEX HEAD 2
55 918 TEE, 1/4 FNPT 1
56 R7-15 ADAPTER, BRASS 1/2 FNPT X 1/4 MNPT 1
57 L210 LABEL, CONTROL PANEL 1

Provides innovative maintenance solutions for a wide variety
of industries including commercial HVAC, food and beverage
processing, power generation and manufacturing.
HVAC & FACILITY MAINTENANCE SOLUTIONS
For Sales Call: 1-800-333-7467
For Service Call: 1-800-370-2855
GOODWAY®TECHNOLOGIES CORPORATION
420 West Avenue, Stamford, CT 06902 USA
Tel: 203-359-4708 · Toll-Free Tel: 800-243-7932
Fax: 203-359-9601 · Toll-Free Fax: 800-359-9625
Email: goodway@goodway.com
Visit: www.goodway.com
P/N RAM-PRO-XL
©Copyright 2021 Goodway Technologies Corp., Stamford, CT USA
Effective date March 18, 2021
Goodway is a Trademark of Crossford International.
Goodway reserves the right to improve products; contact the factory for the latest conguration and uses.
This manual suits for next models
1
Table of contents
Other Good Way Cleaning Equipment manuals

Good Way
Good Way QUICK SHOT QS-300 Manual

Good Way
Good Way GDS-15-PH Manual

Good Way
Good Way BioSpray-10C Manual

Good Way
Good Way BioSpray-5 Manual

Good Way
Good Way SOOT-A-MATIC SAM-3 Installation and operation manual

Good Way
Good Way GVC-18000 Manual

Good Way
Good Way CoilVac CVC-100 Manual

Good Way
Good Way Hi-Flo CC-400HF Manual

Good Way
Good Way TFC-JR Operating instructions

Good Way
Good Way GDS-C40 Manual