Govee H610B User manual

English 01
Deutsch 10
Français 19
Español 28
Italiano 37

01
Read and follow all the safety instructions:
Safety Instructions
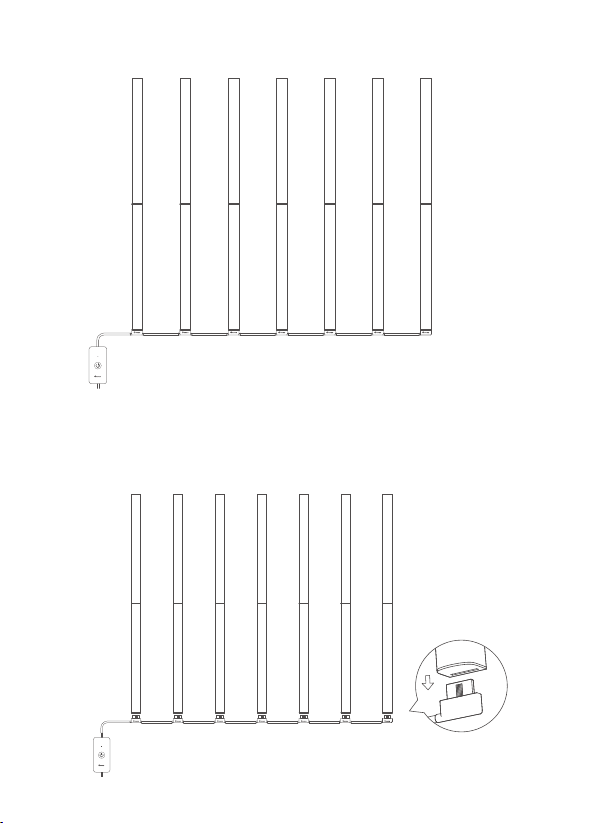
Do not assemble the light bars included in this product with other products.
Up to two light bars can be assembled together at once. Otherwise, the surplus one will
not light up.
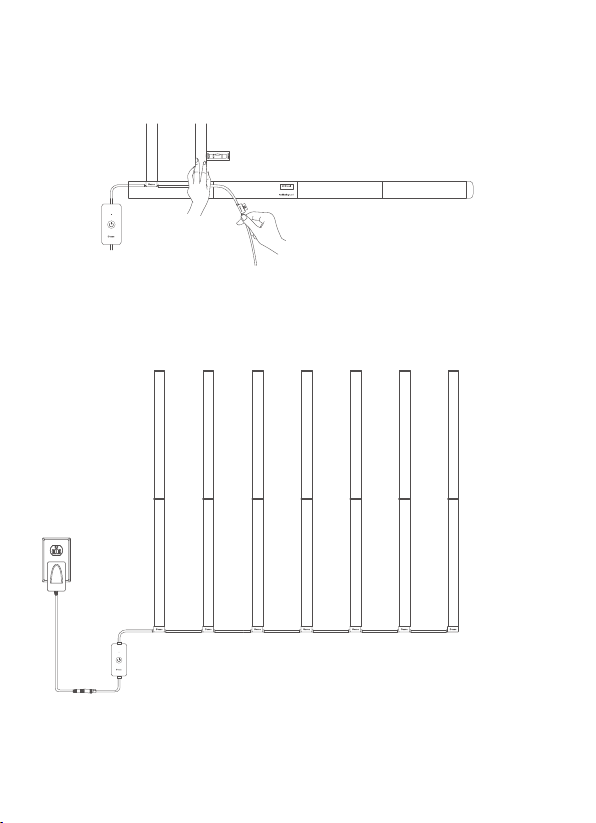
Use this product with the provided power adapter only.
This product is not waterproof. Avoid exposing it to splashes, water drops, or
high-humidity environments.
The internal light sources of this product cannot be replaced. If the light sources sustain
damage, this product must be replaced.
Do not allow children to assemble and install this product without adult supervision.
External dimmers cannot be used with this product.
Avoid installing this product near potentially dangerous or damaging sources (e.g.,
candles, liquid-filled objects).
Install this product on a clean, dry surface in order to maximize adhesion.
Avoid pulling this product’s power cord forcibly.
Thanks for choosing Govee Glide Music Wall Light. The light bars included in this product,
if assembled together, can create a colorful music wall with plentiful scene modes and
music modes for you to choose. You can also use the DIY function in Govee Home App to
create your own lighting effects as you wish, no matter if the light is installed in the
bedroom, gaming room, or living room.
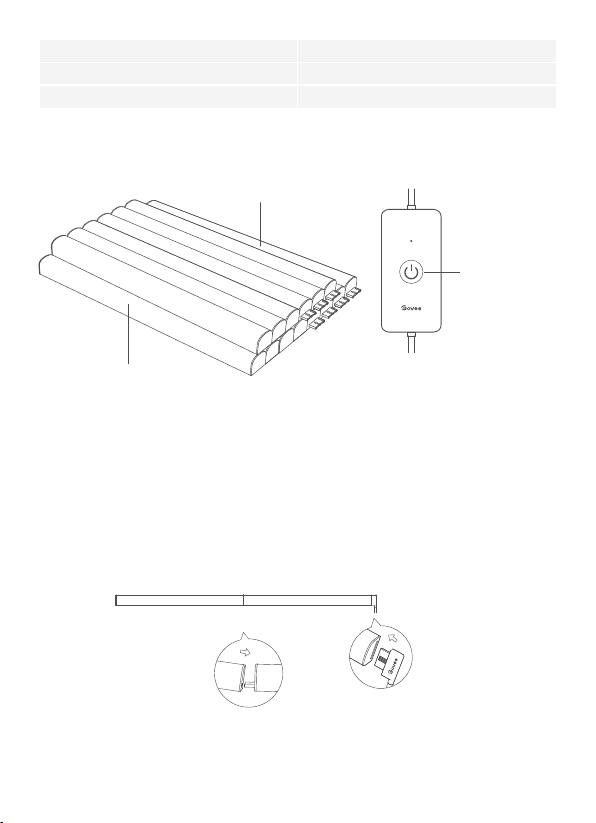
Introduction
Item
A Segments
B Segments
Control Box
Power Adapter
User Manual
Quantity
7
7
1
1
1
What You Get
English

Mini Level
Orientation Ruler
Positioning Card
1
1
1
At a Glance
Installing Your Wall Light
“B” Segments: end pieces that
only include an input port “A” Segments: includes both
input and output ports
Press to turn the
light on or off.
1. Check all the items listed to confirm if they are complete.
2. Assemble all the light bars together on the floor or the ground as shown in the image.
Plug into power to confirm if all bars can light up.
Before You Install
02

03
Note: To achieve the best RGBIC lighting effects, it is recommended to install the light bars
in a 7*2 configuration.
3. Unplug all the power clips from the end of the light bars. Use the included positioning card
to find a suitable surface for installing all the light bars and confirm if the distance between
the device and the power outlet is enough to plug in the power adapter.

04
Installation Steps
1. Make sure the installation surface is dry and clean. Stick the mini level onto the designated
position on the positioning card, and remove the adhesive films of the positioning card.
Make sure the bubble of the mini bar is centered between the lines of the tube for the best
orientation. Then, stick the positioning card onto the surface.
3. Take one "A" segment and position the mini level on its side. Then plug the power clip
near to the control box into the end of the "A" segment and plug a "B" segment to the
other end. Align the assembled bar with the edge of the positioning card and make sure
the bubble of the mini level centers between the lines of the tube. Then remove the
adhesive film of the assembled bar and long press it for 5s to stick it onto the installation
surface.
2. Stick the control box to a suitable location.

05
4. Take another “A” segment and position the mini level on its side. Insert this segment to a
“B” segment and plug the second power clip into the end of this “A” segment and
straighten the whole power cord. Then align this assembled bar with the edge of the
positioning card and press the bar for 5s to stick it onto the installation surface. Use the
same installation process with other “A” segments and “B” segments.
5. Plug the power adapter into power and enjoy the lighting effects.

06
In addition to the previous installation method, you can also try the following
shapes to install.
Note:
The distance between each assembled light bar can also be narrowed using the
following method.
05 6 7 8 9 10 11 14 15 CM
Position the mini level on the side of the bar and make sure the bubble in it
centers between the lines of the tube.
After assembling and sticking the first light bar, use the orientation ruler to
measure the right distance to stick the rest.
1.
2.

07
Pairing Your Device with Govee Home App
Controlling the Device with Your Voice
A Wi-Fi router that supports 2.4GHz and 802.11 b/g/n bands (5GHz is not
supported).
What You Need
Download Govee Home App from App Store (IOS) or Google Play (Android).
Open the app, tap the “+” icon in the top right corner and search for "H610B.”
Tap the device icon and follow the on-screen instructions to complete pairing.
1.
2.
3.
Open the app, then tap the device icon to enter its details page.
Tap the setting icon in the top right corner.
Select “User Guide” and follow on-screen instructions to set up controlling the
device using your voice.
1.
2.
3.
Pairing Instructions
A smartphone or tablet running iOS or Android.
Specifications
Model
Power Supply
Lighting Color
Control Method
H610B
Adapter 12V
RGBIC
Control Box, Govee Home App,
Voice Assistants

08
Troubleshooting
Cannot connect to Govee Home App.
Check if the wall light is powered on.
Check if your smartphone’s Bluetooth is enabled, or try connecting with another
smartphone.
When connecting for the first time, ensure the smartphone is near the wall light.
If the connection error still exists, please delete the connected wall light from "My Device"
on the app.
Reconnect to Govee Home App by following the instructions provided previously.
1.
Wi-Fi disconnected or failed to connect.
Check if the wall light is powered on.
Do not skip connecting to Wi-Fi during pairing process.
Ensure your Wi-Fi router is 2.4GHz capable (5GHz is not supported).
Ensure you entered the correct Wi-Fi password during the Wi-Fi connection process.
Try connecting the wall light with a smartphone hotspot to check if your home network is
working properly.
Shorten the distance between the wall light and the Wi-Fi router to less than 1m, then try
reconnecting.
2.
Cannot pair or connect with Alexa or Google Assistant.
Ensure the stability of the Wi-Fi connection.
Go to the app Settings page and follow the instructions under “User Guide” to pair the
device again.
3.
Only one user can control the device.
Each device can only be controlled by one account.
If multiple users wish to control the same device, ensure they are using the same
account.
4.
Some segments fail to light up.
Check if the segments have been assembled properly.
5.

09
Customer Service
Warranty: 12-Month Limited Warranty
Support: Lifetime Technical Support
Email: [email protected]
Official Website: www.govee.com
@Govee.smarthome
@Goveeofficial
@govee.official
@govee_official
@Govee

10
Lesen und folgen Sie den unten angegebenen Sicherheitsanweisungen
Sicherheitsanweisungen
Bauen Sie die in diesem Produkt enthaltenen Lichtstangen nicht mit anderen Produkten
zusammen.
Bis zu zwei Lichtstangen können gleichzeitig zusammengebaut werden. Andernfalls
leuchtet das überschüssige Licht nicht auf.
Verwenden Sie dieses Produkt nur mit dem mitgelieferten Netzteil.
Dieses Produkt ist nicht wasserdicht. Setzen Sie es keinen Wasserspritzern, Wassertrop-
fen oder Umgebungen mit hoher Luftfeuchtigkeit aus.
Die inneren Lichtquellen können nicht ersetzt werden. Wenn die Lichtquelle beschädigt
ist, sollte das Produkt ersetzt werden.
Erlauben Sie Kindern nicht, dieses Produkt ohne Aufsicht von Erwachsenen zu montieren
und zu installieren.
Externe Dimmer können mit diesem Produkt nicht verwendet werden.
Vermeiden Sie die Installation des Produkts in der Nähe potenziell gefährlicher
Gegenstände (z. B. Kerzen, mit Flüssigkeit gefüllte Gegenstände).
Installieren Sie dieses Produkt auf einer sauberen, trockenen Oberfläche um die
Klebfestigkeit zu maximieren.
Vermeiden Sie es das Netzkabel des Produkts mit Gewalt zu ziehen.
Vielen Dank, dass Sie sich für das Govee Glide Music Wall Light entschieden haben. Die in
diesem Produkt enthaltenen Lichtstangen können, wenn zusammengebaut, eine bunte
Musikwand mit zahlreichen auswählbaren Szenen- und Musikmodi schaffen. Mit der
DIY-Funktion in der Govee Home App können Sie auch Ihre eigenen Lichteffekte nach Ihren
Wünschen erstellen, egal ob das Licht im Schlafzimmer, Spielzimmer oder Wohnzimmer
installiert ist.
Einleitung
Bestandteil
“A” Segmente
“B” Segmente
Steuerungsbox
Netzteil
Bedienungsanleitung
Menge
7
7
1
1
1
Was Sie erhalten
Deutsch

11
Mini-Wasserwaage
Orientierungslineal
Positionierungskarte
1
1
1
At a Glance
Bringen Sie Ihr Wandlicht an
„B“-Segmente: das Endstück,
das nur einen Input-Port enthält
„A“-Segmente: umfasst sowohl
Input- als auch Output-Ports
Betätigen Sie, um
das Licht ein- oder
auszuschalten.
1. Überprüfen Sie ob alle aufgelisteten Elemente vollständig vorhanden sind.
2. Montieren Sie alle Lichtleisten zusammen auf dem Boden, wie in der Abbildung gezeigt.
Schließen Sie das Gerät an die Stromversorgung an, um sich zu vergewissern, dass alle
Stangen aufleuchten.
Vor der Installation

12
Hinweis: Um die besten RGBIC-Lichteffekte zu erzielen, wird empfohlen, die Lichtstangen in
einem 7*2 Setup zu installieren.
3. Trennen Sie alle Netzklemmen vom Ende der Lichtstangen. Verwenden Sie die mitgelieferte
Positionierungskarte, um eine geeignete Oberfläche für die Installation aller Lichtleisten zu
finden, und überprüfen Sie, ob der Abstand zwischen dem Gerät und der Steckdose
ausreicht, um das Netzteil anzuschließen.

13
Installationsschritte
1. Stellen Sie sicher, dass die Montagefläche trocken und sauber ist. Kleben Sie die
Mini-Wasserwaage auf die vorgesehene Stelle auf der Positionierungskarte und entfernen
Sie die Klebefolien der Positionierungskarte. Stellen Sie sicher, dass die Blase der
Wasserwaage für die beste Ausrichtung zwischen den Linien des Schlauchs zentriert ist.
Kleben Sie dann die Positionierungskarte auf die Oberfläche.
3. Nehmen Sie ein "A" Segment und positionieren sie die Miniwasserwaage an der Seite.
Stecken sie dann den Powerclip nahe der Steuerbox in das Ende von Segment "A" und
stecken Sie das Segment "B" in das andere Ende. Richten Sie die zusammengefügte
Stange anhand der Ecke der Positionierungskarte aus und stellen Sie sicher, dass die
Blase in der Miniwasserwaage sich zentral zwischen den Linien der Röhre befindet.
Entfernen Sie dann den Klebestreifen der angebrachten Stange und drücken Sie diese für
5 Sekunden an um sie auf der Oberfläche anzubringen.
2. Kleben Sie die Steuerbox an einen geeigneten Ort.

14
4. Nehmen Sie ein weiteres "A" Segment und positionieren Sie die Mini Wasserwaage an
der Seite. Stecken Sie dieses Segment in ein "B" Segment und stecken Sie den zweiten
Power Clip in das Ende dieses "A" Segments und ziehen Sie das gesamte Netzkabel
gerade. Richten Sie dann diese zusammengebaute Leiste an der Kante der Position
ierungskarte aus und drücken Sie die Leiste 5 Sekunden lang feste an, um sie auf die
Installationsfläche zu kleben. Verwenden Sie denselben Installationsprozess mit anderen
„A“-Segmenten und „B“-Segmenten.
5. Schließen Sie das Netzteil an die Stromversorgung an und genießen Sie die Lichteffekte.

15
Zusätzlich zur vorherigen Installationsmethode können Sie auch versuchen, in
den folgenden Formen zu anzubringen.
Hinweis:
Der Abstand zwischen den einzelnen montierten Lichtstangen kann mit der
folgenden Methode verringert werden.
05 6 7 8 9 10 11 14 15 CM
Positionieren Sie die Mini Wasserwaage an der Seite der Lichtstange und stellen
Sie sicher, dass die Blase sich zwischen den Linien der Röhre befindet.
Nach der Anbringung der Lichtstangen verwenden Sie das Orientierungslineal
um die richtige Entfernung zwischen diesen abzumessen.
1.
2.

16
Ihr Gerät mit der Govee Home App pairen
Steuern Sie das Gerät mit Ihrer Stimme
Ein Wi-Fi Router der 2,4GHz und 802.11 b/g/n Bänder unterstützt. 5GHz wird
nicht unterstützt.
Was Sie benötigen
Downloaden Sie die Govee Home App vom App Store (iOS) oder von Google Play (Android).
Öffnen Sie die Govee Home App, betätigen Sie das “+” Icon in der oberen rechten Ecke und
suchen Sie nach “H610B”.
Betätigen Sie das Geräte-Icon und folgen Sie den Anweisungen auf dem Bildschirm um das
Pairing abzuschließen.
1.
2.
3.
Öffnen Sie die App und tippen Sie auf das Gerätesymbol, um die Startseite aufzurufen.
Tippen Sie auf das Einstellungssymbol in der oberen rechten Ecke.
Wählen Sie „Benutzerhandbuch“ und befolgen Sie die Anweisungen auf dem Bildschirm,
um die Sprachsteuerung einzurichten..
1.
2.
3.
Pairing Anweisungen
Ein Smartphone oder Tablet welches iOS oder Android verwendet.
Spezifikationen
Model
Stromversorgung
Lichtfarbe
Steuerungsmethode
H610B
Adapter 12V
RGBIC
Steuerungsbox, Govee Home App,
Sprachassistenten

17
Troubleshooting
Kann keine Verbindung zur Govee Home App herstellen.
Überprüfen Sie, ob das Wandlicht eingeschaltet ist.
Überprüfen Sie, ob Bluetooth auf Ihrem Smartphone aktiviert ist, oder versuchen Sie eine
Verbindung mit einem anderen Smartphone herzustellen.
Stellen Sie beim erstmaligen Verbinden sicher, dass sich das Smartphone in der Nähe des
Wandlichts befindet.
Wenn der Verbindungsfehler weiterhin besteht, löschen Sie bitte das verbundene
Wandlicht aus „Mein Gerät“ in der App.
Verbinden Sie erneut mit der Govee Home App, indem Sie den zuvor genannten
Anweisungen folgen.
1.
Wi-Fi getrennt oder Verbindung fehlgeschlagen.
Überprüfen Sie ob das Wandlicht eingeschaltet ist.
Überspringen Sie nicht den Verbindungsaufbau zum Wi-Fi während Sie sich im Pairing
Prozess befinden.
Stellen Sie sicher, dass Sie einen Wi-Fi Router verwenden der 2,4Ghz unterstützt (5GHz
wird nicht unterstützt.
Stellen Sie sicher, dass das korrekte Wi-Fi Passwort während der Wi-Fi Verbindungsproz-
esses eingegeben haben.
Versuchen Sie das Wandlicht mit einem Smartphone Hotspot zu verbinden, wenn Ihre
Netzwerk Verbindung nicht ordentlich funktioniert.
Verkürzen Sie die Entfernung zwischen dem Gerät und dem Wi-Fi Router auf weniger als
15,24 Meter und verbinden Sie erneut.
2.
Kann nicht gepairt oder mit Alexa oder Google Assistant verbunden werden.
Stellen Sie die Stabilität der Wi-Fi Verbindung sicher.
Gehen Sie auf Einstellungen und folgen Sie den Anweisungen unter “Benutzer Guide” um
das Gerät erneut zu pairen.
3.
Nur ein User kann das Gerät steuern
Jedes Gerät kann nur von einem Account gesteuert werden.
Wenn mehrere User das Gerät steuern möchten, so stellen Sie sicher, dass alle denselben
Account verwenden.
4.
Einige Segmente leuchten nicht auf.
Überprüfen Sie ob die Segmente ordentlich angebracht wurden.
5.

18
Kundendienst
Warranty: 12-Month Limited Warranty
Support: Lifetime Technical Support
Email: [email protected]
Official Website: www.govee.com
@Govee.smarthome@Goveeofficial
@govee.official
@govee_official
@Govee
Other manuals for H610B
1
Table of contents
Languages:
Other Govee Lighting Equipment manuals

Govee
Govee Glide Hexagon Pro H6066 User manual

Govee
Govee H70B1 User manual

Govee
Govee DreamView G1 Pro User manual

Govee
Govee H619A User manual

Govee
Govee H6119 User manual

Govee
Govee H614E User manual

Govee
Govee H605C User manual

Govee
Govee H6126 User manual

Govee
Govee H61C3 User manual

Govee
Govee H61A2 User manual

Govee
Govee H617E User manual

Govee
Govee H618A User manual

Govee
Govee H7040 User manual

Govee
Govee Glide Hexagon Pro H6066 User manual

Govee
Govee H613D User manual

Govee
Govee Lynx Dream User manual

Govee
Govee H6179 User manual

Govee
Govee H6059 User manual

Govee
Govee H6008 User manual

Govee
Govee H6130 User manual