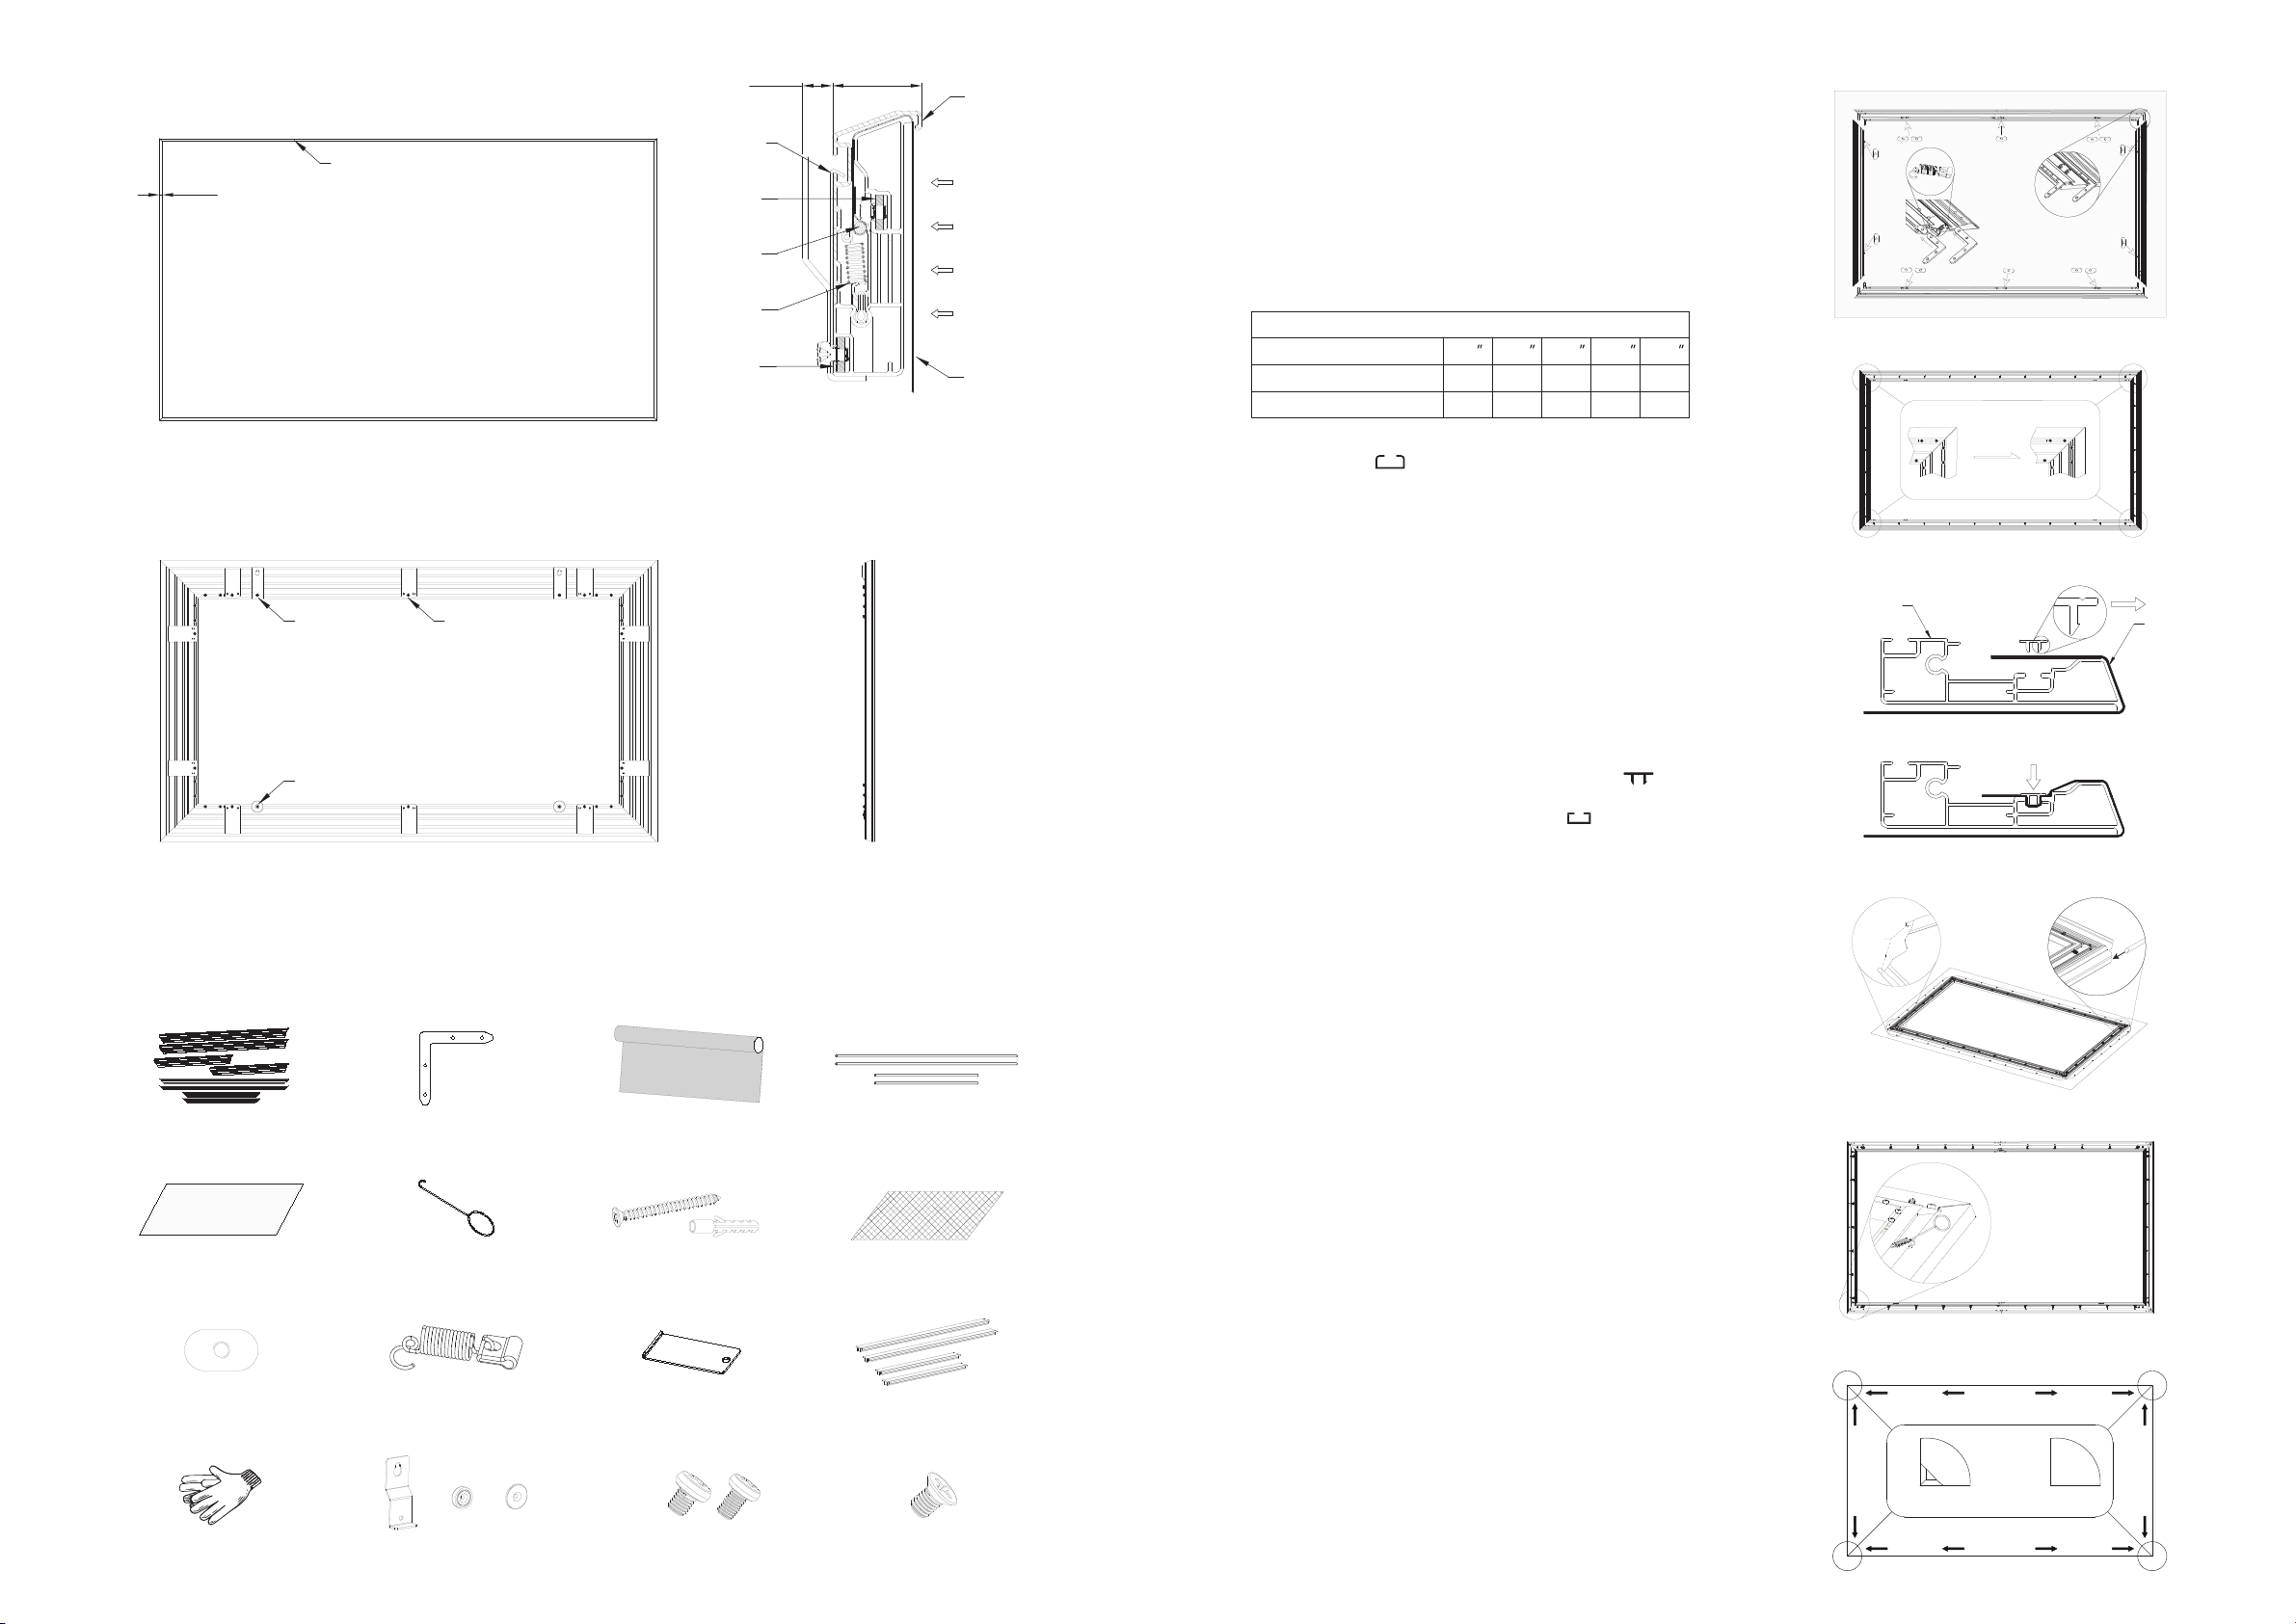
manuals.online logo
Brands
  1. Home
  2. •
  3. Brands
  4. •
  5. Grandview
  6. •
  7. Projection Screen
  8. •
  9. Grandview Liberty Flash Series User manual

Grandview Liberty Flash Series User manual

Instruction Manual for
Flash Series Fixed Thin Frame Screen
Model: PF-Lxxx(S1)
Thank you for purchasing a Grandview projection screen. Before use, please read instructions
carefully. After installation, store instructions for future reference.
III/a III/c
III/d
IV/a-bIV/c
A
B
5-7mm
A
B
Kind Reminder
Please proceed installation on flat and clean ground to provide protection for the screen fabric
and maintain the perfect frame assembling.
Please be careful about the sharp edges while installing to avoid cutting.
III.Bezel frame assembly
a. Lay the screen directly on the front side, take the bezel frame one by one into the corresponding inner frame; adjust the position of the
bezel frame, refer to the inner frame 45° trimming surface alignment.
b. Slide the pre-assembled sliding nut to the two ends, hook the hook end of the thin bezel frame brackets to the outermost slot of the
decorative frame, and align the long round hole at the other end with the sliding nut. Twist the M5X6mm corner screws gently.
c. Adjust the position of the four bezel frames to minimize the gap of the 45° cutting edge of the four corners, lock the screws, and
complete the screen assembly. It is recommended that the thin bezel frame brackets be installed in the first four corners and then the
middle.
d. Note: When gap of the 45° cutting edge of the four corners is too
large and the two bezel frames cannot be pressed together tightly,
a slender steel bar can be used to extend into the pry hole and
prize the thin bezel frame brackets for tightening.
IV. Screen fixing method
a. Slide the remaining sliding nut on the inner frame above the screen so that it is symmetrically distributed at the 2/3 position of the total
length of the screen. Use the M5*8mm screws to lock the hanging plate. At the bottom frame, at the vertically same position, use the M5*
8mm magnet mounting screw is to lock the attached disc.
b. Use a suitable tool to horizontally install the concrete anchors at a suitable upper position on the wall. The horizontal spacing A is equal
to the pitch of the hanging plate. Screw in a 5x50 Phillips head screw so that the screw head surface is about 5-7 mm away from the wall. In
the corresponding lower position, the magnetic is installed vertically, and the spacing B is equal to the total height of the screen minus 117mm.
c. Need two persons cooperated to lift the screen, and the top was slightly inclined. The mounting brackets holes were aligned with the raised
Phillips head screws. After hanging firmly, slightly place the screen, and the magnetic force of the magnetic sucked the attached discs to
complete fixed of the screen. (Be sure to check if the screen is secure. If necessary, adjust the position of the attached disc to make it aligned.)
Maintenance screen
Clean the screen
In order to ensure that you have a good screen quality for a long time,
please use a curtain to cover the screen when you are not using it for
a long time to prevent dust and dirt from contaminating the screen.
Clean the screen with warm water or a soft soapy water to clean it.
Remember that the cleaning method cannot tear the screen hard to
avoid permanent deformation. Do not use diluents, organic solvents,
or corrosive detergents.
Prize
Prize the hole
Embedding
Screen structure
Decorative frame
11mm
7mm
32.7mm I/a-c
I/d
III/a-b
III/c-d
III/e
Centered
1
2
3
4
5
67
8
9
1011
12
Front view
Back view
Side view
Partial section view
Mounting
Brackets
Attached disc
Thin Bezel Frame
Brackets
Thin Bezel
Frame
Brackets
Screw
nut
Tension
rod
Material
Springs
Inner
frame
Decorative
frame
Projection Light
Screen
Screen component
Please check whether the screen components are complete before assembly; some screws and accessories are
available in order to replace them after damage during installation.
Screen Frame & Frame Bezels
(2 short, 2 long each)
Corner Brackets (8) Screen Material (1) Tension Rods
(2 short, 2 long each)
Protective Sheet (1) Spring Tool (2)
Sliding Nuts [installed] (14) Material Springs [installed]
* Extra Springs included in
the hardware pack (4)
Thin Bezel Frame
Brackets (10)
Gloves (2 Pair) Mounting Brackets (2) Magnets
(2) Attached disc (2)
M5x8mm Magnet
Mounting Screws (4)
Screen assembly method
I. Inner frame connection method
a. Gloves should be worn before installation. After cleaning
the site, the pearl cotton film is distributed on the bottom pad.
Four long and short inner frames are placed into a rectangle.
b. Check that the number of tension spring assemblies and
sliding nuts pre-assembled in the inner frame is correct. The
number of sliding nuts is 5 for each long frame and 2 for each
short frame. The number of conventional size tension spring
assemblies is shown in the table below. If it is found to be
missing, please make up enough.
c. The Corner Brackets are respectively inserted into the
upper and lower shaped grooves of the four right-angled
inner frames, and fasten by the M5X6mm corner screw one
by one angle is 90°.
d. Adjust the border to full alignment and tighten the screws
to complete the inner frame connection. This step will affect
the appearance of the bezel frame, please be patient for
perfect matching.
II . Screen installationI
a. The tension rods side's up and tiled on the screen (note that
the site is cleaned, and there is no raised object on the bottom).
The front side of the frame is placed on the screen with the front
side facing down, and the long and short tension rods are
respectively inserted into the corresponding curling holes inside,
ensure that the exposed ends of the tension rods are all equal
in length.
b. Adjust the relative position of the frame and the screen to make it
centered symmetrically for easier installation. Note: The inner frame
edge is sharp, so be careful when moving to prevent cutting your hand
or cutting the screen.
c. Use the spring tool to hook the small round hole on the tension
spring, and drag all the tension spring assemblies to the corresponding
screen holes to prepare the installation screen.
d. Fold the screen edge, pull the tension spring with the spring tool, and
hang the tension rods in the hole of the screen; it is recommended to
hang the 2-3 tension springs in the middle of the four sides, adjust the
position of the screen to center, then hang the position of the four corners,
and finally hang up all the remaining springs .
e. If wrinkles, waves are present, the reason is that the screen is not
completely tight, you can gently adjust it from the middle to the outside until
the four corners of the screen completely cover the border.
Precautions:
1. When you purchase a PVC elastic soft screen, because the
material of the screen is shrinkable, the size of the screen will be
reduced after a long time, and it can be appropriately elongated
during installation.
2. If the force is too large when hanging the spring, it will cause
permanent deformation. If the tension spring fails, please replace
it in time.
Screen
Wrong
Screen
Right
equal
length
Qty. of Pre-assembly Springs
92
12
7
100
12
7
106
14
8
110
14
8
120
14
9
Screen size(16:9/16:10)
Each long sides
Each shot sides
adjust
M5x50mm Phillips Head Screws
& Concrete Anchors (6)
Black Covering Cloth
(only for AW6 acoustic
weaved fabric)
Transparent PVC pressing
strip long and short each 2pcs
for horizontal and vertical
frame (To fix the black cloth)
M5x8mm Bracket Mounting Screws (4)
M5x6mm Corner Screws (46)
Inner
frame
II/a-c
I . Black covering cloth installationI
If you are purchasing this product with AW6 acoustic weaved
fabric, before you install the projection fabric, please install the
black cloth first to block the reflection of the projection light onto
the frame metal surface. Detail as below:
a. Lay the fabric flat, then put the installed screen frame onto the
black cloth center.
b. Fold up the black cloth from four sides and use the shape
PVC pressing strip (the L shape locking leg outward as in II/a
-c) to press down the black cloth into the shape frame
notch for stabilization.
c. Adjust the black cloth until it fits.
Facing
outward
Black
covering
cloth
Press down

This manual suits for next models

2

Other Grandview Projection Screen manuals

Grandview SkyShow Series User manual

Grandview

Grandview SkyShow Series User manual

Grandview Portable X-Press Series User manual

Grandview

Grandview Portable X-Press Series User manual

Grandview Super Mobile LS-E Series User manual

Grandview

Grandview Super Mobile LS-E Series User manual

Grandview Elegant EL-M Series User manual

Grandview

Grandview Elegant EL-M Series User manual

Grandview HideAway HH3 User manual

Grandview

Grandview HideAway HH3 User manual

Grandview PE-Y (R7)15 Series User manual

Grandview

Grandview PE-Y (R7)15 Series User manual

Grandview FC-FHMF Series User manual

Grandview

Grandview FC-FHMF Series User manual

Grandview Dynamique R3 User manual

Grandview

Grandview Dynamique R3 User manual

Grandview Large Sky-Show User manual

Grandview

Grandview Large Sky-Show User manual

Grandview Dynamique R3 User manual

Grandview

Grandview Dynamique R3 User manual

Grandview DIAS DI-M Series User manual

Grandview

Grandview DIAS DI-M Series User manual

Grandview LF-PP series User manual

Grandview

Grandview LF-PP series User manual

Grandview GVFA100V User manual

Grandview

Grandview GVFA100V User manual

Grandview Sky-Show User manual

Grandview

Grandview Sky-Show User manual

Grandview CB-UY92 User manual

Grandview

Grandview CB-UY92 User manual

Grandview CB-Mxx User manual

Grandview

Grandview CB-Mxx User manual

Grandview CN Series User manual

Grandview

Grandview CN Series User manual

Grandview Cyber Series CB-MIxx User manual

Grandview

Grandview Cyber Series CB-MIxx User manual

Grandview Large Stage MAIII User manual

Grandview

Grandview Large Stage MAIII User manual

Grandview FC-FHP-MF Series User manual

Grandview

Grandview FC-FHP-MF Series User manual

Grandview SkyShow Series User manual

Grandview

Grandview SkyShow Series User manual

Grandview EL-Pxx User manual

Grandview

Grandview EL-Pxx User manual

Grandview FC-FH-MI II Series User manual

Grandview

Grandview FC-FH-MI II Series User manual

Grandview Fantasy Series FA-Mxx User manual

Grandview

Grandview Fantasy Series FA-Mxx User manual

Popular Projection Screen manuals by other brands

Vital Systems ArcPro Mach4 user guide

Vital Systems

Vital Systems ArcPro Mach4 user guide

LUMENE Movie Palace 200C user manual

LUMENE

LUMENE Movie Palace 200C user manual

SCREENLINE Lodo Evolution Inceiling manual

SCREENLINE

SCREENLINE Lodo Evolution Inceiling manual

Rostra 250-8274 Installation  & owners guide

Rostra

Rostra 250-8274 Installation & owners guide

Barco R9840400 installation manual

Barco

Barco R9840400 installation manual

SCREENLINE Maximilian 2.0 Pro manual

SCREENLINE

SCREENLINE Maximilian 2.0 Pro manual

Celexon Professional Plus installation guide

Celexon

Celexon Professional Plus installation guide

V-TAC 11077 instruction manual

V-TAC

V-TAC 11077 instruction manual

Mustang SC-E120D169 Specifications

Mustang

Mustang SC-E120D169 Specifications

Elite Screens Starling Tab-Tension 2 Series Replacement instructions

Elite Screens

Elite Screens Starling Tab-Tension 2 Series Replacement instructions

Andersen LuminAire installation guide

Andersen

Andersen LuminAire installation guide

iGGUAL PSIMS200 user guide

iGGUAL

iGGUAL PSIMS200 user guide

Remaco PRO Series Installation guide & manual

Remaco

Remaco PRO Series Installation guide & manual

R. Lang Company Roll Away R6500 Series installation instructions

R. Lang Company

R. Lang Company Roll Away R6500 Series installation instructions

Enwork Skyline Compression Topper Screen installation guide

Enwork

Enwork Skyline Compression Topper Screen installation guide

Elite Screens Kestrel FE100H brochure

Elite Screens

Elite Screens Kestrel FE100H brochure

Projecta Dry Erase Instruction book

Projecta

Projecta Dry Erase Instruction book

Elite Screens Home100IWH2-A Comparison chart

Elite Screens

Elite Screens Home100IWH2-A Comparison chart

manuals.online logo
manuals.online logoBrands
  • About & Mission
  • Contact us
  • Privacy Policy
  • Terms and Conditions

Copyright 2025 Manuals.Online. All Rights Reserved.