manuals.online logo
Brands
  1. Home
  2. •
  3. Brands
  4. •
  5. Grandview
  6. •
  7. Projection Screen
  8. •
  9. Grandview FC-FHP-MI Series User manual

Grandview FC-FHP-MI Series User manual

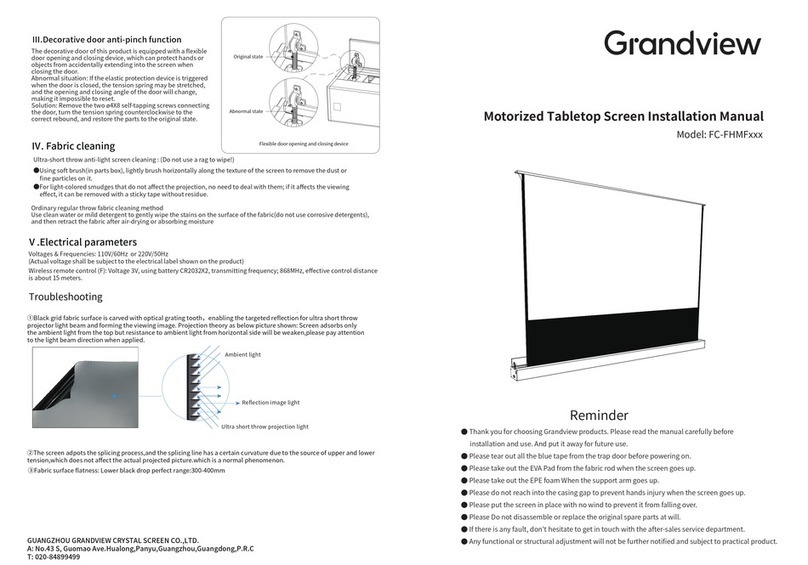
Ⅲ.Decorative door anti-pinch function
Ⅴ.Electrical parameters
Model: FC-FHP-MIxxx
Voltages & Frequencies: 110V/60Hz or 220V/50Hz
(Actual voltage shall be subject to the electrical label shown on the product)
GUANGZHOU GRANDVIEW CRYSTAL SCREEN CO.,LTD.
A: No.43 S, Guomao Ave.Hualong,Panyu,Guangzhou,Guangdong,P.R.C
T: 020-84899499
Troubleshooting
①Black grid fabric surface is carved with optical grating tooth,enabling the targeted reflection for ultra short throw
projector light beam and forming the viewing image. Projection theory as below picture shown: Screen adsorbs only
the ambient light from the top but resistance to ambient light from horizontal side will be weaken,please pay attention
to the light beam direction when applied.
Ambient light
Reflection image light
Ultra short throw projection light
②The screen adpots the splicing process,and the splicing line has a certain curvature due to the source of upper and
lower tension,which does not affect the actual projected picture.which is a normal phenomenon.
Motorized Tabletop Screen Installation Manual
③Fabric surface flatness: Lower black drop perfect range:250-350mm
c. Infrared remote control
● Press the up button, the decorative door opens first, and the fabric rises;
● Press the stop button, the decorative door or fabric will pause;
● Press the down button, the fabric rolls back, and the decorative door is closed.
● Jog the up key and down key, the fabric moves up or down;Usually used in
electronic stroke positioning settings.
Electronic Positioning:
Press and hold the button for 3 seconds, the motor will rotate forward and
backward once, use the Up and Down button to position the projection screen
to a desire position, press and hold the button for 3 seconds, the motor will
rotate forward and backward once signaling the position have been memorized.
*If projection screen does not extend to proper position, retract the projection
screen fully, wait 5 seconds and try again.
Iindicator light
UP
Stop
Down
Jog Up
Jog Down
Model:AC-127
Ⅱ
/c
Caution
Thank you for choosing Grandview products. Please read the manual carefully before installation and use.
●Please tear out all the blue tape from the trap door before powering on.
●Please do not reach into the casing gap to prevent hands injury when the screen goes up.
●Please put the screen in place with no wind to prevent it from falling over.
●Please Do not disassemble or replace the original spare parts at will.
The decorative door of this product is equipped with a flexible door opening and
closing device, which can protect hands or objects from accidentally extending
into the screen when closing the door.
Ⅳ. Maintenance
Non ambient light rejection regular throw fabric:
Use clean water with mild detergent to gently wipe the stains on the surface of the fabric (do not use corrosive detergents).
Only retract the projection screen when the fabric is completely dry.
Ultra-short throw ambient light rejection fabric:
DO NOT USE RAG OR PAPER TOWEL TO WIPE
Use brush provided to brush lightly horizontally along the texture of the screen to remove dust or other fine particles.
For light-colored smudges that affects viewing, try removing with residue-free tape.
●
●
Screen structure diagram
Accessories
Ⅱ.Functions and Instructions
This product has three control methods
a.Manual Control Button
b.12V Tigger Control
c.RF Remote Control
.
b.
a.Manual Control
The Manual Control Button is located on the power
port side of the casing. Pressing the button will
command the screen to extend, pressing the button
will command the screen to stop, then again to
retract, then stop in sequence.
b.12V Tigger Control
Connect the 12V Tigger Port and the 12V port with a 12V
trigger cable; the projection screen is then synchronized
with the projector (when the projector is powered on,
the screen will automatically extend to set position; when
the projector is powered off, the screen will retract).
Stop
Stop
Up Down
Manual Cycle
Connecting Parts
Tab Tension
Fabric
End Cap
Fabric Support Bar
Upper Support Arm
Joint
Lower Support Arm
Side View
Manual Control Button
Infrared Receiver
12V Trigger
Projector
■Power Cable 1pcs ■ IR Remote Control 1pcs ■
12V Trigger Cable 1pcs
■ Limit Adjustment Tool 1pcs
■ Brush 1pcs
■IR Receiver 1pcs ■Adjustable Mounting Bracket 2pcs
(Optional)
■ User Manual 1pcs
Casing
Power Port
Side Handle
Flexible Door Opening And
Closing Device
■ Allen Key 1pcs ■M5X10mm Combination Screw 6pcs
■ ø5X40mmRound Head Self-Tapping Screw 10pcs
Plastic Expansion Tube 10pcs
Ⅰ.Screen Installation Guidelines
① Scenario 1
Lay the projection screen flat on the cabinet: leave at least 4mm of room from
the wall for the decorative door’s operation. Fully extend the projection
screen using the remote, adjust the tilt of the projection screen using the Level
Adjustment Nobs under the casing.
Caution: Projection screen might tip over if there is too much tilt.
Ⅱ
/a-b
Top
center line
Marking line at the bottom of the casing
Wall or Cabinet
Distance A
b.Drill the 4 holes for each bracket on the wall, install an Expansion Fixture in each hole. Place the Adjustable Brackets
against the wall lining up with the Expansion Fixtures and tighten usingφ5*40 Tapping Screws.
c.Adjust the T-Nuts on the Adjustable Bracket so that they are parallel with the wall (see diagram), place the projection
screen on the Adjustable Brackets, adjust the projection screen horizontally to the desire position, tighten the T-Nuts
from under the Adjustable Brackets to lock in place. (T-Nuts are installed for front installation in default, user can install
the T-Nuts to the Reverse Mounting Holes when needed for reversed installation)
d.Connect to power, fully extend projection screen; observe for tilt, adjust tilt using the Allen Key to desire position to
finish installation.
size (diagonal)
Distance A (mm)
92”(16:9)
1630
100”(16:9)
1810
110”(16:9)
1910
120”(16:9)
2130
Level
T-Nut
T-Nut
Insert to
notch
T-Nut
Spin to
Tighten
±1.5° Adjustable
Ⅰ/② c-d
Reverse
Mounting Holes
Front Installation Reversed Installation
Ⅰ/① a-b
Level Adjustment Nob
Turn the Level Adjustment
Nobs under the casing
Adjusting the tilt of the
projection screen
distance to wall≥4mm
Cabinet
Ⅰ/①
70109
152
Decorative Door
Manual Control Button
IR Port(φ3.5)
12V Tigger Port(φ2.5)
② Scenario 2
a.Measure the total length of the casing, measure the height where the bottom
of the projection screen will be placed, and mark it on the wall. See value “A”
on the table for the recommended distance between the two Adjustable
Brackets. Line up the top of the Adjustable Bracket with the bottom of the
projection screen (mark that was made on the wall).

Other Grandview Projection Screen manuals

Grandview GRUC070V User manual

Grandview

Grandview GRUC070V User manual

Grandview FC-FH-MF II Series User manual

Grandview

Grandview FC-FH-MF II Series User manual

Grandview Legacy Series User manual

Grandview

Grandview Legacy Series User manual

Grandview EDGE R3 PE-L Series Instruction Manual

Grandview

Grandview EDGE R3 PE-L Series Instruction Manual

Grandview SkyShow Series User manual

Grandview

Grandview SkyShow Series User manual

Grandview CB-UY92 User manual

Grandview

Grandview CB-UY92 User manual

Grandview GVFA100V User manual

Grandview

Grandview GVFA100V User manual

Grandview LF-HMF-xxx User manual

Grandview

Grandview LF-HMF-xxx User manual

Grandview Cyber Series CB-MIxx User manual

Grandview

Grandview Cyber Series CB-MIxx User manual

Grandview CB-Pxx User manual

Grandview

Grandview CB-Pxx User manual

Grandview LF-PP series User manual

Grandview

Grandview LF-PP series User manual

Grandview Sky-Show User manual

Grandview

Grandview Sky-Show User manual

Grandview Large Stage MBII User manual

Grandview

Grandview Large Stage MBII User manual

Grandview LF-Mxx User manual

Grandview

Grandview LF-Mxx User manual

Grandview CB-Mxx User manual

Grandview

Grandview CB-Mxx User manual

Grandview CR-Pxx User manual

Grandview

Grandview CR-Pxx User manual

Grandview LF-PHxx(DY) User manual

Grandview

Grandview LF-PHxx(DY) User manual

Grandview PE-Y (R7)15 Series User manual

Grandview

Grandview PE-Y (R7)15 Series User manual

Grandview CB-UMxx Series User manual

Grandview

Grandview CB-UMxx Series User manual

Grandview FC-FHP-MF Series User manual

Grandview

Grandview FC-FHP-MF Series User manual

Grandview CB-Sxx User manual

Grandview

Grandview CB-Sxx User manual

Grandview Tripod User manual

Grandview

Grandview Tripod User manual

Grandview Edge R2 Series User manual

Grandview

Grandview Edge R2 Series User manual

Grandview GRIP084V User manual

Grandview

Grandview GRIP084V User manual

Popular Projection Screen manuals by other brands

SCREENLINE Maximilian manual

SCREENLINE

SCREENLINE Maximilian manual

OneScreen HL7 user manual

OneScreen

OneScreen HL7 user manual

Draper Odin manual

Draper

Draper Odin manual

Draper Paragon V Series Installation & operating instructions

Draper

Draper Paragon V Series Installation & operating instructions

HKS Euroscreen Diplomat Tab Tension manual

HKS

HKS Euroscreen Diplomat Tab Tension manual

Da-Lite Designer Da-Tab Electrol Instruction book

Da-Lite

Da-Lite Designer Da-Tab Electrol Instruction book

Screen Excellence True Aspect Masking TAM 2 L Assembly instructions

Screen Excellence

Screen Excellence True Aspect Masking TAM 2 L Assembly instructions

Vizio E50X-E1 installation guide

Vizio

Vizio E50X-E1 installation guide

Da-Lite Fast-Fold NXT Instruction book

Da-Lite

Da-Lite Fast-Fold NXT Instruction book

Akuart SS50 instruction manual

Akuart

Akuart SS50 instruction manual

Elite Screens VMAX113XWS brochure

Elite Screens

Elite Screens VMAX113XWS brochure

Ofs Heya Assembly instructions

Ofs

Ofs Heya Assembly instructions

Sony HT-M2 Service manual

Sony

Sony HT-M2 Service manual

Screen Technics ELECTRICINEMA 235 instructions

Screen Technics

Screen Technics ELECTRICINEMA 235 instructions

Steren LCD-500 instruction manual

Steren

Steren LCD-500 instruction manual

LUMENE Movie Palace Premium 3D Assembly instructions and user's manual

LUMENE

LUMENE Movie Palace Premium 3D Assembly instructions and user's manual

LP Morgan Rondo Opus user manual

LP Morgan

LP Morgan Rondo Opus user manual

ES HT Series user guide

ES

ES HT Series user guide

manuals.online logo
manuals.online logoBrands
  • About & Mission
  • Contact us
  • Privacy Policy
  • Terms and Conditions

Copyright 2025 Manuals.Online. All Rights Reserved.