manuals.online logo
Brands
  1. Home
  2. •
  3. Brands
  4. •
  5. Grandview
  6. •
  7. Projection Screen
  8. •
  9. Grandview FC-FHMF Series User manual

Grandview FC-FHMF Series User manual

Reminder
Ⅲ.Decorative door anti-pinch function
Ⅳ. Fabric cleaning
GUANGZHOU GRANDVIEW CRYSTAL SCREEN CO.,LTD.
A: No.43 S, Guomao Ave.Hualong,Panyu,Guangzhou,Guangdong,P.R.C
T: 020-84899499
Motorized Tabletop Screen Installation Manual
Model: FC-FHMFxxx
The decorative door of this product is equipped with a flexible
door opening and closing device, which can protect hands or
objects from accidentally extending into the screen when
closing the door.
Abnormal situation: If the elastic protection device is triggered
when the door is closed, the tension spring may be stretched,
and the opening and closing angle of the door will change,
making it impossible to reset.
Solution: Remove the two ø4X8 self-tapping screws connecting
the door, turn the tension spring counterclockwise to the
correct rebound, and restore the parts to the original state.
Ordinary regular throw fabric cleaning method
Use clean water or mild detergent to gently wipe the stains on the surface of the fabric(do not use corrosive detergents),
and then retract the fabric after air-drying or absorbing moisture
Voltages & Frequencies: 110V/60Hz or 220V/50Hz
(Actual voltage shall be subject to the electrical label shown on the product)
Troubleshooting
①Black grid fabric surface is carved with optical grating tooth,enabling the targeted reflection for ultra short throw
projector light beam and forming the viewing image. Projection theory as below picture shown: Screen adsorbs only
the ambient light from the top but resistance to ambient light from horizontal side will be weaken,please pay attention
to the light beam direction when applied.
Wireless remote control (F): Voltage 3V, using battery CR2032X2, transmitting frequency; 868MHz, effective control distance
is about 15 meters.
Original state
Abnormal state
Flexible door opening and closing device
Ⅴ.Electrical parameters
●Thank you for choosing Grandview products. Please read the manual carefully before
installation and use. And put it away for future use.
●Please tear out all the blue tape from the trap door before powering on.
●Please take out the EVA Pad from the fabric rod when the screen goes up.
●Please take out the EPE foam When the support arm goes up.
●Please do not reach into the casing gap to prevent hands injury when the screen goes up.
●Please put the screen in place with no wind to prevent it from falling over.
●Please Do not disassemble or replace the original spare parts at will.
●If there is any fault, don't hesitate to get in touch with the after-sales service department.
●Any functional or structural adjustment will not be further notified and subject to practical product.
Ambient light
Reflection image light
Ultra short throw projection light
②The screen adpots the splicing process,and the splicing line has a certain curvature due to the source of upper and lower
tension,which does not affect the actual projected picture.which is a normal phenomenon.
③Fabric surface flatness: Lower black drop perfect range:300-400mm
Ultra-short throw anti-light screen cleaning : (Do not use a rag to wipe!)
●Using soft brush(in parts box), lightly brush horizontally along the texture of the screen to remove the dust or
●For light-colored smudges that do not affect the projection, no need to deal with them; if it affects the viewing
fine particles on it.
effect, it can be removed with a sticky tape without residue.
Screen structure diagram
Ⅱ.Functions and Instructions
This product has three control methods
a. Manual cycle button
b. 12V trigger control
c.RF remote control
a.Manual cycle button
The manual cycle button is set on the end cover of
the power supply side of the shell. Pressing the
button will control the screen to rise, stop, fall,
stop, and rise repeatedly. Continuously loop.
b.12V trigger control
Connect the screen trigger hole and projector trigger hole
with a 12V trigger cable; the screen synchronizes the opening
and closing of the projector (that is, when the projector is
turned on, the screen is automatically turned on; when the
projector is turned off, the screen is automatically turned off)
Connecting parts
Tab tension
Fabric
Door
End Cap
Casing
Fabric support bar
Upper support arm
Joint
Lower support arm Side View
c. RF remote control
●Press the up button, the decorative door opens first, and the fabric rises;
●Press the stop button, the decorative door or fabric will paus
●Press the down button, the fabric rolls back, and the decorative door is closed.
●Jog the up key and down key, the fabric moves up or down;
Usually used in electronic stroke positioning settings.
■ wireless remote 1pcs
Disconnect the screen power supply for 10 seconds and then reconnect
it to the power supply. Press the remote control up and stop buttons
simultaneously within 10 seconds, and the motor will rotate forward and
backward once, and the code matching is completed. The code deletion is
the same as the code pairing operation, the odd time is the code pairing, and the even time is the code deletion.
Code pairing/deleting code
(code pairing has been successful at the factory):
Intelligent electronic itinerary positioning (this product can realize the screen unfolding itinerary setting through the remote
control)
Operation method (stretch a paperclip into the hole, press the positioning setting button on the back of the remote control):
Screen unfolding stroke setting: positioning setting key (lighted) → remote control up and down to the desired position → stop
→ positioning setting key (light off) → location record successful
UP
STOP
DOWN
JOG UP
JOG DOWN
Positioning setting key
AC123Wireless remote control
Paper clip
71
98
145
Power jack
side handle
Manual cycle button
IR jack(φ3.5)
12V trigger jack(φ2.5)
Stop
Stop
Up Down
Manual cycle
Manual cycle button
12V trigger jack
Projector
IR JACK(φ3.5)
Flexible door opening and
closing device
Accessories
■Power cable 1pcs ■ 12V trigger cable 1pcs
■ Adjustment key(4mm) 1pcs
■ Brush 1pcs
■Adjustable Mounting Bracket 2pcs
■ User manual 1pcs
■ Hexagonal wrench 1pcs ■ M5X14mmCombination
screw 6pcs
■ M5X10mm screw 10pcs
■ ø5X40mmRound head self-tapping screw 10pcs
Plastic expansion tube 10pcs
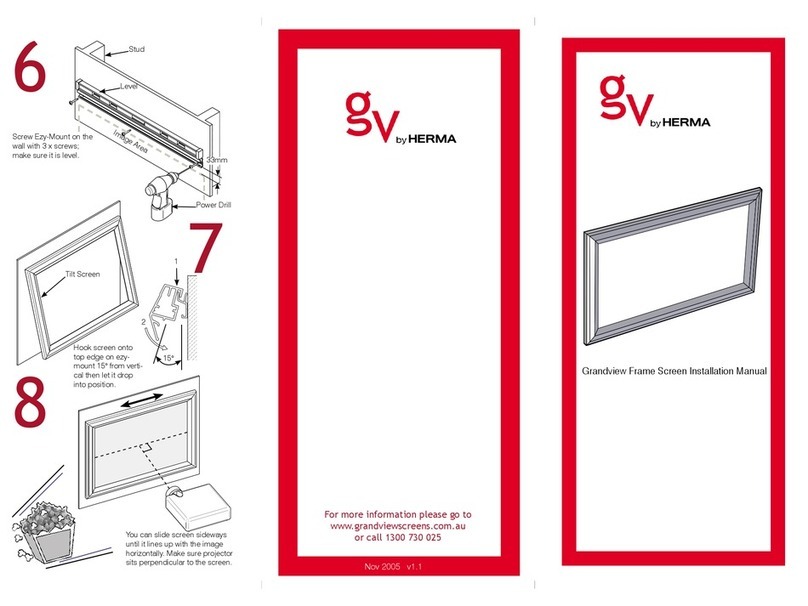
Ⅰ.Screen Installation Guidelines
a.
1.Measure the size of the screen, calculate the installation
position of the screen;
2.Mark the installation line at the bottom of the casing. Take
the adjustable mounting brackets, with a symmetrical spacing
of 1600 mm of the center line
3.Stick a flat marking line on the top to mark the positions of
the four screw holes
b.
1.Drill the holes and drive the expansion tube.
2. Place the adjustable mounting brackets vertically, align the
screw holes, and tighten the ø5*40 self-tapping screws.
Ⅰ/a-b
Top
center line
Marking line at the bottom of the casing
Ⅱ
/a-b
Ⅱ
/c
Wall or Cabinet
a
b
Ⅰ/c-d
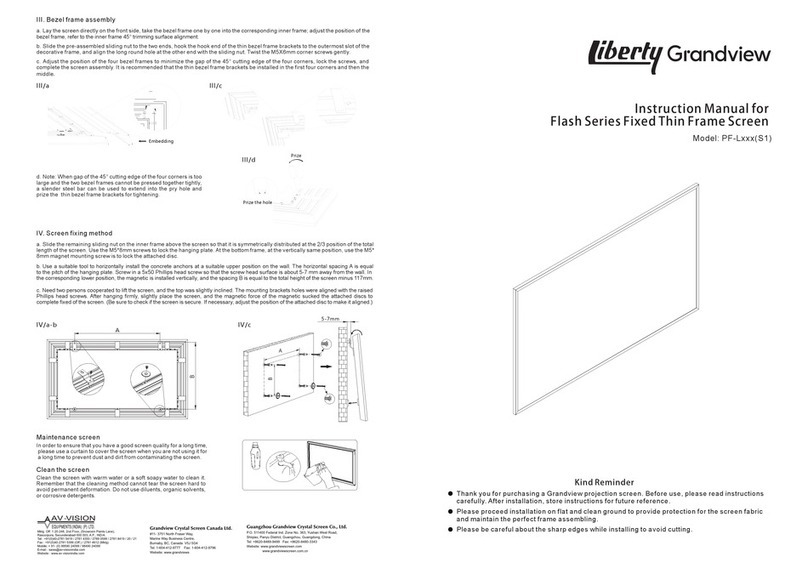
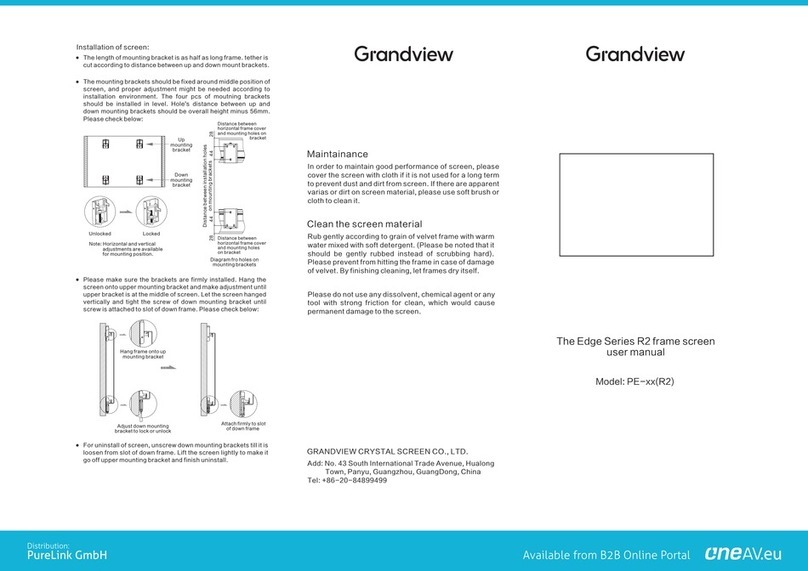
c. Keep the power supply side to the left, gently place the screen on the bracket, align the bottom rivet nut with the hole on the
bracket, and screw on the M5X14 combination screw, adjust and fix the screen left and right to a suitable position, and tighten
the screws to fix the screen.
d. Connect the power supply and fully unfold the fabric; observe the angle between the fabric surface and the wall, and use the
hexagonal wrench to rotate the hexagonal adjustment screws on the two mounting brackets; after fine-tuning the inclination of
of the screen.
the fabric surface to the best, tighten the machine screw on the screw sleeve to fix it Angle, complete the installation and adjustment
Note: Installation methods ①②, b mounting plate is not used and can be removed. Installation method ③④ First, fix the b
mounting plate on the screen shell with M5x14 combination screws, and then put the fabric lightly on the a mounting plate
and then lock the connecting screws between the a and b plates.
Remove the 4 screws to remove the b
mounting plate (This mounting plate
can be selected according to the specific
installation method)
Installation ① Installation ② Installation ③ Installation ④
Adjustable±1.5°
Adjustable±1.5°
Adjustable±1.5°
Adjustable±1.5°
Fixed Angle
cabinetcabinet
M5X14mm
Combination screw
■
USB to
ø
3.5 mono cable 1pcs
Other Grandview Projection Screen manuals

Grandview Edge R7 User manual

Grandview

Grandview Edge R7 User manual

Grandview Edge R2 Series User manual

Grandview

Grandview Edge R2 Series User manual

Grandview SkyShow Series User manual

Grandview

Grandview SkyShow Series User manual

Grandview Large Stage MAIII User manual

Grandview

Grandview Large Stage MAIII User manual

Grandview GRUC070V User manual

Grandview

Grandview GRUC070V User manual

Grandview CB-UY92 User manual

Grandview

Grandview CB-UY92 User manual

Grandview Cyber Series CB-MIxx User manual

Grandview

Grandview Cyber Series CB-MIxx User manual

Grandview LF-PU Series User manual

Grandview

Grandview LF-PU Series User manual

Grandview GRIP084V User manual

Grandview

Grandview GRIP084V User manual

Grandview FC-FH-MI II Series User manual

Grandview

Grandview FC-FH-MI II Series User manual

Grandview Deluxe Pull Down User manual

Grandview

Grandview Deluxe Pull Down User manual

Grandview Sky-Show User manual

Grandview

Grandview Sky-Show User manual

Grandview PT-L Series User manual

Grandview

Grandview PT-L Series User manual

Grandview EL-Pxx User manual

Grandview

Grandview EL-Pxx User manual

Grandview Dynamique R3 User manual

Grandview

Grandview Dynamique R3 User manual

Grandview FC-FHP-MF Series User manual

Grandview

Grandview FC-FHP-MF Series User manual

Grandview Elegant EL-M Series User manual

Grandview

Grandview Elegant EL-M Series User manual

Grandview Pull Up Portable Screen User manual

Grandview

Grandview Pull Up Portable Screen User manual

Grandview FC-M User manual

Grandview

Grandview FC-M User manual

Grandview Edge R1 Series User manual

Grandview

Grandview Edge R1 Series User manual

Grandview Fast Fold User manual

Grandview

Grandview Fast Fold User manual

Grandview Large Sky-Show User manual

Grandview

Grandview Large Sky-Show User manual

Grandview CB-Mxx User manual

Grandview

Grandview CB-Mxx User manual

Grandview CR-Pxx User manual

Grandview

Grandview CR-Pxx User manual

Popular Projection Screen manuals by other brands

DNP Supernova STS installation guide

DNP

DNP Supernova STS installation guide

Simply Elegant 220-111 Assembly and installation instructions

Simply Elegant

Simply Elegant 220-111 Assembly and installation instructions

Elite Screens Kestrel Tab-Tension 2 CLR manual

Elite Screens

Elite Screens Kestrel Tab-Tension 2 CLR manual

LG LAEC015-GN owner's manual

LG

LG LAEC015-GN owner's manual

Elite Screens Kestrel Stage Series user guide

Elite Screens

Elite Screens Kestrel Stage Series user guide

Elite Screens YARD MASTER MANUAL SERIES Product White Paper

Elite Screens

Elite Screens YARD MASTER MANUAL SERIES Product White Paper

FP PostBase Vision Quick reference guide

FP

FP PostBase Vision Quick reference guide

Dragonfly DFRM-TAB-100-MW installation manual

Dragonfly

Dragonfly DFRM-TAB-100-MW installation manual

Kauber BLUE LABEL installation guide

Kauber

Kauber BLUE LABEL installation guide

VITRA Tyde 2 Instructions for use

VITRA

VITRA Tyde 2 Instructions for use

Elite Screens AEON series user guide

Elite Screens

Elite Screens AEON series user guide

Rehau RELAZZO Assembly instructions

Rehau

Rehau RELAZZO Assembly instructions

NoFlyStore Platinum.04/3 installation instructions

NoFlyStore

NoFlyStore Platinum.04/3 installation instructions

Projecta Dry Erase Instruction book

Projecta

Projecta Dry Erase Instruction book

Celexon Motor Green Screen manual

Celexon

Celexon Motor Green Screen manual

MEDIUM Maxxscreen 15 Mounting instruction

MEDIUM

MEDIUM Maxxscreen 15 Mounting instruction

EGAN Fabric TableScreen Assembly & installation

EGAN

EGAN Fabric TableScreen Assembly & installation

Synergy Global Technology ID-17A user manual

Synergy Global Technology

Synergy Global Technology ID-17A user manual

manuals.online logo
manuals.online logoBrands
  • About & Mission
  • Contact us
  • Privacy Policy
  • Terms and Conditions

Copyright 2025 Manuals.Online. All Rights Reserved.