Es muy importante seguir las siguientes instrucciones para conservar los
acabados de los productos HELVEX, con brillo y en perfecto estado:
1. Utilice únicamente agua y un paño limpio.
2. No utilice fibras, polvos, abrasivos, ni productos químicos.
3. No utilice objetos punzo-cortantes para limpiar los acabados.
4. Se recomienda realizar la limpieza de su producto diariamente.
Nota: Vea nuestros tips en la pag. www.helvex.com.mx
It is very important to follow the instructions below to preserve HELVEX products
finishes, shiny and in perfect condition:
1. Use only water and a clean cloth.
2. Do not use fibers, powders, abrasives, or chemicals.
3. Do not use sharp objects to clean the finish.
4. It is recommended to clean your product daily.
Note: See our tips on: www.helvex.com.mx
Recomendaciones de Limpieza / Cleaning Recommendations
In Guadalajara:
Contact:
Enter our free
training courses.
In Monterrey:
En la Ciudad de México:
In Mexico City:
En Monterrey:
En Guadalajara:
01 55 53 33 94 00
Ext. 5804, 5805 y 5806 (0133) 36 19 01 13
Comunícate:
Participa en nuestros
cursos gratuitos
de capacitación.
(0181) 83 33 57 67
(0181) 83 33 61 78
2
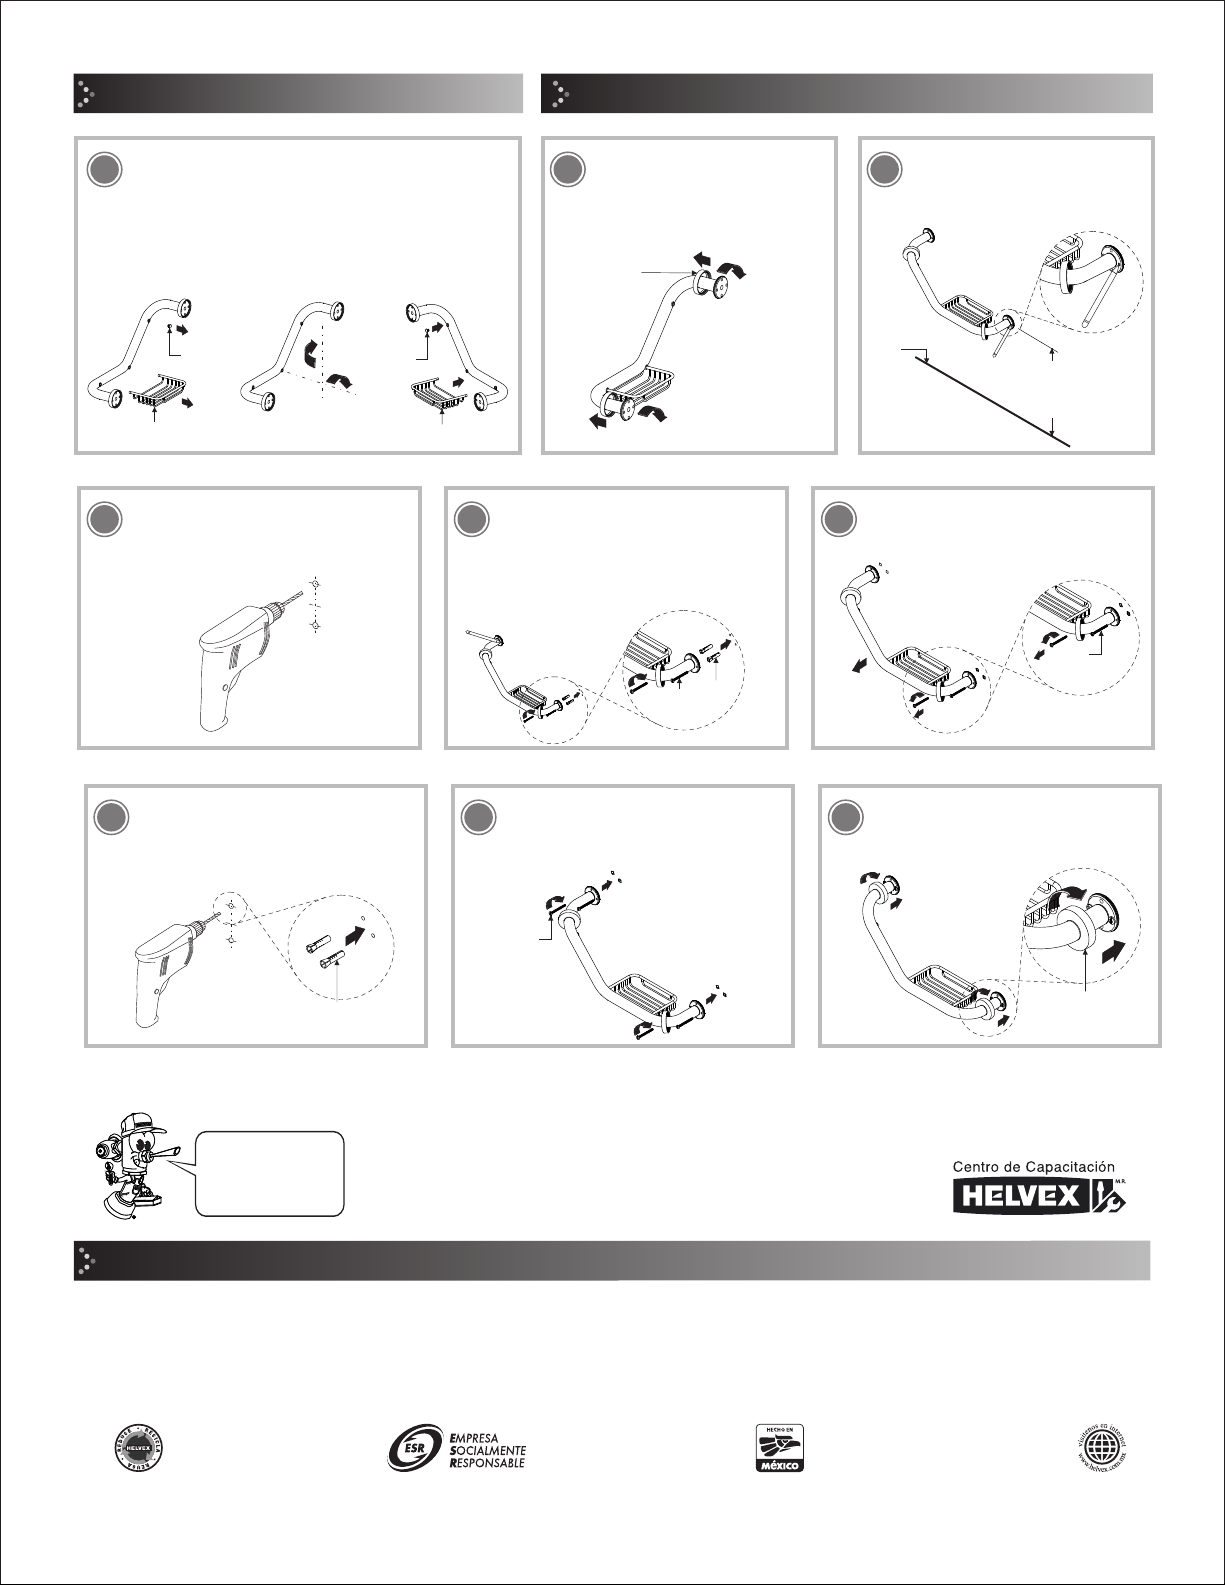
Selección de Posición /Position Selection
Desenrosque y recorra los
chapetones sin maltratar el
producto. / Unscrew and move
the escutcheons without
mistreating the product.
4
Si elige la posición A, retire el botón y la jabonera,
posteriormente coloque la jabonera como se indica. / If
you choose the position A, remove the button and the
soap dish, then place the soap dish as shown.
3
1. Retire el botón
y la jabonera. /
Remove the button
and the soap dish.
botón
button
3. Ensamble el botón y la
jabonera. / Assembly the
button and soap dish.
2. Gire la barra a
la posición deseada. /
Rotate the bar to the
desired position.
jabonera
soap dish
botón
button
jabonera
soap dish
Instalación General / General Installation
chapetón
escutcheon
NOTA: Recorra con
cuidado los chapetones.
NOTE: Carefully move
the escutcheon.
Presente la agarradera y marque
los barrenos en la pared. /
Present the handle tub and mark
the holes in the wall.
5
Nivel de Piso
Terminado
Finish Floor
Level
altura para tina o
regadera recomendada
height for tub or shower
recommended
Barrene con broca para concreto ø5/16”
(no incluida). / Drill with masonry bit
ø5/16” (not included).
6 8 Retire las pijas y la agarradera. /
Remove the lag screws and the handle
tub.
7Inserte los taquetes (incluidos) y fije el
ancla con las pijas (incluidas). Marque
los barrenos del ancla superior. / Insert
anchors (included) and set the wall
bracket with lag screws (included). Mark
the upper wall bracket holes.
taquete
anchor
pija
wall
bracket
pija
wall
bracket
Barrene con broca para concreto ø5/16”
(no incluida) e inserte los taquetes. / Drill
with masonry bit ø5/16” (not included)
and insert the anchor.
911 Recorra y enrosque los chapetones. /
Move and screw the escutcheons.
10 Fije la agarradera insertando y
enroscando las pijas firmemente. / Fix
the handle tub inserting and tightening
the lag screw.
pija
wall
bracket
taquete
anchor
chapetón
escutcheon
HELVEX, S. A. DE C. V. Calzada Coltongo # 293, Col. Industrial Vallejo, Del. Azcapotzalco, C. P. 02300, Ciudad de México.
NPT
FFL


