manuals.online logo
Brands
  1. Home
  2. •
  3. Brands
  4. •
  5. Helvex
  6. •
  7. Bathroom Fixture
  8. •
  9. Helvex H-500 User manual

Helvex H-500 User manual

This manual suits for next models

2

Other Helvex Bathroom Fixture manuals

Helvex Clasica 105 User manual

Helvex

Helvex Clasica 105 User manual

Helvex LAV MOREA1 User manual

Helvex

Helvex LAV MOREA1 User manual

Helvex E-309 User manual

Helvex

Helvex E-309 User manual

Helvex Futura RM-7 User manual

Helvex

Helvex Futura RM-7 User manual

Helvex Explora H-201 User manual

Helvex

Helvex Explora H-201 User manual

Helvex B-305-S User manual

Helvex

Helvex B-305-S User manual

Helvex LV MARCUS BC User manual

Helvex

Helvex LV MARCUS BC User manual

Helvex FB-110-38-3.5 User manual

Helvex

Helvex FB-110-38-3.5 User manual

Helvex Magna DX EP-2120 User manual

Helvex

Helvex Magna DX EP-2120 User manual

Helvex PREMIER H3005-TR035-EB User manual

Helvex

Helvex PREMIER H3005-TR035-EB User manual

Helvex Elite DX ME-2121 User manual

Helvex

Helvex Elite DX ME-2121 User manual

Helvex TH-974 User manual

Helvex

Helvex TH-974 User manual

Helvex E-305 User manual

Helvex

Helvex E-305 User manual

Helvex RM-27 User manual

Helvex

Helvex RM-27 User manual

Helvex Clasica 105 User manual

Helvex

Helvex Clasica 105 User manual

Helvex Nautilia M-1006 User manual

Helvex

Helvex Nautilia M-1006 User manual

Helvex Vertika E-3007 User manual

Helvex

Helvex Vertika E-3007 User manual

Helvex H-3012 User manual

Helvex

Helvex H-3012 User manual

Helvex MG MOJAVE TDS2 User manual

Helvex

Helvex MG MOJAVE TDS2 User manual

Helvex TV-201 User manual

Helvex

Helvex TV-201 User manual

Helvex H-3008 User manual

Helvex

Helvex H-3008 User manual

Helvex AC10-TR011 User manual

Helvex

Helvex AC10-TR011 User manual

Helvex 110-32 User manual

Helvex

Helvex 110-32 User manual

Helvex REJ-01-AI User manual

Helvex

Helvex REJ-01-AI User manual

Popular Bathroom Fixture manuals by other brands

Kohler Mira Sport Max J03G Installation and user guide

Kohler

Kohler Mira Sport Max J03G Installation and user guide

Moen 186117 Series installation guide

Moen

Moen 186117 Series installation guide

Hans Grohe Raindance Showerpipe 27235000 Instructions for use/assembly instructions

Hans Grohe

Hans Grohe Raindance Showerpipe 27235000 Instructions for use/assembly instructions

Signature Hardware ROUND SWIVEL BODY SPRAY 948942 Install

Signature Hardware

Signature Hardware ROUND SWIVEL BODY SPRAY 948942 Install

fine fixtures AC3TH installation manual

fine fixtures

fine fixtures AC3TH installation manual

LIXIL HP50 Series quick start guide

LIXIL

LIXIL HP50 Series quick start guide

KOLO ATOL PLUS installation manual

KOLO

KOLO ATOL PLUS installation manual

Hans Grohe PuraVida 15073000 Instructions for use/assembly instructions

Hans Grohe

Hans Grohe PuraVida 15073000 Instructions for use/assembly instructions

Toto TS111B8 Installation and owner's manual

Toto

Toto TS111B8 Installation and owner's manual

Kohler K-1158-H2 Homeowner's guide

Kohler

Kohler K-1158-H2 Homeowner's guide

Coram Showers OFFSET QUADRANT manual

Coram Showers

Coram Showers OFFSET QUADRANT manual

baliv DU-2010 manual

baliv

baliv DU-2010 manual

odass OD-1710 instruction manual

odass

odass OD-1710 instruction manual

Oxygenics Evolution Easy installation instructions

Oxygenics

Oxygenics Evolution Easy installation instructions

Bradley Express SS Series installation instructions

Bradley

Bradley Express SS Series installation instructions

DURAVIT C.1 C15240 0090 Instructions for mounting and use

DURAVIT

DURAVIT C.1 C15240 0090 Instructions for mounting and use

Sunshower PURE SOLO manual

Sunshower

Sunshower PURE SOLO manual

Heatstore HSTRL500WTN Installation and operating instructions

Heatstore

Heatstore HSTRL500WTN Installation and operating instructions

manuals.online logo
manuals.online logoBrands
  • About & Mission
  • Contact us
  • Privacy Policy
  • Terms and Conditions

Copyright 2025 Manuals.Online. All Rights Reserved.

Regadera de Chorro Fijo /
Fixed Jet Shower
Hola soy Fluxy, te
ayudaré a instalar
tu producto.
Componentes del Producto / Product Components
INSTALLATION GUIDE
Hi I'm Fluxy, I'll
help you to install
your product.
INSTALLATION GUIDE
GUÍA DE INSTALACIÓN
perico teflón
plumber
tape
adjustable
wrench
Herramienta Requerida / Required Tools
[email protected]
Original Spare Parts:
Consultancy and Technical
01(55)53339431
01800 909 2020 01 (55) 53 33 94 00
Refacciones Originales:
Asesoría y Servicio Técnico:
Ext. 5068, 4815 y 5913
Service:
53 33 94 21
01 800 890 0594
[email protected]
1-07-0670-3
H500-6
H-500
1 Economizador /Economizer
2 Tuerca Moleteada /Knurled Nut
3 Inserto p/Tuerca / Insert for Nut
4 Nudo /Knot
5 Empaque de Vinil / Vinyl Gasket
6 Tuerca Unión /Union Nut
7 O’ring / O´ring
8 Cuerpo Regadera /Shower Body
9 Empaque Hule /Rubber Gasket
10 Plato / Plate
11 Tornillo /Screw
12 Restrictor 6 l / Restrictor 6 l
13 Economizador 7,6 l / Economizer 7,6 l
No. Descripción / Description
1
2
3
4
5
6
7
8
9
10
11 NPT
*70 cm
27,5 plg
*120 cm
47,2 plg
cuerpo mezclador
(no incluído)
Mixer body
(not included)
brazo (no incluido)
arm (not included)
*Medidas recomendadas
*Recommended dimensions
Requerimientos de instalacion
H500-8
Para disminuir el riesgo de lesiones o daños a la propiedad, lea todas las instrucciones antes de instalar el
producto. Utilice gafas de seguridad. En obras de construcción, instalación, modificación, ampliación y
reparación deben cumplir con el reglamento de construcción y obras de su localidad. El producto ilustrado
puede sufrir cambios de aspecto como resultado de la mejora continua a la que está sujeto.
Agradecemos su elección por los productos HELVEX.
Estamos seguros de que su confiabilidad por el producto excederá sus más altas expectativas, cuya
funcionalidad, estética, durabilidad, respaldo integral y alta calidad le otorgarán plena satisfacción por años,
reflejando el compromiso con la calidad, innovación y el medio ambiente que forman parte de Helvex.
To reduce the risk of injury or property damage, read all instructions before installing the product. Please
remember to use safety glasses. In construction, installation, alteration, extension and repair, the rules of
constructions must be applied. As result of continuous improvement, the illustration product may change in
appearance.
ADVERTENCIA / WARNING
Esta guía de instalación aplica al producto en cualquier acabado. / This installation
guide applies to the product in any finish.
Thank you for choosing HELVEX products.
We are confident that the product reliability will exceed your maximum expectations. The functionality,
aesthetics, durability, quality and support will grant you full satisfaction for years, it is Helvex commitment to
the quality, innovation and the environment.
Cada metro de altura de
su producto a la base
del tinaco equivalen a
(0,1 kg/cm²) [1,42 PSI].
Every meter of height of
your product to the base
of the tube is equivalent
to (0,1 kg/cm²) [1,42
PSI].
Requerimientos de Instalación
Installation Requirements
H-500 0,2 2,84 19,6
Requerimientos de Instalación
Installation Requirements
Modelo / Model Mínima / Minimum Máxima / Maximum
kg/cm² PSI kPa kg/cm² PSI kPa
6,0 85,3 588,3
Para el correcto funcionamiento de éstos productos, se
recomiendan las siguientes presiones:
For the correct operation of these products, the following
pressures are recommended:
H500-6 0,2 6,0 85,3 588,3
0,2 6,0 85,3 588,3
2,84
2,84
19,6
19,6
H500-8
/ Installation Requirements
H-500
8
12
2
3
4
5
6
7
9
10
11
H500-6
13
2
3
4
5
6
7
8
9
10
11
H500-8
1 2
Es muy importante seguir las siguientes instrucciones para conservar los
acabados de los productos HELVEX, con brillo y en perfecto estado:
1. Utilice únicamente agua y un paño limpio.
2. No utilice fibras, polvos, abrasivos, ni productos químicos.
3. No utilice objetos punzo-cortantes para limpiar los acabados.
4. Se recomienda realizar la limpieza de su producto diariamente.
Visite nuestras páginas www.helvex.com.mx para México y www.helvex.com
para el mercado Internacional
It is very important to follow the instructions below to preserve HELVEX products
finishes, shiny and in perfect condition:
1. Use only water and a clean cloth.
2. Do not use fibers, powders, abrasives, or chemicals.
3. Do not use sharp objects to clean the finish.
4. It is recommended to clean your product daily.
Visit our pages www.helvex.com.mx for Mexico and www.helvex.com
for the International market.
Recomendaciones de Limpieza / Cleaning Recommendations
In Guadalajara:
Contact:
Enter our free
training courses.
In Monterrey:
En la Ciudad de México:
In Mexico City:
En Monterrey:
En Guadalajara:
01 55 53 33 94 00
Ext. 5804, 5805 y 5806 (0133) 36 19 01 13
Comunícate:
Participa en nuestros
cursos gratuitos
de capacitación.
(0181) 83 33 57 67
(0181) 83 33 61 78
2
Posibles Causas y Soluciones / Troubleshooting
Probelma / Problem Causas / Causes Solucións / Solutions
Disminución del chorro de
agua. / The pressure water
is low.
No se colocó cinta teflón en las uniones. / There´s not
plumber tape in the joins.
La / presión de operación no es la adecuada
The operating pressure is not adequate.
El plato o el nudo están sucios. /
The plate or knot are dirty.
Colocar cinta teflón en cada unión(pag.2, paso 3).
/ Place plumber tape around the joins(page 2, step 3).
Verifique que la presión minima de operación sea 0,2 Kg/cm². /
Verify that the minimum operation pressure is 2,84 PSI.
Desarme la regadera y limpie el plato y el nudo a chorro de agua.
/ Disassembly the shower and clean the plate and
the knot with water jet.
Hay fuga en la conexión del
la brazo. / There is leaks
in the connection arm.
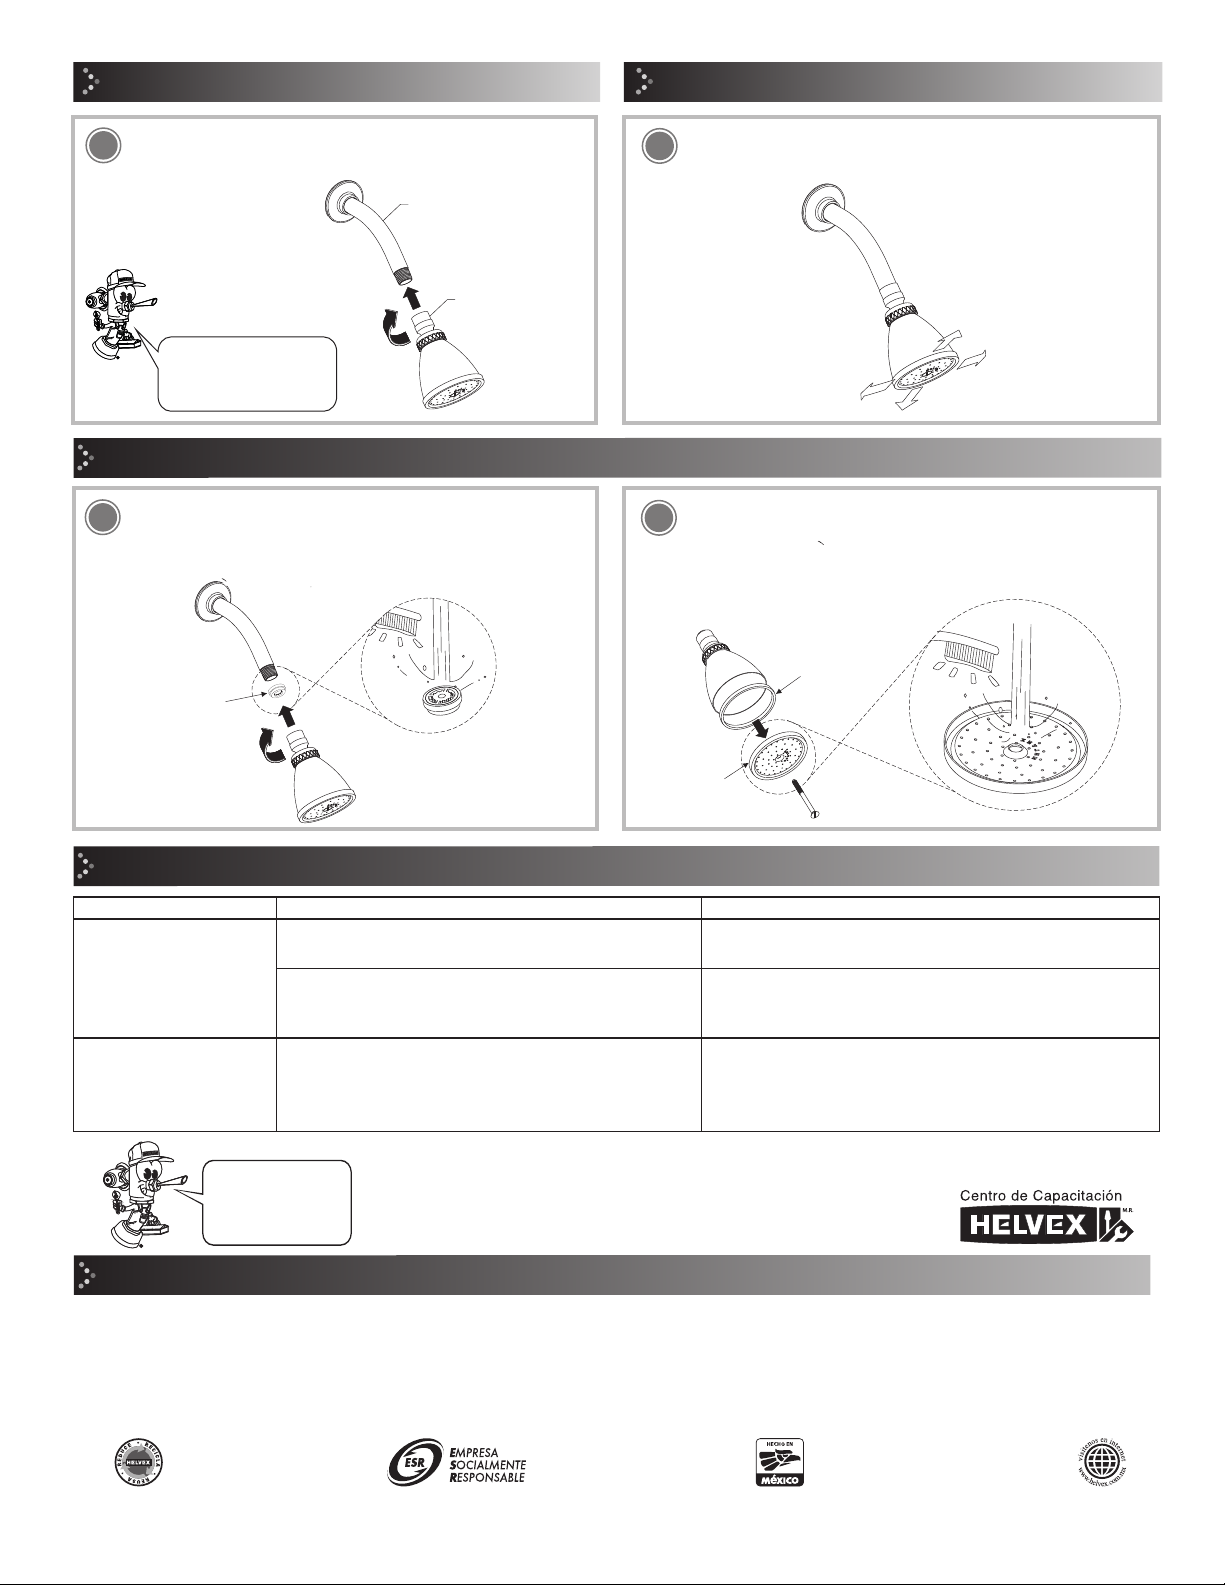
Instalación General / General Installation Operación / Operation
brazo (no incluÍdo)
arm (not include)
regadera
armada
assembly
shower
Enrosque la regadera armada al brazo (no incluído). / Screw
the assembly shower to arm (not included).
Desenrosque la regadera del brazo y posteriormente extraiga el
economizador para lavarlo a chorro de presión y reensamble /
Unscrew the shower and take the economizer to clean with
water jet, then reassembly.
Oriente el cuerpo regadera a donde desee. / Guide the body
shower where is required
Retire la tapa desatornillando el tornillo y lave la parte posterior
de la tapa a chorro de agua y posteriormente reensamble
colocando primero el empaque y posteriormente la tapa.
/ Remove the cap by unscrewing the screw and wash the back
of the cap with water and then reassemble by placing the gasket
first and then the cap.
economizador
economizer
tapa
plug
empaque
gasket
HELVEX, S. A. DE C. V. Calzada Coltongo # 293, Col. Industrial Vallejo, Del. Azcapotzalco, C. P. 02300, Ciudad de México.
Mantenimiento / Maintenance
Colocar teflón en las
cuerda del brazo. / Place
plumber tape around the
threaded arm.
34
56