manuals.online logo
Brands
  1. Home
  2. •
  3. Brands
  4. •
  5. HunterDouglas
  6. •
  7. Indoor Furnishing
  8. •
  9. HunterDouglas RB 500 User manual

HunterDouglas RB 500 User manual

Coupled Standard+ and Heavy Duty+
Manual Clutch Installation
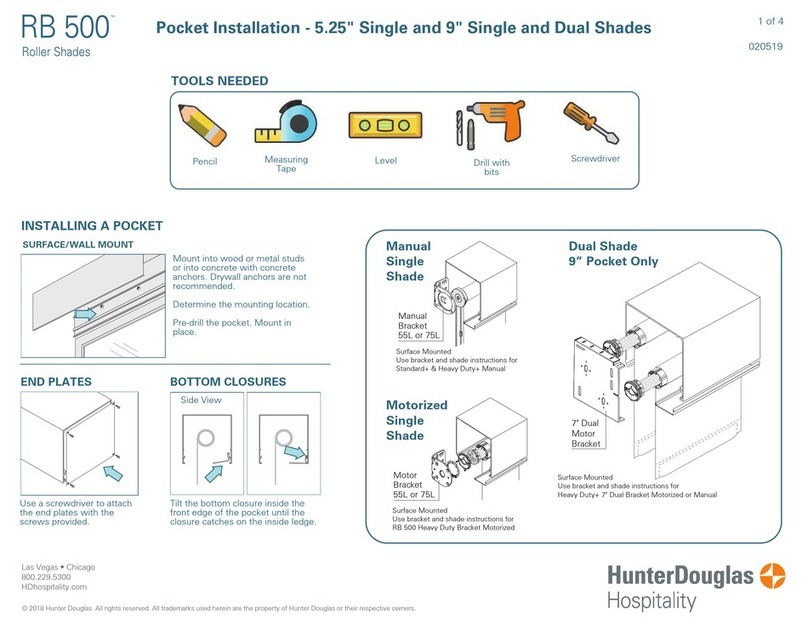
Mount into wood or metal studs or into concrete with concrete anchors.
Drywall anchors are not recommended.
Determine the mounting location.
a) surface/wall b) ceiling c) on frame d) in recess
Measure and mark the bracket locations with a pencil.
Mount brackets with the screws provided. Pre-drilling is recommended.
Check that the brackets are level and aligned.
STANDARD+ BRACKETS
STANDARD+ BRACKET HEAVY DUTY+ BRACKET
HEAVY DUTY+ BRACKETS
© 2018 Hunter Douglas. All rights reserved. All trademarks used herein are the property of Hunter Douglas or their respective owners.
Las Vegas • Chicago
800.229.5300
HDhospitality.com
1 of 4
a
c
b
d
ac
b
d
Insert the provided Allen key into the set screw
of the leveler.
Adjust skewing by turning the Allen key left or
right to move the shade up or down. Support
the shade with your hand if necessary.
All adjustments can be made after the shade
has been installed and after the operation has
been tested.
OPTIONAL: INTEGRATED LEVELER
ADJUST LEVELER
TOOLS NEEDED
INSTALLING THE BRACKETS
Pencil Level
Measuring
Tape Drill with
bits
Allen Key
(provided with
optional Leveler)
Screwdriver Pliers
Ensure the leveling set screw
opening is pointing downwards
before installing the bracket.
On the Standard+ Bracket, the
orientation can be changed by
loosening the two screws (M3x6)
and turning the leveler 90°. Fix
the screws after turning.
Slide the screw cover
over the bracket until
it snaps in place.
HEAVY DUTY+ BRACKET SCREW COVERS
Place the clutch
onto the clutch
bracket.
Push the shade
against the clutch
end and lift the roller
shade up until the end
plug fits into the center
of the idle bracket.
2
1
SCREW COVER INSTALLATION
Coupled Standard+ and Heavy Duty+ Manual Clutch Installation 2 of 4
INSTALLING THE SHADE - Do not remove the tape around the shade until it is fully installed
© 2018 Hunter Douglas. All rights reserved. All trademarks used herein are the property of Hunter Douglas or their respective owners.
Las Vegas • Chicago
800.229.5300
HDhospitality.com
CLUTCH BRACKET IDLE BRACKET
MOUNT OUTER BRACKET AND COUPLER
MOUNT THE COUPLED SHADE
COUPLING 2 INTERMEDIATE BRACKETS
ALIGNER SET ADJUSTMENT
Fix the outer
bracket
inside the
pocket with
the screws
provided.
Place the
tube with
plug
connector
on the
aligner or
connector
set head.
Press the
tube
bearing
plug, lift
the roller
shade and
snap into
the idle
bracket
end.
Slide the
aligner or the
connector
through the
bracket into
the idle end.
Fix the inner
bracket with
the screws
provided.
Slide the
aligner or the
connector
through the
bracket into
the idle end.
click
2
1
2 1
3
To align the bottom
hembars, pull the shade
away from the aligner set
(1), turn the shade to line
up the bottom hembars
together (2). Release the
shade to secure the
position (3). Not possible
when using a connector
set.
Rotate the nut on
the idle end
clockwise until it
meets the tube.
This locks the shade
into position.
LOCK THE SHADES CHECK SHADE
OPERATION
UNLOCKED
CORD TENSIONER
INSTALLATION
BALL STOP
INSTALLATION
LOCKED
Coupled Standard+ and Heavy Duty+ Manual Clutch Installation 3 of 4
© 2018 Hunter Douglas. All rights reserved. All trademarks used herein are the property of Hunter Douglas or their respective owners.
Las Vegas • Chicago
800.229.5300
HDhospitality.com
Remove the tape from the shade.
Make sure the shade operates properly.
Pull the front chain down to raise the shade.
Pull the back chain down to lower the shade.
Adjust leveler if applicable.
SET LOWER LIMIT
Lower shade to the bottom of the window opening.
Place a ball stop over the chain in front of the clutch
and secure using pliers.
SET UPPER LIMIT
Raise shade to the desired height.
Place a ball stop over the chain in back of the clutch
and secure using pliers.
Be sure the cord tensioner is not placed in the path of the bottom
rail and fabric.
Unlock the cord tensioner by removing the plug from the screw hole
and pushing down.
Hold the cord tensioner firmly in place and check that the bead chain,
ball stop, and chain connector can move freely through it. The chain
should not be taught.
Mark the screw hole with a pencil. Attach the cord tensioner directly
to the wall using a 1½” screw. Use a wall anchor if necessary.
click
click
Slide the end caps onto
the brackets. Snap the end caps onto the brackets until it clicks into
place. Slide the end cap towards you
to remove from the bracket.
Lift the backside of the endcap away from the bracket,
then slide the end cap towards you.
BRACKET COVER INSTALLATION
Coupled Standard+ and Heavy Duty+ Manual Clutch Installation 4 of 4
BRACKET COVER REMOVAL
SHADE REMOVAL
UNLOCK THE SHADE
Move the shade
downward and out
of the clutch bracket.
2
1
3
REMOVE CLUTCH END
STANDARD+ END CAPS HEAVY DUTY+ END CAPS
© 2018 Hunter Douglas. All rights reserved. All trademarks used herein are the property of Hunter Douglas or their respective owners.
Las Vegas • Chicago
800.229.5300
HDhospitality.com
STANDARD+ BRACKET HEAVY DUTY+ BRACKET
REMOVE COUPLED SHADE FIRST
Place a screwdriver between
the bracket and bearing plug
and push towards the aligner
to remove the shade. Move
the shade downward and
out of the bracket. Remove
the aligner or connector from
the bearing plug.
Slide the
aligner or the
connector out
of the shade.
Rotate the nut
on the idle end
counterclockwise
to unlock the
shade.

Other manuals for RB 500

6

Other HunterDouglas Indoor Furnishing manuals
HunterDouglas Silhouette Installation manual

HunterDouglas

HunterDouglas Silhouette Installation manual

HunterDouglas Duette Parts list manual

HunterDouglas

HunterDouglas Duette Parts list manual

HunterDouglas Duette User manual

HunterDouglas

HunterDouglas Duette User manual

HunterDouglas PowerView User manual

HunterDouglas

HunterDouglas PowerView User manual

HunterDouglas Duette Parts list manual

HunterDouglas

HunterDouglas Duette Parts list manual

HunterDouglas Vignette Series Parts list manual

HunterDouglas

HunterDouglas Vignette Series Parts list manual

HunterDouglas Design Studio Parts list manual

HunterDouglas

HunterDouglas Design Studio Parts list manual

HunterDouglas Sonnette Parts list manual

HunterDouglas

HunterDouglas Sonnette Parts list manual

HunterDouglas Duette User manual

HunterDouglas

HunterDouglas Duette User manual

HunterDouglas Vignette Traversed User manual

HunterDouglas

HunterDouglas Vignette Traversed User manual

HunterDouglas PowerTilt Owner's manual
HunterDouglas

HunterDouglas PowerTilt Owner's manual

HunterDouglas Design Studio Roman Shades Straight-Pull... Parts list manual

HunterDouglas

HunterDouglas Design Studio Roman Shades Straight-Pull... Parts list manual

HunterDouglas Design Studio Parts list manual

HunterDouglas

HunterDouglas Design Studio Parts list manual

HunterDouglas Alustra Woven Textures Parts list manual

HunterDouglas

HunterDouglas Alustra Woven Textures Parts list manual

HunterDouglas Applause Parts list manual

HunterDouglas

HunterDouglas Applause Parts list manual

HunterDouglas Luminette PowerGlide 2.0 Assembly instructions

HunterDouglas

HunterDouglas Luminette PowerGlide 2.0 Assembly instructions

HunterDouglas Cadence Operation manual

HunterDouglas

HunterDouglas Cadence Operation manual

HunterDouglas Design Studio Roman Shades Parts list manual

HunterDouglas

HunterDouglas Design Studio Roman Shades Parts list manual

HunterDouglas Pleated Standard LiteRise Parts list manual

HunterDouglas

HunterDouglas Pleated Standard LiteRise Parts list manual

HunterDouglas Designer Banded Series Parts list manual

HunterDouglas

HunterDouglas Designer Banded Series Parts list manual

HunterDouglas Provenance Parts list manual

HunterDouglas

HunterDouglas Provenance Parts list manual

HunterDouglas Duette PowerView Parts list manual

HunterDouglas

HunterDouglas Duette PowerView Parts list manual

HunterDouglas Alustra Woven Textures Parts list manual

HunterDouglas

HunterDouglas Alustra Woven Textures Parts list manual

HunterDouglas Palm Beach Polysatin PowerView Gen 3... Parts list manual

HunterDouglas

HunterDouglas Palm Beach Polysatin PowerView Gen 3... Parts list manual

Popular Indoor Furnishing manuals by other brands

Next HARTFORD LT 860134 Assembly instructions

Next

Next HARTFORD LT 860134 Assembly instructions

Quest Leisure Products Quest Elite Naples Pro Series Full instruction guide

Quest Leisure Products

Quest Leisure Products Quest Elite Naples Pro Series Full instruction guide

sweeek. BOHEME IBOCONSOLE manual

sweeek.

sweeek. BOHEME IBOCONSOLE manual

BRW Natalia III Assembly manual

BRW

BRW Natalia III Assembly manual

Clou match me CL/07.56.006.50 installation instructions

Clou

Clou match me CL/07.56.006.50 installation instructions

Germania 0266 Assembly instruction

Germania

Germania 0266 Assembly instruction

Bestar 29420-1117-1217 Assembly instructions

Bestar

Bestar 29420-1117-1217 Assembly instructions

GALLERY 5059413329654 ASSEMBLY  & CARE GUIDE

GALLERY

GALLERY 5059413329654 ASSEMBLY & CARE GUIDE

Smith & Noble Cellular Operating & programming guide

Smith & Noble

Smith & Noble Cellular Operating & programming guide

Next BRONX T45556 Assembly instructions

Next

Next BRONX T45556 Assembly instructions

Livarno Living 283344 Assembly instruction

Livarno Living

Livarno Living 283344 Assembly instruction

BDI SEQUEL 20 6112 instruction manual

BDI

BDI SEQUEL 20 6112 instruction manual

The Land of Nod Dusen Dusen Playhouse Assembly instructions

The Land of Nod

The Land of Nod Dusen Dusen Playhouse Assembly instructions

Furniture of America YNJ-1462 quick start guide

Furniture of America

Furniture of America YNJ-1462 quick start guide

Monarch Specialties I 1840 Assembly instructions

Monarch Specialties

Monarch Specialties I 1840 Assembly instructions

Poliman Moveis D06000 Assembly instructions

Poliman Moveis

Poliman Moveis D06000 Assembly instructions

nardi Maestrale 220 quick guide

nardi

nardi Maestrale 220 quick guide

Allen + Roth OPHELIA 60AL installation manual

Allen + Roth

Allen + Roth OPHELIA 60AL installation manual

manuals.online logo
manuals.online logoBrands
  • About & Mission
  • Contact us
  • Privacy Policy
  • Terms and Conditions

Copyright 2025 Manuals.Online. All Rights Reserved.