manuals.online logo
Brands
  1. Home
  2. •
  3. Brands
  4. •
  5. HunterDouglas
  6. •
  7. Window Blind
  8. •
  9. HunterDouglas Country Woods Operation manual

HunterDouglas Country Woods Operation manual

Installation and
Care Instructions
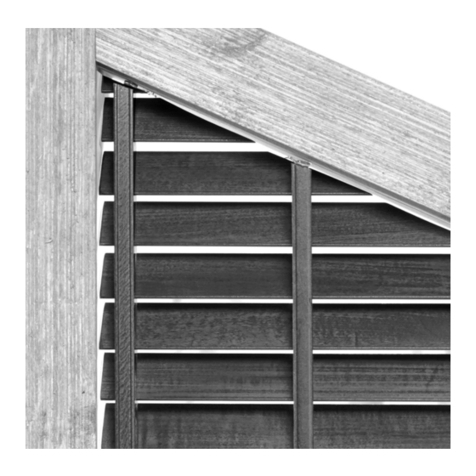
Fixed Slat
Specialty Shapes
Country Woods®
Wood Blinds
HEXAGON OCTAGON CIRCLE OVAL
ARCH
QUARTER
ARCH ANGLE TRIANGLE
Tools needed for installing your blind:
• Measuring tape
• Pencil
• Flat blade screwdriver
• Phillips screwdriver
• Carpenter’s level
• Power drill, drill bits and 1/4" hex
bit socket (or socket wrench with
1/4" hex socket)
In addition, you will need fasteners designed to work with your
specific mounting surfaces:
THANK YOU
for purchasing a Hunter Douglas product. Your
new blind has been custom built for you from the highest quality
materials to provide you with a lifetime of beauty and function.
Important: Read these instructions all the way through before
beginning.
Getting Started
Remove the blind from the package. Keep the packaging until the
blind is installed to your satisfaction.
Each fixed slat specialty shape you ordered includes:
• The required number of slats, cut to varying widths to form the
correct shape.
• Two or more uprights into which the slats are inserted.
•Arch, quarter arch, angle, and triangle only: One bottom rail to
which the uprights are attached, along with two flat head screws
(#6 x 11/4") per upright to attach the uprights to the bottom rail;
and one extra 2" slat for light control.
Each fixed slat specialty shape you ordered also includes all necessary
mounting hardware:
• The required number of mounting brackets. There are two types
of brackets, one for inside mounts and one for outside mounts.
• Two #6 x 11/4" hex head screws per mounting bracket.
• One snap button per mounting bracket.
BOTTOM RAIL
(Arches, Quarter Arches, An
g
les, Trian
g
les onl
y
)
MOUNTING BRACKET
(Inside Mount) MOUNTING
BRACKET
(Outside Mount)
SNAP
BUTTON
UPRIGHT
SLATS
Wood
Drywall, Plaster
Metal
Mounting Surface Fastener
No. 6 Hex Head Screws
(Provided)
Wall Anchors, Expansion Bolts
(Not Provided)
Sheet Metal Screws
(Not Provided)
1
For assistance, call the Hunter Douglas
Customer Information Center
at 1-888-501-8364
7:00 AM to 4:30 PM MST, Mon.-Fri.
Visit our Web site at hunterdouglas.com
Assemble the Blind
Blinds with No Bottom Rail
Hexagon, Octagon, Circle, and Oval
Arrange the Uprights
Each upright is marked with a label: A, B, C, etc. Start on the left side
with “A” and arrange the uprights as labeled.
• Stand the uprights on their back edge so that the slots are face up,
with the slots angled the same on all uprights.
• Arrange the uprights so that they approximate the shape of the
blind, with the slots aligned horizontally.
• The distance between uprights should be approximately equal.
Install the Slats
• Slats are stacked in the order of assembly.
• Start at the bottom slot of the uprights and insert the first slat.
• Work your way up to the top until all slots are filled.
A B C D E
SHAPE OF
BLIND
Blinds with Bottom Rail
Arch, Quarter Arch, Angle, and Triangle
Position the Bottom Rail
• Stand the bottom rail on its back edge, with its front edge facing
up and the countersunk holes toward you.
• Labels indicating the position of the uprights are located on the
top of the bottom rail, near the front edge.
Arrange the Uprights
• Each upright is marked with a label that matches the label on the
bottom rail.
• Arrange the uprights as labeled against the top side of the bottom
rail.
• The slots in the uprights must face up, and the end of the upright
with two holes goes against the bottom rail.
B C
A
COUNTERSUNK
HOLES
UPRIGHT POSITION LABELS
UPRIGHT
POSITIONS
BOTTOM RAIL
BOTTOM
SIDE
TOP
SIDE
FRONT EDGE
BACK EDGE
Attach the Uprights to the Bottom Rail
• Attach the uprights to the bottom rail using two flat head screws
(#6 x 11/4") per upright.
• The screws go through the countersunk holes in the bottom rail,
and then into the uprights.
Double check that the slots in all the uprights are facing up.
Important: Do not overtighten the screws.
Install the Slats
• Insert the slats into the slots in the uprights. Start at the bottom
and insert the longest slat.
• Work your way up to the top until all slots are filled.
A B C D E F G
SHAPE OF
BLIND
Important: With 25/8" slats, the bevel on the bottom part of the slat
should face downward (see illustration at right).
2
5
/
8
"
Slat
Bevel
Upright
Important: With 25/8" slats, the bevel
on the bottom part of the slat should
face downward.
Optional Additional Slat Instllation
Arch, Quarter Arch, Angle, and Triangle
An additional slat labeled “extra” is included with your order. This
slat is the same length as the bottom rail. It is designed to help
eliminate the light gap at the bottom of the specialty shape.
If you choose to install this extra slat:
• Use the Velcro provided to attach the slat to the rear side of the
bottom rail, with the slat upright as shown in the illustrations.
• Be sure the slat is installed on the rear side of the bottom rail so
that it faces the window when the blind is installed.
2Install the Blind
Snap Buttons
• Snap buttons are installed onto the top of the uprights.
• On blinds with no bottom rail, snap buttons are installed onto the
bottom of the uprights, as well.
• On outside mounted blinds with a bottom rail, snap buttons are
also installed onto the ends of the rail.
The following chart shows onto which uprights you will need to
install snap buttons. The black boxes indicate snap button locations.
NUMBER OF UPRIGHTS
= Snap Button Locations
UPRIGHT LABEL DESIGNATIONS
AC
AD
AE
AF
ACEG
AB
B
BC
BCD
BCDE
BDF
2:
3:
4:
5:
6:
7:
Front View
Rear View
Extra
Slat
Extra
Slat
SNAP
BUTTON
UPRIGHT
Notice on the chart that:
• A blind with two uprights will have snap buttons installed onto
both.
• Blinds with three to six uprights will have snap buttons installed
onto the middle upright(s), omitting only the two on the far left
and far right.
• Blinds with seven uprights will have snap buttons installed onto
alternate uprights.
Install the Snap Buttons
• Insert snap buttons into the
pre-drilled holes on the uprights
indicated on the chart, and
press them firmly in place.
• On blinds with no bottom
rail, remember to install
snap buttons on both the
top and bottom of the
uprights.
• On outside mounted blinds
with a bottom rail, also install
snap buttons into the pre-drilled
holes on the ends of the rail.
Install the Mounting Brackets
Mark the Mounting Bracket Locations
• With inside mounted specialty shapes, hold the blind inside the
opening, flush with the front of the opening, and mark on the
casement the locations of the front edges of all snap buttons.
• With outside mounted specialty shapes, center the blind over the
opening and mark the location of all snap buttons on the wall or
molding.
Attach the Mounting Brackets (Inside Mounts)
• Position the circular opening at the front of the brackets
approximately 1/4" behind where you marked the front edge
location of the snap buttons.
• Mark where to drill pilot holes for the #6 x 11/4" mounting screws.
• Drill 1/8" pilot holes and attach the brackets with the screws.
• Be sure all brackets are mounted the same depth inside the
opening.
MARKS
TOP OF
OPENING
Product Code No. 8800031002 1M-9/04
© 2004 Hunter Douglas Inc. ® Registered trademark of Hunter Douglas Inc.
™Trademark of Hunter Douglas Inc. Patented in the U.S. and foreign countries.
U.S. and foreign patents pending.
3
A NOTE ABOUT WOOD PRODUCTS
Our wood blinds are true wood products, made from 100% hardwood.
There will be variations in color, grain, texture, and warpage that are
characteristic of all woods. These variations will be especially visible
in blinds with light color stains. The variations are normal and natural,
and are considered acceptable quality.
Care and Cleaning
Like any wood furnishings, Country Woods blinds should be cleaned
on a routine basis to keep them looking new.
• Dust regularly. Use a soft clean cloth, chemically-treated dust
cloth or dusting mitt.
• Blinds may also be vacuumed using a brush attachment.
• Another way to clean blinds is simply by wiping them with a soft,
damp cloth.
• Stained blinds, like wood furniture, should be treated periodically
with lemon oil or other wood preservative to protect their finish
and enhance their luster.
Important: Hunter Douglas does not recommend ultrasonic cleaning
of wood blinds.
Install the Blind
• Align the snap buttons on the uprights (and bottom rail, if
applicable) with the front of the mounting brackets.
• Insert the snap buttons into the mounting brackets until they
“snap” in place.
Attach the Mounting Brackets (Outside Mounts)
• Orientation of the mounting brackets depends on whether the
snap button is at the top or bottom of the upright, or the left or
right end of the bottom rail (see illustration).
• Position the brackets on your marks so that the circular opening
at the front of the brackets will fit onto the snap buttons.
• Mark where to drill pilot holes for the #6 x 11/4" mounting screws.
• Drill 1/8" pilot holes and attach the brackets with the screws.
ORIENTATION FOR
BOTTOM OF UPRIGHT
MARK
SNAP
BUTTON
SNAP
BUTTON
INSIDE MOUNT OUTSIDE MOUNT

Other HunterDouglas Window Blind manuals

HunterDouglas RB 500 Safety guide

HunterDouglas

HunterDouglas RB 500 Safety guide

HunterDouglas PowerView Venetian Blind 18VDC User manual

HunterDouglas

HunterDouglas PowerView Venetian Blind 18VDC User manual

HunterDouglas Provenance Woven Wood Shades Parts list manual

HunterDouglas

HunterDouglas Provenance Woven Wood Shades Parts list manual

HunterDouglas PowerView Gen 3 User manual

HunterDouglas

HunterDouglas PowerView Gen 3 User manual

HunterDouglas Alustra Woven Textures User manual

HunterDouglas

HunterDouglas Alustra Woven Textures User manual

HunterDouglas SCG 64 User manual

HunterDouglas

HunterDouglas SCG 64 User manual

HunterDouglas Reveal with MagnaView Operation manual

HunterDouglas

HunterDouglas Reveal with MagnaView Operation manual

HunterDouglas Nantucket EasyRise Operation manual

HunterDouglas

HunterDouglas Nantucket EasyRise Operation manual

HunterDouglas Paramount Owner's manual

HunterDouglas

HunterDouglas Paramount Owner's manual

HunterDouglas 2" Horizontal Aluminum Blinds Parts list manual

HunterDouglas

HunterDouglas 2" Horizontal Aluminum Blinds Parts list manual

HunterDouglas Specialty Motorized Vertical Blinds Parts list manual

HunterDouglas

HunterDouglas Specialty Motorized Vertical Blinds Parts list manual

HunterDouglas Silhouette A Deux Parts list manual

HunterDouglas

HunterDouglas Silhouette A Deux Parts list manual

HunterDouglas Vignette Traditional User manual

HunterDouglas

HunterDouglas Vignette Traditional User manual

HunterDouglas 5-257 User manual

HunterDouglas

HunterDouglas 5-257 User manual

HunterDouglas LiteRise Operation manual

HunterDouglas

HunterDouglas LiteRise Operation manual

HunterDouglas Sonnette User manual

HunterDouglas

HunterDouglas Sonnette User manual

HunterDouglas Solera EasyRise Parts list manual

HunterDouglas

HunterDouglas Solera EasyRise Parts list manual

HunterDouglas Vignette Modern Roman Shades Parts list manual

HunterDouglas

HunterDouglas Vignette Modern Roman Shades Parts list manual

HunterDouglas Silhouette Halo Duolite Parts list manual

HunterDouglas

HunterDouglas Silhouette Halo Duolite Parts list manual

HunterDouglas VS 100 Guide rail Maintenance and service guide

HunterDouglas

HunterDouglas VS 100 Guide rail Maintenance and service guide

HunterDouglas Duette User manual

HunterDouglas

HunterDouglas Duette User manual

HunterDouglas 5-216 User manual

HunterDouglas

HunterDouglas 5-216 User manual

HunterDouglas Alustra Woven Textures ST30 Parts list manual

HunterDouglas

HunterDouglas Alustra Woven Textures ST30 Parts list manual

HunterDouglas Wood Blinds User manual

HunterDouglas

HunterDouglas Wood Blinds User manual

Popular Window Blind manuals by other brands

Tudelu MUTE installation manual

Tudelu

Tudelu MUTE installation manual

Victoria M PLISSEE Original assembly instructions

Victoria M

Victoria M PLISSEE Original assembly instructions

SelectBlinds Classic Grommet Custom Made Drapes installation instructions

SelectBlinds

SelectBlinds Classic Grommet Custom Made Drapes installation instructions

SELT Venetian Blind C80 Technical and Operational Documentation

SELT

SELT Venetian Blind C80 Technical and Operational Documentation

Velux SML instructions

Velux

Velux SML instructions

Springs Window Fashions Mini Blind manual

Springs Window Fashions

Springs Window Fashions Mini Blind manual

Lafayette Auto-Wand V2 Programming instructions

Lafayette

Lafayette Auto-Wand V2 Programming instructions

Jalousie Sky Line Assembly and operating instructions

Jalousie

Jalousie Sky Line Assembly and operating instructions

Allen + Roth C935480125 manual

Allen + Roth

Allen + Roth C935480125 manual

Costway OP70275 user manual

Costway

Costway OP70275 user manual

domicet flexSet 25/28 mm Mounting instructions

domicet

domicet flexSet 25/28 mm Mounting instructions

Electra Honeycomb Series How to install

Electra

Electra Honeycomb Series How to install

Diaz 3859 manual

Diaz

Diaz 3859 manual

CBM 3.5 Vertical Blinds installation instructions

CBM

CBM 3.5 Vertical Blinds installation instructions

MaxxMar HWM-10 Installation, operation & programming instructions

MaxxMar

MaxxMar HWM-10 Installation, operation & programming instructions

Victoria M MINI ROLLO installation instructions

Victoria M

Victoria M MINI ROLLO installation instructions

Style selections 70816 installation instructions

Style selections

Style selections 70816 installation instructions

VENETA 65101-10242-G installation instructions

VENETA

VENETA 65101-10242-G installation instructions

manuals.online logo
manuals.online logoBrands
  • About & Mission
  • Contact us
  • Privacy Policy
  • Terms and Conditions

Copyright 2025 Manuals.Online. All Rights Reserved.