manuals.online logo
Brands
  1. Home
  2. •
  3. Brands
  4. •
  5. IHP
  6. •
  7. Fireplace Accessories
  8. •
  9. IHP SECURE FLEX SF-12 User manual

IHP SECURE FLEX SF-12 User manual

NOTE: DIAGRAMS & ILLUSTRATIONS ARE NOT TO SCALE
1
SECURE FLEX®VENT KIT
(12’ COMPRESSED LENGTH)
HEARTH PRODUCTS
KITS AND ACCESSORIES
INSTALLATION INSTRUCTIONS FOR SECURE FLEX®VENT KIT (MODEL NO. SF-12) (CATALOG NO. 98K03)
USED WITH DIRECT-VENT GAS FIREPLACES IN HORIZONTAL VENTING APPLICATIONS ONLY
GENERAL APPLICATIONS
Refertothefireplaceinstallationinstructionsforapprovedhorizontalvent-
ing configurations. Rigid Secure Vent®(SV4.5) direct-vent components
are shown in these configurations; however, these Secure Flex vent kits
may also be used. All restrictions, clearances and allowances that pertain
to the rigid piping apply to the flexible venting also.
Expanding Secure Flex and Secure Flex Joining Restrictions -
Flexible vent pipe is packaged and shipped in its contracted state. When
installing flexible vent pipe, its length may be expanded up to twice its
contracted size. This 12’ section of flexible pipe may be expanded up
to 24’. The 12’ section may be cut to any length to suit a particular ap-
plication; however, the flex sections must not be joined together
to extend a vent run. After expanding the vent, check that the vent’s
spring spacers are spaced every 12” or less.
Adding Secure Flex to the End of a Secure Vent (Rigid Vent) Run -
Secure Flex may be added to the end of a vent run made up of rigid
Secure Vent (SV4.5) vent sections. The flex adaptor (87L00) must be used
when connecting the flexible pipe to the rigid . All the restrictions such as
venting length, height, routing, horizontal to vertical ratio requirements or
clearance considerations as detailedin the fireplace installationinstructions
for rigid vent must be adhered to for the flexible vent.
Attaching the Flexible Vent to the Adaptor (See parts A and B below
and Figure 2)-
A. Install the Inner Flex Pipe -
1. Install the small gear clamp loosely around the inner flexible vent
pipe, push it back out of the way.
2. Apply a bead of Mill-Pac Black (700°F) high temperature sealant -
Catalog No. 10K81) to the inner adaptor collar, approximately 1/2”
from the end.
3. Pull and extend the inner flexible vent pipe.
4. Slide the inner flex pipe over the adaptor collar. Overlap the flexible
vent pipe with the adaptor collar 1-3/4", ensuring that flexible vent
pipe is free from damage or tears.
5. Slide the gear clamp down to approximately 3/4” from the end of
the flexible pipe. Tighten the clamp fully to secure the flexible pipe
to the inner adaptor collar.
6. Install three screws 120 degrees apart through the flexible vent
pipe and into the adaptor collar just below the gear clamp to provide
additional security to the connection.
GENERAL INFORMATION
This Secure Flex®venting kit may be used when horizontally venting an
IHP direct-vent gas fireplace. It contains 12’ of compressed flex vent.
If you encounter any problems, need clarification of these instructions or
are not qualified to properly install this kit, contact you local distributor
or dealer.
Read this instruction sheet in its entirety before beginning the installation.
ALL WARNINGS AND PRECAUTIONS IN THE INSTALLATION AND
OPERATION MANUALS PROVIDED WITH THE APPLIANCE APPLY TO
THESE INSTRUCTIONS.
INSTALLATION INSTRUCTIONS
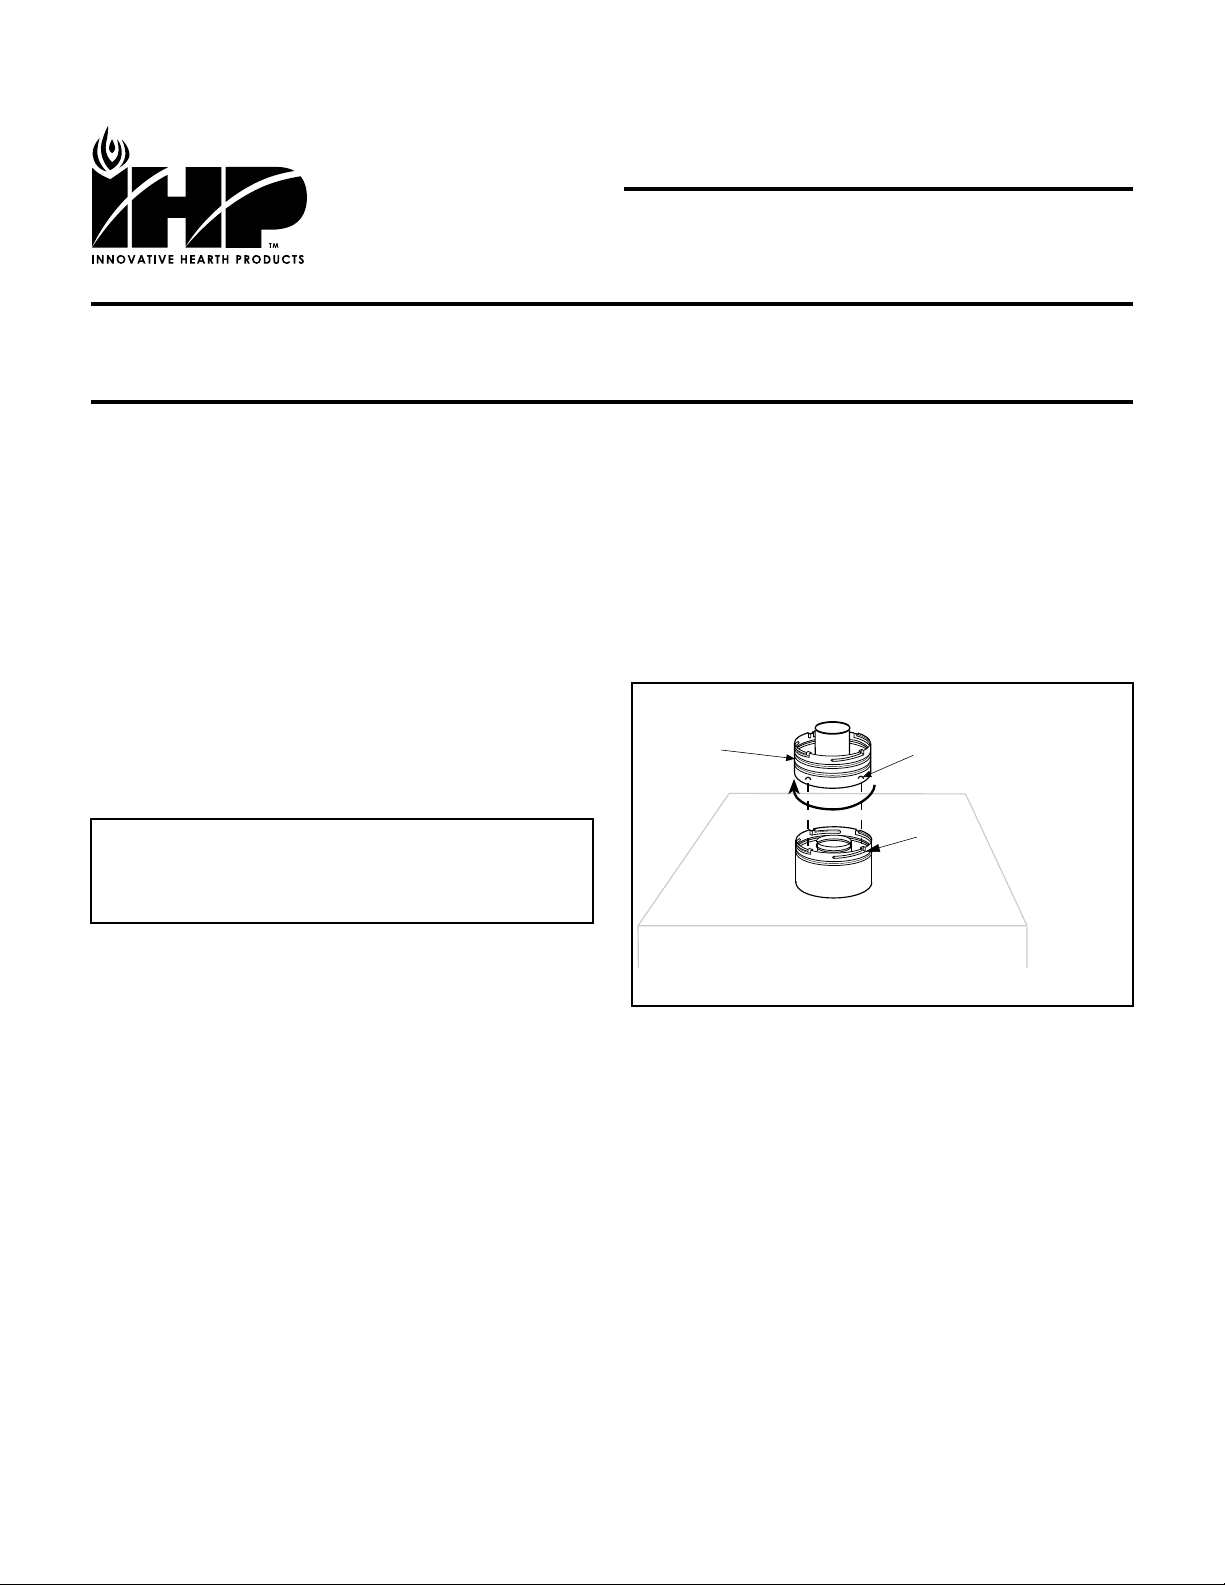
Figure 1 - Connecting Flex Adaptor To Appliance Collar
750053M
Rev. B 05/2014
Installation of Secure Flex®Adaptor -
Secure Flex comes with an adaptor (catalog no. 87L00) that can be fitted
to the appliance collar or the inclined channel end of the last Secure Vent
section (SV4.5) in a rigid system. Align the dimpled end of the adaptor
over the previously installed section or appliance collar, adjusting the
radial alignment until the four locking dimples of the adaptor are aligned
with the inlets of the four incline channels of the last vent section or
collar. Push on the adaptor until it fully engages, then twist the adaptor
clockwise running the dimples down and along the incline channels until
they seat at the end of the channels. See Figure 1.
Flex
Adaptor
Align the dimple (four places)
with the opening of the locking
incline channel on appliance
collar. Twist vent component
clockwise to engage and seal.
Locking
Incline Channel
DRAFT
4/15/2014
INSTALLATION SHOULD BE PERFORMED BY A qUALIFIED
TECHNICIAN ACCORDING TO THESE INSTRUCTIONS, THE
INSTALLATION INSTRUCTIONS FOR THE PARTICULAR AP-
PLIANCE BEING INSTALLED, AND LOCAL CODES.
2
B. Install the Outer Flex Pipe -
1. Install the large gear clamp loosely around the outer flexible vent
pipe, push it back out of the way.
2. Apply a bead of Mill-Pac Black (700°F) high temperature sealant
- Catalog No. 10K81) to the outer adaptor collar; to the grooves of
the collar which extend approximately 1” from the end and to the
flat surface, approximately 1-3/8" from the end.
3. Pull and extend the outer flexible vent pipe.
4. Slide the outer flex pipe over the adaptor collar. Overlap the flexible
vent pipe with the adaptor collar 1-3/4", ensuring that the flexible
vent pipe is free from damage or tears.
5. Slide the gear clamp down to approximately 3/4” from the end of
the flexible pipe. Tighten the clamp fully to secure the flexible pipe
to the outer adaptor collar.
6. Install three screws 120 degrees apart through the flexible vent
pipe and into the adaptor collar just below the gear clamp to provide
additional security to the connection.
Routing Secure Flex®Vent -
Ensure that the flex vent is properly routed to provide the required clear-
ance. Do Not allow the flexible vent to bend in a radius tighter than 5”
(127 mm). Refer to Figure 3. Venting should be sloped upward toward
the termination a minimum of 1/4” rise per foot (20mm per meter) of
horizontal vent run. Support the horizontal vent sections using metal
straps spaced at 2’ (0.61 meter) intervals.
Attaching Secure Flex Vent to Termination -
Connect flex vent only to Secure Flex vent terminations, not Secure Vent
terminations. See Table 1 for listed Secure Flex vent termination part
numbers. Secure the flexible vent to the Secure Flex terminations in the
same manner (see Figure 2)as it was attached to the adaptor.
Figure 3 - Minimum Flex Bend Radius
Printed in U.S.A. © 2000 IHP LLC
P/N 750053M REV. B 05/2014
NOTE: DIAGRAMS & ILLUSTRATIONS ARE NOT TO SCALE.
Figure 2 - Connecting Flex To Flex Adaptor
5" (127 mm)
Radius Minimum
SF-18 Flexible
Vent Section
1508 Elm Hill Pike, Suite 108 • Nashville, TN 37210
IHP reserves the right to make changes at any time, without notice, in design, materials,
specifications, and prices, and also to discontinue colors, styles, and products. Consult your
local distributor for fireplace code information.
Separately-Ordered Listed Secure Flex Components
Cat. No. Model No. Description
H1969 SF4.5HT-2 Horizontal Square Termination for Flex with Firestop\Spacer (H2246), 4.5” Gear Clamp (88J01), 7.5” Gear Clamp (83J00)
and Flex Adaptor (87L00)
10K81 SFMP Mill-Pac Black High-Temperature Sealant
88J01 SF-GC4 Gear Clamp 4.5” for Flex
83J00 SF-GC7 Gear Clamp 7.5” for Flex
87L00 SF4.5RF Flex Adaptor
Table 1
1-3/4” (44 mm)
Flexible Pipe and
Adaptor Outer
Collar Overlap
Gear
Clamps
Adaptor
(SV4.5RF)
Apply ONLY MIL-PAC BLACK
HIGH TEMPERATURE SEALANT
(Catalog No. 10K81) to the
outside surface of both collars
of the adaptor (be especially
careful to fill the grooves of the
outer collar to be covered by
the flexible pipe) and slide
flexible pipe over inner and
outer adaptor collars.
NOTE: OUTER PIPE IS PULLED AWAY TO SHOW THE DETAIL OF THE INNER PIPE
Flex Vent
1-3/4” (44 mm)
Flexible Pipe and
Adaptor Inner
Collar Overlap
Attach Adaptor to Appliance
Collar, or Secure Vent Sections
Securing Screw
(3 Places equally
Spaced Just Below
Gear Clamp)
Securing Screw
(3 Places equally
Spaced Just Below
Gear Clamp)

This manual suits for next models

2

Other IHP Fireplace Accessories manuals

IHP DUALBURNER24N User manual

IHP

IHP DUALBURNER24N User manual

IHP F2624 User manual

IHP

IHP F2624 User manual

IHP GAB Series User manual

IHP

IHP GAB Series User manual

IHP PCBM-325 User manual

IHP

IHP PCBM-325 User manual

IHP VF F3784 User manual

IHP

IHP VF F3784 User manual

IHP DRFTWD-LOG60 User manual

IHP

IHP DRFTWD-LOG60 User manual

IHP Astria Series User manual

IHP

IHP Astria Series User manual

IHP AK4 User manual

IHP

IHP AK4 User manual

IHP LPDBK User manual

IHP

IHP LPDBK User manual

IHP GCKSMS557051NP User manual

IHP

IHP GCKSMS557051NP User manual

IHP GCK-LS User manual

IHP

IHP GCK-LS User manual

IHP H5861 User manual

IHP

IHP H5861 User manual

IHP RIVROCK-25PK User manual

IHP

IHP RIVROCK-25PK User manual

IHP MAGNIFLAMEOD24NE Quick start guide

IHP

IHP MAGNIFLAMEOD24NE Quick start guide

IHP H5872 User manual

IHP

IHP H5872 User manual

IHP F1762 User manual

IHP

IHP F1762 User manual

IHP EPIC-TRIM-B User manual

IHP

IHP EPIC-TRIM-B User manual

IHP CHAROAK35 User manual

IHP

IHP CHAROAK35 User manual

IHP HeatFlo Kit HTFLO-LIN60 User manual

IHP

IHP HeatFlo Kit HTFLO-LIN60 User manual

IHP PURFIRE AH1924 User manual

IHP

IHP PURFIRE AH1924 User manual

IHP RDV-CONTF-BLK User manual

IHP

IHP RDV-CONTF-BLK User manual

IHP BWBK User manual

IHP

IHP BWBK User manual

IHP 900077-07 User manual

IHP

IHP 900077-07 User manual

IHP BLB36SF Series User manual

IHP

IHP BLB36SF Series User manual

Popular Fireplace Accessories manuals by other brands

Emberside SPKES-NG installation instructions

Emberside

Emberside SPKES-NG installation instructions

Dimplex SMP-155-E-ST install guide

Dimplex

Dimplex SMP-155-E-ST install guide

Dimplex MFP050W install guide

Dimplex

Dimplex MFP050W install guide

Napoleon RCHS20 installation instructions

Napoleon

Napoleon RCHS20 installation instructions

Hearth & Home FBG-4832-EDGE installation instructions

Hearth & Home

Hearth & Home FBG-4832-EDGE installation instructions

Lennox Hearth Products SHADOWDANCE LSVFSD-LP Installation and operation instructions

Lennox Hearth Products

Lennox Hearth Products SHADOWDANCE LSVFSD-LP Installation and operation instructions

Empire Comfort Systems DVP50PFB installation instructions

Empire Comfort Systems

Empire Comfort Systems DVP50PFB installation instructions

MODENO OCK40-NG01 manual

MODENO

MODENO OCK40-NG01 manual

VEVOR H230-A quick start guide

VEVOR

VEVOR H230-A quick start guide

Selkirk SUPERVENT SC INSTALLATION INSTRUCTIONS & MAINTENANCE GUIDE

Selkirk

Selkirk SUPERVENT SC INSTALLATION INSTRUCTIONS & MAINTENANCE GUIDE

Lennox Hearth Products DPSS36 installation instructions

Lennox Hearth Products

Lennox Hearth Products DPSS36 installation instructions

Valor GV60CKO installation manual

Valor

Valor GV60CKO installation manual

Regency HEAT WAVE 946-556 manual

Regency

Regency HEAT WAVE 946-556 manual

Whalen Houghton MNFP60HTN26HLAA manual

Whalen

Whalen Houghton MNFP60HTN26HLAA manual

Hearth & Home Grand Vista 36 installation instructions

Hearth & Home

Hearth & Home Grand Vista 36 installation instructions

Desa Wall Mantel and Base with Trim W32KCSA Assembly and installation instructions

Desa

Desa Wall Mantel and Base with Trim W32KCSA Assembly and installation instructions

Heatilator WHB30 installation instructions

Heatilator

Heatilator WHB30 installation instructions

Valor Fires Wellington Surround installation guide

Valor Fires

Valor Fires Wellington Surround installation guide

manuals.online logo
manuals.online logoBrands
  • About & Mission
  • Contact us
  • Privacy Policy
  • Terms and Conditions

Copyright 2025 Manuals.Online. All Rights Reserved.