manuals.online logo
Brands
  1. Home
  2. •
  3. Brands
  4. •
  5. IHP
  6. •
  7. Fireplace Accessories
  8. •
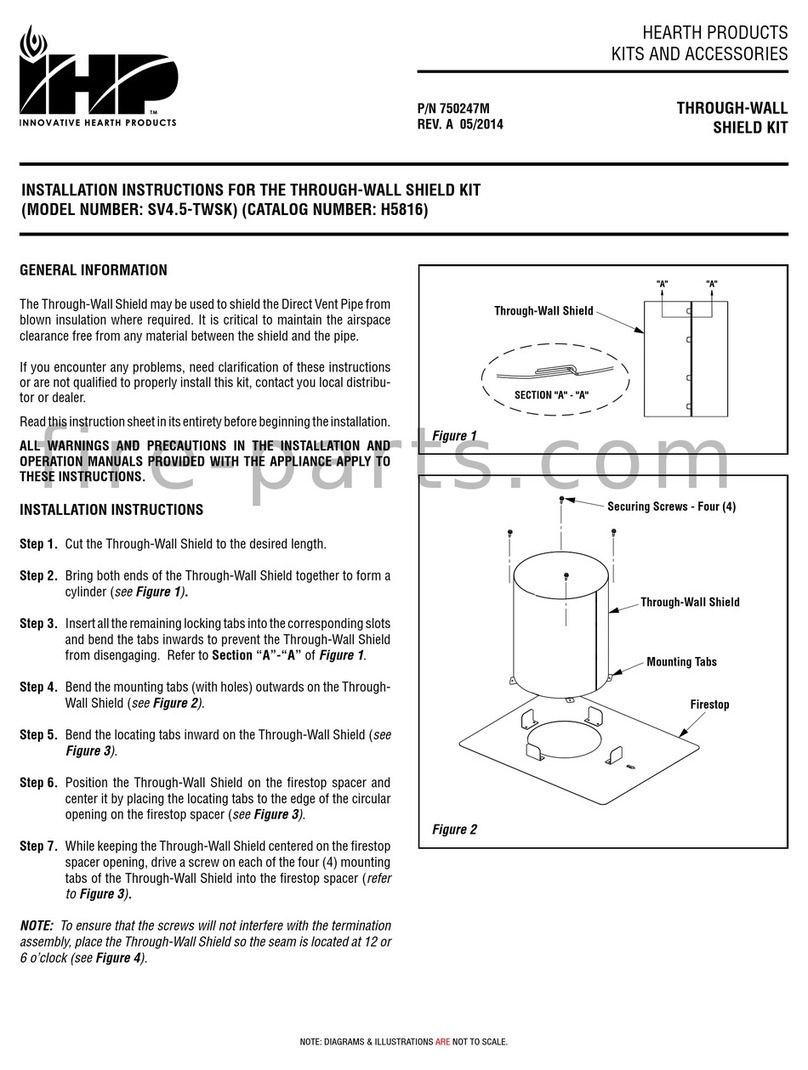
  9. IHP FBK-LIN User manual

IHP FBK-LIN User manual

WARNING
ELECTRICAL GROUNDING INSTRUCTIONS This appliance is equipped with a three-prong (grounding) plug for
your protection against shock hazard and should be plugged directly into a properly grounded three-prong
receptacle. The appliance must be electrically grounded in accordance with local codes or, in the absence of
local codes, the National Electrical Code, ANSI/NFPA 70-(latest edition). (In Canada, the current CSA C22-1
Canadian Electrical Code.)
FBK-LIN
INSTALLATION INSTRUCTIONS FOR FBK-LIN KIT
FOR USE IN ASTRIA ALLUME60TEN AND SUPERIOR DRL4060TEN FIREPLACES
(This Kit is Compatible for One Sided Application only)
HEARTH PRODUCTS
KITS AND ACCESSORIES
900940-00 REV. NC 12/2018
Blower Kit
Catalog
Number
Model Number Kit Name
F3783 FBK-LIN Blower Kit 2 pc.
Blower
Assembly
Thermal switch
Assembly
Speed Control
Assembly
WARNING
This kit must be installed by a qualified installer,
service agency, or gas supplier at the time of the
fireplace installation. These instructions must
be used in conjunction with the installation and
operation manual provided with the fireplace.
INSTALLER: Leave this manual with the fireplace.
CONSUMER: Retain this manual for future reference.
IMPORTANT NOTICE
THIS KIT IS COMPATIBLE WITH ONE SIDED FIREPLACES ONLY.
GENERAL INFORMATION
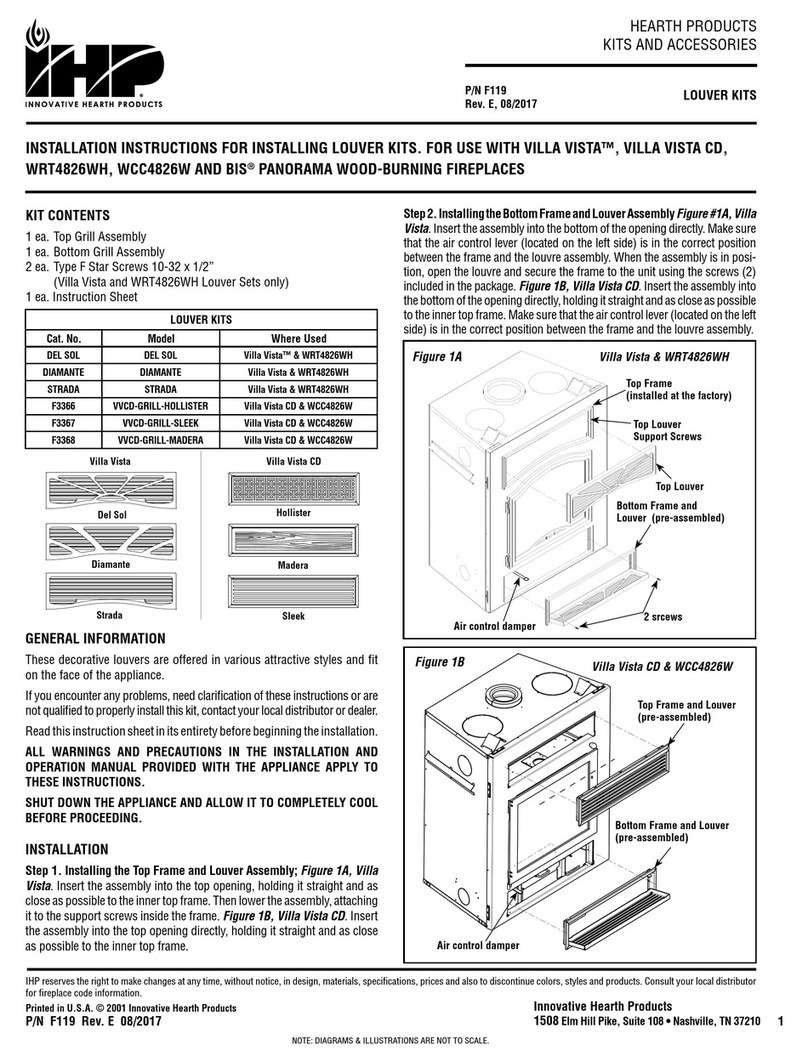
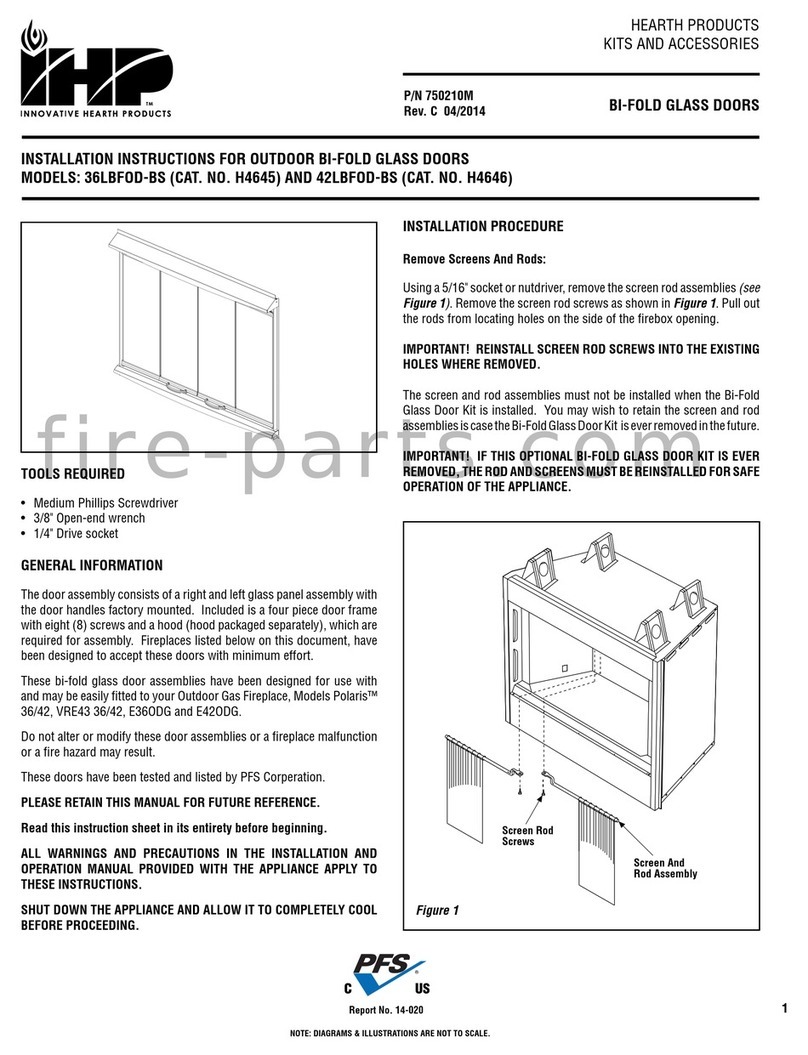
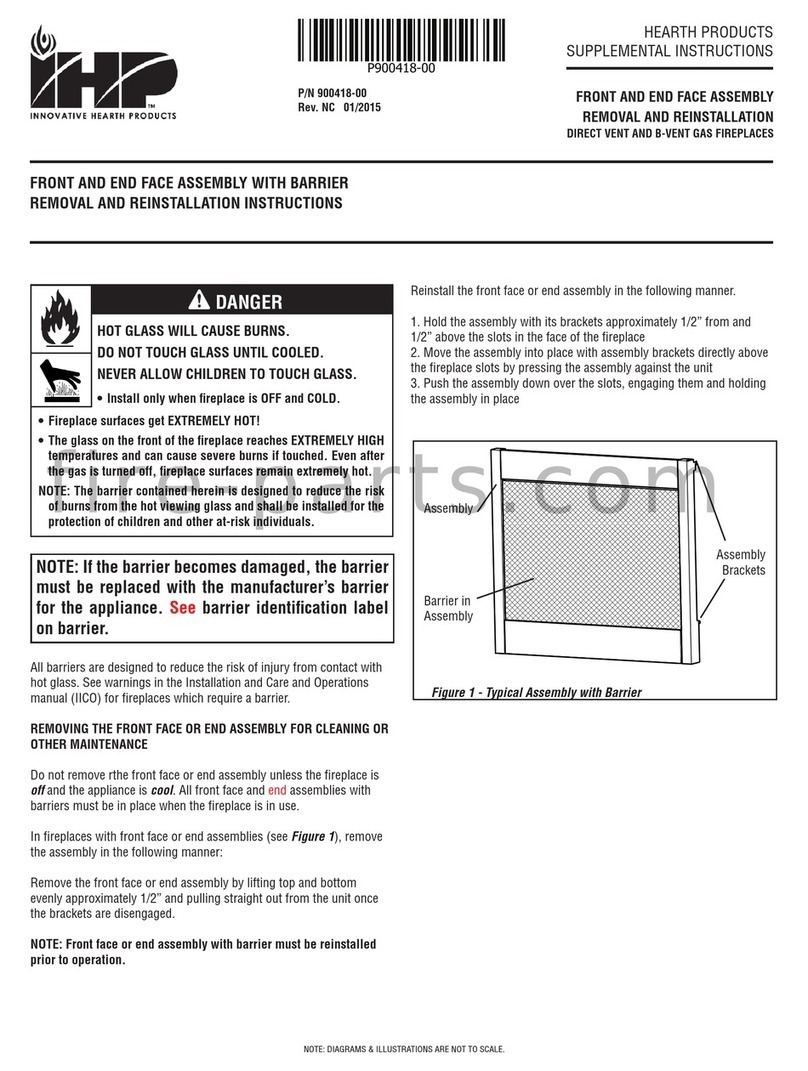
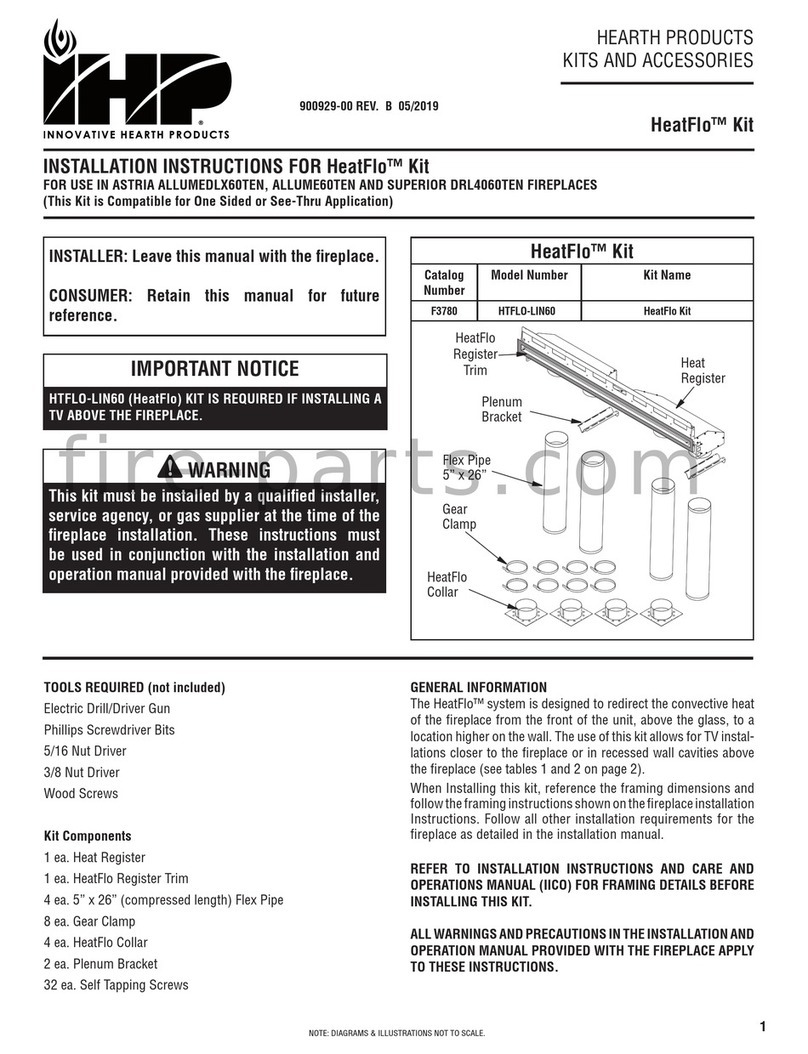
This blower kit may be used with gas fireplaces listed herein. The
FBK-LIN blower kit is used when unit-mounted variable speed blower
control is desired.The blowers areinstalled beneath therear of firebox.
Room air is drawn in through the bottom area of the fireplace, heated
as it passes across the firebox, and discharged through the upper
air exhaust area at the top of the firebox.
ALL WARNINGS AND PRECAUTIONS IN THE INSTALLATION AND
OPERATION MANUAL PROVIDED WITH THE FIREPLACE APPLY TO
THESE INSTRUCTIONS.
TOOLS REQUIRED (not included)
Electric Drill/Driver Gun
Phillips Screwdriver Bits
5/16 Nut Driver
Kit Components
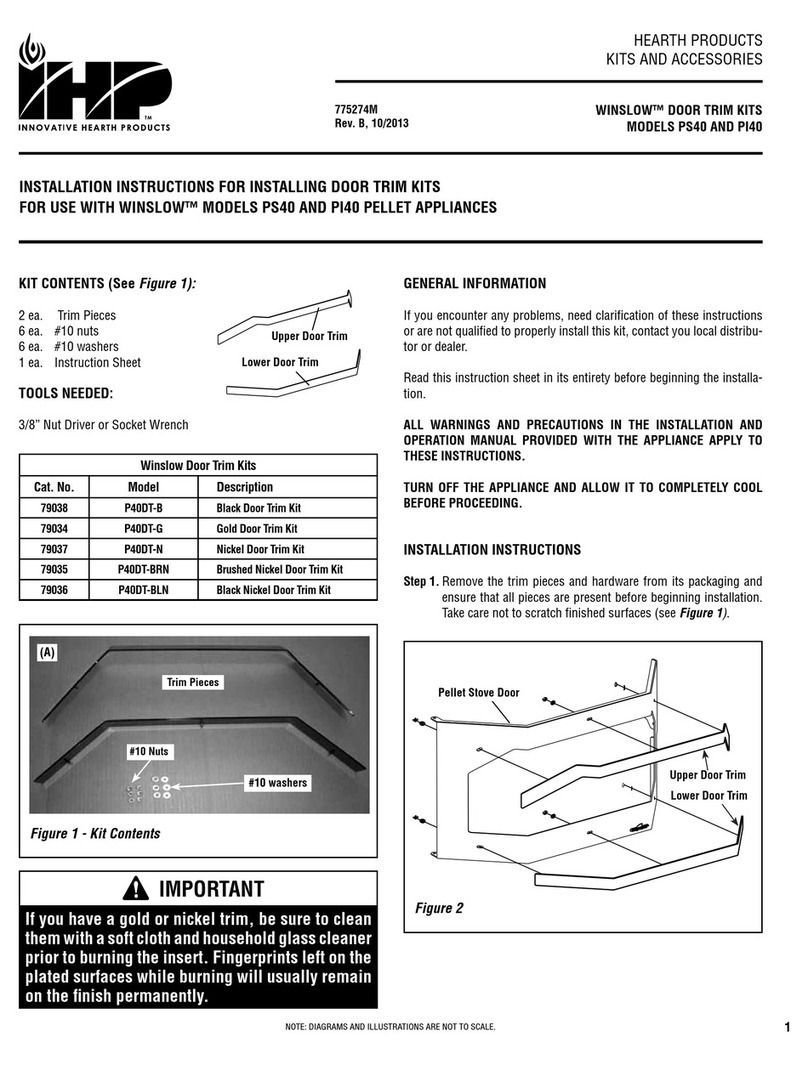
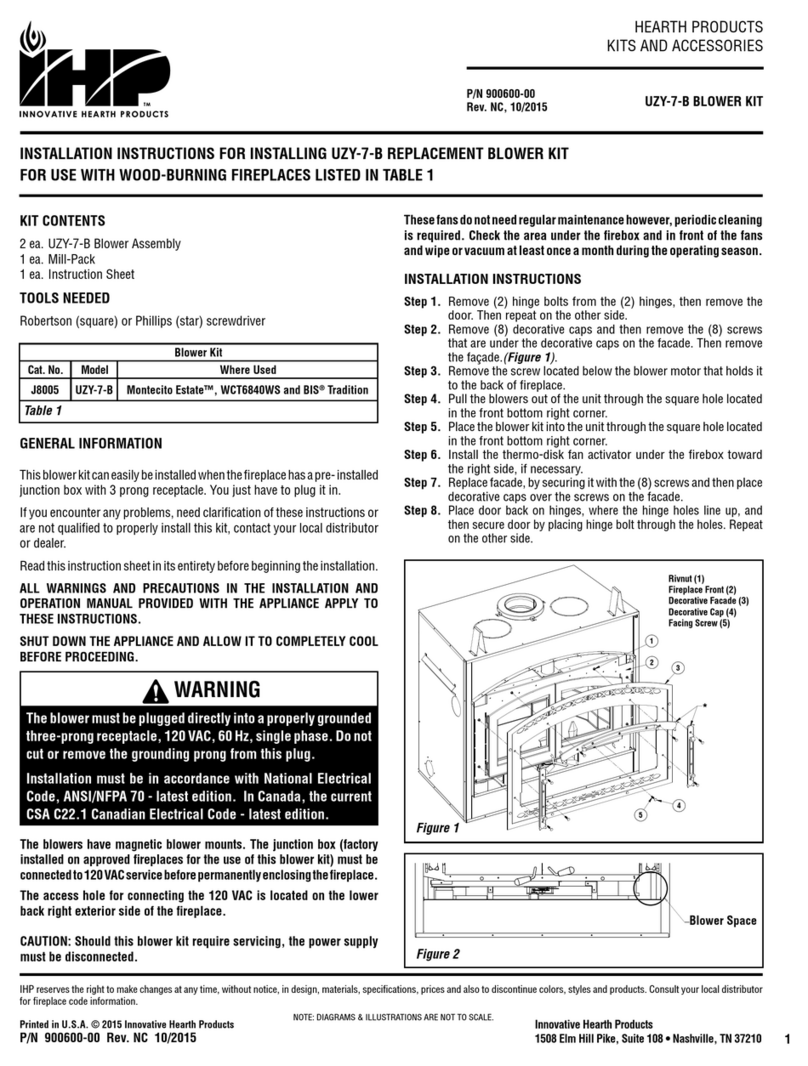
This kit includes 2 (two) blower assemblies with pre installed
magnets, one (1) thermal switch magnetic assembly, one (1) speed
control assembly and these instructions.
fire-parts.com
IHP.us.com 900940-00_NC2
BK-LIN INSTALLATION
Figure 1 - Removing Bottom Face
Figure 2 - Blower Location
Figure 3 - Mounting Blowers
Figure 4 - Thermal Switch/Blower Side View
Bottom
Front
Face
Blower Mounting Brackets
Blowers Mounted
Speed
Control
Firebox
Leg
INSTALLING FBK-LIN
Note: The FBK-LIN blower is for application into direct-vent models
listed on this manual only. The FBK-LIN blower kit can be installed
before or after fireplace installation. When installing the FBK-LIN
thermostatically-controlled blower, make sure the wiring connec-
tions from the thermal switch to the blower are connected in place.
Note: While performing the installation, arrange all wires in an
orderly fashion as to not to interfere with other amenities installed
in the fireplace.
INSTALLING BLOWER KIT IN A NON INSTALLED FIREPLACE
ACCESSING THE FIREPLACE
1. To access the fireplace, first remove nine (9) screws holding
the bottom front fireplace face (Figure 1).
Route FBK-LIN
Blower Through
this Area
Blower
Location
Magnets
Route FBK-LIN
Blower Through
this Area
Air Flow
Direction
Thermal
Switch
Side view Firebox Bottom
INSTALLING BLOWER KIT
1. Locate 2 blower mounting brackets on the firebox outer wrap-
per (Figure 2).
2. Be certain that all wire terminals are securely attached to ter-
minals on blower motor and that the screw retaining the green
ground wire is tight.
3. Place the left blower against the lower rear wall bracket of the
firebox outer wrapper with the exhaust port directed upward
(Figure 3).
4. Place the right blower against the lower rear wall bracket of the
firebox outer wrapper with the exhaust port directed upward
(Figure 3).
5. Connect each blower power cord to the wire harness assembly
plugs.
6. Attach thermal switch magnetic bracket to the bottom of the
firebox bottom cover. The thermal switch must be oriented
near the firebox bottom as shown in Figure 4, in order to sense
temperature and properly operate. The blowers will be held in
position against the back wall by the magnets incorporated onto
the blower housing (see Figure 4).
7. Mount speed control assembly by attaching the side with mag-
nets to the left firebox leg as shown in Figure 3.
8. Plug power cord from speed control to the junction box located
on the lower left side of firebox.
9. The installation of the blower is now complete.
10. Proceed to install the fireplace.
fire-parts.com
IHP.us.com900940-00_NC 3
BK-LIN INSTALLATION
CAUTION
Use gloves as sheet metal parts may be sharp.
INSTALLING BLOWER KIT ON A FINISHED-INSTALLED FIREPLACE
ACCESSING THE FIREPLACE
1. To access the glass door securing latches, first remove the
screen barrier from fireplace.
2. Lift the barrier to clear the bottom channel and swing the
bottom of the barrier out. Then lower the barrier to clear the
top channel. Place the barrier in a safe location for later re-
installation (Figure 5).
3. Detach the four (4) door latches on top of firebox (Figure 6).
4. Swing the top of the glass door away from the fireplace about
15° angle (Figure 7).
5. Remove access control door from rectangular opening in
front of the glass door by lifting up it from the bushings and
pulling up to release the tabs from slots on side retaining
brackets. Set aside the access control door for later re-
installation (Figure 7).
Figure 5 - Removing/Replace Barrier
Upper Front
Face Barrier
Channel
Bottom Front
Face Barrier
Channel
Push UP
Barrier Top to
slide up then
slide Down
pulling OUT
Bottom
Front Face
Screen
Barrier
UP
DOWN
Figure 6 - Removing/Replace Glass Door
Figure 7 - Removing Access Door
Glass Door
4 Door Latches
Access
Door
Retaining
Bracket
Side
Filler
REMOVING INNER COMPONENTS
Remove the following parts for accessing the bottom rear of fire-
place. Note: Save all parts/screws removed in a secure location for
later reinstallation.
1. Remove the media (if installed), following the instructions
provided with the Media Kit.
2. Remove the eight (8) 5/16 in. screws securing the pan media
(see Figure 9, page 4).
3. Remove two (2) screws holding the pilot assembly.
4. Remove the eight (8) 5/16 in. screws securing the burner
assembly (see Figure 10, page 4).
5. Carefully rotate the burner towards the front to disengage the
air shutter lever and slide the burner to the left, to clear the
venturi from the orifice. Then, lift the burner and take it out of
the fireplace (see Figure 10, page 4).
6. Remove twenty (20) screws securing the firebox bottom cover
plate be careful not to break the gasket underneath cover plate
(Figures 11 and 11a), page 4
7. Proceed to installing blower kit.
fire-parts.com
IHP.us.com 900940-00_NC4
Figure 9 - Removing Pan Media
Figure 8 - Remove Pan Media, Burner Assembly and Firebox
Bottom Cover Plate
Figure 10 - Removing Burner Assembly
Figure 11a - Gasket View
Figure 11 - Removing Firebox Bottom Cover
Pilot
Screws
Holding
the burner
Assembly
(Qty. 8)
Screws holding
Pilot Assembly
Air Shutter
Lever
Pan
Media
Pan
Media
Burner
Assembly
Firebox
Bottom
Cover Plate
Screws holding
the Pan Media
(Qty. 8)
Gasket exposed,
(Do not remove)
Control
Access Pilot Shield
Burner
Remove 20 Screws
Holding Firebox
Bottom Cover
BK-LIN INSTALLATION
fire-parts.com
IHP.us.com900940-00_NC 5
Figure 14: Attaching Thermal Switch
Figure 15: Mounting Speed Control
Figure 12: Blower Location
Figure 13: Installing Blower
INSTALLING FBK-LIN
Note: While performing the installation, arrange all wires in an
orderly fashion as to not to interfere with other amenities installed
in the fireplace.
1. Be certain that all wire terminals are securely attached to ter-
minals on blower motor and that the screw retaining the green
ground wire is tight.
2. Place the left blower against the lower rear wall bracket of the
firebox outer wrapper with the exhaust port directed upward
(Figures 12 and 13 ).
3. Place the right blower against the lower rear wall bracket of the
firebox outer wrapper with the exhaust port directed upward
(Figures 12 and 13 ).
4. Connect each blower power cord to the wire harness assembly
plugs.
5. Attach thermal switch magnetic bracket to the bottom of the
firebox bottom cover removed in step 6 (removing inner com-
ponents). The thermal switch must be oriented near the firebox
bottom as shown in Figure 14, in order to sense temperature
and properly operate. The blowers will be held in position against
the back wall by the magnets incorporated onto the blower
housing (Figures 12 and 13).
6. Reinstall firebox bottom cover using the 20 screws removed in
step 6, (removing inner components).
7. Mount speed control assembly by attaching the side with mag-
nets to the left firebox leg as shown in Figure 15.
8. Plug power cord from speed control to the junction box located
on the lower left side of firebox.
9. Test run the blower for at least 15 minutes before reinstalling
all parts/accessories removed.
10. Reinstall all parts/accessories removed in reverse order.
Blower Location
Firebox Leg
Speed
Control
Magnet
Magnet
Thermal Switch
BK-LIN INSTALLATION
fire-parts.com
IHP.us.com 900940-00_NC6
AC/DC
POWER
ADAPTOR
Speed Controller
and ON/OFF Switch
DFC WIRE HARNESS
SPARK WIRE CABLE
PILOT GROUND WIRE
PILOT
SENSOR
CABLE
HOOD IGNITER ROD
FLAME SENSOR
PILOT TUBE
CPI SWITCH
OFF (O) = INTERMITTENT PILOT MODE
ON (-) = STANDING PILOT MODE
PROFLAME DFC BOARD
PROFLAME VALV E
ELECTRONIC
PILOT ASSEMBLY
B = BLACK
BR = BROWN
GY = GRAY
PU = PURPLE
R = RED
BL = BLUE
G = GREEN
O = ORANGE
W = WHITE
Y = YELLOW
WIRING COLOR CODE
B
R
W
W
B
B
B
BL
BL
G
G
O
Y
Y
R
Y
G
O
BL
W
G
O
O
RB
GR
R
B
BL
Battery Holder
Wire Harness
Battery Holder/Receiver
ON/OFF Remote Switch
B
GWG
W
Circulation
BLOWER (OPTIONAL)
Main Power Cord
Thermal Switch
Blower Right
Circulation
Blower Left
B
R
DOUBLE RECEPTACLE
JUNCTION BOX
HOT
HOT
NEUTRAL
GROUND
B
R
W
G
WIRING DIAGRAM ASTRIA ALLUME60TEN FIREPLACES
fire-parts.com
IHP.us.com900940-00_NC 7
AC/DC
POWER
ADAPTOR
BATTERY HOLDER
Remove when Using Optional
Battery Holder/Receiver
ON/OFF Switch
Speed Controller
and ON/OFF Switch
DFC WIRE HARNESS
SPARK WIRE CABLE
PILOT GROUND WIRE
PILOT
SENSOR
CABLE
HOOD IGNITER ROD
FLAME SENSOR
PILOT TUBE
CPI SWITCH
OFF (O) = INTERMITTENT PILOT MODE
ON (-) = STANDING PILOT MODE
PROFLAME DFC BOARD
PROFLAME VALVE
ELECTRONIC
PILOT ASSEMBLY
B = BLACK
BR = BROWN
GY = GRAY
PU = PURPLE
R = RED
BL = BLUE
G = GREEN
O = ORANGE
W = WHITE
Y = YELLOW
WIRING COLOR CODE
B
B
R
R
W
W
B
B
B
B
BL
BL
G
G
O
Y
Y
R
R
Y
G
O
B
GWG
W
Circulation
BLOWER (OPTIONAL)
Main Power Cord
Thermal Switch
Blower Right
Circulation
Blower Left
B
R
DOUBLE RECEPTACLE
JUNCTION BOX
HOT
HOT
NEUTRAL
GROUND
B
R
W
G
WIRING DIAGRAM SUPERIOR DRL4060TEN FIREPLACES
fire-parts.com
Innovative Hearth Products reserves the right to make changes at any time, without notice, in
design, materials, specifications, prices and also to discontinue colors, styles and products.
Consult your local distributor for fireplace code information.
Printed in U.S.A. © 2018 Innovative Hearth Products LLC
P/N 900940-00 Rev. NC 12/2018 1769 East Lawrence Street • Russellville, AL 35654
fire-parts.com

This manual suits for next models

1

Other IHP Fireplace Accessories manuals
IHP Snap-Pak User manual

IHP

IHP Snap-Pak User manual

IHP HeatFlo Kit User manual

IHP

IHP HeatFlo Kit User manual

IHP CDFBBK-35 User manual

IHP

IHP CDFBBK-35 User manual

IHP SV4.5-TWSK User manual

IHP

IHP SV4.5-TWSK User manual

IHP PCBM-42 User manual

IHP

IHP PCBM-42 User manual

IHP BWBK User manual

IHP

IHP BWBK User manual

IHP AK4 User manual

IHP

IHP AK4 User manual

IHP RIVROCK-25PK User manual

IHP

IHP RIVROCK-25PK User manual

IHP OAK-UVFRC User manual

IHP

IHP OAK-UVFRC User manual

IHP HeatFlo Kit HTFLO-LIN60 User manual

IHP

IHP HeatFlo Kit HTFLO-LIN60 User manual

IHP SECURE FLEX SF-12 User manual

IHP

IHP SECURE FLEX SF-12 User manual

IHP PCBM-325 User manual

IHP

IHP PCBM-325 User manual

IHP GCKSMS557051NP User manual

IHP

IHP GCKSMS557051NP User manual

IHP STK-LIN60-B KIT User manual

IHP

IHP STK-LIN60-B KIT User manual

IHP BVCBK User manual

IHP

IHP BVCBK User manual

IHP Superior 900347-00 User manual

IHP

IHP Superior 900347-00 User manual

IHP WINSLOW PS40 User manual

IHP

IHP WINSLOW PS40 User manual

IHP RDV-CONTF-BLK User manual

IHP

IHP RDV-CONTF-BLK User manual

IHP SEREFINA CI1500 GCK LP User manual

IHP

IHP SEREFINA CI1500 GCK LP User manual

IHP RDV-BRK-STD User manual

IHP

IHP RDV-BRK-STD User manual

IHP F1762 User manual

IHP

IHP F1762 User manual

IHP BNZN User manual

IHP

IHP BNZN User manual

IHP 900077-07 User manual

IHP

IHP 900077-07 User manual

IHP DUALBURNER24N User manual

IHP

IHP DUALBURNER24N User manual

Popular Fireplace Accessories manuals by other brands

Heatilator CFL-18NG Log Placement Instructions

Heatilator

Heatilator CFL-18NG Log Placement Instructions

Heat & Glo DRIFTWOOD-C32 installation instructions

Heat & Glo

Heat & Glo DRIFTWOOD-C32 installation instructions

HPC El Pilot Assembly Replacement

HPC

HPC El Pilot Assembly Replacement

SimpliFire SF-OD43 owner's manual

SimpliFire

SimpliFire SF-OD43 owner's manual

FireplaceXtrordinair CoolSmart TV manual

FireplaceXtrordinair

FireplaceXtrordinair CoolSmart TV manual

Solas TWENTY6 SL-26N installation manual

Solas

Solas TWENTY6 SL-26N installation manual

Lopi WILMINGTON DVS FACE 99500146 user manual

Lopi

Lopi WILMINGTON DVS FACE 99500146 user manual

superior fires SF12-212-000 Installation & assembly instructions

superior fires

superior fires SF12-212-000 Installation & assembly instructions

Dimplex DFP6787C install guide

Dimplex

Dimplex DFP6787C install guide

Montigo H38-DF Installing

Montigo

Montigo H38-DF Installing

Travis Industries 4237 quick start guide

Travis Industries

Travis Industries 4237 quick start guide

Next BRONX COMPACT FIREPLACE SURROUND 982325 Assembly instructions

Next

Next BRONX COMPACT FIREPLACE SURROUND 982325 Assembly instructions

Majestic MERID36IN installation instructions

Majestic

Majestic MERID36IN installation instructions

Valor H3 Series installation manual

Valor

Valor H3 Series installation manual

Napoleon NEFE30-3820AW Installation and operation manual

Napoleon

Napoleon NEFE30-3820AW Installation and operation manual

AMD DIrect GWS-17R Installation and operating instructions
AMD DIrect

AMD DIrect GWS-17R Installation and operating instructions

Town & Country Fireplaces TCWS.38CE2 Instructions for the use

Town & Country Fireplaces

Town & Country Fireplaces TCWS.38CE2 Instructions for the use

BuckMaster EMBER VISION 100 SERIES manual

BuckMaster

BuckMaster EMBER VISION 100 SERIES manual

manuals.online logo
manuals.online logoBrands
  • About & Mission
  • Contact us
  • Privacy Policy
  • Terms and Conditions

Copyright 2025 Manuals.Online. All Rights Reserved.