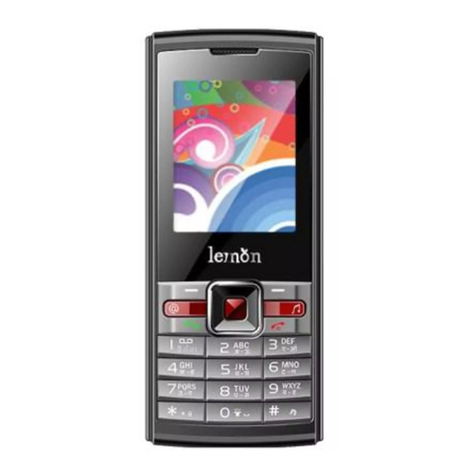
Lemon Lemon Duo 305 User manual

1

2
© 201 1 . All rights are reserved. No part of this document may be reproduced
without permission. All trademarks and brand names mentioned in this publication
are property of their respective owners.
While all efforts have been made to ensure the accuracy of all contents in this
manual, we assume no liability for errors or omissions or statements of any kind in
this manual, whether such errors or omissions or statements resulting from
negligence, accidents, or any other cause. The contents of this manual are subject
to change without notice.
Protect our environment! We strive to produce products in compliance with global
environmental standards. Please consult your local authorities for proper disposal.
Note: User ’ s Manual is Just to guide the user about the functionality of the phone.
This does not seem any certificate of technology. Some functions may very due to
modifications and up gradations of software or due to print mistake.

3
SAFETY
SAFETY
SAFETY
SAFETY
PRECAUTIONS
PRECAUTIONS
PRECAUTIONS
PRECAUTIONS
Before using your phone, please read the following important information to
eliminate or reduce any possibility of causing damage and personal injury.
Improper use will invalidate the warranty! These safety instructions also apply to
original accessories.
Do not use wireless phones while driving.
Switch off wireless devices in aircraft. The signal may cause
interference. Using them on aircraft is illegal.
Do not use mobile phones where blasting is in progress.
Follow regulations and rules strictly.
Do not use mobile phones at a refueling point. Don ’ t use
near fuel or chemicals
Follow regulations or rules in hospital and health care
facilities. Switch phone off near medical equipment.
All wireless devices may get interference that could affect
performance.
Only qualified service personnel can install or repair this
device.
Use only approved accessories and batteries.
Use only in normal position. Do not expose your phone to
extreme high temperatures above +60 ℃(+140 ° F ). Do not
use anything static to clean your phone.
Ensure the phone is turned on and in service. Enter the
emergency number, then press Pick Up key. Give your
location. Do not end the call until told to do so.

4
CONTENTS
CONTENTS
CONTENTS
CONTENTS
1
1
1
1
PREFACE
PREFACE
PREFACE
PREFACE
.
.
.
.
.
.
.
.
.
.
.
.
.
.
.
.
.
.
.
.
.
.
.
.
.
.
.
.
.
.
.
.
.
.
.
.
.
.
.
.
.
.
.
.
.
.
.
.
.
.
.
.
.
.
.
.
.
.
.
.
.
.
.
.
.
.
.
.
.
.
.
.
.
.
.
.
.
.
.
.
.
.
.
.
.
.
.
.
.
.
.
.
.
.
.
.
.
.
.
.
.
.
.
.
.
.
.
.
.
.
.
.
.
.
.
.
.
.
.
.
.
.
.
.
.
.
.
.
.
.
.
.
.
.
.
.
.
.
.
.
.
.
.
.
.
.
.
.
.
.
.
.
.
.
.
.
.
.
.
.
.
.
.
.
.
.
.
.
.
.
.
.
.
.
.
.
.
.
.
.
.
.
.
.
.
.
.
.
.
.
.
.
.
.
.
.
.
.
.
.
.
.
.
.
.
.
.
.
.
.
.
.
.
.
.
.
.
.
.
.
.
.
.
.
.
.
.
.
.
.
.
.
.
.
.
.
.
.
.
.
.
.
.
.
.
.
.
.
.
.
.
.
.
.
.
.
.
.
.
.
.
.
.
.
.
.
.
.
.
.
.
.
.
.
.
.
.
.
.
.
.
.
.
.
.
.
.
.
.
.
.
.
.
.
.
.
.
.
.
.
.
.
.
.
.
.
.
.
.
.
.
.
.
.
.
.
.
.
.
.
.
.
.
.
.
.
.
.
.
.
.
.
.
.
.
.
.
.
.
.
.
.
.
.
.
.
.
.
.
.
.
.
.
.
.
.
.
.
.
.
.
.
.
.
.
.
.
.
.
.
.
.
.
.
.
.
.
.
.
.
.
.
.
.
.
.
.
.
.
.
.
.
.
.
.
.
.
.
.
.
.
.
.
.
.
.
.
.
.
.
.
.
.
.
.
.
.
.
.
.
.
.
.
.
.
.
.
.
.
.
.
.
.
.
.
.
.
.
.
.
.
.
.
.
.
.
.
.
.
.
.
.
.
.
.
.
.
.
.
.
.
.
.
.
.
.
.
.
.
.
.
.
.
.
.
.
.
.
.
.
.
.
.
.
7
7
7
7
2
2
2
2
ABOUT
ABOUT
ABOUT
ABOUT
YOUR
YOUR
YOUR
YOUR
DEVICE
DEVICE
DEVICE
DEVICE
.
.
.
.
.
.
.
.
.
.
.
.
.
.
.
.
.
.
.
.
.
.
.
.
.
.
.
.
.
.
.
.
.
.
.
.
.
.
.
.
.
.
.
.
.
.
.
.
.
.
.
.
.
.
.
.
.
.
.
.
.
.
.
.
.
.
.
.
.
.
.
.
.
.
.
.
.
.
.
.
.
.
.
.
.
.
.
.
.
.
.
.
.
.
.
.
.
.
.
.
.
.
.
.
.
.
.
.
.
.
.
.
.
.
.
.
.
.
.
.
.
.
.
.
.
.
.
.
.
.
.
.
.
.
.
.
.
.
.
.
.
.
.
.
.
.
.
.
.
.
.
.
.
.
.
.
.
.
.
.
.
.
.
.
.
.
.
.
.
.
.
.
.
.
.
.
.
.
.
.
.
.
.
.
.
.
.
.
.
.
.
.
.
.
.
.
.
.
.
.
.
.
.
.
.
.
.
.
.
.
.
.
.
.
.
.
.
.
.
.
.
.
.
.
.
.
.
.
.
.
.
.
.
.
.
.
.
.
.
.
.
.
.
.
.
.
.
.
.
.
.
.
.
.
.
.
.
.
.
.
.
.
.
.
.
.
.
.
.
.
.
.
.
.
.
.
.
.
.
.
.
.
.
.
.
.
.
.
.
.
.
.
.
.
.
.
.
.
.
.
.
.
.
.
.
.
.
.
.
.
.
.
.
.
.
.
.
.
.
.
.
.
.
.
.
.
.
.
.
.
.
.
.
.
.
.
.
.
.
.
.
.
.
.
.
.
.
.
.
.
.
.
.
.
.
.
.
.
.
.
.
.
.
.
.
.
.
.
.
.
.
.
.
.
.
.
.
.
.
.
.
.
.
.
.
.
.
.
.
.
.
.
.
.
.
.
8
8
8
8
2.1 A PPEAR . . . . . . . . . . . . . . . . . . . . . . . . . . . . . . . . . . . . . . . . . . . . . . . . . . . . . . . . . . . . . . . . . . . . . . . . . . . . . . . . . . . . . . . . . . . . . . . . . . . . . . . . . . . . . . . . . . . 8
2.2 K EYS INSTRUCTION . . . . . . . . . . . . . . . . . . . . . . . . . . . . . . . . . . . . . . . . . . . . . . . . . . . . . . . . . . . . . . . . . . . . . . . . . . . . . . . . . . . . . . . . . . . . . . . . . . 9
2.3 I CONS . . . . . . . . . . . . . . . . . . . . . . . . . . . . . . . . . . . . . . . . . . . . . . . . . . . . . . . . . . . . . . . . . . . . . . . . . . . . . . . . . . . . . . . . . . . . . . . . . . . . . . . . . . . . . . . . . . . 10
3
3
3
3
GETTING
GETTING
GETTING
GETTING
STARTED
STARTED
STARTED
STARTED
.
.
.
.
.
.
.
.
.
.
.
.
.
.
.
.
.
.
.
.
.
.
.
.
.
.
.
.
.
.
.
.
.
.
.
.
.
.
.
.
.
.
.
.
.
.
.
.
.
.
.
.
.
.
.
.
.
.
.
.
.
.
.
.
.
.
.
.
.
.
.
.
.
.
.
.
.
.
.
.
.
.
.
.
.
.
.
.
.
.
.
.
.
.
.
.
.
.
.
.
.
.
.
.
.
.
.
.
.
.
.
.
.
.
.
.
.
.
.
.
.
.
.
.
.
.
.
.
.
.
.
.
.
.
.
.
.
.
.
.
.
.
.
.
.
.
.
.
.
.
.
.
.
.
.
.
.
.
.
.
.
.
.
.
.
.
.
.
.
.
.
.
.
.
.
.
.
.
.
.
.
.
.
.
.
.
.
.
.
.
.
.
.
.
.
.
.
.
.
.
.
.
.
.
.
.
.
.
.
.
.
.
.
.
.
.
.
.
.
.
.
.
.
.
.
.
.
.
.
.
.
.
.
.
.
.
.
.
.
.
.
.
.
.
.
.
.
.
.
.
.
.
.
.
.
.
.
.
.
.
.
.
.
.
.
.
.
.
.
.
.
.
.
.
.
.
.
.
.
.
.
.
.
.
.
.
.
.
.
.
.
.
.
.
.
.
.
.
.
.
.
.
.
.
.
.
.
.
.
.
.
.
.
.
.
.
.
.
.
.
.
.
.
.
.
.
.
.
.
.
.
.
.
.
.
.
.
.
.
.
.
.
.
.
.
.
.
.
.
.
.
.
.
.
.
.
.
.
.
.
.
.
.
.
.
.
.
.
.
.
.
.
.
.
.
.
.
.
.
.
.
.
.
.
.
.
.
.
.
.
.
.
.
.
.
.
.
.
.
.
.
.
.
.
.
.
.
.
11
11
11
11
3.1 B A TTERY . . . . . . . . . . . . . . . . . . . . . . . . . . . . . . . . . . . . . . . . . . . . . . . . . . . . . . . . . . . . . . . . . . . . . . . . . . . . . . . . . . . . . . . . . . . . . . . . . . . . . . . . . . . . . . . .
11
3.1.1 I NSTALL &REMOVE BATTERY . . . . . . . . . . . . . . . . . . . . . . . . . . . . . . . . . . . . . . . . . . . . . . . . . . . . . . . . . . . . . . . . . . . . . . . . . . . . . . . . . . .
11
3.1.2 C HARGING . . . . . . . . . . . . . . . . . . . . . . . . . . . . . . . . . . . . . . . . . . . . . . . . . . . . . . . . . . . . . . . . . . . . . . . . . . . . . . . . . . . . . . . . . . . . . . . . . . . . . . . . . . . . .
11
3.2 SIM CARD INSTALLATION . . . . . . . . . . . . . . . . . . . . . . . . . . . . . . . . . . . . . . . . . . . . . . . . . . . . . . . . . . . . . . . . . . . . . . . . . . . . . . . . . . . . . . . . 12
3.3 M EMORY CARD INSTALLATION . . . . . . . . . . . . . . . . . . . . . . . . . . . . . . . . . . . . . . . . . . . . . . . . . . . . . . . . . . . . . . . . . . . . . . . . . . . . . . . . . 12
3.4 H EADSET . . . . . . . . . . . . . . . . . . . . . . . . . . . . . . . . . . . . . . . . . . . . . . . . . . . . . . . . . . . . . . . . . . . . . . . . . . . . . . . . . . . . . . . . . . . . . . . . . . . . . . . . . . . . . . . 13
3.5 F ILE MANAGER . . . . . . . . . . . . . . . . . . . . . . . . . . . . . . . . . . . . . . . . . . . . . . . . . . . . . . . . . . . . . . . . . . . . . . . . . . . . . . . . . . . . . . . . . . . . . . . . . . . . . . . 13
3.6 WEBCAM . . . . . . . . . . . . . . . . . . . . . . . . . . . . . . . . . . . . . . . . . . . . . . . . . . . . . . . . . . . . . . . . . . . . . . . . . . . . . . . . . . . . . . . . . . . . . . . . . . . . . . . . . . . . 13
3.7 P OWER ON AND OFF . . . . . . . . . . . . . . . . . . . . . . . . . . . . . . . . . . . . . . . . . . . . . . . . . . . . . . . . . . . . . . . . . . . . . . . . . . . . . . . . . . . . . . . . . . . . . . 14
4
4
4
4
CALL
CALL
CALL
CALL
FUNCTIONS
FUNCTIONS
FUNCTIONS
FUNCTIONS
.
.
.
.
.
.
.
.
.
.
.
.
.
.
.
.
.
.
.
.
.
.
.
.
.
.
.
.
.
.
.
.
.
.
.
.
.
.
.
.
.
.
.
.
.
.
.
.
.
.
.
.
.
.
.
.
.
.
.
.
.
.
.
.
.
.
.
.
.
.
.
.
.
.
.
.
.
.
.
.
.
.
.
.
.
.
.
.
.
.
.
.
.
.
.
.
.
.
.
.
.
.
.
.
.
.
.
.
.
.
.
.
.
.
.
.
.
.
.
.
.
.
.
.
.
.
.
.
.
.
.
.
.
.
.
.
.
.
.
.
.
.
.
.
.
.
.
.
.
.
.
.
.
.
.
.
.
.
.
.
.
.
.
.
.
.
.
.
.
.
.
.
.
.
.
.
.
.
.
.
.
.
.
.
.
.
.
.
.
.
.
.
.
.
.
.
.
.
.
.
.
.
.
.
.
.
.
.
.
.
.
.
.
.
.
.
.
.
.
.
.
.
.
.
.
.
.
.
.
.
.
.
.
.
.
.
.
.
.
.
.
.
.
.
.
.
.
.
.
.
.
.
.
.
.
.
.
.
.
.
.
.
.
.
.
.
.
.
.
.
.
.
.
.
.
.
.
.
.
.
.
.
.
.
.
.
.
.
.
.
.
.
.
.
.
.
.
.
.
.
.
.
.
.
.
.
.
.
.
.
.
.
.
.
.
.
.
.
.
.
.
.
.
.
.
.
.
.
.
.
.
.
.
.
.
.
.
.
.
.
.
.
.
.
.
.
.
.
.
.
.
.
.
.
.
.
.
.
.
.
.
.
.
.
.
.
.
.
.
.
.
.
.
.
.
.
.
.
.
.
.
.
.
.
.
.
.
.
.
.
.
.
.
.
.
.
.
.
.
.
.
.
.
.
.
.
.
.
.
.
.
.
.
.
.
.
14
14
14
14
4.1 M AKE
A
CALL . . . . . . . . . . . . . . . . . . . . . . . . . . . . . . . . . . . . . . . . . . . . . . . . . . . . . . . . . . . . . . . . . . . . . . . . . . . . . . . . . . . . . . . . . . . . . . . . . . . . . . . . . 14
4.1.1 M AKE
A
DOMESTIC CALL . . . . . . . . . . . . . . . . . . . . . . . . . . . . . . . . . . . . . . . . . . . . . . . . . . . . . . . . . . . . . . . . . . . . . . . . . . . . . . . . . . . . . . . . . 14
4.1.2 M AKE AN EXTENSION CALL . . . . . . . . . . . . . . . . . . . . . . . . . . . . . . . . . . . . . . . . . . . . . . . . . . . . . . . . . . . . . . . . . . . . . . . . . . . . . . . . . . . . . . 14
4.1.3 M AKE AN INTERNATIONAL CALL . . . . . . . . . . . . . . . . . . . . . . . . . . . . . . . . . . . . . . . . . . . . . . . . . . . . . . . . . . . . . . . . . . . . . . . . . . . . . . . 14
4.1.4 M AKE
A
CALL FROM PHONEBOOK . . . . . . . . . . . . . . . . . . . . . . . . . . . . . . . . . . . . . . . . . . . . . . . . . . . . . . . . . . . . . . . . . . . . . . . . . . . 14
4.1.5 R EDIAL
A
CALL BY CALL LOG . . . . . . . . . . . . . . . . . . . . . . . . . . . . . . . . . . . . . . . . . . . . . . . . . . . . . . . . . . . . . . . . . . . . . . . . . . . . . . . . . . 14
4.1.6 S MART DIAL . . . . . . . . . . . . . . . . . . . . . . . . . . . . . . . . . . . . . . . . . . . . . . . . . . . . . . . . . . . . . . . . . . . . . . . . . . . . . . . . . . . . . . . . . . . . . . . . . . . . . . . . . . . 14
4.2 A NSWER
A
CALL . . . . . . . . . . . . . . . . . . . . . . . . . . . . . . . . . . . . . . . . . . . . . . . . . . . . . . . . . . . . . . . . . . . . . . . . . . . . . . . . . . . . . . . . . . . . . . . . . . . . . 15
4.3 C ALL OPTIONS . . . . . . . . . . . . . . . . . . . . . . . . . . . . . . . . . . . . . . . . . . . . . . . . . . . . . . . . . . . . . . . . . . . . . . . . . . . . . . . . . . . . . . . . . . . . . . . . . . . . . . . 15
5
5
5
5
TEXT
TEXT
TEXT
TEXT
ENTRY
ENTRY
ENTRY
ENTRY
.
.
.
.
.
.
.
.
.
.
.
.
.
.
.
.
.
.
.
.
.
.
.
.
.
.
.
.
.
.
.
.
.
.
.
.
.
.
.
.
.
.
.
.
.
.
.
.
.
.
.
.
.
.
.
.
.
.
.
.
.
.
.
.
.
.
.
.
.
.
.
.
.
.
.
.
.
.
.
.
.
.
.
.
.
.
.
.
.
.
.
.
.
.
.
.
.
.
.
.
.
.
.
.
.
.
.
.
.
.
.
.
.
.
.
.
.
.
.
.
.
.
.
.
.
.
.
.
.
.
.
.
.
.
.
.
.
.
.
.
.
.
.
.
.
.
.
.
.
.
.
.
.
.
.
.
.
.
.
.
.
.
.
.
.
.
.
.
.
.
.
.
.
.
.
.
.
.
.
.
.
.
.
.
.
.
.
.
.
.
.
.
.
.
.
.
.
.
.
.
.
.
.
.
.
.
.
.
.
.
.
.
.
.
.
.
.
.
.
.
.
.
.
.
.
.
.
.
.
.
.
.
.
.
.
.
.
.
.
.
.
.
.
.
.
.
.
.
.
.
.
.
.
.
.
.
.
.
.
.
.
.
.
.
.
.
.
.
.
.
.
.
.
.
.
.
.
.
.
.
.
.
.
.
.
.
.
.
.
.
.
.
.
.
.
.
.
.
.
.
.
.
.
.
.
.
.
.
.
.
.
.
.
.
.
.
.
.
.
.
.
.
.
.
.
.
.
.
.
.
.
.
.
.
.
.
.
.
.
.
.
.
.
.
.
.
.
.
.
.
.
.
.
.
.
.
.
.
.
.
.
.
.
.
.
.
.
.
.
.
.
.
.
.
.
.
.
.
.
.
.
.
.
.
.
.
.
.
.
.
.
.
.
.
.
.
.
.
.
.
.
.
.
.
.
.
.
.
.
.
.
.
.
.
.
.
.
.
.
.
.
.
.
.
.
.
.
.
.
.
.
.
.
.
.
.
.
.
.
.
.
.
.
.
.
.
.
.
.
.
.
.
15
15
15
15
5.1 S WITCH INPUT METHODS . . . . . . . . . . . . . . . . . . . . . . . . . . . . . . . . . . . . . . . . . . . . . . . . . . . . . . . . . . . . . . . . . . . . . . . . . . . . . . . . . . . . . . . . 15
5.2 S MART HINDI INPUT METHOD . . . . . . . . . . . . . . . . . . . . . . . . . . . . . . . . . . . . . . . . . . . . . . . . . . . . . . . . . . . . . . . . . . . . . . . . . . . . . . . . . 15
5.3 H INDI INPUT METHOD . . . . . . . . . . . . . . . . . . . . . . . . . . . . . . . . . . . . . . . . . . . . . . . . . . . . . . . . . . . . . . . . . . . . . . . . . . . . . . . . . . . . . . . . . . . . . 15
5.4 S MART ENGLISH INPUT METHOD . . . . . . . . . . . . . . . . . . . . . . . . . . . . . . . . . . . . . . . . . . . . . . . . . . . . . . . . . . . . . . . . . . . . . . . . . . . . . 15
5.5 E NGLISH INPUT METHOD . . . . . . . . . . . . . . . . . . . . . . . . . . . . . . . . . . . . . . . . . . . . . . . . . . . . . . . . . . . . . . . . . . . . . . . . . . . . . . . . . . . . . . . . 15
5.6 I NPUT PUNCTUATIONS AND SYMBOLS . . . . . . . . . . . . . . . . . . . . . . . . . . . . . . . . . . . . . . . . . . . . . . . . . . . . . . . . . . . . . . . . . . . . . . 16
5.7 I NPUT SPACE . . . . . . . . . . . . . . . . . . . . . . . . . . . . . . . . . . . . . . . . . . . . . . . . . . . . . . . . . . . . . . . . . . . . . . . . . . . . . . . . . . . . . . . . . . . . . . . . . . . . . . . . . 16

5
5.8 I NPUT NUMBERS . . . . . . . . . . . . . . . . . . . . . . . . . . . . . . . . . . . . . . . . . . . . . . . . . . . . . . . . . . . . . . . . . . . . . . . . . . . . . . . . . . . . . . . . . . . . . . . . . . . . 16
6
6
6
6
MENU
MENU
MENU
MENU
OPERATION
OPERATION
OPERATION
OPERATION
.
.
.
.
.
.
.
.
.
.
.
.
.
.
.
.
.
.
.
.
.
.
.
.
.
.
.
.
.
.
.
.
.
.
.
.
.
.
.
.
.
.
.
.
.
.
.
.
.
.
.
.
.
.
.
.
.
.
.
.
.
.
.
.
.
.
.
.
.
.
.
.
.
.
.
.
.
.
.
.
.
.
.
.
.
.
.
.
.
.
.
.
.
.
.
.
.
.
.
.
.
.
.
.
.
.
.
.
.
.
.
.
.
.
.
.
.
.
.
.
.
.
.
.
.
.
.
.
.
.
.
.
.
.
.
.
.
.
.
.
.
.
.
.
.
.
.
.
.
.
.
.
.
.
.
.
.
.
.
.
.
.
.
.
.
.
.
.
.
.
.
.
.
.
.
.
.
.
.
.
.
.
.
.
.
.
.
.
.
.
.
.
.
.
.
.
.
.
.
.
.
.
.
.
.
.
.
.
.
.
.
.
.
.
.
.
.
.
.
.
.
.
.
.
.
.
.
.
.
.
.
.
.
.
.
.
.
.
.
.
.
.
.
.
.
.
.
.
.
.
.
.
.
.
.
.
.
.
.
.
.
.
.
.
.
.
.
.
.
.
.
.
.
.
.
.
.
.
.
.
.
.
.
.
.
.
.
.
.
.
.
.
.
.
.
.
.
.
.
.
.
.
.
.
.
.
.
.
.
.
.
.
.
.
.
.
.
.
.
.
.
.
.
.
.
.
.
.
.
.
.
.
.
.
.
.
.
.
.
.
.
.
.
.
.
.
.
.
.
.
.
.
.
.
.
.
.
.
.
.
.
.
.
.
.
.
.
.
.
.
.
.
.
.
.
.
.
.
.
.
.
.
.
.
.
.
.
.
.
.
.
.
.
.
.
.
.
.
.
.
.
.
.
.
.
.
.
.
.
.
.
.
16
16
16
16
6.1 A CCESS MENUS . . . . . . . . . . . . . . . . . . . . . . . . . . . . . . . . . . . . . . . . . . . . . . . . . . . . . . . . . . . . . . . . . . . . . . . . . . . . . . . . . . . . . . . . . . . . . . . . . . . . . 16
7
7
7
7
MENU
MENU
MENU
MENU
FUNCTIONS
FUNCTIONS
FUNCTIONS
FUNCTIONS
.
.
.
.
.
.
.
.
.
.
.
.
.
.
.
.
.
.
.
.
.
.
.
.
.
.
.
.
.
.
.
.
.
.
.
.
.
.
.
.
.
.
.
.
.
.
.
.
.
.
.
.
.
.
.
.
.
.
.
.
.
.
.
.
.
.
.
.
.
.
.
.
.
.
.
.
.
.
.
.
.
.
.
.
.
.
.
.
.
.
.
.
.
.
.
.
.
.
.
.
.
.
.
.
.
.
.
.
.
.
.
.
.
.
.
.
.
.
.
.
.
.
.
.
.
.
.
.
.
.
.
.
.
.
.
.
.
.
.
.
.
.
.
.
.
.
.
.
.
.
.
.
.
.
.
.
.
.
.
.
.
.
.
.
.
.
.
.
.
.
.
.
.
.
.
.
.
.
.
.
.
.
.
.
.
.
.
.
.
.
.
.
.
.
.
.
.
.
.
.
.
.
.
.
.
.
.
.
.
.
.
.
.
.
.
.
.
.
.
.
.
.
.
.
.
.
.
.
.
.
.
.
.
.
.
.
.
.
.
.
.
.
.
.
.
.
.
.
.
.
.
.
.
.
.
.
.
.
.
.
.
.
.
.
.
.
.
.
.
.
.
.
.
.
.
.
.
.
.
.
.
.
.
.
.
.
.
.
.
.
.
.
.
.
.
.
.
.
.
.
.
.
.
.
.
.
.
.
.
.
.
.
.
.
.
.
.
.
.
.
.
.
.
.
.
.
.
.
.
.
.
.
.
.
.
.
.
.
.
.
.
.
.
.
.
.
.
.
.
.
.
.
.
.
.
.
.
.
.
.
.
.
.
.
.
.
.
.
.
.
.
.
.
.
.
.
.
.
.
.
.
.
.
.
.
.
.
.
.
.
.
.
.
.
.
.
.
.
.
.
.
.
.
.
.
.
.
.
.
.
.
.
16
16
16
16
7.1 C ONT ACTS . . . . . . . . . . . . . . . . . . . . . . . . . . . . . . . . . . . . . . . . . . . . . . . . . . . . . . . . . . . . . . . . . . . . . . . . . . . . . . . . . . . . . . . . . . . . . . . . . . . . . . . . . . . . . 16
7.2 M ESSAGES . . . . . . . . . . . . . . . . . . . . . . . . . . . . . . . . . . . . . . . . . . . . . . . . . . . . . . . . . . . . . . . . . . . . . . . . . . . . . . . . . . . . . . . . . . . . . . . . . . . . . . . . . . . . 16
7.2.1 W RITE MESSAGE . . . . . . . . . . . . . . . . . . . . . . . . . . . . . . . . . . . . . . . . . . . . . . . . . . . . . . . . . . . . . . . . . . . . . . . . . . . . . . . . . . . . . . . . . . . . . . . . . . . . 16
7.2.2 C HAT BOX . . . . . . . . . . . . . . . . . . . . . . . . . . . . . . . . . . . . . . . . . . . . . . . . . . . . . . . . . . . . . . . . . . . . . . . . . . . . . . . . . . . . . . . . . . . . . . . . . . . . . . . . . . . . . 17
7.2.3 I NBOX . . . . . . . . . . . . . . . . . . . . . . . . . . . . . . . . . . . . . . . . . . . . . . . . . . . . . . . . . . . . . . . . . . . . . . . . . . . . . . . . . . . . . . . . . . . . . . . . . . . . . . . . . . . . . . . . . . . . 17
7.2.4 O UTBOX . . . . . . . . . . . . . . . . . . . . . . . . . . . . . . . . . . . . . . . . . . . . . . . . . . . . . . . . . . . . . . . . . . . . . . . . . . . . . . . . . . . . . . . . . . . . . . . . . . . . . . . . . . . . . . . . 17
7.2.5 D RAFTBOX . . . . . . . . . . . . . . . . . . . . . . . . . . . . . . . . . . . . . . . . . . . . . . . . . . . . . . . . . . . . . . . . . . . . . . . . . . . . . . . . . . . . . . . . . . . . . . . . . . . . . . . . . . . . 17
7.2.6 S ENTBOX . . . . . . . . . . . . . . . . . . . . . . . . . . . . . . . . . . . . . . . . . . . . . . . . . . . . . . . . . . . . . . . . . . . . . . . . . . . . . . . . . . . . . . . . . . . . . . . . . . . . . . . . . . . . . . 17
7.2.7 S ETTING . . . . . . . . . . . . . . . . . . . . . . . . . . . . . . . . . . . . . . . . . . . . . . . . . . . . . . . . . . . . . . . . . . . . . . . . . . . . . . . . . . . . . . . . . . . . . . . . . . . . . . . . . . . . . . . . 17
7.3 C ALL LOG . . . . . . . . . . . . . . . . . . . . . . . . . . . . . . . . . . . . . . . . . . . . . . . . . . . . . . . . . . . . . . . . . . . . . . . . . . . . . . . . . . . . . . . . . . . . . . . . . . . . . . . . . . . . . . 18
7.4 S ETTINGS . . . . . . . . . . . . . . . . . . . . . . . . . . . . . . . . . . . . . . . . . . . . . . . . . . . . . . . . . . . . . . . . . . . . . . . . . . . . . . . . . . . . . . . . . . . . . . . . . . . . . . . . . . . . . . 18
7.4.1 C ALL SETTINGS . . . . . . . . . . . . . . . . . . . . . . . . . . . . . . . . . . . . . . . . . . . . . . . . . . . . . . . . . . . . . . . . . . . . . . . . . . . . . . . . . . . . . . . . . . . . . . . . . . . . . . 18
7.4.2 P HONE SETUP . . . . . . . . . . . . . . . . . . . . . . . . . . . . . . . . . . . . . . . . . . . . . . . . . . . . . . . . . . . . . . . . . . . . . . . . . . . . . . . . . . . . . . . . . . . . . . . . . . . . . . . 19
7.4.3 N ETWORK SETUP . . . . . . . . . . . . . . . . . . . . . . . . . . . . . . . . . . . . . . . . . . . . . . . . . . . . . . . . . . . . . . . . . . . . . . . . . . . . . . . . . . . . . . . . . . . . . . . . . . . 19
7.4.4 S ECURITY SETUP . . . . . . . . . . . . . . . . . . . . . . . . . . . . . . . . . . . . . . . . . . . . . . . . . . . . . . . . . . . . . . . . . . . . . . . . . . . . . . . . . . . . . . . . . . . . . . . . . . . 19
7.4.5 U SER PROFILES . . . . . . . . . . . . . . . . . . . . . . . . . . . . . . . . . . . . . . . . . . . . . . . . . . . . . . . . . . . . . . . . . . . . . . . . . . . . . . . . . . . . . . . . . . . . . . . . . . . . . 20
7.4.6 R ESTORE FACTORY SETTINGS . . . . . . . . . . . . . . . . . . . . . . . . . . . . . . . . . . . . . . . . . . . . . . . . . . . . . . . . . . . . . . . . . . . . . . . . . . . . . . . . 20
7.5 M ULTIMEDIA . . . . . . . . . . . . . . . . . . . . . . . . . . . . . . . . . . . . . . . . . . . . . . . . . . . . . . . . . . . . . . . . . . . . . . . . . . . . . . . . . . . . . . . . . . . . . . . . . . . . . . . . . . . 20
7.5.1 C AMERA . . . . . . . . . . . . . . . . . . . . . . . . . . . . . . . . . . . . . . . . . . . . . . . . . . . . . . . . . . . . . . . . . . . . . . . . . . . . . . . . . . . . . . . . . . . . . . . . . . . . . . . . . . . . . . . . 20
7.5.2 V IDEO RECORDER . . . . . . . . . . . . . . . . . . . . . . . . . . . . . . . . . . . . . . . . . . . . . . . . . . . . . . . . . . . . . . . . . . . . . . . . . . . . . . . . . . . . . . . . . . . . . . . . . . 20
7.5.3 P ICTURE BROWSER . . . . . . . . . . . . . . . . . . . . . . . . . . . . . . . . . . . . . . . . . . . . . . . . . . . . . . . . . . . . . . . . . . . . . . . . . . . . . . . . . . . . . . . . . . . . . . . . 21
7.5.4 A UDIO PLAYER . . . . . . . . . . . . . . . . . . . . . . . . . . . . . . . . . . . . . . . . . . . . . . . . . . . . . . . . . . . . . . . . . . . . . . . . . . . . . . . . . . . . . . . . . . . . . . . . . . . . . . 21
7.5.5 V IDEO PLAYER . . . . . . . . . . . . . . . . . . . . . . . . . . . . . . . . . . . . . . . . . . . . . . . . . . . . . . . . . . . . . . . . . . . . . . . . . . . . . . . . . . . . . . . . . . . . . . . . . . . . . . . 21
7.5.6 FM RADIO . . . . . . . . . . . . . . . . . . . . . . . . . . . . . . . . . . . . . . . . . . . . . . . . . . . . . . . . . . . . . . . . . . . . . . . . . . . . . . . . . . . . . . . . . . . . . . . . . . . . . . . . . . . . . 21
7.5.7 S OUND RECORDER . . . . . . . . . . . . . . . . . . . . . . . . . . . . . . . . . . . . . . . . . . . . . . . . . . . . . . . . . . . . . . . . . . . . . . . . . . . . . . . . . . . . . . . . . . . . . . . . 21
7.6 F ILE MANAGER . . . . . . . . . . . . . . . . . . . . . . . . . . . . . . . . . . . . . . . . . . . . . . . . . . . . . . . . . . . . . . . . . . . . . . . . . . . . . . . . . . . . . . . . . . . . . . . . . . . . . . . 21
7.7 O RGANIZER . . . . . . . . . . . . . . . . . . . . . . . . . . . . . . . . . . . . . . . . . . . . . . . . . . . . . . . . . . . . . . . . . . . . . . . . . . . . . . . . . . . . . . . . . . . . . . . . . . . . . . . . . . . 21
7.7.1 C ALENDAR . . . . . . . . . . . . . . . . . . . . . . . . . . . . . . . . . . . . . . . . . . . . . . . . . . . . . . . . . . . . . . . . . . . . . . . . . . . . . . . . . . . . . . . . . . . . . . . . . . . . . . . . . . . . 21
7.7.2 A LARM . . . . . . . . . . . . . . . . . . . . . . . . . . . . . . . . . . . . . . . . . . . . . . . . . . . . . . . . . . . . . . . . . . . . . . . . . . . . . . . . . . . . . . . . . . . . . . . . . . . . . . . . . . . . . . . . . . 22

7.7.3 B LUETOOTH . . . . . . . . . . . . . . . . . . . . . . . . . . . . . . . . . . . . . . . . . . . . . . . . . . . . . . . . . . . . . . . . . . . . . . . . . . . . . . . . . . . . . . . . . . . . . . . . . . . . . . . . . . . 22
7.7.4 C ALCULATOR . . . . . . . . . . . . . . . . . . . . . . . . . . . . . . . . . . . . . . . . . . . . . . . . . . . . . . . . . . . . . . . . . . . . . . . . . . . . . . . . . . . . . . . . . . . . . . . . . . . . . . . . . 22
7.7.5 S TOPWA TCH . . . . . . . . . . . . . . . . . . . . . . . . . . . . . . . . . . . . . . . . . . . . . . . . . . . . . . . . . . . . . . . . . . . . . . . . . . . . . . . . . . . . . . . . . . . . . . . . . . . . . . . . . . 22
7.7.6 W ORLD CLOCK . . . . . . . . . . . . . . . . . . . . . . . . . . . . . . . . . . . . . . . . . . . . . . . . . . . . . . . . . . . . . . . . . . . . . . . . . . . . . . . . . . . . . . . . . . . . . . . . . . . . . . 22
7.7.7 U NIT CONVERTER . . . . . . . . . . . . . . . . . . . . . . . . . . . . . . . . . . . . . . . . . . . . . . . . . . . . . . . . . . . . . . . . . . . . . . . . . . . . . . . . . . . . . . . . . . . . . . . . . . 22

6
7.7.8 CURRENCY CONVERTER.........................................................................................22
7.7.9 HEALTH.................................................................................................................22
7.7.10 E-BOOK READER...................................................................................................22
7.7.11 GAME....................................................................................................................23
7.8 SERVICES..............................................................................................................23
7.8.1 INTERNET SERVICES.............................................................................................. 23
7.8.2 STK......................................................................................................................23
7.9 LEMON TWIST........................................................................................................23
8 BATTERY INFORMATION.............................................................................................23
8.1 OPERATION INFORMATION...................................................................................... 23
8.2 NOTICE INFORMATION............................................................................................ 23
9 SAFETY INFORMATION...............................................................................................24
9.1 OPERATING ENVIRONMENT.....................................................................................24
9.2 ELECTRONIC DEVICES............................................................................................24
9.2.1 PACEMAKER.......................................................................................................... 24
9.2.2 HEARING AIDS........................................................................................................24
9.2.3 OTHER MEDICAL DEVICES.......................................................................................24
9.2.4 VEHICLES..............................................................................................................25
9.3 POTENTIALLY DANGEROUS SITUATIONS...................................................................25
10 CARE AND MAINTENANCE.........................................................................................25
11 GPRS SETTINGS.......................................................................................................... 26
12. LEMON CARE :AUTHORIZED SERVICE CENTRE ……………………………………35

7
1Preface
Thank you very much for your choice of this product designed by our company!
The wireless device described in this guide is approved for use on the GSM network
GSM network is a global cellular communication system of international standards.
Allow you to receive an international telephone call used as in your homeland.
However, before using these advanced network functions, you must firstly apply
for these required services.
In order to better use your device, we suggest that you carefully read this guide to
know all the functions well.
Note: Due to the cellular network settings and the services provided, some functions
may be unavailable. For more information, please contact your service provider.

8
1 About your device
1.1 Appear

9
1.2 Keys instruction
Notice: In this user guide, when we say "Press”, the “Press” means “click the key then
release”. "Press and hold" or “long press” means the key is kept pressed for two or more
seconds.
Keys Descriptions
OK key &
Navigation
keys
OK key is used to confirm.At the standby mode,
Up key: Camera
Down key: Calendar
Leftkey: Write SMS
Right key: Bluetooth
Left soft key It depends on the display text above it.
Right soft key It depends on the display text above it.
SIM1 key Press it to make or answer a call;
At the standby mode, press it to access Dialed Calls;
SIM2 key Press it to make or answer a call;
At the standby mode, press it to access Dialed Calls;
End key/
Power Key Press it to end the current call;
Return from any menu to standby mode;
Long press it to power on/off the device
FM Radio key At the standby mode, press it to FM Radio (need to insert
earphone).
Music Control Keys In standby mode, press Play/Pause key to enter Audio
Player;
In AudioPlayer, use these keys (from left to right) as:
Rewind, Play/Pause, Stop, Fast-Forward.
Number keys To input numbers, letters and special characters.
* key It has different functions in different menus.
In standby mode, press left soft key and * key to
lock/unlock keypad.
# key It has different functions in different menus.
In standby mode, press and hold this key to change user
profiles.

10
1.3 Icons
Icons Descriptions
Show the SIM1’s current network signal level.
Show the SIM2’s current network signal level.
Show the power level of Battery.
You have unread SMS of SIM1 and SIM2.
You have unread MMS of SIM1 and SIM2.
You have missed calls.
Alarm is set on.
The headset is plugged in.
Show the current profile is General.
Show the current profile is Meeting.
Show the current profile is Vibrate.
Show the current profile is Indoor.
Show the current profile is Outdoor.
Show the current profile is Bluetooth.
Bluetooth is powered on.
Show Flight Mode is power on.
Show memory card is in.

11
2
2
2
2
Getting
Getting
Getting
Getting
started
started
started
started
1.3
1.3
1.3
1.3
Battery
Battery
Battery
Battery
Please use the approved batteries, and only use the battery charger approved by the device producer to charge your battery.
1.3.1
1.3.1
1.3.1
1.3.1
Install
Install
Install
Install
&remove
&remove
&remove
&remove
battery
battery
battery
battery
Remove:
Remove:
Remove:
Remove:
Remove the back cover of the device by pushing forwards;
Uplift the battery from its slot and take it out.
Install:
Install:
Install:
Install:
Match the metal contacts of battery separately with the battery compartment metal contacts, and put the battery base into
the slot;
(2) Slide the back cover toward the bottom of the phone to lock the cover into its place.

12
1.3.2
1.3.2
1.3.2
1.3.2
Charging
Charging
Charging
Charging
Connect the charger to a power supply, and then plug in the charger pin to the charger jack on the bottom of the phone .
Charger animation will be displayed if the device is powered off. When it is powered on, the power status icon at the top right
corner of the screen will blink circularly.
Disconnect the charger from handset and power supply when battery is full.
Notice:
1 During charging, don ’ t remove or move the battery to prevent the battery circuit from burning out.
2 During charging, it is normal that the phone and charger will become heated.
3 If the battery is completely empty, it may take a period of time before the charging icon appears on the screen.
1.4
1.4
1.4
1.4
SIM
SIM
SIM
SIM
card
card
card
card
installation
installation
installation
installation
Keep the metallic face of a SIM card downward, and slide it gently to the position of SIM 1.
Keep the metallic face of the other SIM card downward, and slide it gently to the position of SIM 2.
To
remove a SIM card, please power off your device first, remove the battery and slide the card out gently.
SIM1
SIM 2

13
1.5
1.5
1.5
1.5
Memory
Memory
Memory
Memory
card
card
card
card
installation
installation
installation
installation
Keep the metallic face of a memory card downward, and slide it gently to the position of Memory card.
To
remove Memory card, please remove the back cover first and slide the memory card out gently.
1.6
1.6
1.6
1.6
Headset
Headset
Headset
Headset
Insert the headset into the headset at the bottom of the device if required.
1.7
1.7
1.7
1.7
File
File
File
File
manager
manager
manager
manager
File manager is used to manage the phone and the memory cards respectively.
1 . Connect to a computer
The USB function of the device is available, no matter the device is powered on or off.
While the device is powered off, it will start charging and open File manager after the USB cable is plugged in. When the device
is powered on, it will enter the “ USB Config ” interface automatically after the USB cable is plugged in. In the interface, sel ect “ U
Disc ” to start File manager. If your memory cards are inserted, the computer will pop up removal disks, respectively representing
your device and memory cards.
Memory card

14
After you enter, you will find some preset files or folders. For the sake of normal use, please put related files into relevant
directories, that is, MP3 files shall be put into My music, videos into Videos, photos into Photos, records into Audio and Blue tooth
received into Received. After the operation is completed, if you want to exit, click the USB icon on the lower right side of the PC
desktop, select to stop the USB devices, and remove them after the pop-up warning “ USB devices can be removed now ” ap pears .
2. Format
If you format Phone or Memory card, all files in it will be deleted.
You
can format Phone or Memory card in two ways:
Use the phone to format directly.
Steps: Select File manager > Memory card/Phone > Format.
Use PC to format
To
better complete the formatting, please follow the following steps:
(1) Right click My computer to select Manage > Storage >Disk management;
(2) Right click the disk of a memory card, and select Format.
(3) In Allocation Unit Size, select Default and then confirm.
1.8
1.8
1.8
1.8
W
W
W
W
ebcam
ebcam
ebcam
ebcam
You
can use the device as a WEBCAM.
For the first use, you may be required to install a driver. If you are using Windows
XP,
there is no need to install the driver. Follow
these steps below:
1.Plug in the USB cable when the device is powered on. The device will turn to USB Config automatically;
2.Select “ WEBCAM ” . The screen will display the picture captured by camera;
To
exit WEBCAM, close web camera on your PC first, and then unplug the USB cable. Don ’ t plug the cable directly.
1.9
1.9
1.9
1.9
Power
Power
Power
Power
on
on
on
on
and
and
and
and
off
off
off
off
Press and hold the End key to switch your device on/off.
If SIM lock or Phone lock is activated, please enter the password as required.

15
2
2
2
2
Call
Call
Call
Call
functions
functions
functions
functions
1.1
1.1
1.1
1.1
Make
Make
Make
Make
a
a
a
a
call
call
call
call
When the sign of a network operator appears on the idle screen, you can make or answer calls.
1.1.1
1.1.1
1.1.1
1.1.1
Make
Make
Make
Make
a
a
a
a
domestic
domestic
domestic
domestic
call
call
call
call
Enter a phone number, including the area code if you are calling a fixed phone number (excluding local numbers). Press SIM1
key or SIM2 key to make a call via your desired SIM card.
1.1.2
1.1.2
1.1.2
1.1.2
Make
Make
Make
Make
an
an
an
an
extension
extension
extension
extension
call
call
call
call
When making an extension call, you can press * key to switch until the extension prefix “ P ” appears. After a switchboard number
is dialed, the device will pause automatically for a few seconds then dial your desired extension number. Input the following o ne
by one: Area code – Switchboard number – P – Extension number. Then press SIM1 key or SIM2 key to make
a
call via your
desired SIM card.
1.1.3
1.1.3
1.1.3
1.1.3
Make
Make
Make
Make
an
an
an
an
international
international
international
international
call
call
call
call
Enter the country code, the area code and the phone number. Press SIM1 key or SIM2 key to make
a
call via your select SIM
card. “ + ” is required when you enter the country code.
You
can press * key to switch until + appears. When you are making
a
call
to Hong Kong, Macao or Taiwan, it
’
s the same method.
1.1.4
1.1.4
1.1.4
1.1.4
Make
Make
Make
Make
a
a
a
a
call
call
call
call
from
from
from
from
Phonebook
Phonebook
Phonebook
Phonebook
Access Contacts to select
a
desired phone number, and press SIM1 key or SIM2 key to make
a
call via your desired SIM card.
1.1.5
1.1.5
1.1.5
1.1.5
Redial
Redial
Redial
Redial
a
a
a
a
call
call
call
call
by
by
by
by
Call
Call
Call
Call
log
log
log
log
Access Call log, scroll to
a
desired number or name, and press SIM1 key or SIM2 key to make
a
call via your desired SIM card.
1.1.6
1.1.6
1.1.6
1.1.6
Smart
Smart
Smart
Smart
dial
dial
dial
dial
When you enter the first few digits of your desired contact's phone number at the standby mode, the device will list all matched

16
contacts' numbers at the bottom of the screen. Press direction keys to select your desired contact and press SIM1 key or SIM2
key to make
a
call via your desired SIM card.
1.2
1.2
1.2
1.2
Answer
Answer
Answer
Answer
a
a
a
a
call
call
call
call
When there is an incoming call, there will be reminding information of the corresponding SIM card. The caller
’
s name or number
will appear in the screen if you have activated the Caller ID Display service. At this time, you can press SIM1 key, SIM2 key, or left
soft key to answer it.
If an incoming call arrives during your operation in sub window,
a
new window will pop up to inform you and your operation will be
interrupted. If you miss it, when you return to the standby screen, you will be reminded that there is
a
missed call of SIM 1 or SIM
2.
1.3
1.3
1.3
1.3
Call
Call
Call
Call
options
options
options
options
During a call, you can press the left soft key to enter Call options. The options differ according to your call status. Here below are
a few of them: Turn on handfree, Hold call, New call, Contacts, Messages, Call log, Start recording, Mute, and DTMF off .
2
2
2
2
Text
Text
Text
Text
entry
entry
entry
entry
During use, you will be required to input texts time and time again.
You
can input texts, letters, numbers or symbols (including
punctuations).
1.1
1.1
1.1
1.1
Switch
Switch
Switch
Switch
input
input
input
input
methods
methods
methods
methods
In
any
Text
Editor, press # key to switch input methods.
1.2
1.2
1.2
1.2
Smart
Smart
Smart
Smart
Hindi
Hindi
Hindi
Hindi
input
input
input
input
method
method
method
method
Switch to smart Hindi .
Press number keys to input letters continuously and select
a
desired word to smartly input.
1.3
1.3
1.3
1.3
Hindi
Hindi
Hindi
Hindi
input
input
input
input
method
method
method
method
Switch to Multitap Hi .

17
Following the sequence of letters on
a
key, you can press the key once to insert the first letter on the key, twice for the second
letter, etc., until the highlight is on your desired letter. Then release the key to input it.
1.4
1.4
1.4
1.4
Smart
Smart
Smart
Smart
English
English
English
English
input
input
input
input
method
method
method
method
Switch to smart English .
Press number keys to input letters continuously and select
a
desired word to smartly input.
1.5
1.5
1.5
1.5
English
English
English
English
input
input
input
input
method
method
method
method
Switch to Multitap ABC or Multitap abc.
Following the sequence of letters on
a
key, you can press the key once to insert the first letter on the key, twice for the second
letter, etc., until the highlight is on your desired letter. Then release the key to input it.
1.6
1.6
1.6
1.6
Input
Input
Input
Input
punctuations
punctuations
punctuations
punctuations
and
and
and
and
symbols
symbols
symbols
symbols
No matter what input method you are using, press * key to display
a
list of punctuations and symbols for you to select.
1.6.1
1.6.1
1.6.1
1.6.1
Input
Input
Input
Input
space
space
space
space
P ress 0 key to input
a
space (except number method mode).
1.6.2
1.6.2
1.6.2
1.6.2
Input
Input
Input
Input
numbers
numbers
numbers
numbers
Switch to Numeric input method. Directly press the number keys to input numbers
3
3
3
3
Menu
Menu
Menu
Menu
operation
operation
operation
operation
1.1
1.1
1.1
1.1
Access
Access
Access
Access
menus
menus
menus
menus
You
can press the left soft key or short press OK key to view menus of all levels.

18
4
4
4
4
Menu
Menu
Menu
Menu
functions
functions
functions
functions
1.1
1.1
1.1
1.1
Contacts
Contacts
Contacts
Contacts
After you enter Contacts , select one contact and press left soft key to access: Add new entry, Phonebook search, Write message ,
Call, Send vcard, Delete, Mark, Copy, and Others .
Notice:
1 Sending vCard can only be supported when the received device also supports it.
2 When you are copying entries from Phone to SIM1/SIM2, only the names and numbers of entries will be copied.
3 Adding or deleting caller group member and Incoming caller ringtone are limited to entries in Phone only.
1.2
1.2
1.2
1.2
Messages
Messages
Messages
Messages
1.2.1
1.2.1
1.2.1
1.2.1
Write
Write
Write
Write
message
message
message
message
1.2.2
1.2.2
1.2.2
1.2.2
New
New
New
New
SMS
SMS
SMS
SMS
Access this menu to edit and send message. When you are writing
a
message, you can Insert template, Insert number or Insert
name , and also can add phiz to the message . After
a
message is completed, you can select to use SIM 1 or SIM 2 to send or
save it.
1.2.3
1.2.3
1.2.3
1.2.3
New
New
New
New
MMS
MMS
MMS
MMS
Enter MMS Editing Interface.
You
can edit
To,
Cc, Bcc, Title and Content , select to preview , save, or set send ontime . When you
are editing content, you can Insert Slide, Insert Picture, Insert Sound, Insert Video, Delete , or Set slide time .
1.3
1.3
1.3
1.3
Chat
Chat
Chat
Chat
Box
Box
Box
Box
View all the received and sent messages. S elect one message and press left soft key, you can access Reply, Call sender, Delete,
or Delete all.
1.4
1.4
1.4
1.4
Inbox
Inbox
Inbox
Inbox
View all the received messages.

19
When there is
a
new message in SIM1 or SIM2, the device will play the preset message tone and the corresponding unread
message icon will also appear on top of the screen.
You
can select to tap and view the new message, or access Inbox to read.
After the message is read, press Options to Delete, Reply, Forward, etc.
1.5
1.5
1.5
1.5
Outbox
Outbox
Outbox
Outbox
In
Outbox, you can view the saved messages.
You
can select one to Send, Delete, Operate, etc .
1.6
1.6
1.6
1.6
Draftbox
Draftbox
Draftbox
Draftbox
In
Draft box , you can view the uncompleted and saved messages.
You
can select one to Delete, Edit, Operate, etc .
1.7
1.7
1.7
1.7
Sentbox
Sentbox
Sentbox
Sentbox
In
Sentbox , you can view the sent message .
Y
ou can select one to Delete, Operate, etc.
1.7.1
1.7.1
1.7.1
1.7.1
Setting
Setting
Setting
Setting
1.7.2
1.7.2
1.7.2
1.7.2
Templates
Templates
Templates
Templates
There are several predefined templates in the device.
You
can edit, use them , or select to create new template .
1.1.
1.1.
1.1.
1.1.
Voice
Voice
Voice
Voice
mail
mail
mail
mail
Enter Voice mail to set the voicemail numbers of SIM 1 & SIM 2 operators. Dial either number to listen to voice messages in the
voice mailbox. This function needs supports of network operators.
1.1.1
1.1.1
1.1.1
1.1.1
Broadcast
Broadcast
Broadcast
Broadcast
Message
Message
Message
Message
Y
our phone supplies to receive broadcast message. E nter this function , you can Read, Startup, select Channel, and set
Language.
1.1.2
1.1.2
1.1.2
1.1.2
SMS
SMS
SMS
SMS
settings
settings
settings
settings
Access this menu to configure the following settings: SIM1 Msg Center, SIM2 Msg Center, Message Validity Period, Status
Report, Save Sent Messages, Prior Storage Medium, New Msg Alert with Content .

20
1.1.3
1.1.3
1.1.3
1.1.3
MMS
MMS
MMS
MMS
settings
settings
settings
settings
Access this menu to configure the following settings: SIM1 MMS Count, SIM2 MMS Count, Arrive Report, Read Report,
Anonymity, Priority, Retrieve MMS, Play S o und, Adversting, Message Validity Period, Storage, Restore to Default, Delete SMS
Notification of MMS Push.
Notice:
Notice:
Notice:
Notice:
The storage space left for MMS in the phone is limited. So if the space is insufficient, please delete some unnecessary
MMS.
1.1.4
1.1.4
1.1.4
1.1.4
Message
Message
Message
Message
memory
memory
memory
memory
You
can select this menu to check the memory of SMS and MMS.
1.1.5
1.1.5
1.1.5
1.1.5
SMS
SMS
SMS
SMS
Count
Count
Count
Count
T his function can record all messages you sent and received.
1.8
1.8
1.8
1.8
Call
Call
Call
Call
log
log
log
log
Select Call log to view recent calls in SIM1 and in SIM2, including Dialed Calls, Received Calls, Missed Calls, Rejected Calls,
Delete All, Call Time, and GPRS Counter.
1.9
1.9
1.9
1.9
Setting
Setting
Setting
Setting
s
s
s
s
1.9.1
1.9.1
1.9.1
1.9.1
Call
Call
Call
Call
settings
settings
settings
settings
In
this function, you can configure SIM 1 call settings, SIM 2 call settings and Advanced settings.
Dual
Dual
Dual
Dual
SIM
SIM
SIM
SIM
settings
settings
settings
settings
You
can select to set SIM enable select, SIM settings, set SIM name, dual SIM settings wizard, and help.
Network
Network
Network
Network
Select
Select
Select
Select
Select SIM1 or SIM2 to set:
—Auto
Auto
Auto
Auto
Select
Select
Select
Select
Press the left soft key and confirm, the mobile phone will search various networks. This operation will let your phone register the
most suitable network.
—Manual
Manual
Manual
Manual
Select
Select
Select
Select
Other manuals for Lemon Duo 305
1
Table of contents
Other Lemon Cell Phone manuals