LGB 25558 User manual

Modell der SP Diesellok
25558

2

3
Inhaltsverzeichnis: Seite
Sicherheitshinweise 4
Wichtige Hinweise 4
Funktionen 4
Betriebshinweise 4
Multiprotokollbetrieb 5
Schaltbare Funktionen 6
Wartung und Instandhaltung 7
CV -Tabelle 8
Tabelle Funktionsmapping DCC 40
Bilder 42
Ersatzteile 44
Table of Contents: Page
Safety Notes 10
Important Notes 10
Functions 10
Information about operation 10
Multi-Protocol Operation 11
Controllable Functions 12
Service and maintenance 13
Table for CV 14
Table for Function Mapping DCC 40
Figures 42
Spare parts 44
Inhoudsopgave: Pagina
Veiligheidsvoorschriften 22
Belangrijke aanwijzing 22
Functies 22
Bedrijfsaanwijzingen 22
Multiprotocolbedrijf 23
Schakelbare functies 24
Onderhoud en handhaving 25
CV 26
Tabel functiemapping DCC 40
Afbeeldingen 42
Onderdelen 44
Indice del contenuto: Pagina
Avvertenze per la sicurezza 34
Avvertenze importanti 34
Funzioni 34
Avvertenze per ilfunzionamento 34
Esercizio multi-protocollo 35
Funzioni commutabili 37
Manutenzione ed assistere 37
CV 38
Tabella di mappatura delle Funzioni DCC 40
Figures 42
Pezzi di ricambio 44
Sommaire : Page
Remarques importantes sur la sécurité 16
Information importante 16
Fonctionnement 16
Remarques sur l’exploitation 16
Mode multiprotocole 16
Fonctions commutables 18
Entretien et maintien 19
CV 20
Tableau pour mapping des fonctions DCC 40
Images 42
Pièces de rechange 44
Indice de contenido: Página
Aviso de seguridad 28
Notas importantes 28
Funciones 28
Instrucciones de uso 28
Funcionamiento multiprotocolo 29
Funciones commutables 30
El mantenimiento 31
CV 32
Tabla de mapeado de funciones DCC 40
Figuras 42
Recambios 44

4
Sicherheitshinweise
• Das Modell darf nur mit einem dafür bestimmten Betriebssystem eingesetzt werden.
• Nur Schaltnetzteile und Transformatoren verwenden,
die Ihrer örtlichen Netzspannung entsprechen.
• Das Modell darf nur aus einer Leistungsquelle versorgt werden.
• Beachten Sie unbedingt die Sicherheitshinweise in der Bedienungsanleitung zu
Ihrem Betriebssystem.
• Nicht für Kinder unter 15 Jahren.
• ACHTUNG! Funktionsbedingte scharfe Kanten und Spitzen.
• ACHTUNG! Dieses Produkt enthält Magnete. Das Verschlucken von mehr als einem
Magneten kann unter Umständen tödlich wirken. Gegebenenfalls ist sofort ein Arzt
aufzusuchen.
Wichtige Hinweise
• Die Bedienungsanleitung ist Bestandteil des Produktes und muss deshalb aufbe-
wahrt sowie bei Weitergabe des Produktes mitgegeben werden.
• Gewährleistung und Garantie gemäß der beiliegenden Garantieurkunde.
• Für Reparaturen oder Ersatzteile wenden Sie sich bitte an Ihren LGB-Fachhändler.
• Entsorgung: www.maerklin.com/en/imprint.html
Allgemeiner Hinweis zur Vermeidung elektromagnetischer Störungen: Um den
bestimmungsgemäßen Betrieb zu gewährleisten, ist ein permanenter, einwandfreier
Rad-Schiene-Kontakt der Fahrzeuge erforderlich. Führen Sie keine Veränderungen an
stromführenden Teilen durch.
Mit diesem besonders präparierten Modell besitzen Sie eine exklusive Ausführung,
die den Originalzustand nach vielen Betriebsjahren bei Wind und Wetter wiedergibt.
Diese Sonderserie wurde nur in einer kleinen Stückzahl angefertigt. Die künstliche
Alterung wurde in sorgfältiger Handarbeit von erfahrenen Fachleuten einzeln
ausgeführt. Trotz einer abschließenden Fixierung mit Firnis bildet die zusätzliche
Farbgebung jedoch keine homogene, harte Lackschicht.
Bitte behandeln Sie das Modell daher besonders vorsichtig und vermeiden Sie Krat-
zen, Reiben oder Wischen an der Oberfläche und an den Details. Bitte verwenden Sie
keine Reinigungsflüssigkeiten oder Pflegebäder.
Bitte berücksichtigen Sie, dass die Ersatzteile zu diesem werkseitig gealterten Modell
nur im nicht gealterten Zustand verfügbar sind.
Funktionen
• Das Modell ist für den Betrieb auf LGB-Zweileiter-Gleichstrom-Systemen mit
herkömmlichen LGB-Gleichstrom-Fahrpulten vorgesehen (DC, 0 - 24 V).
• Werkseitig eingebauter Multiprotokoll-Decoder (DC, DCC, mfx).
• Zum Einsatz mit dem LGB-Mehrzugsystem (DCC) ist das Modell auf Lokadresse 03
programmiert. Im Betrieb mit mfx wird die Lok automatisch erkannt.
• Mfx-Technologie für Mobile Station/Central Station.
Name ab Werk: SP 8448
• Veränderbare Lautstärke der Geräusche
• Im Analogbetrieb ist das Betriebsgeräusch an.
• Die Funktionen können nur parallel aufgerufen werden. Die serielle Funktionsaus-
lösung ist nicht möglich (beachten Sie hierzu die Anleitung zu Ihrem Steuergerät).
• Verwenden Sie nach Möglichkeit die größeren Radien „R3” und „R5“, um die
Betriebssicherheit zu erhöhen und einen vorbildgetreuen Einsatz zu ermöglichen.
• Beim Durchfahren von Kurven ragt das Führerhaus weit nach außen. Überprüfen
Sie deshalb das Lichtraumprofil Ihrer Anlage, bevor Sie das Modell fahren lassen.
• Vor Brücken, Bahnsteigen oder Tunnels sollte unbedingt ein gerades Gleis einge-
baut werden, damit die Lok sich gerade ausrichten kann, bevor sie die Hindernisse
passiert.
Betriebsartenschalter
Das Modell hat einen vierstufigen Betriebsarten–Schalter im Führerstand (Bild 1 & 2).
Pos. 0 Lok stromlos abgestellt
Pos. 1 Lokmotor, Beleuchtung und Sound eingeschaltet
Pos. 2 wie Position 1
Pos. 3 wie Position 1
Elektronischer Sound
Die Lok ist mit einem Lautstärkeregler ausgestattet. Der Lautstärkeregler ist neben
dem Betriebsartenschalter angeordnet (Bild 1).
Glocke und Horn können mit dem beiliegenden LGB-Sound-Schaltmagneten (17050)
ausgelöst werden. Der Schaltmagnet lässt sich zwischen die Schwellen der meisten
LGB-Gleise klipsen.
Der Magnet befindet sich seitlich versetzt unter dem eingeprägten LGB-Logo. Platzie-
ren Sie den Magneten auf einer Seite, um das Horn auszulösen, wenn die Lok diese
Stelle überquert. Bei Anordnung auf der anderen Seite ertönt die Glocke.

5
Multiprotokollbetrieb
Analogbetrieb
Der Decoder kann auch auf analogen Anlagen oder Gleisabschnitten betrieben wer-
den. Der Decoder erkennt die analoge Gleichspannung (DC) automatisch und passt
sich der analogen Gleisspannung an. Es sind alle Funktionen, die unter mfx oder DCC
für den Analogbetrieb eingestellt wurden aktiv (siehe Digitalbetrieb).
Digitalbetrieb
Der Decoder ist ein Multiprotokolldecoder. Der Decoder kann unter folgenden Digital-
Protokollen eingesetzt werden: mfx oder DCC.
Das Digital-Protokoll mit den meisten Möglichkeiten ist das höchstwertige Digital-
Protokoll. Die Reihenfolge der Digital-Protokolle ist in der Wertung fallend:
Priorität 1: mfx; Priorität 2: DCC; Priorität 3: DC
Hinweis: Digital-Protokolle können sich gegenseitig beeinflussen. Für einen stö-
rungsfreien Betrieb empfehlen wir, nicht benötigte Digital-Protokolle mit Configura-
tions Variable (CV) 50 zu deaktivieren.
Deaktivieren Sie, sofern dies Ihre Zentrale unterstützt, auch dort die nicht benötigten
Digital-Protokolle.
Werden zwei oder mehrere Digital-Protokolle am Gleis erkannt, übernimmt der De-
coder automatisch das höchstwertige Digital-Protokoll, z.B. mfx/DCC, somit wird das
mfx-Digital-Protokoll vom Decoder übernommen.
Hinweis: Beachten Sie, dass nicht alle Funktionen in allen Digital-Protokollen möglich
sind. Unter mfx und DCC können einige Einstellungen von Funktionen, welche im
Analog-Betrieb wirksam sein sollen, vorgenommen werden.
Hinweise zum Digitalbetrieb
• Die genaue Vorgehensweise zum Einstellen der diversen CVs entnehmen Sie bitte
der Bedienungsanleitung Ihrer Mehrzug-Zentrale.
• Die ab Werk eingestellten Werte sind für mfx gewählt, so dass ein bestmöglichstes
Fahrverhalten gewährleistet ist. Für andere Betriebssysteme müssen gegebenen-
falls Anpassungen getätigt werden.
• Der Betrieb mit gegenpoliger Gleichspannung im Bremsabschnitt ist mit der
werkseitigen Einstellung nicht möglich. Ist diese Eigenschaft gewünscht, so muss
auf den konventionellen Gleichstrombetrieb verzichtet werden (CV 29/Bit 2 = 0).
mfx-Protokoll
Adressierung
• Keine Adresse erforderlich, jeder Decoder erhält eine einmalige und eindeutige
Kennung (UID).
• Der Decoder meldet sich an einer Central Station oder Mobile Station mit seiner
UID-Kennung automatisch an.
Programmierung
• Die Eigenschaften können über die grafische Oberfläche der Central Station bzw.
teilweise auch mit der Mobile Station programmiert werden.
• Es können alle CV mehrfach gelesen und programmiert werden.
• Die Programmierung kann entweder auf dem Haupt- oder dem Programmiergleis
erfolgen.
• Die Defaulteinstellungen (Werkseinstellungen) können wieder hergestellt werden.
• Funktionsmapping: Funktionen können mit Hilfe der Central Station 60212 (einge-
schränkt) und mit der Central Station 60213/60214/60215 beliebigen Funktionstasten
zugeordnet werden (Siehe Hilfe in der Central Station).
DCC-Protokoll
Adressierung
• Kurze Adresse – Lange Adresse – Traktionsadresse
• Adressbereich:
1 – 127 kurze Adresse, Traktionsadresse
1 – 10239 lange Adresse
• Jede Adresse ist manuell programmierbar.
• Kurze oder lange Adresse wird über die CV 29 ausgewählt.
• Eine angewandte Traktionsadresse deaktiviert die Standard-Adresse.
Programmierung
• Die Eigenschaften können über die Configuration Variablen (CV) mehrfach geän-
dert werden.
• Die CV-Nummer und die CV-Werte werden direkt eingegeben.
• Die CVs können mehrfach gelesen und programmiert werden (Programmierung
auf dem Programmiergleis).
• Die CVs können beliebig programmiert werden (PoM - Programmierung auf dem
Hauptgleis). PoM ist nicht möglich bei den CV 1, 17, 18 und 29. PoM muss von Ihrer
Zentrale unterstützt werden (siehe Bedienungsanleitung ihres Gerätes).
• Die Defaulteinstellungen (Werkseinstellungen) können wieder hergestellt werden.
• 14 bzw. 28/128 Fahrstufen einstellbar.
• Alle Funktionen können entsprechend dem Funktionsmapping geschaltet werden.
• Weitere Information, siehe CV-Tabelle DCC-Protokoll.
Es wird empfohlen, die Programmierungen grundsätzlich auf dem Programmiergleis
vorzunehmen.

6
Funktionsmapping DCC
Es ist möglich, die Funktionalitäten, die vom Decoder gesteuert werden, den Funkti-
onstasten nach Wunsch zuzuordnen (mappen). Dazu muss in der entsprechenden CV
ein entsprechender Wert eingetragen werden.
In der Tabelle auf den Seiten 40/41 sind die CVs (Zeilen) und die Funktionalitäten
(Spalten) aufgeführt. Zu jeder Taste gehören 4 CVs. Aus Platzgründen wurden ab CV
282 (Taste F5) die 4 CVs zu jeder Taste jeweils in einer Zeile zusammengefasst.
Grundsätzlich ist es möglich, einer Taste mehrere Funktionalitäten, bzw. eine Funktio-
nalität mehreren Tasten zuzuweisen.
Hinweis: Die Programmierung des Funktionsmappings sollte nur durch erfahrene
Anwender durchgeführt werden.
Je nach Auslegung des Decoders können einzelne Funktionalitäten über SUSI
gesteuert sein. Diese Funktionalitäten werden vom Decoder als Sound behandelt. Die
zugehörigen Lautstärken können dann nicht verändert werden.
Beispiele zum Funktionsmapping:
AUX 2 soll vorwärts und rückwärts auf Funktion 3
CV 272 & CV 372 = 8
CV 273 & CV 373 = 0
CV 274 & CV 374 = 0
CV 275 & CV 375 = 0
Sound 15 soll von vorwärts und rückwärts Funktion 3 auf Funktion 8 verlegt werden.
Die bestehende Belegung von Funkton 8 wird dabei überschrieben.
CV 275 & CV 375 = 0
CV 273 & CV 373 = 0
CV 274 & CV 374 = 0
CV 275 & CV 375 = 0
CV 297 & CV 397 = 0
CV 298 & CV 398 = 0
CV 299 & CV 399 = 0
CV 300 & CV 400 = 4
Schaltbare Funktionen
Beleuchtung 1LV +LR
Geräusch: Horn lang 1 Sound 1
Geräusch: Bremsenquietschen aus 2 BS
Geräusch: Horn kurz 3 Sound 2
Geräusch: Hornsequenz vor Bahnübergang 4 Sound 7
Geräusch: Kompressor 5 Sound 13
Geräusch: Betriebsgeräusch 1, 2 6 FS
Geräusch: Glocke 7 Sound 3
Sound an/aus 8 Sound 15
ABV, aus 9
Geräusch: Kabinenfunk 10 Sound 10
Rangierlicht doppel A 11 LV+LR+AUX1
Blinklicht 12 AUX 2
Fernlicht 13 AUX 3
Geräusch: Sanden 14 Sound 4
Nummernschild-Beleuchtung 15 AUX 4
1im Analogbetrieb aktiv
2mit Zufallsgeräuschen
Hinweis:
Unter www.LGB.de finden Sie ein Tool, mit dem Sie verschiedene Decodereinstel-
lungen berechnen können, sowie eine ausführliche Beschreibung des Decoders und
der Einstellungen. In dieser Anleitung ist auch das Programmieren der Decoderein-
stellungen mit dem Univeral-Handy-55015 erklärt.

7
WARTUNG
Schmierung
Die Achslager hin und wieder mit je einem Tropfen MärklinÖl (7149) ölen.
Austauschen der Glühlampen
Lampen: Lampengehäuse vom Modell abziehen. Eingesteckte Glühlampe aus dem
Sockel ziehen. Neue Glühlampe einstecken. Modell wieder zusammenbauen.
Innenbeleuchtung: Glühlampe mit einer Pinzette aus der Fassung ziehen. Neue
Glühlampe einstecken.
Austauschen des Haftreifens
Das Getriebe sollte ausgebaut werden, um den Haftreifen auszutauschen:
• Auf der Unterseite des Getriebes sind sechs Schrauben. Erste und letzte Schraube
lösen.
• Getriebe vorsichtig aus dem Fahrgestell ziehen.
• Mit einem kleinen flachen Schraubendreher den alten Haftreifen entfernen:
• Den alten Haftreifen aus der Rille (Nut) im Treibrad hebeln.
• Vorsichtig den neuen Haftreifen über das Rad schieben und in die Rille (Nut) des
Rads einsetzen.
• Überprüfen, dass der Haftreifen richtig sitzt.
• Modell wieder zusammenbauen.

8
Register Belegung Bereich Default
1 Adresse 1 – 127 3
2 Minimalgeschwindigkeit 0 – 255 25
3 Anfahrverzögerung 0 – 255 5
4 Bremsverzögerung 0 – 255 5
5 Maximalgeschwindigkeit 0 – 255 255
8 Reset 8 131
13 Funktion F1 – F8 bei alternativem Gleissignal 0 – 255 32
14 Funktion FL, F9 – F15 bei alternativem Gleissignal 0 – 255 1
17 erweiterte Adresse, höherwertiges Byte 192 – 231 192
18 erweiterte Adresse, niederwertiges Byte 0 – 255 128
19 Traktionsadresse 0 – 255 0
21 Funktionen F1 – F8 bei Traktion 0 – 255 0
22 Funktionen FL, F9 – F15 bei Traktion 0 – 255 0
29
Bit 0: Fahrtrichtung normal/invers
Bit 1: Anzahl der Fahrstufen 14/28(128)
Bit 2: Analogbetrieb aus/an
Bit 5: kurze / lange Adresse aktiv
0/1
0/2
0/4
0/32
6
50
Alternative Formate
Bit 1: Analog DC
Bit 3: mfx aus/an
0/2
0/8 10
53 Motorregelung - Regelreferenz 0 – 255 255
54 Motorregelung - Regelparameter K 0 – 255 64
55 Motorregelung - Regelparameter I 0 – 255 64
56 Motorregelung - Regeleinfluss 0 – 255 24
Register Belegung Bereich Default
60
Multibahnhofsansage
Bit 0 – 3: Anzahl der Bahnhöfe
Bit 4: Endansage wechselt die Reihenfolge
Bit 5: Lokrichtung wechselt die Reihenfolge
Bit 6: Vorgabe für Reihenfolge
0 – 15
0/16
0/32
0/64
1
63 Lautstärke gesamt 0 – 255 255
64 Schwelle für Bremsenquietschen 0 – 255 55
67 – 94 Geschwindigkeitstabelle Fahrstufen 1 – 28 0 – 255
112 Mapping Licht vorne, Modus 0 – 16 1
113 Mapping Licht vorne, Dimmer 0 – 255 255
114 Mapping Licht vorne, Periode 0 – 255 20
115 – 135 Mapping phys. Ausgänge, Licht hinten, Aux 1 – 6,
vgl. 112 – 114
0 – 16
0 – 255
137 Faktor Rangiergang 1 – 128 128
138 Lautstärke Bremsenquietschen 0 – 255 255
139 Lautstärke Betriebsgeräusch 0 – 255 255
140 Lautstärke Horn lang 0 – 255 255
141 Lautstärke Horn kurz 0 – 255 255
142 Lautstärke Glocke 0 – 255 255
143 Lautstärke Sanden 0 – 255 255
146 Lautstärke Hornsequenz 0 – 255 255
149 Lautstärke Kabinenfunk 0 – 255 255
152 Lautstärke Kompressor 0 – 255 255
176 Minimalgeschwindigkeit analog DC 0 – 255 5
177 Maximalgeschwindigkeit analog DC 0 – 255 240

9
Register Belegung Bereich Default
257 – 260 Funktionsmapping Funktion FL vorwärts 0 – 255 257 = 1
262 – 265 Funktionsmapping Funktion F1 vorwärts 0 – 255 263 = 16
267 – 270 Funktionsmapping Funktion F2 vorwärts 0 – 255 268 = 4
272 – 275 Funktionsmapping Funktion F3 vorwärts 0 – 255 273 = 32
277 – 280 Funktionsmapping Funktion F4 vorwärts 0 – 255 279= 4
282 – 285 Funktionsmapping Funktion F5 vorwärts 0 – 255 285 = 1
287 – 290 Funktionsmapping Funktion F6 vorwärts 0 – 255 288 = 8
292 – 295 Funktionsmapping Funktion F7 vorwärts 0 – 255 293 = 64
297 – 300 Funktionsmapping Funktion F8 vorwärts 0 – 255 300 = 4
302 – 305 Funktionsmapping Funktion F9 vorwärts 0 – 255 303 = 1
307 – 310 Funktionsmapping Funktion F10 vorwärts 0 – 255 309 = 32
312 – 315 Funktionsmapping Funktion F11 vorwärts 0 – 255 312 = 7
317 – 320 Funktionsmapping Funktion F12 vorwärts 0 – 255 317 = 8
322 – 325 Funktionsmapping Funktion F13 vorwärts 0 – 255 322 = 16
327 – 330 Funktionsmapping Funktion F14 vorwärts 0 – 255 328 = 128
332 – 335 Funktionsmapping Funktion F15 vorwärts 0 – 255 332 = 32
337 – 340 Funktionsmapping Stand vorwärts 0 – 255 337 = 0
342 – 345 Funktionsmapping Fahrt vorwärts 0 – 255 342 = 0
347 – 350 Funktionsmapping Sensor 1 vorwärts 0 – 255
352 – 355 Funktionsmapping Sensor 2 vorwärts 0 – 255
357 – 360 Funktionsmapping Funktion FL rückwärts 0 – 255 357 = 2
362 – 365 Funktionsmapping Funktion F1 rückwärts 0 – 255 363 = 16
Register Belegung Bereich Default
367 – 370 Funktionsmapping Funktion F2 rückwärts 0 – 255 368 = 4
372 – 375 Funktionsmapping Funktion F3 rückwärts 0 – 255 373 = 32
377 – 380 Funktionsmapping Funktion F4 rückwärts 0 – 255 379 = 4
382 – 385 Funktionsmapping Funktion F5 rückwärts 0 – 255 385 = 1
387 – 390 Funktionsmapping Funktion F6 rückwärts 0 – 255 388 = 8
392 – 395 Funktionsmapping Funktion F7 rückwärts 0 – 255 393 = 64
397 – 400 Funktionsmapping Funktion F8 rückwärts 0 – 255 400 = 4
402 – 405 Funktionsmapping Funktion F9 rückwärts 0 – 255 403 = 1
407 – 410 Funktionsmapping Funktion F10 rückwärts 0 – 255 409 = 32
412 – 415 Funktionsmapping Funktion F11 rückwärts 0 – 255 412 = ´7
417 – 420 Funktionsmapping Funktion F12 rückwärts 0 – 255 417 = 8
422 – 425 Funktionsmapping Funktion F13 rückwärts 0 – 255 422 = 16
427 – 430 Funktionsmapping Funktion F14 rückwärts 0 – 255 428 = 128
432 – 435 Funktionsmapping Funktion F15 rückwärts 0 – 255 432 = 32
437 – 440 Funktionsmapping Stand vorwärts rückwärts 0 – 255 437 = 0
442 – 445 Funktionsmapping Fahrt vorwärts rückwärts 0 – 255 442 = 0
447 - 450 Funktionsmapping Sensor 1 rückwärts 0 – 255
452 – 455 Funktionsmapping Sensor 2 rückwärts 0 – 255

10
Safety Notes
• This model may only be used with the operating system designed for it.
• Use only switched mode power supply units and transformers that are designed
for your local power system.
• This locomotive must never be supplied with power from more than one power pack.
• Pay close attention to the safety notes in the instructions for your operating system.
• Not for children under the age of 15.
• WARNING! Sharp edges and points required for operation.
• WARNING! This product contains magnets. Swallowing more than one magnet may
cause death in certain circumstances. If necessary, see a doctor immediately.
Important Notes
• The operating instructions are a component part of the product and must therefore
be kept in a safe place as well as included with the product, if the latter is given to
someone else.
• The warranty card included with this product specifies the warranty conditions.
• Please see your authorized LGB dealer for repairs or spare parts.
• Disposing: www.maerklin.com/en/imprint.html
General Note to Avoid Electromagnetic Interference: A permanent, flawless wheel-
rail contact is required in order to guarantee operation for which a model is designed.
Do not make any changes to current-conducting parts.
This specially prepared model is an exclusive version, which reproduces the conditi-
on of the original after many years of operation in wind and weather.
This special series was only produced in a small quantity. The artificial weathering
was separately applied with careful hand work by experienced artisans. Despite a
final fixing of the colors with varnish, this additional application of color does not form
a homogeneous, hard coating.
Therefore, please handle the model with special care and avoid, scratching, rubbing,
or wiping the surface and the details. Please do not use liquid cleaners or cleaning
solutions.
Please note that the spare parts for this model weathered at the factory are only
available in non-weathered version.
Functions
• This model is designed for operation on LGB two-rail DC systems with conventio-
nal LGB DC train controllers or power packs (DC, 0 - 24 volts).
• Factory-installed multiple protocol decoder (DC, DCC, mfx).
•
The model is programmed with locomotive address 03 for use with the LGB Multi
Train System (DCC). The locomotive is automatically recognized in operation with mfx.
• Mfx technology for the Mobile Station/Central Station.
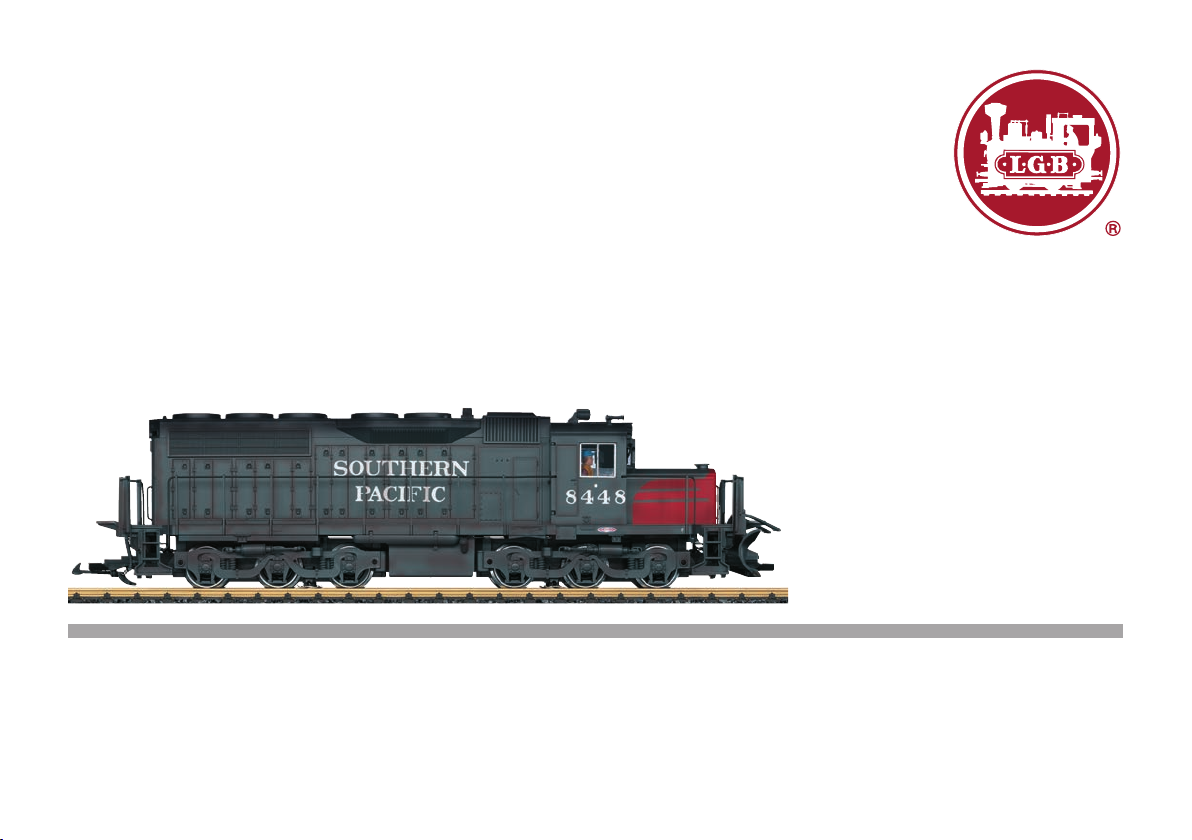
Name set at the factory: SP 8448
• Volume can be changed for the sound effects
• The operating sounds are on in analog operation.
• The functions can be activated only in parallel. Serial activation of the functions is
not possible (Please note here the instructions for your controller).
• When possible, use the larger “R3“ and “R5“ curves in order to increase the
operating reliability and allow prototypical operation.
• The engineer‘s cab will swing out quite a bit when the locomotive is negotiating
curves. For that reason check the clearance gauge of your layout before you run
this model.
• A straight section of track should always be installed before bridges, station plat-
forms, or tunnels so that the locomotive can straighten itself before passing these
obstacles.
Mode of Operation Switch
This locomotive has a 4-position mode of operation switch (Figure 1 & 2).
Pos. 0 Locomotive stored on a siding without current
Pos. 1 Locomotive motor, lighting, and sound turned on
Pos. 2 Same as Position 1
Pos. 3 Same as Position 1
Sound
This locomotive has a volume controller. The volume controller is located next to the
mode of operation switch (Figure 1).
The bell and horn can be activated with the LGB sound activation magnet (17050) in-
cluded with the locomotive. The activation magnet can be clipped into place between
the ties of most LGB track sections.
The magnet is positioned to the side under the LGB logo cast into the plastic cover.
Place the magnet on one side to activate the horn when the locomotive passes over
this spot. The bell will sound when the magnet is placed on the other side.

11
Multi-Protocol Operation
Analog Operation
This decoder can also be operated on analog layouts or areas of track that are
analog. The decoder recognizes alternating current (DC) and automatically adapts
to the analog track voltage. All functions that were set under mfx or DCC for analog
operation are active (see Digital Operation).
Digital Operation
The decoders are multi-protocol decoders. These decoders can be used under the
following digital protocols: mfx or DCC.
The digital protocol with the most possibilities is the highest order digital protocol.
The sequence of digital protocols in descending order is:
Priority 1: mfx; Priority 2: DCC; Priority 3: DC
Note: Digital protocols can influence each other. For trouble-free operation, we re-
commend deactivating those digital protocols not needed by using CV 50. Deactivate
unneeded digital protocols at this CV if your controller supports this function.
If two or more digital protocols are recognized in the track, the decoder automatically
takes on the highest order digital protocol, example: mfx/DCC; the decoder takes on
the mfx digital protocol (see previous table).
Note: Please note that not all functions are possible in all digital protocols. Several
settings for functions, which are supposed to be active in analog operation, can be
done under mfx and DCC.
Notes on digital operation
• The operating instructions for your central unit will give you exact procedures for
setting the different parameters.
• The values set at the factory have been selected for mfx in order to guarantee the
best possible running characteristics.
Adjustments may have to be made for other operating systems.
• The setting done at the factory does not permit operation with opposite polarity
DC power in the braking block. If you want this characteristic, you must do without
conventional DC power operation (CV 29/Bit 2 = 0).
mfx Protocol
Addresses
• No address is required; each decoder is given a one-time, unique identifier (UID).
• The decoder automatically registers itself on a Central Station or a Mobile Station
with its UID-identifier.
Programming
• The characteristics can be programmed using the graphic screen on the Central
Station or also partially with the Mobile Station.
• All of the Configuration Variables (CV) can be read and programmed repeatedly.
• The programming can be done either on the main track or the programming track.
• The default settings (factory settings) can be produced repeatedly.
• Function mapping: Functions can be assigned to any of the function but-
tons with the help of the 60212 Central Station (with limitations) and with the
60213/60214/60215 Central Station (See help section in the Central Station).
DCC Protocol
Addresses
• Short address – long address – multiple unit address
• Address range:
1 – 127 for short address and multiple unit address,
1 – 10239 for long address
• Every address can be programmed manually.
• Short or long address is selected by means of CV 29 (Bit 5).
• A multiple unit address that is being used deactivates the standard address.
Programming
• The characteristics can be changed repeatedly using the Configuration Variables
(CV).
• The CV numbers and the CV values are entered directly.
• The CVs can be read and programmed repeatedly. (Programming is done on the
programming track.)
• The CVs can be programmed in any order desired. (PoM - Programming can be
done on the main track). PoM is not possible with CVs CV 1, 17, 18,and 29. PoM
must be supported by your central controller (Please see the description for this
unit.).
• The default settings (factory settings) can be produced repeatedly.
• 14/28 or 126 speed levels can be set.
• All of the functions can be controlled according to the function mapping (see CV
description).
• See the CV description for the DCC protocol for additional information.
We recommend that in general programming should be done on the programming
track.

12
Function Mapping DCC
It is possible to assign functions controlled from the decoder to function buttons
of your choice (mapping). To do this an appropriate value must be entered in the
appropriate CV.
The CVs (lines) and the functions (columns) are listed in the tables on pages 40/41.
Four CVs belong to each button. For space reasons the 4 CVs were put together in
one line starting with CV 282 (Button F5).
It is basically possible to assign several functions to one button or one function to
several buttons.
Note: The programming for function mapping should be done only by experienced
users.
Individual functions can be controlled by means of SUSI depending on the design of
the decoder. These functions can be handled by the decoder as sound. The volume
levels belonging to these functions cannot be changed.
Examples of Function Mapping:
AUX 2 is to be forwards and backwards on Function 3
CV 272 & CV 372 = 8
CV 273 & CV 373 = 0
CV 274 & CV 374 = 0
CV 275 & CV 375 = 0
Sound 15 is to be shifted from forwards and backwards on Function 3 to Function 8.
The existing function at Function 8 is overwritten in the process.
CV 275 & CV 375 = 0
CV 273 & CV 373 = 0
CV 274 & CV 374 = 0
CV 275 & CV 375 = 0
CV 297 & CV 397 = 0
CV 298 & CV 398 = 0
CV 299 & CV 399 = 0
CV 300 & CV 400 = 4
Controllable Functions
Lighting 1LV +LR
Sound effect: Long Horn 1 Sound 1
Sound effect: Squealing brakes off 2 BS
Sound effect: Short Horn 3 Sound 2
Sound: Horn sequence before a grade crossing 4 Sound 7
Sound effect: Compressor 5 Sound 13
Sound effect: Operating sounds 1, 2 6 FS
Sound effect: Bell 7 Sound 3
Sound on/off 8 Sound 15
ABV, off 9
Sound effect: Cab radio 10 Sound 10
Double A switching light 11 LV+LR+AUX1
Flashing light 12 AUX 2
Long distance headlights 13 AUX 3
Sound effect: Sanding 14 Sound 4
Number Board Lights 15 AUX 4
1active in analog operation
2with random sounds
Note:
At www.LGB.de you will find a tool you can use to calculate different decoder set-
tings as well an extensive description of the decoder and the settings. Programming
the decoder settings with the 55015 Universal Hand Controller is also explained in
these instructions.

13
SERVICE
Lubrication
The axle bearings should be lubricated occasionally with a small amount of Märklin-
Oil (7149).
Replacing Light Bulbs
Lamps: Remove the lamp housing from the model. Pull the light bulb out of the socket
into which it is plugged. Plug in the new light bulb. Put the model back together.
Interior Lighting: Pull the light bulb out of the socket using a pair of tweezers. Plug in
the new light bulb.
Replacing Traction Tires
The drive mechanism should be removed in order to replace the traction tire:
• There are six screws on the underside of the mechanism. Loosen the first and last
screw.
• Carefully pull the mechanism from the truck frame.
• Remove the old traction tire with a small flat blade screwdriver:
• Lift the old traction tire out of the groove in the driving wheel.
• Carefully push the new traction tire over the wheel and seat it into the groove on
the wheel.
• Check to make sure that the traction tire is seated correctly on the wheel.
• Put the model back together.

14
Register Assignment Range Default
1 Address 1 – 127 3
2 Minimum speed 0 – 255 25
3 Acceleration delay 0 – 255 5
4 Braking delay 0 – 255 5
5 Maximum speed 0 – 255 255
8 Reset 8 131
13 Function F1 – F8 with alternative track signal 0 – 255 32
14 Function FL, F9 – F15 with alternative track signal 0 – 255 1
17 Expanded address, higher value byte 192 – 231 192
18 Expanded address, lower value byte 0 – 255 128
19 Multiple unit operation address 0 – 255 0
21 Functions F1 – F8 with multiple unit operation 0 – 255 0
22 Function FL, F9 – F15 with multiple unit operation 0 – 255 0
29
Bit 0: Direction normal/inverted
Bit 1: Number of speed levels 14/28(128)
Bit 2: Analog operation off/on
Bit 5: short / long address active
0/1
0/2
0/4
0/32
6
50
Alternative Formats
Bit 1: Analog DC
Bit 3: mfx off/on
0/2
0/8 10
53 Motor control – control reference 0 – 255 255
54 Motor control – control parameter K 0 – 255 64
55 Motor control – control parameter I 0 – 255 64
56 Motor control – control influence 0 – 255 24
Register Assignment Range Default
60
Multi-station announcement
Bit 0 – 3: Number of stations
Bit 4: Last announcement changes the sequence
Bit 5: Locomotive direction changes the sequence
Bit 6: Start for the sequence
0 – 15
0/16
0/32
0/64
1
63 Total volume 0 – 255 255
64 Threshhold for squealing brakes 0 – 255 55
67 – 94 Speed table for speed levels 1 – 28 0 – 255
112 Mapping lights in the front, mode 0 – 16 1
113 Mapping lights in the front, dimmer 0 – 255 255
114 Mapping lights in the front, cycle 0 – 255 20
115 – 135 Mapping phys. outputs, lights in the rear, Aux 1 – 6,
compare 112 – 114
0 – 16
0 – 255
137 Factor for switching range 1 – 128 128
138 Volume for squealing brakes 0 – 255 255
139 Volume for Operating sounds 0 – 255 255
140 Volume for Long Horn 0 – 255 255
141 Volume for Short Horn 0 – 255 255
142 Volume for Bell 0 – 255 255
143 Volume for Sanding 0 – 255 255
146 Volume for Horn sequence 0 – 255 255
149 Volume for Cab radio 0 – 255 255
152 Volume for Compressor 255
176 Minimum speed in analog DC 0 – 255 5
177 Maximum speed in analog DC 0 – 255 240

15
Register Assignment Range Default
257 – 260 Function mapping Function FL forwards 0 – 255 257 = 1
262 – 265 Function mapping Function F1 forwards 0 – 255 263 = 16
267 – 270 Function mapping Function F2 forwards 0 – 255 268 = 4
272 – 275 Function mapping Function F3 forwards 0 – 255 273 = 32
277 – 280 Function mapping Function F4 forwards 0 – 255 279= 4
282 – 285 Function mapping Function F5 forwards 0 – 255 285 = 1
287 – 290 Function mapping Function F6 forwards 0 – 255 288 = 8
292 – 295 Function mapping Function F7 forwards 0 – 255 293 = 64
297 – 300 Function mapping Function F8 forwards 0 – 255 300 = 4
302 – 305 Function mapping Function F9 forwards 0 – 255 303 = 1
307 – 310 Function mapping Function F10 forwards 0 – 255 309 = 32
312 – 315 Function mapping Function F11 forwards 0 – 255 312 = 7
317 – 320 Function mapping Function F12 forwards 0 – 255 317 = 8
322 – 325 Function mapping Function F13 forwards 0 – 255 322 = 16
327 – 330 Function mapping Function F14 forwards 0 – 255 328 = 128
332 – 335 Function mapping Function F15 forwards 0 – 255 332 = 32
337 – 340 Function mapping standstill forwards 0 – 255 337 = 0
342 – 345 Function mapping running forwards 0 – 255 342 = 0
347 – 350 Function mapping Sensor 1 forwards 0 – 255
352 – 355 Function mapping Sensor 2 forwards 0 – 255
357 – 360 Function mapping Function FL backwards 0 – 255 357 = 2
362 – 365 Function mapping Function F1 backwards 0 – 255 363 = 16
Register Assignment Range Default
367 – 370 Function mapping Function F2 backwards 0 – 255 368 = 4
372 – 375 Function mapping Function F3 backwards 0 – 255 373 = 32
377 – 380 Function mapping Function F4 backwards 0 – 255 379 = 4
382 – 385 Function mapping Function F5 backwards 0 – 255 385 = 1
387 – 390 Function mapping Function F6 backwards 0 – 255 388 = 8
392 – 395 Function mapping Function F7 backwards 0 – 255 393 = 64
397 – 400 Function mapping Function F8 backwards 0 – 255 400 = 4
402 – 405 Function mapping Function F9 backwards 0 – 255 403 = 1
407 – 410 Function mapping Function F10 backwards 0 – 255 409 = 32
412 – 415 Function mapping Function F11 backwards 0 – 255 412 = ´7
417 – 420 Function mapping Function F12 backwards 0 – 255 417 = 8
422 – 425 Function mapping Function F13 backwards 0 – 255 422 = 16
427 – 430 Function mapping Function F14 backwards 0 – 255 428 = 128
432 – 435 Function mapping Function F15 backwards 0 – 255 432 = 32
437 – 440 Function mapping standstill forwards backwards 0 – 255 437 = 0
442 – 445 Function mapping running forwards backwards 0 – 255 442 = 0
447 - 450 Function mapping Sensor 1 backwards 0 – 255
452 – 455 Function mapping Sensor 2 backwards 0 – 255

16
Remarques importantes sur la sécurité
• La locomotive ne peut être utilisée qu‘avec le système d‘exploitation indiqué.
• Utiliser uniquement des convertisseurs et transformateurs correspondant à la
tension du secteur local.
•
La locomotive ne peut être alimentée en courant que par une seule source de courant.
• Veuillez impérativement respecter les remarques sur la sécurité décrites dans le
mode d’emploi de votre système d’exploitation.
• Ne convient pas aux enfants de moins de 15 ans.
• ATTENTION! Pointes et bords coupants lors du fonctionnement du produit.
• ATTENTION! Ce produit contient des aimants. L’ingestion de plusieurs aimants
peut être mortelle. Le cas échéant, consulter immédiatement un médecin.
Information importante
• La notice d‘utilisation fait partie intégrante du produit ; elle doit donc être conser-
vée et, le cas échéant, transmise avec le produit.
• Garantie légale et garantie contractuelle conformément au certificat de garantie
ci-joint.
• Pour toute réparation ou remplacement de pièces, adressez-vous à votre
détaillant-spécialiste LGB.
• Elimination : www.maerklin.com/en/imprint.html
Indication d‘ordre général pour éviter les interférences électromagnétiques: La garan-
tie de l‘exploitation normale nécessite un contact roue-rail permanent et irréprochable.
Ne procédez à aucune modification sur des éléments conducteurs de courant.
Avec ce modèle particulièrement élaboré, vous possédez une version unique qui
reste conforme à l‘état d‘origine après de nombreuses années d‘utilisation par tous
les temps.
Cette série spéciale n‘a été produite qu‘en petite quantité. Le vieillissement artificiel a
été réalisé à la main et avec précaution sur chaque modèle par des spécialistes. Mal-
gré une fixation finale au vernis, la coloration supplémentaire ne forme cependant
pas une couche de vernis homogène et dure.
Par conséquent, traitez ce modèle avec beaucoup de soin et évitez de rayer, de
frotter ou d‘essuyer les surfaces et les détails. N‘utilisez aucun produit de nettoyage
ou produit traitant.
Notez que les pièces de rechange pour ce modèle «vieilli» en usine ne sont disponi-
bles qu’à l’état «neuf».
Fonctionnement
• Le modèle est prévu pour être exploité sur des systèmes deux rails c.c. LGB avec
des pupitres de commandes LGB classiques en courant continu (DC, 0 - 24 V).
• Décodeur multiprotocolaire (DC, DCC, mfx) intégré.
•
Pour l’utilisation avec le système multitrain LGB (DCC), le modèle est programmé sur
l’adresse 03. En mode d’exploitation mfx, la locomotive est reconnue automatiquement.
• Technologie mfx pour Mobile Station/Central Station.
Nom encodée en usine : SP 8448
• Volume des bruitages réglable
• En exploitation analogique, le bruitage d’exploitation est activé.
• Les fonctions ne peuvent être déclenchées qu’en parallèle. Le déclenchement
des fonctions en série n’est pas possible (consultez la notice de votre appareil de
commande).
• Utilisez si possible les rayons supérieurs «R3» et «R5» afin d’augmenter la fiabilité
d’exploitation et de permettre une utilisation réaliste.
• Lors du passage dans les courbes, la cabine de conduite est largement déportée.
Contrôlez donc bien le gabarit de libre passage de votre réseau avant la mise en
circulation du modèle.
• Avant les ponts, les quais ou les tunnels, intégrez impérativement un élément de voie
droit afin que la locomotive puisse se remettre en ligne avant de passer les obstacles.
Commutateur de mode d’exploitation
La locomotive est équipée d’un commutateur à quatre positions pour la sélection du
mode d’exploitation (figure 1 & 2).
Pos. 0 Locomotive garée hors tension
Pos. 1 Moteur de la loco, éclairage et bruitage activés
Pos. 2 Idem Position 1
Pos. 3 Idem Position 1
Effets sonores
La loco est équipée d’un régulateur pour le volume sonore. Ce régulateur est situé à
côté du commutateur pour la sélection du mode d’exploitation (figure 1).
Cloche et trompe peuvent être déclenchées via l’aimant de commutation pour
bruitage LGB fourni (réf. 17050). L’aimant de commutation peut se clipser entre les
traverses de la plupart des éléments de voie LGB.
L’aimant se trouve décalé sur le côté, sous le logo LGB gravé. Placez l’aimant sur l‘un
des côtés afin de déclencher la trompe quand la loco passe à cet endroit. Si l’aimant
est placé de l’autre côté, il déclenche le bruit de la cloche.
Mode multiprotocole
Mode analogique
On peut aussi faire fonctionner le décodeur sur des installations ou des sections de
voie analogiques. Le décodeur identifie automatiquement la tension de voie analo-
gique (CC). Toutes les fonctions qui ont été paramétrée pour le mode analogique sous

17
mfx ou sous DCC sont actives (voir mode numérique).
Mode numérique
Les décodeur sont des décodeur multiprotocole. Le décodeur peut être utilisé avec
les protocoles numériques suivants : mfx, DCC
Le protocole numérique offrant les possibilités les plus nombreuses est le protocole
numérique à bit de poids fort. La hiérarchisation des protocoles numériques est
descendante :
Priorité 1 : mfx; Priorité 2 : DCC; Priorité 3 :
DC
Indication : des protocoles numériques peuvent s’influencer réciproquement. Pour
une exploitation sans perturbations, nous recommandons de désactiver avec CV 50
des protocoles numériques non nécessaires.
Dans la mesure où votre centrale les supporte, désactivez y aussi les protocoles
numériques non nécessaires. Lorsque deux ou plusieurs protocoles numériques sont
identifiés au niveau de la voie, le décodeur reprend automatiquement le protocole
numérique à bit de poids fort, p. ex. mfx/DCC. Le protocole numérique mfx est donc
repris par le décodeur (voir tableau antérieur).
Indication : remarquez que toutes les fonctions ne peuvent pas être actionnées dans
tous les protocoles numériques. Sous mfx et sous DCC, il est possible de procéder à
quelques paramétrages de fonctions devant être actives dans le cadre de l’exploita-
tion analogique.
Remarques relatives au fonctionnement en mode digital
• En ce qui concerne la procédure de réglage des divers paramètres, veuillez vous
référer au mode d‘emploi de votre centrale de commande multitrain.
• Les valeurs paramétrées d’usine sont choisies pour mfx de manière à garan-
tir le meilleur comportement de roulement possible. Pour d’autres systèmes
d’exploitation, ces valeurs devront éventuellement être adaptées.
• L’exploitation avec courant continu de polarité inverse dans les sections de freina-
ge n’est pas possible avec le réglage d’usine. Si cette propriété est désirée, il faut
alors renoncer à l’exploitation conventionnelle en courant continu (CV 29/Bit 2 = 0).
Protocole mfx
Adressage
• Aucune adresse n’est nécessaire, le décodeur reçoit toutefois une identification
unique et non équivoque (UID).
• Avec son UID-identification, le décodeur indique automatiquement à une station
centrale ou à une station mobile qu’il est connecté.
Programmation
• Les caractéristiques peuvent être programmées par l’intermédiaire de la couche
graphique de la station centrale, voire en partie aussi au moyen de la station mobile.
• Toutes les configurations variables (CV) peuvent être lues et programmées de
façon réitérée.
• La programmation peut être réalisée soit sur la voie principale, soit sur la voie de
programmation.
• Les paramétrages par défaut (paramétrages usine) peuvent être rétablis.
• Mappage des fonctions : les fonctions peuvent être affectées à de quelconques
touches de fonction au moyen de la station centrale (60212) (restreinte) et avec la
station centrale 60213/60214/60215 (voir Aide au niveau de la station centrale).
Protocole DCC
Adressage
• Adresse brève – adresse longue – adresse de traction.
• Champ d’adresse :
1 – 127 adresse brève, adresse de traction
1 – 10239 adresse longue
• Chaque adresse est programmable manuellement.
• Une adresse courte ou longue est sélectionnée via la CV 29 (bit 5).
• Une adresse de traction utilisée désactive l’adresse standard.
Programmation
• Les caractéristiques peuvent être modifiées de façon réitérée par l’intermédiaire
des variables de configuration (CVs).
• Toutes les configurations variables (CV) peuvent être lues et programmées de
façon réitérée.
• La programmation peut être réalisée soit sur la voie principale, soit sur la voie de
programmation.
• Les CVs peuvent être programmées librement (programmation de la voie principa-
le (PoM). PPoM (Programming on the Main) n’est pas possible pour les CV 1, 17,
18 et 29. PoM doit être supportée par votre centrale (voir mode d’emploi de votre
appareil).
• Les paramétrages par défaut (paramétrages usine) peuvent être rétablis.
• 14/28, voire 128 crans de marche sont paramétrables.
• Toutes les fonctions peuvent être commutées en fonction du mappage des fonc-
tions (voir le descriptif des CVs).
• Pour toute information complémentaire, voir le tableau des CVs, protocole DCC.
Il est recommandé, de réaliser la programmation, fondamentalement, sur la voie de
programmation.

18
Mapping des fonctions DCC
Les fonctions commandées par le décodeur peuvent être librement affectées aux
différentes touches de fonctions (mapping). A cet effet, il faut enregistrer une valeur
correspondante dans la CV correspondante.
Le tableau des pages 40 et 41 établit une liste des CV (lignes) et des fonctions
(colonnes). A chaque touche correspondent 4 CV. Pour des raisons de place, les 4 CV
correspondant à chaque touche ont été regroupées sur une seule ligne à partir de la
CV 282 (touche F5).
En principe, plusieurs fonctions peuvent être affectées à une même touche, resp. une
même fonction peut être affectée à plusieurs touches.
Remarque : La programmation du mapping de fonctions est réservée aux utilisateurs
avertis.
En fonction de la configuration du décodeur, les différentes fonctions peuvent être
commandées via SUSI. Ces fonctions sont traitées par le décodeur en tant que
bruitage. Le volume correspondant ne peut alors pas être modifié.
Exemples de mapping de fonctions:
AUX 2 doit être affecté à Fonction 3 en avant et en arrière
CV 272 & CV 372 = 8
CV 273 & CV 373 = 0
CV 274 & CV 374 = 0
CV 275 & CV 375 = 0
Le bruitage 15 doit être transposé de la fonction 3 en avant et en arrière sur la fonc-
tion 8. L’affectation existante de la fonction 8 doit donc être supprimée.
CV 275 & CV 375 = 0
CV 273 & CV 373 = 0
CV 274 & CV 374 = 0
CV 275 & CV 375 = 0
CV 297 & CV 397 = 0
CV 298 & CV 398 = 0
CV 299 & CV 399 = 0
CV 300 & CV 400 = 4
Fonctions commutables
Eclairage 1LV +LR
Bruitage : Trompe long 1 Sound 1
Bruitage : Grincement de freins désactivé 2 BS
Bruitage : Trompe court 3 Sound 2
Bruitage: Séquence trompe avant un passage à niveau 4 Sound 7
Bruitage : Compresseur 5 Sound 13
Bruitage : Bruit d’exploitation 1, 2 6 FS
Bruitage : Cloche 7 Sound 3
Activation/Désactivation du son 8 Sound 15
ABV, désactivé 9
Bruitage : Radio cabine 10 Sound 10
Feu de manœuvre double A 11 LV+LR+AUX1
Clignotant 12 AUX 2
Phares à longue portée 13 AUX 3
Bruitage : Sablage 14 Sound 4
Plaque d‘immatriculation éclairage 15 AUX 4
1activée en mode d’exploitation analogique
2avec bruits aléatoires
Remarque :
Sur le site www.LGB.de , vous trouverez également un outil vous permettant de
calculer différents paramètres du décodeur ainsi qu’une description détaillée du dé-
codeur et des paramètres. Cette notice fournit également des explications relatives à
la programmation des paramètres décodeur avec le Universal-Handy 55015.

19
ENTRETIEN
Lubrification
Les roulements des essieux doivent être lubrifiés de temps à autre avec une goutte
d’huile de Märklin (7149).
Remplacer les lampes incandescentes
Lampes : Retirer le boîtier de la lampe du modèle. Retirer l’ampoule à incandescence
de son socle. Enficher la nouvelle ampoule. Remonter le modèle.
Eclairage intérieur: A l’aide d’une pincette, retirer l’ampoule de la douille. Enficher la
nouvelle ampoule.
Remplacer le bandage d’adhérence
Pour remplacer le bandage d’adhérence, il est conseillé de démonter la transmission.
• Sous la transmission se trouvent six vis. Desserrer la première et la dernière vis.
• Retirer délicatement le système de transmission du châssis.
• A l’aide d’un petit tournevis plat, retirer le bandage d‘adhérence usé:
• Faire levier pour sortir le bandage d’adhérence usé de la rainure (cannelure) de la
roue motrice.
• Pousser délicatement le nouveau bandage d’adhérence sur la roue et le position-
ner dans la rainure de la roue.
• Vérifier qu’il est bien mis.
• Remonter le modèle.

20
Registres Affectation Domaine
Valeur
par défaut
1 Adresse 1 – 127 3
2 Vitesse minimale 0 – 255 25
3 Temporisation de démarrage 0 – 255 5
4 Temporisation de freinage 0 – 255 5
5 Vitesse maximale 0 – 255 255
8 Réinitialisation 8 131
13 Fonction F1à F8 pour signal de voie alternatif 0 – 255 32
14 Fonction FL, F9 à f15 pour signal de voie alternatif 0 – 255 1
17 Adresse avancée, byte supérieur 192 – 231 192
18 Adresse avancée, byte inférieur 0 – 255 128
19 Adresse traction 0 – 255 0
21 Fonctions F1 à F8 pour traction 0 – 255 0
22 Fonction FL, F9 à F15 pour traction 0 – 255 0
29
Bit 0 : Sens de marche normal/inversé
Bit 1: Nombre de crans de marche 14/28(128)
Bit 2: Mode analogique désactivé/activé
Bit 5: Adresse courte/longue activée
0/1
0/2
0/4
0/32
6
50
Formats alternatifs
Bit 1: Analogique c.c.
Bit 3: Mfx désactivé/activé
0/2
0/8 10
53 Régulation du moteur – référence de régulation 0 – 255 255
54 Régulation du moteur - paramètre de régulation K 0 – 255 64
55 Régulation du moteur – paramètre de régulation I 0 – 255 64
56 Régulation du moteur – influence de régulation 0 – 255 24
Registres Affectation Domaine
Valeur
par défaut
60
Annonce en gare multiple
Bit 0 à 3: Nombre des gares
Bit 4: Annonce finale modifie l’ordre
Bit 5: Sens de marche de la loco modifie l’ordre
Bit 6: Ordre par défaut
0 – 15
0/16
0/32
0/64
1
63 Volume global 0 – 255 255
64 Seuil pour grincement de frein 0 – 255 55
67 – 94 Tableau de vitesse, crans de marche 1 à 28 0 – 255
112 Mapping éclairage avant, mode 0 – 16 1
113 Mapping éclairage avant, variateur 0 – 255 255
114 Mapping éclairage avant, période 0 – 255 20
115 – 135 Mapping sorties phys., éclairage arrière, Aux 1 à 6,
cf. 112 à 114
0 – 16
0 – 255
137 Facteur vitesse de manoeuvre 1 – 128 128
138 Volume grincement de frein 0 – 255 255
139 Volume Bruit d’exploitation 0 – 255 255
140 Volume Trompe long 0 – 255 255
141 Volume Trompe court 0 – 255 255
142 Volume Cloche 0 – 255 255
143 Volume Sablage 0 – 255 255
146 Volume Séquence trompe 0 – 255 255
149 Volume Radio cabine 0 – 255 255
152 Volume Compresseur 255
176 Vitesse minimale analogique c.c. 0 – 255 5
177 Vitesse maximale analogique c.c. 0 – 255 240
Table of contents
Languages:
Other LGB Toy manuals