Importato da: LIFE ELECTRONICS S.p.A.
Via Raaele Leone, 3 – 95018 Riposto (CT)
www.life-electronics.com
Made in CHINA
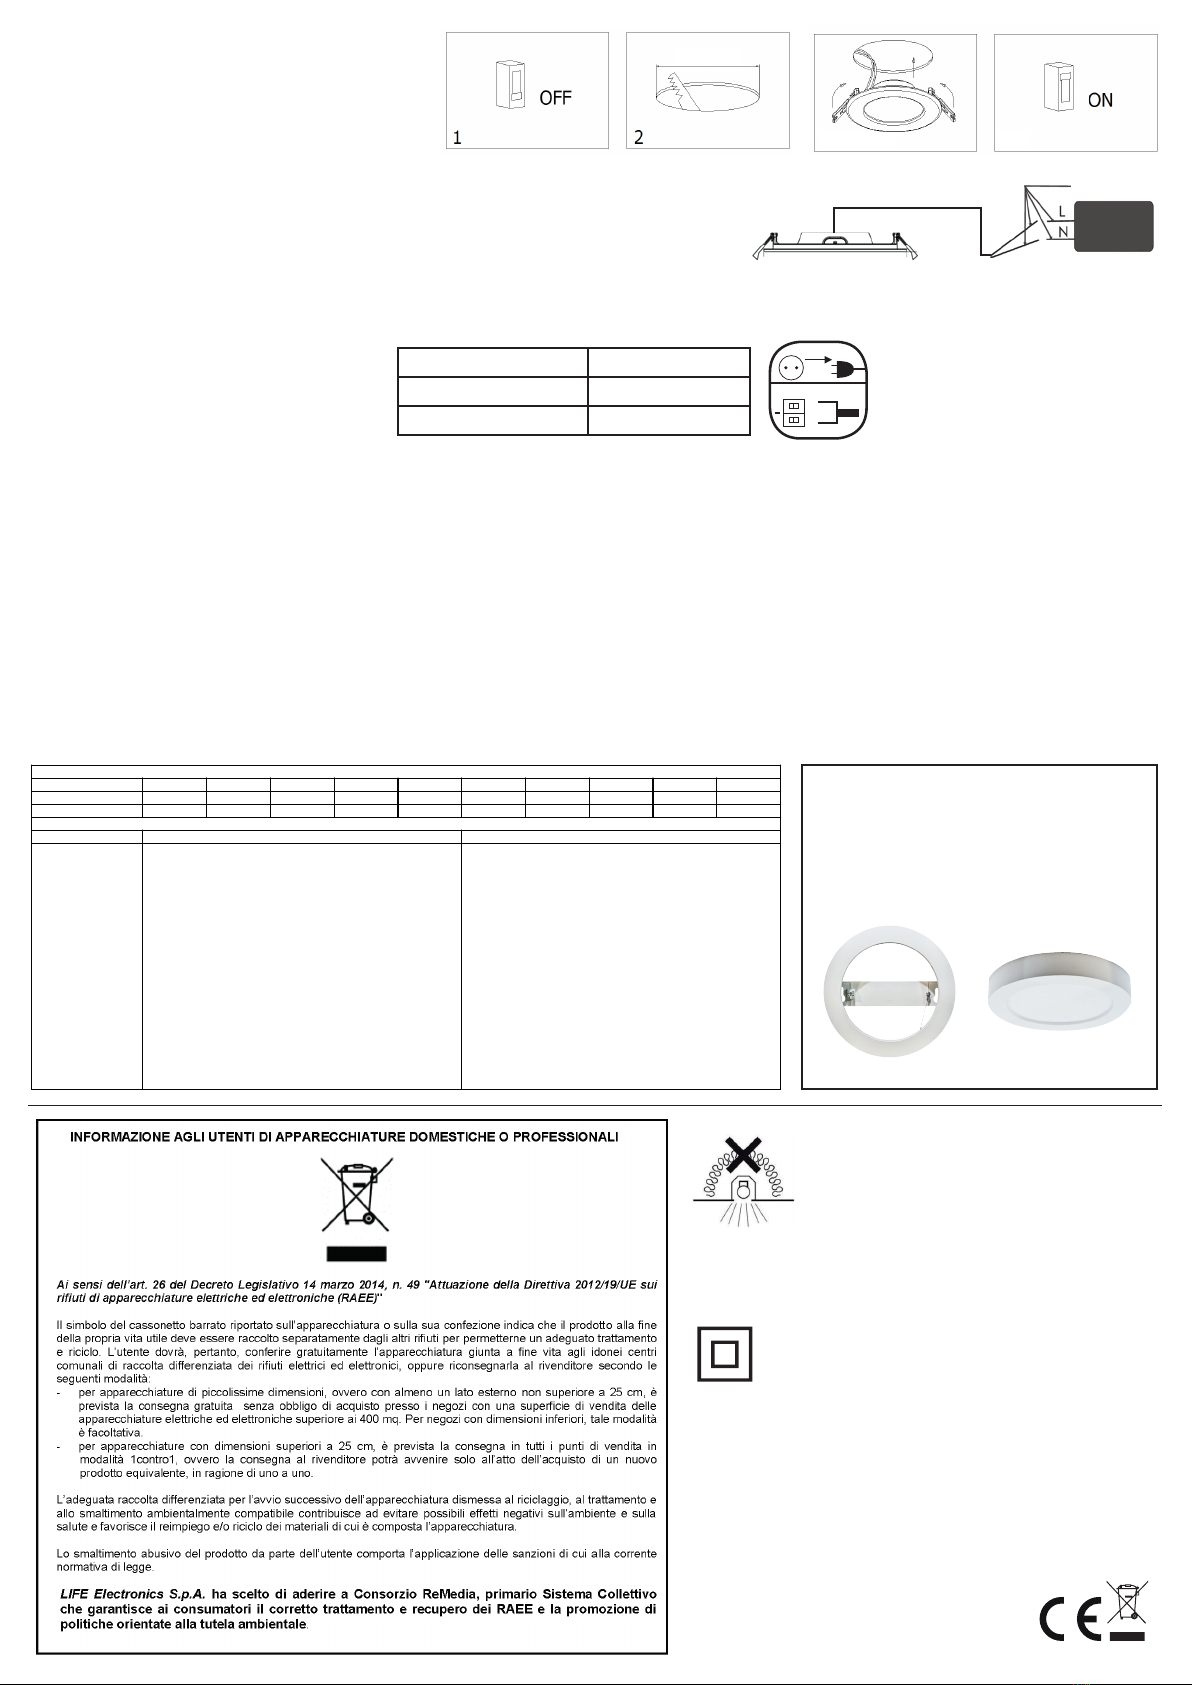
1) Prima di eettuare l’installazione, togliere tensione alla linea di alimentazione.
1) Before installing, cut o the power.
2) Praticare un foro sul supporto delle dimensioni indicate sulla tabella
2) Drill a hole on the support of the sizes shown on the table.
3) Collegare Fase e Neutro del faretto ad una morsettiera protetta (non in dotazione).
3) Connect Phase and Neutral of the downlight to a protected terminal board (not supplied).
4) Piegare le molle di ssaggio di 180° ed introdurle all’interno del supporto.
4) Pull up spring clamps 180° before putting the down light into the hole.
5) Fissare il faretto al supporto (le molle lo sseranno saldamente).
5) Fix the downlight to the support (spring clamps x it securely)
6) Ristabilire la tensione alla linea di alimentazione 220-240Vac, 50/60Hz e testare il corretto funzionamento del faretto.
6) Turn on the power 220-240Vac, 50/60Hz and test downlight.
Il dispositivo è in Classe II, quindi non necessita della messa a terra, ma per assicurare un adeguato doppio isolamento su tutta la linea di alimenta-
zione utilizzare un cavo gommato, avente una sezione compresa fra 1,5mm2 e 2,5mm2. Sguainare i li conduttori del cavo di alimentazione elettrica
solo della porzione di conduttore che entrerà all’interno della morsettiera protetta, prestando attenzione alla fuoriuscita dei trefoli che potrebbero
causare corto circuiti.
The device is in Class II, so it does not need to be grounded, but to ensure adequate double insulation along the entire power line use a rubberized cable,
having a section between 1.5mm2and 2, 5mm2. Strip the conductor wires of the power supply cable only of the conductor portion that will enter the protected
terminal board, paying attention to the escape of the strands that could cause short circuits.
220-240Vac
ACCESSORI / ACCESSORIES
39.9TS030006Z1 - Cornice
montaggio a plafone per faretto
39.9TS030006*
UGR
Apparecchio
Codice 39.9TS030006x
Nome FARETTO LED FLOOD DA INCASSO
Rilievo
Codice 39.9TS030006x
Nome FARETTO LED FLOOD DA INCASSO
Flusso Apparecchio 389.86 lm Potenza Apparecchio 6.00 W Efficacia 64.98 lm/W Rendimento 99.96%
Flusso Lampade 390.00 lm Valore Massimo 372.15 cd/klm Posizione H=-2.00 V=0.00 VH VH Asimmetrico
UGR
S = 0.250
Reflectancies
Ceiling/Cavity 0.7 0.7 0.5 0.5 0.3 0.7 0.7 0.5 0.5 0.3
Walls 0.5 0.3 0.5 0.3 0.3 0.5 0.3 0.5 0.3 0.3
WorkingPlane 0.2 0.2 0.2 0.2 0.2 0.2 0.2 0.2 0.2 0.2
RoomDimensions ViewedCrosswise ViewedEndwise
x=2H y=2H 22.3 23.6 22.6 23.8 23.8 22.1 23.4 22.4 23.6 23.8
x=2H y=3H 23.9 25.1 24.3 25.4 25.4 23.7 24.8 24.0 25.1 25.4
x=2H y=4H 24.6 25.7 25.0 26.0 25.9 24.3 25.4 24.6 25.7 25.9
x=2H y=6H 24.7 25.7 25.1 26.1 26.4 24.7 25.8 25.1 26.1 26.4
x=2H y=8H 24.7 25.7 25.0 26.0 26.5 24.9 25.9 25.2 26.2 26.5
x=2H y=12H 24.6 25.6 25.0 25.9 26.5 24.9 25.9 25.3 26.2 26.5
x=4H y=2H 23.0 24.1 23.4 24.4 24.5 22.8 23.9 23.2 24.2 24.5
x=4H y=3H 24.9 25.8 25.2 26.1 26.2 24.6 25.5 24.9 25.8 26.2
x=4H y=4H 25.7 26.5 26.1 26.9 26.9 25.3 26.2 25.7 26.5 26.9
x=4H y=6H 25.8 26.5 26.2 26.9 27.4 25.9 26.6 26.3 27.0 27.4
x=4H y=8H 25.8 26.4 26.2 26.8 27.5 26.1 26.7 26.5 27.1 27.5
x=4H y=12H 25.8 26.3 26.2 26.8 27.6 26.1 26.7 26.6 27.1 27.6
x=8H y=4H 26.0 26.7 26.5 27.1 27.1 25.6 26.3 26.1 26.7 27.1
x=8H y=6H 26.2 26.7 26.6 27.1 27.7 26.3 26.9 26.8 27.3 27.7
x=8H y=8H 26.2 26.6 26.6 27.1 28.0 26.6 27.0 27.0 27.5 28.0
x=8H y=12H 26.1 26.5 26.6 27.0 28.1 26.7 27.1 27.2 27.6 28.1
x=12H y=4H 26.1 26.7 26.5 27.1 27.1 25.6 26.2 26.1 26.6 27.1
x=12H y=6H 26.2 26.7 26.7 27.1 27.7 26.3 26.8 26.8 27.2 27.7
x=12H y=8H 26.2 26.6 26.7 27.1 27.9 26.6 27.0 27.0 27.4 27.9
LITESTAR (c)OxyTech Srl www.oxytech.it Pagina 1
Apparecchio di Classe II
Apparecchio nel quale la protezione contro la scossa elettrica non
si basa unicamente sull’isolamento principale, ma anche sulle
misure supplementari di sicurezza, quali il doppio isolamento
o l’isolamento rinforzato. Questi apparecchi non prevedono
dispositivi per la messa a terra, o non dipendono dalle condizioni
di installazione.
ATTENZIONE:
rispettare lo schema di collegamento
ATTENTION:
respect the diagram and don’t invert the connections
Simbolo / Symbol Cavo / Cable
L = Fase / Phase Marrone / Brown
N = Neutro / Neutral Blu / Blue
INSTALLAZIONE / INSTALLATION
Apparecchio non idoneo ad essere ricoperto di materiale
termicamente isolante
Collegare Fase e Neutro della linea di alimentazione elettrica 220-240Vac, 50/60Hz nell’altro lato della morsettiera protetta.
Connect Phase and Neutral of the 220-240Vac, 50 / 60Hz power supply line to the other side of the protected terminal board.
3 - 4 - 5 6
1
2
NF


