manuals.online logo
Brands
  1. Home
  2. •
  3. Brands
  4. •
  5. Light Sky
  6. •
  7. Lighting Equipment
  8. •
  9. Light Sky SIRENA User manual

Light Sky SIRENA User manual

SIRENA
-1-
CONTENTS
Congratulations on choosing our company product! We thank you for your custom.
◆ Please keep in mind that this product, like other products of the company, adheres to the concept of
people-oriented design and manufacture, and takes product quality as the foundation.
◆ We put the interests of customers first, and do our best to meet customer requirements.
◆ Please read this instruction manual carefully and keep it for future reference. In the case of fully
understanding the product information, strictly abide by theUse the instruction manual to ensure that
the product is installed, used and serviced correctly and safely.
◆ Our company is not responsible for any damage to lamps or other performance due to personal failure
to follow the instructions during installation, use and maintenance.responsibility.
◆ Our company reserves the right to modify the manual at any time and without prior notice.
1. Safety Instructions...........................................................................................................2
2. Technical Specifications .................................................................................................5
2.1 Attachment And Size .............................................................................................7
3. Control Panel ...................................................................................................................8
4. How To Set The Unit....................................................................................................................9
4.1 Main Function.......................................................................................................9
6. Electrical Connection Diagram......................................................................................22
7. Troubleshooting..............................................................................................................23
8. Fixture Cleaning............................................................................................................24
5. Control By Universal DMX Controller .........................................................................14
5.1 DMX 512 Connection...........................................................................................14
5.2 Channel Setting....................................................................................................15
5.3 Address Setting ...................................................................................................15
5.4 DMX 512 Configuration........................................................................................16
9. Duty exonerative and copyright protectio..................................................................24
-2-
The following symbols are used to identify important safety information on the product
and in this manual:
WARNING
1.Safety Instructions
Important:
Damages caused by the disregard of this user manual are not subject to warranty.
The dealer will not accept liability for any resulting defects or problems.
 Unpack and check carefully to ensure that there is no transportation damage before
using the unit.
 DO install and operate by qualified operator.
 The light source in this luminaire should be replaced by the manufacturer or its service
agent or a similarly qualified person, always cut off the power supply before replacing he
light source.
 DO NOT allow children to operate the fixture.
 Use safety chain when fixing the unit. Handle the unit by carrying its base instead of
head only.
Please read the instruction carefully which includes important information about
the installation, usage and maintenance.
Please keep this User Manual for future consultation. If you sell the unit to another user,
be sure that they also receive this manual.
Applies only to
luminaires directly
mounted on
surfaces of
non-combustible
materials
Replace all
shatter shields
Take a short
distance from
the object to be
photographed
(meters)
Rated
maximum
ambient
temperature
Do not point
the lens towards
the sun or
strong light
Operation not
allowed during
runtime
Hazardous
voltage.Risk
of severe or lethal
electric shock.
Safety hazard.
Risk ofsevere
injury or death.
Refer to manual
betore installing,
powering or
servicing.
Firehazard. Burn hazard.
Hot surface.
nottouch.
Donottouch
Risk ofeye
injury.Safety
glassesmust
be worn.
Risk ofhand injury.
Safety gloves
must be worn.
-3-
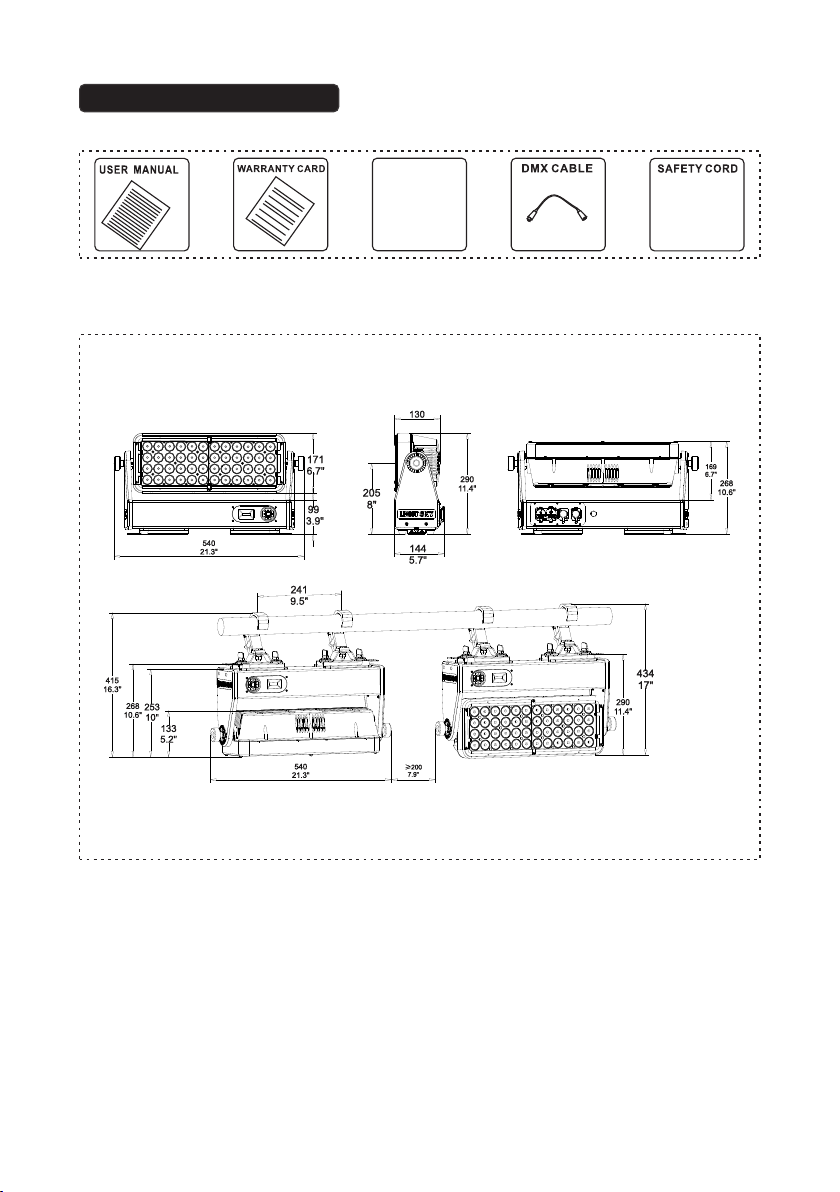
 The unit must be installed in a location with adequate ventilation, at least 20cm from
adjacent surfaces.
 Be sure that no ventilation slots is blocked, otherwise the unit will be overheated.
 Before operation, ensure that you are connecting this product to the proper voltage in
accordance with the specifications in this manual or on the product’s specification label.
 It’s important to ground the yellow/green conductor to earth in order to avoid electric shock.
 Minimum ambient temperature TA: -20℃. Maximum ambient temperature TA: 45℃.
Do not operate this product at a lower or higher temperature.
 DO NOT connect the device to any dimmer pack.
 When the lamp is running, do not place combustible objects next to it. The shortest
distance between the device and inflammable and explosive objects or materials is 0.5m.
 Make sure the power cord is not crimped or damaged; replace it immediately if damaged.
 Unit’s surface temperature may reach up to 80℃. DO NOT touch the housing
bare-handedduring its operation.
 Avoid any flammable liquids, water or metal from entering the unit. Once it happens,
cut off the mains power immediately.
 DO NOT operate in a dirty or dusty environment. DO clean the fixture regularly.
 DO NOT touch any wire during operation as there might be a hazard of electric shock.
 Avoid entanglement of the power cord with other wires.
 The minimum distance to objects/surface must be more than 3 meters.
 In the event of serious operating problem, stop using the unit immediately.
 Never turn on and off the unit time after time.
 The housing, the lenses, or the ultraviolet filter must be replaced if they are visibly
damaged.
 DO NOT open the housing as there are no user serviceable parts inside.
 DO NOT attempt to operate this unit if it becomes damaged. DO NOT attempt any
repairs yourself. Repairs carried out by unskilled people can lead to damage or
malfunction. Please contact the nearest authorized technical assistance center if needed.
 Disconnect this product from its power source before servicing.
 DO use the original packaging if the device is to be transported.
 Avoid direct eye exposure to the light source while the product is on.
-4-
 DO NOT operate this product if you see damage on the housing, shields, or cables.
Have the damaged parts replaced by an authorized technician at once.
Installation:
The fixture should be fixed on the clamp. Always ensure that the unit is firmly fixed to avoid
vibration and slipping off during operation. Ensure that the trussing or area of installation
must be able to hold 10 times the weight without any deformation. Always install a safety
cable that can hold at least 12 times the weight of the fixture when installing.
DO install and operate by qualified operator. It must be installed in a place where there is
out of the reach of people.
-5-
2.Technical Specifications
OPTICAL
- Luminous flux: 27000 lm
- Light Source: 48pcs*15W RGBL LED
- Color temperature: 2200K ~ 8500K adjustable
- Lens Angle: 18° (15°/22°/25° optional)
- Diffuser Angle: (20°/30°/40°/55° optional)
EFFECT
- Dimmer: 16Bit, 0-100% linear dimming, four dimming curves are optional
- Stroboscopic: 1-25 electron stroboscopic and random stroboscopic
- LED frequency : 1000Hz ~ 25KHz
CONTROL
- Control mode: DMX512, RDM
- Menu Displays device temperature, channel data, and software version information
- RDM Indicates bidirectional data transmission
- Channel mode: :9CH, Default 24CH,20CH,16CH,1CH,3CH,4CH-1,4CH-2,5CH,7CH
see channel table for details
SOFTWARE
- Upgrade software through the DMX signal interface
- Intelligent temperature control to ensure LED life
- Silent fan, intelligent temperature detection
- Tilt Movement: Tilt rotation Angle ±100° manual adjustment
POWER
- voltage: VAC 100-240V 50/60Hz
- Maximum power: 620W
- Power factor: 0.996
SIZE & WEIGHT
- size: 540mm×144mm×290mm
- standard carton packing (1sets) :620mm x 265mm x 365mm
- N.W: 12.9 Kg G.W: 14.9Kg
- Flycase (option-5 sets) :1000mmx730mmx470mm
- N.W: 64.5 Kg G.W: 100.2Kg
-6-
OTHERS
- IP rate: IP65
- Working Ambient: -20 ° C t- 45 ° C
- Maximum fixture connect in Power: 2 /110V 4 /220V
- Maximum current of fixture: 110V Maximum current: 5.6A; 220V maximum current: 2.82A
- Optional accessories: hanger assembly, shutters assembly, folding shutters assembly
APPROVALS
- The product implementation standard: GB 7000.1-2015 GB7000. 217-2008
- 、Approved certifications: CE RoHs
- The product complies with the following EU directives:
Low Voltage Directive 2014/35/EU . EMC Directive 2014/30/EU-
illuminationdiagram
37 10 15
18°
Diameter(m)
Distance(m)
0.98 2.21 2.95 4.7
18° Lux R 3810 700 343 152
1.56
1372
5
G 6921 1271 623 277
2492
B 233 114 51
456
L 7007 1287 631 280
2523
17329 3183 1560 693
6238
1267
-7-
2.1.Attachment And Size
Attachment contents-Fig.1
Size-Fig.2
power cord
-8-
OK confirmation key
UP
DOWN
To the left
To the right
2.Button:
1.Display: To show the various menus and the selected function.
3.Control Panel
3.Power input: connect to the power supply.
4. Power output: connect to the lamp power output adapter.
5. DMX input: for DMX512 connection, use 3 or 5-core XLR signal cable to connect
console and lamps,and input DMX signal.
6. DMX output: used for DMX512 connection, use 3 or 5-core XLR signal cable to
connect console and lamps,And output DMX signal.
1 2 3 4 5 6
-9-
Turn on the fixture, press the OK button to enter the menu mode, use the UP/DOWN buttons to
find the menu, when the preset menu is shown on the display, press the OK button to confirm,
use the UP/DOWN buttons to select a submenu, then press the OK button to save Settings, use
the left button to return to the previous menu.
The main functions are as follows:
4.How To Set The Unit
4.1.Main Function
Dmx Set
Auto Run Mode
Auto Run Sp
Addr Edit(Auto)
DMX Function
Dmx Addr Edit A001~AXXX
Alone(Default)
Master
Speed = 01-99
Yes
No
Information
Soft Version
Clr Fixture Time
DMX Info
RDM Set
Fixture Time
Total Time
RDM UID = xxxxxxxxxxxx
Personal Set
Channel Mode
Standby Key Lock
SelectDimmer Hz
DimmerCurve
09 CH(Default)
24 CH
20 CH
16 CH
01 CH
03 CH
04 CH-1
04 CH-2
05 CH
07 CH
Select 24K Hz(Default)
Select 12K Hz
Select 6K Hz
Select 3K Hz
Linear(Default)
Square
I-Square
S Curve
Manual Control
Service
Channel
Calibration
Factory Set
Strobe.Dimmer
Reset Default
ClearTotalTime
Developer
Temp To Power
Manual Or Dmx
LOGO Display
Reset Address
On/Off(Default ON)
Code:1111
Language
Dis Rotation
Temperature
English
Normal
Chinese
Rotate 180
Code:2222 Default:off
MAIN MENU
V1.00A...
Yes
No
Yes
No
On/Off(Default ON)
On/Off(Default ON)
On/Off(Default ON)
-10-
● Dmx Set
Enter MENU, select the Dmx Set function, press the OK button to confirm, use the up/down buttons
to select: address code setting, function, automatic mode, automatic running speed, automatic editing
address code.
Dmx Addr Edit
Select Dmx Addr Edit, press the OK button to confirm, the current DMX address will be shown on the
display. Use the up/down buttons to select addresses 001~512, and press the OK button to save.
Press the OK button to return to the previous menu.
DMX Function
Select DMX Function, press the OK button to confirm, use the up/down buttons to select the desired
function: DMX Hold (default), DMX Black Burst, Red, Green, Blue, Lemon, Red+Green, Red+Blue,
Red + lemon color, green + blue, green + lemon color, blue + lemon color, self-propelled program 1~12,
press the OK button to save.
Press the left button to return to the previous menu.
Auto Run Mode
Select Auto Run Mode, press the OK button to confirm, use the Up/Down buttons to select the channel
mode: Standalone (default), Host, and press the OK button to save.
Press the left button to return to the previous menu.
Auto Run Sp
Select Auto Run Sp, press the OK button to confirm, use the up/down buttons to adjust the self-running
speed (01-99), press the OK button to save, the default self-running
speed is 12. Press the left button to return to the previous menu.
Addr Edit(Auto)
Select Addr Edit (Auto), press the OK button to confirm, use the Up/Down buttons to view the channel
modes: Free Channel Mode, 09 Channel (default), 24 Channel, 20 Channel, 16 Channel, 01 Channel,
03 Channel, 04 Channel 1 , 04 channel 2, 05 channel, 07 channel, press the OK button to enter the
selection interface, press
the up and down keys to select: Yes/No, press the OK key to confirm and return to the previous menu.
-11-
● Information
Enter the MENU menu, select the Information function, press the OK button to confirm, use the up/down
buttons to select: total running time, device time, software version, clear device time, DMX channel
information, RDM settings.
Total Time
Select Total Time, press the OK button to confirm, you can view the device: total time, total lighting time.
Press the left button to return to the previous menu.
Fixture Time
Select Fixture Time, press the OK button to confirm, you can view the device: device time, lighting time.
Press the left button to return to the previous menu.
Soft Version
Select Soft Version, press the OK button to confirm, you can view the device: current software version
information. Press the left button to return to the previous menu.
Clr Fixture Time
Select Clr Fixture Time, press the OK button to confirm, you can clear the running time information of
the device, this is a developer option, you need to enter the corresponding password to operate.
DMX Info
Select DMX Info, press the OK button to confirm, you can view the device: the channel information of
the current channel. Press the left button to return to the previous menu.
RDM Set
Select RDM Set, press OK button to confirm, you can view the device: RDM_UID. Press the left button
to return to the previous menu.
● Personal Set
Enter the MENU menu, select the Personal Set function, press the OK button to confirm, use the up/down
buttons to select: channel mode, standby menu lock, select dimming frequency, select dimming curve.
Channel Mode
Select Channel Mode, press the OK button to confirm, you can use the up and down keys to
select: 09 channel (default), 24 channel, 20 channel, 16 channel, 01 channel, 03 channel, 04 channel 1,
04 channel 2, 05 channel, 07 channel, Press the OK key to enter the selection confirmation and return
to the previous menu.
Standby Key Lock
Select Standby Key Lock, press the OK button to confirm, enter the password: 2222, press the up and
down buttons to select: On, Off (default), press the OK button to confirm and return to the previous menu.
-12-
SelectDimmer Hz
SelectDimmer Hz, press the OK button to confirm, you can use the up and down keys to
select: 12K Hz dimming, 6K Hz dimming, 3K Hz dimming, press OK to confirm and exit.
DimmerCurve
Select DimmerCurve, press the OK button to confirm, you can use the up and down keys to
select: linear (default), square dimming, inverse square dimming, S-curve dimming, press the OK button
to confirm and exit.
DMX Value(0-255)100%
100%
Brightness output
100%
100%
Brightness output
DMX Value(0-255)100%
100%
Brightness output
DMX Value(0-255)100%
100%
Brightness output
DMX Value(0-255)
● Manual Control
Enter the MENU menu, select the Manual Control function, press the OK button to confirm the entry,
use the up and down keys to select each channel, press the left and right keys to adjust the DMX value
of the selected channel, and press the OK button to return to the previous menu.
●Service
Enter the MENU menu, select Service, press the OK button to confirm, you can use the up and down
keys to select: channel calibration, factory settings, press the OK key to confirm, and then press the
left button to return to the previous menu.
Calibration
Select Calibration, press the up and down keys to select, press the OK button to confirm, you can
fine-tune the saturation color of RGBL from 0 to 255 (default 000), then press the OK button to confirm
and return to the previous menu.
-13-
Factory Set
Select Factory Set, press the up and down keys to select, press the OK button to confirm, you can
use the up and down keys to select: restore factory settings (password: 1111), clear total time
(developer option, inoperable), developer (temperature-related power: on/ OFF (default ON);
MANUAL or DMX: ON/OFF (default ON); LOGO display switch: ON/OFF (default ON);
RESET address code: ON/OFF (default OFF)), then press the OK button to return to Previous menu.
● Language
Enter the MENU menu, select the Language function, press the OK button to confirm, use the up/down
buttons to select: English, Chinese (default), press the left button to return to the previous menu.
Description of special key functions: Press the left and right keys at the same time, hold for 3 seconds,
and the display will switch between Chinese and English.
●Dis Rotation
Enter the MENU menu, select the Dis Rotation function, press the OK button to confirm, use the
up/down buttons to select: normal (default), rotate 180 degrees, press the left button to return to the
previous menu. Description of special key functions: Press the up and down keys at the same time,
hold for 3 seconds, the display direction will be reversed.
●Temperature
Enter the MENU menu, select the Temperature function, press the OK button to confirm, use the
up/down buttons to select and view the temperature of the light-emitting panel of the device, and press
the left button to return to the previous menu.
-14-
6.1.DMX 512Connection
5.Control By Universal DMX Controller
5.1.DMX 512 Connection
1. At last unit, the DMX cable has to be terminated with a terminator. Solder a 1200hm 1/4W
resistor between pin 2(DMX-) and pin 3(DMX+) into a 3-pin XLR-plug and plug it in the DMX-output
of the last unit.
2. Connect the unit together in a “daisy chain” by XLR plug cable from the output of the unit to
the input of the next unit. The cable cannot be branched or split to a “Y” cable. DMX 512 is a very
high-speed signal. Inadequate or damaged cables, soldered joints or corroded connectors can easily
distort the signal and shut down the system.
3. The DMX output and input connectors are pass-through to maintain the DMX circuit, when one
of the units’ power is disconnected.
4. Each lighting unit needs to have a DMX address to receive the data by the controller. The
address number is between 1-512.
5. The end of the DMX 512 system should be terminated to reduce signal errors.
6. 3 pin XLR connectors are more popular than 5 pins XLR.
3 pin XLR: Pin 1: GND, Pin 2: Negative signal (-), Pin 3: Positive signal (+)
5 pin XLR: Pin 1: GND, Pin 2: Negative signal (-), Pin 3: Positive signal (+), Pin4, Pin5 not used.
DMX - output
1
- Shield
2 - Signal (-)
- Signal (+)
- Not connected
- Not connected
3
4
5
1
2
3
DMX-input
- Shield
- Signal (-)
- Signal (+)
- Not connected
- Not connected
4
5
DMX512 in
signal end
out
in out
in
-15-
5.2.Channel Setting
Enter the MENU menu, select the Personal Settings function, select the channel mode, press the OK
button to confirm, you can use the up and down keys to select:09 channels (default), 24 channels,
20 channels, 16 channels, 01 channels, 03 channels, 04 channels 1, 04 channels 2, 05 channels,
07 channels,Press the OK key to enter the selection confirmation and return to the previous menu.
6.3 Address Setting
Enter MENU, select the DMX setting function, select the address code setting, press the OK button to
confirm, the current DMX address will be displayed on the display. Use the up/down buttons to select
addresses 001~512, and press the OK button to save. Press the OK button to return to the previous
menu.
Please refer to the following diagram to address your DMX512 channel for the first 4 units.
Channel mode Unit 1
Address
Unit 2
Address
Unit 3
Address Unit
Address
4
5.3.Address Setting
9 CH110 19 28
24 CH125 49 73
20 CH121 41 61
16 CH117 33 49
01 CH123 4
03 CH147 10
04 CH-1 159 13
04 CH-2 159 13
05 CH1611 16
07 CH1815 22
-16-
5.4 DMX 512 Configuration.
Please control the fixture by referring to the configurations below
9CH
Channel Value/DMX percentage Function Note
1
Shutter
0..9 No function
10..255 Strobe effect slow to fast
2Dimmer
0..255 Dimmer 0%...100%
3Red
0..255 0-100% Red dimmer from dark to bright
4Green
0..255 0-100% Green dimmer from dark to bright
5Blue
0..255 0-100%
Blue
dimmer
from
dark
to
bright
6Lime
0..255 0-100%
Lime
dimmer
from
dark
to
bright
7
Color
temperature
selection
0..2 No
function
3..49 White
Color
Temp
3200K
Section
50..99 White
Color
Temp
4000K
Section
100..149 White
Color
Temp
5600K
Section
150..199 White
Color
Temp
6800K
Section
200..249 White
Color
Temp
7500K
Section
250..255 White
Color
Temp
8500K
8
Pixel
Macro
0..4 No
function
5..28 Marcro
1
29..55 Marcro
2
56..76 Marcro
3
77..100 Marcro
4
101..124 Marcro
5
125..148 Marcro
6
149..172 Marcro
7
173..196 Marcro
8
197..220 Marcro
9
221..244 Marcro
10
245..250 Marcro
11
251..255 Marcro
12
9
Macro
Speed
0..255 Macro Speed from slow to fast
Remarks: After the address code is successfully written in batches, the lights will light up in sequence red, green, blue, lemon, and finally flash
twice, and then switch back to the original light state.
-17-
24CH
Channel Value/DMX percentage Function Note
1
Shutter
0..9 No function
10..255 Strobe effect slow to fast
2Dimmer
0..255 Dimmer 0%...100%
3Red
0..255 0-100% Red dimmer from dark to bright
4Green
0..255 0-100% Green dimmer from dark to bright
5Blue
0..255 0-100%
Blue
dimmer
from
dark
to
bright
6Lime
0..255 0-100%
Lime
dimmer
from
dark
to
bright
7
Pixel
Macro
0..4 No
function
5..28 Marcro
1
29..55 Marcro
2
56..76 Marcro
3
77..100 Marcro
4
101..124 Marcro
5
125..148 Marcro
6
149..172 Marcro
7
173..196 Marcro
8
197..220 Marcro
9
221..244 Marcro
10
245..250 Marcro
11
251..255 Marcro
12
8Macro
Speed
0..255 Macro
Speed
from
slow
to
fast
9Red
in
Pixel
1
0..255 Red
in
pixel
1
saturation
control
(0-100%)
10 Green
in
Pixel
1
0..255 Green
in
pixel
1
saturation
control
(0-100%)
11 Blue
in
Pixel
1
0..255 Blue
in
pixel
1
saturation
control(0-100%)
12 Lime
in
pixel
1
0..255 Lime
in
pixel
1
saturation
control(0-100%)
13 Red
in
pixel
2
0..255 Red
in
pixel
2
saturation
control(0-100%)
14 Green
in
pixel
2
0..255 Green
in
pixel
2
saturation
control(0-100%)
15 Blue
in
pixel
2
0..255 Blue
in
pixel
2
saturation
control(0-100%)
16 Lime
in
pixel
2
0..255 Lime
in
pixel
2
saturation
control(0-100%)
17 Red
in
Pixel
3
0..255 Red
in
pixel
3
saturation
control
(0-100%)
18 Green
in
pixel
3
0..255 Green
in
pixel
3
saturation
control(0-100%
19 Blue in pixel 3
0..255 Blue in pixel 3 saturation control(0-100%)
20 Lime in pixel 3
0..255 Lime in pixel 3 saturation control(0-100%)
21 Red in Pixel 4
0..255 Red in pixel 4 saturation control (0-100%)
22 Green in pixel 4
0..255 Green in pixel 4 saturation control(0-100%)
23 Blue in pixel 4
0..255 Blue in pixel 4 saturation control(0-100%)
24 Lime in pixel 4
0..255 Lime in pixel 4 saturation control(0-100%)
-18-
20CH
Channel Value/DMX percentage Function Note
1
Shutter
0..9 No function
10..255 Strobe effect slow to fast
2Dimmer
0..255 Dimmer 0%...100%
3
Pixel Macro
0..4 No function
5..28 Marcro 1
29..55 Marcro 2
56..76 Marcro 3
77..100 Marcro
4
101..124 Marcro
5
125..148 Marcro
6
149..172 Marcro
7
173..196 Marcro
8
197..220 Marcro
9
221..244 Marcro
10
245..250 Marcro
11
251..255 Marcro
12
4Macro
Speed
0..255 Macro
Speed
from
slow
to
fast
5Red
in
Pixel
1
0..255 Red
in
pixel
1
saturation
control
(0-100%)
6Green
in
Pixel
1
0..255 Green
in
pixel
1
saturation
control
(0-100%)
7Blue
in
Pixel
1
0..255 Blue
in
pixel
1
saturation
control(0-100%)
8Lime
in
pixel
1
0..255 Lime
in
pixel
1 saturation
control(0-100%)
9Red
in
pixel
2
0..255 Red
in
pixel
2
saturation
control(0-100%)
10 Green
in
pixel
2
0..255 Green
in
pixel
2
saturation
control(0-100%)
11 Blue
in
pixel
2
0..255 Blue
in
pixel
2
saturation
control(0-100%)
12 Lime
in
pixel
2
0..255 Lime
in
pixel
2
saturation
control(0-100%)
13 Red
in
Pixel
3
0..255 Red
in
pixel
3
saturation
control
(0-100%)
14 Green
in
pixel
3
0..255 Green
in
pixel
3
saturation
control(0-100%
15 Blue
in
pixel
3
0..255 Blue
in
pixel
3
saturation
control(0-100%)
16 Lime
in
pixel
3
0..255 Lime in pixel 3 saturation control(0-100%)
17 Red in Pixel 4
0..255 Red in pixel 4 saturation control (0-100%)
18 Green in pixel 4
0..255 Green in pixel 4 saturation control(0-100%)
19 Blue in pixel 4
0..255 Blue in pixel 4 saturation control(0-100%)
20 Lime in pixel 4
0..255 Lime in pixel 4 saturation control(0-100%)
-19-
16CH
Channel Value/DMX percentage Function Note
1Red in Pixel 1
0..255 Red in pixel 1 saturation control (0-100%)
2Green in Pixel 1
0..255 Green in pixel 1 saturation control (0-100%)
3Blue in Pixel 1
0..255 Blue in pixel 1 saturation control(0-100%)
4Lime in pixel 1
0..255 Lime in pixel 1 saturation control(0-100%)
5Red in pixel 2
0..255 Red
in
pixel
2
saturation
control(0-100%)
6Green
in
pixel
2
0..255 Green
in
pixel
2
saturation
control(0-100%)
7Blue
in
pixel
2
0..255 Blue
in
pixel
2
saturation
control(0-100%)
8Lime
in
pixel
2
0..255 Lime
in
pixel
2
saturation
control(0-100%)
9Red
in
Pixel
3
0..255 Red
in
pixel
3
saturation
control
(0-100%)
10 Green
in
pixel
3
0..255 Green
in
pixel
3
saturation
control(0-100%
11 Blue
in
pixel
3
0..255 Blue
in
pixel
3
saturation
control(0-100%)
12 Lime
in
pixel
3
0..255 Lime
in
pixel
3
saturation
control(0-100%)
13 Red
in
Pixel
4
0..255 Red
in
pixel
4
saturation
control
(0-100%)
14 Green
in
pixel
4
0..255 Green
in
pixel
4
saturation
control(0-100%)
15 Blue
in
pixel
4
0..255 Blue
in
pixel
4
saturation
control(0-100%)
16 Lime
in
pixel
4
0..255 Lime in pixel 4 saturation control(0-100%)
1CH
Channel Value/DMX percentage Function Note
1ALL Dimmer
0..255 Dimmer 0%...100% Control all LED
3CH
Channel Value/DMX percentage Function Note
1Red
0..255 0-100% Red dimmer from dark to bright
2Green
0..255 0-100% Green dimmer from dark to bright
3Blue
0..255 0-100% Blue dimmer from dark to bright

Other Light Sky Lighting Equipment manuals

Light Sky LUNAR BSW User manual

Light Sky

Light Sky LUNAR BSW User manual

Light Sky BUMBLEBEE Series User manual

Light Sky

Light Sky BUMBLEBEE Series User manual

Light Sky E550P User manual

Light Sky

Light Sky E550P User manual

Light Sky MAMBA User manual

Light Sky

Light Sky MAMBA User manual

Light Sky F1700WB -E User manual

Light Sky

Light Sky F1700WB -E User manual

Light Sky AQUABEAM400 LL User manual

Light Sky

Light Sky AQUABEAM400 LL User manual

Light Sky TX0760 User manual

Light Sky

Light Sky TX0760 User manual

Light Sky F400BSW User manual

Light Sky

Light Sky F400BSW User manual

Light Sky SUPER SCOPE User manual

Light Sky

Light Sky SUPER SCOPE User manual

Light Sky SHARK LASER User manual

Light Sky

Light Sky SHARK LASER User manual

Light Sky SHARK450 User manual

Light Sky

Light Sky SHARK450 User manual

Light Sky L7-D48 User manual

Light Sky

Light Sky L7-D48 User manual

Light Sky PEARL WASH User manual

Light Sky

Light Sky PEARL WASH User manual

Light Sky SUNNY MINI User manual

Light Sky

Light Sky SUNNY MINI User manual

Light Sky F1000 WASH-50R User manual

Light Sky

Light Sky F1000 WASH-50R User manual

Light Sky E180B User manual

Light Sky

Light Sky E180B User manual

Light Sky AQUAPEARL-PRO User manual

Light Sky

Light Sky AQUAPEARL-PRO User manual

Light Sky F260II PLUS User manual

Light Sky

Light Sky F260II PLUS User manual

Light Sky TourPro s500 Hybrid User manual

Light Sky

Light Sky TourPro s500 Hybrid User manual

Light Sky IPL1015BEAM User manual

Light Sky

Light Sky IPL1015BEAM User manual

Light Sky SHARK450BSW User manual

Light Sky

Light Sky SHARK450BSW User manual

Popular Lighting Equipment manuals by other brands

SOUTHPAW Fiber Optic Star manual

SOUTHPAW

SOUTHPAW Fiber Optic Star manual

brennenstuhl Chip LED L CN 110 IP65 operating instructions

brennenstuhl

brennenstuhl Chip LED L CN 110 IP65 operating instructions

KSIX SMARTLED BXLEDST5M11 user manual

KSIX

KSIX SMARTLED BXLEDST5M11 user manual

PROEL SPIDER 575 PLCP575 user manual

PROEL

PROEL SPIDER 575 PLCP575 user manual

Sensio Glow SE19079C0 manual

Sensio

Sensio Glow SE19079C0 manual

Hayward AQL-CHEM4-ACID owner's manual

Hayward

Hayward AQL-CHEM4-ACID owner's manual

Viabizzuno lettera O installation instructions

Viabizzuno

Viabizzuno lettera O installation instructions

Efka Outdoor Lightbox 80 Acrylic installation manual

Efka

Efka Outdoor Lightbox 80 Acrylic installation manual

Knightsbridge 12DC36 Installation & maintenance manual

Knightsbridge

Knightsbridge 12DC36 Installation & maintenance manual

ROBLAN VIASOL installation manual

ROBLAN

ROBLAN VIASOL installation manual

Eagle F318DL product manual

Eagle

Eagle F318DL product manual

Polygroup Summer Waves Maintenance Kit owner's manual

Polygroup

Polygroup Summer Waves Maintenance Kit owner's manual

Chauvet Q-WASH 260-LED Quick reference guide

Chauvet

Chauvet Q-WASH 260-LED Quick reference guide

EUROM Sunset 2000 instruction manual

EUROM

EUROM Sunset 2000 instruction manual

ARRI SkyLink Short Instruction

ARRI

ARRI SkyLink Short Instruction

EcoxGear SOUNDEXTREME SEI-SEWHP1 Series user guide

EcoxGear

EcoxGear SOUNDEXTREME SEI-SEWHP1 Series user guide

Bresser F000589 instruction manual

Bresser

Bresser F000589 instruction manual

Saxby Lighting Sight 3 in 1 Instruction leaflet

Saxby Lighting

Saxby Lighting Sight 3 in 1 Instruction leaflet

manuals.online logo
manuals.online logoBrands
  • About & Mission
  • Contact us
  • Privacy Policy
  • Terms and Conditions

Copyright 2025 Manuals.Online. All Rights Reserved.