medi CIRCAID JUXTA-FIT User manual

DANSK
NEDERLANDS
ENGLISH
ITALIANO
DEUTSCH
FRANÇAIS
JF-HW-INT-DFU-111912-01
CircAid Medical Products, Inc.
9323 Chesapeake Drive, Suite B2
San Diego, CA 92123 U.S.A.
01-858-576-3550
MDSS
Schigraben 41
30175 Hannover, Germany
EC REP
DANSK 1
DEUTSCH 2
ENGLISH 3
FRANÇAIS 4
ITALIANO 5
NEDERLANDS 6
HAND WRAP
Il tutore non può essere tagliato o modicato in alcun modo. Se ciò dovesse accadere
verrà annullata la garanzia di sei mesi CircAid Medical Products, Inc. non si assume
alcuna responsabilità per eventuali danni sici o materiali a cose dovuto ad un uso
improprio dei nostri prodotti. CircAid è un marchio registrato e Juxta-Fit è un marchio di
proprietà di CircAid Medical Products, Inc. Velcro è un marchio commerciale registrato
di Velcro USA, Inc. ©2012 CircAid Medical Products, Inc. Tutti i diritti riservati.
This garment is not designed to be cut or modied in anyway. Doing so will void the six
month limited warranty. CircAid Medical Products, Inc. assumes no liability for injury
or damages resulting from contraindicated use of its products. CircAid is a registered
trademark and Juxta-Fit is a trademark of CircAid Medical Products, Inc. Velcro is a
registered trademark of Velcro USA, Inc. ©2012 CircAid Medical Products, Inc. All Rights
Reserved.
CircAid Medical Products, Inc. påtager sig intet ansvar for uheld eller skader, der opstår
fra kontraindiceret brug af vores produkter. CircAid er et registreret varemærke og
Juxta-Fit er et varemærke tilhørende CircAid Medical Products, Inc. Velcro er et
registreret varemærke tilhørende Velcro USA, Inc. ©2012 CircAid Medical Products, Inc.
All Rights Reserved.
CircAid Medical Products, Inc aanvaardt geen aansprakelijkheid voor letsel of schade die
voortvloeit uit gecontra-indiceerd gebruik van onze producten. CircAid is een
geregistreerd handelsmerk en Juxta-Fit™ is een handelsmerk van CircAid Medical
Products, Inc. Velcro is een geregistreerd handelsmerk van Velcro USA, Inc.
©2012 CircAid Medical Products, Inc. Alle rechten voorbehouden.
Cette pièce d’habillement n’est pas conçue pour être coupée ou modiée de quelque
façon que ce soit. Si vous le faites, la garantie de 6 mois sera immédiatement annulée.
CircAid Medical Products Inc. décline toute responsabilité relative à des blessures ou
des dégâts résultant d’un usage contre-indiqué de ses produits. CircAid est une marque
déposée et Juxta-Fit, une marque de fabrique de CircAid Medical Products Inc. Velcro
est une marque déposée de Velcro USA Inc. Tous droits réservés. ©2012 CircAid Medical
Products Inc.
Diese Gewebematerialien dürfen nicht zerschnitten oder in irgendeiner Weise geändert
werden. Geschieht dies dennoch, wird die sechsmonatige Garantie unwirksam. CircAid
Medical Products, Inc. übernimmt keinerlei Haftung für Verletzungen oder Schäden, die
durch unsachgerechten oder kontraindizierten Gebrauch unserer Produkte verursacht
werden. CircAid ist ein eingetragenes Warenzeichen und Juxta-Fit ist eine Handelsmarke
von CircAid Medical Products, Inc. Velcro ist ein eingetragenes Warenzeichen von Velcro
USA. ©2012 CircAid Medical Products, Inc. Alle Rechte vorbehalten.

PLEJE OG VEDLIGEHOLDELSE
BRUGSANVISNING:
Juxta-Fit™ Håndomslag
ONDERHOUD:
GEBRUIKSAANWIJZING:
Juxta-Fit™ Handverband
SÅDAN TAGER DU JUXTAFIT™ HÅNDOMSLAG PÅ:
TRIN 1 Lad tommelngeren glide gennem håndomslagets tommelngerhul,
så den sorte side af stoet vender ind mod huden. Den korte søm bør
løbe fra tommelngeren til håndleddet. Tommelngeren bør også være
centreret inden i hullet, så materialet ligger adt mod huden.
TRIN 2 Knyt din hånd for at sætte håndomslaget på plads. Tag dernæst fat i
igen med Velcro®, der sidder mellem de to bånd på håndomslaget.
Træk, så der er en komfortabel spænding og fastgør igen til
håndomslagets afrundede del inden i hånden.
TRIN 3 Træk håndomslagets yderste bånd (nærmest ngrene) med fast og
komfortabel kompression, og fastgør endens krog ovenpå hånden. Det
anbefales, at kanten på håndomslaget tilpasses, så det er på linje med
roden af ngrene.
BEMÆRK: Båndene skal muligvis justeres og vinkles for at tilføje
yderligere kompression til bestemte områder efter behov.
TRIN 4 Træk det andet og sidste bånd rundt om tommelngeren med fast og
komfortabel kompression, og fastgør det ovenpå hånden. Juster
båndets position efter behov for at maksimere komfort og kompression.
TRIN 5 Stop håndomslagets kant ved håndleddet ind under ærmet.
BEMÆRK: Håndomslagets position kan justeres, så den dækker flere af
fingrene eller håndleddet afhængigt af, hvad man ønsker.
SÅDAN FJERNER DU JUXTAFIT™ HÅNDOMSLAG:
TRIN 1 For at erne håndomslaget skal du frigøre båndene og folde dem
tilbage i sig selv.
TRIN 2 Løsgør håndomslaget fra hånden og træk den af.
Juxta-Fit™-håndomslag må aldrig gøre ondt. Den bør føles fast, men
komfortabel. Hvis trykket stiger eller falder bemærkelsesværdigt under
brug, skal du løsne eller stramme båndene derefter.
HVIS DU OPLEVER NOGEN FORMER FOR SMERTE, SKAL DU STRAKS
FJERNE JUXTAFIT™ HÅNDOMSLAG OG KONSULTERE DIN LÆGE.
INDHOLDSSTOFFER I JUXTA-FIT™ HÅNDOMSLAG: Nylon, Polyuretan, Lycra®,
Sølv SØLVMÆRKATER: satinacetat.
DETTE PRODUKT INDEHOLDER SØLV.
DETTE PRODUKT INDEHOLDER IKKE LATEX.
BRUGSINDIKATIONER: Lymfødem
KONTRAINDIKATIONER: Alvorlig arteriel insuciens, akut infektion.
BEMÆRK: For at forlænge levetiden
for dit Juxta-Fit™-håndomslag, skal
du håndvaske det og tørre det
hængende eller liggende. Hvis du
oplever nogen former for smerte,
skal du straks erne Juxta-Fit™
hånsomslag og konsultere din læge.
HÅNDVASK
MÅ IKKE BLEGES
MÅ IKKE KEMISK RENSES
SKAL TØRRES HÆNGENDE ELLER LIGGENDE
MÅ IKKE VRIDES
MÅ IKKE STRYGES
m
„†
‹
’
Â
ˆ
HET AANTREKKEN VAN HET JUXTA-FIT™ HANDVERBAND:
STAP 1 Schuif de duim door het duimgat van het handverband met de zwarte
kant van het materiaal op de huid. De naad loopt vanaf de basis van
de duim tot de pols. Houdt de duim in het centrum van het duimgat,
zodat het materiaal plat tegen de huid ligt.
STAP 2 Maak een vuist om het handverband op zijn plaats te verankeren. Plak
vervolgens het klittenband met een comfortabele druk op elkaar vast,
dit bevind zich tussen de twee banden.
STAP 3 Trek de bovenste band van het handverband aan met een stevige en
comfortabele druk en sla deze onder de duim door naar bovenkant
hand. Zet het klittenband vast. Aanbevolen wordt, dat de
bovenkant van het handverband uitlijnt op de basis van de vingers.
Pas aan indien nodig.
Opmerking: de banden kunnen indien nodig worden aangepast om extra druk te
geven aan specieke gebieden.
STAP 4 Trek de tweede resterende band rond de basis van de duim tot een
comfortabele druk, en bevestig deze aan de bovenkant van de hand.
Verstel de positie van de band indien nodig om het comfort en de
druk te maximaliseren.
STAP 5 Duw het overlappende materiaal van het handverband onder het
armverband.
Opmerking: de positie van handverband kan aangepast worden zodat het de
vingers of de pols meer bedekt, afhankelijk van de voorkeur.
HET UITTREKKEN VAN DE JUXTA-FIT™ HANDVERBAND:
STAP 1 Om het handverband af te doen, trekt U de banden los en vouwt U
deze terug op het verband.
STAP 2 Neem het verband van de hand.
Opmerking: het Juxta-Fit ™ handverband mag nooit pijn doen. Het moet stevig,
maar comfortabel aanvoelen. Als de druk merkbaar toe- of afneemt tijdens het
dragen, zet de banden dan losser of strakker afhankelijk van wat nodig is.
ALS U PIJN VOELT, HET JUXTAFIT ™ HANDVERBAND
ONMIDDELLIJK VERWIJDEREN EN RAADPLEEG UW BEHANDELAAR
SAMENSTELLING JUXTA-FIT™ HANDSCHOEN: Nylon, Polyurethaan, Lycra®,
Zilver ETIKETTEN: Satijn Acetaat
DIT PRODUCT BEVAT ZILVER.
DIT PRODUCT BEVAT GEEN LATEX.
INDICATIES VOOR GEBRUIK: lymfoedeem
CONTRAINDICATIES: ernstige arteriële insuciëntie, acute infectie.
De Juxta-Fit™ handverband
gaat langer mee als u hem met
de hand wast en hangend of
liggend laat drogen. U kunt de
Juxta-Fit™ handverband ook
in de machine wassen op de
stand voor delicaat materiaal en
drogen op een lage temperatuur.
HANDWAS
GEBRUIK GEEN BLEEKMIDDEL
NIET IN DE DROGER DOEN
HANGEND OF LIGGEND LATEN DROGEN
NIET UITWRINGEN
NIET STRIJKEN
m
„†
‹
’
Â
ˆ
1 DANSK: BRUGSANVISNING NEDERLANDS: AANWIJZINGEN VOOR HET GEBRUIK 6
TRIN 1
TRIN 2
TRIN 3
TRIN 4
TRIN 4
TRIN 5
STAP 1
STAP 2
STAP 3
STAP 4
STAP 4
STAP 5

PFLEGEANLEITUNG:
GEBRAUCHSANLEITUNG:
Juxta-Fit™ Stulpenhandschuhs
ISTRUZIONI PER IL LAVAGGIO:
ISTRUZIONI PER L’USO:
Guanto Protettivo Juxta-Fit™
ANLEGEN DES JUXTA-FIT™ STULPENHANDSCHUHS:
SCHRITT 1 Schieben Sie den Daumen durch das Daumenloch des Stulpenhandschuhs,
wobei die schwarze Seite des Gewebes dem Kinn zugewandt ist. Die Naht
sollte vom Daumenansatz zum Handgelenk hin verlaufen. Der Daumen
sollte ferner in der Mitte des Loches stecken, sodass das Material eng anliegt.
SCHRITT 2 Machen Sie eine Faust, um das Handstück richtig zu positionieren. Greifen
Sie sodann den Velcro®-Streifen, der sich zwischen den beiden Bändern
des Handstücks bendet. Ziehen Sie den Streifen fest an, bis eine für Sie
angenehme Spannung vorhanden ist und drücken Sie ihn anschließend auf
dem runden Abschnitt des Handstückes fest.
SCHRITT 3 Ziehen Sie das obere Band des Handstückes an, bis ein fester und dennoch
für Sie bequemer Kompressionsdruck entsteht und drücken Sie sodann das
Bandende an der Rückseite des Handstückes an. Wir empfehlen, dass die
obere Begrenzung des Handstückes bündig mit dem Fingeransatz verläuft
und nötigenfalls entsprechend ausgerichtet wird.
Bitte beachten sie: Die Bänder können nach Bedarf angepasst und entsprechend
ausgerichtet werden, um den Kompressionsdruck in bestimmten Bereichen zu erhöhen.
SCHRITT 4 Ziehen Sie das zweite Band um den Daumenansatz herum an, bis ein fester
und dennoch für Sie angenehmer Kompressionsdruck entsteht und
befestigen Sie das Band sodann an der Rückseite des Handstückes.
Korrigieren Sie die Positionierung des Bandes nach Bedarf für einen
möglichst bequemen Sitz und den für Sie optimalen Kompressionsdruck.
SCHRITT 5 Stecken Sie das überstehende Material des Handstückes unter die
Armmanschette.
Bitte beachten Sie: Der Sitz bzw. die Positionierung des Stulpenhandschuhs kann
wunschgemäß entsprechend so angepasst werden, dass er einen größeren Teil der
Finger oder aber des Handgelenks abdeckt.
ABLEGEN DES JUXTA-FIT™ STULPENHANDSCHUHS:
SCHRITT 1 Lösen Sie die Bänder und legen Sie diese zusammen, um den
Stulpenhandschuh abzulegen.
SCHRITT 2 Ziehen Sie den Stulpenhandschuh aus.
Bitte beachten Sie: Der Juxta-FitTM Stulpenhandschuh darf niemals drücken oder
Schmerzen verursachen. Das Material sollte fest, aber dennoch bequem sitzen. Sollte
sich der Druck beim Tragen nennenswert erhöhen oder verringern, lockern Sie einfach
die Bänder oder ziehen Sie diese entsprechend an.
LEGEN SIE UNVERZÜGLICH DEN JUXTAFITTMSTULPENHANDSCHUH AB,
WENN SIE SCHMERZEN EMPFINDEN UND SUCHEN SIE IHREN ARZT AUF.
BESTANDTEILE DES JUXTAFIT™ STULPENHANDSCHUHS: Nylon, Polyurethan,
Elastan, silberne HAFTETIKETTEN: Acetat-Satin
DIESES PRODUKT ENTHÄLT SILBER.
DIESES PRODUKT IST LATEXFREI.
ANWENDUNG BEI: Lymphödem
GEGENANZEIGEN: schwere arterielle Insuzienz, akute Infektionen
Bitte beachen sie: Waschen Sie Ihren
Juxta-Fit™ Stulpenhandschuhs nur mit der
Hand und hängen Sie ihn zum Trocknen
tropfnass auf oder trocknen Sie ihn liegend,
damit er möglichst lange gut erhalten bleibt.
Der Juxta-Fit™ Stulpenhandschuhs ist auch
maschinenwaschbar, sofern ein schonender
Waschgang gewählt und das Material auf
niedriger Temperatur getrocknet wird.
HANDWÄSCHE
NICHT BLEICHEN
NICHT CHEMISCH REINIGEN
TROPFNASS AUFHÄNGEN ODER
LIEGEND TROCKNEN
NICHT AUSWRINGEN
NICHT BÜGELN
m
„†
‹
’
Â
ˆ
COME INDOSSARE GUANTO PROTETTIVO JUXTA-FIT™:
FASE 1 Inlare il pollice attraverso l’apposito foro nel guanto con il lato del tessuto
di colore nero rivolto verso la pelle. La linea di giunzione dovrebbe andare
dalla base del pollice al polso. Il pollice dovrebbe anche essere centrato
all’interno della presa, così che il materiale si appoggi piatto contro la pelle.
FASE 2 Errare il pugno per mantenere ferma e quindi posizionare bene la copertura
della mano. Quindi aerrare la linguetta in Velcro® che si trova fra le due
strisce di copertura del palmo. Stringere applicando una tensione
confortevole e ssare la linguetta alla sezione rotonda sempre del
segmento di copertura del palmo.
FASE 3 Tirare la fascia che si trova sopra la parte superiore del palmo applicando
una compressione decisa ma confortevole e ssare la parte terminale della
linguetta alla parte posteriore del segmento per la mano. Si consiglia di
allineare bene il bordo superiore alla base delle dita e regolarlo quanto
serve.
Nota: Se necessario, le fasce possono essere regolate per dare una maggiore
compressione in alcune aree speciche.
FASE 4 Stringere la seconda fascia rimasta attorno alla base del pollice esercitando
una compressione decisa e confortevole, ed attaccarla alla parte posteriore
della mano. Regolare la posizione della fascia quanto basta perché sia
confortevole e sucientemente compressa.
FASE 5 Inserire il materiale sovrapposto del tutore per la mano sotto il tutore per il
braccio.
Nota: La posizione del guanto protettivo può essere regolata di modo che copra di
più le dita o il polso a seconda della necessità.
COME RIMUOVERE IL GUANTO PROTETTIVO JUXTA-FIT™:
FASE 1 Per rimuovere il guanto protettivo, staccare le fasce e ripiegarle su se stesse.
FASE 2 Srotolare il guanto protettivo dalla mano e farlo scivolare fuori.
Nota: Il guanto protettivo Juxta-Fit™ non dovrebbe mai procurare dolore. Il guanto
dovrebbe dare una sensazione di compressione e comfort allo stesso tempo. Se
la pressione aumenta o diminuisce in modo importante durante l’uso, allentare o
stringere le fasce quanto serve.
SE VI FA MALE, TOGLIETE IMMEDIATAMENTE IL GUANTO PROTETTIVO
JUXTAFIT™ E CONSULTATE IL VOSTRO MEDICO.
COMPOSIZIONE GUANTO PROTETTIVO JUXTA-FIT™: Nylon, Poliuretano, Lycra®,
Argento ETICHETTE: Acetato di raso
QUESTO PRODOTTO CONTIENE ARGENTO.
QUESTO PRODOTTO NON CONTIENE LATTICE.
INDICAZIONI PER L’USO: Linfedema
CONTROINDICAZIONI: Grave insucienza arteriosa, infezione acuta.
Nota: Per allungare la vita del vostro
Il guanto protettivo Juxta-Fit™
lavarlo a mano e asciugarlo appeso
in verticale per farlo sgocciolare
oppure steso in piano il guanto
protettivo Juxta-Fit™ può anche
essere lavato in lavatrice usando un
programma delicato e asciugato a
bassa temperatura.
LAVAGGIO A MANO
NON CANDEGGIARE
NON LAVARE A SECCO
ASCIUGARE APPESO LASCIANDO
SGOCCIOLARE OPPURE IN POSIZIONE STESA
NON STRIZZARE
NON STIRARE
m
„†
‹
’
Â
ˆ
5 2DEUTSCH: GEBRAUCHSANLEITUNGITALIANO: ISTRUZIONI PER L’USO
FASE 1
FASE 2
FASE 3
FASE 4
FASE 4
FASE 5
SCHRITT 1
SCHRITT 2
SCHRITT 3
SCHRITT 4
SCHRITT 4
SCHRITT 5
CARE INSTRUCTIONS:
DIRECTIONS FOR USE:
Juxta-Fit™ Hand Wrap
ENTRETIEN:
CONSIGNES D’UTILISATION:
Le Gantelet Juxta-Fit™
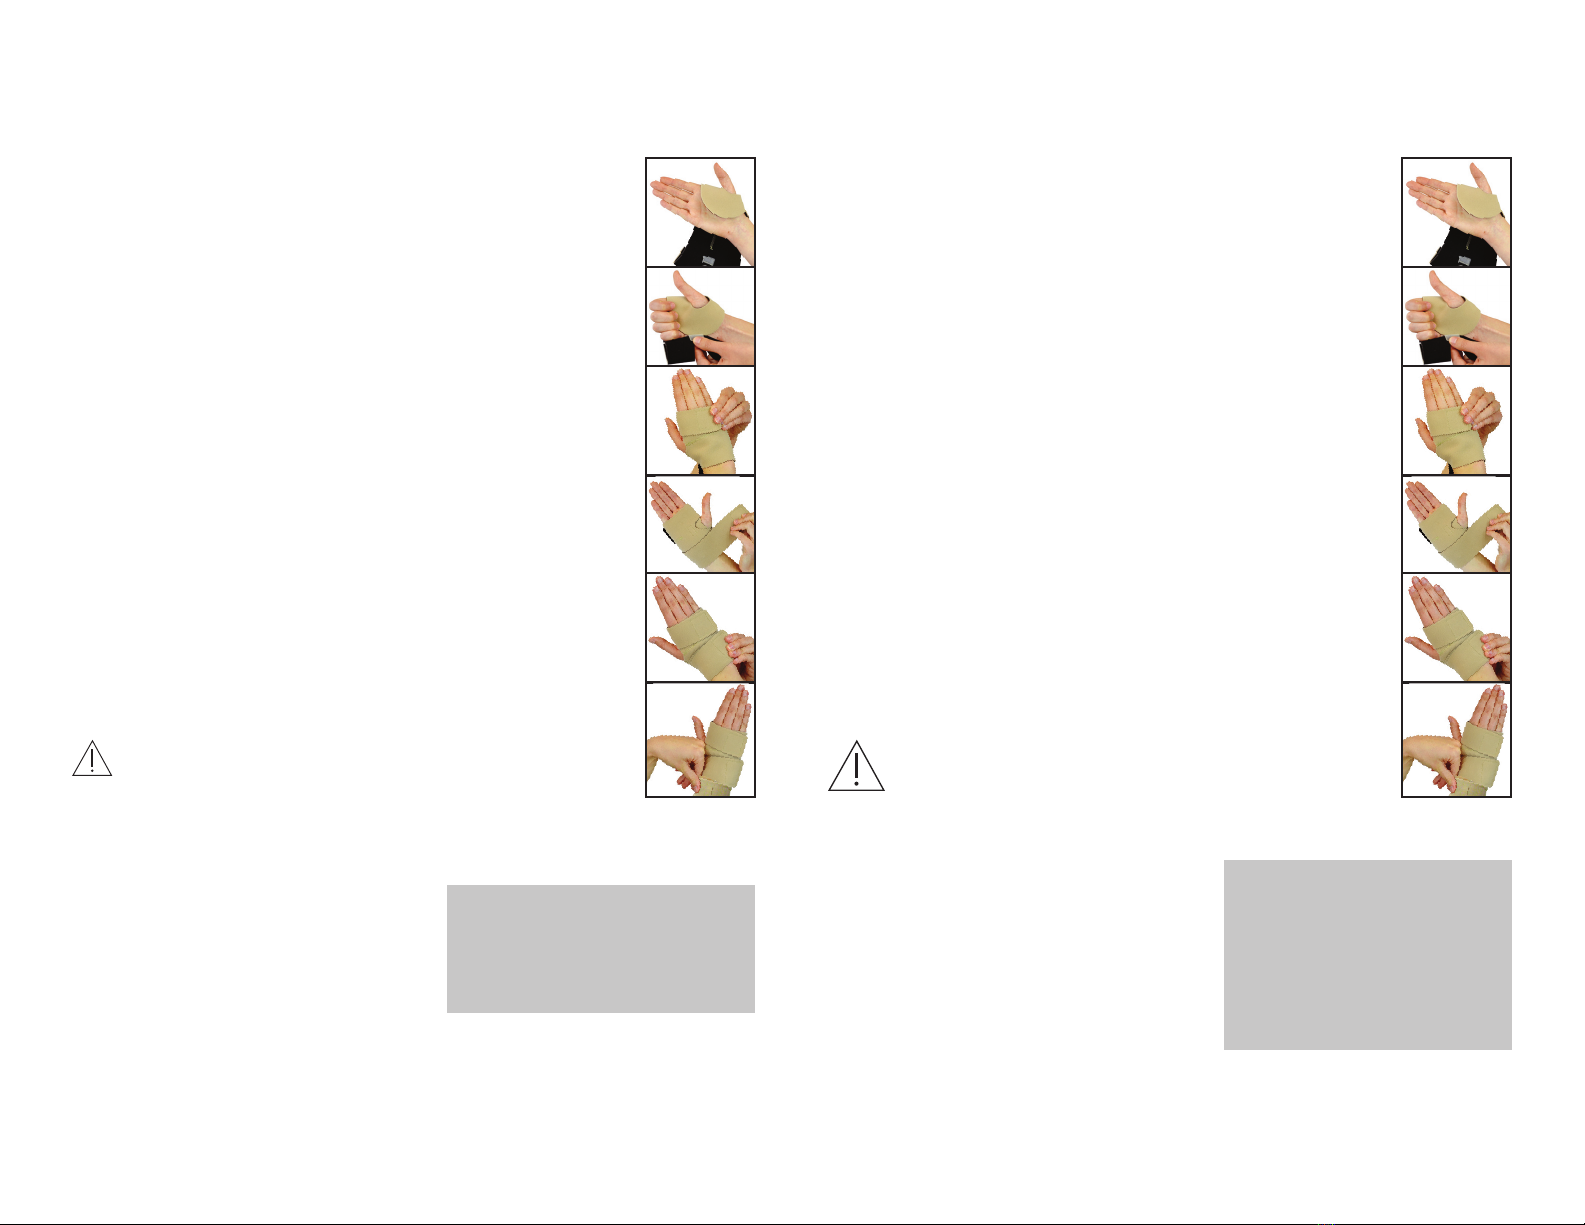
DONNING THE JUXTA-FIT™ HAND WRAP:
STEP 1. Slide the thumb through the hand wrap’s thumb hole with the black side
of the fabric facing the skin. The seam line should be running from the
base of the thumb to the wrist. The thumb should also be centered within
the hole so that material lies at against the skin.
STEP 2. Make a st to anchor the hand piece in place. Then, grab a hold of the
Velcro® tab that is located between the two hand piece bands. Pull to a
comfortable tension and secure the tab to the rounded section of the
hand piece.
STEP 3. Pull the top band of the hand piece to a rm and comfortable
compression and secure the tab end to the back of the hand piece.
It is recommended that the top edge of the hand piece lines up with the
base of the ngers and adjust accordingly.
NOTE: The bands may be adjusted and angled to add additional compression to
specic areas as needed.
STEP 4. Pull the second remaining band around the base of the thumb to rm and
comfortable compression, and attach it to the back of the hand. Adjust
the band position as needed to maximize comfort and compression.
STEP 5. Tuck the overlapping material of the hand piece underneath the
armsleeve. Note: The position of the hand wrap can be adjusted so that it
covers more of the ngers or the wrist depending on preference.
REMOVING THE JUXTA-FIT™ HAND WRAP:
STEP 1. To remove the Juxta-Fit™ Hand Wrap, detach the bands and fold them
back onto themselves.
STEP 2. Unwrap the Juxta-Fit™ Hand Wrap from the hand and slide o.
Note: The Juxta-Fit™ Hand Wrap should never hurt. It should feel rm but
comfortable. If pressure increases or decreases noticeably during wear, loosen or
tighten the bands accordingly.
IF YOU ARE EXPERIENCING ANY PAIN, IMMEDIATELY REMOVE THE
JUXTAFIT™ HAND WRAP AND CONSULT YOUR PHYSICIAN.
Components of Juxta-Fit™ Gauntlet: Nylon, Polyurethane, Spandex and Silver Label: Satin Acetate
This product contains silver. THIS PRODUCT DOES NOT CONTAIN LATEX.
Indications for use: Lymphedema
Contraindications: Severe arterial insuciency, acute infection.
NOTE: To extend the life of your
Juxta-Fit™ Gauntlet hand wash and drip
or at dry. The Juxta-Fit™ Gauntlet can
also be machine washed using a gentle
cycle and dried on a low heat setting.
HAND WASH
DO NOT BLEACH
DO NOT DRY CLEAN
DRIP DRY OR FLAT DRY
DO NOT WRING
DO NOT IRON
m
„†
‹
’
Â
ˆ
Composants du Gantelet Juxta-Fit™ : nylon, polyuréthanne, lycra, argent ÉTIQUETTES : satin acétate
Ce produit contient de l’argent. CE PRODUIT NE CONTIENT PAS DE LATEX.
Indications : lymphoedème
Contre-Indications : insusance artérielle grave, infection aiguë.
Remarque: lavez votre le gantelet
Juxta-Fit™ à la main et étendez-le
mouillé ou séchez-le à plat an de
prolonger sa durée de vie. Le gantelet
Juxta-Fit™ peut aussi être lavé en
machine en utilisant un cycle doux et
un séchage à chaleur faible.
METTRE LE GANTELET JUXTA-FIT™:
ÉTAPE 1 Glissez le pouce à travers le trou qui lui est destiné dans le gantelet,
le côté noir du tissu vers la peau. Le tracé de la couture doit aller
de la base du pouce au poignet. Le pouce doit être centré dans la
prise pour que la matière soit bien à plat contre la peau.
ÉTAPE 2 Serrez le poing pour maintenir la partie sur la paume en place.
Prenez ensuite l’attache en Velcro® située entre les deux bandes
sur la main. Tirez pour arriver à une tension confortable et xez
l’attache sur la partie arrondie de la pièce.
ÉTAPE 3 Tirez la bande supérieure de la pièce pour obtenir une compression
ferme et confortable et xez l’extrémité de l’attache au dos de la
pièce sur la main. Il est recommandé de garder le bord supérieur de
la pièce aligné à la base des doigts et de régler en conséquence.
Remarque : Les bandes peuvent être réglées et orientées pour assurer une
compression supplémentaire sur des zones spéciques, le cas échéant.
ÉTAPE 4 Tirez la bande restante autour de la base du pouce an d’obtenir
une compression ferme et confortable ; xez-la ensuite au dos de
la main. Réglez la position de la bande pour obtenir le meilleur
confort et une compression maximale.
ÉTAPE 5 Rentrez la partie qui chevauche sous la manche.
ENLEVER LE GANTELET JUXTA-FIT™:
ÉTAPE 1 Détachez les bandes et repliez-les sur elles-mêmes pour ôter le
gantelet.
ÉTAPE 2 Défaites le gantelet de la main et faites-le glisser.
Remarque : Le gantelet Juxta-Fit™ ne doit jamais faire mal. Il doit laisser une
impression de fermeté, mais aussi de confort. Si la pression s’accroît ou
diminue sensiblement pendant que le gantelet est porté, relâchez ou
resserrez les bandes en conséquence.
SI VOUS RESSENTEZ UNE DOULEUR, ENLEVEZ
IMMÉDIATEMENT LE GANTELET JUXTAFIT™ ET
CONSULTEZ VOTRE MÉDECIN.
LAVER À LA MAIN
NE PAS JAVELLISER
NE PAS NETTOYER À SEC
ÉTENDRE MOUILLÉ OU SÉCHER À PLAT
NE PAS ESSORER
NE PAS REPASSER
m
„†
‹
’
Â
ˆ
34FRANÇAIS: MODE D’EMPLOI
ENGLISH: DIRECTIONS FOR USE
STEP 1
STEP 2
STEP 3
STEP 4
STEP 4
STEP 5
ÉTAPE 1
ÉTAPE 2
ÉTAPE 3
ÉTAPE 4
ÉTAPE 4
ÉTAPE 5
Other medi Personal Care Product manuals

medi
medi Mediven User manual

medi
medi protect.Heel soft User manual

medi
medi protect.Collar soft User manual

medi
medi mediven thrombexin 18 User manual

medi
medi protect.CSB User manual

medi
medi Circaid Juxtacures User manual

medi
medi Humeral fracture brace User manual

medi
medi mediven sheer & soft User manual

medi
medi CIRCAID MEASURE-UP User manual

medi
medi igli Active Light User manual

medi
medi 4C flex User manual

medi
medi protect.Dorsofix User manual

medi
medi Manumed T User manual

medi
medi Rehab one User manual

medi
medi Stabimed pro User manual

medi
medi Spinomed User manual

medi
medi Lumbamed maternity User manual

medi
medi Lumbamed sacro User manual

medi
medi protect.CAT User manual

medi
medi M.4 s CI User manual


