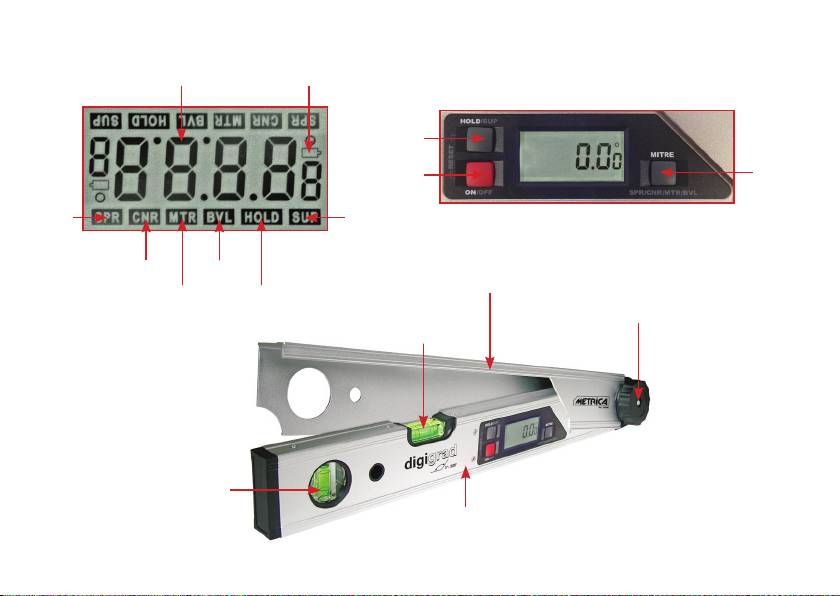
Metrica DIGIGRAD 29890 User manual

DIGIGRAD
MISURATORE D’ANGOLI DIGITALE
Ref. 29890

Sicurezza della batteria
atteNziONe:
- Le batterie possono esplodere o perdere liquido e possono
causare lesioni o incendi.
- Per ridurre questo rischio:
- Seguire sempre le istruzioni e le avvertenze sull’etichetta
della batteria.
- NON creare cortocircuiti tra i terminali della batteria.
- NON mettere sotto carica le batterie alcaline.
- NON utilizzare insieme batterie vecchie e nuove.
- Sostituire tutte le batterie nello stesso momento con altre
nuove della stessa marca e tipo.
- NON utilizzare tipi diversi di batterie.
- NON buttare le batterie nel fuoco.
- Tenere sempre le batterie fuori dalla portata dei bambini.
- Rimuovere sempre le batterie se non si intende utilizzare il
dispositivo per lungo tempo.
NOte:
1) Assicurarsi di utilizzare le giuste batterie come racco-
mandato.
2) Assicurarsi che le batterie siano inserite in modo corretto,
con la corretta polarità.
3) NON smaltire questo prodotto con i rifiuti domestici.
4) Seguire SEMPRE le norme locali per smaltire le batterie.
5) Attenersi alla normativa locale per la raccolta, il reciclo
e lo smaltimento dei rifiuti elettrici ed elettronici ai sensi
della direttiva RAEE (WEEE).
MaNuteNziONe
La livella non è impermeabile.
Porre attenzione a non bagnare lo strumento: possono verifi-
carsi danni ai circuiti interni.
NON lasciare la livella alla luce diretta del sole e non esporla
a temperature elevate.
L’alloggiamento e alcune parti interne sono in plastica e pos-
sono deformarsi alle alte temperature.
NON conservare la livella in un ambiente freddo.
Durante il riscaldamento può formarsi umidità sulle parti in-
terne che potrebbe causare la corrosione dei circuiti interni.
NOTA: Quando si lavora in ambienti polverosi, sul display
può depositarsi dello sporco. Rimuovere l’umidità o lo
sporco con un panno morbido e asciutto. NON utilizzare
detergenti aggressivi o solventi.
AVVERTENZE PER IL FUNZIONAMENTO

12
83
4
5
6
7
11
10
9
13
16
14
12
15

DIGIGRAD
MaNuale d’uSO
iNStallaziONe delle batterie
1. Sollevare il braccio per esporre il vano batterie che si trova sul
retro dello strumento.
2. Togliere il coperchio, come indicato.
3. Inserire (2) batterie AAA.
4. Riposizionare il coperchio e far scattare la chiusura.
diSplay
1. Visualizzazione della misura istantanea dell’angolo
2. Indicatore di carica della batteria
3. Indicatore SPR*
4. Indicatore CNR*
5. Indicatore MTR*
6. Indicatore BVL*
7. Indicatore HOLD (blocco del valore misurato)
8. Indicatore SUP*
caratteriStiche
9. Tasto ON/OFF
10. Tasto HOLD/SUP
11. TasTo MITRE (da non usaRE)
12. Braccio regolabile
13. Braccio principale
14. Manopola di serraggio
15. Fiala orizzontale
16. Fiala verticale
acceNSiONe/SpegNiMeNtO
- A bracci chiusi, premere il tasto ON / OFF (10) per > 1 sec. per
accendere il display e la retroilluminazione.
- Il display può presentarsi con lettura diritta o capo-
volta : per cambiare la posizione leggere il paragrafo
“inversione del display”.
- Il display indica in gradi (°) l’angolo (1) compreso tra i bracci
(12) e (13).
- La lettura è indicata in gradi/decimo di grado arrotondato a 5
centesimi
- Il display si spegne automaticamente dopo circa 5 minuti di
non utilizzo.
- La retroilluminazione si spegne automaticamente dopo circa 1
minuto di non utilizzo. Se il display è acceso e la retroillumina-
zione si spegne, per riaccenderla premere 2 volte il tasto HOLD
per circa 1 secondo.
* Funzione da non utilizzare per il normale uso quotidiano

- L’icona di carica della batteria (2) viene visualizzata quando la
durata residua della batteria è di circa 2 ore.
- Premere Il tasto ON / OFF per > 2 sec. per spegnere il display.
INVERSIONE DEL DISPLAY
Con il display acceso, premere il tasto ON / OFF per circa 1 sec.
per invertire il display. Premere di nuovo per circa 1 sec. per far
tornare il display in posizione normale.
Se il simbolo indicante i gradi si trova in basso a sinistra,
significa che il display è capovolto.
Quando il vertice dell’angolo da misurare è a destra, posiziona-
re la livella con il braccio principale come base (fig. A), con il
display a lettura diritta posizionato a destra .
Per una lettura corretta, il numero visualizzato deve sempre
essere sulla parte destra dello schermo .
Quando il vertice dell’angolo da misurare è a sinistra (fig. B) è ne-
cessario posizionare la livella con il braccio regolabile (12) come
base ed effettuare la lettura sul braccio principale dopo aver ca-
povolto il display (ved. istruzioni).
Per una lettura corretta, il numero visualizzato deve sempre
essere sulla parte destra dello schermo .
ricalibraziONe
Se l’unità è caduta o si sospetta inesattezza dello strumento, è
possibile ricalibrare il punto zero.
A strumento acceso con i bracci (12) e (13) chiusi insieme, pre-
mere simultaneamente il tasto ON / OFF (10) e HOLD / SUP (9)
per > 1 sec. per ripristinare l’angolo a 0 °.
Fig. A Fig. B

hOld
Premere il tasto HOLD / SUP per circa 1 sec. per bloccare l’an-
golo corrente visualizzato sul display.
L’indicatore HOLD (7) apparirà e lampeggerà sul display.
NOTA: Spegnendo il display con la funzione Hold attiva, la
funzione Hold rimane memorizzata e sarà ancora attiva
quando lo strumento verrà riacceso.
Premere il tasto HOLD / SUP di nuovo per circa 1 sec. per sbloc-
care l’angolo indicato e tornare alla misurazione istantanea
dell’angolo tra i due bracci.
atteNziONe
NON uSare il taStO Mitre (11) perché attiva una funzione
particolare non prevista nel normale uso quotidiano.
Se, inavvertitamente, si preme il tasto Mitre, seguire queste
istruzioni per uscire dalla funzione.
a. Se si è premuto il tasto Mitre una volta per meno di un se-
condo e sul display lampeggia il simbolo Mtr, ripremere il
tasto Mitre per meno di un secondo: lo strumento torna alla
misurazione istantanea
b. Se si è premuto il tasto Mitre una volta per più di 2 secon-
di: compare la scritta Spr prima lampeggiante e poi fissa.
PremereiltastoON/OFFper1secondoperusciredallafunzione
e tornare alla misurazione istantanea: la scritta Spr scompare
c. Se una volta comparsa la scritta Spr si è premuto inavver-
titamente di nuovo il tasto Mitre e sul display compare la
scritta cNr, premere il tasto ON/OFF per 1 secondo per
uscire dalla funzione e tornare alla misurazione istantanea: la
scritta cNr scompare
d. Se una volta comparsa la scritta cNr si è premuto inavver-
titamente di nuovo il tasto Mitre e sul display compare la
scritta Mtr, premere il tasto ON/OFF per 1 secondo per
uscire dalla funzione e tornare alla misurazione istantanea: la
scritta Mtr scompare
e. Se una volta comparsa la scritta Mtr si è premuto inav-
vertitamente di nuovo il tasto Mitre e sul display compare
la scritta bVl, premere il tasto ON/OFF per 1 secondo per
uscire dalla funzione e tornare alla misurazione istantanea: la
scritta bVl scompare
CARATTERISTICHE TECNICHE
Alimentazione 2 batterie alcaline AAA (incluse)
Intervallo di misura 0°- 225 °
Precisione dell’angolo digitale ± 0.1°
Precisione Fiala/e 0,057 ° (1 mm/m)
Temperatura di esercizio -10 ° C a 50 ° C
Temperatura di stoccaggio -20 ° C a 70 ° C
Durata della batteria Circa 100 ore
Resistenza all’acqua Resistente all’acqua, ma non impermeabile

DIGIGRAD
DIGITAL ANGLE GAUGE
Ref. 29890

Battery Safety
Warning:
- Batteries may explode or leak, and can cause injury or fire.
- To reduce this risk:
- Always follow the instructions and warnings on the battery
label.
- DO NOT short across the battery terminals.
- DO NOT put charging alkaline batteries.
- DO NOT use old and new batteries together.
- Replace all batteries at the same time with new ones of
same brand and type.
- DO NOT use different types of batteries.
- DO NOT throw batteries in fire.
- Always keep batteries out of the reach of children.
- Always remove the batteries if the device is not used for a
long time.
nOteS:
1) Be sure to use the correct batteries as recommended.
2) Make sure the batteries are inserted correctly, with the
correct polarity.
3) DO NOT dispose of this product with household waste.
4) ALWAYS follow local regulations to dispose of batteries.
5) Adopt your local regulations for the collection, recycling
and the disposal of waste electrical and electronic
equipment under the WEEE Directive.
MaintenanCe
The instrument is not waterproof.
Take care not to wet the instrument: it may cause damage to
the internal circuits.
DO NOT leave the device to direct sunlight and do not expose
it to high temperatures.
Its housing and some internal parts are plastic made and they
may become deformed at high temperatures.
DO NOT store the device in a cold environment.
During heating moisture may form on its internal parts that
could cause corrosion of the internal circuits.
NOTE: When working in dusty conditions, some dirt can
be deposited on the display. Remove moisture or dirt
with a soft, dry cloth. DO NOT use strong detergents or
solvents.
NOTES ON OPERATIONS

12
83
4
5
6
7
11
10
9
13
16
14
12
15

DIGIGRAD
USer ManUaL
BatterieS inStaLLatiOn
1. Lift the arm to expose the battery compartment located on the
back of the instrument.
2. Remove the cover, as shown.
3. Insert 2 x AAA batteries.
4. Replace the cover and snap closure.
DiSpLay
1. Display the instantaneous measurement of the angle
2. Battery Charge Indicator
3. SPR Indicator *
4. CNR Indicator *
5. MTR Indicator *
6. BVL Indicator *
7. HOLD Indicator (block of the measured value)
8. SUP Indicator *
featUreS
9. ON / OFF key
10. HOLD / SUP key
11. MITRE KEy (noT To bE usEd)
12. Adjustable arm
13. Main arm
14. Clamping Knob
15. Horizontal Vial
16. Vertical Vial
pOWer On / Off
- With closed arms, press the ON / OFF (10) for > 1 sec. to turn
on the display and backlight.
- Display can show upright or inverted reading:
to change the position refer to “display overturning” instruc-
tions.
- Display shows as degrees (°), the angle (1) between the arms
(12) and (13).
- Reading is displayed in degrees and decimal degrees
rounded to 5 hundredths of a degree
- Display switches off automatically after about 5 minutes of
non-use.
- Backlight turns off automatically after about 1 minute of non-
use. If the display is turned on and the backlight turns off, then
press 2 times HOLD button again for about 1 second to turn it
on again.
* Function not be used for the ordinary daily use
display overturning

- Battery charge icon (2) is displayed when the remaining battery
time is approximately 2 hours.
- Press the ON / OFF button for > 2 sec. to turn off the display.
DiSpLay OvertUrning
With the display on, press the ON / OFF button for about 1 sec.
to reverse the display.
Press again for about 1 sec. to return the display to its normal
position.
If the symbol indicating the degree is located in the
bottom left, it means that the display is upside down.
When the vertex of the angle to be measured is on the right, place
the instrument with the main arm as the base (Fig. A), with the
display showing upright reading positioned to the right .
For a correct reading, the number displayed must always be
on the right side of the screen .
When the vertex of the angle to be measured is on the left (Fig. B) it
is necessary to place the instrument with the adjustable arm (12)
as a basis and take the reading on the arm after having reverted
the display (see Instructions).
For a correct reading, the number displayed must always be
on the right side of the screen .
RECALIBRATION
If the unit is dropped or an inaccuracy of the instrument is su-
spected, it is possible to recalibrate the zero point.
With the instrument powered on and the arms (12) and (13) clo-
sed together, simultaneously press the ON / OFF (10) and HOLD /
SUP (9) for > 1 sec. to reset the angle to 0°.
Fig. A Fig. B

HOLD
Press HOLD / SUp key for about 1 sec. to lock the current angle
shown on the display.
The HOLD indicator (7) will appear and flash on the display.
NOTE: If the display is turned off with the Hold function acti-
ve, the hold function is stored and it will still be active when
the unit is powered on again.
Press HOLD / SUp again for about 1 sec. to unlock the angle
shown and return to the instantaneous measurement of the an-
gle between the two arms.
iMpOrtant
DO nOt USe tHe Mitre key (11) because it activates a par-
ticular function not applicable in normal daily use.
If the Mitre key is pressed accidentally, please follow these
instructions to exit.
a. If the Mitre button is pressed once for less than one second
and the symbol Mtr flashes on the display, press MITRE key
again for less than one second: the instrument returns to the
instant measurement mode.
b. If the Mitre button is pressed once for more than 2 seconds:
the word SPR first flashing and then fixed will be shown on
the display.Press the On / Off key for 1 second to exit and
return to the instant measurement: SPR message disappears
c. If the Mitre button was accidentally pressed again after that
the SPR symbol had appeared on the display and the Cnr
symbol is now displayed, press the On / Off key for 1 second
to exit and return to the instant measurement: CNR MeSSa-
ge disappears
d. If the Mitre button was accidentally pressed again after that
the Cnr symbol had appeared on the display and the Mtr
symbol is now displayed, press the On / Off key for 1 second
to exit and return to the instant measurement: Mtr message
disappears
e. If the Mitre button was accidentally pressed again after that
the Mtr symbol had appeared on the display and the BvL
symbol is now displayed, press the On / Off for 1 second
to exit and return to the instant measurement: BvL message
disappears
TECHNICAL FEATURES
Power supply 2x AAA alkaline batteries (included)
Measuring range 0 ° - 225 °
Digital angle accuracy ± 0.1 °
Vial/s Accuracy 0.057 ° (1 mm / m)
Working Temperature -10 ° C to 50 ° C
Storage Temperature -20 ° C to 70 ° C
Battery Life About 100 hours
Water resistance Water resistant, but not waterproof

DIGIGRAD
RAPPORTEUR D’ANGLE DIGITAL
Ref. 29890

Sécurité de la batterie
atteNtiON
- Les piles peuvent exploser ou perdre du liquide et peuvent
provoquer des blessures ou incendies.
- Pour réduire ce risque :
- Suivre toujours les instructions et les avertissements indi-
qués sur l’étiquette de la batterie.
- Ne pas créer des court-circuits à travers les extrémités de
la batterie.
- Ne pas charger les batteries alcalines.
- Ne pas utiliser ensemble piles neuves et anciennes
- Remplacer toutes les piles en même temps par des neuves
de la même marque et type.
- Ne pas utiliser différents types de piles.
- Ne pas jeter les piles au feu.
- Garder toujours les piles hors de la portée des enfants.
- Enlever toujours les piles si l’appareil n’est pas utilisé pour
longtemps.
aNNOtatiONS
1) Assurez-vous d’utiliser les batteries appropriées recom-
mandées.
2) Assurez-vous que les piles soient insérées correctement,
en respectant la polarité.
3) Ne pas jeter ce produit avec les déchets ménagers.
4) Suivre toujours la réglementation locale pour l’élimina-
tion des batteries.
5) Respecter la réglementation locale pour la collecte, le
recyclage et l’élimination des déchets électriques et
électroniques selon la directive RAEE (WEEE).
eNtretieN
Le niveau n’est pas étanche.
Faire attention à ne pas mouiller l’instrument pour éviter
d’endommager les circuits internes.
Ne pas laisser le niveau à la lumière directe du soleil et ne pas
l’exposer à des températures élevées.
Le boîtier et certaines pièces internes sont en plastique et
peuvent se déformer à des températures élevées.
Ne pas ranger le niveau dans un environnement froid.
Lors du réchauffement, de l’humidité peut se former sur les
pièces internes ; cela pourrait causer la corrosion des circuits
internes.
REMARQUE : Lorsque vous travaillez dans des conditions
poussiéreuses, l’affichage peut se salir. Éliminer l’humi-
dité ou la saleté avec un chiffon souffle et sec. Ne pas
utiliser des détergents puissants ou des solvants.
AVERTISSEMENTS POUR L’EMPLOI

12
83
4
5
6
7
11
10
9
13
16
14
12
15

DIGIGRAD
MaNuel d’utiliSatiON
iNStallatiON deS pileS
1. Soulever le bras pour exposer le compartiment des batteries
situé sur le dos de l’instrument.
2. Enlever le couvercle, comme indiqué.
3. Insérez les (2) piles AAA.
4. Repositionner le couvercle et le fermer.
diSplaY
1. Affichage de la mesure instantanée de l’angle
2. Indicateur de charge
3. Indicateur SPR *
4. Indicateur CNR *
5. Indicateur MTR *
6. Indicateur BVL *
7. Indicateur HOLD (blocage de la valeur mesurée)
8. Indicateur SUP *
caracteriStiQueS
9. ON / OFF
10. Touche HOLD / SUP
11. Touche MITRe (à ne pas uTIlIseR)
12. Bras réglable
13. Bras principale
14. Bouton de serrage
15. Fiole horizontale
16. Fiole vertical
alluMaGe/arret
- A bras fermés, appuyer sur la touche ON / OFF (9) pour plus
d’une seconde pour allumer l’écran et le rétroéclairage.
- L’affichage peut se présenter avec la lecture tout droit
ou à l’envers : pour changer la position, lire le point
“inversion du display”.
- L’affichage indique en degrés (°), l’angle (1) entre les bras (12)
et (13).
- La lecture est affichée en degrés / dixième de degrés arrondi
à 5 centièmes.
- L’affichage s’éteint automatiquement après environ 5 minu-
tes de non-utilisation.
- Le rétroéclairage s’éteint automatiquement après 1 minute
de non-utilisation. Si l’écran est allumé et le rétro-éclairage
est éteint, appuyer 2 fois sur le bouton HOLD pour environ 1
seconde pour l’allumer.
* Ne pas utiliser cette fonction pour une utilisation quotidienne normale

- L’icône de charge de la batterie (2) est affiché lorsque l’auto-
nomie de la batterie est d’environ 2 heures.
- Appuyer sur le bouton ON / OFF pour > 2 sec. pour désactiver
l’affichage.
INVERSION DU DISPLAY
Avec l’écran allumé, appuyer sur le bouton ON / OFF pendant
environ 1 sec. pour inverser l’affichage. Appuyer de nouveau pen-
dant environ 1 sec. pour avoir à l’écran dans sa position normale.
Si le symbole qui indique les degrés est situé en bas à
gauche, cela signifie que l’écran est à l’envers.
Lorsque le sommet de l’angle à mesurer est sur la droite, pla-
cer le niveau avec le bras principal comme base (dessin A), avec
l’écran à lecture tout droit positionné à droite .
Pour une lecture correcte, le nombre affiché doit toujours
être sur le côté droit de l’écran .
Lorsque le sommet de l’angle à mesurer est à gauche (dessin B),
il faut positionner le niveau avec le bras réglable (12) de base et
effectuer la lecture sur le bras principale après avoir renversé le
display (voir. Instructions).
Pour une lecture correcte, le nombre affiché doit toujours
être sur le côté droite de l’écran .
RECALIBRAGE
Si l’appareil est tombé ou si vous pensez qu’il ne soit pas précis,
on peut re-étalonner le point zéro.
L’appareil doit être allumé avec les bras (12) et (13) fermés en
même temps.
Il faut appuyer simultanément sur la touche ON / OFF (9) et HOLD
/ SUP (10) pendant > 1 sec. pour remettre l’angle à zéro.
Fig. A Fig. B

HOld
Appuyer sur HOLD / SUP pendant environ 1 sec. pour bloquer
l’angle actuel affiché sur l’écran.
L’indicateur HOLD (7) apparaît et clignote sur l’écran.
ATTENTION : si l’appareil s’éteint avec la fonction Hold ac-
tive, cette fonction sera mémorisée et sera toujours active
lorsque l’appareil est allumé.
Appuyer de nouveau sur HOLD / SUP pendant environ 1 sec.
pour débloquer l’angle indiqué et revenir à la mesure instantanée
de l’angle entre les deux bras.
atteNtiON
Ne paS utiliSer la tOucHe Mitre (11), car cette touche
active une fonction particulière qui ne convient pas à l’utilisation
quotidienne normale.
Si, par inadvertance, vous appuyez sur la touche Mitre, il faut
suivre les instructions suivantes pour sortir de cette fonction:
a. SivousavezappuyésurleboutonMitreunefoisseulementpour
moins d’une seconde et le symbole Mtr clignote sur l’écran,
il faut appuyer de nouveau sur la touche Mitre pour moins
d’une seconde et l’appareil revient à la mesure instantanée
b. Si vous avez appuyé sur le bouton Mitre une fois seulement
pour plus de 2 secondes : le mot SPR clignote et après se fixe
sur le display.
Il faut appuyer sur le bouton ON / OFF pour 1 seconde pour quitter
lafonctionetrevenirà lamesureinstantanée:lemotSprdisparaît
c. Si une fois que le mot Spr est affiché sur l’écran vous ap-
puyez de nouveau par inadvertance sur la touche Mitre, le
mot cNr apparait sur l’écran.
Il faut appuyer sur la touche ON / OFF une deuxième fois
pour 1 seconde pour quitter la fonction et revenir à la mesure
instantanée: le mot cNr disparaît
d. Si une fois que le mot cNr est affiché sur l’écran vous ap-
puyez de nouveau par inadvertance sur la touche Mitre, le
mot Mtr apparait sur l’écran.
Il faut appuyer sur la touche ON / OFF une deuxième fois
pour 1 seconde pour quitter la fonction et revenir à la mesure
instantanée: le mot Mtr disparaît
e. Si une fois que le mot Mtr est affiché sur l’écran vous ap-
puyez de nouveau par inadvertance sur la touche Mitre, le
mot blV apparait sur l’écran.
Il faut appuyer sur la touche ON / OFF une deuxième fois
pour 1 seconde pour quitter la fonction et revenir à la mesure
instantanée: le mot blV disparaît
CARACTERISTIQUES TECHNIQUES
Alimentation 2 piles alcalines AAA (incluses)
Plage de mesure 0 ° -225 °
Précision d’angle digitale ± 0,1 °
Précision fiole 0,057 ° (1 mm / m)
Température de fonctionnement -10 ° C à 50 ° C
Température de stockage -20 ° C à 70 ° C
Autonomie de la batterie environ 100 heures
Résistance à l’eau résistant à l’eau, mais pas étanche

Importato e Distribuito da:
Metrica S.p.A - Via Grandi, 18 - 20097 San Donato Mil.se (MI) - Italy
Table of contents
Languages:
Other Metrica Measuring Instrument manuals

Metrica
Metrica H4 User manual

Metrica
Metrica 60291 User manual

Metrica
Metrica 60611 User manual

Metrica
Metrica 10001 User manual

Metrica
Metrica 61160 User manual

Metrica
Metrica BRAVO ROTATIVO H User manual

Metrica
Metrica 61345 User manual

Metrica
Metrica BRAVO 61365 User manual

Metrica
Metrica 10080 User manual

Metrica
Metrica 60459 User manual