Metrica 61345 User manual

Ref. 61345
LASER
AUTOLIVELLANTE
ROTANTE
SELF-LEVELING ROTATING LASER
LASER ROTATIF AUTO-NIVELANT
SELBSTNIVELLIERENDER

TASTIERA COMANDI
KEYBOARD CONTROLS
COMMANDES DE CLAVIER
TASTATURSTEUERUNG
IMPUGNATURE
HANDLES
POIGNEES
GRIFFE
FINESTRA DEL LASER
LASER WINDOW
FENÊTRE LASER
LASERFENSTER
MODULO LASER
LASER MODULE
MODULE LASER
LASERMODUL

E
F
C
B
A
D
G
H
TASTIERA COMANDI
A Interruttore ON / OFF
B Funzione TILT
C Scanner
D Regolazione velocità di rotazione
E “+” o Regolazione rotazione
in senso orario
F “–” o Regolazione rotazione
in senso antiorario
M Manuale / Automatico
KEYBOARD CONTROLS
A ON / OFF switch
B TILT function
C Scanner
D Setting the rotation speed
E “+” or rotation setting
clockwise
F “-” or rotation setting
counterclockwise
M Manual / Automatic
COMMANDES DE CLAVIER
A Interrupteur ON / OFF
B TILT fonction
C Scanner
D Réglage de la vitesse de rotation
E “+” ou réglage de rotation
dans le sens horaire
F “-” ou réglage de la rotation
dans le sens antihoraire
M Manuel / Automatique
TASTATURSTEUERUNG
A Ein / Aus-Schalter
B TILT-Funktion
C Scanner
D Einstellen der
Rotationsgeschwindigkeit
E “+” oder Rotationseinstellung
im Uhrzeigersinn
F “-” oder Rotationseinstellung
gegen den Uhrzeigersinn
M Manuell / automatisch

ALIMENTAZIONE
Il dispositivo funziona con:
• Kit 4 batterie ricaricabili NiMH C-tipo che si trova sul fondo
all’interno dell’unità.
Viene fornito con il caricatore.
FUNZIONI
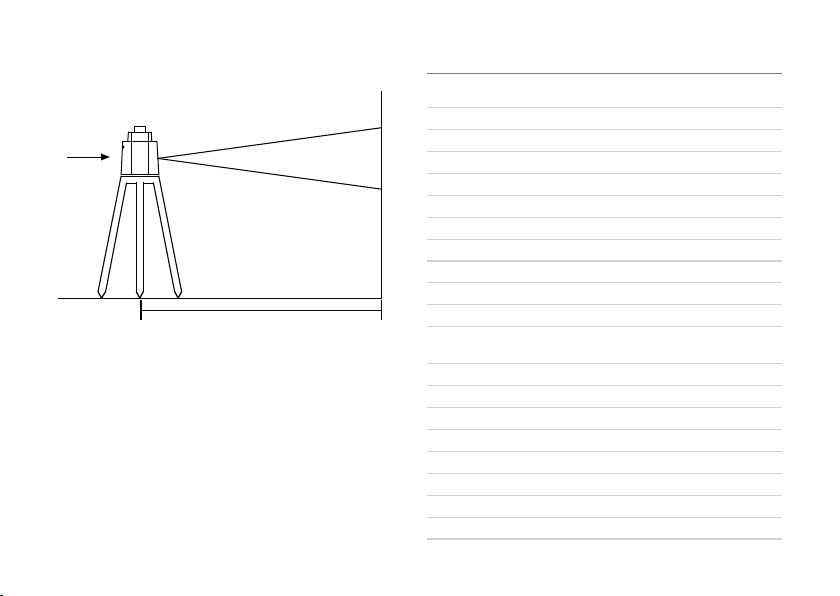
Piano orizzontale:collocare il apparecchio su un piano, un cavalet-
to o una staffa a parete. La gamma di auto-livellamento è (± 5 °).
Piano verticale: collocare l’apparecchio sul laterale piatto, la
gamma di auto-livellamento (± 5 °).
• Premere il pulsante (A) per accendere l’unità.
Se il SIMBOLO lampeggia sul dislay digitale, il livello
dellabatterianonèsufficiente.Ricaricareosostituirelebatterie.
• All’accensione l’unità è configurata in modalità automatica.
Il laser lampeggierà fino ad autolivellamento avvenuto. Suc-
cessivamente il laser ruoterà a 600 giri / minuto.
Se l’apparecchio non rientra nell’intervallo di autolivellamento
(± 5 °), il raggio laser e il LED lampeggeranno. Posizionare
quindi, l’apparecchio su un piano per permettere l’autolivella-
mento (± 5 °).
REGOLAZIONE VELOCITÀ
• Per modificare la velocità, premere il tasto (D)
• Una volta: il raggio è fisso a 0 giri / min
• Due volte: il raggio ruota a 60 giri / min
• Tre volte: il raggio ruota a 120 giri / min
• Quattro volte: il raggio ruota a 300 giri / min
• Cinque volte: il raggio ruota a 600 giri / min
• Per ruotare il punto, a laser fermo, premere i pulsanti (E o F)
progressivamente.
FUNZIONE SCANNER
Per accedere alla funzione scanner, premere il tasto (C).
Premendolo in successione, il raggio viene proiettato con una
larghezza di 10 °, 45 °, 90 ° e 180 °.
Per ruotare gradualmente il raggio laser, premere i tasti (E o F).
FUNZIONE TILT PER SEGNALARE MOVIMENTI ACCIDENTALI
DEL DISPOSITIVO
Per attivare la funzione TILT l’apparecchio deve essere in fun-
zione di autolivellamento. Premere il tasto (B), Il simbolo si
accende sul display digitale.
• Se lo strumento laser viene spostato accidentalmente, il rag-
gio laser smette di ruotare e lampeggia.
• Per riattivare la rotazione, spegnere lo strumento e riavviare.
La funzione TILT verrà disabilitata.
FUNZIONE SLOPE (PER IMPOSTARE L’INCLINAZIONE)
Automatica:
LA FUNZIONE TILT DEVE ESSERE DISATTIVATA
Una volta avviata la funzione di autolivellamento ed a raggio
rotante:

• Premere il tasto CAL (H)
• Sul display appaiono X e Yed “X” lampeggia sul display
• premere i tasti “+” e “–” per impostare il valore in percen-
tuale dell’inclinazione lungo l’asse X (indicata sul coperchio
dell’apparecchio)
• premere il tasto “X/Y” (G): lampeggia “Y” sul display
• premere i tasti “+” e “–” per impostare il valore in percen-
tuale dell’inclinazione lungo l’asse Y(indicata sul coperchio
dell’apparecchio)
• premere nuovamente il tasto “X/Y” (G) per confermare i dati
La rotazione si arresta e lo strumento si posiziona ai valori
impostati.
Riparte la rotazione utilizzando le impostazioni date
Per variare i dati di impostazione premere 2 volte il tasto CAL
(H) e ripetere la procedura.
• Per tornare alla posizione di autolivellamento a 0 gir/min spe-
gnere e riaccendere lo strumento
FUNZIONE SLOPE (PER IMPOSTARE L’INCLINAZIONE)
Manuale:
Premere il tasto (A) tenendolo premuto per più di 5 secondi
• Compare il simbolo sul display
LO STRUMENTO NON E’ PIU’ AUTOLIVELLATO
• Premere il tasto “X/Y” (G)
• Sul display appare “X” sul display
• premere i tasti “+” e “–” per impostare inclinare visivamente
il raggio sino al punto desiderato
• premere il tasto “X/Y” (G): appare “Y” sul display
• premere i tasti“+” e “–” per impostare inclinare visivamente
il raggio sino al punto desiderato
• premere nuovamente il tasto “X/Y” (G) per confermare i dati
Per spegnere lo strumento premere brevemente il tasto verde (A)
TELECOMANDO
Puntare il telecomando perpendicolare a qualsiasi lato dell’ap-
parecchio.
Funzioni utilizzabili:
1. Rotazione
2. Scanner
3. Slope (inclinazioni)
RICEVITORE
3 tasti:
1. ON / OFF
2. Per attivare o escludere il segnale acustico.
3. Per selezionare la sensibilità della misura (fine o media)

CONTROLLO CALIBRAZIONE
DISTANZA 30 METRI
PIANO ORIZZONTALE
X1
ASSE X1 h1
ASSE X2 h2
Posizionare apparecchio a circa 30 m da un muro come nel di-
segno sopra. Posizionare l’unità con l’asse X1 diretto verso la
parete.
Accendere il dispositivo e intercettare il raggio orizzontale (h1).
Ruotare il dispositivo di 180 °, accendere e intercettare il raggio
orizzontale (h2).
La distanza verticale tra 2 punti (h1 e h2) dovrebbe essere in-
feriore a 3 mm.
Ripetere la stessa procedura per l’asse Y.
CARATTERISTICHE TECNICHE
Precisione di livellamento orizzontale ±3 mm / 30 m
verticale ± 5 mm / 30 m
Campo di autolivellamento ± 5°
Range regolazione pendenza ± 10%
Sistema di livellamento Sensore elettronico veloce
Autonomia ~ 30 ore
Campo di lavoro 500 m Ø
Valori di rotazione 0 - 60 - 120 - 300 - 600 g/min.
Funzione scanner 10° - 45° - 90° - 180°
Segnale di fuori livellamento si
Tipo di laser 635 nm
Potenza laser classe II
Batterie 4 x NiMH C4000mAh 1,2 V
ricaricabili
Dimensione 220 x 220 x 210 mm
Temperatura di esercizio -10 °C / +50 °C
Peso (senza batterie) 3,5 Kg
Impermeabilità IP 54
Filetto per attacco treppiedi 5/8”
Portata telecomando ~ 50 / 20 m (in/out)
Batterie telecomando 2 x 1,5 V DC
Batterie ricevitore 1 x 9 V DC

POWER SUPPLY
The device works with:
• 4 rechargeable NiMH C-cell batteries located on the bottom of
the unit. Comes with the charger.
FEATURES
Horizontal plane: Place the instrument on a floor, tripod, or wall
mount. The self-leveling range is ± 5 °.
Vertical plane: Place the device on the flat side, the self-leveling
range is ± 5 °.
• Press the (A) button to turn on the unit.
If the SYMBOL flashes on the digital display, the bat-
tery level is not sufficient. Recharge or replace the batteries.
• When turned on, the device is set to automatic mode.
The laser will flash until self-leveling. Thereafter, the laser will
turn at 600 rpm.
If the device is not in the self-leveling range (± 5 °), the laser
beam and the LED flash. Then place the unit at a level allowing
self-leveling (± 5 °).
ADJUSTMENT OF SPEED
To change the speed, press the button (D):
• Once: the beam is set to 0 rpm
• Twice: the beam rotates at 60 rpm
• Three times: the beam rotates at 120 rpm
• Four times: the beam rotates at 300 rpm
• Five times: the beam rotates at 600 rpm
• To rotate the point, fixed laser, press the (Eor F) buttons gra-
dually.
SCANNER FUNCTION
To access the scanner function, press the (C) key.
By pressing successively, the beam is projected with a width of
10 °, 45 °, 90 ° and 180 °.
To rotate the laser beam gradually, press the (Eor F) buttons.
TILT FUNCTION TO SIGNAL ACCIDENTAL MOVEMENTS OF
THE DEVICE
To activate the TILT function, the device must be self-leveling.
Press the key (B).The symbol lights up on the digital display.
• If the laser instrument is accidentally moved, the laser beam
stops rotating and flashes.
• To reactivate the rotation, turn off the instrument and restart.
The TILT function will be disabled.
SLOPE FUNCTION (TO ADJUST THE INCLINATION)
Automatic:
THE TILT FUNCTION MUST BE DISABLED
Once the auto-leveling and rotating radius function has started:
• Press the CAL key (H)
• Xand Yappear on the display and “X” flashes on the display
• Press the “+” and “-” buttons to adjust the percentage of the

inclination on the Xaxis (indicated on the cover of the unit)
• Press the “X / Y” (G) key: “Y” flashes on the display
• Press the “+” and “-” buttons to adjust the percentage of the
incline on the Y axis (indicated on the cover of the unit)
• Press the “X / Y” (G) key again to confirm the data
The rotation stops and the instrument is set to the defined
values.
The rotation starts again using the date settings
To change the setting data, press the CAL (H) key twice and
repeat the procedure.
• To return to the auto-leveling position at 0 rpm, turn the in-
strument off and on again
SLOPE FUNCTION (TO ADJUST THE INCLINATION)
Manual:
Press and hold the button (A) for more than 5 seconds
• The symbol appears on the display
THE INSTRUMENT IS NO LONGER SELF-LEVELING
• Press the “X / Y” (G) button
• “X” appears on the display
• Press the “+” and “-” buttons to visually adjust the radius to
the desired point
• Press the “X / Y” (G) key: “Y” appears on the display
• Press the “+” and “-” buttons to visually adjust the radius to
the desired point
• Press the “X / Y” (G) key again to confirm the data
To turn off the instrument, briefly press the green button (A)
REMOTE CONTROL
Point the remote control perpendicular to any side of the unit.
Usable functions:
1. Rotation
2. Scanner
3. Slope (inclinations)
RECEIVER
3 buttons:
1. ON / OFF
2. To activate or exclude the acoustic signal.
3. To select the measurement sensitivity (fine or medium)

CALIBRATION CONTROL
DISTANCE 30 M
HORIZONTAL PLANE
X1
AXIS X1 h1
AXIS X2 h2
Place the unit about 30 m from a wall as shown in the drawing
above. Position the unit with the X1 axis facing the wall.
Turn on the unit and intercept the horizontal beam (h1).
Rotate the device 180 °, turn on and intercept the horizontal
beam (h2).
The vertical distance between 2 points (h1 and h2) must be less
than 3 mm.
Repeat the same procedure for the Y-axis.
TECHNICAL FEATURES
Levelling accuracy horizontal ±3 mm / 30 m
vertical ± 5 mm / 30 m
Self-levelling range ± 5°
Gradient adjustment range ± 10%
Levelling system Fast electronic sensor
Autonomy ~ 30 hours
Working range 500 m Ø
Rotation values 0 - 60 - 120 - 300 - 600 r/min.
Scanner function 10° - 45° - 90° - 180°
Signal out of leveling Yes
Laser type 635 nm
laser power Class II
Batteries 4 x NiMH C4000mAh 1.2V
rechargeable
Size 220 x 220 x 210 mm
Operating temperature -10 °C / +50 °C
Weight (without batteries) 3.5 Kg
Water resistance IP 54
Thread for tripod connection 5/8”
Remote control range ~ 50 / 20 m (in/out)
Remote control batteries 2 x 1.5 V DC
Receiver batteries 1 x 9 V DC

ALIMENTATION
L’appareil fonctionne avec :
• Kit 4 piles rechargeables de type C NiMH situées en bas à
l’intérieur de l’appareil. Livré avec le chargeur.
FONCTIONS
Plan horizontal : placez l’appareil sur un sol, un trépied ou un
support mural. La plage d’auto-nivellement est de ± 5 °.
Plan vertical : placez l’appareil sur le côté plat, la plage d’auto-
nivellement est de ± 5 °.
• Appuyez sur le bouton (A) pour allumer l’appareil.
Si le SYMBOLE clignote sur l’affichage numérique, le
niveau de la batterie n’est pas suffisant. Rechargez ou rem-
placez les piles.
• Lorsqu’il est allumé, l’appareil est configuré en mode auto-
matique.
Le laser va clignoter jusqu’à l’auto-nivellement. Par la suite, le
laser tournera à 600 tr / min.
Si l’appareil ne se trouve pas dans la plage d’auto-nivelle-
ment (± 5 °), le faisceau laser et la LED clignotent. Placez
ensuite l’appareil à un niveau permettant un auto-nivellement
(± 5 °).
AJUSTEMENT DE VITESSE
• Pour changer la vitesse, appuyez sur le bouton (D)
• Une fois : le rayon est fixé à 0 tr / min
• Deux fois : le rayon tourne à 60 tr / min
• Trois fois : le rayon tourne à 120 tr / min
• Quatre fois : le rayon tourne à 300 tr / min
• Cinq fois : le rayon tourne à 600 tr / min
• Pour faire pivoter le point, laser fixe, appuyez sur les boutons
(Eou F) progressivement.
FONCTION SCANNER
Pour accéder à la fonction scanner, appuyez sur la touche (C).
En appuyant successivement, le faisceau est projeté avec une
largeur de 10 °, 45 °, 90 ° et 180 °.
Pour faire pivoter le faisceau laser progressivement, appuyez sur
les touches (Eou F).
FONCTION TILT POUR SIGNALER LES MOUVEMENTS ACCI-
DENTELS DE L’APPAREIL
Pour activer la fonction TILT, l’appareil doit être auto-nivelant.
Appuyez sur la touche (B). Le symbole s’allume sur l’affi-
chage numérique.
• Si l’instrument laser est accidentellement déplacé, le rayon
laser cesse de tourner et clignote.
• Pour réactiver la rotation, éteignez l’instrument et redémar-
rez. La fonction TILT sera désactivée.
FONCTION DE PENTE (POUR RÉGLER L’INCLINAISON)
Automatique:

LA FONCTION TILT DOIT ÊTRE DÉSACTIVÉE
Une fois la fonction de rayon auto-nivelant et rotatif démarrée:
• Appuyez sur la touche CAL (H)
• XetYapparaissentsurl’affichageet“X”clignotesurl’affichage
• Appuyez sur les touches “+” et “-” pour régler le pourcentage
del’inclinaisonsurl’axeX(indiquésurlecouvercledel’appareil)
• Appuyez sur la touche “X / Y” (G): “Y” clignote sur l’afficheur
• Appuyez sur les touches “+” et “-” pour régler le pourcen-
tage de l’inclinaison sur l’axe Y (indiqué sur le couvercle de
l’appareil)
• Appuyez de nouveau sur la touche “X / Y” (G) pour confirmer
les données
La rotation s’arrête et l’instrument est positionné aux valeurs
définies.
La rotation recommence en utilisant les paramètres de date
Pour modifier les données de réglage, appuyez deux fois sur
la touche CAL (H) et répétez la procédure.
• Pour revenir à la position d’auto-nivellement à 0 tr / min,
éteindre et rallumer l’instrument
FONCTION DE PENTE (POUR RÉGLER L’INCLINAISON)
Manuel:
Appuyez sur le bouton (A) en le maintenant enfoncé pendant plus
de 5 secondes
• Le symbole apparaît sur l’affichage
L’INSTRUMENT N’EST PLUS AUTO-NIVELE
• Appuyez sur la touche “X / Y” (G)
• “X” apparaît sur l’affichage
• Appuyez sur les touches “+” et “-” pour régler visuellement
le rayon au point désiré
• Appuyer sur la touche “X / Y” (G): “Y” apparaît sur l’afficheur
• Appuyez sur les touches “+” et “-” pour régler visuellement
le rayon au point désiré
• Appuyer de nouveau sur la touche “X / Y” (G) pour confirmer
les données. Pour éteindre l’instrument, appuyez brièvement
sur le bouton vert (A)
TÉLÉCOMMANDE
Dirigez la télécommande perpendiculairement à n’importe quel
côté de l’unité.
Fonctions utilisables:
1. Rotation
2. Scanner
3. Pente (inclinaisons)
RÉCEPTEUR
3 touches:
1. ON / OFF
2. Pour activer ou exclure le signal acoustique.
3. Pour sélectionner la sensibilité de mesure (fine ou moyenne)

CONTRÔLE D’ÉTALONNAGE
30 MÈTRES
PLAN DE PAYSAGE
X1
AXE X1 h1
AXE X2 h2
Placez l’appareil à environ 30 m d’un mur comme indiqué sur
le dessin ci-dessus. Positionnez l’unité avec l’axe X1 dirigé vers
le mur.
Allumez l’appareil et interceptez le faisceau horizontal (h1).
Faites pivoter l’appareil de 180 °, allumez et interceptez le fai-
sceau horizontal (h2).
La distance verticale entre 2 points (h1 et h2) doit être inférieure
à 3 mm.
Répétez la même procédure pour l’axe Y.
CARACTÉRISTIQUES TECHNIQUES
Précision de nivellement horizontal ±3 mm / 30 m
vertical ± 5 mm / 30 m
Plage de nivellement automatique ± 5°.
Plage de réglage du gradient ± 10%.
Système de nivellement Capteur électronique rapide
Autonomie ~ 30 heures
Portée 500 m Ø
Valeurs de rotation 0 - 60 - 120 - 120 - 300 - 600 r/min.
Fonction scanner 10° - 45° - 90° - 90° - 180°.
Signal de sortie de mise à niveau Oui
Type de laser 635 nm
Puissance laser Classe II
Batteries 4 x NiMH C4000mAh 1.2V
rechargeable
Taille 220 x 220 x 220 x 210 mm
Température de fonctionnement -10 °C / +50 °C
Poids (sans piles) 3,5 Kg
Etanchéité IP 54
Filetage pour trépied 5/8”.
Portée de la télécommande ~ 50 / 20 m (entrée/sortie)
Piles de la télécommande 2 x 1,5 V DC
Batteries de réception 1 x 9 V DC

STROMVERSORGUNG
Das Gerät arbeitet mit:
• 4 wiederaufladbaren NiMH-C-Zellen-Batterien, die sich an der
Unterseite des Geräts befinden. Ladegerät im Lieferumfang.
EIGENSCHAFTEN
Horizontale Ebene: Stellen Sie das Gerät auf einen Boden, ein
Stativ oder eine Wandhalterung. Der Selbstnivellierbereich be-
trägt ± 5 °.
Vertikale Ebene: Stellen Sie das Gerät auf die flache Seite, der
Selbstnivellierbereich beträgt ± 5 °.
• Drücken Sie die Taste (A), um das Gerät einzuschalten.
Wenn das SYMBOL auf der Digitalanzeige blinkt, ist
der Akkuladestand nicht ausreichend. Laden Sie die Batterien
auf oder tauschen Sie sie aus.
• Nach dem Einschalten befindet sich das Gerät im automati-
schen Modus.
Der Laser blinkt bis zur Selbstnivellierung. Danach dreht sich
der Laser mit 600 U / min.
Befindet sich das Gerät nicht im Selbstnivellierbereich (± 5 °),
blinken der Laserstrahl und die LED.Stellen Sie das Gerät dann
auf eine Höhe, die eine Selbstnivellierung ermöglicht (± 5 °).
EINSTELLUNG DER GESCHWINDIGKEIT
Um die Geschwindigkeit zu ändern, drücken Sie die Taste (D):
• Einmal: Der Laserstrahl ist auf 0 U / min eingestellt
• Zweimal: Der Strahl dreht sich mit 60 U / min
• Dreimal: Der Strahl dreht sich mit 120 U / min
• Viermal: Der Strahl dreht sich mit 300 U / min
• Fünf Mal: Der Strahl dreht sich mit 600 U / min
• Um den Laser zu drehen, drücken Sie die Tasten (Eoder F)
sukzessiv.
SCANNERFUNKTION
Umaufdie Scannerfunktionzuzugreifen,drückenSie dieTaste(C).
Durch aufeinanderfolgendes Drücken wird der Strahl mit einer
Breite von 10 °, 45 °, 90 ° und 180 ° projiziert.
Um den Laserstrahl schrittweise zu drehen, drücken Sie die Ta-
ste (Eoder F).
TILT FUNCTION UM UNBEABSICHTIGTE BEWEGUNGEN DES
GERÄTES ZU SIGNALISIEREN
Um die TILT-FUNKTION zu aktivieren, muss das Gerät selbst-
nivellierend sein. Drücken Sie die Taste (B). Das Symbol
leuchtet auf der Digitalanzeige auf.
• Wenn das Laserinstrument versehentlich bewegt wird, hört
der Laserstrahl auf zu rotieren und blinkt.
• Um die Rotation zu reaktivieren, schalten Sie das Gerät aus
und starten Sie es neu. Die TILT-FUNKTION wird deaktiviert.
SLOPE FUNCTION (ZUM EINSTELLEN DER NEIGUNG)
Automatisch:

DIE TILTFUNKTION MUSS DEAKTIVIERT WERDEN
Sobald die Funktionen der Selbstnivellierung und der Rotation
gestartet wurden:
• Drücken Sie die CAL-TASTE (H)
• Xund Y erscheinen auf dem Display und “X” blinkt auf dem
Display
• Drücken Sie die Tasten “+” und “-”, um den Prozentsatz der
Neigung auf der X-Achse einzustellen (auf der Abdeckung des
Geräts angegeben).
• Drücken Sie die Taste “X / Y” (G): “Y” blinkt auf dem Display
• Drücken Sie die Tasten “+” und “-”, um den Prozentsatz der
Neigung auf der Y-Achse einzustellen (auf der Abdeckung des
Geräts angegeben).
• Drücken Sie erneut die Taste “X / Y” (G), um die Daten zu
bestätigen
Die Rotation stoppt und das Gerät wird auf die definierten
Werte eingestellt.
Die Drehung beginnt erneut mit den Einstellungen.
Um die Einstellungsdaten zu ändern, drücken Sie zweimal die
Taste CAL (H) und wiederholen Sie den Vorgang.
• Um mit 0 U / min zur automatischen Nivellierposition
zurückzukehren, schalten Sie das Gerät aus und wieder ein.
SLOPE FUNCTION (ZUM EINSTELLEN DER NEIGUNG)
Manuell:
Halten Sie die Taste (A) länger als 5 Sekunden gedrückt
• Das Symbol erscheint auf dem Display
DAS GERAET IST NICH MEHR IM SELBSTNIVELLIER-MODUS
• Drücken Sie die Taste “X / Y” (G)
• “X” erscheint auf dem Display
• Drücken Sie die Tasten “+” und “-”, um den Radius visuell
auf den gewünschten Punkt einzustellen
• DrückenSiedieTaste“X/Y”(G):“Y”erscheintaufdemDisplay
• Drücken Sie die Tasten “+” und “-”, um den Radius visuell
auf den gewünschten Punkt einzustellen
• Drücken Sie erneut die Taste “X / Y” (G), um die Daten zu
bestätigen
UmdasGerätauszuschalten,drückenSiekurzdiegrüneTaste(A)
FERNSTEUERUNG
Richten Sie die Fernbedienung senkrecht auf eine beliebige Seite
des Geräts.
Nutzbare Funktionen:
1. Rotation
2. Scanner
3. Neigungen
EMPFÄNGER
3 Tasten:
1. EIN / AUS
2. Um das akustische Signal zu aktivieren oder auszuschließen
3. Wählen Sie die Messempfindlichkeit (fein oder mittel)

KALIBRIERUNGSKONTROLLE
30 METER ENTFERNT
LANDSCHAFTSPLAN
X1
X1-ACHSE h1
X2-ACHSE h2
Stellen Sie das Gerät etwa 30 m von einer Wand entfernt auf, wie
in der Zeichnung oben gezeigt. Positionieren Sie das Gerät mit
der X1-Achse zur Wand hin.
Schalten Sie das Gerät ein und fangen Sie den horizontalen
Strahl ab (h1). Drehen Sie das Gerät um 180 °, schalten Sie es
ein und fangen Sie den horizontalen Strahl ab (h2).
Der vertikale Abstand zwischen 2 Punkten (h1 und h2) muss we-
niger als 3 mm betragen.
Wiederholen Sie den Vorgang für die Y-Achse.
TECHNISCHE DATEN
Nivellierungsgenauigkeit horizontale ± 3 mm / 30 m
vertikal ± 5 mm / 30 m
Selbstnivellierungsbereich ± 5 °
Neigungsverstellung ± 10%
Nivelliersystem schneller elektronischer Sensor
Autonomie 30 Stunden
Arbeitsbereich 500 m Ø
Rotationswerte 0 - 60 - 120-300 - 600 U / min.
Scannerfunktion 10 ° - 45 ° - 90 ° - 180 °
Signal außerhalb der Selbstniv. Ja
Laser-Typ 635 nm
Laserleistungsklasse II
Batterien 4 x NiMH C4000mAh 1,2 V
wiederaufladbar
Abmessungen 220 x 220 x 210 mm
Betriebstemperatur -10 °C / +50 °C
Gewicht (ohne Batterien) 3,5 Kg
Wasser-/Staubschutzart IP 54
Gewinde für Stativbefestigung 5/8 "
Reichweite der Fernbedienung ~ 50 / 20 m (in/out)
Batterien für die Fernbedienung 2 x 1,5 V DC
Batterien Empfänger 1 x 9 V DC


Importato e Distribuito da:
Metrica S.p.A - Via Grandi, 18
20097 San Donato Mil.se (MI) - Italy
IP 54
Table of contents
Languages:
Other Metrica Measuring Instrument manuals

Metrica
Metrica 60611 User manual

Metrica
Metrica c80 User manual

Metrica
Metrica BRAVO LASER ROTATIVO User manual

Metrica
Metrica BRAVO 61365 User manual

Metrica
Metrica CALIBRO IP 67 User manual

Metrica
Metrica BRAVO ROTATIVO H User manual

Metrica
Metrica 10001 User manual

Metrica
Metrica 60291 User manual

Metrica
Metrica 61160 User manual

Metrica
Metrica DIGIGRAD 29890 User manual