MRC FDL-18N-70 Series User manual

PLEASE READ THIS MANUAL CAREFULLY BEFORE OPERATION
MRC.VER.01-04.10
INSTRUCTION MANUAL FOR
Freeze Dry Systems
FDL-18N-70 series

CHAPTER 1
CHAPTER 1CHAPTER 1
CHAPTER 1
INTRODUCTION
INTRODUCTIONINTRODUCTION
INTRODUCTION
Congratulations on your purchase of our Freeze Dry System, which is designed
for laboratory lyophilization procedures. The refrigerant used in the refrigeration
system is CFC-free so it will not endanger the environment. The unit is easy to
install and maintain. Proper care and maintenance of this product will result in
many years of dependable service.
Freeze Dry Process
Freeze Dry ProcessFreeze Dry Process
Freeze Dry Process
Freeze drying is an important process in sample prep procedures and for the
preservation and storage of biologicals, pharmaceuticals and foods. Of the
various methods of dehydration, freeze drying (lyophilization) is especially suited
for substances that are heat sensitive. Other than food processing (e.g., coffee,
whole dinners), freeze drying has been extensively used in the development of
pharmaceuticals (e.g., antibiotics) and preservation of biologicals (e.g., proteins,
plasma, viruses and microorganisms). The nondestructive nature of this process

has been demonstrated by the retention of viability in freeze dried viruses and
microorganisms.
Freeze drying is a process whereby water or other solvent is removed from frozen
materials by converting the frozen water directly into its vapor without the
intermediate formation of liquid water. The basis for this sublimation process
involves the absorption of heat by the frozen sample in order to vaporize the ice;
the use of a vacuum pump to enhance the removal of water vapor from the
surface of the sample; the transfer of water vapor to a collector; and the removal
of heat by the collector in order to condense the water vapor. In essence, the
freeze dry process is a balance between the heat absorbed by the sample to
vaporize the ice and the heat removed from the collector to convert the water
vapor into ice.
About This Manual
About This ManualAbout This Manual
About This Manual
This manual is designed to help you learn how to install, use, and maintain your
Freeze Dryer. Instructions for performing routine maintenance and making minor
modifications to your Freeze Dryer are also included.
CHAPTER
CHAPTER CHAPTER
CHAPTER 2
22
2
PREREQUISITES
PREREQUISITESPREREQUISITES
PREREQUISITES
Before you install your Freeze Dryer, you need to prepare your site for installation.
Carefully examine the location where you intend to install your Freeze Dryer. You
must be certain that the area is level and of solid construction. An electrical

source must be located near the installation site.
Electrical Requirements
Electrical RequirementsElectrical Requirements
Electrical Requirements
The Freeze Dryer requires a dedicated electrical outlet. This outlet requires a 15
Amp circuit breaker or fuse is required for models rated at 230V (50 Hz). The
power cord on 230V models are equipped with a plug on the power cord. It will be
necessary to change a plug to match the available receptacle.
Unpacking Your Freeze Dryer
Unpacking Your Freeze DryerUnpacking Your Freeze Dryer
Unpacking Your Freeze Dryer
Carefully unpack your Freeze Dryer and inspect it for damage that may have
occurred in transit. If your Freeze Dryer is damaged, notify the delivery carrier
immediately and retain the entire shipment intact for inspection by the carrier.
Setting Up Your Freeze Dryer
Setting Up Your Freeze DryerSetting Up Your Freeze Dryer
Setting Up Your Freeze Dryer
After you verify receipt of the proper components, move your Freeze Dryer to the
location where you want to install it. Then, follow the steps listed below.
Component Orientation
Component OrientationComponent Orientation
Component Orientation
The refrigeration system in the Freeze Dryer draws air in through the bottom of
the cabinet and exhausts air out through the rear sides. A minimum of 2" should
be allowed between the back and sides of the Freeze Dryer and the adjacent wall
surface. Restriction of the airflow through the cabinet during operation could
adversely affect performance.
Vacuum Pump Connection
Vacuum Pump ConnectionVacuum Pump Connection
Vacuum Pump Connection

A vacuum pump is required to operate your Freeze Dry System properly. The
Freeze Dryer is equipped with a 25mm ID, heavy wall, vacuum hose for
connecting the collector chamber to the vacuum pump.
Make certain that the oil in the vacuum pump is
Make certain that the oil in the vacuum pump isMake certain that the oil in the vacuum pump is
Make certain that the oil in the vacuum pump is
at the proper level.
at the proper level.at the proper level.
at the proper level.
Place the vacuum pump near the benchtop Freeze Dryer models, or place the
vacuum pump on the floor.
Connect the vacuum pump power cord to the receptacle on the rear side of the
cabinet labeled “vacuum pump” , If the vacuum pump has an off/on switch, turn
the switch on. The vacuum pump will be controlled by the Freeze Dryer. Connect
the vacuum pump inlet port to the vacuum tube on the right side of the cabinet
with the vacuum hose and clamps provided. If necessary, cut the hose to proper
length to allow for gentle bends without kinks.
Electrical Connection
Electrical ConnectionElectrical Connection
Electrical Connection
Plug the power cord into the receptacle on the rihgt side of the Freeze Dryer and
plug the other end into a suitable power receptacle.
Drying Chamber or Drying Manifold
Drying Chamber or Drying ManifoldDrying Chamber or Drying Manifold
Drying Chamber or Drying Manifold
Installation
InstallationInstallation
Installation
The drying chamber or drying manifold, purchased separately, may be positioned
directly above the 3-inch hole in the collector chamber lid. When vacuum is
applied to the system, the chamber will be held securely in place.
The installation and setup of your Freeze Dryer is now complete.

CHAPTER
CHAPTER CHAPTER
CHAPTER 3
33
3
USING YOUR FREEZE
USING YOUR FREEZEUSING YOUR FREEZE
USING YOUR FREEZE
DRYER
DRYERDRYER
DRYER
After your Freeze Dryer has been installed, you are ready to begin using your
Freeze Dryer.
Freeze Dryer Controls
Freeze Dryer ControlsFreeze Dryer Controls
Freeze Dryer Controls
The control panel for the Freeze Dryer is shown below with a
description about its function.

The Freeze Dryer is being controlled manually by the operator. Each function
must be started by the operator.
Main Power Switch – Turns the Freeze Dryer on or off. (Not shown, located on the
right side of the cabinet).
1. Temperature LED Display – This display indicates the temperature of the
collector.
2. COMP – Manual refrigeration switch ,Used to start or stop the refrigeration
compressor.
3. PUMP – Used to start or stop the vacuum pump, The power is being supplied
to the vacuum pump receptacle on the right side of the Freeze Dryer.
You can start the vacuum pump when the collector temperature reaches –40°C or
lower.
4. Vacuum –Vacuum gauge power, This key is used to start or stop vacuum
display.
5. CAL. –Calibration, service use only.
6. Vacuum LED Display –Vacuum display, This display indicates the relative
system
vacuum level.

Operation Checklist
Operation ChecklistOperation Checklist
Operation Checklist
The following checklist should be followed prior to each use of your Freeze Dryer:
1. Wipe the interior of the collector chamber with a soft cloth or paper towel to
remove any accumulated moisture.
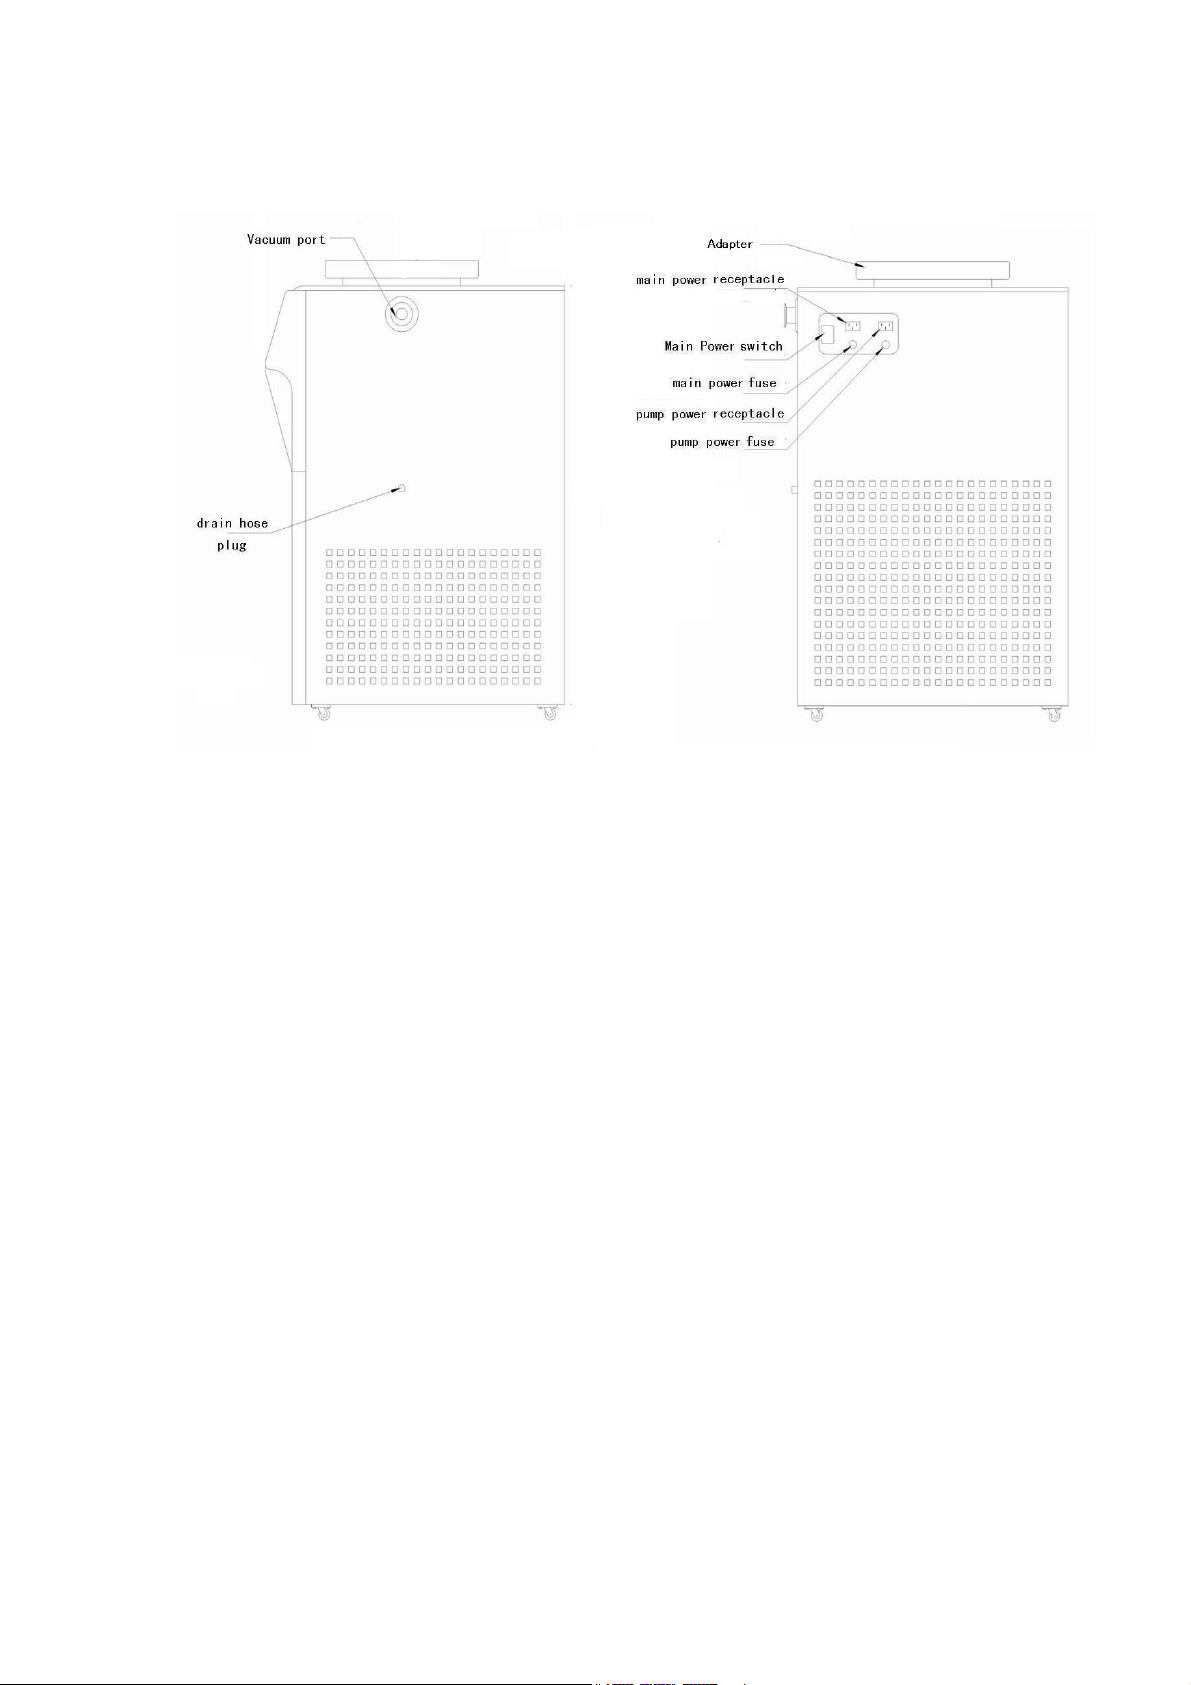
2. Check the collector chamber drain hose to ensure that the hose is free of
moisture and that the drain plug is securely installed. The freeze dryer will not
start if moisture is detected.
3. Using a soft, lint-free cloth or paper towel, wipe the collector chamber lid
gasket to remove any dirt and contaminants that could cause a vacuum leak.
Vacuum grease is not required on the lid gasket to obtain a proper vacuum seal.
4. Remove the accessory drying chamber or manifold from the connection port
and using a soft, lint-free cloth or paper towel, wipe the port gasket and sealing
surfaces of the drying chamber/manifold to remove any dirt and contaminants that
could cause a vacuum leak. Reinstall the drying chamber or manifold on the port.
Vacuum grease is not required on the port gasket to obtain a proper vacuum seal.
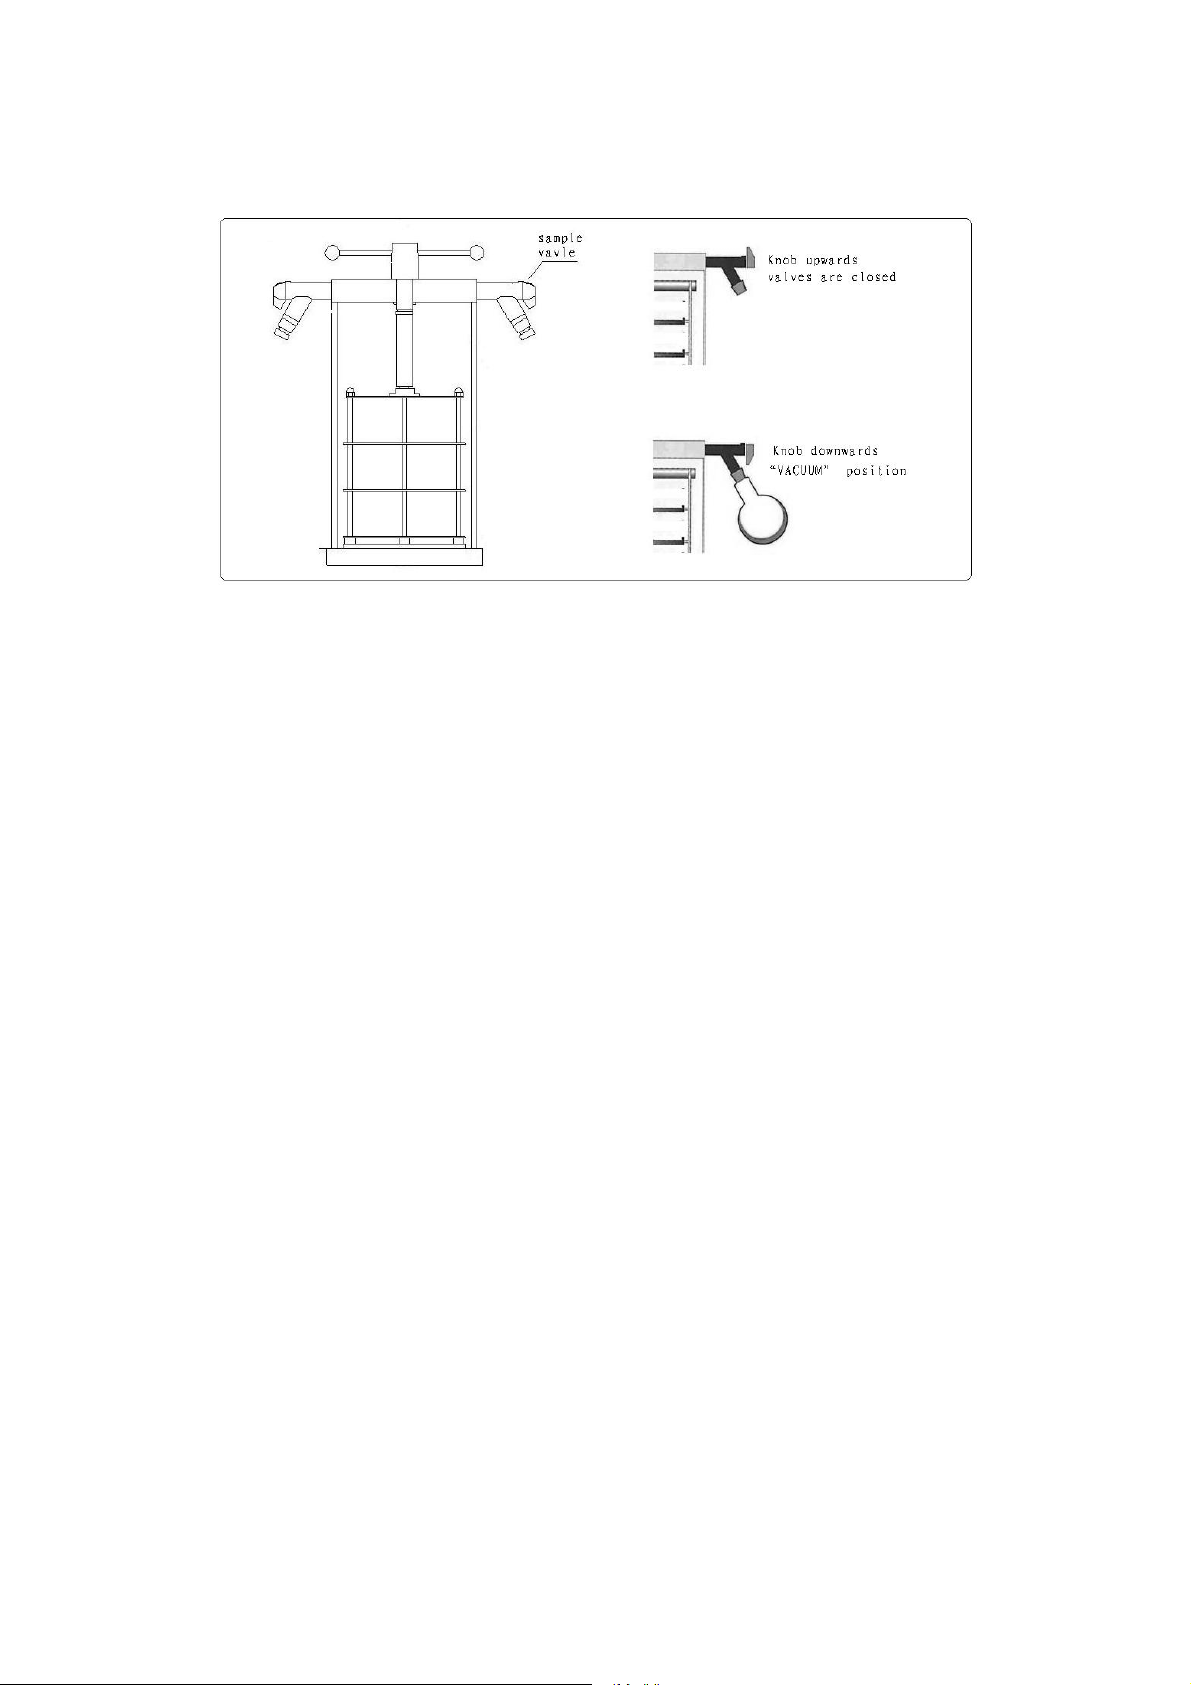
5. Check that each sample valve is closed or in the “upwards” position.
Vacuum Pump Ballast Setting
Vacuum Pump Ballast SettingVacuum Pump Ballast Setting
Vacuum Pump Ballast Setting
Most vacuum pumps are equipped with a gas ballast mechanism. The freeze dry
process requires high vacuum. Therefore, it is recommended that the gas ballast
be closed during the operation of the Freeze Dry System. If the gas ballast is left
open for extended periods of operation, the oil can be pumped out the exhaust,
causing the pump to fail.
Operating the Freeze Dryer
Operating the Freeze DryerOperating the Freeze Dryer
Operating the Freeze Dryer

To manually run the freeze dry process, Turns the Freeze Dryer on by Main
Power Switch. (Not shown, located on the rearward side of the cabinet),
Temperature LED Display indicates the actual temperature of the collector.
Press the VACUUM switch, Vacuum LED Display will indicate system vacuum
level, When the vacuum in the system is above 999 Pa, the vacuum display will
indicate “999” ,At 999 Pa and below, the display will show the actual vacuum.
Press the COMP switch, This will start the refrigeration system. The red LED
above the switch will illuminate. When the collector temperature reaches –50°C or
lower, the vacuum pump may be started by pressing the PUMP switch.
Pre
PrePre
Pre-
--
-Free
FreeFree
Freezing Samples
zing Sampleszing Samples
zing Samples
Appropriate containers for freeze drying include ampules, serum bottles, and wide
mouth freeze drying flasks. Shell freezing of samples is recommended for wide
mouth freeze drying flasks. Smaller samples in ampules and serum bottles may
be frozen in a
freezer or in the center of the collector chamber. The sample container size
should always be at least two to three times the sample size (i.e., 40 ml samples
should be prepared in 80 ml containers or larger). The temperature required for
pre-freezing is dependent on the characteristics of the sample. Pre-freezing
temperature typically is at least 10° to 20°C below the eutectic or collapse
temperature of the sample.
Adding Sample
Adding SampleAdding Sample
Adding Sample
The following procedure should be followed when using sample valves in the
freeze dry process(For
FDL-18N-70
):

1. Connect a pre-frozen sample to a sample valve on the drying chamber or
manifold using an adapter. After connecting a pre-frozen sample to a valve, turn
the plastic valve knob to the downwards position to open the valve, which
connects the attached sample to system vacuum. The bevel on the knob should
be positioned downwards.
2. Before adding another sample bottle, allow system vacuum to return to 40Pa
or lower. Any combination of valves and sample sizes may be utilized at one time
provided that the system vacuum and collector temperature remain sufficiently
low to prevent melting of the frozen sample.
3. When all the frost has disappeared from the outer surface of the sample
container and no cold spots can be detected by handling the container, the
sample is nearly dry. To be certain of low final moisture content, dry the sample
for several hours past this point.
4. To remove a sample bottle after drying is complete, turn the plastic knob on the
valve to the upwards position, which closes the valve and vents the container. The
sample bottle may now be removed.
Table of contents
Other MRC Laboratory Equipment manuals
Popular Laboratory Equipment manuals by other brands

Belden
Belden HIRSCHMANN RPI-P1-4PoE installation manual

Koehler
Koehler K1223 Series Operation and instruction manual

Globe Scientific
Globe Scientific GCM-12 quick start guide

Getinge
Getinge 86 SERIES Technical manual

CORNING
CORNING Everon 6000 user manual

Biocomp
Biocomp GRADIENT MASTER 108 operating manual


