manuals.online logo
Brands
  1. Home
  2. •
  3. Brands
  4. •
  5. NEC
  6. •
  7. Conference System
  8. •
  9. NEC Conference Max Plus User manual

NEC Conference Max Plus User manual

Other manuals for Conference Max Plus

2

Other NEC Conference System manuals

NEC Aspire 16CNFU User manual

NEC

NEC Aspire 16CNFU User manual

NEC ASPILA EX Owner's manual

NEC

NEC ASPILA EX Owner's manual

NEC Univerge SV9100 User manual

NEC

NEC Univerge SV9100 User manual

NEC SL1100 User manual

NEC

NEC SL1100 User manual

NEC Univerge SV9100 Owner's manual

NEC

NEC Univerge SV9100 Owner's manual

NEC Univerge SV8100 User manual

NEC

NEC Univerge SV8100 User manual

NEC UNIVERGE SL2100 User manual

NEC

NEC UNIVERGE SL2100 User manual

NEC Univerge UM8000 User manual

NEC

NEC Univerge UM8000 User manual

NEC UNIVERGE SL2100 User manual

NEC

NEC UNIVERGE SL2100 User manual

NEC VisuaLink 384 User manual

NEC

NEC VisuaLink 384 User manual

NEC Univerge SV8100 User manual

NEC

NEC Univerge SV8100 User manual

NEC ElectraElite IPK Operating and installation instructions

NEC

NEC ElectraElite IPK Operating and installation instructions

NEC Univerge UM8000 Operating and installation instructions

NEC

NEC Univerge UM8000 Operating and installation instructions

NEC UNIVERGE SL2100 User manual

NEC

NEC UNIVERGE SL2100 User manual

NEC Conference Max User manual

NEC

NEC Conference Max User manual

NEC Univerge SV8100 Service manual

NEC

NEC Univerge SV8100 Service manual

NEC Aspire User manual

NEC

NEC Aspire User manual

NEC Aspila Topaz Owner's manual

NEC

NEC Aspila Topaz Owner's manual

NEC Univerge SV8100 User guide

NEC

NEC Univerge SV8100 User guide

NEC i-Series User manual

NEC

NEC i-Series User manual

NEC TOPAZ User manual

NEC

NEC TOPAZ User manual

NEC Univerge SV9100 User manual

NEC

NEC Univerge SV9100 User manual

NEC SOPHO 2000 IPS DM User manual

NEC

NEC SOPHO 2000 IPS DM User manual

NEC UNIVERGE SL2100 User manual

NEC

NEC UNIVERGE SL2100 User manual

Popular Conference System manuals by other brands

Jabbla Tellus 6 operating instructions

Jabbla

Jabbla Tellus 6 operating instructions

LY International Electronics H-9500 Series Installation and operating manual

LY International Electronics

LY International Electronics H-9500 Series Installation and operating manual

RADVision Scopia XT1000 user guide

RADVision

RADVision Scopia XT1000 user guide

AT&T MERLIN LEGEND Reference

AT&T

AT&T MERLIN LEGEND Reference

Polycom RealPresence Group Series setup sheet

Polycom

Polycom RealPresence Group Series setup sheet

ProSoft Technology AN-X4-AB-DHRIO user manual

ProSoft Technology

ProSoft Technology AN-X4-AB-DHRIO user manual

Sony PCS-I150 Operation guide

Sony

Sony PCS-I150 Operation guide

Middle Atlantic Products VTC Series instruction sheet

Middle Atlantic Products

Middle Atlantic Products VTC Series instruction sheet

AVT MAGIC AC1 Go Configuration guide

AVT

AVT MAGIC AC1 Go Configuration guide

Prentke Romich Company Vanguard Plus Setting up and using

Prentke Romich Company

Prentke Romich Company Vanguard Plus Setting up and using

Speakerbus iD 712 user guide

Speakerbus

Speakerbus iD 712 user guide

Trelleborg SafePilot CAT PRO user guide

Trelleborg

Trelleborg SafePilot CAT PRO user guide

Sennheiser ADN instruction manual

Sennheiser

Sennheiser ADN instruction manual

ADTRAN NetVanta 7100 Configuration guide

ADTRAN

ADTRAN NetVanta 7100 Configuration guide

AINA PTT Voice Responder quick guide

AINA

AINA PTT Voice Responder quick guide

Yamaha ProjectPhone PJP-100H owner's manual

Yamaha

Yamaha ProjectPhone PJP-100H owner's manual

vissonic VLI Series user manual

vissonic

vissonic VLI Series user manual

Panasonic KX-VC500 user manual

Panasonic

Panasonic KX-VC500 user manual

manuals.online logo
manuals.online logoBrands
  • About & Mission
  • Contact us
  • Privacy Policy
  • Terms and Conditions

Copyright 2025 Manuals.Online. All Rights Reserved.

TTooCCoonnnneeccttaannddCChhaarrggeeBBaatttteerriieess
1. Slide the cover off the battery compartment on the bottom of the pod.
2. Connect the battery pack plug into the port in the compartment and insert the
battery pack. Slide the cover back into place.
3. Connect the power supply/charger to the conferencing pod and plug it into an
electrical outlet. Charge batteries for 15 hours prior to first use.
TTooCCoonnnneeccttBBaasseeUUnniitt
1. Connect one end of the telephone
cable into the phone jack on the
back of the base unit and the other
end into a wall jack.
2. Connect a recording device to the
2.5mm audio jack (if desired).
3. Connect the power cord to the
base unit and plug it into an
electrical outlet. The base unit
may be located up to 150 feet
from the conferencing pod.
CONFERENCE PHONE SETUP
Getting Started Guide
FFiigguurree11..CCoonnnneeccttiinnggaannddcchhaarrggiinnggtthheebbaatttteerryy
Paging button
In Use and
Power LEDs
FFiigguurree22..CCoonnnneeccttiinnggtthheebbaasseeuunniitt
TTooAAcccceesssstthheePPrrooggrraammmmiinnggMMeennuuss
Press and hold until appears on the LCD screen. Then press the key that
corresponds with the desired menu option and follow the instructions below.
PROGRAMMING OPTIONS
NEC Conference Max Plus
AAuuddiiooCCoonnffeerreenncciinngg
*Press and hold the "1" key to enter a hyphen or the "*" key to enter a space in the
. If a number has alre
a
been programmed, use CLEAR to delete the old number before entering the new number.
Ringer Melody 1
Dialing Mode
2
Flash Duration 3
Local Number* 4
Conference* 5
Service* 6
Key ProgrammingMenu Option
1-5 to select a new melody. Press to save selection.
Press . The current melody selection will flash. Press
1 for tone, 2 for pulse. Press to save selection.
Press . The current dialing selection will flash. Press
Press . Enter the phone number that you want the
Conference key to dial. Press to save the number.
select duration. 1 = 600ms, 2 = 300ms, 3 = 150ms, 4 = 100ms,
Press . The current duration will flash. Press 1-5 to
5 = 80ms. Press to save selection.
appear on the LCD screen when the phone is in standby.
Press . Enter the phone number that you want to
Press to save selection.
Press . Enter the phone number that you want the
0key to dial. Press to save the number.
Press CLEAR once to return to the previous menu level or hold to exit
Programming mode without saving changes.
!
CCAAUUTTIIOONN: Read the Safety Information in the instruction manual.
© 2005 . All rights reserved. No part of this document may be reproduced in any form or by any means without written
permission from NEC. NEC reserves specific privileges. Information in this document is subject to change without notice.
NEC Conference MaxPlus is protected by U.S. Patent No. D499,392 Part No. 800-157-201 Rev. 1.0
Printed in China.
NNEECCCCoonnffeerreenncceeMMaaxxPPlluuss
Getting Started Guide
TTooMMaakkeeaaCCaallll
1. Press the OONN//OOFFFFkey to activate
the phone. You will hear a dial tone.
2. Dial the number as you would on a
standard phone. The number is
displayed on the LCD screen.
You can also predial the number while in
Standby mode and press the ON/OFF key to
connect the call.
To add a pause to the number you are
predialing, press and hold the # key.
TTooMMaakkeeaaCCaallllUUssiinnggtthheePPhhoonneebbooookk
1. Press the OONN//OOFFFFkey to turn on the
phone. You will hear a dial tone.
2. Press the PPHHOONNEEBBOOOOKKkey.
3. Press the number (00--99) that
corresponds with the stored phone
number you want to dial.
TTooAAnnsswweerraaCCaallll
•Press the OONN//OOFFFFkey.
The phone will ring (unless ringer is
turned off) and the phone LEDs and
phone icon on the LCD screen will
flash when there is an incoming call.
TTooEEnnddaaCCaallll
• Press the OONN//OOFFFFkey.
TTooSSttoorreeaaNNuummbbeerriinntthheePPhhoonneebbooookk
1. Enter the number while phone is in
standby (inactive) mode.
To add a pause to the phone
number, press and hold the pound (#)
key. To add a dash to the phone num-
ber, press and hold the 1 key. To add a
space to the phone number, press and
hold the star key (*).
2. Press and hold the PPHHOONNEEBBOOOOKKkey
until the Phonebook and Program
icons appear.
3. Assign a Phonebook location (00––99) by
pressing the corresponding number key.
4. Press PPHHOONNEEBBOOOOKKagain to save the
entry. You will hear a confirmation
tone.
5. To exit Phonebook Edit mode before
saving the entry, press CCLLEEAARR.
TTooAAddjjuussttRRiinnggeerrVVoolluummee
• While the phone is ringing, press
VVOOLLUUMMEEUUPPor VVOOLLUUMMEEDDOOWWNN.
• While the phone is inactive, press
VVOOLLUUMMEEUUPPor VVOOLLUUMMEEDDOOWWNN.The
ringer melody will play once at the new
level.
TTooTTuurrnntthheeRRiinnggeerrOOnn//OOffff
• Press and hold the star key (**).
TTooAAcccceessssYYoouurrCCoonnffeerreenncciinnggSSeerrvviiccee
• Press the CCOONNFFEERREENNCCEEkey. This fea-
ture must be programmed before use.
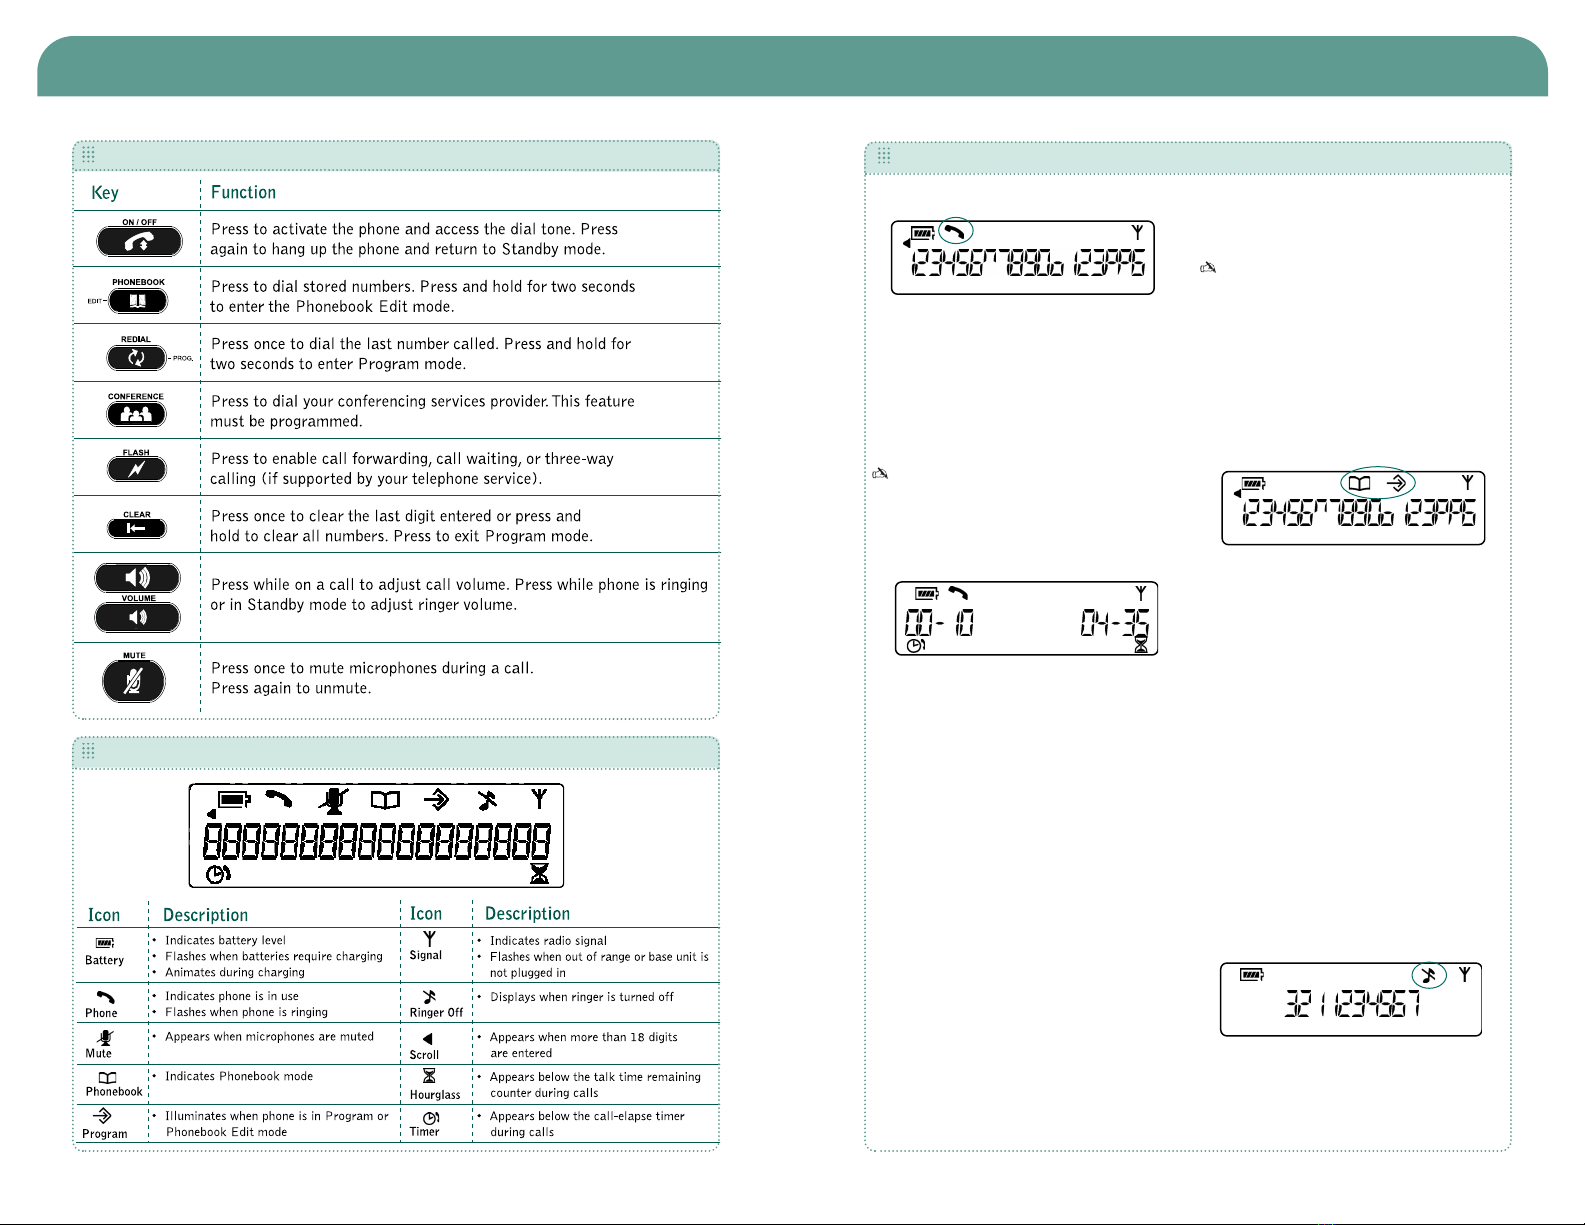
FFiigguurree44..TThheeeellaappsseeddccaallllttiimmee((lleefftt))aanndd
aapppprrooxxiimmaatteerreemmaaiinniinnggttaallkkttiimmee((rriigghhtt))
aappppeeaarrwwhheennaaccaal
llliissiinnpprrooggrreessss..
FFiigguurree33..TThheepphhoonneeiiccoonnaappppeeaarrsswwhheenntthhee
pphhoonneeiissaaccttiivvee..
FFiigguurree55..TThheePPhhoonneebbooookkaannddPPrrooggrraammiiccoonnss..
FFiigguurree66..RRiinnggeerrooffffiiccoonn..
USING THE PHONE
KEYPAD FUNCTIONS
LCD DISPLAY