Optimum OPT 500 User manual

500
QUALITYYOUCANTRUST
USER’SMANUAL
WHOLECOLD-PRESSSLOWJUICER

1
OPTIMUM500COLDPRESSJUICER 1
SAFETYFIRST 3
WHAT’SINTHEBOX&JUICERDIMENSIONS 5
OPTIMUMCUSTOMERMESSAGE 6
PARTSANDACCESSORIES 7
EXTRAINFORMATION 8
ASSEMBLYINSTRUCTIONS 10
DIRECTIONSFORUSE 14
PRECAUTIONSFORUSE 16
FOODPREPARATIONANDJUICINGTECHNIQUES 17
CLEANINGANDMAINTAININGYOURJUICER 19
SELF-CLEAN 19
TROUBLESHOOTING 20
SPECIFICATIONS 21
CONTACTUS 22
CONTENTS
After years of experience, months of design and testing, Optimum has teamed up with
some of the world’s most reputable slow-juicer manufacturers to launch the revolutionary
Optimum500Cold-Press Juicer.
Fruit Juices
The Optimum 500 is able to easily juice anything from a
soft berry to a hard apple, creating a healthy drink with 35%
more juice than conventional juicers.
Vegetable Juices
The Cold Press Process of the Optimum 500 will slowly
juice hard vegetables to leafy greens in seconds,
maintaining maximum living nutriments and enzymes, just
chop them up and o you go.
Wheatgrass
Wheatgrass, aloe leaves, pine needles and other medicinal
herbs can be juiced with ease using the Cold Press
Process of the Optimum 500, when you follow the simple
preparationsteps.
Nut Milks
Soak almonds, pistachios, Brazilian nuts and many more
nuts overnight, add water and place in your Optimum 500
for a nutritionally fresh nut-milk.
Ice cream from frozen fruits
The Optimum 500 can turn your favourite fruits into a
fat free, preservative free, beautiful guilt-free bowl of
icecream.
OPTIMUM 500 COLD-PRESS JUICER

2 3
Soy Milk
The Optimum 500 can replace a traditional soy milk
machine, as the Cold Press Process can extract milk from
soaked soy beans in seconds.
Nut Butters
Although we recommend the Optimum Blender for nut
butters, soaked nuts processed in the Optimum 500 Juicer
have the enzyme inhibitors removed making them more
digestible. You must remove the wiper blade attachment
before preparing nut butter. Limit of 500 grams at a time.
Baby Food
The Optimum 500 can make healthy food for your baby,
juicing fruits and vegetables into either a juice or a healthy
pudding full of nutriments and minerals.
Self-Cleaning
No need for a dishwasher, the Optimum 500 can self-clean, removing most of the pulp
beforerinsing.
Comprehensive Warranty
All Optimum products are covered by an international warranty, supported by service centres in
Australia, New Zealand, Europe, United States, United Kingdom and other countries.
SAFETY FIRST
When using electrical appliances, basic safety precautions should always be followed, including
the following:
1. Read all instructions before using.
2. Keep wet hands out of reach of the power supply and socket, to prevent electric shock orinjury.
3. To protect against risk of electrical shock, keep wet hands out of reach of the power supply and
socket and do not immerse the motor base in water or any liquid.
4. This appliance is not intended for use by persons (including children) with reduced physical,
sensory or mental capabilities, or lack of experience and knowledge, unless they have been
given supervision or instruction concerning use of the appliance by a person responsible for
their safety.
5. Do not operate the appliance if the cord or plug is damaged, if the appliance malfunctions or
if the juicer dropped or damaged in any manner. Return appliance to the nearest authorized
service facility for examination, repair and electrical or mechanical adjustment.
6. Be careful not to over bend, bind, drag or place significant pressure on the power cord. Ensure
the cord does not come into contact with any high heat source.
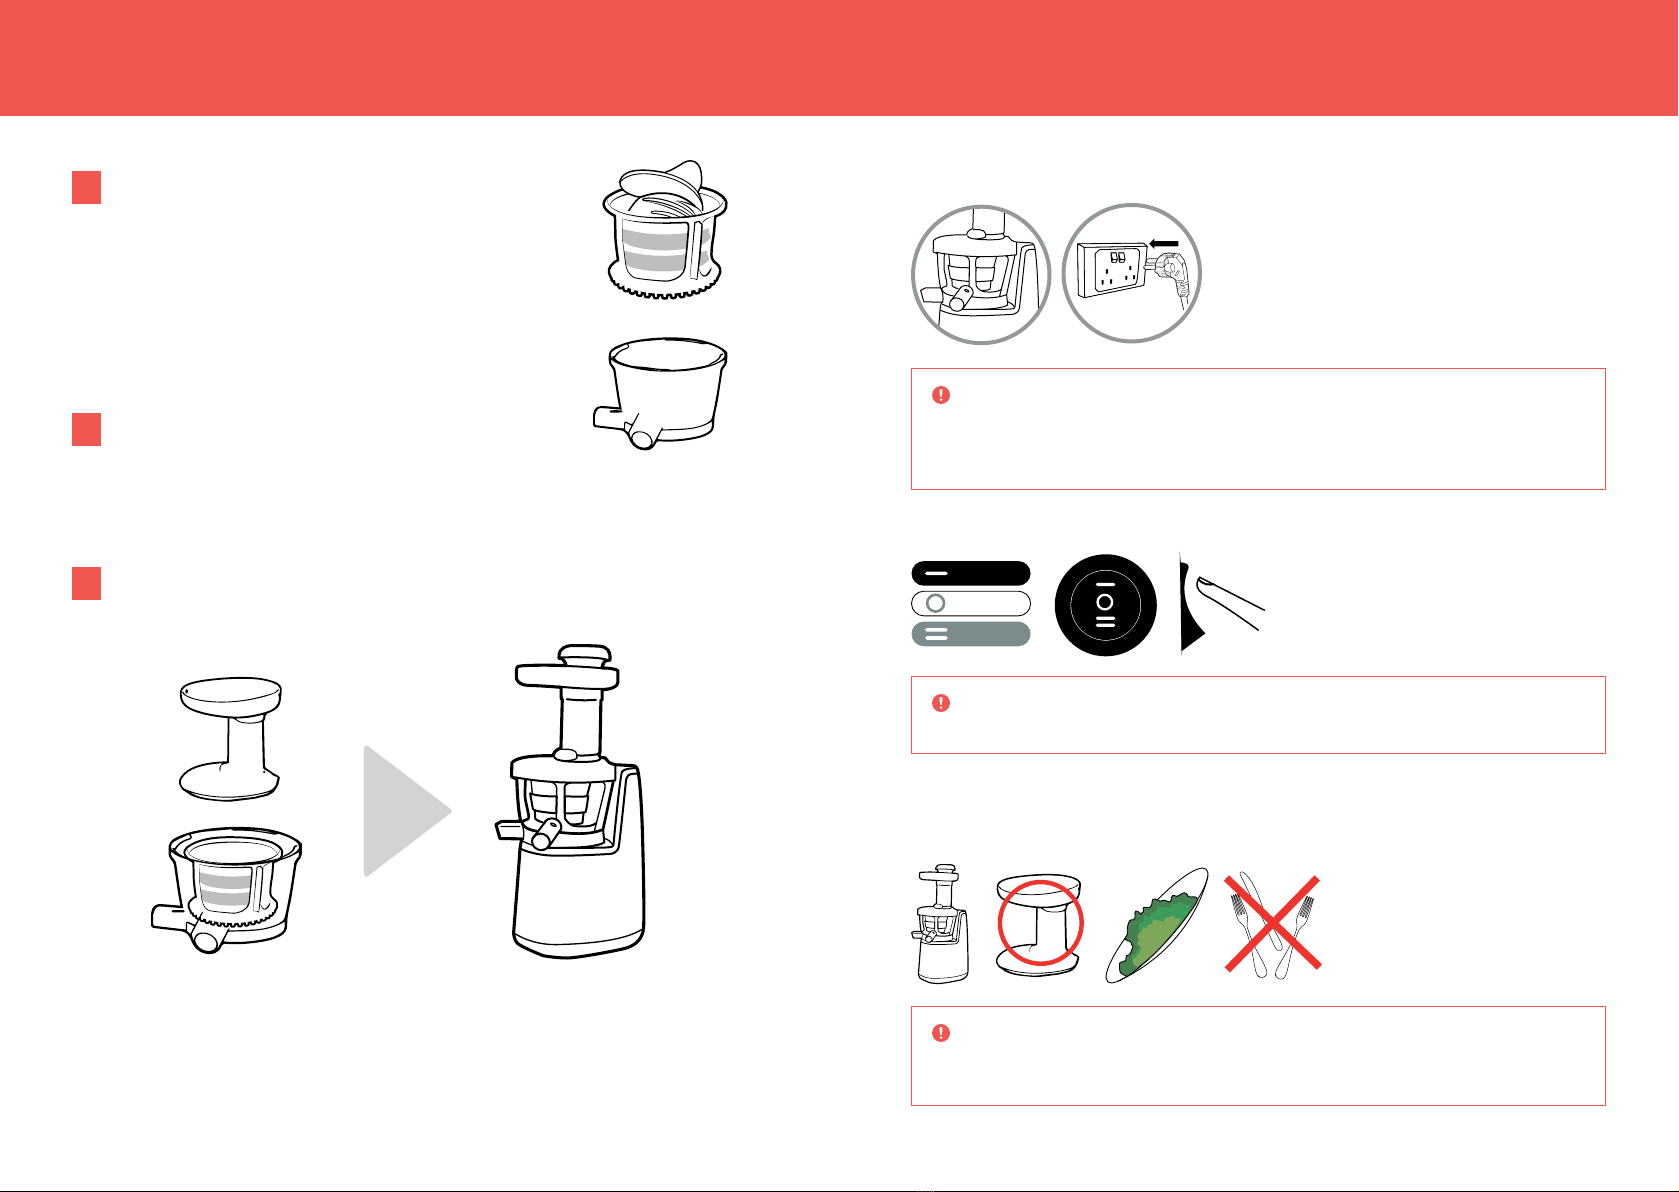
7. Unplug the device from the power supply when not in use, before assembling, taking o parts,
changing accessories and before cleaning.
8. Do not insert fingers or any foreign objects into the feed tube, waste chute or juice outlet whilst
the appliance is connected to the power supply. If food becomes lodged in the inlet use the
tamper, or use the reverse button on the machine to dislodge. If necessary disconnect the
device from the power supply and remove the blockage before continuing.
9. To ensure the appliance is not dropped, please place this appliance on a level surface with
sucient operating space. Impact can cause device damage or personal injury.
10. Do not use attachments not recommended or sold by the manufacturer as it may lead to fire,
electric shock or injury.
11. This device is intended for home use only, do not use outdoors.
12. Do not use appliance for other than intended purpose.
13. Lift appliance with the handle only.
14. Do not put any parts into the dishwasher.
15. Do not use the appliance to juice hard materials, including pips or large seeds.
16. Do not leave the device running continuously for over 30 minutes. The device may give o a
strange odour in the first few uses, which will dissipate over time. Please contact the Optimum
customer service centre if you experience any device malfunction.
BEFOREUSINGYOUROPTIMUM500COLD-PRESSJUICER,
PLEASEREADTHESESAFETYINSTRUCTIONSCAREFULLY.
FAILURE TO FOLLOW SAFETY INSTRUCTIONS AND WARNINGS COULD
RESULT IN SERIOUS INJURY. MISUSE OF YOUR JUICER MAY DAMAGE
YOUR APPLIANCE AND VOID YOUR WARRANTY.

4 5
OPTIMUM CUSTOMER MESSAGEWHAT’S IN THE BOX
1 Juicer Motor Unit/Main Body
1 Hopper/Safety Lid
1 Dual action juicing screw
1 Pulp Jug/Pitcher
1 Juice Jug/Pitcher
3 Juicing Strainers (fine, coarse, blank plate)
1 Spinning Brush
1 Juicing Bowl
1 Pusher/Tamper
1 Cleaning Brush
1 Tofu Box
1 Juice Tap
1 User’s Manual
NB: The tofu box includes - one large rectangle mould, one fabric cloth & one smaller lid mould.
JUICER DIMENSIONS
Optimum 500 Slow Juicer Dimensions are:
Length: 21cm
Width: 14cm
Height: 44cm
Optimum 500 Shipping Dimensions are:
Length: 33.5cm
Width: 31.5cm
Height: 39cm
Optimum is dedicated to providing 100% natural nutrition to our customers through our high quality
kitchen appliances. With the Optimum 500 Juicer you can enjoy a variety of nutrient rich juice along
with these benefits.
• Ability to juice greens, herbs and grasses (with a high yield) when prepared correctly
• Juicing fruits AND vegetables, including soft varieties
• Cold pressed, to produce a superior enzyme and nutrient content juice
• Low speed (rpm), to minimise oxidation and produce a longer lasting juice
• Upright design allows gravity to assist in the juicing process
• Juice tap to reduce froth and foaming
• Less waste than centrifugal juicers
• Child friendly with no sharp blades
• Space saving design
• Auto pulp ejection for continuous automatic juicing
• Built in reverse function eliminates clogging for continuous juicing
• Easy to clean with only 5 parts which need a quick rinse or wash
• Low noise
Dual stage juicing that eectively juices:
• Soft fruit e.g. oranges
• Hard Fruit e.g. apples
• Soft Vegetables e.g. kale
• Hard Vegetables e.g. carrot
• Nuts
• Wheatgrass
• Soybeans
Other functions that include making:
• Ice cream from frozen fruits e.g. banana
• Nut milks with soft or soaked nuts
• Soymilk from soybeans
• Tofu
• Baby food
In addition, fabulous recipes for your Optimum Slow juicer can be found on online.
This appliance is intended to be used in household and similar applications such as:
• sta kitchen areas in shops, oces and other working environments;
• farm houses;
• by clients in hotels, motels and other residential type environments;
• bed and breakfast type environments.

6 7
PARTS & ACCESSORIES
HOPPER
SAFETY LID
DUAL ACTION
JUICING SCREW
PULP PITCHER SPINNING BRUSH
CLEANING BRUSH
PUSHER/TAMPER
MAIN BODY
TOFU BOX
JUICE TAP
JUICING BOWL
PULP OUTLET
JUICE OUTLET
JUICE PITCHER
COARSE STRAINER FINE STRAINER BLANK STRAINER

8 9
EXTRA INFORMATION ASSEMBLY INSTRUCTIONS
Juice Tap
The juice tap can be optionally inserted into the juice chute. This can help to reduce froth and
foaming in some juice. Simply close the tap while juicing until the juice bowl is approximately 1/3 full,
then open the juice tap allowing the juice to flow into the juice pitcher/jug. The juice tap can also be
used to assist with self-cleaning, see instructions later in this manual.
Tofu Box
The tofu box includes - one large rectangle mould, one fabric cloth & one smaller lid mould. This can be
used to make fresh tofu at home. The cloth is laid inside the large rectangle mould, the tofu mixture is
poured in after it has been processed in the juicer, and then the smaller lid mould is rested on top.
TIP: The cloth from the tofu box can also be used to strain nut milks.
1. CHOICE OF STRAINERS
Coarse strainer
Coarse hole strainer is to juice soft fruit (strawberry, kiwi fruit & tomato)
or sticky material (bananas).The end result when using this strainer will
contain more pulp.
(Nylon material)
Fine strainer
Fine-hole strainer is to juice hard fruit, beans & vegetables with fibres.
The juice will be smoother.
(ULTEM/ PEI material)
Homogenising strainer/ Blank Plate
This specially designed blank plate can be used for grinding dry hard
food material (coee beans, almonds, etc.) It is also able to make frozen
fruit ice-cream and baby food.
(ULTEM/ PEI material)

10 11
ASSEMBLY INSTRUCTIONS (CONTINUED)
Tips • Make sure all silicone parts are correctly placed before juicing.
If not correctly placed, this may lead to leakage
• Silicone parts are safe to disassemble & wash, and can be used again once dried.
• Keep an eye on the silicon parts when cleaning; do not use hot water to wash.
Tips • When experiencing leakage
during use, please first check
if all silicone parts are correctly
placed / inserted. Small silicone
parts are easily missed during
assembly / use; ensure you keep
them properly placed. If missing
or broken, please contact the
Optimum Customer Service
Centre for replacement parts
before using.
2. INSTRUCTIONS FOR SILICONE PART USAGE 3. PRODUCT ASSEMBLY
.
.
.
.
.
.
.
.
.
.
.
.
.
.
.
.
.
.
.
.
.
.
.
.
.
.
.
.
.
.
.
.
.
.
.
.
.
.
.
Spinning Brush
Silicone Brush. Please assemble the silicone
brush according to the picture, place the tail of
brush towards bottom and insert the parts in
sequence in the picture.
Underside of juicing bowl
Silicone Ring. Place it correctly to fit the slot.
(When installing the silicone ring, the side with
the larger diameter is to the top).
Underside of juicing bowl
Silicone Juice Stopper. After cleaning,
assemble it according to the arrow instruction in
thepicture.
AAs shown in the pictures below, place the juicing bowl onto the base. When placed properly,
ensure that juicing bowl is fully pressed into the base and firmlyattached.
BAs shown in the sequence in the below picture, place the strainer and dual action juicing
screw into the spinning brush. When assembled, the components in the spinning brush can
rotatesmoothly.
A
B
Dual action
juicing screw
Juicing strainer
Spinning brush

12 13
PRODUCT ASSEMBLY (CONTINUED) DIRECTIONS FOR USE
CPlace the kit after being assembled (juicing strainer, dual
action juicing screw and spinning brush) into juicing bowl,
by lining up the dot on the top of the juicing strainer with
the dot on the side of the juicing bowl.
Ensure that bottom of the dual action juicing screw is
engaged onto the motor shaft.
When positioned properly, the juicing strainer and dual
action juicing screw will sit flat and level and will not rotate.
DEngage the hopper with the juicing bowl as shown on the
picture, lining up the dot on the side of the hopper with the
dot on the side of the juicing bowl and turning into place.
The device can only work when hopper and juicing bowl is fixed properly. If experiencing
diculty please ensure strainer and dual action juicing screw are correctlyinserted.
EIf desired install the de-foaming tap onto juice outlet, place juice pitcher and pulp pitcher under
juice outlet and pulp outlet accordingly. When using the tap ensure you do not fill the bowl with
liquid more than 1/3rd the way up the bowl to avoid leakage onto base.
STEP 1 Connect power plug with socket outlet and switch on the power.
STEP 2 Switch on the device and slowly feed cut up pieces of food down the feed tube.
STEP 3 Rinse everything thoroughly before putting into the machine.
Do not put excessive volumes of food or press food hard into the device; this may cause
clogging, leaks or damage.
Caution Place pitchers under two outlets (juice & pulp outlets). It is normal that the device
makes squeaking noise when starting. This noise is caused by friction between
spinning brush and parts inside juicing bowl. Sounds will disappear after food
isinserted.
Caution Do not operate with wet hands. Violating the warning may cause serious injury or
electric shock.
Caution Please use only the tamper to assist with guiding food into bowl, do not use any
other implement like spoons in the feed tube.
This will cause damage to the machine.
ON
OFF
REV

14 15
DIRECTIONS FOR USE (CONTINUED) PRECAUTIONS FOR USE
What to do if the dual action juicing screw stops working when in use:
Too hard, too much or incorrectly prepared food being stued into the device may cause the
protection system to activate and stop the appliance running.
A. Switch the device to the o position.
B. Push reverse button without releasing for
3-5 seconds, repeat this step 2-3times.
NB: You may see food moving back up and
out of the feed tube, this is normal.
C. Resume juicing as normal after reverse
rotation ends.
Tips • Reverse button needs to be held down. If the juicer still does not work after above
instructions are followed, please unplug, disassemble and clean the juicer thoroughly.
This includes unclogging any debris from the stopper on the underside of the
juicingbowl.
Frequently juicing food that is too hard or pushing too much food in at once may
shorten product lifespan.
REMOVEHARDSEEDSBEFOREJUICINGFROMFRUITSLIKE:PERSIMMONS,
PEACHES,PLUMS,ETC.
HARDITEMS(KUDZUVINE,SUGARCANEETC.)ARENOTSUITABLEFORJUICING.
JUICERCANBEUSEDTOMASHGARLICANDPEPPERSWITHMOISTURE.
NOT SUITABLEFORGRINDINGDRY GRAINS.
WHENJUICINGHARDFRUITSORVEGETABLESLIKECARROTSTHEYMAYCAUSE
LOUDNOISES,THISDOESNOTINDICATEDAMAGETOTHEMACHINE.
BEAWARETHATJUICEMAYSPILLOUTWHENJUICINGFRUITSANDVEGETABLE
LIKEGRAPESANDTOMATOES.
USINGFROZENFRUITSANDVEGETABLESMAYINFLUENCETHEFLAVOUR
OF JUICE.
FREQUENTLYJUICINGPROCESSEDANDHARDFOODSTUFFS(ICE,FRUITSEEDS,
ETC.)MAYDAMAGETHESTRAINERS.PLEASEUSEWITHCARE.
THECONTINUOUSWORKINGTIMESHOULDBENOMORETHAN30MINUTES.
DRINKJUICESASSOONASPOSSIBLEAFTERJUICING,IFYOUWISHTOSTORE
JUICEPLACEITINASEALEDGLASSCONTAINERINTHEREFRIGERATOR.
JUICINGTOOMUCHFOODORJUICINGHARDFOODSTUFFSMAYMAKEIT
DIFFICULTTOREMOVETHEHOPPERFROMTHEJUICINGBOWL.

16 17
FOOD PREPARATION & JUICING TECHNIQUE
The Optimum 500 Juicer is versatile and gets great results every time. It makes nut milks, frozen
desserts and baby food along with being able to juice grasses, fruits and vegetables.
If you don’t use the Optimum Slow Juicer correctly, it can end up creating a large amount of pulp
in the juice or become blocked. Blockage can occur due to the way you prepare the fruits and
vegetables before juicing or how you feed them into the feed tube. Preparation is the key to
easyjuicing.
All fruits and vegetables must be prepared as follows:
• Refrigerate your product prior to juicing. This will also give you a less pulpy juice.
• Rinse thoroughly.
• Remove any seeds or hard ends.
• Cut the ingredients into thin pieces that fit in the feed tube. Ensure all pieces are approximately
3-5cm in length at most.
NB: This is especially important for fibrous vegetables such as celery, kale, spinach and all grasses.
Familiarise yourself with the tips below for optimal results:
TIP 1: DON’T PRESS/SHOVE FOOD INTO THE OPTIMUM 500 SLOW JUICER
Most of us are used to juice with the old-style centrifugal juicing machines. If you recall, those
machines require you to forcefully press/shove food into them, and allow large items like whole
apples. You actually had to push hard on carrots and apples to shove them into the spinning blade
where they were shredded into tiny flying pieces.
Do not use this same pushing/pressing/shoving force with the Optimum 500 Slow Juicer! There
is no spinning blade and no dizzying shredding taking place. No pressing is required. Instead, simply
let your food fall into the “chewing juicing screw.” Virtually no force is necessary! In fact, forcing more
food into it can cause too much vegetable mass to end up in the juicing screw at one time, and this
will result in pulp overflowing into your juice, or the juicer to become blocked.
When juicing grasses, feed the Optimum 500 a small amount of grass at a time, cutting the grass
into short pieces approx. 3cm long ensures the waste can easily come out of the waste chute. You
do NOT need to “clump” the grass into a ball like you used to do with the centrifugal juicers. In fact,
you can slowly feed small strands of grass, coriander, parsley and other leafy greens without any
problem at all! You can also juice kale and spinach in the same way.
A great tip for large leafy, stringy or fibrous vegetables is to remove the leaf from the stem, cut
both leaves and stems into 3-5cm lengths and feed through gently, letting the juicing screw pull the
ingredients into the juicer, using the tamper only gently if required.
TIP 2: JUICE LOW-FIBRE PLANTS FIRST, AND HIGH-FIBRE PLANTS LAST
Here’s a really important tip: If you’re going to juice high-fibre plants like celery or spinach, juice them
last! Why? Because the fibres in celery tend to accumulate in the ejection port in the juicing bowl at
the bottom of the juicing screw. If this port becomes clogged, then “pulp overflow” will occur, sending
extra pulp into your juice. Following Tip #1 will minimise the chances of this occurring to almost zero.
As long as the port stays open, the pulp in your juice will be minimised. So the best way to do this
is to juice your low-fibre fruits and veggies first: Apples, carrots, etc. Save the stringier, fibrous plants
for last. You’ll get a much better result.
TIP 3: JUICE YOUR JUICE!
If you still find too much pulp in your juice, just pour the juice back through the machine again! You’ll
find that the second time through, nearly all the pulp is removed.
You can also strain it through a nut-milk bag, or the fabric cloth that came in your tofu box.
It is important to follow these three tips as you’ll find that the Optimum 500 Juicer produces very
little pulp in the final juice and will not get blocked.
NB: After you have had your juicer for some time, please check that the silicon wiper blades have
not worn; this can also cause extra pulp in the juice.

18 19
CLEANING & MAINTAINING YOUR JUICERTOFU RECIPE
HOW TO MAKE HOMEMADE TOFU USING THE OPTIMUM 500 SLOW JUICER
Ingredients
1 ½ cup (300g) uncooked soybeans
4 cups (1L) water
1 tbsp (20ml) ground sea salt
1 tbsp (20ml) white rice vinegar
Method
1. Soak the soybeans in 4 cups of water overnight (approximately 8 - 12 hours) or until you no
longer see wrinkles on the beans. NB: Do not leave uncovered and out during hot weather for
more than a day.
2. Place the fine strainer in position, turn on the juicer and using a medium-sized spoon or ladle,
ladle the soybean and water mix (1:1 ratio) into the juicer. Use all of the soybeans and water. The
water will prevent clogging and yield better results.
3. Soy pulp will be ejected through the waste chute; soy milk will come out of the juice chute.
Optional: Extracted soy milk can be put back into the Optimum juicer for re-straining for finer
and smoother soy milk, which will create softer tofu (if desired). Without re-straining, you will end
up with coarser and more firm tofu.
4. Place soy milk in a saucepan on high heat, stirring constantly to prevent sticking.
5. As soon as the soy milk comes to a boil, lower the heat to medium and add the salt/
vinegarmixture.
6. Stir only 2-3 times very slowly on medium heat and let the soy milk start to curdle (createlumps).
7. Remove from heat once the mixture has curdled and looks like soft bean curd.
8. Place the bottom of the Optimum tofu box inside a large bowl, making sure there is enough
room for water to drain out, and line with the tofu box fabric. Scoop soft bean curd into the
linedpan.
9. Wrapping the fabric evenly over the bean curd, place the lid on top. Place the dual action juicing
screw from the Optimum juicer on top of the tofu press, allowing the weight to squeeze out the
excess juice/milk. In approximately 30 minutes, your homemade tofu is ready to eat.
10. Remove tofu carefully and serve immediately, make into your favourite meal, or refrigerate.
1. Turn device “OFF”. Please do not touch the plug with wet hands.
2. Twist the hopper to unlock by grabbing the two outlets. Make sure the arrow is aligned with
open side before pulling o the bowl.
3. Disassemble the device in reverse to assembly order.
4. Once disassembled, clean it using warm soapy water and cleaning brush provided. Do not
use a metal sponge to clean as this may scratch and damage the device. Do not clean it in the
dishwasher.
5. Do not immerse or rinse the main body under water, use dry towel or wet sponge to clean.
6. Let the parts dry in an open, clean and draft space after washing. Store it out of reach
ofchildren.
In order to extend the product service life, please clean it promptly after usage.
If it appears that the plastic of the containers and parts is very dry, wipe with cooking oil and then
wash with gentle detergent to clean.
SELF-CLEAN
When making more than one juice, it is not necessary to disassemble after juicing each dierent type
of food; a quick self-clean will ensure juice flavours do not mix.
1. Ensure the pitchers are underneath both the waste and juice chutes. Turn o juicing tap.
2. Switch on the juicer and pour a bowl of clean water slowly into the feed tube.
3. Turn on juicing tap drain water after juicing bowl is clean.
NB: Please disassemble fully after juicing is complete and follow the cleaning instructions found in
this manual.

20 21
TROUBLESHOOTING Q&A SPECIFICATIONS
Product Juicer
Model 500 - Whole Slow Juicer
Power Consumption 150W
RPM 65rpm
Power cord length 1.2m
Motor type AC motor
Fuse 5A
Product weight 6.8kg
Dimensions 21cm(L) x 14cm(W) x 44cm(H)
Working sound volume 30-50 decibels
Check the below troubleshooting guide before calling for assistance or maintenance. If you cannot
resolve the issue please contact Optimum Customer Service for support and service.
Troubleshooting when the device does not work:
A. Please check if the plug is correctly positioned.
B. Please check if all components are correctly
installed. Only when all components are
properly inserted / assembled can the device
be operated. Should the juicer made a strange
noise or not start please re-check assembly.
C. Please check hopper is securely locked in place
with juicing bowl; juicer will not start when this is
not done correctly.
The device does not work
• Make sure the power plug is correctly plugged
into the wall socket.
• Make sure the device is assembled correctly.
The device stops when juicing
• Please check power plug has not become lose.
• Please ensure you have not put in excessive or
hard foodstu into the juicer. Please check that
the device has not been working continuously
for too long.
Leaking from beneath juicing bowl
• Please check if the silicone stopper is plugged
insecurely.
The device shakes when juicing
• The motor rotation may cause it to shake slightly.
• Please ensure the device is on a level surface.
• Please ensure that the food is
preparedcorrectly.
Separation of juice
• Please note that some ingredients have dierent
density and you may note a slight separation
during juicing. Simply stir and enjoy.
Abnormal noise
• Please ensure to place the device on level
ofsurface.
• Check if the device contains excessive or overly
hard foodstus.
Dyed containers or accessories
• Please clean the device promptly after using
to prevent pulp leftovers from sticking to
thecontainers.
• The container or accessories may be stained
when juicing some foods containing rich
pigments. Clean it with cooking oil and then
withdetergent.
Hopper/lid is stuck
• Do not force it open.
• Make sure that no excessive pulp is left inside
the device. Please start the juicer to assist in
removing any build up.
• Check if any unidentified or hard objects have
been left inside. Use the reverse button to push
objects back up the feed tube.
Only for EU countries. Do not dispose of electric appliances together with household
waste material! In observance of European Directive 2002/96/EC on waste electrical
and electronic equipment and its implantation in accordance with national law, electric
appliances that have reached the end of their life must be collected separately and
returned to an environmentally compatible recycling facility.

22 23
WARRANTY TERMS & CONDITIONS (INTERNATIONAL)
Eective as of 1st January 2014
This warranty as outlined below solely covers distributors. Please contact your distributor for full product warranty.
1. Optimum® warrants this appliance to be free from defects in materials and workmanship and to perform
satisfactorily in household use for a period of 2 years from the date of purchase when used in accordance with
the accompanying instruction book.
2. Any warranties exceeding this standard period are oered as extended terms by the selling distributor and
claimable only though that provider.
3. Defects that occur within this manufacturer’s warranty period, under normal use and care will be repaired or
replaced at our discretion only if the selling distributor is unable to do so. This is done solely at our option
with no charge for parts. This warranty does not extend to accessories included or purchased separately.
Replacements can be oered for major faults as determined by your distributor and at their own discretion.
4. The strainers will only deteriorate or break through abuse and misuse are therefore are not covered by this
warranty for more than 30 days after purchase date.
5. In the event that the goods requiring repair are under warranty, and this distributor is unable to provide
the repairs; the customer is responsible for any freight charges to or from Optimum® (or their approved
serviceprovider).
6. Whilst in transit the goods are at the owner’s risk and any further damage during this transportation is not
covered under warranty.
7. Customers should ensure that the product being returned is properly packaged so as to ensure that no
damage occurs to the product during transit. To be able to process the warranty claim ensure you have
included an explanation of any problem, Optimum® will not fault-find and will only repair described faults as
covered under warranty.
8. This full warranty is void if this appliance has been subject to abuse, negligence, accident, alteration, failure to
follow operating instructions, or the product has been exposed to abnormal or extreme conditions.
9. Cosmetic changes that do not aect performance, such as discolouration of parts of the product in the
hands of the user or the eects of the use of abrasive cleaners will not be warranted or considered defects.
Thecleaning or removal of food products along with any damage caused by allowing them to build up is not
covered by this full warranty.
10. This warranty does not cover normal wear and tear of the product or parts.
11. This warranty does not cover any defect caused by an accident, misuse, abuse, improper installation or
operation, lack of reasonable care, unauthorized medication, loss of parts, tampering or attempted repair by a
person not authorized by Optimum®.
12. The warranty will not apply if damage, malfunction or failure resulting from alterations, accident, misuse, abuse,
fire, liquid spillage, maladjustment of customer controls, use on an incorrect voltage, power surges and dips,
thunderstorm activity, acts of God, voltage supply problems, tampering or unauthorized repairs by any persons,
use of defective or incompatible accessories, exposure to abnormally corrosive conditions or entry by any
insect, vermin or foreign object in the product.
13. You must keep your purchase receipt as proof of purchase and as proof of the date on which the purchase
was made. The purchase receipt must be presented when making a claim under this warranty.
14. In the event the receipt of purchase is not presented, then this warranty is invalid. Consumer Law allows us to
request reasonable proof of purchase to service a warranty claim.
15. This warranty does not imply, intend to or detract any consumer rights listed in and able to be enforced
from Regulated Consumer Law, any condition which is found to be in breach of the consumer law, the single
condition shall be void only and all other conditions remain in place.
CONTACTING US
Please contact the distributor located in the Country where you made your original purchase for
all Support, Servicing and Warranty.

OPT Juicer500 Manual v10
Table of contents
Other Optimum Juicer manuals

Optimum
Optimum optima RK-0850 User manual

Optimum
Optimum H3000 User manual

Optimum
Optimum RK-0660 User manual

Optimum
Optimum RK-0670 User manual

Optimum
Optimum RK-0900 User manual

Optimum
Optimum RKS-2100 User manual

Optimum
Optimum RK-0012 User manual

Optimum
Optimum RK-1220 User manual

Optimum
Optimum RKS-3015 User manual

Optimum
Optimum RK-0655 User manual

Optimum
Optimum 600M User manual

Optimum
Optimum RK-0650 User manual

Optimum
Optimum RKS-2100 User manual

Optimum
Optimum 600XL User manual

Optimum
Optimum RK-0610 "FRUTIA" User manual

Optimum
Optimum H3000 User manual

Optimum
Optimum 400 EVOLVE User manual

Optimum
Optimum 600 User manual

Optimum
Optimum RK-0010 User manual

Optimum
Optimum 600 User manual