Ricoh P3500M User manual

Getting Started
<Quick Guide>
DEF010
DPW006
Starting the Machine
v
Selecting the Destination from the Destination List
v
Preparation
Starting a Meeting
DEF003
DEF005
DPW001
DPW002
Searching the Destination from the Destination List
v
DPW003
DPW004
DPW006
DPW006
1

DEF014
DPW005
DPW006
DPW006
DPW006
What You Can Do
Leaving the Meeting
Start screen sharing on the conference system to be used.
Select “Ricoh Screen Share” as a shared application.
Sharing the Computer Screen
v
DEF016
DEF015
Connecting to an Unregistered Destination
v
DPW003
2

Read this manual carefully before you use this service and keep it handy for future reference.
For safe and correct use, be sure to read the Safety Information in "Read This First" before using the machine.
Getting Started
<Setup Guide>
Important Notice
We will not have any liability in regard to any loss or damage resulting from the use of this product for any applications other than the video confer-
ence system.
About This Manual
This manual explains how to operate RICOH Unied Communication System P3500M (this machine) for connecting to a compatible video conference system
.
For details about how to use this machine, the operating environment requirements and specications, see Operating Instructions.
The Operating Instructions is supplied in PDF. You can view the Operating Instructions on the Ricoh home page:
http://www.ricoh.com/support/•
About This Machine
This machine runs on Mircosoft Windows 7 Embedded Standard OS and can be operated by using the mouse, keyboard, Control Panel, or via
remote control.
With this machine, you can connect to a virtual meeting room and have a meeting on a WebRTC-supported conference system.
Necessary Devices
The following devices are necessary to use this machine.
Device name Interface
Mouse USB (type A)
Keyboard USB (type A)
Video output device (monitor or projector) Analog RGB/VGA, HDMI terminal
The following devices can also be used to suit your environment and usage application.
Device name Interface
Analog Audio Input Device (Microphone, headset, and other devices) Audio input
Analog Audio Output Device (Speaker or headset, and other devices) Audio output
Digital Audio Input/Output Device (USB microphone speaker) USB3.0 (type A)
USB ash drive (used to import and export Address Book data, update system
les, and import certicates)
USB3.0 (type A)
Video Input Device (USB camera) USB3.0 (type A)
Video Input Device (camera) HDMI terminal
A keyboard coupled with a mouse or a keyboard with a mouse connected to its USB port can also be used.•
3

Guide to Components
DNC001
1 32
5
4
6
7
89101112
DTQ001
13
1. [Push] key Used to raise the camera unit.
2. Zoom keys Used to adjust the zoom of the machine's camera.
3. Camera OFF key Used to turn off the display of the machine's camera.
4. Power indicator Lights when the machine turns on.
This indicator blinks while the machine is starting up or shutting down.
5. [Power] key Used to turn the machine on and off.
6. [Disconnect] key Used to exit browser.
7. [Enter] key Used to activate the menu, setting, or set value selected with the cursor keys.
8. Speaker volume keys Used to adjust the speaker volume.
9. Cursor keys Used to select a menu or setting.
10. [Menu] key Used to display the Settings menu, where you can change the machine's settings.
11. [Mute] key Used to temporarily disable audio input on the machine.
12. Mute indicator Flashes if the [Mute] key is used to disable the microphone.
13. MAC address Used to check the MAC address of this machine.
E: Ethernet MAC address•
W: Wireless LAN MAC address•
You can use the remote control to perform the same operations that are performed on the control panel of the machine.•
Connecting Devices
1. Connect the power cord set to the machine.
2. Connect a video output device to the machine.
3. Connect an Ethernet cable to the machine.
Only when using the wired network, connect an Ethernet cable.
4. Connect a keyboard to the machine.
5. Connect a mouse to the machine.
4

Preparing to Use the Machine
Start this machine, and then congure network and other initial settings.
Follow the instructions on the screen to operate the system by using the mouse and keyboard.
1. Press the [Power] key.
The machine starts and the Initial Settings window appears.
2. Select the region and language, and then select [Next].
You must log out after selecting the region and language, and then log in again. Follow the instructions on the screen for operation.
3. Set the date and time, and then select [Next].
4. Congurerequiredsettingsforyournetworkenvironment.
Ask the network administrator about which settings need to be specied in this step, and then enter the correct values.
5. Whenyouarenishedwiththeconguration,select[Next(SaveSettingsandRestart)].
The machine restarts and the Initial Settings window appears.
6. Setacerticateasnecessary.
If the network environment requires a certicate, use a USB ash drive to download the certicate from your computer.•
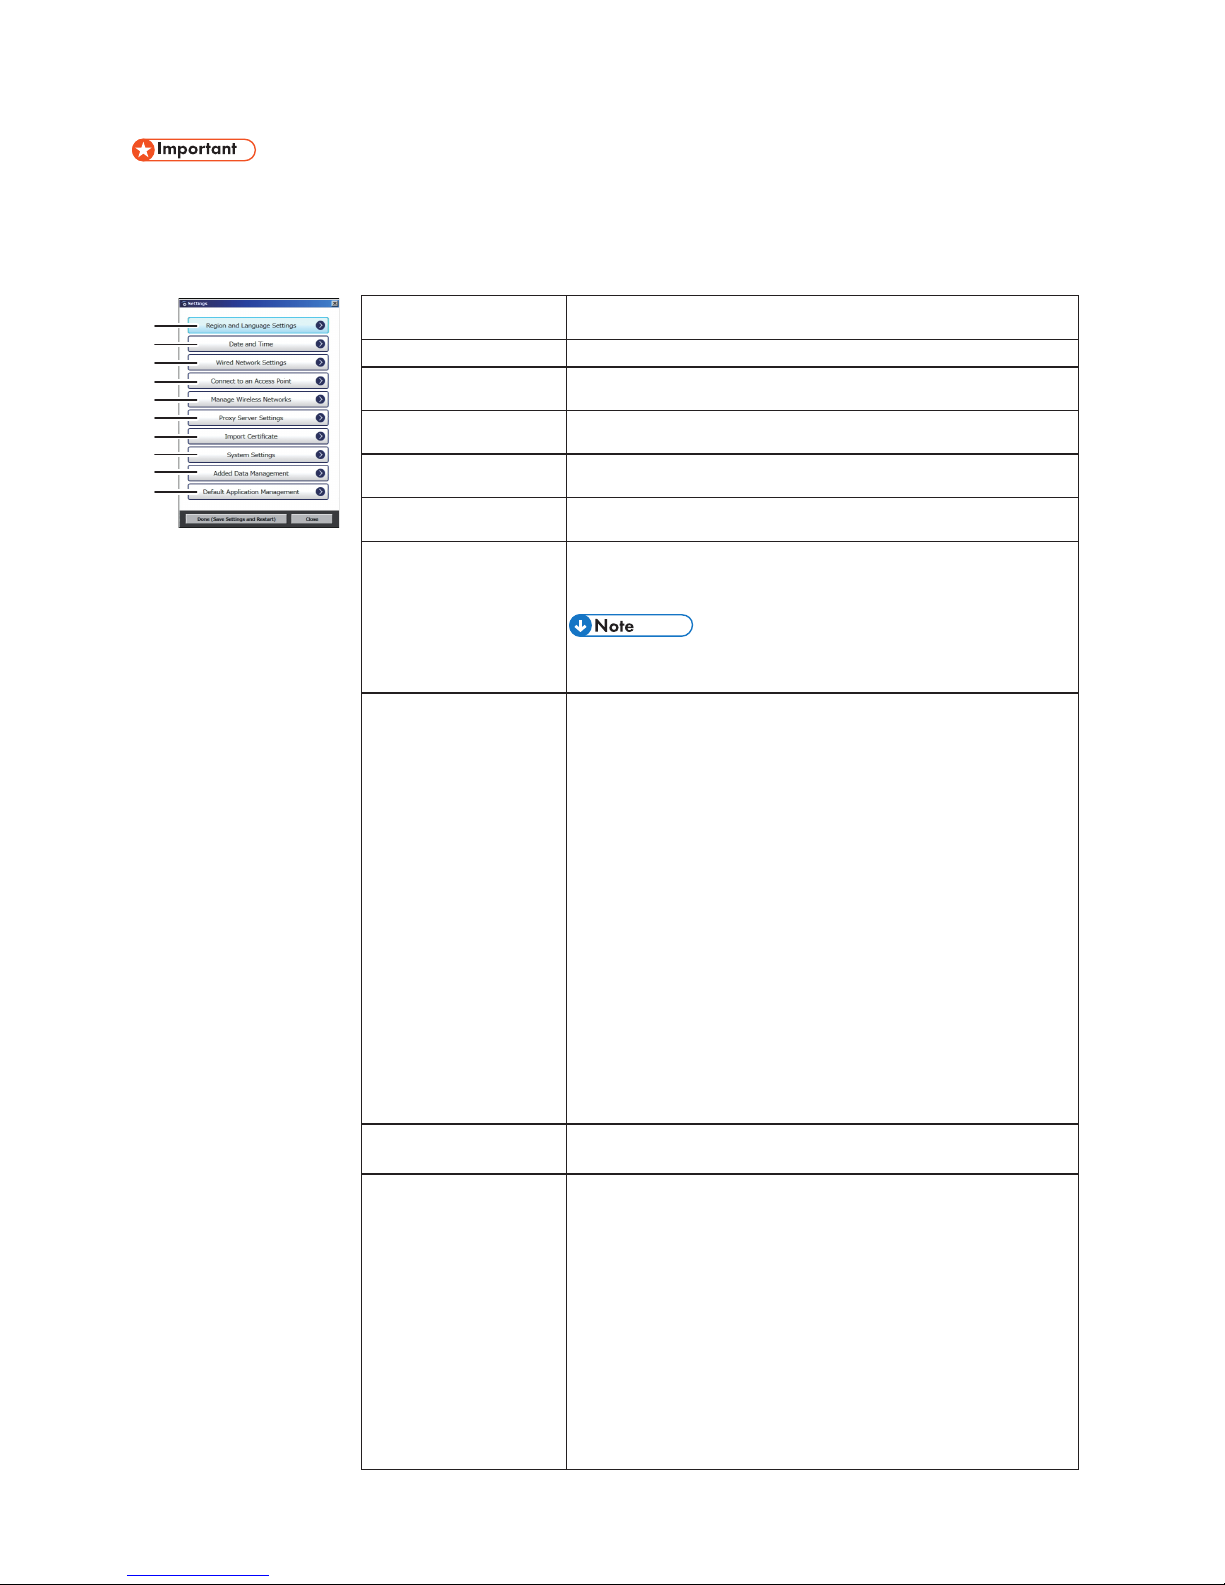
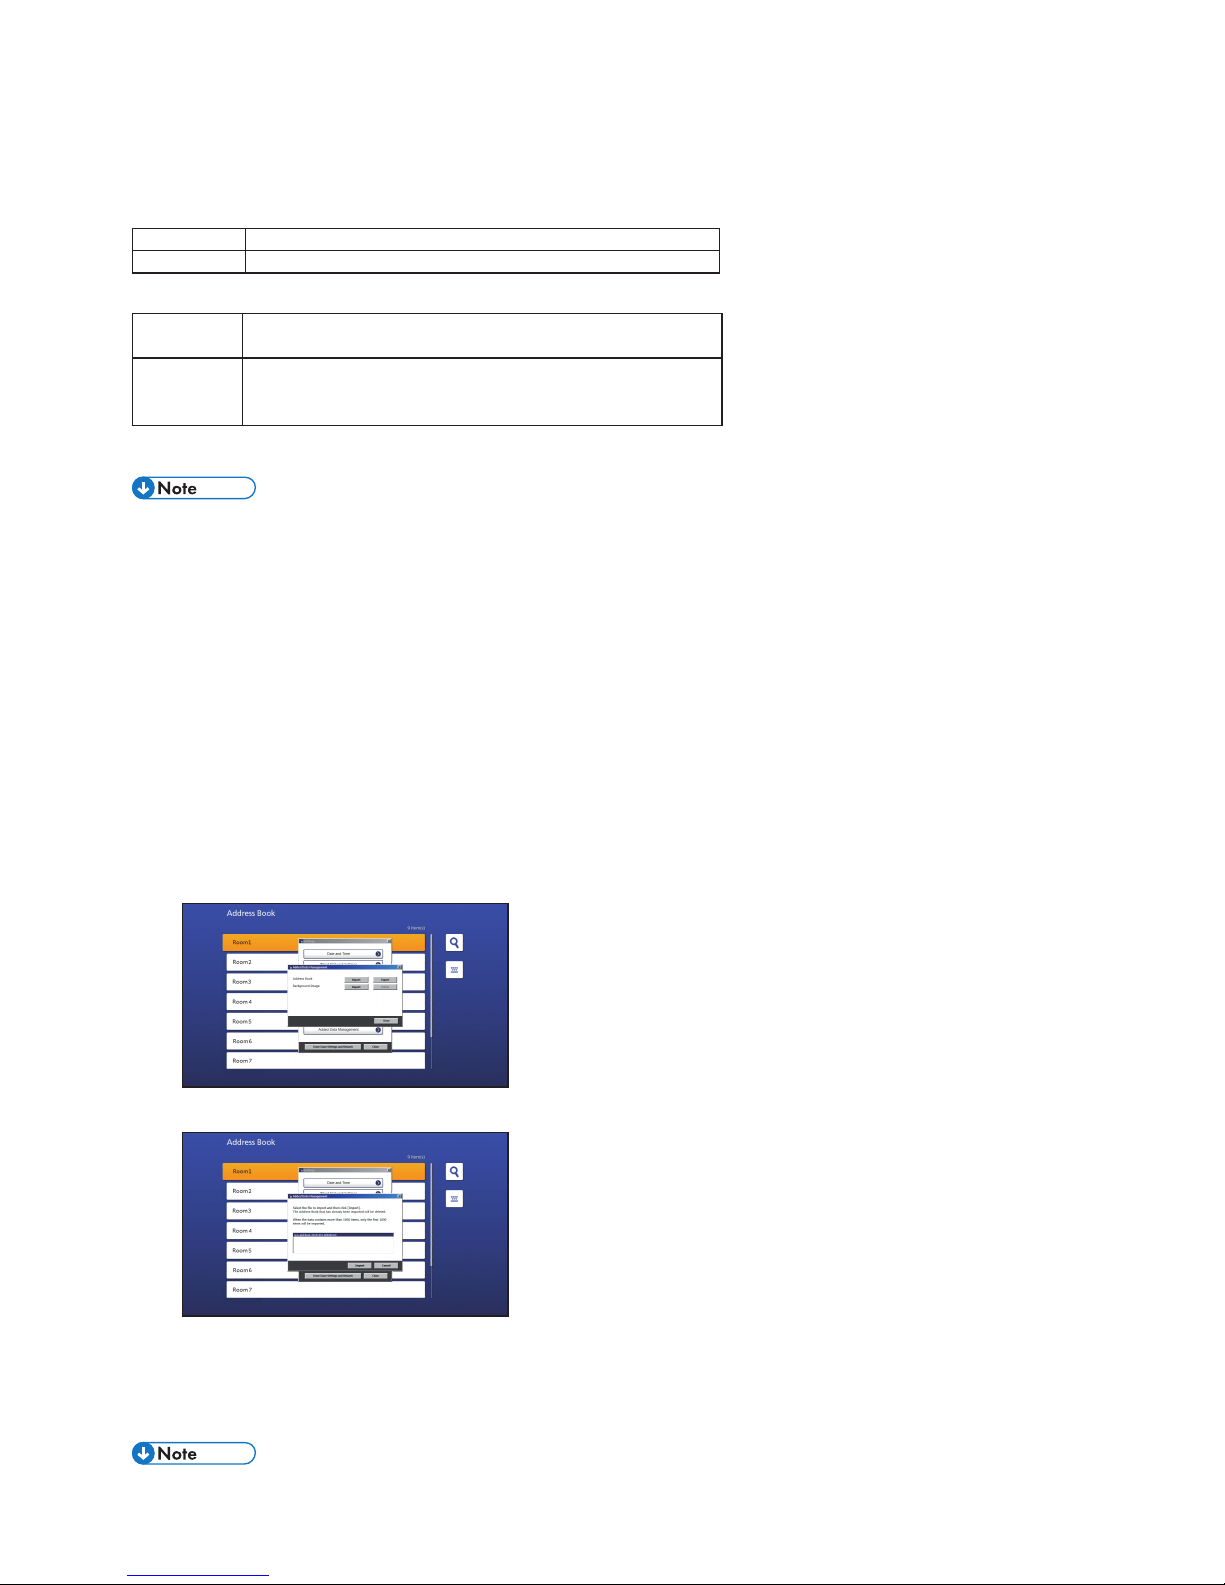
7. Select the application you want to display when the machine starts up.
AddressBook(ThisMachine)•
Displays Address Book.
If you select Address Book, specify the URL of the page to be displayed when you press [Manual Entry].
My Meeting Video•
Displays My Meeting Video using the RICOH UCS Advanced service.
For details about the RICOH UCS Advanced service and My Meeting Video, see "Connecting to the RICOH UCS Advanced Service".
Browser(StartupPage)•
Displays the specied page in the web browser.
If you select Browser, specify the URL of the page to be displayed.
The URL can be up to 256 characters in length.•
8. Whenyouarenishedwiththeconguration,select[Done(SaveSettingsandRestart)].
The machine restarts and the default startup page appears.
You can also change the machine settings from “Settings”. For details, see “Changing the Machine Settings”.•
Preparing for Screen Share
To install the driver for PC Screen Share, this machine must be connected to a network. Before installing the driver, make•
sure the machine is connected to a network via a wired or wireless LAN.
AdministratorprivilegesarerequiredtoinstallthedriverforPCScreenShare.Logontothecomputerasamemberofthe•
Administrators group.
Operating Environment
Windows: Mac OS:
CPU Core 2 Duo 2.0GHz or higher Computer Macbook Pro
Memory 1GB or higher OS 10.9 ,10.10, 10.11
HDD 100 MB or more of free space Resolution 800 x 600, 1440 x 900
OS
Windows Vista (Service Pack 2 or later) / 7 / 8 / 8.1/10
Resolution 800 x 600 (SVGA), 1024 x 768 (XGA), 1280 x 800
(WXGA)
64,000 colors or more (recommended)
5

Installing for Windows
To share your screen of the computer, you must rst install the driver for Screen Share on your computer.
1. Turn the machine on.
2. Connect the USB cable to the USB port on this machine.
Connect the micro-B connector end of the USB cable to the USB port (type micro-B) on this machine.
3. ConnecttheAconnectorendoftheUSBcabletotheUSBport(typeA)onthecomputer.
The driver may begin installing automatically. If this happens, a dialog box indicating that the driver has not been installed correctly may appear.•
In such a case, click [Close] to close the dialog box and proceed to Step 4.
If the Add New Hardware Wizard appears, click [Cancel].•
If the auto-play screen appears, close the screen.•
If the message “The driver for PC Screen Share has not been installed. Install the driver and then start the software.” appears, click [OK].•
4. Open "Computer" on your computer and right-click [PC Screen Share].
5. Click [Install the 32-bit driver for PC Screen Share] or [Install the 64-bit driver for PC Screen Share]. Make sure to select
the correct driver for your computer's OS.
If neither choice appears, run dpinst32.exe (for 32-bit OS) or dpinst64.exe (for 64-bit OS). These les are located in the folder "driver"
on the drive "PC Screen Share".
6. Follow the instructions given in the installation wizard to complete the installation.
After the installation is complete, a dialog box indicating that the computer needs to be restarted may appear. If this is the case, restart
your computer.
If you want to uninstall the driver for PC Screen Share, uninstall the driver from "Add or Remove Programs". For details about "Add or •
Remove Programs", see Windows Help.
Remove the USB cable from your computer before uninstalling the driver for PC Screen Share.•
To re-install the driver for PC Screen Share, you must uninstall the driver once, and then install the driver again.•
Holding a Meeting
About Address Book Screen
When this machine starts, Address Book is displayed.
Address Book is used to register the URL and name of a virtual conference room as a destination.
Before having a meeting, you need to register the destination address in Address Book. For details about registering the destination, see •
“Managing Address Book”.
DPW008
1
2
3
1. Destination List Displays a list of destinations registered in Address
Book.
2. [Search] Use this function to search for a registered
destination in the destination list.
3. [Manual Entry] Use this function to display the page of the video
conference system specied as the default startup
page.
Start Meeting
1. Press the [Power] key.
Address Book is displayed.
2. Press the [Push] key, and then lift the arm of the camera to raise the camera unit.
3. Adjust the orientation by carefully moving and rotating the camera vertically or horizontally.
6

4. Select the destination you want to connect, and start the meeting.
You can also use the cursor keys on this machine to select the destination and then press the [Enter] key.
5. Select [Join].
The web browser opens and displays the selected video conference system.
For details about operation during the meeting, see the manual or Help of the video conference system you are using.•
The machine turns off automatically when it is left idle for 15 minutes.•
Searching for a Destination in the Destination List
1. Select the [Search] button.
You can also use [ ] key of this machine to select the [Search] button, and then press the [Enter] key of this machine.
2. Enter a keyword to search for the destination.
3. Press the [Enter] key of the keyboard.
Search results showing all relevant destinations are displayed in the destination list.
4. Select the destination you want to connect.
You can also use [ ] key of this machine to select the destination, and then press the [Enter] key of this machine.
The web browser opens and displays the selected video conference system.
Keywords can be up to 100 characters in length.•
7

8
Connecting to an Unregistered Destination
If you specify the URL of a conference system that you want to use when you set up the machine, you can display the specied page by only
pressing [Manual Entry]. Following this, enter the destination information directly on that page to connect to a meeting.
To specify or change the page to be displayed when you press [Manual Entry], use Default Application Management, in Settings.•
1. Select the [Manual Entry] button.
You can also use [ ] and [ ] keys of this machine to select [Manual Entry], and then press the [Enter] key of this machine.
The web browser opens and displays the selected video conference system.
Sharing the Computer Screen
Connecting the machine to your computer via a USB cable and using Screen Share allows you to share the screen displayed on your computer to
the other participants.
If the video conference system that you are using does not support the “Screen Share” function via a browser, the screen•
cannot be shared.
1. ConnecttheUSBcabletotheUSBport(typemicro-B)onthismachine.
2. ConnecttheAconnectorendoftheUSBcabletotheUSBport(typeA)onthecomputer.
3. Start the Screen Share software.
Sharing Your Windows Screen
The Screen Share software on your computer starts automatically.
If it does not start automatically, open "Computer" on your computer, right-click [PC Screen Share], and then click [Start PC Screen Share].
Sharing Your Mac OS X Screen
1. Start Finder.
2. Click [Unied_Communication_System] in "DEVICES".
3. Click [mac].
If the Finder display is set to icon view, double-click [mac].
4. Double-click [Screen Share].
4. Click [Start Sharing].
5. Start screen sharing on the video conference system to be used.
Select “Ricoh Screen Share” as a shared application.
For operation instructions, refer to the help for the video conference system to be used.
To stop sharing your computer screen, click [Stop Sharing].
Ending the Meeting
1. Press the [Disconnect] key of this machine.
The browser closes.
2. Press the [Power] key to turn this machine off.
3. Select [OK].
The power of the machine is turned off.

9
Changing the Machine Settings
Change the machine settings according to the environment in which the machine is used.
Forchangingthenetworksettings,askthenetworkadministratoraboutwhichsettingsneedtobespeciedinwired/•
wireless network settings, and then enter the correct values.
1. Press the [Menu] key.
2. Select the setting menu you want to change.
DTQ002
1
2
3
4
5
6
7
8
9
10
1. Regionand
Language Settings
Used to change the region or language.
2. Date and Time Used to change date, time, or timezone.
3. Wired Network
Settings
Used to change the wired network settings.
4. Connect to an
Access Point
Used to change the access point.
5. Manage Wireless
Networks
Used to change the wireless network settings.
6. Proxy Server
Settings
Used to change the proxy server settings.
7. ImportCerticate Used to add or change a certicate.
If you change the location or network where you use the machine, you may need
to add or change a certicate, depending on the new network environment.
If the network environment requires a certicate, use a USB ash •
drive to download the certicate from your computer.
8. System Settings Used to change the system settings.
Update system from the network on startup•
If this check box is selected, the machine will check the server for system
updates when it starts up. If an update is available, the system will be
updated via the network. Follow the instructions on the screen to update
the system les.
Connection Test•
Used to test whether the machine can connect to the system update server.
If your network environment requires proxy server authentication, a
dialog box prompting for authentication is displayed.
System update from USB memory•
Used to update the system les downloaded on your computer.
Store the system les in a USB ash drive, and then insert it into this
machine. Follow the instructions on the screen to update the system les.
Collect Log•
Used to collect the logs.
Insert a USB ash drive, and then follow the instructions on the screen
to collect and save the logs.
9. Added Data
Management
Used to managing Address Book. For details, see "Managing Address Book"
and "Changing Background Image".
10. Default
Application
Management
Select the application that you want to display when the machine starts up.
AddressBook(ThisMachine)•
Displays Address Book.
If you select Address Book, specify the URL of the page to be displayed
when you press [Manual Entry].
My Meeting Video•
Displays My Meeting Video using the RICOH UCS Advanced service.
For details about the RICOH UCS Advanced service and My Meeting
Video, see "Connecting to the RICOH UCS Advanced Service".
Browser(StartupPage)•
Displays the specied page in the web browser
If you select Browser, specify the URL of the page to be displayed.

10
Managing Address Book
Preparing Address Book
You must rst create a text le that contains the destination list.
Create a text le (.txt) with tab-separated values and enter the destination address in accordance with the following format.
File name:
Format rucs-addrbook-*.txt
Example rucs-addrbook-20160101.txt
Destination address:
Format Label line: name<tab>url
2nd and subsequent lines: destination name<tab>destination URL
Example name url
Room1 https://url1.com/
Room2 https://url2.com/
To transfer the Address Book le to this machine, save the text le to a USB ash drive.
The destination name is a name displayed in the Address Book application of this machine.•
A destination name can contain one or more spaces. If there is a blank line that only contains spaces and the like, that line and •
succeeding lines are not registered.
If there is no destination registered in Address Book, a text le only containing a label line is exported. You can enter destinations into the •
text le for use.
To change a specic destination, export the Address Book le, edit or delete the destination line in the le, and then import the edited le •
into the machine.
When you import a new Address Book le, any existing Address Book les will be deleted.•
To clear the entire contents of Address Book, import an Address Book le that only contains a label line.•
If there are more than 1000 items in the le, only the rst 1000 items will be imported.•
Import Address Book
1. InserttheUSBashdrivecontainingtheAddressBookleintothismachine.
2. Press the [Menu] key.
3. Select [Added Data Management].
4. Select [Import] of “Address Book”.
5. Selectthetextleyouwanttoimport,andthenselect[Import].
If the Address Book le has been imported successfully, a conrmation message is displayed.
6. Select [Close].
7. Select[Done(SaveSettingsandRestart)].
The machine restarts automatically.
If an error message is displayed, check the destination addresses in the le and check the le name to make sure they are correct.•

Export Address Book
1. InsertaUSBashdriveintothismachine.
2. Press the [Menu] key.
3. Select [Added Data Management].
4. Select [Export] of “Address Book”.
If Address Book is exported successfully, a message will be displayed.
5. Select [Close].
Changing Background Image
You can change the background image in Address book.
To do so, save the image you want as a JPEG le on a USB ash drive.
When you import a new background image le, any existing image le is deleted.•
Import Background Image
1. InserttheUSBashdrivecontainingtheJPEGleyouwantintothismachine.
2. Press the [Menu] key.
3. Select [Added Data Management].
4. Select [Import] of “Background Image”.
5. Selecttheimageleyouwanttoimport,andthenselect[Import].
If the background image is imported successfully, a message will be displayed.
6. Select [Close].
7. Select[Done(SaveSettingsandRestart)].
The machine restarts automatically.
Delete Background Image
If the existing background image is deleted, the background of Address Book is reset to the factory setting.
1. Press the [Menu] key.
2. Select [Added Data Management].
3. Select [Delete] of “Background Image”.
4. Select [Delete].
5. Select[Done(SaveSettingsandRestart)].
The machine restarts automatically.
11

EN GB EN US
© 2016 Ricoh Co., Ltd.
Printed in Japan
E0A5-7015
12
Trademarks
Mac OS, MacBook and Mac Book Pro are trademarks of Apple Inc., registered in the United States and other countries.
Microsoft, Windows, Windows Vista, and Windows 7 Embedded Standard are either registered trademarks or trademarks of Microsoft Corpora-
tion in the United States and/or other countries.
The proper names of the Windows operating systems are as follows:
The product names of Windows Vista are as follows:•
Microsoft®Windows Vista®Ultimate
Microsoft®Windows Vista®Business
Microsoft®Windows Vista® Home Premium
Microsoft®Windows Vista®Home Basic
Microsoft®Windows Vista® Enterprise
The product names of Windows 7 are as follows:•
Microsoft®Windows® 7 Home Premium
Microsoft®Windows® 7 Professional
Microsoft®Windows® 7 Ultimate
Microsoft®Windows® 7 Enterprise
The product names of Windows 8 are as follows:•
Microsoft®Windows®8
Microsoft®Windows® 8 Pro
Microsoft®Windows® 8 Enterprise
The product names of Windows 8.1 are as follows:•
Microsoft®Windows®8.1
Microsoft®Windows® 8.1 Pro
Microsoft®Windows® 8.1 Enterprise
The product names of Windows 10 are as follows:•
Microsoft®Windows® 10 Home
Microsoft®Windows® 10 Pro
Microsoft®Windows® 10 Enterprise
Other product names used herein are for identication purposes only and might be trademarks of their respective companies. We disclaim any and
all rights to those marks.
Other manuals for P3500M
2
This manual suits for next models
1
Table of contents
Other Ricoh Conference System manuals
Popular Conference System manuals by other brands

Eaton
Eaton SmartWire-DT Application

Jabbla
Jabbla Tellus 6 operating instructions

LY International Electronics
LY International Electronics H-9500 Series Installation and operating manual

AINA
AINA PTT Voice Responder quick guide

Yamaha
Yamaha ProjectPhone PJP-100H owner's manual

Tenveo
Tenveo ALL-IN-ONE manual

scope
scope DataTrack 20 Installation and user manual

Grandstream Networks
Grandstream Networks GXV34 0 Series user guide

AT&T
AT&T MERLIN LEGEND Release 2.0 MLX Queued Call... Operator's guide

Beck
Beck com.tom BASIC 5.2 Startup guide

Clear One
Clear One XAP 400 datasheet

Aethra
Aethra vega X3 Technical specifications