EnglishDeutsch
 logo
Brands
  1. Home
  2. •
  3. Brands
  4. •
  5. Saxby Lighting
  6. •
  7. Lighting Equipment
  8. •
  9. Saxby Lighting 97818 User manual

Saxby Lighting 97818 User manual

Other Saxby Lighting Lighting Equipment manuals

Saxby Lighting Sight Plus 72638 Manual

Saxby Lighting

Saxby Lighting Sight Plus 72638 Manual

Saxby Lighting Regen Manual

Saxby Lighting

Saxby Lighting Regen Manual

Saxby Lighting Hero CCT User manual

Saxby Lighting

Saxby Lighting Hero CCT User manual

Saxby Lighting RULAR CCT User manual

Saxby Lighting

Saxby Lighting RULAR CCT User manual

Saxby Lighting 75145 Manual

Saxby Lighting

Saxby Lighting 75145 Manual

Saxby Lighting 13801 User manual

Saxby Lighting

Saxby Lighting 13801 User manual

Saxby Lighting E27 LED GLS Manual

Saxby Lighting

Saxby Lighting E27 LED GLS Manual

Saxby Lighting Orion20 User manual

Saxby Lighting

Saxby Lighting Orion20 User manual

Saxby Lighting EL-20079 Manual

Saxby Lighting

Saxby Lighting EL-20079 Manual

Saxby Lighting 75272 Manual

Saxby Lighting

Saxby Lighting 75272 Manual

Saxby Lighting 73666 Manual

Saxby Lighting

Saxby Lighting 73666 Manual

Saxby Lighting 14008 User manual

Saxby Lighting

Saxby Lighting 14008 User manual

Saxby Lighting Axial Rectangular User manual

Saxby Lighting

Saxby Lighting Axial Rectangular User manual

Saxby Lighting 46393 Manual

Saxby Lighting

Saxby Lighting 46393 Manual

Saxby Lighting Icarus Twin Wall EL-40054 Manual

Saxby Lighting

Saxby Lighting Icarus Twin Wall EL-40054 Manual

Saxby Lighting Albus CCT User manual

Saxby Lighting

Saxby Lighting Albus CCT User manual

Saxby Lighting 43810 Manual

Saxby Lighting

Saxby Lighting 43810 Manual

Saxby Lighting 43787 Manual

Saxby Lighting

Saxby Lighting 43787 Manual

Saxby Lighting 43810 Manual

Saxby Lighting

Saxby Lighting 43810 Manual

Saxby Lighting HeroPro CCT Emergency User manual

Saxby Lighting

Saxby Lighting HeroPro CCT Emergency User manual

Saxby Lighting Odyssey Spike User manual

Saxby Lighting

Saxby Lighting Odyssey Spike User manual

Saxby Lighting 72641 Manual

Saxby Lighting

Saxby Lighting 72641 Manual

Saxby Lighting 76768 Manual

Saxby Lighting

Saxby Lighting 76768 Manual

Saxby Lighting 75930 User manual

Saxby Lighting

Saxby Lighting 75930 User manual

Popular Lighting Equipment manuals by other brands

Brizo 8SP-MU-4 manual

Brizo

Brizo 8SP-MU-4 manual

LUCE&LIGHT BROM 1.0 installation instructions

LUCE&LIGHT

LUCE&LIGHT BROM 1.0 installation instructions

IKEA BJÖRKSPIREA manual

IKEA

IKEA BJÖRKSPIREA manual

Laserworld Evolution Series ES-400RGB manual

Laserworld

Laserworld Evolution Series ES-400RGB manual

EuroLite LED B-40 user manual

EuroLite

EuroLite LED B-40 user manual

Qazqa Suplux SL 3 Black 103062 instruction manual

Qazqa

Qazqa Suplux SL 3 Black 103062 instruction manual

Commercial Electric 54568141 Use and care guide

Commercial Electric

Commercial Electric 54568141 Use and care guide

CREE LIGHTING 304 Series installation instructions

CREE LIGHTING

CREE LIGHTING 304 Series installation instructions

Goobay 49867 user manual

Goobay

Goobay 49867 user manual

ECOMAN ITALIA LED T8 instruction manual

ECOMAN ITALIA

ECOMAN ITALIA LED T8 instruction manual

Alkalite Krypton KT-81 user manual

Alkalite

Alkalite Krypton KT-81 user manual

Clas Ohlson GU10 manual

Clas Ohlson

Clas Ohlson GU10 manual

DTS DELTA 10 F user manual

DTS

DTS DELTA 10 F user manual

ring Solar Steplight manual

ring

ring Solar Steplight manual

One Stop Gardens 57696 Owner's manual & safety instructions

One Stop Gardens

One Stop Gardens 57696 Owner's manual & safety instructions

SIREM Swimeo A2 instructions

SIREM

SIREM Swimeo A2 instructions

Silvair MESH-CEDRP quick start guide

Silvair

Silvair MESH-CEDRP quick start guide

S&P PCRL80 manual

S&P

S&P PCRL80 manual

https://manuals.online logo
https://manuals.online logoBrands
  • About & Mission
  • Contact us
  • Privacy Policy
  • Terms and Conditions

Copyright 2026 Manuals.Online. All Rights Reserved.

www.saxbylighting.com
Instruction manual
97818
Emergency LED Conversion Kit Self Test
Battery Replacement
We recommend cleaning with a soft dry cloth. Do not use solvents or abrasive cleaners as these could damage the finish.
For your safety, always switch off the power supply before cleaning.
Care and Safety
Technical data
220-240 V~, 50 Hz
Supply
Voltage:
If after routine operation check, the lamp does not remain lit for the three hour period, a new battery pack may be required.
• Switch off the electricity at the mains, both switched and permanent supply.
• Allow batteries to fully discharge then reconnect to supply and allow to charge for 24 hours.
• Test again for 3 hours, if light does not remain lit change the battery pack as follows:
- Disconnect from the mains supply both permanent and switched supply.
- Undo the cover on the back of the product.
- Unplug the battery lead from the lead coming.
- Remove the battery pack and lift the battery pack out of the fitting. Waste electrical products should not be disposed of
with household waste. Please recycle where facilities exist. Check with your local authority or retailer for recycling advice.
- Replace the battery with a LiFePO4 6.4V 1500mAh only. Use of a different type of battery will damage the product.
- Write current date on the new battery pack.
- Fit new battery pack in position.
- Plug battery pack into circuit board.
- Close and secure cover on the back of the product.
- Restore power and allow to charge for 24 hours.
- Perform full operation check and update test record.
Conformity with all relevant EC Directive requirements.
The power supply is Double Insulated and does not require connection to an Earth circuit.
Waste electrical products should not be disposed of with household waste. Please recycle where facilities
exist. Check with your Local Authority or local store for recycling advice.
Live Voltages may be present in this unit even when turned off or when completely disconnected.
Conformity with all relevant UKCA Directive requirements.
V1 28/07/2021
EU Manufacturer: 1 Gnarrenburg, 27442
UK Manufacturer: BH17 7BY
Duration: 3 hours (180 minutes)
Operating Temperature: -20ºC to 45ºC
Maximum Operatin Humidity: 10-90%
Output: 9-80VDC - 3W Maximum
Charge Current: 100mA
This product is rated at IP20.
IP
20
Battery Current: 1.5A Maximum
Change over Time: Approximately 1s
Battery Specification: LiFePO4 6.4V 1500mAh
Battery Charge Time: 24 hours
Battery warranty: 2 years
Warning
Please read these instructions carefully before commencing any work
This Emergency pack must be fitted by a competent and qualified electrician.
Install in accordance with the IEE Wiring regulations and current Building Regulations.
Please Note: The limited warranty shall be deemed null and void in the following circumstances: Failure by the installer, end
user or any third party to exercise caution to protect any covered product or part from outside damage, adverse temperature
(normal operating ambient temperature 0 - 25°C), humidity conditions, fluctuations in the electrical system or physical abuse
as well as failure related to workmanship in the installation of the products or parts.
These products are designed for connection to a 220-240V~50Hz supply.
Check the pack and make sure you have all the parts listed.
To prevent electrocution switch off at the mains supply before installing or maintaining this fitting. Ensure other persons
cannot restore the electrical supply without your knowledge.
This Emergency pack is suitable for indoor use only.
If replacing an existing fitting, make a careful note of the connections.
Do not use Megger or similar high voltage instruments. Due to the fact this Emergency pack contains electronic components
that maybe damaged by high test voltages, they must be disconnected from the circuit before testing.
To prevent damage to the Emergency pack, do not mix with conventional magnetic ballasts on the same electrical circuit.
Any faulty, broken or damaged modules should be replaced immediately.
Waste electrical products should not be disposed of with household waste. Please recycle where facilities exist. Check with
your local authority or retailer for recycling advice.
Thank you for purchasing this light fitting. Please read the instructions carefully before use to ensure safe and satisfactory
operation of this product. Please retain these instructions for future reference.
This light fitting is double insulated and does
not require connection to an Earth circuit.
Check that...
• You have correctly identified the wires.
• The connections are tight.
• No loose strands have been left out of the connection block.
Familiarize yourself with the installation procedure and ensure the power is safely isolated before installing the Emergency pack.
Ensure the LED luminaire is within the specification 9-80VDC.
Installation
Existing fittings must be completely removed before installation of a new product. Before removing the existing fitting, carefully
note the position of each set of wires.
Note that the switch is turned off before installation.
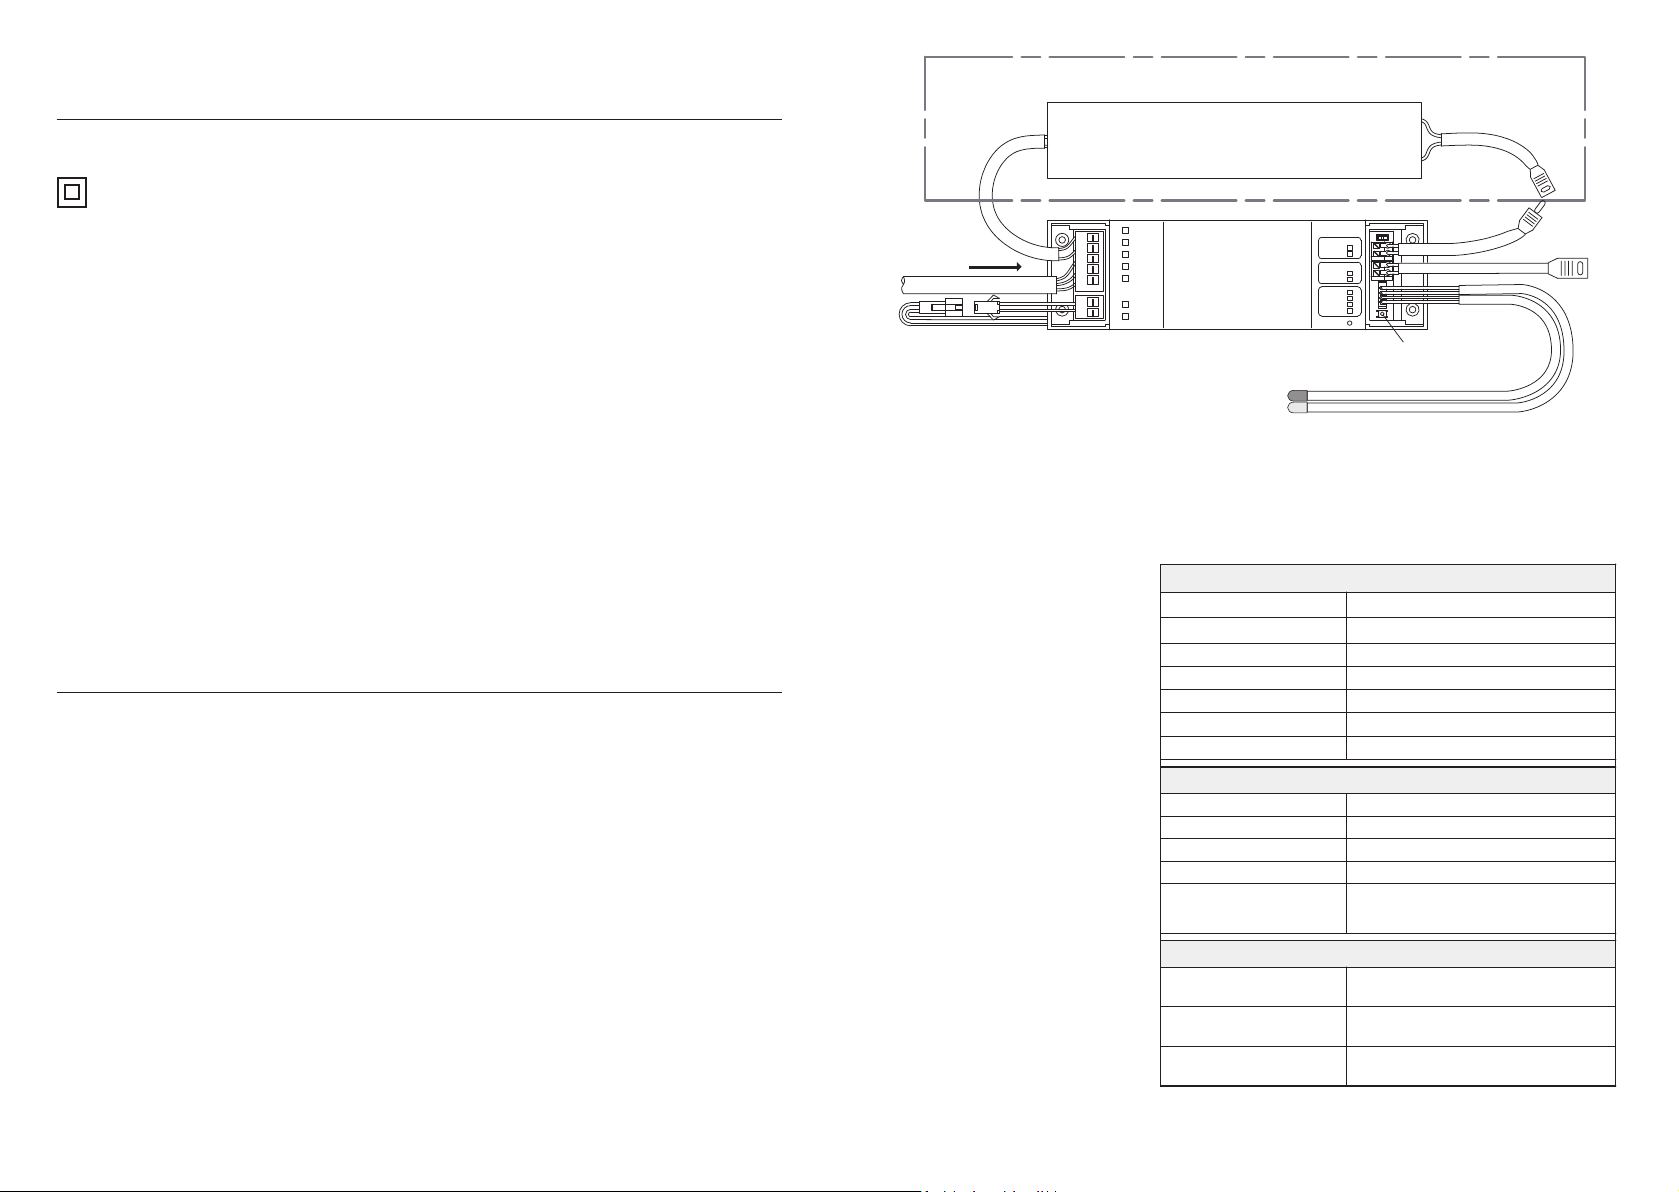
Wire as required below (Fig.1):
Non-Maintained Emergency:
Connect the mains input Unswitched Live (PL), Neutral (N). The low voltage side just requires output to the LED luminaire
positive (+) and negative (-). Then connect the battery. Install the LED indicators in a suitable location.
Maintained Emergency:
Connect the mains input Unswitched Live (PL), Neutral (N) and Switch Live (SL). Connect the Live out (LD) and Neutral out
(ND) to the driver mains input. The low voltage side connect the output from the LED driver to the LED Driver output (+) and
Negative (-) luminaire output to the output to LEDs positive (+) and negative (-). Then connect the battery. Install the LED
indicators in a suitable location.
Please note: For manual testing purposes a provision is made inside the cover of the low voltage side of the driver
(Fig.1) marked as Test on the casing. See overleaf for details on manual testing.
Turn on the power and ensure that the module is showing charge indicator.
This fitting requires a minimum 24 hours initial charge period prior to any manual emergency testing.
The battery has a rated duration of at least 4
years but should be replaced if the duration
of operation is less than 3 hours after a 24hr
charge time with no interrupted supply.
All full duration tests should be where
possible be undertaken at times of low risk
adjacent emergency luminaires we
recommend that you you reset the inbuilt
timer or run a manual 30 day test to stagger
testing times. Once commissioned fill in the
date of the first test/install date this will
allow the end user to monitor and record
subsequent test information on the supplied
report. All tests with the exception of the
visual inspection will be completed
automatically including battery charge
condition and lamp status.
L
N
N
SL
PL
BAT -
BAT +
Test
G+
G-
R+
R-
+
-
+
-
Output to LEDs
LED Driver output
Output to LED
Luminaire
N
L
-
+
Output
to LED
LED Driver
240VAC
Input
Input from mains
supply
Battery connector
Red/Green Status LED
Maintained Emergency optional wiring
Manual Test Button
D
D
Daily:
The battery in this product has self testing
function. Visual inspection of the battery
charge LED as below:
Automatic Monthly (Every 30 Days):
(in addition to the daily check)The results of
the short duration test shall be recorded.
Automatic Annually (Every 180 & 360
Days): (in addition to the daily check)
The results of the full duration tests shall
be recorded.
Manual Testing - Can only be completed under mains conditions
Manual Simulated Power Failure
Manual 30 Day Test
Manual 180/360 Day Test
Manual Fast Test (24 minutes)
Hold test button until you hear 1 beep
Hold test button until you hear 2 beeps
Hold test button until you hear 3 beeps
Hold test button until you hear 4 beeps
Abort Test
Hold the test button for 15 seconds, when you
hear the long sound, the self-test function will
restore the defaults
Fault Indicators:
Red LED flashing once a second, Green LED off,
Beeps twice every minute until fault rectified
Red LED flashing twice a second, Green LED off,
Beeps twice every minute until fault rectified
Battery/Charging Fault
Lamp Fault
Failed Duration Test Red LED solid, Green LED off, Beeps twice every
minute until fault rectified
Performance Indicators:
Normal Operation
Automatic 30 Day Test
Automatic 180/360 Day Test
Manual Simulated Power Failure
Manual 30 Day Test
Manual 180/360 Day Test
Manual Fast Test (24 minutes)
Red LED off, Green LED Solid
Red LED off, Green LED flashing once a second
Red LED off, Green LED flashing twice a second
Red LED off, Green LED off
Red LED off, Green LED four times a second
Red LED off, Green LED flashing once a second
Red LED off, Green LED flashing twice a second