Thankyouforpurchasingthislightfitting.Pleasereadtheinstructionscarefullybeforeusetoensuresafeand
satisfactoryoperationofthisproduct.Pleaseretaintheseinstructionsforfuturereference.
Warning
This light fitting is Class 1 and must be connected to
an Earth circuit
Pleasereadtheseinstructionscarefullybefore
commencinganywork.
Thisunitmustbefittedbyacompetentandqualified
electrician.
InstallinaccordancewithIEEWiringregulationsand
currentBuildingRegulations.
Topreventelectrocutionswitchoffatmainssupply
beforeinstallingormaintainingthisfitting.Ensure
otherpersonscannotrestoretheelectricalsupply
withoutyourknowledge.Ifyouareinanydoubt,
pleaseconsultaqualifiedelectrician.
Thislightfittingshouldbeconnectedtoacircuitwitha
30mARCDfitted.
Ifreplacinganexistingfitting,makeacarefulnoteof
theconnections.
Thissystemcontainsnon-replaceablepartsand
cannotbeserviced.Ifdamageoccursthepartshould
bescrapped.
Wasteelectricalproductsshouldnotbedisposedof
withhouseholdwaste.Pleaserecyclewherefacilities
exist.Checkwithyourlocalauthorityorretailerfor
recyclingadvice.
ThisproductisratedatIP44.
Thisproductisnotsuitablefordimming.
Thisproductisnotsuitableforlocationinorneara
marineorseaenvironment.
Specification
Voltage: 220-240V~50Hz
Lamp: 2x10WLEDModule
IPrating: 44
Layout
• Avoidmountingonsurfacessubjecttovibration,as
thismayaffectthePIRsensor.
• Toavoiddamagetotheunit,donotaimthesensor
towardsthesunorareasofstrongelectro-magnetic
disturbances.
• Toavoidnuisancetriggering,thesensorshouldbe
aimedawayfromheatsources,suchasBBQ’s,
Air-Conditioners,otheroutsidelighting,movingcars
andflueventsorreflectivesurfacessuchassmooth
whitewallsorswimmingpools.
• Whenselectinglocation,itisadvisabletonotethat
movementacrossthesensorsfieldismoreeffective
thantowards/awayfromit.
•Planthedesiredlayoutofthisfittingcarefully,ensuring
thecableswillreachthedistancebetweenthejunction
boxandthelightfitting
•Avoidlocatinganycablesinpositionsthatwould
causeahazard.Positioncablesandjunctionboxes
(notsupplied)awayfromareaswheretheymaybeat
riskfrombeingcut,trappedordamaged
•Cablesinwallsmustbeprotectedusingsuitable
conduitorplastictrunking.
•Themainssupplycablemusthaveaminimumcross
sectionalareaof1.0mm²
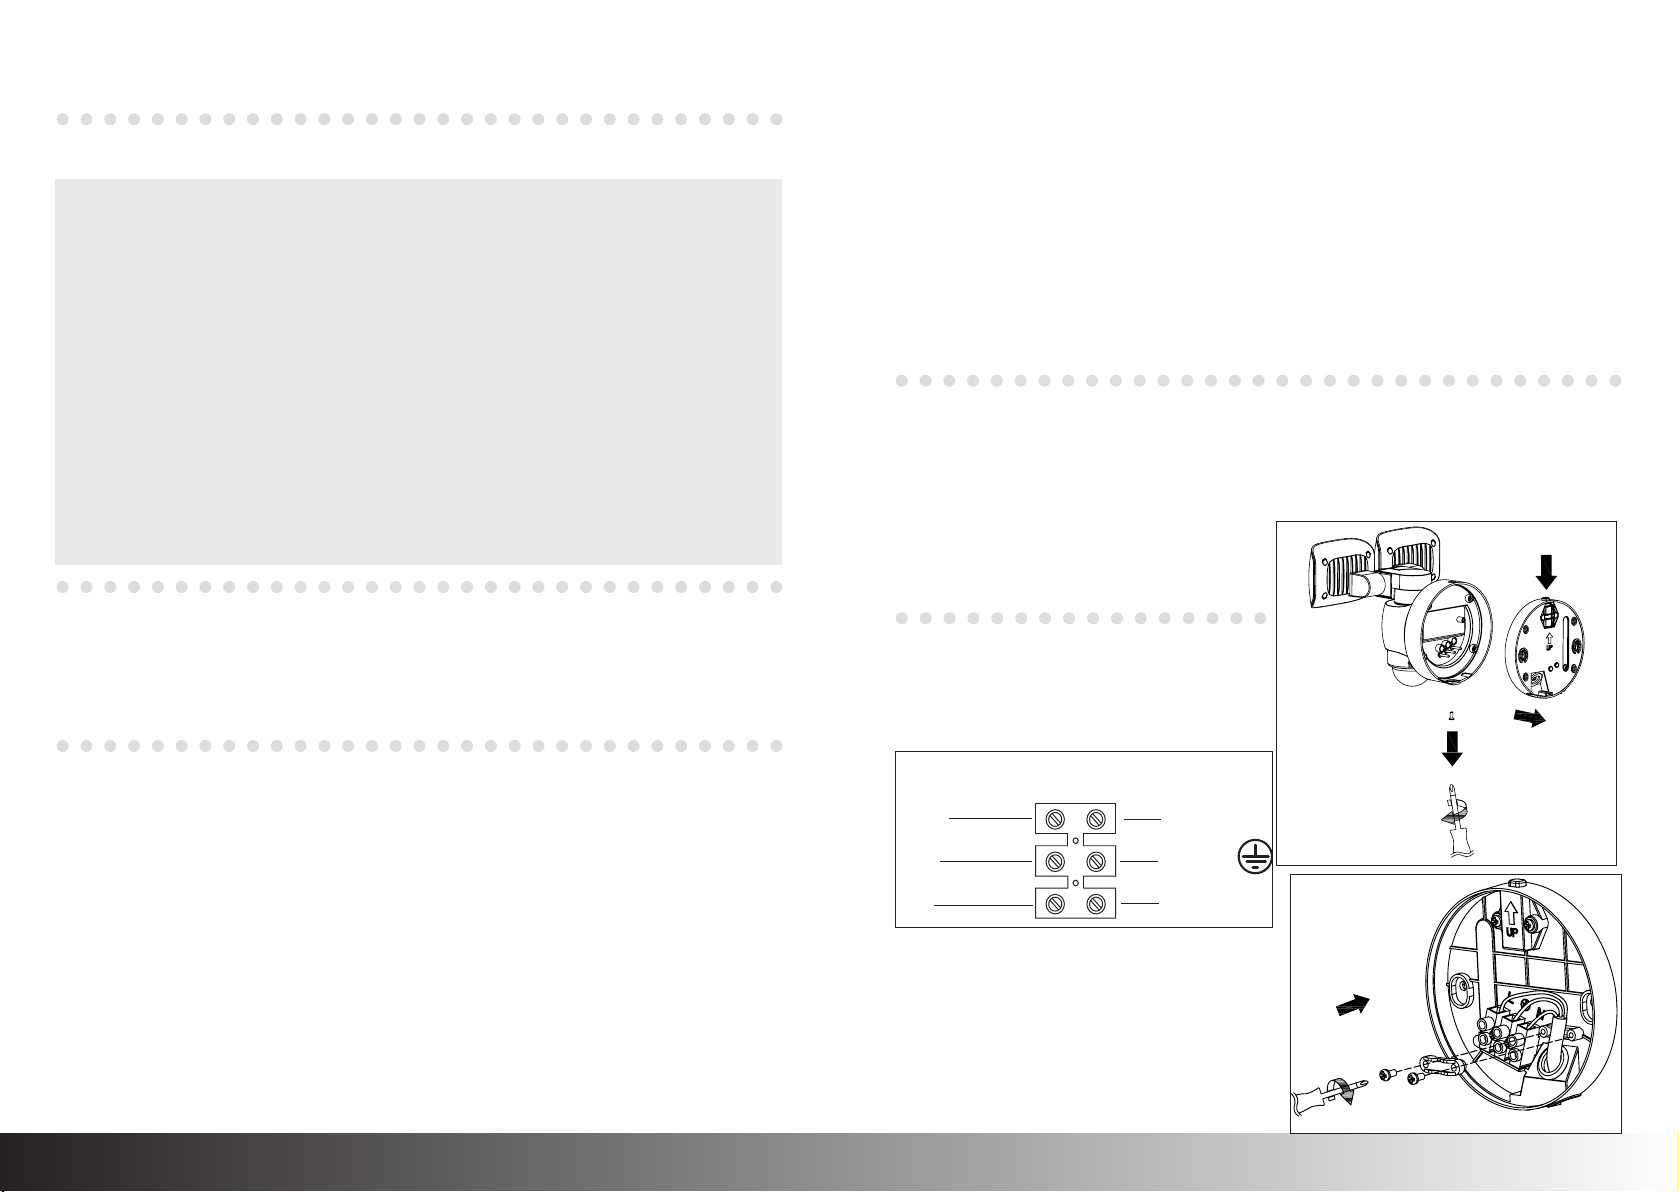
• Decideontheoptimumlocationfortheproduct.Ensurethewalliscapableofholdingtheweightoftheproduct.
• Placetheproductinanuprightposition.
• Detachthewallbackbyremovingthescrewfromthebottomoftheproduct.Setscrewasideforrefittinglater
(Fig.1).
•.Pushbuttonontopofproductandremovewallback(Fig.1).
•.Usingthewallbackasatemplate,markanddrillthepositionofthefixingholes.
•.Pullthecablethroughtherubbergrommetinthebackplate.
• Fixthewallbacktothewallusingthescrewsandwallplugs.Takecaretoavoiddamaginganyconcealed
wiringandpipes.Thecorrectfixingsshouldbeusedforbrickorcavitywalls.
• Wireasdetailedbelow.
• Reattachtheproducttothewallbackusingthescrewssetasideearlier.
•Replacefuseorcircuitbreakerandswitchon.
•AdjustthePIRsensorasdetailedbelow.Pleasenotethesensorrotatesforeasyaccesstothecontrols.Linethe
whitedotsupatthefrontoftheproducttoensurethecorrectorientation.
•Gentlyrotatetheangleoftheshadesbyhandtoyour
preferredposition.
• Yourlightisnowreadyforuse.
Installation
Fig. 1
Commissioning
Wiring
• Youhavecorrectlyidentifiedthewires
• Theconnectionsaretight
• Noloosestrandshavebeenleftoutoftheconnectionblock.
• Thecordgripisre-lockedinplace(Fig.2).
Havingcorrectlyidentifiedthewiringfromyourexisting
lightfitting,unscrewthecordgrip(Fig.2),pullthewire
throughtheholeandconnecttotheconnectionblock
insidetheproductinthefollowingway:
Check that...
NEUTRAL
SPARE BLOCK
SWITCHED LIVE
BLUE (N)
SPARE BLOCK
BROWN (L)
SUPPLY LIGHT FITTING
NEUTRAL
EARTH
(GREEN/YELLOW)
SWITCHED
LIVE
BLUE (N)
GREEN/YELLOW
BROWN (L)
SUPPLY LIGHT FITTING
Fig. 2
Push


