SHOEI NEOTEC3 393 User manual

取扱説明書
このたびは SHOEI ヘルメットをお買い上げいただき、誠にありがとうございます。本製品の
機能および注意事項を十分にご理解いただき、より安全に快適なモーターサイクルライフを
送っていただくために、ご使用前に本取扱説明書をよく読んで、記載されている内容を十分に
理解してください。本取扱説明書は、読み終わったあと、いつでも取り出せる場所に保管して
ください。本取扱説明書を紛失したときは、弊社までお問い合わせください。
この取扱説明書の内容は、予告なしに変更する場合があります。
この取扱説明書に使われているイラストは、実際の製品とは異なる場合があります。
この取扱説明書の著作権は、株式会社 SHOEI にあります。無断転載、複製は固くお断りします。
Instructions for use
Thank you for purchasing this SHOEI helmet. Please read this manual carefully before use and
keep it for future reference. This manual contains valuable information to help you understand
the functions of the product and the instructions for use in order for you to enjoy a safety and
comfortable motorcycle life. Your SHOEI dealer can provide a replacement if it is lost.
The contents of this manual are subject to change without notice.
The illustrations in this manual may dier from the actual product.
The copyrights for this manual belong to SHOEI CO., LTD. Reproduction or copying of this
manual without written permission is strictly prohibited.
취급설명서
SHOEI 헬멧을 구매해 주셔서 대단히 감사합니다. 본 제품의 기능 및 주의사항을 충분히 이해
한 후 더욱 안전하고 쾌적한 모터 사이클 주행을 위해 사용하시기 전에 본 취급설명서를 잘 읽
고 기재된 내용을 충분히 이해해 주십시오. 본 취급설명서를 다 읽은 후에는 언제든지 꺼내 볼
수 있는 장소에 보관해 주십시오. 본 취급설명서를 분실했을 때에는 당사로 문의해 주십시오.
이 취급설명서의 내용은 예고 없이 변경될 수 있습니다.
이 취급설명서에 사용된 일러스트는 실제 제품과 다를 수 있습니다.
이 취급설명서의 저작권은 주식회사 SHOEI에 있습니다. 무단 전재, 복제를 엄격히 금지합니다.
Arahan penggunaan
Terima kasih kerana membeli topi keledar SHOEI ini. Baca buku panduan ini dengan teliti
sebelum penggunaan dan simpan buku panduan ini untuk rujukan masa depan. Buku panduan
ini mengandungi maklumat penting bagi membantu anda memahami fungsi produk dan arahan
penggunaan agar anda dapat menikmati kehidupan bermotosikal yang selamat dan selesa.
Wakil atau pengedar SHOEI anda boleh menggantikan buku panduan anda jika buku ini hilang.
Kandungan dalam buku panduan ini adalah tertakluk kepada perubahan tanpa notis.
Ilustrasi dalam buku panduan ini mungkin berbeza daripada produk sebenar.
Hak cipta untuk manual ini milik SHOEI CO., LTD. Pengeluaran semula atau penyalinan buku
panduan ini tanpa kebenaran adalah dilarang sama sekali.
日本語 /English 1-30
/한국어 31-60
Bahasa Melayu 61-90
Printed in Japan 20231026
393
393
* 製品についてのお問い合わせは、お近くのSHOEI正規販売店か下記Webサイトをご覧いた
だき、お問い合わせください。
* For further information, please consult your local SHOEI distributor or dealer.
*
* 자세한 정보에 대한 문의사항은 가까운 SHOEI 판매점에 문의해 주십시오.
* Untuk maklumat lanjut, sila rujuk wakil atau pengedar SHOEI tempatan anda.
株式会社SHOEI
本社・国内営業部
〒110-0016 東京都台東区台東1-31-7
Tel: 03-5688-5180 Fax: 03-3837-8245
SHOEI CO., LTD.
HEAD OFFICE
1-31-7 Taito, Taito-ku, Tokyo 110-0016, JAPAN
Tel: +81 3 5688 5170 Fax: +81 3 3837 8245
www.shoei.com
shoei.com/worldwide/sales.html

1
日本語 /English
1
日本語 English
日本語
最初にお読みください
梱包物の確認
各部の名称
ベンチレーションシステム
フェイスカバーの開閉
チンカーテン
ブレスガード
CNS-3C シールド
CNS-3C シールドの取り扱いに
関するご注意
シリコンオイルの使用方法
デフロスター
サービスツール
QSV-2 サンバイザー
QSV-2 サンバイザーの取り扱いに
関するご注意
反射ステッカー
防曇シート
内装の交換について
内装の取り外し方、取り付け方
内装の取り扱いに関するご注意
NEOTEC3 専用インターコムを
取り付けるときは
その他のご注意
パーツリスト
NEOTEC3 オプションパーツ
English
Read This First 2
Conrm the Packed Items 3
Parts Description 4
Ventilation System 5
Opening and Closing the Face Cover 6
Chin Curtain 7
Breath Guard 8
CNS-3C Shield/Visor 9
Important Notice about Handling
the CNS-3C Shield/Visor 13
Applying Silicone Oil 14
Service Tool 15
Defogger Ventilation System 15
QSV-2 Sun Visor 16
Important Notice about Handling
the QSV-2 Sun Visor 18
Reective Stickers 19
Anti-fog Sheet 20
Replacing Interior Parts 21
Removing and Installing Interior Parts 22
Important Notice about Handling
Interior Parts 26
When Installing the
Dedicated Intercom for NEOTEC 3 27
Other Cautions 29
Parts List 30
NEOTEC 3 Optional Parts 30

32
日本語 /English
この商品はオートバイ用のヘルメットです。
これ以外の目的に使用しないでください。他の目的
でこのヘルメットを使用すると、事故の際、十分な
保護が得られないことがあります。
ヘルメットは、すべての予測可能な高速
および低速の衝撃から着用者を保護する
ことはできません。
頭部の保護能力を最大まで引き出すために、ヘルメッ
トを頭部に適切にフィットさせ、あごひもを顎の下
でしっかりと締め付けてください。また、ヘルメッ
トを頭に固定したときに、十分な周辺視界が確保で
きなければいけません。ヘルメットが大きすぎると、
使用時にヘルメットがずれることがあり、これが原
因で、ヘルメットが事故で外れたり、視界を妨げた
りする可能性があり、けがや死亡の原因となります。
ヘルメットを正しく着用する方法については、「安全
マニュアル」を参照してください。
マニュアルの内容は予告なしに変更されることがあ
ります。
マニュアル内で使用されている図は、実際の製品と
は異なる場合があります。
マニュアルの著作権は株式会社 SHOEI に帰属します。
本書を無断で転載または複製することは、固く禁じ
られています。
製品の梱包箱を開封後、以下の部品や付属物が含ま
れているか確認してください。
1. ヘルメット
2. 防曇シート
3. ブレスガード
4. ヘルメットバッグ
5. 取扱説明書
6. 安全マニュアル
7. E-3 タグ(マレーシア向けのみ)
8. 「SHOEI」ロゴステッカー(2 枚)
9. シリコンオイル
10. 防曇シート用ピン
11. サービスツール
After opening the product box, please conrm that all
parts and accessories are included.
1. Helmet
2. Anti-fog Sheet
3. Breath Guard
4. Helmet Bag
5. Instruction Manual
6. Safety Instructions
7. Warning Label (E-3 tag: for Malaysia only)
8. SHOEI logo stickers (2)
9. Silicon Oil
10. Anti-fog Sheet Pin
11. Service Tool
This product is a motorcycle helmet.
Do not use it for any purposes other than riding
a motorcycle. If you use the helmet for any other
purpose, it may not provide sucient protection in
case of an accident.
No helmet can protect the wearer
against all foreseeable high speed and
low speed impacts.
For maximum head protection, the helmet must t
properly and the retention system must be securely
fastened under the chin. The helmet should allow
sucient peripheral vision when secure on your head.
If your helmet is too large, it may slide on your head
while riding causing your helmet to obstruct your
vision or come o in an accident resulting in personal
injury or death. To learn to properly wear and secure
your helmet, see the booklet “How to Use Your Helmet
Properly” that is packed with your helmet.
The contents of this manual are subject to change
without notice.
The illustrations in this manual may dier from the
actual product.
The copyrights for this manual belong to SHOEI CO.,
LTD. Reproduction or copying of this manual without
written permission is strictly prohibited.
梱包物(箱や緩衝材)は、修理時の送付な
どのためにできるだけ保存されることをお
薦めしますが、廃棄される場合は、法令に
従い正しく処理してください。
We recommend that you save the box and
its cushioning material in case you need to
ship the product or its parts for repair. If you
dispose of these materials, please follow the
proper laws and regulations.
最初にお読みください
日本語
Read This First
English
梱包物の確認
日本語
Conrm the Packed Items
English
145
6 7
WARNING
8910 11
3
2

54
日本語 /English
1. フェイスカバー開閉ノブ
2. フェイスカバー
3. ロア エア インテーク
4. デフロスター
5. シールドロックボタン
6. CNS-3C シールド
7. QSV-2 サンバイザー
8. 衝撃吸収ライナー
9. アッパー エア インテーク
10. シェル
11. シールドベース
12. サンバイザー開閉レバー
13. トップ エア アウトレット
14. バッテリースペース用カバー
15. インターコムベースカバー
16. チンストラップ
17. チンカーテン
1. Face Cover Button
2. Face Cover
3. Lower Air Intake
4. Defogger Ventilation System
5. Shield/Visor Lock Button
6. CNS-3C Shield/Visor
7. QSV-2 Sun Visor
8. Impact Absorbing Liner
9. Upper Air Intake
10. Shell
11. Shield/Visor Base
12. Sun Visor Lever
13. Top Air Outlet
14. Battery Space Cover
15. Intercom Base Cover
16. Chinstrap
17. Chin Curtain
本取扱説明書中で表記される「右」、
「左」は、ヘルメットをかぶった状態
で着用者から見た「右」、「左」に対
応しています。
The terms “right” and “left” in this
manual are from the point of view of a
rider who is wearing the helmet.
6
9 10 11
15
13
3
1
4
12
14
7
8
5
2
17
16
Droite
Gauche
ベンチレーションを開くと、周りの音が大
きく聞こえたり、乗車姿勢によっては風切
り音が発生したりする場合があります。
Opening the vents on the helmet can cause
an increase in noise levels.
各部の名称
日本語
Parts Description
English
ベンチレーションシステム
日本語
Ventilation System
English
Upper Air Intake
アッパー エアインテーク
Lower Air Intake
ロア エアインテーク
Top Air Outlet
トップ エアアウトレット
Right
右
Left
左
開ける
Open
開ける
Open
閉じる
Close
閉じる
Close
ブレスガードなし / With no breath guard
ブレスガードあり / With breath guard
※開閉機構はありません。
Note: There is no manual opening/closing
mechanism for the vents.

76
日本語 /English
フェイスカバーは、ワンタッチで開閉できます。開
くときは、フェイスカバー中央下部のフェイスカバー
開閉ノブを下方に引いてロックを解除したあと、1
段目のストッパーにかかるまで、フェイスカバーを
上げてください。さらに開くときは、2段目のストッ
パーにかかるまで、フェイスカバーを上げてくださ
い。フェイスカバーがストッパーにかかるとき、「カ
チッ」と音がなります。
閉めるときは、ロックが掛かる位置までフェイスカ
バーをゆっくり下ろしてください。
The face cover can be opened and closed with a
single touch. To open the face cover, pull down the
button in the bottom center of the face cover and
release the lock. Lift and rotate the face cover until
you hear a click when the rst stopper engages. The
face cover can be secured in opened position by
continuing to rotate the face cover until it clicks in the
second stopper.
To close the face cover, gently rotate it downward until
you hear a click when the face cover lock engages.
警告 WARNING
z フェイスカバーのストッパーは、開けた状態を完
全に維持する機構ではありません。
フェイスカバーを開けた状態で走行すると、風の
あおりを受け、フェイスカバーが閉じてしまう恐
れがあります。
視界がさえぎられ大変危険ですので、走行時はフェ
イスカバーを閉じ、ロックした状態で使用してく
ださい。
z フェイスカバーを取り外さないでください。フェ
イスカバーやシールドの調整が必要な場合は、お
近くの正規販売店にご相談ください。
z ノブを引いたままフェイスカバーを閉めると、ロッ
クが掛からないことがあります。ロックが掛かっ
ていないと、走行中にフェイスカバーが不意に開
いて思わぬ事故につながる恐れがあります。フェ
イスカバーを閉めたあとは、ロックが掛かってい
るか必ず確認してください。
z ヘルメットを持ち運ぶときは、フェイスカバーを
閉めて、ロックを掛けた状態にしてください。ロッ
クが掛かっていないと、フェイスカバーが開いた
り、ヘルメットを損傷したりする恐れがあります。
z チンカーテンをつかんでフェイスカバーを開閉し
ないでください。チンカーテンが脱落する可能性
があります。
z The face cover stopper is not a locking
mechanism and does not completely hold the
open status.
Riding with the face cover open may create wind
drag, causing the face cover to close.
This may obstruct your view and can be very
dangerous. Always have the face cover closed
and locked while riding your motorcycle.
z Do not remove the face cover from the helmet.
In case of need to adjust the face cover or the
shield/visor, consult your local SHOEI dealer
nearby.
z Do not hold the button while closing the face
cover. This can cause the face cover lock to fail to
engage. A face cover that is not locked may open
unexpectedly during riding and lead to an accident.
After closing the face cover, be sure to check that
it is locked.
z When carrying the helmet, be sure to close the
face cover and check that it is locked. Carrying
the helmet with the face cover unlocked can cause
sudden opening of the face cover and the helmet
may be dropped or become damaged.
z Do not open or close the face cover by grasping the
chin curtain. The chin curtain may come o.
チンカーテンは、装着すると、ヘルメットのあご周
りの風の巻き込みを低減します。また、風切り音の
侵入を低減します。
チンカーテンは取り外しが可能です。取り外し、取
り付けは、下記の方法で行います。
チンカーテンの取り外し方
チンカーテンは、フェイスカバー下端のプレートに
差し込まれ、2 箇所のピンで固定されています。左
右のピン付近のプレートをめくり、チンカーテンの
プレートを貫通しているピンを抜き、チンカーテン
を抜き取ります。取り外しは左右片側ずつ行います。
チンカーテンの取り付け方
図のようにフェイスカバー下端のプレートをめくり、
隙間にチンカーテンのプレートを差し込みます。フェ
イスカバーのプレート内側のピンをチンカーテンの
プレートの穴に差し込みます。取り付けは左右片側
ずつ行います。
Installing the chin curtain restricts the inow of wind
into the chin area. It also reduces the wind noise.
The chin curtain is detachable. Follow the procedure
below to remove and install the chin curtain.
Removing the Chin Curtain
The chin curtain is inserted into the plate at the bottom
edge of the face cover and fastened with two pins.
Refer to the drawing. Lift up the face cover plate
near its right and left pins, and remove the pins that
pass through the chin curtain plate. Pull out the chin
curtain. Remove the chin curtain on both the right and
left sides.
Installing the Chin Curtain
As shown in the drawing, lift up the face cover plate
(at the bottom edge of the face cover) and insert the
chin curtain plate in the space created. There are pins
on the interior side of the face cover plate. Insert them
through the holes of the chin curtain plate. Attach the
chin curtain on both the right and left sides.
警告 WARNING
z チンカーテンを装着すると、周りの車やバイクの
音が、通常より小さく聞こえます。運転時は、特
にご注意ください。
z プレートのピンを抜かずにチンカーテンを強く
引っ張らないでください。チンカーテンやフェイ
スカバー下端のプレートが破損する恐れがありま
す。
z ヘルメットを持ち運ぶときなどに、チンカーテン
を持たないでください。パーツが外れ、ヘルメッ
トが落下して破損する可能性があります。
z With the chin curtain installed, the sound from
nearby vehicles will be reduced. Please be aware
of this while riding.
z Do not pull the chin curtain with the pins in place.
If you do, the chin curtain or face cover plate may
become damaged.
z Do not carry or hold the helmet by the chin curtain.
The chin curtain may come o, and the helmet may
drop.
フェイスカバーの開閉
日本語
Opening and Closing the Face
Cover
English
チンカーテン
日本語
Chin Curtain
English
ピン
Pin

98
日本語 /English
ブレスガードを取り付けると、ロアエアインテークか
らの空気の流れが変わり、口元に風が送り込まれると
ともに、呼吸によるシールドの曇りを軽減します。
ブレスガードの取り付け、取り外しは、下記の方法
で行います。
ブレスガードの取り付け方
図のように、ブレスガードをデフロスターと衝撃吸
収ライナーの隙間に差し込みます。
ブレスガードの取り外し方
デフロスターと衝撃吸収ライナーの隙間から、ブレ
スガードを引き抜きます。ブレスガードを引き抜い
た際、フェイスカバーから窓ゴム裏側が引き出され
てしまうことがあります。その際は窓ゴムをつまみ、
元の状態に戻してご使用ください。
Installing the breath guard changes the airow from
the lower air intake. This directs air around your mouth
and also reduces fogging of the shield/visor caused
by breathing.
Follow the procedure below to install and remove the
breath guard.
Installing the Breath Guard
As shown in the drawing, insert the breath guard in
the space between the defogger ventilation system
and the impact absorbing liner.
Removing the Breath Guard
Pull the breath guard from the space between the
defogger ventilation system and the impact absorbing
liner. When you pull out the breath guard, the back
side of the window beading may come o. If this
happens, grab the window beading between the
thumb and the forenger and return it to its location.
ブレスガード
日本語
Breath Guard
English
ヘルメットを持ち運ぶときなどに、ブレスガードを
持たないでください。パーツが外れ、ヘルメットが
落下して破損する可能性があります。
警告
CNS-3C シールド
日本語
CNS-3C Shield/Visor
English
CNS-3C シールドを完全に下ろすと、ロックが掛かり
ます。
走行時は、このポジションにすることを推奨します
(図 1)。
図 2 のようにシールドロックを解除し、シールドを
少し開けた状態で低速走行することで、ヘルメット
内を換気することができます。
ご購入後はじめてお使いになる際は、シー
ルドから保護フィルムを剥がしてください。
警告
図 2 のようにシールドを少し開けた状態で高速走行
した場合、シールドが不意に開く恐れがあり危険で
す。高速走行時には使用しないでください。
Before using the shield/visor for the rst time
after purchase, remove the protective lm
from the shield/visor.
CNS-3C シールドの開け方
シールドロックボタンを押してロックを解除し、シー
ルドタブを持って、シールドを開けます。
If you pull the CNS-3C shield/visor completely down,
it will be locked.
It is recommended that the shield/visor remains in this
position during touring (Drawing 1).
By riding at a low speed with the shield/visor lock
released and the shield/visor slightly opened as
shown in Drawing 2, air inside the helmet can be
circulated.
Opening the CNS-3C Shield/Visor
Press the shield/visor lock button to release the lock
and open the shield/visor by holding the shield tab.
シールドタブ
Shield/Visor Tab
Shield/Visor Lock Button
シールドロック
ボタン
1 2
WARNING
WARNING
Do not carry or hold the helmet by the breath guard.
The breath guard may come o, causing the helmet
to drop.
Riding at a high speed with the shield/visor slightly
opened as shown in Drawing 2 may cause the shield/
visor to open unexpectedly, which is extremely
dangerous. Do not use the slightly open position when
riding at high speeds.

1110
日本語 /English
CNS-3C シールドの取り外し方
1. シールドを全開の状態(図 1)にします。
2. トリガーを下に引きながら、シールドを下からめく
るように持ち上げてフック A を外します(図 2)。フッ
ク A を外すとフック B も外れます。
3. シールドを軽く下に引いて、フック C をフックレー
ルから外します(図 3)。
4. 反対側も同じ要領で取り外します。
Removing the CNS-3C Shield/Visor
1. Open CNS-3C shield/visor to the fully opened position
(Drawing 1).
2. While pulling the trigger down, lift and turn the shield/
visor upward by holding the bottom edge to release
hook A (Drawing 2). When hook A is released, hook B
is also released at the same time.
3. Pull the shield/visor down lightly and then remove
hook C from the hook rail (Drawing 3).
4. Follow the same procedure to remove the other side.
1
3
2
シールド
Shiled/Visor
Hook C
フック C
フック A
Hook A
フック C
Hook C
フック A
Hook A
トリガー
Trigger
フックレール
Hook Rail
Hook B
フック B
日本語
English
警告
WARNING
フックやギアがシールドベースにはまっていないと、走
行中にシールドが外れ、思わぬ事故を引き起こす可能性
があります。CNS-3C シールド取り付け後は、シールド
の開閉操作を数回繰り返し、フックやギアが確実にはまっ
ているか確認してください。また、シールドを完全に下
ろした状態で、シールドタブがフックに掛かるか確認し
てください。
If the hook and gear are not securely fastened in the shield/
visor base, the shield/visor may come loose while riding
and an accident may unexpectedly occur. After installing
the CNS-3C shield/visor, open and close the shield/visor
a few times to conrm that the hook and gear t securely.
With the shield/visor completely closed, conrm that the
shield/visor tab is clasped by the hook.
CNS-3C シールドの取り付け方
1. シールドを全開状態の位置(図 4)に合わせ、フッ
ク B をシールドベースのギアに押し込みます(図 5)。
2. フック A、フック C の位置を目安にして、それぞれ
のフックを上から押します。「カチッ」という音とと
もにフック A とフック C がフックレールにはまりま
す(図 6)。
3. 反対側も同じ要領で取り付けます。
4. 最後に、シールドのフックおよびギアがシールドベー
スに確実にはまっているか確認します。
Installing the CNS-3C Shield/Visor
1. Adjust the shield/visor to fully opened position
(Drawing 4) and insert hook B into the gear (Drawing 5).
2. Press hooks A and C as per Drawing 6 to x hooks
into the hook rail.
3. Follow the same procedure to install the other side.
4. Conrm that the shield/visor hook and gear t properly
into the shield/visor base.
4
5
6
日本語
English
シールド
Shield/Visor
フック B
Hook B
ギア
Gear
シールド
Shield/Visor
フック C
Hook C
フックレ ー ル
Hook Rail
フック Aフック A
Hook AHook A
トリガー
Trigger

1312
日本語 /English
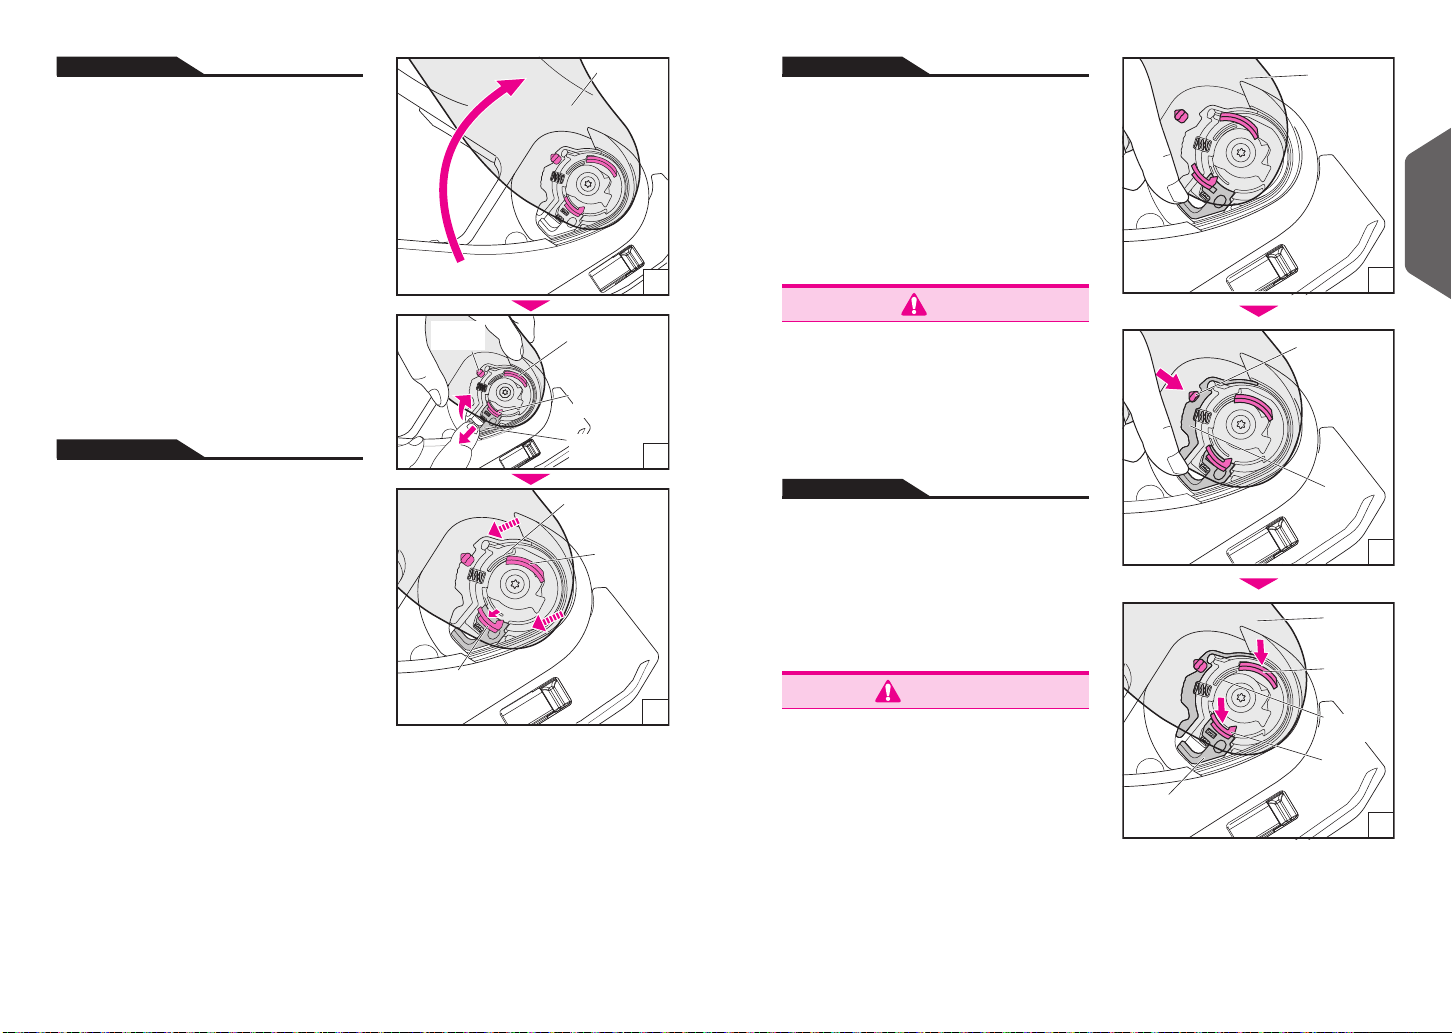
z シールドの汚れや傷は走行中の視界の妨げとなり、
大変危険です。CNS-3C シールドが汚れたり傷が付
いたりしたら、直ちに使用を中止し、取り外して
洗浄するか、交換してください。
z CNS-3C シールドは、水で薄めた中性洗剤で洗い、
真水でよくすすいでから柔らかい布でふき取り、
乾かしてください。40℃を超える湯・塩水・酸性
またはアルカリ性の洗剤・ベンジン・シンナー・
ガソリン・その他の有機溶剤・ガラスクリーナー
など、有機溶剤を含むクリーナー類は使用しない
でください。これらが付着すると、シールドが変
質し、安全性に支障をきたす可能性があります。
z シールドが曇った状態で走行しないでください。
視界が妨げられ大変危険です。CNS-3C シールドが
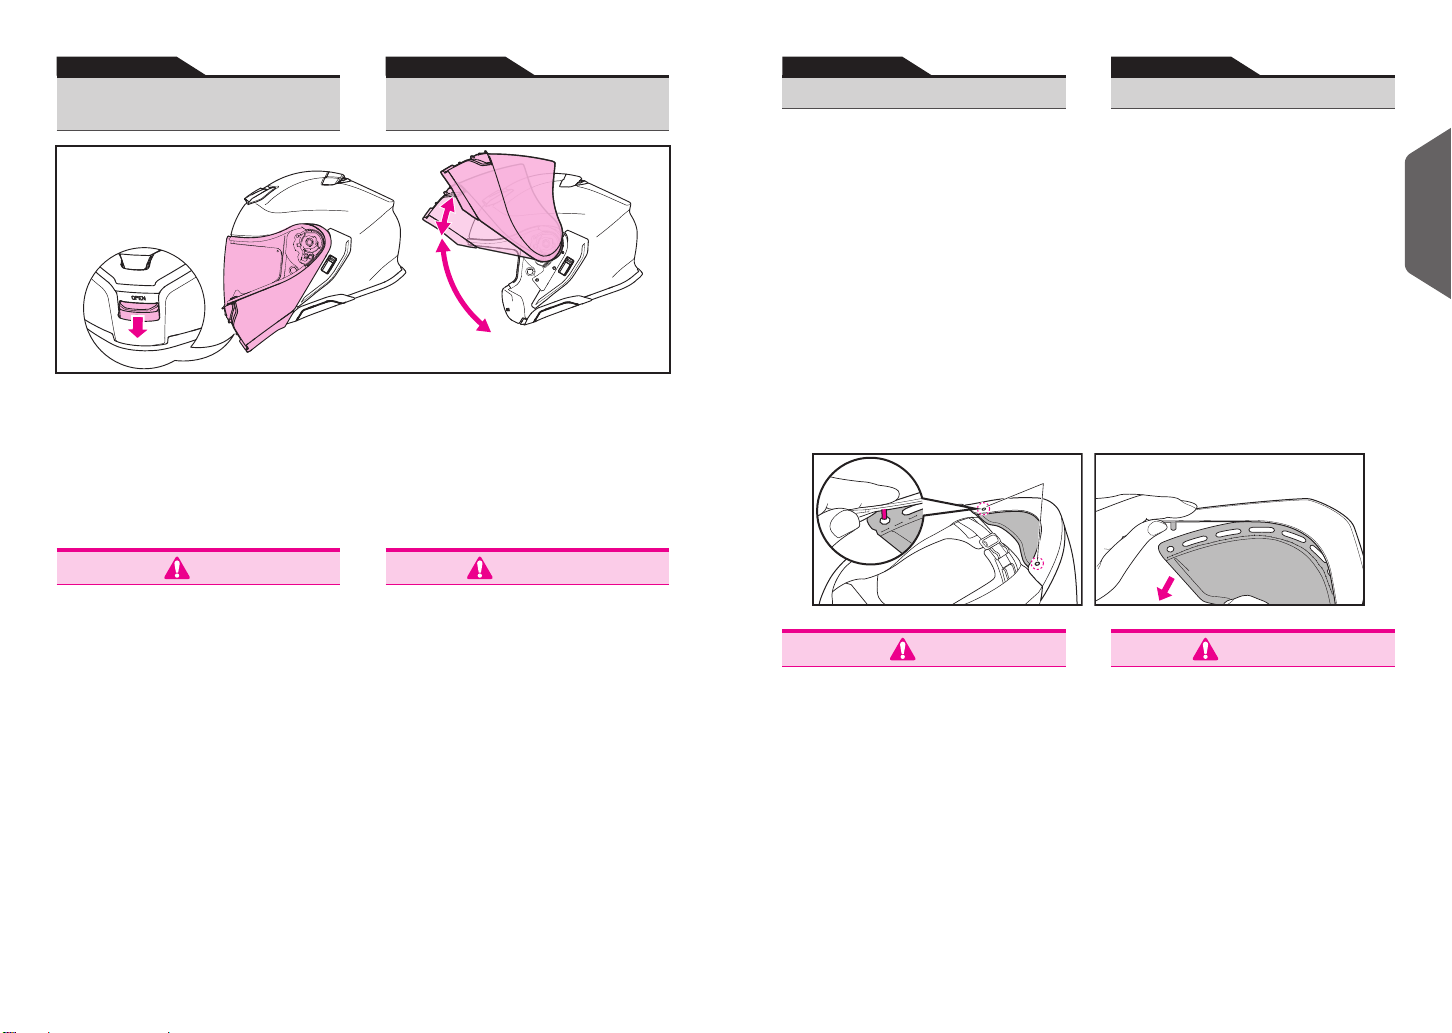
曇った場合、ロアエアインテークを開けたり、シー
ルドを開けたりしてヘルメット内をよく換気し、
シールドの曇りを取り除いてください。また、防
曇シートの使用も、シールドの曇り止めに効果的
です。
z 防曇シートをご使用の場合は、必ず SHOEI 純正品
の防曇シートをご使用ください。取り扱い方法に
ついては、防曇シートに同梱されている取扱説明
書をご覧ください。
z CNS-3C シールドは、保護フィルムをはがして使用
してください。
z CNS-3C シールドの視界に入る位置に、ステッカー
や粘着テープを貼らないでください。
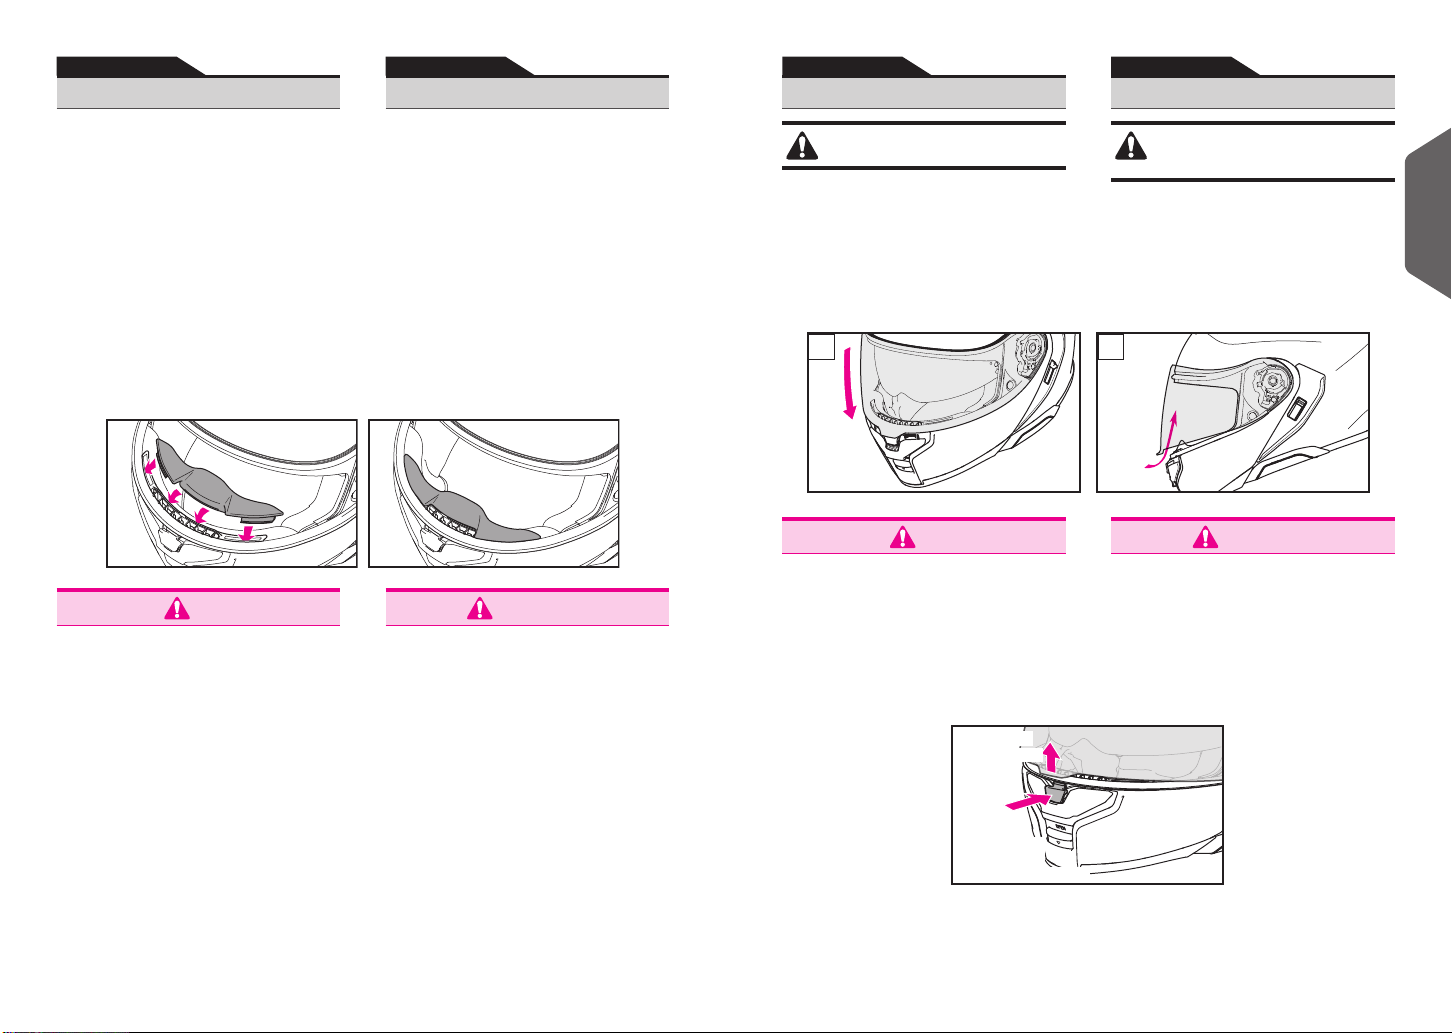
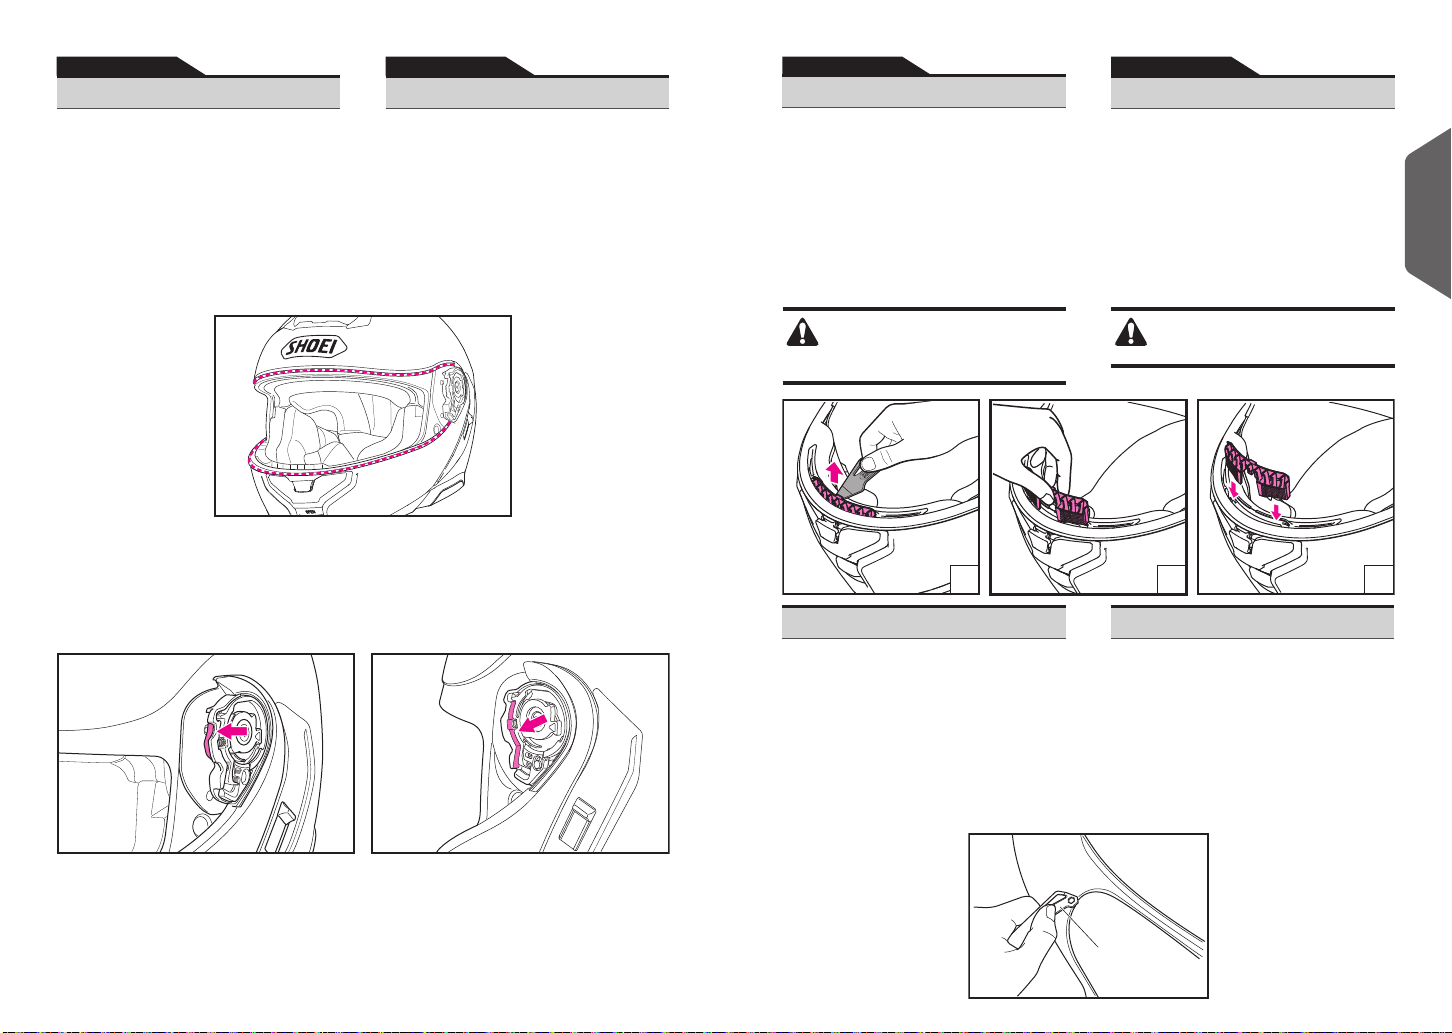
z シールドの開閉の動きが悪くなったり、擦れるよ
うな音がした場合は、窓ゴムにシリコンオイルを
塗布してください。シリコンオイルの塗布箇所に
ついては、「シリコンオイルの使用方法」を参照し
てください。
z Dirt and scratches on the shield/visor may obstruct
your view while riding and can be very dangerous!
If the CNS-3C shield/visor gets dirty or scratched,
stop using it immediately. Remove the shield/visor
and clean or replace it.
z The CNS-3C shield/visor should be cleaned with a
solution of mild, neutral soap and water. Rinse well
with pure water then wipe dry with a soft cloth. Do
not use any of the following cleaning materials:
hot water over 40ºC; salt water; any acidic or
alkali detergent; benzine, thinner, gasoline, or
other organic solvents; glass cleaner; or any
cleaner containing organic solvents. If any
of these cleaners are used, the shield’s/visor’s
chemical nature may be altered and safety may be
hindered.
z Do not ride with a shield/visor that is fogged. This
may obstruct your view and can be very dangerous.
If the CNS-3C shield/visor is fogged, open the lower
air intake to circulate air within the helmet and
remove the fog from the shield/visor. Use of the
anti-fog sheet is also eective in stopping fog.
z Always use SHOEI’s genuine anti-fog sheet for the
applicable shield/visor. For tting the anti-fog sheet,
please read instructions enclosed in it.
z Remove the protective lm before using the CNS-
3C shield/visor.
z Do not place any sticker or adhesive tape in the eld
of vision of the CNS-3C shield/visor.
z If the shield/visor becomes dicult to open or close,
or it makes a rubbing sound, apply silicone oil onto
the window beading. Refer to “Using the Silicone
Oil” for details of the application points.
CNS-3C シールドの取り扱いに
関するご注意
Important Notice about Handling
the CNS-3C Shield/Visor
警告 WARNING
日本語 日本語
English English
このシールドをお使いになる前に、取扱説明書内の
指示や警告を注意深くお読みください。取扱説明書
内の指示や警告に従わずに生じた損害については、
一切その責任を負いません。
z 着色シールド(Dark Smoke)、ミラー加工シール
ド(Spectra)は、ECE R22/06 に規定されている可
視光線透過率の要求を満たしていません。ただし、
日差しの強いサーキットでの長時間の使用では、
認定品と比較して目の疲労を軽減する場合があり
ます。
z 着色シールドや、ミラー加工のシールドは、可視
光線透過率を下げ、ある状況下では視界の妨げと
なり、ケガや死亡につながる事故を引き起こす恐
れがあります。
z 着色シールドや、ミラー加工のシールドは、夜間
やトンネル内、雨天や霧など、視界の悪い環境で
は使用しないでください。これらのシールドは日
中での使用専用です。
z 着色シールドもしくはミラー加工のシールドと、
インナーサンバイザー、サングラスなどの可視光
線透過率を下げる製品は、いずれも併用しないで
ください。視界が妨げられ、大変危険です。
z シールドに、曇り止め効果のある防曇シートを装
着すると、シールドの可視光線透過率が最大で
10% 低下します。
米国内で、着色シールドもしくはミラー加工のシー
ルドを、サンバイザーと併用すると、 VESC-8* に規定
されている可視光線透過率の要求事項が満たされな
くなります。
着色シールドもしくはミラー加工のシールドと、サ
ンバイザーを併用しないでください。視界が制限さ
れ、重傷や死亡につながる事故の恐れがあります。
Read the instructions and warnings in the owner's
manual carefully before using this face shield/
visor. It is your responsibility to ensure that your
use of this shield/visor complies with any state or
local laws.
z The light transmittance ratio of the tinted (Dark
Smoke) and mirrored (Spectra) shield/visor is lower
than the requirement of ECE R22/06. However,
when used for an extended period in strong sunlight
while riding on a circuit, they may alleviate eye
fatigue more eectively compared to homologated
shield/visors.
z Tinted or mirrored shields/visors reduce light
transmittance and may impair a rider’s vision in
certain circumstances, increasing the likelihood of
a crash resulting in injury or death.
z Never use a tinted or mirrored shield/visor at night,
in tunnels, in rain or fog, or in other low visibility
conditions. These shields/visors are intended for
daytime use only.
z Do not use a tinted or mirrored shield/visor together
with the helmet’s internal sun visor, sunglasses or
any other product that reduces light transmittance.
This may obstruct your view and can be very
dangerous.
z When a mist retardant anti-fog sheet is attached
to these shields/visors, the light transmittance ratio
decreases by a maximum of 10%.
If a tinted or mirrored shield/visor is used together
with the sun visor in the U.S.A., the requirement for
the light transmission ratio specied in VESC-8* is
not met.
Do not use the tinted or mirrored shield/visor together
with the sun visor. Otherwise, the restricted vision
caused by the tinted or mirrored shield/visor may lead
to accidents, resulting in serious injury or death.
VESC-8:バイク搭乗者の目の保護に関する車両機器
安全委員会規則第 8 号。この規則は米国 36 の州で、
バイク搭乗者の目の保護具使用に関する法律ととも
に、広く参照・適用されています。 VESC-8: Vehicle Equipment Safety Commission
regulation No. 8 for motorcyclist eye protection
This standard is widely referred to and applied in 36
states in the U.S.A. together with the laws regarding
motorcyclist eye protection.

1514
日本語 /English
シリコンオイルの使用方法
日本語
Applying Silicone Oil
English
シリコンオイルは、ごみやホコリをふき取ってから
塗布し、余分なシリコンオイルはふき取ってくださ
い。常に快適にご使用いただくため、定期的なメン
テナンスをお勧めします。
窓ゴムへのシリコンオイルの使用方法
シールドと窓ゴムの密着性を保つため、点線で示し
た位置に、付属のシリコンオイルを少量塗布してく
ださい。シリコンオイルがシールドに付着すると、
視界の妨げとなる恐れがあるので、余分なシリコン
オイルは必ずふき取ってください。
ギアへのシリコンオイルの使用方法
シールドやフェイスカバーの開閉の動きが悪くなっ
たり、擦れるような音が発生した場合は、図で示し
た位置に付属のシリコンオイルを極少量塗布してく
ださい。
デフロスターフィルターは、取り外してお手入れす
ることができます。
デフロスターフィルターの取り外し方
サービスツールを、デフロスターのリブとシェルの
隙間に差し込み、テコの要領で持ち上げ(図 1)、デ
フロスターフィルターが少し持ち上がったら手で引
き抜いてください(図 2)。
デフロスターフィルターの取り付け方
デフロスターフィルターを、差し込むようにして取
り付けます(図 3)。
Apply the silicone oil after wiping o any dust and dirt.
Also wipe o any excess silicone oil after application.
Regular maintenance is recommended to ensure
continuing comfort when using the helmet.
Applying the Silicone Oil on the Window
Beading
To maintain adhesion between the shield/visor and
window beading, apply a small amount of the supplied
silicone oil along the dotted line. If silicone oil adheres
to the shield/visor, it may impair visibility. Ensure you
wipe o any excess oil.
Applying the Silicone Oil on the Gears
If the shield/visor or face cover becomes dicult to
open or close, or it makes a rubbing sound, apply a
small amount of the enclosed silicone oil on the part
shown in the drawing.
デフロスターフィルターをお手入れする場
合は、柔らかいブラシなどでやさしく擦り
ながら水洗いし、よく乾かしてからヘル
メットに取り付けてください。
1
2
3
サービスツール Service Tool
サービスツールは、以下の場合に使用します。
• デフロスターフィルターの取り外し
(「デフロスター」を参照)
• サンバイザーの取り外し
(「QSV-2サンバイザー」を参照)
• インターコムベースカバーの取り外し
(「NEOTEC3 専用インターコムを取り付けるとき
は」を参照)
• 防曇シートの調整時
(下図を参照)
防曇シートの調整方法については、防曇シートに同
梱の取扱説明書を参照してください。
Service tool is the tool to be used in following cases.
• Removing the Defogger Filter
(Refer to “Defogger Ventilation System.”)
• Removing sun visor
(Refer to “Removing the QSV-2 Sun Visor.”)
• Removing intercom base cover
(Refer to When Installing the Dedicated Intercom
for NEOTEC 3.”)
• Adjusting anti-fog sheet
(Refer to the Drawing.)
When adjusting anti-fog sheet, read the instruction
manual that comes packed with it.
サービスツール
Service Tool
デフロスター
日本語
The defogger lter can be removed for cleaning.
Removing the Defogger Filter
Insert the service tool into the gap between the rib
of the defogger lter and the shell and then lever the
defogger upward (Drawing 1). Once the part is slightly
raised, pull it out by hand (Drawing 2).
Installing the Defogger Filter
Position the defogger lter as shown in the drawing
and then push it into place (Drawing 3).
Defogger Ventilation System
English
To clean the part, gently scrub it with a soft
brush while rinsing with water. Dry the part
well before reinstalling it in the helmet.

1716
日本語 /English
QSV-2 サンバイザー
日本語
QSV-2 Sun Visor
English
QSV-2 サンバイザーの開閉は、シェル左側にあるサンバイザー開閉レ
バーで行います。サンバイザーを開けるときは、図の位置までレバーを
下げきってください。サンバイザーが完全に開いていないと、走行中に
振動などで不意に閉まって視界が妨げられる可能性があり危険です。
QSV-2 サンバイザーの取り外し方
1. フェイスカバーを開きます(「フェイスカバーの開閉」参照)。
2. サンバイザー開閉レバーを上げ、QSV-2 サンバイザーを閉めます(図 1)。
3. サンバイザーを片手で持ち、サンバイザーホルダーとサンバイザー
の間にサービスツールを差し込み、突起部を外し、サンバイザーを
回すように取り外します(図 2)。
4. 反対側も同じ要領で取り外します。
The QSV-2 sun visor can be opened and closed by sliding the sun visor
lever on the left side of the shell. To open the sun visor, pull the lever down
until it stops in the position shown in the drawing. If the sun visor is not
fully open, it may slip down and close unexpectedly during riding due to
vibration or other phenomena and your view may be obstructed.
Removing the QSV-2 Sun Visor
1. Open the face cover. See “Opening and Closing the Face Cover.”
2. Slide up the sun visor lever and close the QSV-2 sun visor (Drawing 1).
3. Hold the sun visor with one hand and insert the service tool between
the sun visor and the sun visor holder. Then, detach the rounded
protrusion and rotate the sun visor in the direction of the arrow to
remove it (Drawing 2).
4. Also remove the opposite side in the same manner.
2
サンバイザーサンバイザー
レバーレバー
Sun Visor Lever
1
サンバイザーサンバイザー
レバーレバー
Sun Visor Lever
サービスツールサービスツール
Service Tool
QSV-2 サンバイザーの取り付け方
1. サンバイザー開閉レバーを上げ、サンバイザーホルダーを下げます
(図 3)。
2. QSV-2 サンバイザーの凸部分 1をホルダーに差し込み、上方に回転
させながらサンバイザーの突起部 2をホルダーの穴に、「パチン」
と音がするまではめ込みます(図 4)。
3. 反対側も同じ要領で取り付けます。
4. サンバイザーに指紋が付いたときは、乾いた柔らかい布で拭き取っ
てください。
Installing the QSV-2 Sun Visor
1. Slide up the sun visor lever and lower the sun visor holder (Drawing 3).
2. Insert convex part 1 of the QSV-2 sun visor into the holder. While
rotating the sun visor upward, push protrusion 2 of the sun visor into
the hole in the holder until it snaps into place (Drawing 4).
3. Also attach the opposite side in the same manner.
4. When there are ngerprints on the sun visor, wipe them o with a soft,
dry cloth.
警告
WARNING
サンバイザーを正しく取り付けていないと、走行中にサンバイザーが脱
落し、思わぬ事故を引き起こす可能性があります。QSV-2 サンバイザー
取り付け後は、開閉レバーの操作を数回繰り返し、サンバイザーの突起
部がホルダーの穴に確実にはまっているか確認してください。また、サ
ンバイザーとホルダーの間に、隙間がないことを確認してください。
If the sun visor is not installed properly, it may drop unexpectedly during
riding and obstruct the rider’s vision. After installing the QSV-2 sun visor,
raise and lower the visor several times to conrm that the protruding
section of the sun visor is t securely in the holder’s opening. Conrm that
there is no space between the sun visor and the holder.
日本語
English
2
1
4
3
サンバイザーサンバイザー
レバーレバー
Sun Visor Lever
サンバイザーホルダーサンバイザーホルダー
Sun Visor HolderSun Visor Holder

1918
日本語 /English
QSV-2 サンバイザーの取り扱い
に関するご注意
日本語
Important Notice about
Handling the QSV-2 Sun Visor
English
z サンバイザーの開閉は必ず
レバーを操作してください。
手で直接サンバイザーを上
下させないでください。サンバイ
ザーの昇降機構を損傷する可能性
があります。
z QSV-2 サンバイザーは日除けのた
めの装備であり、シールドとして
の機能はありません。シールドを
開けてサンバイザーのみで走行しないでください。
z 着色シールドもしくはミラー加工のシールドと、
インナーサンバイザー、サングラスなどの可視光
線透過率を下げる製品は、いずれも併用しないで
ください。視界が妨げられ、大変危険です。
z 夜間およびトンネル内や、視界が悪い状態のとき
は、QSV-2 サンバイザーは使用しないでください。
z QSV-2 サンバイザーの汚れや傷は走行中の視界の
妨げとなり、大変危険です。QSV-2 サンバイザー
が汚れたり傷が付いたりしたら、直ちに使用を中
止し、取り外してふき取るか、交換してください。
z QSV-2 サンバイザーの汚れは、乾いた柔らかい布
でふき取ってください。40℃を超える湯・塩水・
酸性またはアルカリ性の洗剤・ベンジン・シンナー・
ガソリン・その他の有機溶剤・ガラスクリーナーな
ど、有機溶剤を含むクリーナー類は使用しないでく
ださい。これらが付着すると、サンバイザーが変質
し、安全性に支障をきたす可能性があります。
z QSV-2 サンバイザーは防曇加工が施されています
が、低温時や多湿時には曇る場合があります。そ
の際は、シールドを開けたり、ロアエアインテー
クを開けたりして換気をするか、サンバイザーを
上げて視界を確保してください。
z 保管状況によっては、湿度の影響で QSV-2 サンバ
イザーの表面が白くなることがあります。その場
合、メガネクロスのような、乾いた柔らかい布で
ふくと、元に戻ります。
z 視界を妨げる恐れがあるため、QSV-2 サンバイ
ザーに、ステッカーや粘着テープを貼らないでく
ださい。
z サンバイザーが正しく取り付けられていないと、
使用中に予期せず落下し、視界を妨げる可能性が
あります。QSV-2 サンバイザーを取り付けた後、
サンバイザーの突出部分がホルダーの開口部に
しっかりと収まっていることを確認するために、
サンバイザーを数回上下させてください。また、
サンバイザーとホルダーの間にスペースがないこ
とを確認してください。
zBe sure to use the lever
to open or close the sun
visor. Never raise or lower
the sun visor directly with your
hands. This may damage the
sun visor’s raising and lowering
mechanism.
zThe QSV-2 sun visor is designed
to provide shade only and cannot
function as a shield.
Do not ride with the shield open and using only the
sun visor.
z Do not use a tinted or mirrored shield/visor together
with the helmet’s internal sun visor, sunglasses or
any other product that reduces light transmittance.
This may obstruct your view and can be very
dangerous.
z Raise the sun visor while riding at night, through a
tunnel, or any other low-light condition.
z Dirt and scratches on the sun visor may obstruct
your view while riding and can be very dangerous!
If the QSV-2 sun visor gets dirty or scratched, stop
using it immediately. Remove the sun visor and
clean or replace it.
z To clean the QSV-2 sun visor, wipe it with a soft, dry
cloth. Do not use any of the following cleaning
materials: hot water over 40ºC; salt water; any
acidic or alkali detergent; benzine, thinner,
gasoline, or other organic solvents; glass
cleaner; or any cleaner containing organic
solvents. If any of these cleaners are used, the sun
visor’s chemical nature may be altered and safety
may be hindered.
z The QSV-2 sun visor has undergone anti-fogging
treatment, but may develop fog in low temperatures
or high humidity. In this case, open the lower air
intake to circulate air or raise the sun visor.
z Under certain storage conditions, humidity may
cause the outer surface of the sun visor to become
white. If this happens, take a soft, dry cloth like one
for cleaning eyeglasses and wipe the sun visor to
restore it to its original condition.
z Do not attach any stickers or tape on the QSV-2 sun
visor. They may obstruct your view.
z If the sun visor is not installed properly, it may drop
unexpectedly during riding and obstruct the rider’s
vision. After installing the QSV-2 sun visor, raise
and lower the sun visor several times to conrm
that the protruding section of the sun visor is t
securely in the holder’s opening. Conrm that there
is no space between the sun visor and the holder.
警告 WARNING
国や地域によっては、ヘルメットに反射ステッカー
を貼る必要があります。
そういった国や地域でヘルメットを使用する場合は、
反射ステッカーを、図に示されている位置に貼り付
けてください。ステッカーを貼る前に、ヘルメット
の表面にある油や汚れを取り除いてください。
Reective stickers may be required for the helmet
depending on the country or area.
If using the helmet in such a country or area, apply
reective stickers on the position shown in the
drawing. Before applying the stickers, clean the
helmet to remove any oil or dirt from the surface of
the helmet.
反射ステッカー
日本語
Reective Stickers
English
フロント リア
右サイド左サイド
Front Rear
Right SideLeft Side

2120
日本語 /English
防曇シートをご使用の場合は、ご使用前に防曇シー
トに同梱されている取扱説明書をご覧ください。
Before using the anti-fog sheet, read the instruction
manual included in the package.
防曇シート
日本語
Anti-fog Sheet
English
* PINLOCK
®
は、PINLOCK SYSTEMS B.V. の登録商標
です。
* PINLOCK
®
is a registered trademark of PINLOCK
SYSTEMS B.V.
z クリア以外のシールドに防曇シートを装
着した状態で、夜間走行はしないでくだ
さい。
z 防曇シートは、シールドよりも傷つきや
すい材質でできているので、取り扱いに
は十分ご注意ください。
z 防曇シートを使用すると、乗車姿勢に
よっては視界が妨げられる可能性があり
ます。
z 防曇シートは、保護フィルムを剥がして
使用してください。
z 防曇シートは、シート自体が湿気を吸収
することにより高い曇り止め効果を発揮
します。しかし、低温多湿などの曇りや
すい条件下でヘルメット内が密閉された
状態が続くと、水蒸気でシートが飽和状
態となり、にじみや曇りが発生すること
があります。にじみや曇りが発生すると、
視界が妨げられ大変危険ですので、ロア
エアインテークを開けたり、シールド
を開けたりしてヘルメット内をよく換気
し、にじみや曇りを取り除いてください。
z CNS-3C シールドの防曇シートを交換
す る 場 合 は、SHOEI 純 正 品 の SHOEI
DRYLENS 301 または PINLOCK
®
EVO lens
DKS301 をご購入ください。
z Daytime use only. Never use anti-fog
sheet at night or in any other low visibility
condition.
z The anti-fog sheet is made of a material
that is easier to scratch than the outer
shield/visor. It should be treated with great
care.
z The anti-fog sheet may obstruct the rider’s
view in some riding positions.
z Remove the protective lm before using
the anti-fog sheet.
z The anti-fog sheet demonstrates high
eectiveness in stopping fog by absorbing
moisture. However, if the helmet is used
continuously with the lower vent in the
closed position in low-temperature,
high-humidity conditions, the sheet can
become saturated with water vapor
causing streaks and fog to appear. If
streaks or fog appears, it may obstruct
your view and be very dangerous! In this
case, open the lower air intake and/or
open the shield/visor to circulate air within
the helmet to remove the streaks and fog
from the helmet.
z Purchase SHOEI DRYLENS 301 or
PINLOCK®EVO lens DKS301 for CNS-
3C shield/visor for replacement of anti-fog
sheet.
z チークパッドは全サイズ共用パーツです。例えば、
M サイズで頬部を緩くしたい場合はチークパッド
31、きつくしたい場合はチークパッド 39(共にオ
プションパーツ)に交換してください。
z センターパッドは各製品サイズで異なります。ご
購入の際、お手持ちのヘルメットのサイズを確認
してください。
z The same cheek pads can be used with all helmet
sizes. For the M size helmet example, choose
cheek pad size 31 if you want a looser t and size
39 for a rmer t (both are optional parts).
z Center pads varies by model size. Conrm the size
of your helmet prior to making a purchase.
本製品はセンターパッド、チークパッド(左右)、チ
ンストラップカバー(左右)、イヤーパッド(左右)
を取り外して洗うことができます。また、オプショ
ンパッドに交換することで、かぶり心地を調整する
ことができます。内装の名称と図を参照して、着脱
を確実に行ってください。センターパッド、チーク
パッド、チンストラップカバーは、必ずすべて装着
してご使用ください。内装を交換する場合は、下記
表を参照のうえ、正しいサイズのものをお求めくだ
さい。
Center pad, right and left cheek pads, right and left
chinstrap covers, and right and left ear pads can be
removed for washing. You can also adjust the t of
your helmet by switching to the optional pads. Look
at the list and drawing of interior parts and check
whether the parts are installed or removed. Be sure to
always x the center pad, cheek pads, and chinstrap
covers prior to riding. If necessary, use the following
table to order the proper interior parts to adjust the t
of your helmet.
センターパッド
Center Pad
チークパッド(右)
Cheek Pad (R)
チークパッド(左)
Cheek Pad (L)
イヤーパッド(左)
Ear Pad (L)
イヤーパッド(右)
Ear Pad (R)
チンストラップカバー(右)
Chinstrap Cover (R)
チンストラップカバー(左)
Chinstrap Cover (L)
パッドサイズ / Pad sizes
製品サイズ / Helmet Size S M L XL XXL XXXL
センターパッド/Center
Pad
オ プ シ ョ ン( き つ め )/Optional (rm t) S13 M13 L13 XL13 XXL13 XXL9
標準/Standard S9 M9 L9 XL9 XXL9 XXL5
オプション(ゆるめ)/Optional (loose t) S5 M5 L5 XL5 XXL5 ー
チ ー ク パ ッド /
Cheek Pad
オ プ シ ョ ン( き つ め )/Optional (rm t) 39 39 39 39 39 35
標準/Standard 35 35 35 35 35 31
オプション(ゆるめ)/Optional (loose t) 31 31 31 31 31 ー
内装の交換について
日本語
Replacing Interior Parts
English

2322
日本語 /English
内装の脱着は、下記の手順で行ってください。内装
を脱着する際は、フェイスカバーを全開にしてくだ
さい。
内装の取り外し方
1. チークパッドの取り外し
チンストラップをノイズアイソレーターの穴か
ら引き抜きます(図 1)。次に、チークパッド
を、チークパッドベースから引きはがすように
3 カ所のホックを外します(図 2)。チークパッ
ドブラケット(A)からチークパッドのプレー
トの溝 a を引き抜き、チークパッドをヘルメッ
トの手前側に引きながら、前方から順にプレー
トを引き抜いていきます(図 3)。最後に、チー
クパッドブラケット(B)からプレートの溝 b
を引き抜きます(図 4)。溝 b を引き抜く際は、
強く引かずていねいに引き抜いてください。必
ず溝 a から外してください。溝 a を取り付けた
状態で溝 b を真上に引き抜くと、プレートを破
損する可能性がありますので、ご注意ください。
Use the following procedures to remove or install the
interior parts. Open the face cover completely when
removing or installing the interior parts.
Removing Interior Parts
1. Removing the Cheek Pads
Draw the chinstrap from slit of noise isolator
(Drawing 1). Unfasten the three snaps to
remove the cheek pad from the cheek pad base
(Drawing 2). Pull the plate notch (a) of the cheek
pad out of the cheek pad bracket (A). After this,
remove the plate from rst the front and then
the rear while drawing the cheek pad to the
front of the helmet (Drawing 3). Finally, pull the
plate notch (b) out of the cheek pad bracket (B)
(Drawing 4). Do not pull it hard. Be sure to pull
the front notch (a) out rst. If you pull out the rear
notch (b) before pulling out notch (a), the plate
may be damaged.
内装の取り外し方、取り付け方
Removing and Installing
Interior Parts
日本語
English
4
3
2
a
b
Front
前
後
Rear
ホック
Snap
チークパッドブラケット (A)
プレートプレート
PlatePlate
チークパッドブラケット (B)
Cheek Pad Bracket (A)
Cheek Pad Bracket (B)
1
ノイズ
アイソレーター
Noise Isolator
チン
ストラップ
穴/Slit
Chinstrap
5
2. イヤーパッドの取り外し
イヤーパッドは、ヘルメット内への風の巻き込
みに起因する騒音を低減します。
プレート部分に 4 カ所ある爪を、図 5 のように
チークパッドベースから引き抜き、イヤーパッ
ドを取り外します。反対側も、同じ要領で取り
外します。
3. センターパッドの取り外し
後頭部のホックを 2 カ所外してから(図 6)、
前頭部のプレートをセンターから引き剥がすよ
うにして(図 7)、センターパッドを取り外しま
す。
4. チンストラップカバーの取り外し
チンストラップカバーを取り外すには、チーク
パッドを取り外してからチンストラップカバー
のホックを外し、チンストラップから引き抜き
ます(図 8)。反対側も、同じ要領で取り外します。
2. Removing the Ear Pads
The ear pads are designed to reduce wind noise.
Unfasten the four clasps on the plate from the
cheek pad base, as shown in Drawing 5.
Remove the ear pad. Remove the other ear pad
in the same manner.
3. Removing the Center Pad
Remove the center pad by unsnapping 2 snaps
at the rear of the helmet rst (Drawing 6), and
pull the front portion of the center pad from
center part as per Drawing 7.
4. Removing the Chinstrap Covers
Remove the cheek pad then unfasten the
chinstrap cover snap. Remove the cover from
the chinstrap (Drawing 8). Remove the other
chinstrap cover in the same manner.
日本語
English
7
6
8
前
Front
後
Rear ホック
Snap
Cheek Pad Base
Ear Pad
プレート
Plate
チンストラップ
Chinstrap
ホック
Snap
チ ンストラップ カ バ ー
Chinstrap Cover
イヤーパッド
チークパッドベース

2524
日本語 /English
前
Front
後
Rear
9
内装の取り付け方
1. チンストラップカバーの取り付け
チンストラップカバーは左右兼用です。取り付
けは図 9 を参照し、チンストラップカバーをチ
ンストラップに通し、「カチッ」と音がするま
でホックをはめ込みます。
2. センターパッドの取り付け
前部プレートは、片側(図 10)から反対側(図
11)にかけて、ブラケットの隙間にすべらせる
ように入れます。次に後頭部の 2 カ所のホック
を「カチッ」と音がするまではめ込みます(図
12)。
3. イヤーパッドの取り付け
イヤーパッドは、左右兼用です。取り付けると
きは、図 13 のように (A) の部分をセンターパッ
ドと衝撃吸収ライナーの間に挟み、プレート部
分の 4 カ所の爪を、それぞれチークパッドベー
スの切り欠き部分に差し込んで、イヤーパッド
を固定します。反対側も、同じ要領で取り付け
ます。
Installing Interior Parts
1. Installing the Chinstrap Covers
The chinstrap covers can be used on both the
left and right sides. While referring to Drawing 9,
pass each chinstrap cover through the chinstrap
and insert the snap until it clicks into place.
2. Installing the Center Pad
Slide and insert the front plate into the gaps
of the bracket from one side (Drawing 10) to
another (Drawing 11). Snap the two snaps into
place in the rear of the center pad (Drawing 12).
3. Installing the Ear Pads
The ear pads are interchangeable for right and
left sides. Place ear pad section (A) between the
center pad and the impact absorbing liner as per
Drawing 13. Insert the 4 clasps on the plate in
the notches of the cheek base. Fix the ear pad
in place. Install the other ear pad in the same
manner.
日本語
English
10
11
12
(A)
13
ホック
Snap
プレート
チンストラップ
ホック
チンストラップカバー(左)
Plate
Chinstrap
Snap
Chinstrap Cover (R)
チンストラップカバー(右)
Chinstrap Cover (R)
チンストラップ
カバー(左)
Chinstrap
Cover (L)
イヤーパッドを取り付けると、周りの車や
バイクの音が、通常より小さく聞こえます。
運転時は、特にご注意ください。
With the ear pads installed, the sound from
nearby vehicles will be reduced. Please be
aware of this while riding.
4. チークパッドの取り付け
チークパッドを取り付ける前に、3 カ所のホッ
クが図の位置にあることを確認してください
(図 14)。正しい位置でない場合、ホックがは
まらないことがあります。
取り付けるときは、チークパッドの左右を確認
してください。
プレート後端部の溝 b をチークパッドブラケッ
ト (B) のボスに差し込み(図 15)、プレートを
後方へスライドさせます。
次に、プレート後端から前方に向かって差し込
んでいき、プレートの溝 a をチークパッドブラ
ケット (A) のボスに差し込みます(図 16)。こ
のとき、図 15 のようにプレート後端部が奥ま
でしっかりスライドしていないと、溝 a がボス
にはまりませんのでご注意ください。
プレートを差し込んだあと、図 17 のようにチ
ンストラップをチークパッドのくぼみに通し、
(1) → (2) → (3) の順にホックをはめ込みます。
ホックは、パッド側からホックの上部分を強く
押し、「カチッ」と音がするまではめ込みます。
図 18 のようにパッド角部分を押し、チークパッ
ドのプレートをチークパッドベースの突起部に
はめ込みます。最後に図 19 のようにチンスト
ラップをノイズアイソレーターの穴に通してく
ださい。反対側のチークパッドも、同じ要領で
取り付けます。
4. Installing the Cheek Pads
Before installing the cheek pads, make sure that
the three snaps are positioned properly shown
in Drawing 14. They may not be fastened if they
are not positioned properly.
Identify a right and a left pad.
Insert the notch (b) into a boss of a cheek pad
bracket (B) at the rear of the helmet (Drawing
15) and slide it toward the back of the helmet.
Then, do frontward and insert the notch (a) into a
boss of a cheek pad bracket (A) as per Drawing
16. Be sure to slide the plate toward the back
of the helmet when you insert the rear section
(Drawing 15), otherwise the notch (a) may not t
to the boss.
After the plates are inserted, pass the chinstrap
through the hollow section of the cheek pad
(Drawing 17). Fasten the snaps in 1 to 3 order
by pressing the head of the snaps rmly from
the pad side until they click in place. Press the
corner of the pad as shown in the Drawing 18
and t the cheek pad plate securely into the
boss of the cheek pad base. Finally, insert the
chinstrap into the slit of the noise isolator as per
Drawing 19. Install the other cheek pad in the
same manner.
日本語
English
14
15
b
16
a
17
1
3
2
18
チークパッドブラケット (B)
Cheek Pad Bracket (B)
チークパッドブラケット (A)
Cheek Pad Bracket (A)
ホック
Snap
ボス/Boss
ボス/Boss
前
Front
後
Rear
Ear Pad
イヤーパッド

2726
日本語 /English
内装の取り扱いに関するご注意 Important Notice about
Handling Interior Parts
日本語 English
19
z ホックのはめ込み、取り外しはなるべくホックの
近くを持ち、ていねいに行ってください。ホック
は「カチッ」と音がするまできちんと取り付けて
ください。
z 内装を洗う場合は手洗いか、洗濯機をご使用の場
合はネットに入れるなどして、ていねいに洗って
ください。洗濯の際は水またはぬるま湯を使用し、
乾いた布で水をふき取ってから陰干ししてくださ
い。内装パーツのプラスチック部分を破損する恐
れがありますので、強くしぼったり、プラスチッ
ク部分を折り曲げたりしないでください。脱水機
を使用する場合は、十分ご注意ください。衝撃吸
収ライナー(発泡スチロール部分)は、柔らかい
布を水または水で薄めた中性洗剤で湿らせてふい
てください。パーツを破損する恐れがありますの
で、40℃を超える湯・塩水・酸性またはアルカリ
性の洗剤・ベンジン・シンナー・ガソリン・その
他の有機溶剤・ガラスクリーナーなど、有機溶剤
を含むクリーナー類は使用しないでください。
z When attaching or detaching a snap, you should
hold it near the fastened area and treat it carefully.
Fasten the snap rmly until you hear it click.
z You can clean the inner parts by hand washing
them or by washing them in a washing machine
after placing them in a laundry net. Please treat
them carefully when washing. Use lukewarm
water. Gently squeeze the parts with a dry towel,
then remove them and dry them in the shade. To
prevent damage to the plastic areas of the interior
parts, do not wring them strongly and do not fold or
bend the plastic areas. Take special care if you are
using a washing machine. Do not dry the interior
parts with a clothes dryer, as heat can damage the
material. The impact absorbing liner (polystyrene
foam section) should be wet with a soft cloth dipped
in a solution of mild neutral soap and water and then
wiped. Allow time for the impact absorbing liner to
dry in the shade. Do not dry the impact absorbing
liner in the sunlight or use any type of mechanical
dryer, as the impact absorbing liner is extremely
sensitive to heat. If the impact absorbing liner
is exposed to high heat of any kind, contact your
dealer or SHOEI directly for a safety evaluation. To
prevent damage, do not use any of the following
cleaning materials: hot water over 40ºC; salt water;
any acidic or alkali detergent; benzine, thinner,
gasoline, or other organic solvents; glass cleaner;
or any cleaner containing organic solvents.
チン
ストラップ
Chinstrap
穴/Slit
チ ー ク パ ッド
Cheek Pad
NEOTEC3 専用のインターコムを取り付けるときは、ヘル
メットの左右両側にあるインターコムベースのカバーと、
リア側にあるバッテリースペースのカバーを、それぞれ
取り外す必要があります。
インターコム本体の取り付け、取り外し手順については、
使用する NEOTEC3 の専用インターコムの取扱説明書
を参照してください。
インターコムベースカバーの取り外し
インターコムベースカバーのツメにサービスツールを差
し込み、テコの要領で倒して、インターコムベースカバー
を取り外します。
When installing the dedicated intercom for NEOTEC 3, it
is necessary to remove the intercom base covers from the
left and right sides and the battery space cover at the rear
of the helmet.
When installing or removing the intercom main unit, refer
to the instruction manual of the dedicated intercom for
NEOTEC 3 you use.
Removing Intercom Base Cover
Insert the service tool under the tab of the intercom base
cover and lever the tab upward to remove the cover.
NEOTEC3 専用インターコムを取り
付けるときは
When Installing the Dedicated
Intercom for NEOTEC 3
日本語
English
日本語
English
インターコムベースカバーの取り付け
1. インターコムベースカバー前方のツメを、インター
コムベースのスリットに差し込みます ( 図 1)。
2. インターコムベースカバー後方のツメを、「カチッ」
と音がするまで押し込みます(図 2)。
3. インターコムベースカバーが、図 3 のように正しく
取り付けられていることを確認します。後方のツメ
が入りきっていない場合は、しっかりと押し込んで
ください。
Installing the Intercom Base Cover
1. Insert the tab on the front of the intercom base cover
into the slit in the intercom base (Drawing 1).
2. Push the tab on the rear of the intercom base cover
until it clicks into place (Drawing 2).
3. Conrm that the intercom base cover is installed
correctly as shown in Drawing 3.
If the tab on the rear is not set into place, push the
tab in completely.
1
2
インターコム
ベースカバー
ツメ / Ta b
サービス
ツール
Service Tool
スリット
Intercom Base Cover
Slit
インターコムベースカバー
Intercom
Base Cover
3
〇
×

2928
日本語 /English
バッテリースペース用カバーの取り外し方
バッテリースペースのツメを矢印の方向に押しながら、カ
バーを手前に引いて取り外します。バッテリースペース用
カバーを取り外すと、バッテリースペースにフィルターが
入っていますので、取り出してください。
Removing the Battery Space Cover
To remove the battery space cover, pull the cover toward
the front while pushing the battery space tab in the
direction of the arrow. After removing the battery space
cover, you will nd a lter in the battery space. Remove
the lter.
2
日本語
English
日本語
English
バッテリースペース用カバーの取り付け方
バッテリースペースに、フィルターを入れます(図 1)。
バッテリースペース用カバーのツメ(4 カ所)を、ヘルメッ
トの固定穴に差し込み、バッテリースペースのツメが、「カ
チッ」と音がするまで押し込みます(図 2)。
Installing the Battery Space Cover
Place the lter in the battery space (Drawing 1). Insert
the tabs (4 positions) of the battery space cover into the
securing holes in the helmet and press the cover until the
battery space tab clicks into place (Drawing 2).
ツメ
Tab
ツメ
Tab
Battery Space Cover
バッテリー
スペース用カバー
バッテリースペース用カバー
Battery Space Cover
前
Front
後
Rear
固定穴
Hole
取り外したバッテリースペース用カバーとフィ
ルターは、なくさないように保管してください。
1
フィルター
Filter
警告 WARNING
z ご使用の前に、シールド左右のフックとギアが確
実にはまっているか確認してください。
z センターパッド、チークパッド、チンストラップ
カバーは、必ずすべて装着して、ご使用ください。
z ヘルメットおよびシールドのお手入れに、40℃を
超える湯・塩水・酸性またはアルカリ性の洗剤・
ベンジン・シンナー・ガソリン・その他の有機溶剤・
ガラスクリーナーなど、有機溶剤を含むクリーナー
類は使用しないでください。これらが付着すると、
ヘルメットの構成部材が変質し、安全性に支障を
きたす可能性があります。
z 走行中に付着した虫による汚れは、放置すると塗
装面を浸食し、完全に除去できなくなりますので、
すみやかに取り除いてください。
z シールドやサンバイザーや内装を交換する際は、
必ず純正部品を使用してください。
z Before use, check that the shield/visor hooks and
gears are t rmly.
z Be sure to always wear the center pad, cheek pads,
and chinstrap covers when using the helmet.
z When cleaning and caring for the helmet and
shield/visor, do not use any of the following
cleaning materials: hot water over 40ºC; salt
water; any acidic or alkali detergent; benzine,
thinner, gasoline, or other organic solvents;
glass cleaner; or any cleaner containing organic
solvents. If any of these cleaners are used, the
helmet’s chemical nature may be altered and safety
may be hindered.
z If insects become stuck to the helmet during riding
and are left in place, the helmet surface may be
corroded. They should be removed promptly.
z Be sure to use SHOEI genuine parts when replacing
the shield/visor, sun visor, or inner parts.
その他のご注意 Other Cautions
警告
z インターコムをご使用になる際、インターコムや
接続機器の音量設定によっては周囲の音が聞こえ
なくなることがあります。ご使用にあたっては、
周囲の音を聞き取れるように音量設定してくださ
い。
z インターコムをヘルメットに取り付けていない場
合は、必ず各インターコムベースカバー、バッテ
リースペース用カバー、フィルターをヘルメット
に取り付けた状態で使用してください。
z インターコムベース、バッテリースペースを使用
する場合は、必ず NEOTEC3 専用のインターコムを
使用してください。専用のインターコムについて
は、SHOEI のウェブサイト(www.shoei.com)を
ご確認ください。
z インターコムをご使用になる前に、ご使用になる
インターコムの注意事項を必ずお読みください。
また、インターコム本体の取り扱いについては、
使用されるインターコムの取扱説明書を参照して
ください。
WARNING
z When using the intercom, the sound from
nearby vehicles can be impaired depending
on the volume settings of the intercom and
its connecting devices. Be sure to adjust your
volume accordingly so that your hearing is not
impaired.
z When the intercom is not installed, be sure to use
the helmet with each of the intercom base covers,
the battery space cover, and the lter attached.
z When using the intercom base and battery space,
be sure to install the dedicated intercom for
NEOTEC 3. For information about recommended
intercoms, please visit the SHOEI ocial website
(www.shoei.com).
z Read the safety precautions of the intercom you
use carefully before using it. For information about
handling the intercom, please refer to the instruction
manual of the intercom you use.
日本語 English
Put the removed battery space cover and lter
somewhere safe so they are not lost.

3130
日本語 /English
31
これらのオプションパーツは、修理や交換が可能です。
部品を交換する場合、各部品に同梱の取扱説明書を
お読みください。
z CNS-3C シールド
z QSV-2 サンバイザー
z 防曇シート
z チンカーテン
z ブレスガード
z アッパー エア インテーク
z トップ エア アウトレット
z センターパッド
z チークパッド(左右セット)
z チンストラップカバー(左右セット)
z イヤーパッド(左右セット)
z インターコムベースカバー(左右セット)
z バッテリーケースカバー(フィルター同梱)
These optional parts are available for repair or
replacement.
To replace the parts, read the instruction manual that
comes packed with the parts.
z CNS-3C Shield/Visor
z QSV-2 Sun Visor
z Anti-fog Sheet
z Chin Curtain
z Breath Guard
z Upper Air Intake
z Top Air Outlet
z Center Pad
z Cheek Pads (left and right set)
z Chinstrap Covers (left and right set)
z Ear Pads (left and right set)
z Intercom Base Covers (left and right set)
z Battery Case Cover (lter included)
NEOTEC3 オプションパーツ
パーツリスト
日本語
NEOTEC 3 Optional Parts
Parts List
English
フィッティング調整用パッド(オプション)
長時間の走行時に、前後左右で部分的にきつさを感
じる場合は、オプションの調整用パッドをセンター
パッドの頭頂部に入れることで、フィッティングを
調整することができます。
センターパッドの頭頂部の窓穴から、調整用パッド
を図のように差し込みます。
* 差し込み後はパッドの四隅が角まで入っているか
確認してください。
* フィッティング調整用パッドのパッドサイズは、
全サイズ共通です。
Pads for Fitting Adjustment (Optional)
When riding for long periods, you may feel some
tightness in the front, back, left or right areas of
your helmet. In this case, you can change the t by
inserting the optional adjustment pad into the top part
of the center pad.
Insert the adjustment pad through the opening in the
top part as shown in the drawing.
Note 1. After inserting the pad, check that the pad is
properly ts into the four corners.
Note 2. This is a common size of pads for tting
adjustment.
調整用パッド
한국어
Adjustment Pad
한국어
먼저 읽어 주십시오 32
포장 제품의 확인 33
각부의 명칭 34
벤틸레이션 시스템 35
페이스 커버 개폐 36
턱마개 37
코마개 38
CNS-3C 실드 39
CNS-3C 실드 취급에 관한 주의사항 43
실리콘 오일 사용 방법 44
디프로스터 45
서비스 툴 45
QSV-2 선바이저 46
QSV-2 선바이저 취급에 관한 주의사항 48
반사 스티커 49
김서림방지 렌즈 50
내피 교환에 대해 51
내피 분리 방법, 장착 방법 52
내피 취급에 관한 주의사항 56
NEOTEC3 전용 인터컴을 장착할 때는 57
기타 주의사항 59
부품 목록 60
NEOTEC3 옵션 부품 60

3332
ไทย/한국어
제품의 포장 상자를 개봉한 후 아래의 부품과
부속품이 전부 들어 있는지 확인해 주십시오.
1. 헬멧
2. 김서림방지 렌즈
3. 코마개
4. 헬멧 백
5. 취급설명서
6. 안전설명서
7. E-3 태그 (말레이시아 수출용만)
8. “SHOEI” 로고 스티커 (2장)
9. 실리콘 오일
10. 김서림방지 렌즈용 핀(Anti-Fog Sheet용 핀)
11. 서비스 툴
이 상품은 오토바이용 헬멧입니다.
다른 목적으로 사용하지 마십시오. 다른 목적으로
이 헬멧을 사용하면 사고 시 보호 능력이 충분히
발휘되지 않을 수 있습니다.
헬멧이 모든 예측 가능한 고속 또는
저속의 충격으로부터 착용자를 보호하는
것은 불가능합니다.
머리 보호 능력을 최대한으로 끌어올리기 위해
헬멧을 머리에 적절하게 밀착시킨 후 턱끈을 턱
아래쪽에 단단히 매 주십시오. 헬멧을 머리에
고정했을 때 주변 시야가 충분히 확보돼야 합니다.
헬멧이 너무 크면 사용할 때 헬멧이 비뚤어질 수
있으며, 그로 인해 사고 시 헬멧이 벗겨지거나
시야를 방해할 가능성이 있어 부상 및 사망의 원인이
됩니다. 헬멧을 올바르게 착용하는 방법은
“안전설명서”를 참조해 주십시오.
설명서에 기재된 내용은 예고 없이 변경될 수
있습니다.
설명서에 실린 그림은 실제 제품과 다를 수
있습니다.
설명서의 저작권은 주식회사 SHOEI에 귀속됩니다.
본 설명서를 무단으로 전재 또는 복제하는 행위를
엄격히 금지합니다.
포장 제품(상자, 완충재)은 수리 시 등에
사용할 수 있도록 가능한 한 보관하실 것을
권장하며, 폐기하실 경우에는 법령에 따라
올바르게 처리해 주십시오.
먼저 읽어 주십시오
한국어
포장 제품의 확인
한국어
145
6 7
WARNING
8910 11
3
2

3534
ไทย/한국어
6
9 10 11
15
13
3
1
4
12
14
7
8
5
2
17
16
Droite
Gauche
1. 페이스 커버 개폐 노브
2. 페이스 커버
3. 로어 에어 인테이크
4. 디프로스터
5. 실드 잠금 버튼
6. CNS-3C 실드
7. QSV-2 선바이저
8. 충격 흡수 내장재
9. 어퍼 에어 인테이크
10. 셸
11. 실드 베이스
12. 선바이저 개폐 레버
13. 톱 에어 아웃렛
14. 배터리 스페이스용 커버
15. 인터컴 베이스 커버
16. 턱끈
17. 턱마개
본 취급설명서에 표기된 “우”, “좌”는
헬멧을 쓴 상태에서 착용자가 본
“우측”, “좌측”에 대응합니다.
※개폐 기구는 없습니다.
벤틸레이션을 열면 주변의 소리가 크게
들릴 수 있으며, 승차 자세에 따라서는 윈드
노이즈가 발생할 수 있습니다.
각부의 명칭
한국어
벤틸레이션 시스템
한국어
어퍼 에어 인테이크
/ 코마개 없음
/ 코마개 있음
로어 에어 인테이크
톱 에어 아웃렛
우
좌
열기
열기
닫기
닫기

3736
ไทย/한국어
페이스 커버는 원터치로 개폐할 수 있습니다. 열
때에는 페이스 커버 중앙 하부에 있는 페이스 커버
개폐 노브를 아래쪽으로 당겨 잠금을 해제한 후,
첫 번째 스토퍼에 걸릴 때까지 페이스 커버를 올려
주십시오. 더 많이 열 때에는 두 번째 스토퍼에 걸릴
때까지 페이스 커버를 올려 주십시오. 페이스 커버가
스토퍼에 걸릴 때 찰칵 소리가 납니다.
닫을 때에는 잠금 처리되는 위치까지 페이스 커버를
천천히 내려 주십시오.
경고
z
z
z
z
z
z 페이스 커버의 스토퍼는 열린 상태를 완전히
유지하는 기구가 아닙니다.
페이스 커버를 연 상태에서 주행하면 바람의
영향을 받아 페이스 커버가 닫힐 우려가 있습니다.
시야가 가려져 매우 위험하므로 주행할 때는
페이스 커버를 닫고 잠근 상태에서 사용해
주십시오.
z 페이스 커버를 분리하지 마십시오. 페이스 커버나
실드를 조정해야 할 경우에는 가까운 판매점 또는
대리점에 상담해 주십시오.
z 노브를 당긴 상태에서 페이스 커버를 닫으면 잠금
처리되지 않을 수 있습니다. 잠금 처리되지 않으면
주행 중에 페이스 커버가 갑자기 열려 예기치 못한
사고로 이어질 우려가 있습니다. 페이스 커버를
닫은 후에는 잠금 처리됐는지 반드시 확인해
주십시오.
z 헬멧을 옮길 때에는 페이스 커버를 닫고 잠금
처리한 상태에서 옮겨 주십시오. 잠금 처리되지
않으면 페이스 커버가 열리거나 헬멧이 손상될
우려가 있습니다.
z 턱마개를 잡고 페이스 커버를 개폐하지 마십시오.
턱마개가 빠질 가능성이 있습니다.
턱마개를 장착하면 헬멧의 턱 주변으로 유입되는
바람을 저감시킵니다. 또한 윈드 노이즈의 침입을
줄입니다.
턱마개는 분리할 수 있습니다. 아래에 기재된 방법에
따라 분리 또는 장착합니다.
턱마개 분리 방법
턱마개는 페이스 커버 하단의 플레이트에 꽂혀
2개의 핀으로 고정돼 있습니다. 좌우 핀 부근의
플레이트를 젖히고 턱마개 플레이트에 관통된 핀을
뽑은 후 턱마개를 빼냅니다. 분리할 때에는 좌우
한쪽씩 분리합니다.
턱마개 장착 방법
그림과 같이 페이스 커버 하단의 플레이트를 젖힌
후 사이에 턱마개 플레이트를 끼웁니다. 페이스 커버
플레이트 안쪽의 핀을 턱마개 플레이트의 구멍에
끼웁니다. 장착할 때에는 좌우 한쪽씩 장착합니다.
경고
z
z
z
z 턱마개를 장착하면 주변의 자동차나 바이크
소리가 평소보다 작게 들립니다. 운전 시 특히
주의해 주십시오.
z 플레이트의 핀을 뽑지 않은 상태에서 턱마개를
강하게 당기지 마십시오. 턱마개 및 페이스 커버
하단의 플레이트가 파손될 우려가 있습니다.
z 헬멧을 옮길 때 등에 턱마개를 잡지 마십시오.
부품이 분리돼 헬멧이 떨어지면 파손될 가능성이
있습니다.
페이스 커버 개폐
한국어
턱마개
한국어
핀
Table of contents
Other SHOEI Motorcycle Accessories manuals

SHOEI
SHOEI Air Mask 3 Installation and user guide

SHOEI
SHOEI VFX-WR User manual

SHOEI
SHOEI RF-1400 User manual

SHOEI
SHOEI JO User manual

SHOEI
SHOEI X-Fifteen User manual

SHOEI
SHOEI NEOTEC 3 12070011 User manual

SHOEI
SHOEI Z-8 User manual

SHOEI
SHOEI Neotec II User manual

SHOEI
SHOEI VFX-WR User manual

SHOEI
SHOEI X-Fourteen 263 User manual
Popular Motorcycle Accessories manuals by other brands

MAXXTOW
MAXXTOW 70271 Instruction manual parts catalog

IBEX
IBEX 10008138 Mounting instruction

MOTOAIRBAG
MOTOAIRBAG S64S instruction manual

Petzl
Petzl VERTEX VENT Instructions for use

HealTech Electronics
HealTech Electronics Kawasaki W800 2011 Supplementary manual

Leatt-Brace
Leatt-Brace ADVenture user manual