SPEWE ES-5305 Series User manual
1903161 | 08-2013 | spewe.ch
ES-5305-30 | ES-5305-40
1
Zubehör zu Glühdrahtgerät
Sicherheitshinweise
2
Bedienungsanleitung
3-7
Ersatzteilliste
7/8
Découpeuse a filament chauffant
Instructions de sécurité
2
Mode d’emploi type
3-7
Liste pièces de rechange
7/8
Trancia a filo incandescente
Avvisi di sicurezza
2
Istruzioni per l’uso modello
3-7
Elenco dei pezzi di ricambio
7/8
Heated Wire Cutting Device
Safety Instructions
2
Operating Instructions
3-7
Replacement Parts
7/8
D
ES
ESES
ES-
--
-5305
53055305
5305
Mod. 2013
Art.-Nr. 1200081 (30cm)
Art.-Nr. 1200082 (40cm)
F
I
GB
2
ES-5305-30 | ES-5305-40
1903161 / 08-2013
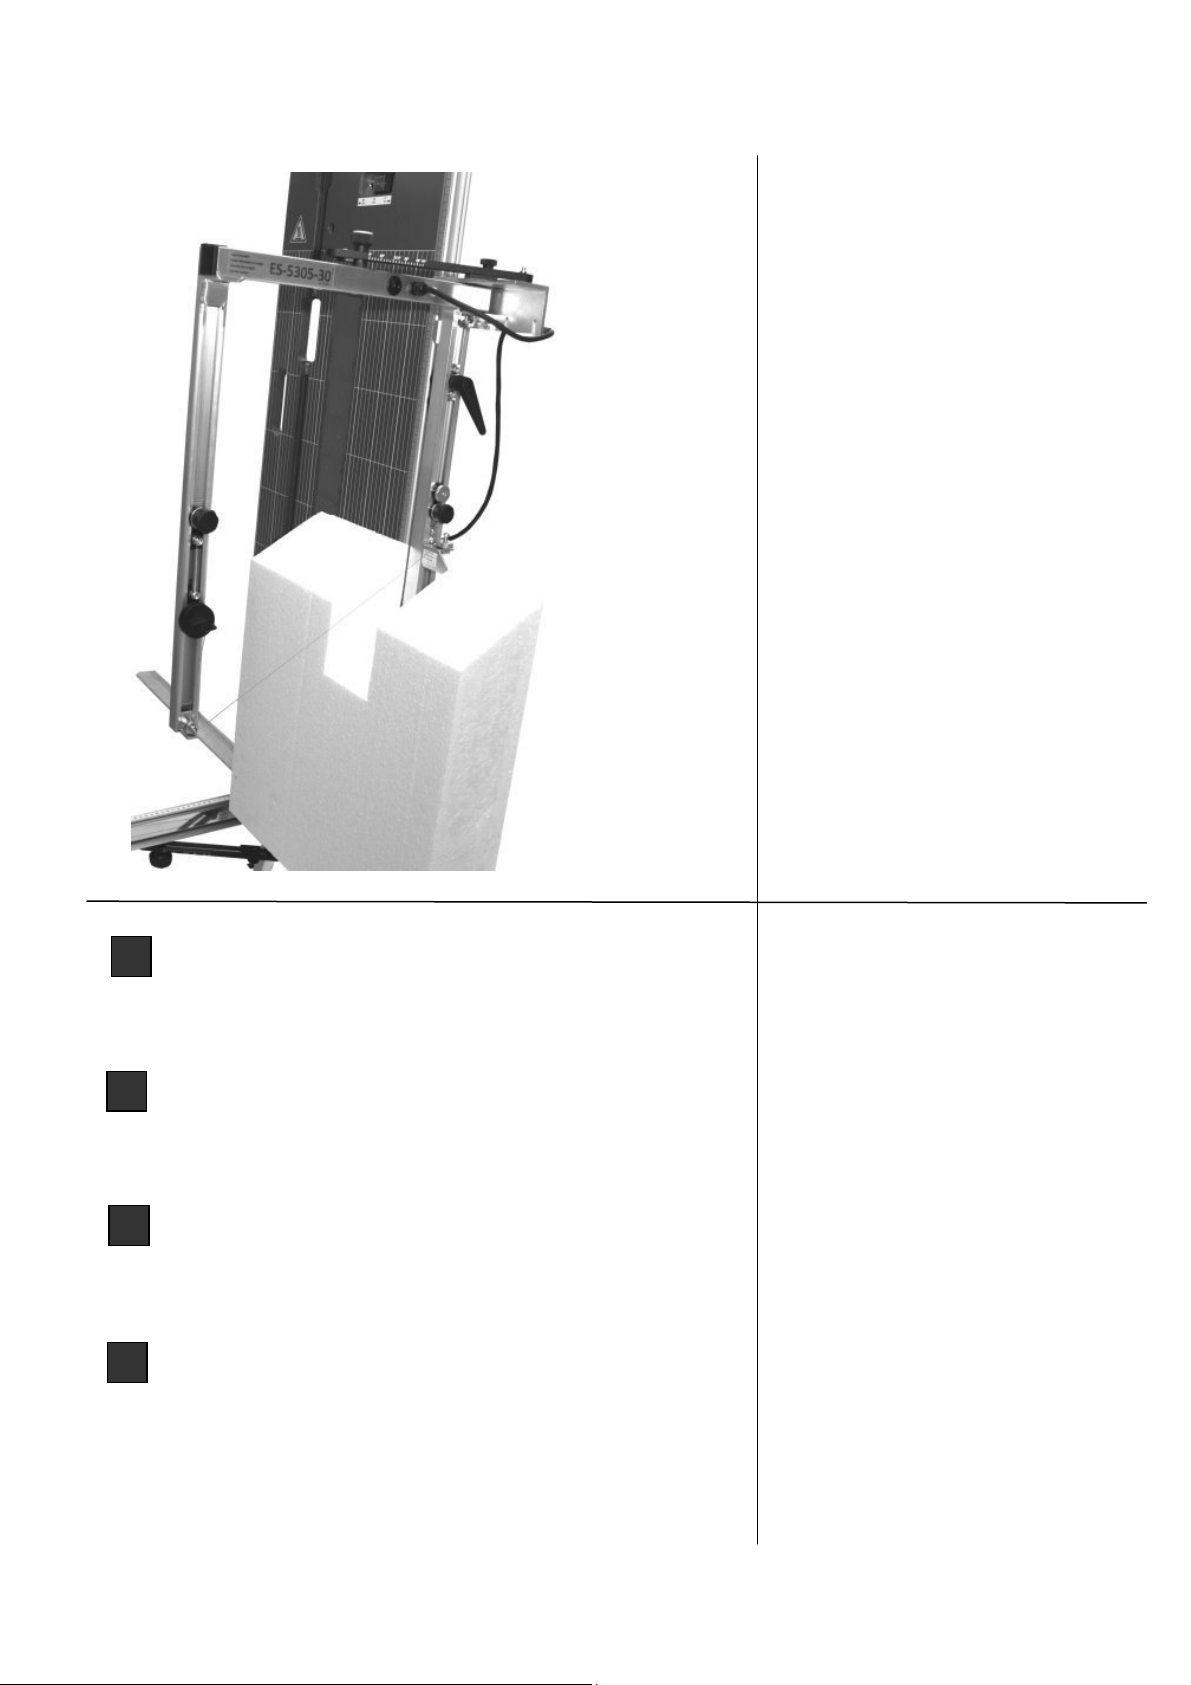
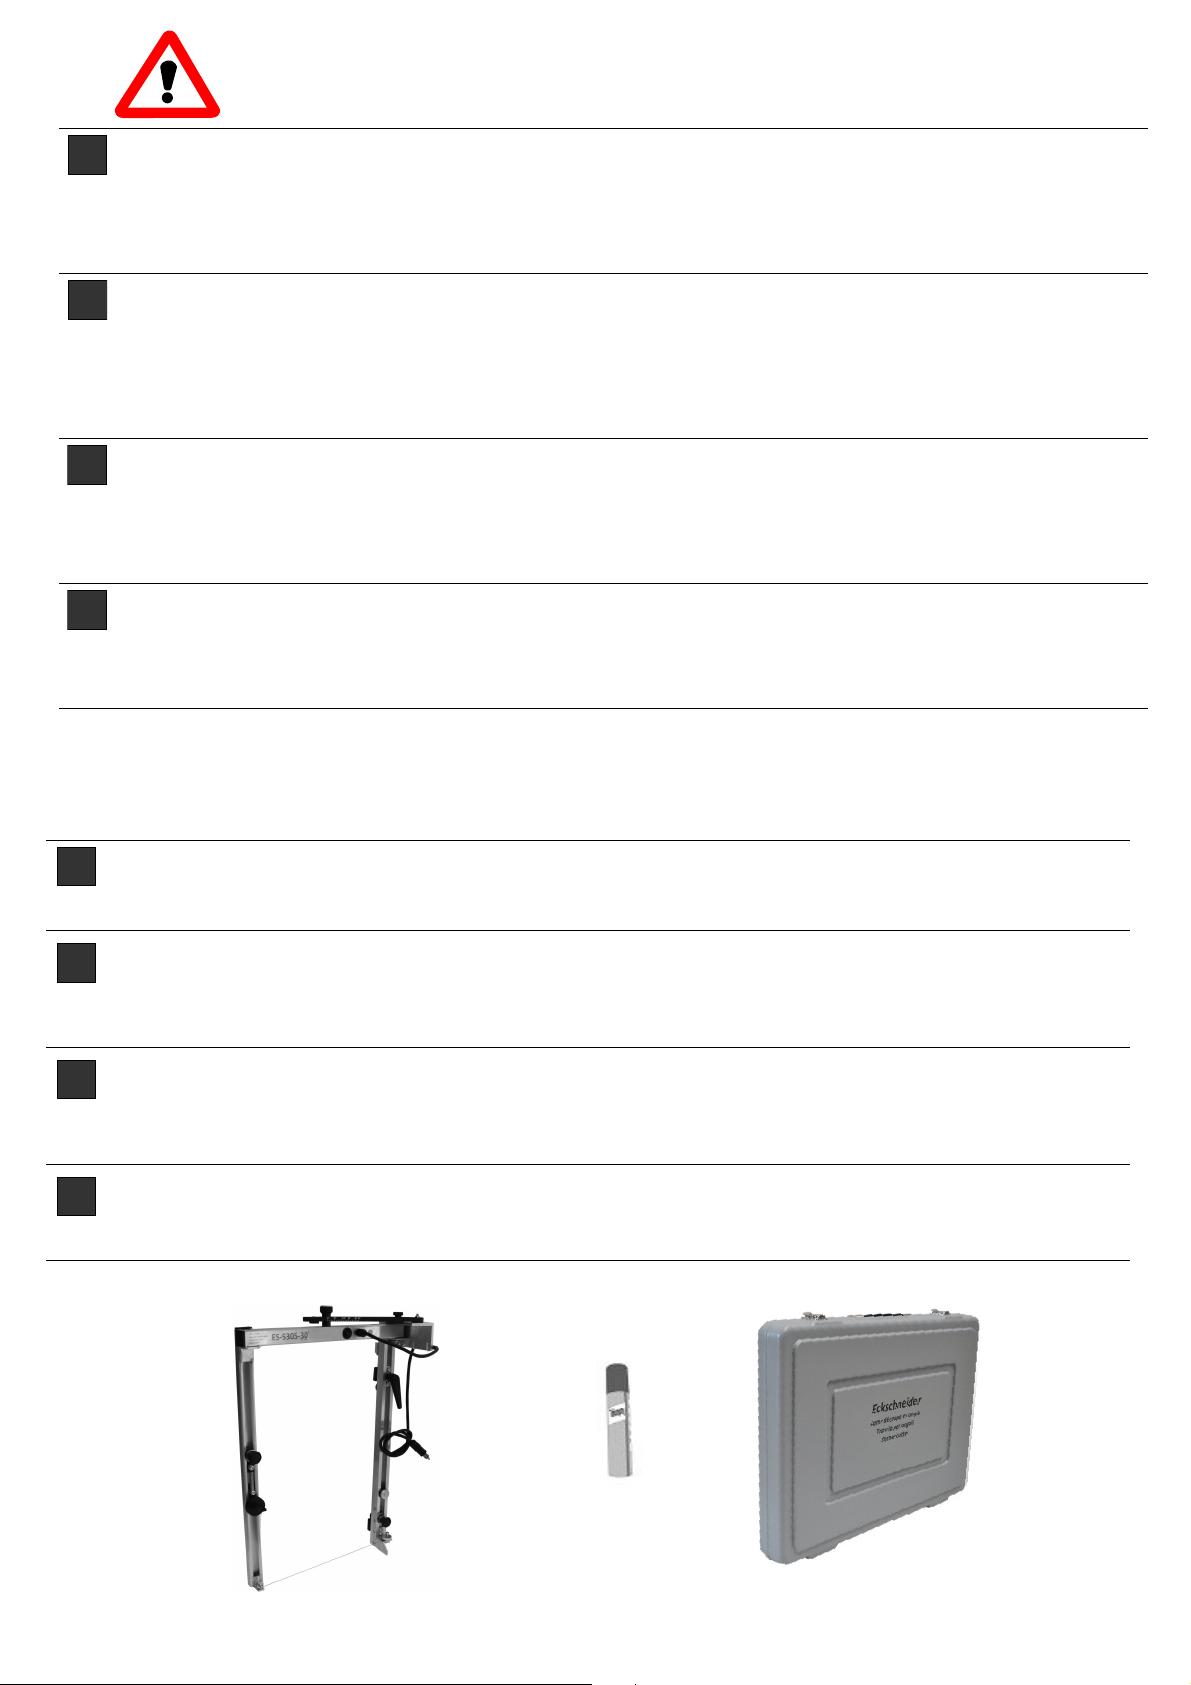
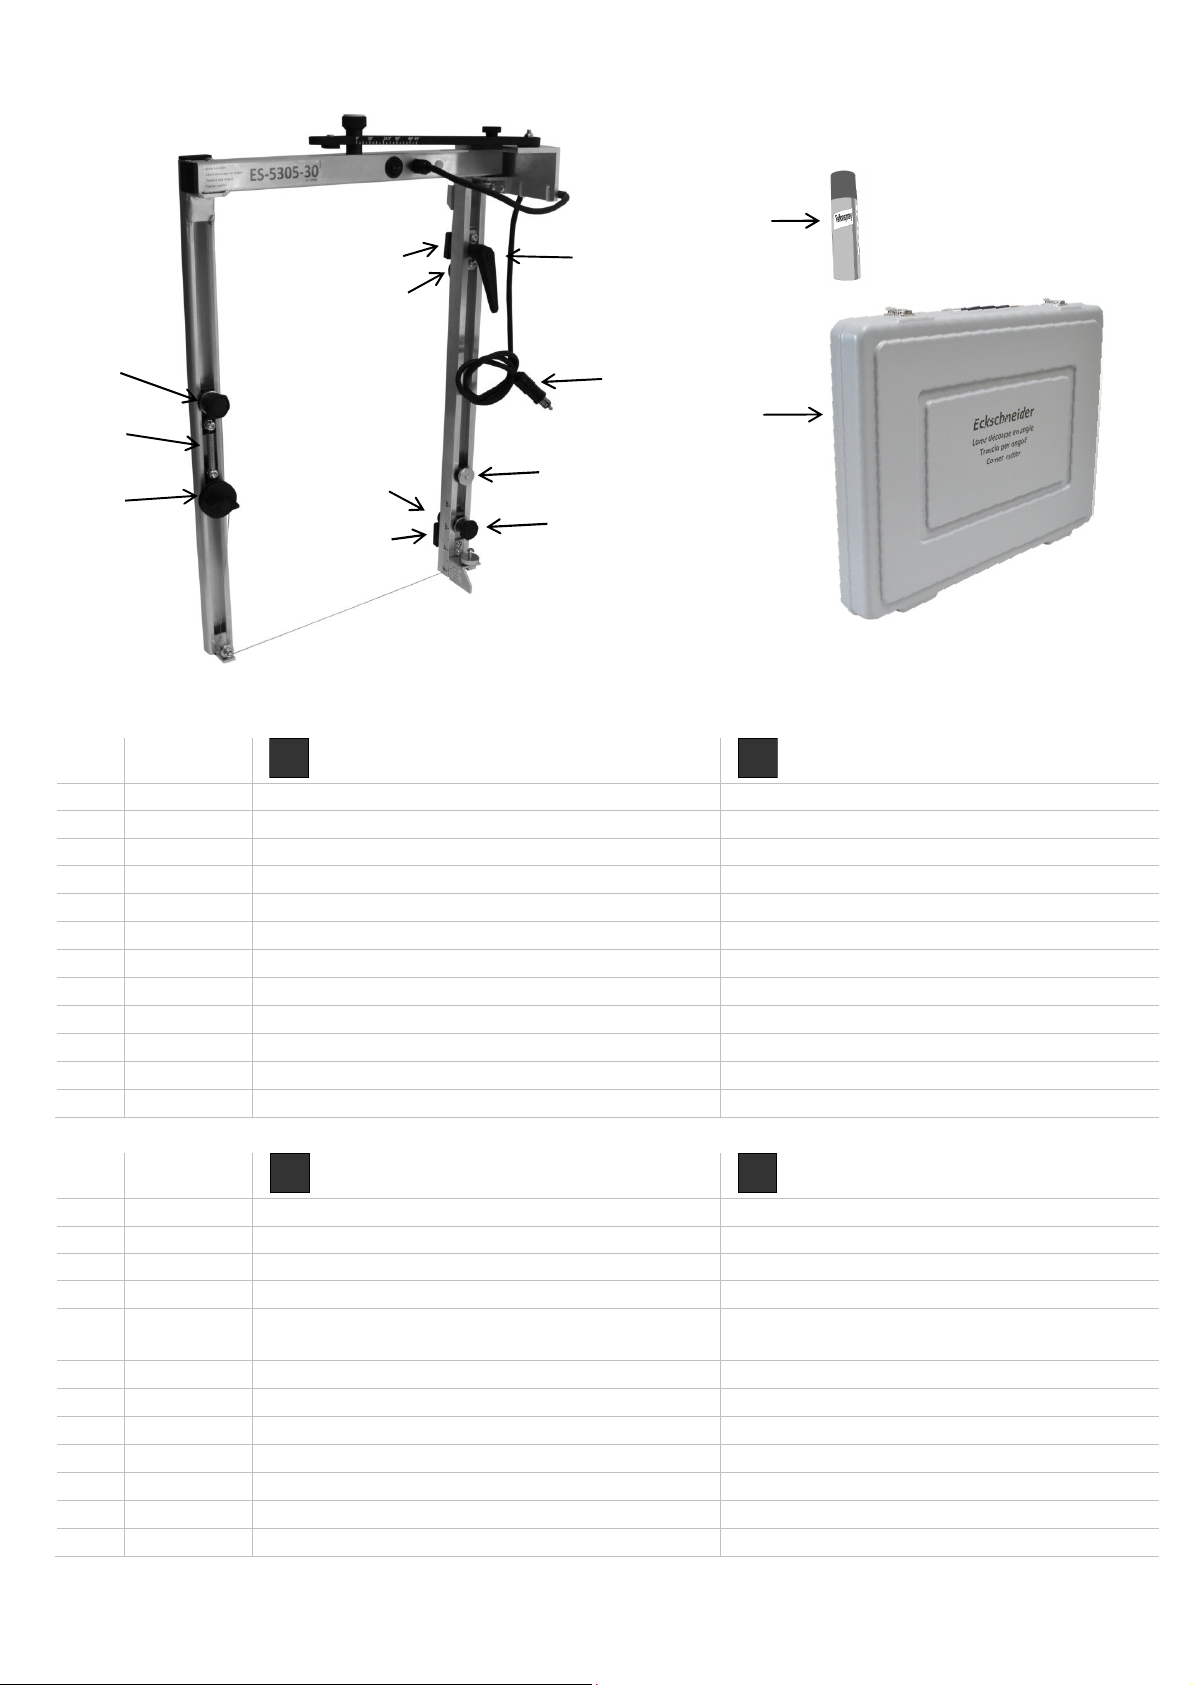
Lieferumfang | Volume de fournitures | Corredo di fornitura | Scope of delivery
D
Lieferumfang: Eckschneider ES-5305-x0, Teflonspray, Anleitung.
Lieferung ES-5305-30 mit ABS-Transportkoffer, ES-5305-40 im Karton
Technische Daten: Schnittlänge: 31/41 cm Schnitttiefe: 52 cm Gewicht Gerät: 2.0 kg
Zuschnitt : Thermisch Stromversorgung: über Trafo am Standgerät
F
Volume de livraison : Découpeuse dángle, type ES-5305-x0, spray au téflon, mode d’emploi.
Livraison ES-5305-30 avec valise ABS, ES-5305-40 dans le carton
Caractéristiques
techniques :
Longueur de coupe: 31/41 cm Profondeur de coupe : 52 cm Poids de l’appareil: 2.0 kg
Découpe : thermique Alimentation électrique : via le transformateur sur la
découpeuse à fil chaud
I
Corredo di fornitura : Dispositivo di taglio angoli modello ES-5305-x0, Teflonspray, Istruzioni d’uso.
Consegna ES-5305-30 con valigetta ABS, ES-5305-40 in una scatola.
Dati tecnici: Lunghezza di taglio: 31/41 cm Profondità di taglio: 52 cm Peso: 2.0 kg
Taglio: termico Alimentazione: mediante trasformatore della taglierina a filo in-
candescente
GB
Scope of delivery: Edge cutter type ES-5305-x0, Teflon spray, operating instructions.
Delivery of ES-5305-30 with ABS suitcase, ES-5305-40 in the carton.
Technical details: Cutting length: 31/41 cm Cutting depth: 52 cm Equipment weight: 2.0 kg
Cut: Thermal Power supply: Via transformer to glow wire cutting equipment
D
Sicherheitshinweise - Vorwort
Diese Anleitung ist die Grundlage zur Bedienung des Glühdraht-Schneidegeräts. Sie verdient Ihre volle Aufmerksamkeit.
Bevor Sie mit irgendwelchen Arbeiten an oder mit dem Gerät beginnen, verpflichten wir Sie, die vorliegende Anleitung und die
separaten Sicherheitsbestimmungen bis zum Schluss sorgfältig durchzulesen. Bestehen irgendwelche Unklarheiten, sprechen
Sie uns umgehend dazu an. Nehmen Sie das Gerät nicht in Betrieb solange Unklarheiten bestehen. Mit der Inbetriebnahme
des Gerätes bestätigen Sie, dass Sie die Anleitung gelesen und verstanden haben und somit die Betriebsverantwortung über-
nommen haben.
F
Remarques de sécurité concernant les coupeuses à filament incandescent – Préface
Ce mode d’emploi est la base pour le maniement de la coupeuse à filament incandescent. Veuillez le consulter avec beau-
coup d’attention.
Avant de commencer quelques travaux que ce soit ou avant d’utiliser la coupeuse, nous vous engageons à lire le présent
mode d’emploi et les remarques de sécurité séparé a minutieusement jusqu’à la fin. S’il y a quelques confusions, n’hésitez
pas à nous contacter immédiatement. Ne mettez pas la coupeuse en service tant qu’il y a des confusions. Avec la mise en
service de la coupeuse, vous confirmez que vous avez lu le mode d’emploi et que vous l’avez compris et ainsi vous prenez en
charge la responsabilité du bon fonctionnement.
I
Avvisi di sicurezza per la trancia a filo incandescente - Premssa
Le presenti istruzioni sono la base per l’uso della taglierina a filo incandescente.
Prima di iniziare qualsiasi operazione sull’apparecchio o con l’apparecchio, vi chiediamo di impegnarvi a leggere attentamente
le presenti istruzioni e la avvertenze di sicurezza separato fino alla fine. Qualora dovessero esservi dei punti non chiari, con-
tattateci immediatamente e parlatecene. Non mettete in funzione l’apparecchio fino a quando sussistono questi dubbi. Met-
tendo in funzione l’apparecchio, confermate di avere letto le istruzioni e di esservi assunto la responsabilità del relativo eserci-
zio.
GB
Hot wire cutter safety advice and instructions manual - Foreword
These instructions must be read before using the hot wire cutter. Please read them carefully.
Before you begin any work or begin using the tool, you must carefully read this introduction and the separate safety advice . If
you have any queries, please do not hesitate to contact us. Do not use the tool if you continue to be unsure about any aspect.
When you begin to use the tool, you tacitly confirm that you have read and understood the introduction and that you take full
responsibility for the operation of the tool.
1903161 | 08-2013 | spewe.ch
ES-5305-30 | ES-5305-40
3
Inbetriebnahme | Installation | Messa in funzione | Setting the Device Up
D
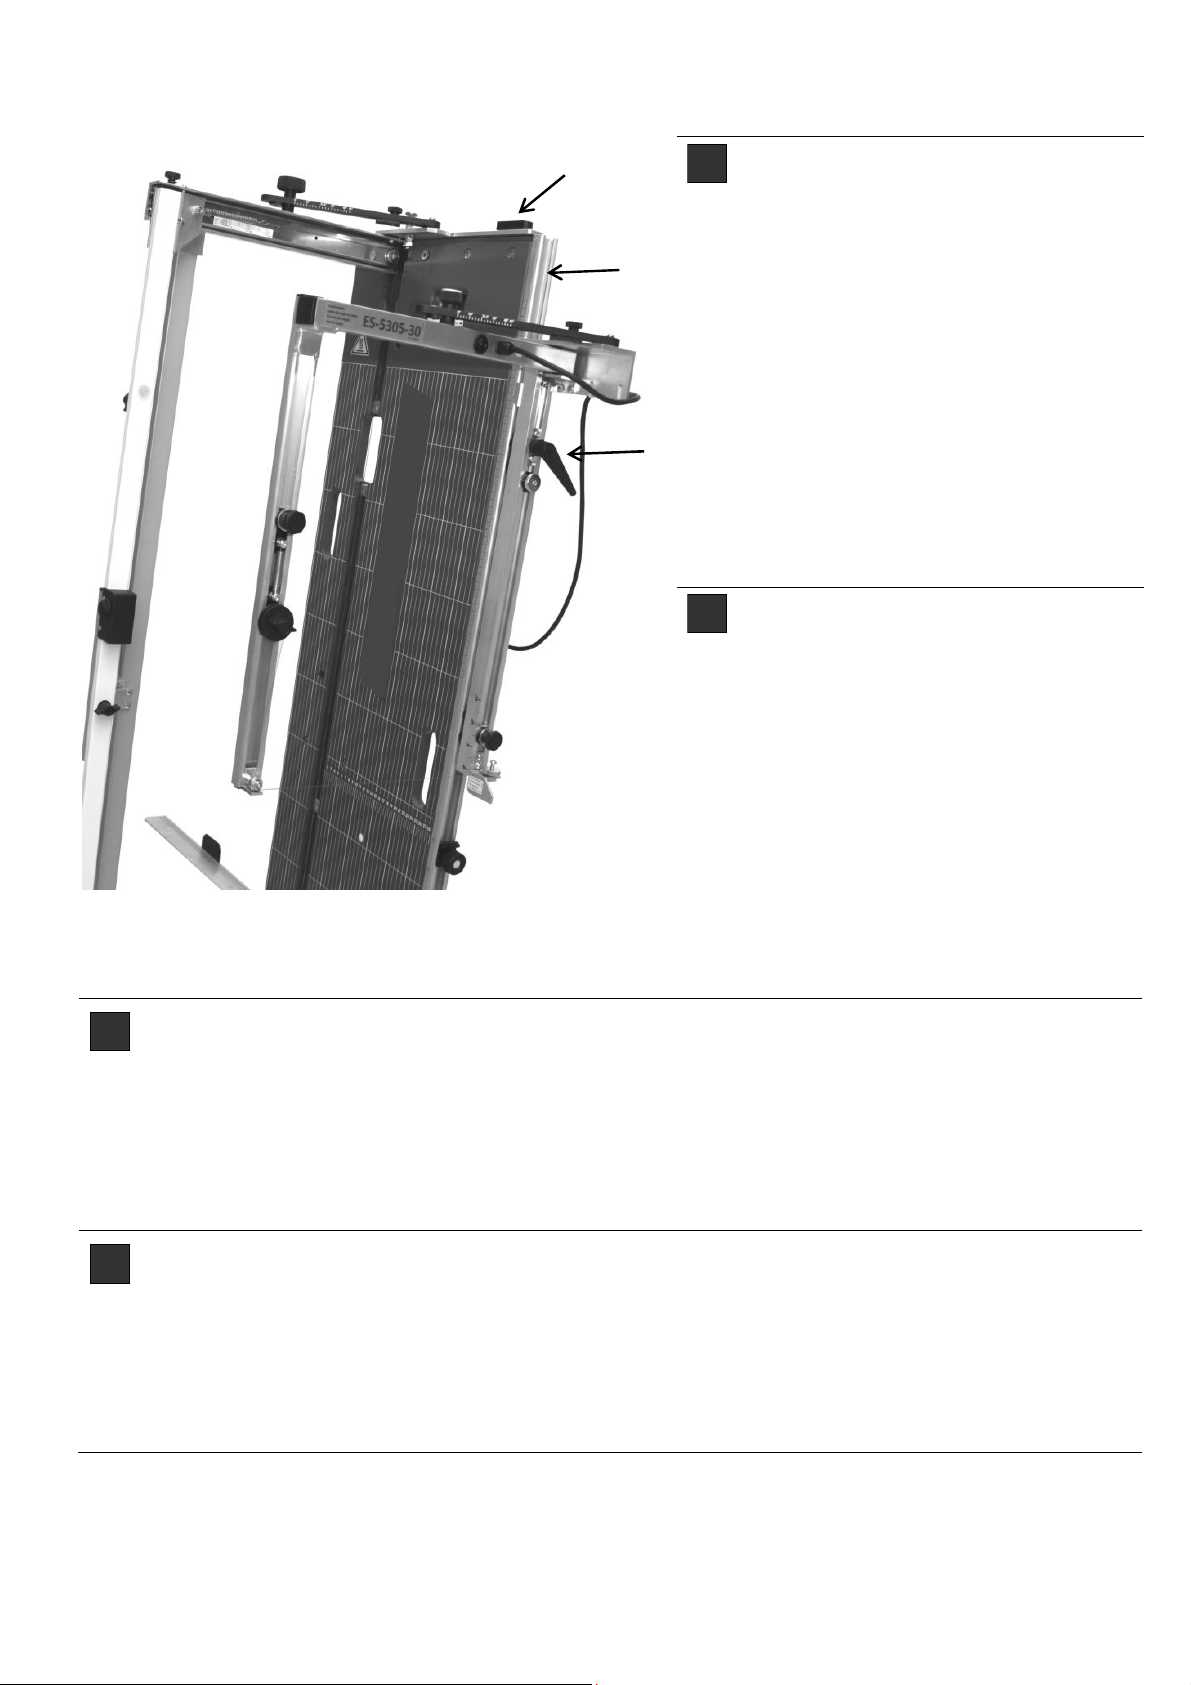
Inbetriebnahme
Bei nachträglichem Zukauf des Eck-
schneiders bitte aufrechte Führungs-
schiene (1) am Standgerät mit beilie-
gendem Teflonspray innwendig auf
ganzer Länge leicht einsprühen und
trocknen lassen. (Monatlich wieder-
holen)
Eckschneider mittels grauen Teflon-
gleiter in aufrechte Schiene einführen
und Klemmhebel (2) fixieren.
C-Schiene (1) mit Sicherungshebel
am Geräteende (1a) schliessen.
Eckschneider an schwarzem Gehäu-
se an Standgeräte-Rückseite einste-
cken.
F
Mise en service
Si vous ajoutez la découpeuse
d’angle à un équipement, veuillez ap-
pliquer une légère pulvérisation de
téflon avec la bombe fournie sur la
glissière verticale (1) tout le long de
l’intérieur de l’appareil de base et
laisser sécher (refaire tous les mois)
Introduire la découpeuse dans la glis-
sière verticale avec le curseur de té-
flon gris et fixer le levier de serrage
(2). Fermer la glissière C (1) avec le
levier de blocage (1a)
Emboîter la découpeuse sur le boîtier
noir à l’arrière de l’appareil de base.
I
Messa in esercizio
Se la taglierina angolare viene acquistata successivamente, nebulizzare del teflon sulla guida (1)
delsupporto, su tutta la lunghezza e lasciare asciugare ripetere ogni mese).
Inserire la taglierina angolare con teflon grigio e fissare la leva di serraggio (2). Chiudere la guida
C (1) con la leva di fissaggio (1a).
Inserire il dispositivo di taglio angoli nella sede nera nella parte posteriore dell’apparecchio a pavi-
mento.
GB
Initiation
In the event of a subsequent additional purchase of the edge cutter, please slightly spray the verti-
cal guide rail (1) on the standing equipment with the Teflon spray enclosed and allow to dry. (re-
peat every month)
Insert edge cutter with grey Teflon slide into vertical rail and secure clamp lever (2). Close C rail (1)
with securing lever (1a).
Insert edge cutter in standing equipment rear on the black case.
1
2
1a
4
ES-5305-30 | ES-5305-40
1903161 / 08-2013
Schnittvarianten | Variantes de coupes | Varianti di taglio | Cutting variants
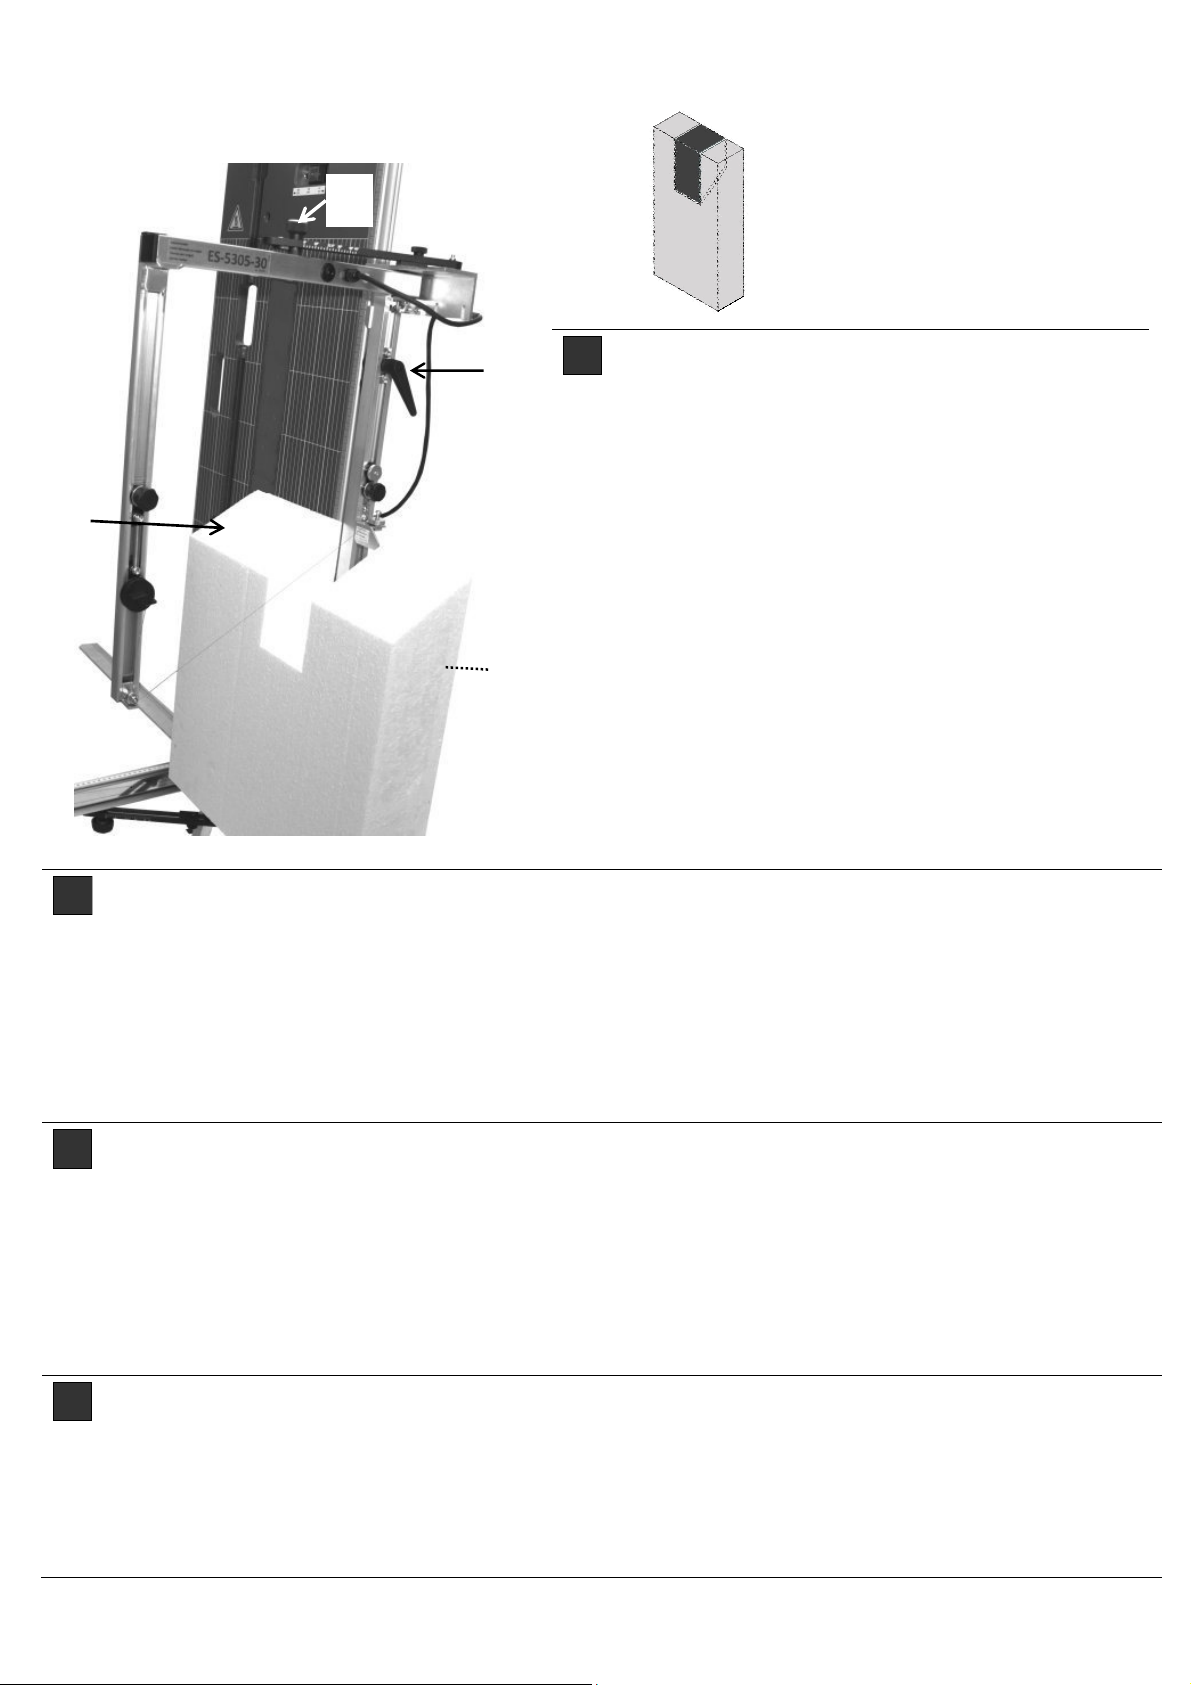
D
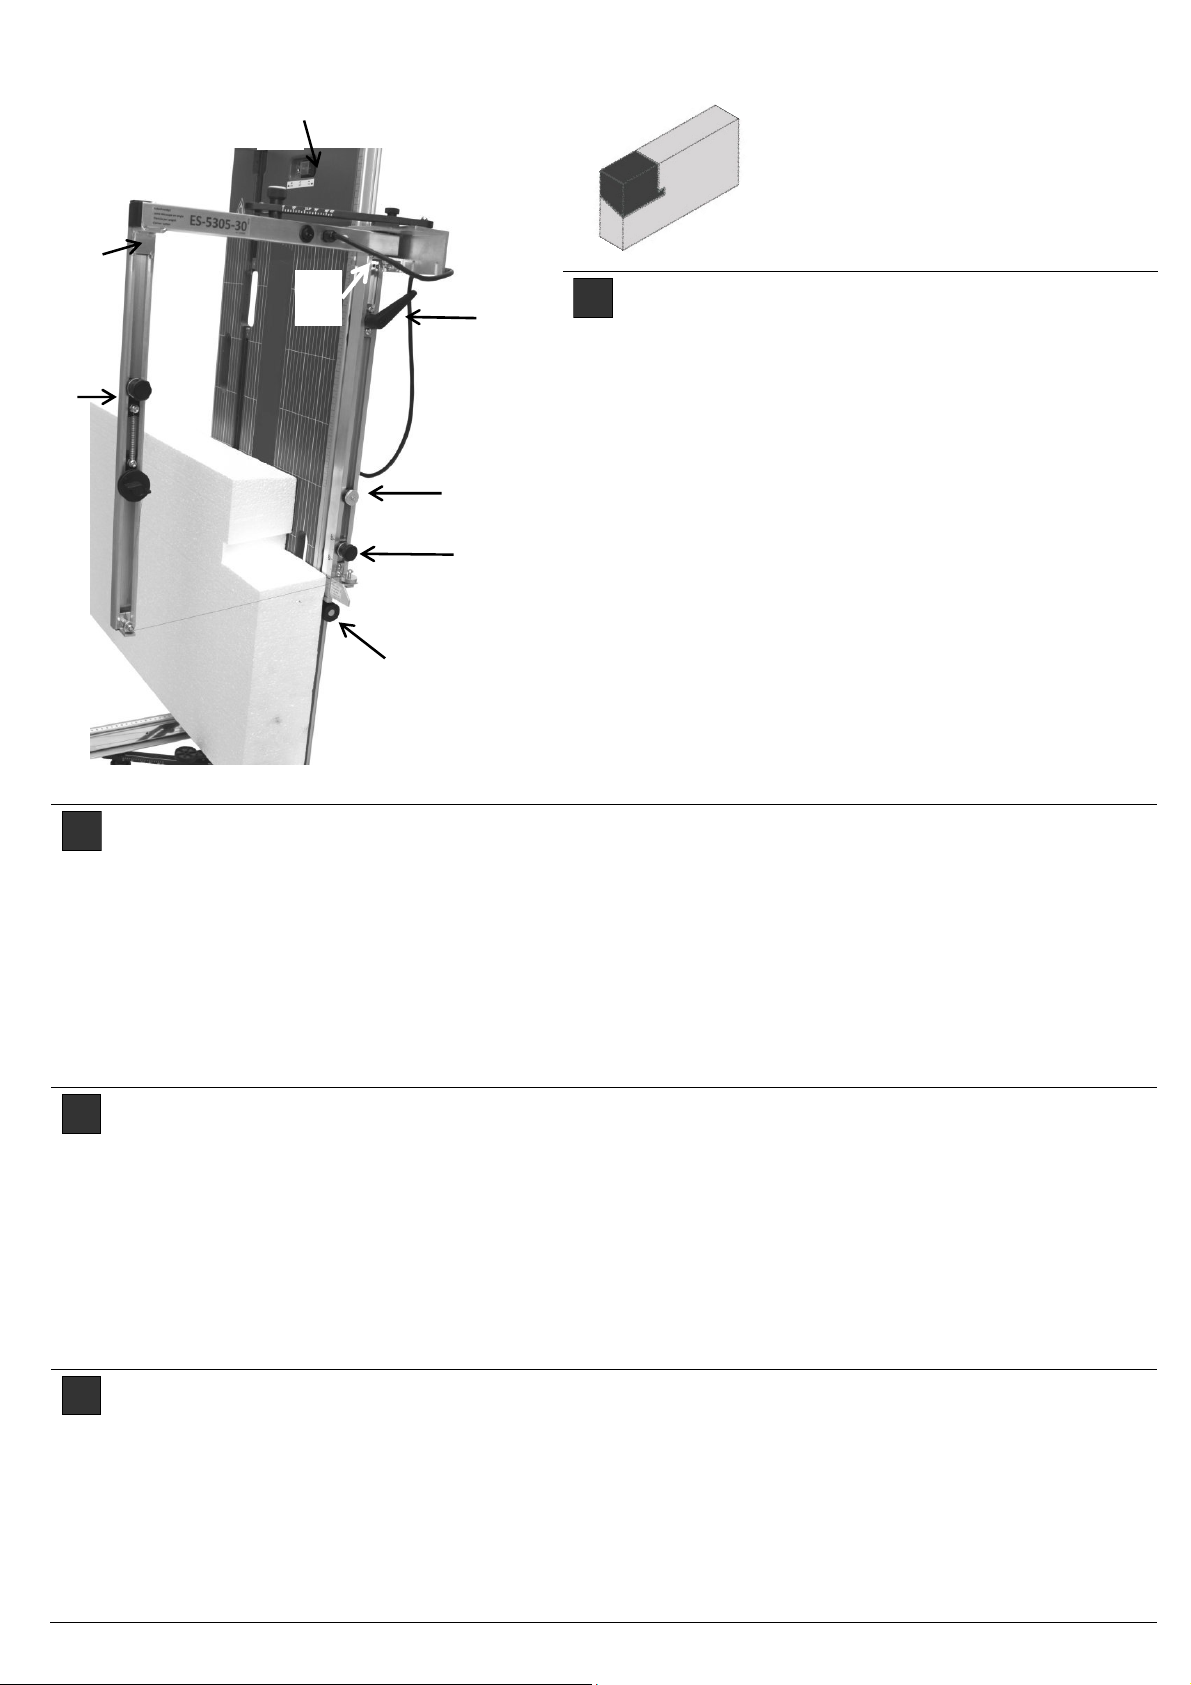
Schrägschnitt:
Reiter (3) mit rechter Hand in gewünschte Neigung
schieben und gleichzeitig Drahtspanner (4) mit lin-
ker Hand nachführen und straffen.
Reiter (5) an (3) führen. Somit sind allfällige Wie-
derholungsschnitte bereits fixiert, auch wenn Reiter
(3) zu einer anderen Neigung umgestellt wird.
Ausschnitttiefe mit Reiter (6) an langer Führungs-
schiene festlegen.
Eckschneider an Wippenschalter (W) nach rechts
drückend einschalten, Klemmhebel (2) nur leicht
lösen, Eckschneider bis zum Reiter (6) gleiten las-
sen und Dämmplatte bei einem Eckausschnitt nach
links oder rechts wegziehen.
Eckschneider vorzugsweise im hinteren Bereich (7)
des Querrohres oder am Klemmhebel haltend
hochschieben. Klemmhebel leicht fixieren und Gerät
ausschalten.
Eckschneider NICHT an vorderer Aluschiene
(7a) hochdrücken !
F
Coupe en biais: Pousser dans la position requise le curseur (3) à l’aide de la main droite tout en vérifiant et en
tendant le tendeur de filament (4) à l’aide de la main gauche.
- Positionner le curseur (5) sur (3). Ainsi, les coupes répétitives éventuelles sont déjà en place même si le curseur
(3) est réglé pour une nouvelle inclinaison.
- Définir la profondeur de coupe à l‘aide du curseur (6) sur la glissière longue.
- Mettre en marche la découpeuse d’angle sur le commutateur basculant (W) en appuyant à droite, desserrer légè-
rement (2) le levier de serrage, laisser glisser la découpeuse jusqu'au curseur (6) et retirer l'isolant à gauche et à
droite pour une découpe d’angle.
- Lever de préférence la découpeuse d’angle à l’arrière du tube transversal ou sur le levier tout en le maintenant.
Fixer sans forcer le levier le blocage et arrêter l’appareil.
NE PAS pousser la découpeuse d’angle sur le rail d’aluminium avant (7a)
I
Taglio obliquo: spingere il corsoio (3) nell’inclinazione desiderata con la mano destra e tendere contemporanea-
mente il tendifilo con la mano sinistra;
accostare il corsoio (5) su (3). In questo modo vengono fissati tutti i tagli ripetitivi anche nel caso in cui il corsoio (3)
sia impostato con una diversa inclinazione;
Definire la profondità di intaglio con il corsoio (6) sulla guida lunga;
Attivare il dispositivo di taglio angoli spostando l'interruttore a bilico (W) verso destra, allentare leggermente la leva
di fissaggio (2), far scorrere il dispositivo di taglio angoli fino al corsoio (6) e rimuovere la piastra insonorizzante da
sinistra o da destra;
Sollevare il dispositivo di taglio angoli nella parte posteriore del tubo longitudinale o sulla leva di fissaggio, afferran-
dola. Fissare leggermente la leva di fissaggio e spegnere l’apparecchio.
NON sollevare la taglierina afferrandola per la guida di alluminio anteriore (7a).
GB
Slope cut: Push slide (3) with right hand into desired slope and follow up wire tensioner (4) with left hand and
tension.
Direct slide (5) to (3). This means that any repeat cuts are already fixed, even if the slide (3) is readjusted o a
different slope.
Set cutting depth with slide (6) on long guide rail.
Activate edge cutter on rocker switch (W) by pressing to the right, only slightly loosen clamp lever (2), allow edge
cutter to move to the slide (6) and retract the insulation board with an edge cut to the left or right.
Preferably push up the edge cutter holding the cross tube or on the clamp lever in the rear area. Fit clamp lever
slightly and switch off the equipment.
Do NOT press up the edge cutter on the front aluminium rail (7a).
4
5
3
6
W
2
7a
7
1903161 | 08-2013 | spewe.ch
ES-5305-30 | ES-5305-40
5
Schnittvarianten | Variantes de coupes | Varianti di taglio | Cutting variants
D
Dachsparrenausschnitt:
Dachneigung an allen Dämmplatten gemäss Ge-
bäudelänge mit langem Draht zuschneiden. (8)
- Neigung an Eckschneider wie oben beschrieben
(Schrägschnitt) einstellen.
- Sparrenausschnitt an Dämmplatte markieren,
Sparrenhöhe mittels Reiter (6) fixieren.
- Einschnitt senkrecht ausführen, Dämmplatte um
Sparrenbreite verschieben, Eckschneider hoch-
schieben und mittels Klemmhebel (2) fixieren.
Sparrenausschnitt kann bei liegender Platte auch
an Stirnseite ausgeschnitten werden.
Gewünschte Neigung durch Abschwenken des
Eckschneiders positionieren und mittels
Sterngriff (9) fixieren. Sparrenhöhe mittels Reiter
(6) fixieren.
F
Découpe de chevrons : Découper l’inclinaison du toit sur tous les panneaux isolants selon la longueur
avec un filament long (8).
Régler l’inclinaison sur la découpeuse d'angle comme décrit ci-dessus (coupe en biais).
Marquer la découpe des chevrons sur l’isolant, fixer la hauteur de chevron par curseur (6) Pratiquer une
incision verticale, déplacer l'isolant autour de la largeur du chevron et remonter la découpeuse et la fixer
sans forcer avec le levier de serrage (2).
Les chevrons peuvent être aussi découpés sur la face avant en laissant le panneau couché. Positionner
l'inclinaison requise en tournant la découpeuse d’angle et la fixer au moyen de la poignée étoile (9).
Fixer la hauteur des chevrons au moyen du curseur (6).
I
Taglio per travetti: Intagliare l’inclinazione del tetto di tutte le piastre insonorizzanti in funzione della
lunghezza con il filo lungo (8).
Impostare l’inclinazione sulla taglierina come descritto sopra (taglio longitudinale);
Marcare l’intaglio sulle piastre insonorizzanti, fissare l’altezza del travetto con il corsoio (6); - effettuare il
taglio verticalmente, spostare la piastra insonorizzante e la larghezza del travetto e sollevare la taglierina
verticale fissandola leggermente con la leva di fissaggio (2);
l’intaglio del travetto può essere effettuato anche con piastra orizzontale sul lato frontale. Posizionare
l'inclinazione desiderata orientando il dispositivo di taglio angoli e fissarlo con l’impugnatura a stella
(9). Fissare l'altezza con il corsoio (6).
GB
Rafter section: Cut the roof slope on all insulation boards in accordance with the long wire (8).
Set slope on edge cutter as described above (slope cut).
Mark rafter section on insulation board, fit rafter height with slide (6). Perform insection vertically, remove
insulation board by rafter width and push edge cutter back up and fit slightly with clamp lever (2).
Rafter section can also be cut out on front side if the board is lying down.
Position desired slope by tilting the edge cutter and fit with star handle (9).
Fit rafter height with slide (6).
2
9
6
8
6
ES-5305-30 | ES-5305-40
1903161 / 08-2013
Justierung | Ajustage | Torsiometrica | Adjustment
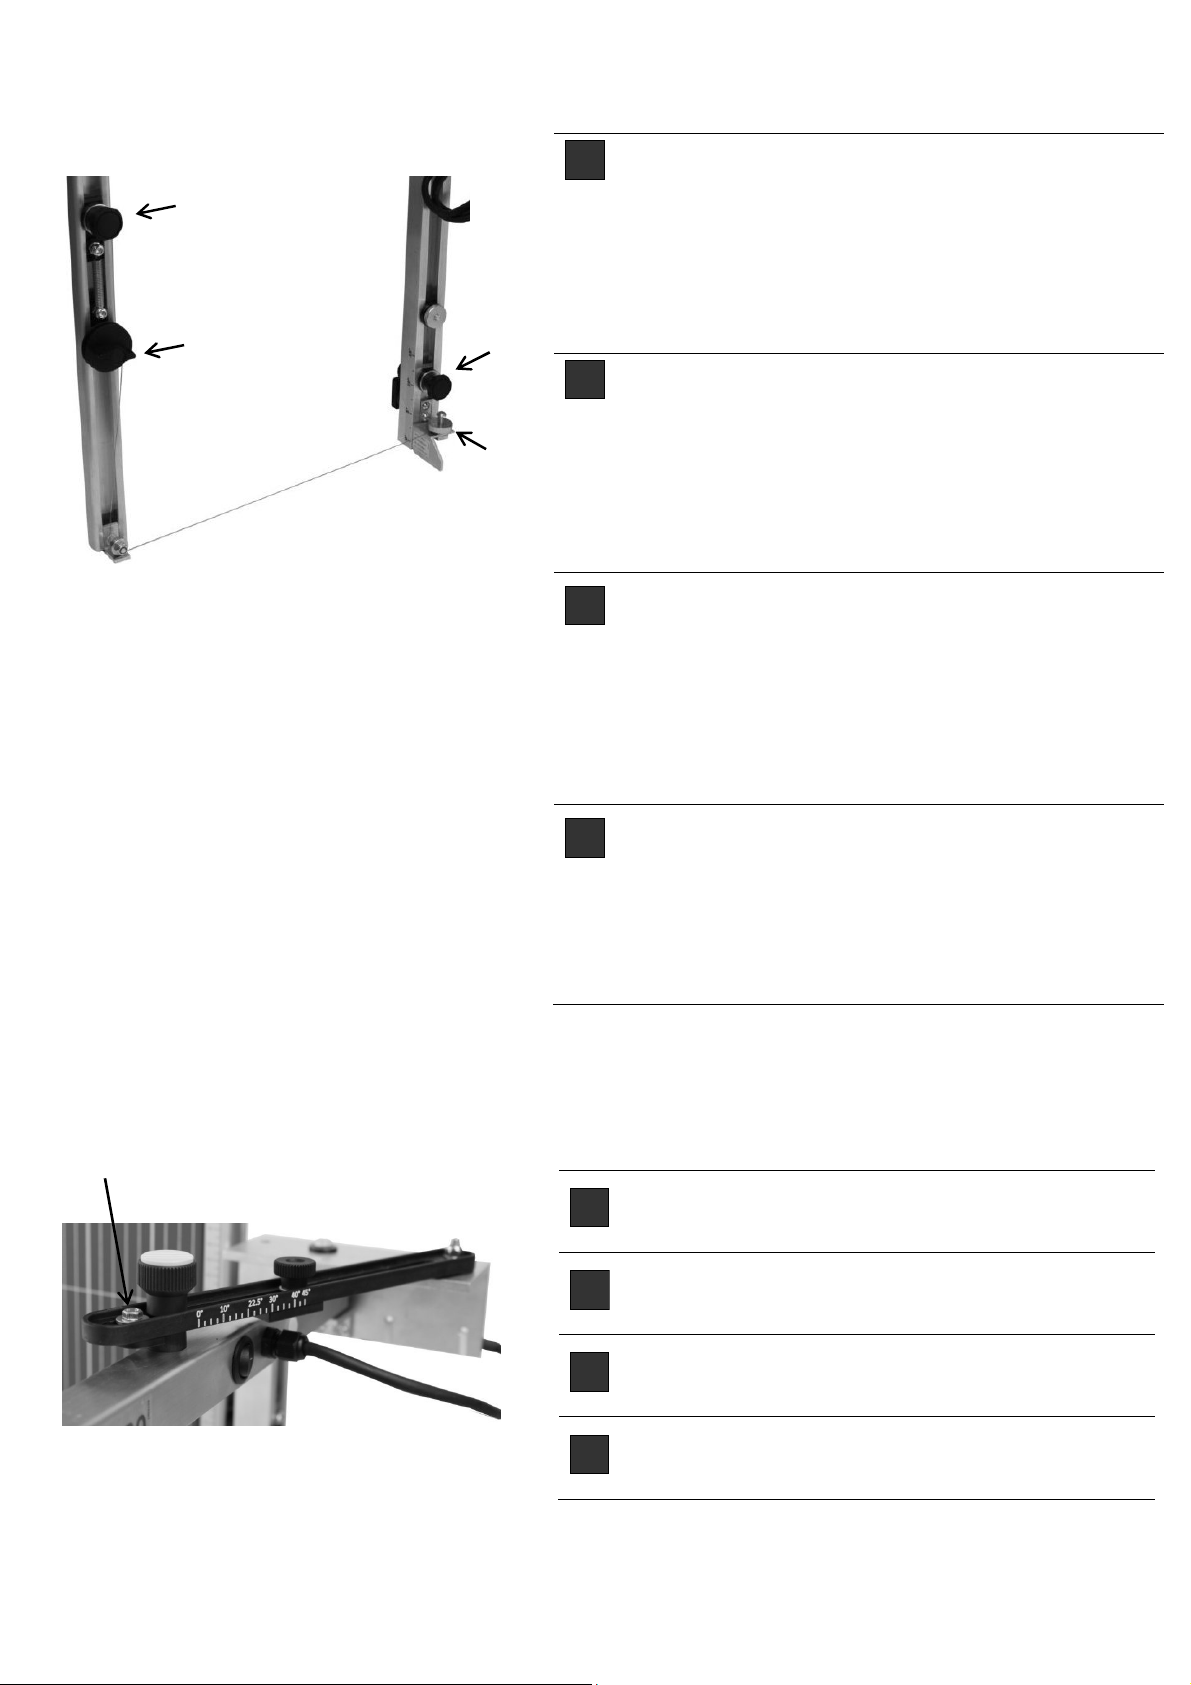
D
90° Draht-Justierung: Gleiter (3) ganz nach unten
schieben. Durch Drehen der Drahtaufnahmerondelle
(10) wird die exakte 90° Justierung vorgenommen.
Parkposition: Wird der Eckschneider nicht benötigt,
lässt sich dieser soweit abschwenken, dass ein un-
gehindertes Arbeiten mit dem Standgerät möglich
ist.
Der Eckschneider muss nicht demontiert werden.
F
Ajustement à 90° Pousser tout en bas le curseur (3)
L’ajustement exact à 90° s’obtient en tournant la
rondelle de réception du filament (10)
Position d’arrêt : Si la découpeuse d’angle est inu-
tile, elle se laisse tourner de manière à permettre un
travail sans entrave sur l‘appareil de base.
La découpeuse d’angle ne doit pas être obligatoire-
ment démontée.
I
Regolazione a 90°: abbassare completamente il
corsoio (3). La regolazione esatta a 90° si ottiene
ruotando la rotella del filo (10).
Posizione “parcheggio”: qualora non si renda
necessario utilizzare il dispositivo di taglio angoli,
sarà possibile abbassarlo in modo tale da non intral-
ciare le operazioni dell’apparecchio a pavimento.
Non è necessario smontarlo.
GB
90° adjustment: Push slide (3) all the way down. By
rotating the wire intake roundels (10), the exact 90°
adjustment is performed.
Parking position: If the edge cutter is not required,
it can be pivoted so that unobstructed working with
the standing equipment is possible. The edge cutter
does not have to be dismounted.
3
10
11
4
D
90°-Schnittwinkel kann mittels Reiter [14] exakt
nachjustiert werden.
F
Un angle de coupe de 90° peut être ajusté avec
précision au moyen du curseur [14].
I
L’archetto per taglio a 90° può essere nuovamente
regolato in modo esatto mediante il corsoio [14].
GB
90° cutting angles can be readjusted precisely with
a slide [14].
14

1903161 | 08-2013 | spewe.ch
ES-5305-30 | ES-5305-40
7
Justierung | Ajustage | Torsiometrica | Adjustment
Draht ersetzen, Draht nachziehen | Remplacer, retendre le filament | Sostituire il filo, tendere il
filo | Installing New Wire, Re-Tightening the Wire
D
Draht nachziehen:
Drahtrest aus Rondelle (10) entfernen und Rondelle
mit Drahtdurchführungsloch nach hinten drehen.
Flügelgriff (11) an Endlosdrahtspule leicht lösen,
neuen Draht vorziehen, bei Rondelle von unten
einfädeln (12) und mittels einfachem Schlick (13)
sichern. Überschüssiger Draht auf Drahtspule zu-
rückwickeln und Flügelgriff (11) wieder gut fixieren.
Anschliessend Draht mittels Sterngriff (4) spannen.
F
Resserrer le filament
Enlever le reste de filament de la rondelle (10) et
tourner vers l’arrière avec le trou guide filament
Desserrer la poignée-étoile (11) sur la bobine de fil
en continu, sortir le filament neuf, l’enfiler (12) de-
puis le bas et bloquer avec un simple fil de fer noué
(13).
Rembobiner sur la bobine le filament en excès et
bien fixer de nouveau la poignée étoile (11).
Puis serrer le fil au moyen de la poignée-étoile (4).
12
13
10
I
Serraggio filo:
Rimuovere i residui di filo dalla rondella (10) ruotando la rotella all’indietro con il foro guidafilo.
Allentare leggermente l’impugnatura a stella (11) sulla bobina del filo, tirare del filo nuovo e infilarlo
dalla parte inferiore (12), fissarlo con un’asola semplice (13)
Riavvolgere il filo in eccesso sulla bobina e fissare l’impugnatura a stella (11).
Serrare il filo con l’impugnatura a stella (4).
GB
Tightening the wire:
Remove remaining wire from the roundel (10) and turn roundel back with wire guiding hole.
Slightly loosen star handle (11) on endless coil, pull wire forward, at roundel thread from the bottom
(12) and secure with simple ooze (13). Rewind excessive wire on wire coil and fit star handle (11)
again.
Subsequently tighten wire with star handle (4).
D
Teflongleiter (15) kann mit Schraube (16) exakt
nachjustiert werden.
F
Guide teflon (15) peut être après ajusté exacte-
ment avec la vis (16).
I
Piedini in teflon (15) possono essere regolate con
vite (16) esattamente.
GB
Teflon glider (15) can be readjusted exactly with
screw (16)
15
16
8
ES-5305-30 | ES-5305-40
1903161 / 08-2013
Ersatzteilliste | Nomenclature | Elenco parti di ricambio per modello | Spare parts list
D
Ersatzteile
F
Nomenclature
1 1200016 Ersatzdrahtspule 0.5mm / 6m Bobine de fil de remplacement 0.5mm / 6m
2 1900065 Gerätestecker Fiche de connexion de l’appareil
3 1900545 Klemmhebel Gross M6/80 Grand levier de serrage M6/80
4 1900575 Rändelmutter Metall, M6 Ecrou molleté métallique, M6
5 1900713 Schrägstellreiter hinten (komplett) Curseur d’inclinaison arrière (complet)
6 1900588 Sterngriffmutter 28-M6 Manette M6, D=28mm
7 1901758 Flügelgriffgriffmutter 32-M6-S poignée papillon M6-S, 32mm
8 1900648 Teflongleiter grau, 33x23mm Guide teflon gris, 33x23mm
9 1900649 Teflonscheibe grau, 27x8mm Disque teflon gris, 27x8mm
10 1900463 Teflonspray, Dose 100ml Spray teflon, boîte 100ml
11 1900521 Zugfeder Ressort de traction
12 1200048 ABS-Koffer ES-530x-30 / ES-600x-30 Bac de transport ES-530x-30 / ES-600x-30
I
Pezzi di ricambio
GB
Spare parts list
1 1200016 Bobina del filo di ricambio 0,5 mm / 6 m Spare wire coil 0.5mm / 6m
2 1900065 Spina connettore Connector
3 1900545 Leva di bloccaggio M6/80 Clamp lever large M6/80
4 1900575 Dado zigrinato metallico, M6 Knurled nut metal, M6
5 1900713 Corsoio di posizionamento posteriore
(completo) Inclination slide rear (complete)
6 1900588 Dado a stella M6, D=28mm Star handle nut M6, D=28mm
7 1901758 Dado a stella M6-S, 32mm T-handle nut M6-S, 32mm
8 1900648 Guida di teflon, grigia, 33x23 mm Teflon slide grey, 33x23mm
9 1900649 Rondella di teflon grigia, 27x8 mm Teflon disc grey, 27x8mm
10 1900463 Teflonspray, 100ml Teflon spray, tin 100ml
11 1900521 Molla di tensione Tension spring
12 1200048 Coppa di trasporto ES-530x-30 / ES-600x-30 Transport bowl ES-530x-30 / ES-600x-30
6
1,7
4
2
3
5
8
8
9
9
10
11
12
This manual suits for next models
2
Other SPEWE Cutter manuals

SPEWE
SPEWE 392GT User manual

SPEWE
SPEWE 112SL-28 Manual

SPEWE
SPEWE 1900L-30 User manual

SPEWE
SPEWE 112SL-28 User manual

SPEWE
SPEWE 890SL User manual

SPEWE
SPEWE 1900ML-30 04 Series User manual

SPEWE
SPEWE 3500EL-40 Manual

SPEWE
SPEWE DT104-28 User manual

SPEWE
SPEWE 890SL User manual

SPEWE
SPEWE FD144T-30 User manual

SPEWE
SPEWE 212GS-30 User manual

SPEWE
SPEWE DT104-28 User manual

SPEWE
SPEWE 212SL-30 User manual

SPEWE
SPEWE 791GT User manual

SPEWE
SPEWE Isoturbo 5305S-30 2014 User manual

SPEWE
SPEWE ES-212-30 User manual

SPEWE
SPEWE 5300S User manual

SPEWE
SPEWE ES-5300 User manual

SPEWE
SPEWE 1900M-24 User manual

SPEWE
SPEWE 1200169 User manual


