Steren ALA-080 User manual

Product / Producto: VIBRATION AND
MOVEMENT ALARM /ALARMA DE
VIBRACIÓN Y MOVIMIENTO
Model / Modelo: ALA-080
Brand / Marca: STEREN
CONDICIONES
1. Para hacer efectiva esta garantía se requiere: La presentación de esta póliza y del producto, en el lugar en donde fue adquirido o en ELECTRONICA STEREN S.A. DE C.V.
2. ELECTRONICA STEREN S.A. DE C.V. se compromete a reparar el producto en caso de estar defectuoso sin ningún cargo al consumidor.
3. El tiempo de reparación en ningún caso será mayor a 30 días contados a partir de la recepción del producto en cualquiera de los sitios en donde pueda hacerse efectiva la
garantía.
4. El lugar donde puede adquirir partes, componentes, consumibles y accesorios, así como hacer válida esta garantía es: En cualquiera de las direcciones arriba mencionadas.
ESTA GARANTIA NO ES VALIDA EN LOS SIGUIENTES CASOS
1. Cuando el producto ha sido utilizado en condiciones distintas a las normales.
2. Cuando el producto no ha sido operado de acuerdo con el instructivo de uso.
3. Cuando el producto ha sido alterado o reparado por personas no autorizadas por ELECTRONICA STEREN S.A. DE C.V.
Nota: El consumidor podrá solicitar que se haga efectiva la garantía ante la propia casa comercial, donde adquirió el producto. Si la presente garantía se extraviara, el
consumidor puede recurrir a su proovedor para que le expida otra póliza de garantía, previa presentación de la nota de compra o factura respectiva.
DATOS DEL DISTRIBUIDOR
DISTRIBUTION / NOMBRE /DISTRIBUIDOR:
ADDRESS / DOMICILIO:
PRODUCT / PRODUCTO: BRAND / MARCA:
MODEL / MODELO: SERIAL NUMBER / No. DE SERIE:
DATE OF DELIVERY / FECHA DE ENTREGA:
Call Center / Centro de Atención a Clientes
del Interior 01 800 500 9000
Mexico City / Cd. de México: 53 54 22 90
This Steren product is warranted under
normal usage against defects in
workmanship and materials to the original
purchaser for one year from the date of
purchase.
Garantiza este producto por el término de
un año en todas sus partes y mano de
obra contra cualquier defecto de fabricación
y funcionamiento, a partir de la fecha de
entrega.
Warranty
CONDITIONS:
1. This warranty card with all the required information, the invoice or purchase ticket, the product box or package, and the product, must be presented with the product
when warranty service is required.
2. If the product stills on the warranty time, the company will repair it free of charge even the transportation charges.
3. The repairing time will not exceed 30 natural days, from the day the claim was received.
4. Steren sells parts, components, consumables and accessories to customer, as well as warranty service, at any of the following addresses:
THIS WARRANTY IS VOID ON THE NEXT CASES:
If the product has been damage by an accident, acts of God, mishandling, leaky batteries, failure to follow enclosed instructions, improper repair by unauthorized
personal, improper safe keeping or otherwise.
Notes:
a) The customer can also claim the warranty service on the purchase establishment.
b) If you lose the warranty card, we can reissue it just showing the invoice or purchase ticket.
Póliza de Garantía

Instructivo de Uso
STEREN recomienda que antes de utilizar su nueva alarma de vibración
y movimiento lea este instructivo para evitar cualquier mal
funcionamiento.
Solo siga estas instrucciones y podrá utilizar fácilmente su nueva
alarma de vibración y movimiento.
Esta alarma es ideal para bicicletas, motocicletas e incluso equipaje.
Tiene incorporada una sirena que produce un sonido agudo y evita
robos sorpresivos
INSTALACIÓN DE LAS BATERIAS
1. Abra el compartimiento de las baterías que se encuentra en la parte
posterior.
2. Coloque 3 pilas tipo AAA (no Incluidas) dentro del compartimiento,
respetando la polaridad, vuelva a cerrar.
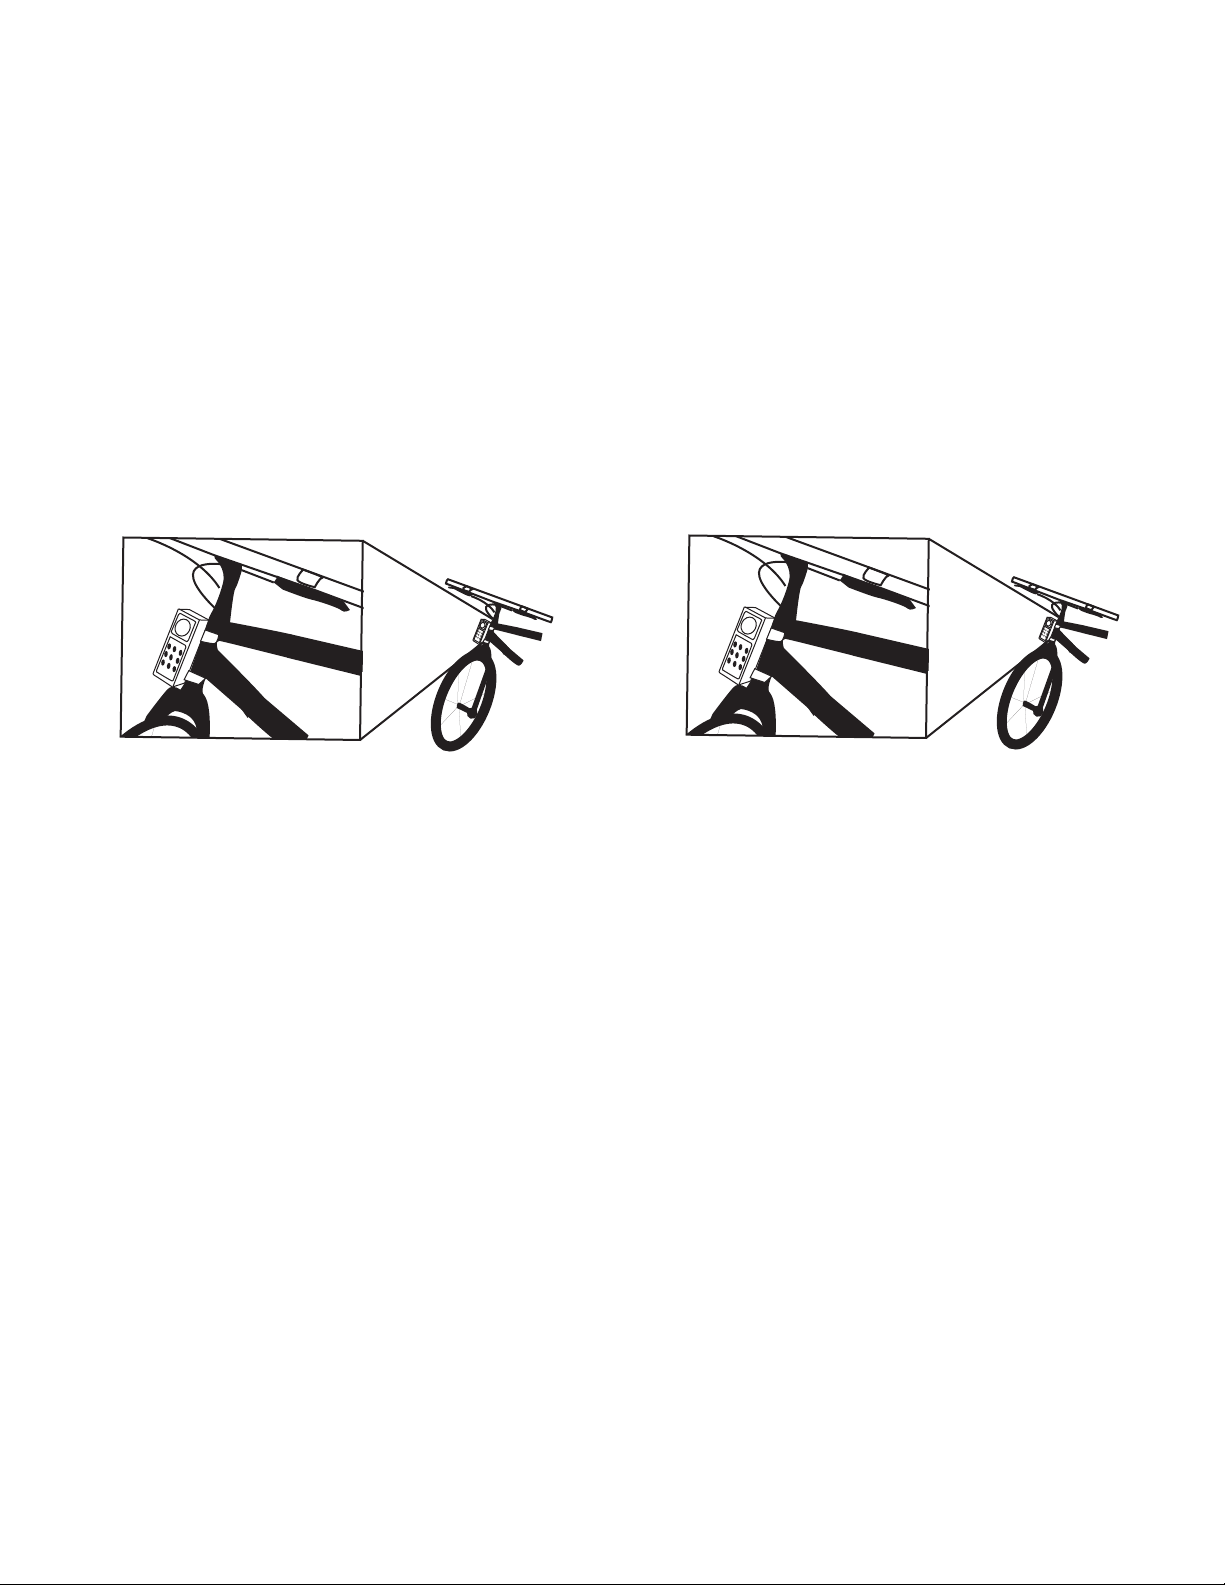
INSTALACIÓN
1. Coloque el soporte circular en la base plana con su tornillo (incluido).
Si el soporte queda flojo, coloque cualquiera de las 3 cintas de
neopreno
sobre el tubo donde va a colocar el soporte circular, para ajustarlo.
2. Coloque nuevamente su alarma dentro de la bolsa de PVC transparente.
3. Si va a ser usada como alarma de equipaje, cuélguela a la jaladora
de su equipaje utilizando la correa incluida.
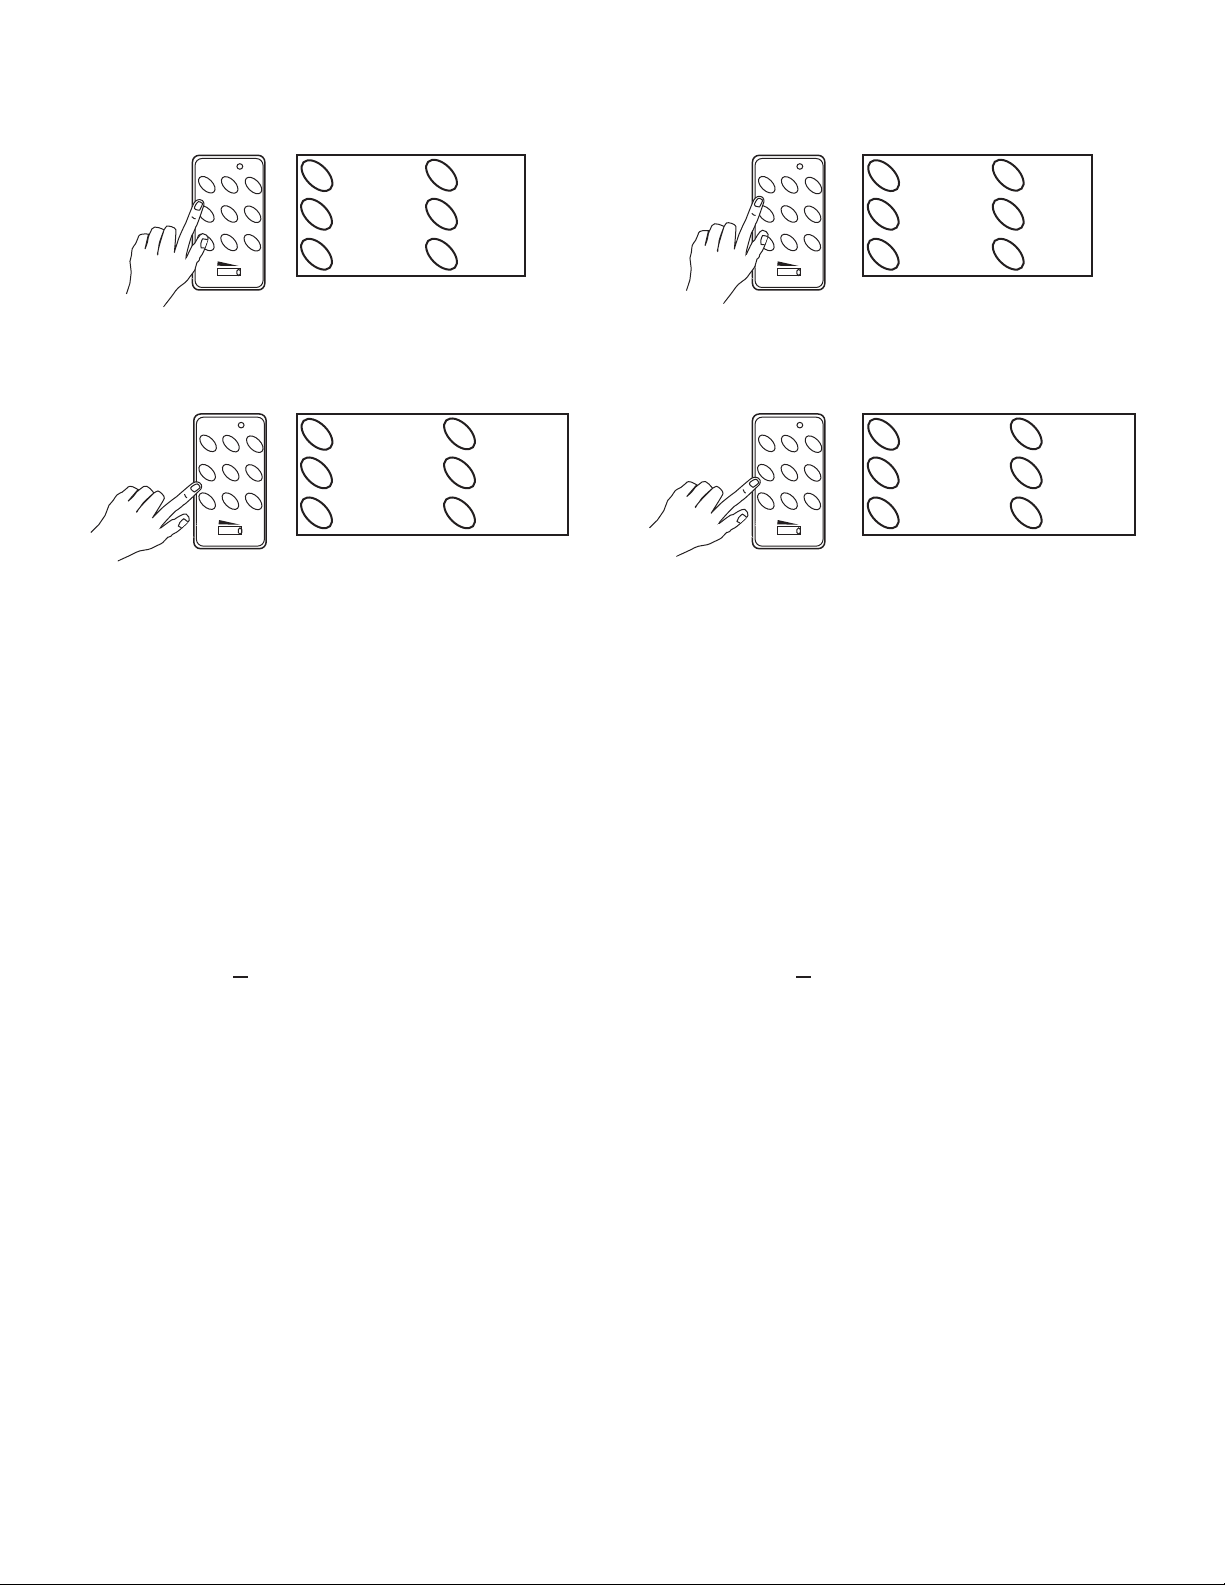
OPERACIÓN
Ajuste la sensibilidad que desee con el interruptor deslizable.
Introduzca los 3 dígitos de la contraseña (1, 2, 3) y después la función
(L). La luz verde en la parte superior derecha del frente de la alarma
(placa frontal), parpadeará y operará después de 30 segundos. Si
introduce una contraseña equivocada 3 veces seguidas la alarma se
activará inmediatamente.
Esta alarma esta ajustada o preestablecida como sigue:
Instruction Manual
STEREN recommends before use the vibration and movement alarm to
read this instruction manual to prevent any damage
Just follow these instructions and easily you will be using your new
vibration and movement alarm.
This alarm is ideal for bicycles, motorcycles and even luggage. It has
built-in a siren that produces a loud sound and avoids surprising robberies.
BATERY INSTALATIONS
a) Open the back cover of the alarm.
b) Place the 3 battery AAAtype (not including) on the battery compartment
and make sure you install them in the proper position.
INSTALLATION
1. Secure the circular stand in the back plate using the supplied screw.
Mount the circular stand on the bicycle and secure it. If the mount is
loose, stick one of the three rubber sticker in the circular stand before
mount it on the bicycle.
2. Put the alarm again on the PVC bag.
3. If the alarm is going to be used for luggage alarm, then hang it to the
handle of your suitcase using the black hanger instead of using the
mount.
OPERATION
Set the sensitivity you require by sliding the switch on the front panel.
Enter the 3 digits code (1,2,3) then function (L). The green light on the
front panel will flash and operate after 30 seconds. If you enter 3 times
sequence an incorrect code in this stage, the alarm will activate
immediately.
This alarm has its timer pre-set as follows:
- Retardo de Entrada de 8 segundos. La alarma se activará después de 8
segundos cuando el equipo se mueva. Si durante el Retardo de Entrada se
introducen 2 dígitos de la contraseña con error, la alarma sonará inmediatamente.
- Retardo de Salida/Tiempo de operación de 30 segundos. Después de introducir
su contraseña y la tecla (L), la alarma esperará 30 segundos antes de iniciar la
detección. Este es el tiempo de Retardo de Salida.
- Auto apagado después de 30 segundos. Cuando la alarma se activa, esta se
apagará automáticamente después de 30 segundos y regresará al modo de
detección.
- Modo de Reposo. La unidad regresará a Modo de Reposo cuando no se
oprima ninguna tecla por más de 1 minuto. Aún en este estado, en posición de
bajo consumo, la alarma detectará. Presione la función (F) para despertarla e
ingresar cualquier otra función.
- Delay enter at 8 seconds. The alarm will be active after 8 seconds
when the equipment moves. On delay enter mode if you enter 2
incorrect digit, the alarm will sound immediately.
- Exit Delay / Operation Time at 30 seconds. After enter the code and
press the button (L), the alarm will wait 30 seconds before starts
detecting. This is the exit delay time.
- Auto shut off at 30 seconds. When the alarm sound, it will stop
automatically after 30 seconds then will go back to detection mode.
- Standby mode. The alarm return to standby mode by itself when no
key is pressed for longer than a minute. However, the alarm still
detect during this mode in low power consume position. Press function
(F) to call up the alarm if any program processing you would apply.
Fig1. Fig1.

Instructivo de Uso
Para desactivar la alarma o terminar la operación digite su contraseña.
Cambio de Contraseña / Fijación de Modo de Tiempo
Libere la alarma del Modo de Reposo presionando el botón (F).
Instruction Manual
The reset the alarm or finish the operation, enter the 3 digit code.
Code changing / Time Mode Setting
Release the alarm from standby mode by pressing the (F) button.
1. Introduzca la contraseña de 3 dígitos pre-establecida (1, 2, 3)
.
2. Introduzca la nueva contraseña de 3 dígitos, ej. (4, 5,6)
dentro de los siguientes 30 segundos, si quiere cambiar
la contraseña existente o entrar al modo de fijación de
tiempo.
Modo de fijación de tiempo: Presione (T) y siga las
instrucciones siguientes.
1. Enter the 3 digits code already set (1, 2, 3).
2. Enter the new 3 digits code, ex. (4, 5, 6) during the next
30 seconds. If you want to change the existing code or go
in time
TimeSetting: Mode press (T) button and follow the next
instructions.
2
1 3
6
5
L
4
FT
Max Min
SENSITIVITY
2
1 3
6
5
L
4
FT
Max Min
SENSITIVITY
2
1 3
6
5
L
4
FT
Max Min
SENSITIVITY
2
1 3
6
5
L
4
FT
Max Min
SENSITIVITY
2
1 3
6
5
L
4
FT
Max Min
SENSITIVITY
2
1 3
6
5
L
4
FT
Max Min
SENSITIVITY
2
1 3
6
5
L
4
FT
Max Min
SENSITIVITY
2
1 3
6
5
L
4
FT
Max Min
SENSITIVITY
3. Modo de Programación
- Retardo de Salida. Presione y mantenga el botón (F)
después seleccione el botón (1) o (2) o (3) para diferentes
tiempos de Retardo de Salida. (ver diagrama).
2
1 3
6
5
L
4
FT
Max Min
SENSITIVITY
1
2
3
1
2
3
0 segundos 0 seg
30 seg
60 seg
30 segundos
60 segundos
3. Setting mode
- Exit delay. Press and hold (F) then select button (1) or
(2) or (3) for different exit delay time (See the diagram).
2
1 3
6
5
L
4
FT
Max Min
SENSITIVITY
1
2
3
1
2
3
0 seconds 0 seg
30 seg
60 seg
30 seconds
60 seconds

Instructivo de Uso
PÁNICO O EMERGENCIA
Presione y Mantenga el botón (F) y presione el botón (L)
Indicador de Batería Baja
Nota: Todos los modos programados y la contraseña, regresarán a los
previamente fijados de fábrica cuando la batería se remplace.
ESPECIFICACIONES
Sensor:
Nivel de sonido:
Frecuencia:
Entrada:
Consumo:
Color:
Tamaño:
Peso:
Instruction Manual
PANIC EMERGENCY
Press and hold (F) button and press (L) button
Low battery indicator
Note: All mode setting and the code setting will resume back to its time
pre-set when the battery is replaced.
SPECIFICATIONS
Sensor:
Sound level:
Frequency:
Input:
Consume:
Color:
Size:
Weight:
-Auto Apagado. Presione el botón (4) o (5) o (6) para
diferentes tiempos de Auto apagado. (ver diagrama).
- Retardo de Entrada. Presione el botón (1) o (2) o (3) para
diferentes tiempos de Retardo de Entrada.(ver diagrama).
1. Cuando la batería esta baja, la alarma emitirá un beep y
una luz roja en la placa frontal se encenderá.
2. Reemplace la batería inmediatamente para tener un
buen uso de su equipo.
1. When the battery is low, the alarm will detect it and a
beep sound will be heard and the LED, in the front panel,
will light up in red color.
2. Replace the battery immediately to make sure of the
good performance of the alarm.
--- ---
2
1 3
6
5
L
4
FT
Max Min
SENSITIVITY
2
1 3
6
5
L
4
FT
Max Min
SENSITIVITY
2
1 3
6
5
L
4
FT
Max Min
SENSITIVITY
2
1 3
6
5
L
4
FT
Max Min
SENSITIVITY
1
2
3
1
2
3
0 segundos 0 seg
30 seg
60 seg
30 segundos
60 segundos
1
2
3
1
2
3
0 seconds 0 seg
30 seg
60 seg
30 seconds
60 seconds
4
5
6
4
5
6
30 segundos 30 seg
60 seg
120 seg
60 segundos
120 segundos
4
5
6
4
5
6
30 seconds 30 seg
60 seg
120 seg
60 seconds
120 seconds
- Auto Shut off Press (4) or (5) or (6) button for different
auto shut off time. (See diagram).
- Delay enter. Press button (1) or (2) or (3) for different
delay enter time (See diagram).
De vibración
110dB
2 – 4 kHz
4,5 V (3 x AAA)
230mA
Blanco
121x46x34mm
180g
vibration
110dB
2 – 4 kHz
4,5 V (3 x AAA)
230mA
Blanco
121 x 46 x 34 mm
180g
Other Steren Security System manuals

Steren
Steren ALA-170 User manual

Steren
Steren TRS-400 User manual

Steren
Steren ALA-200 User manual

Steren
Steren CCTV-095 User manual

Steren
Steren CCTV-2100 User manual

Steren
Steren ALA-010 User manual

Steren
Steren ALA-010 User manual

Steren
Steren CCTV-972 User manual

Steren
Steren ALA-090 User manual

Steren
Steren ALA-030 User manual