Steren ALA-200 User manual

Product / Producto: CLOSET OR
DRAWNER ALARM / ALARMA PARA
GUARDARROPA O CAJON
Model / Modelo: ALA-200
Brand / Marca: Steren
CONDICIONES
1. Para hacer efectiva esta garantía se requiere: La presentación de esta póliza y del producto, en el lugar en donde fue adquirido o en ELECTRONICA STEREN S.A. DE C.V.
2. ELECTRONICA STEREN S.A. DE C.V. se compromete a reparar el producto en caso de estar defectuoso sin ningún cargo al consumidor.
3. El tiempo de reparación en ningún caso será mayor a 30 días contados a partir de la recepción del producto en cualquiera de los sitios en donde pueda hacerse efectiva la
garantía.
4. El lugar donde puede adquirir partes, componentes, consumibles y accesorios, así como hacer válida esta garantía es: En cualquiera de las direcciones arriba mencionadas.
ESTA GARANTIA NO ES VALIDA EN LOS SIGUIENTES CASOS:
1. Cuando el producto ha sido utilizado en condiciones distintas a las normales.
2. Cuando el producto no ha sido operado de acuerdo con el instructivo de uso.
3. Cuando el producto ha sido alterado o reparado por personas no autorizadas por ELECTRONICA STEREN S.A. DE C.V.
Nota: El consumidor podrá solicitar que se haga efectiva la garantía ante la propia casa comercial, donde adquirió el producto. Si la presente garantía se extraviara, el
consumidor puede recurrir a su proovedor para que le expida otra póliza de garantía, previa presentación de la nota de compra o factura respectiva.
DATOS DEL DISTRIBUIDOR
DISTRIBUTION / NOMBRE / DISTRIBUIDOR:
ADDRESS / DOMICILIO:
PRODUCT / PRODUCTO: BRAND / MARCA:
MODEL / MODELO: SERIAL NUMBER / No. DE SERIE:
DATE OF DELIVERY / FECHA DE ENTREGA:
Call Center / Centro de Atención a Clientes
del Interior 01 800 500 9000
Mexico City / Cd. de México: 53 54 22 90
Warranty
CONDITIONS:
1. This warranty card with all the required information, the invoice or purchase ticket, the packing or package, must be presented with the product when warranty
service is required.
2. If product hasn’t exceed warranty period, the company will repair it free of charge including transportation charges.
3. The repairing time will not exceed 30 natural days, from the day the claim was received.
4. Steren sells parts, components, consumables and accessories to customer, as well as warranty service, at any of the following addresses:
THIS WARRANTY IS VOID ON THE NEXT CASES:
If the product has been damage by an accident, acts of God, mishandling, leaky batteries, failure to follow enclosed instructions, improper repair by unauthorized
personnel, improper safe keeping.
Notes:
a) The customer can also claim the warranty service on the purchase establishment.
b) If you lose the warranty card, we can reissue it just showing the invoice or purchase ticket.
Póliza de Garantía
This Steren product is guaranteed under
normal usage against defects in
workmanship and materials to the original
purchaser for one year from the date of
purchase.
Garantiza este producto por el término de
un año en todas sus partes y mano de obra
contra cualquier defecto de fabricación y
funcionamiento, a partir de la fecha de
entrega.
V0706

INSTRUCTIVO DE USO DE ALARMA PARA GUARDARROPA O CAJON
Modelo: ALA-200
Marca: Steren
Antes de utilizar su nueva Alarma para Guardarropa o Cajón lea este
instructivo para evitar cualquier mal funcionamiento. Guárdelo para
futuras referencias.
Si necesita protección para sus pertenencias en la casa u oficina, utilice la
nueva alarma que puede colocar en cajones, puertas o ventanas. Es ideal
para evitar que los niños o personas indeseadas abran lugares peligrosos
o prohibidos para ellos. La alarma cuenta con un código de seguridad que
se ingresa por medio de 4 botones. Se activa por medio de un sensor
magnético.
La alarma es controlada por un microprocesador.
IMPORTANTE
Limpie el equipo con un paño suave y seco.
Compruebe las baterías regularmente.
No coloque la alarma cerca de los oídos, puede causar daños.
El equipo contiene partes pequeñas, no la deje cerca de niños
pequeños.
Utilice la alarma sólo en interiores.
CARACTERÍSTICAS
Moderno dispositivo electrónico de seguridad controlado por un
microprocesador
Protege sus pertenencias colocando el sensor en puertas, ventanas y
cajones
Active o desactive la alarma a través de un código de seguridad de 4
dígitos
Tres sonidos de alarma
CONTROLES
1.- Compartimiento de baterías
2.- Botones para código
3.- Activación / Desactivación
4.- Bocina
5.- Magneto principal
6.- Magneto sencillo
INSTRUCTION MANUAL FOR CLOSET OR DRAWNER ALARM
Model: ALA-200
Brand: Steren
Before using your new closet or Drawner Alarm, please read this
instruction manual to prevent any damage. Put it away in a safe place
for future references.
If you need to protect your belongings within your home or office you can
use this new alarm which you can place in drawers, doors, or windows.
This device is ideal for preventing children or undesired people from
opening dangerous or prohibited places. This alarm has security code
which is input through 4 buttons. This alarm activates through a magnetic
sensor.
The alarm is controlled through a microprocessor.
IMPORTANT
Clean with a soft, dry cloth.
Check the batteries, regularly.
Do not place the equipment near ears, may cause several damages.
The equipment contains small pieces, keep away from children under
three.
Only for indoor use.
MAIN FEATURES
Modern electronic security device controlled by microprocessor
Protect your belongings placing the device in doors, windows or
drawers
Use a 4-digit security code to activate or deactivate the alarm
Three alarm sounds
CONTROLS
1.- Battery compartment
2.- Code buttons
3.- Arm / Disarm
4.- Speaker
5.- Main magnet
6.- Single magnet
1
2
3
4
2
5
6

INSTALACIÓN DE BATERÍAS
1.- Ubique la tapa del compartimiento del baterías.
2.- Utilice un desarmador y retire la tapa (Fig. 1).
3.- Inserte 2 baterías de litio tipo CR2032, poniendo atención a la
polaridad (Fig. 2).
4.- Coloque nuevamente la tapa del compartimiento.
Notas:
Cuando el equipo está activado y comienza a emitir un bip cada 20
segundos, indica que debe cambiar la batería.
Cuando coloca nuevas baterías, deberá configurar un código de
seguridad, por favor consulte la sección de Código Personal.
INSTALACIÓN
1.- Coloque la unidad principal y el sensor a un costado de la ventana o
en el interior de un cajón como muestra la figura.
2.- Para fijarlos, retire la cubierta de la goma adhesiva y presione
firmemente en el lugar seleccionado (Fig. 3).
3.- Coloque el magneto sencillo a un costado del magneto principal, de tal
forma que las flechas coincidan (Fig. 4).
4.- Cuando los magnetos se separan, el equipo comenzará a emitir una
alarma.
Nota:
La distancia máxima entre el magneto principal y el magneto sencillo es
de 15mm
BATTERY INSTALLATION
1.- Locates the battery compartment cover.
2.- Use a screwdriver and release the cover (Fig. 1).
3.- Place 2 lithium batteries, type CR2032, paying attention to polarity
(Fig. 2).
4.- Replace the battery compartment cover.
Notes:
If the equipment is ARMED and beeps every 20 seconds, it means you
must change the batteries.
When you place new batteries on it, you must configure a new security
code, please refers to Personal Code Set.
INSTALLATION
1.- Place main unit and single magnet in your window or inside of a
drawner as shown on the picture.
2.- Use the stickers down of the magnets and main unit to fix them onto
the desired place. Press firmly (Fig. 3).
3.- Place the single magnet aside of the main magnet, pay attention to the
arrows, they must match (Fig. 4).
4.- The alarm will trigger when the magnets was separated.
Note:
Maximum distance between main and single magnet to place is 15mm
Fig. 1 Fig. 2
Fig. 3 Fig. 4

CÓDIGO PERSONAL
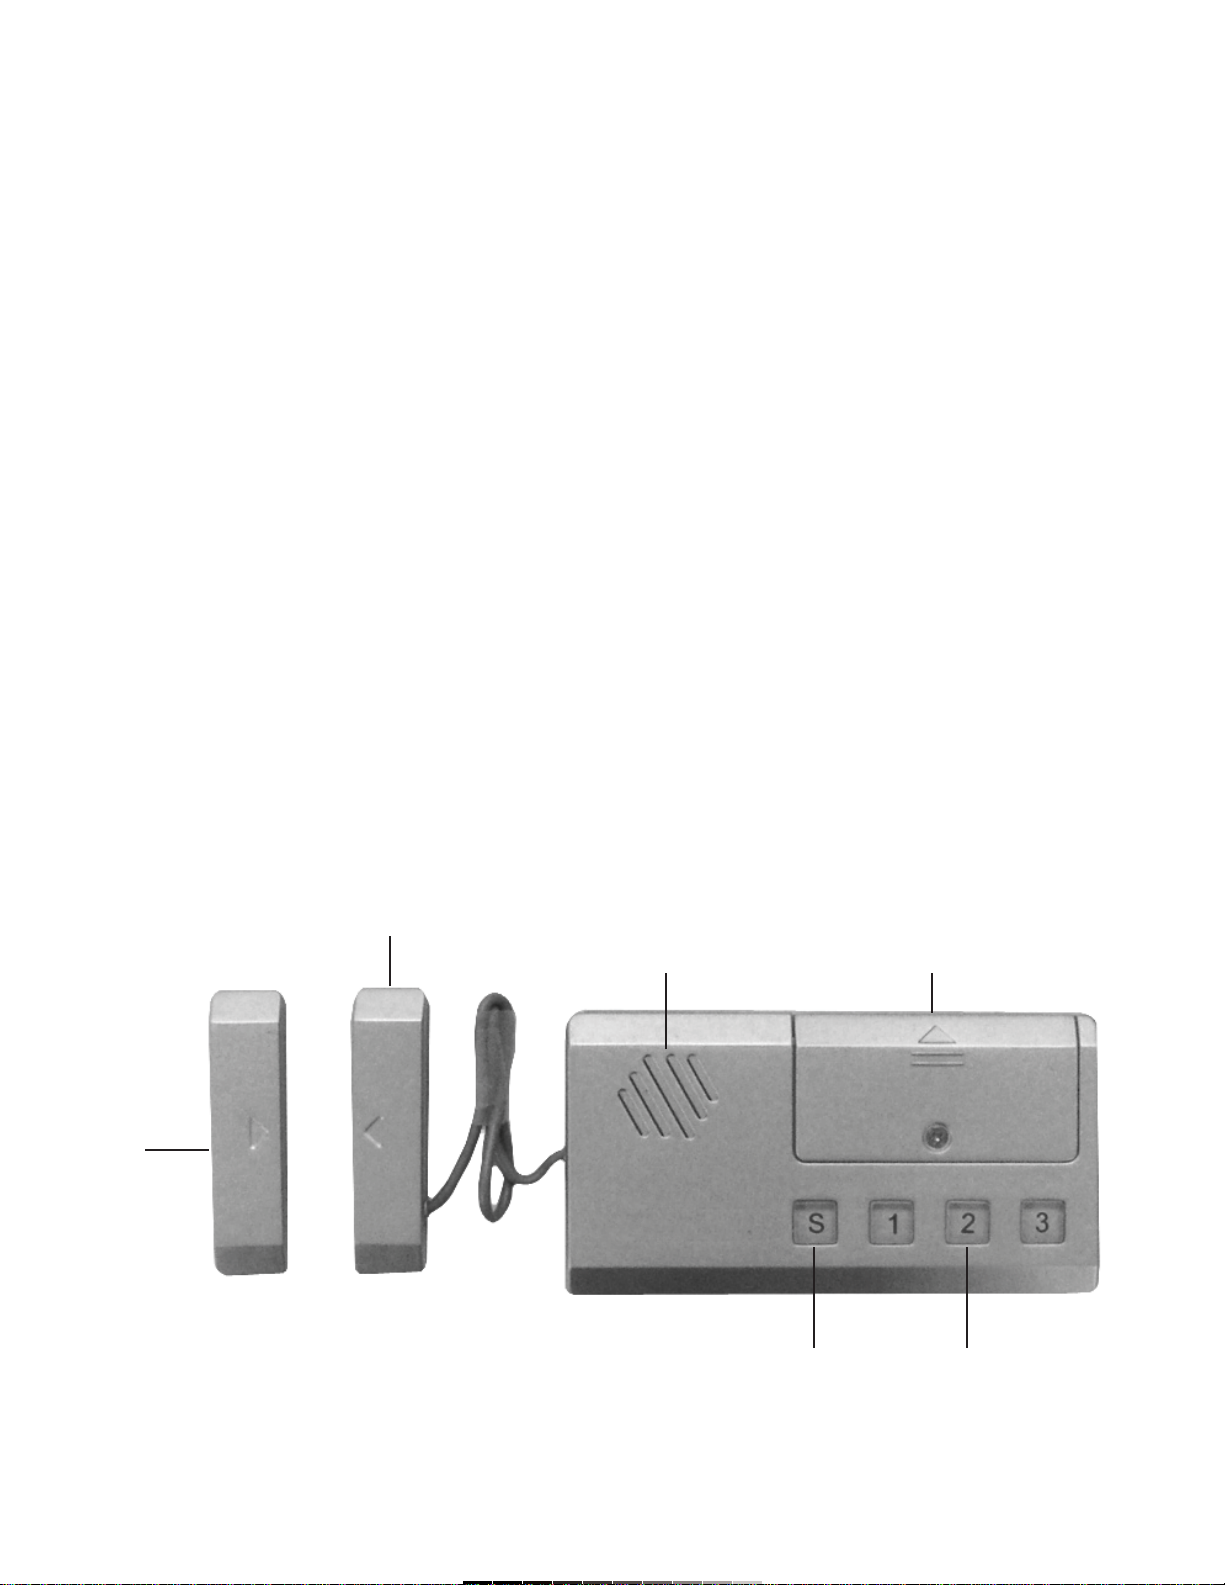
1.- Después de instalar las baterías, los botones parpadearán.
2.- Introduzca un código de 4 dígitos, utilizando los botones 1, 2, 3.
3.- Una vez que introdujo el código, 4 bips se escucharán y los botones se
apagarán.
4.- El código ha sido configurado correctamente.
CAMBIAR EL CÓDIGO PERSONAL
1.- Asegúrese de que la alarma esté desactivada.
2.- Presione el botón “S” e introduzca su código de 4 dígitos.
3.- Los botones parpadearán y se escucharán 4 bips.
4.- Introduzca un nuevo código de seguridad.
5.- Después de introducir los 4 dígitos, se escuchará un bip indicando que
se configuró correctamente el nuevo código.
Nota:
Si no introduce un nuevo código en un lapso de 5 segundos o el tiempo
que dure encendidos los botones, el equipo saldrá del modo de cambio de
código y deberá comenzar nuevamente el proceso.
ACTIVACIÓN / DESACTIVACIÓN DE LAALARMA
1.- Presione el botón “S” dos veces seguidas para activar la alarma. Los
botones parpadearán por 5 segundos y escuchará un bip.
2.- Para desactivar la alarma, presione el botón de “S” e introduzca el
código de 4 dígitos.
3.- Si escucha 3 bips seguidos, significa que la alarma ha sido
desactivada correctamente. En cambio, si escucha dos bips cortos
significa que la contraseña está equivocada. Repita el paso 2.
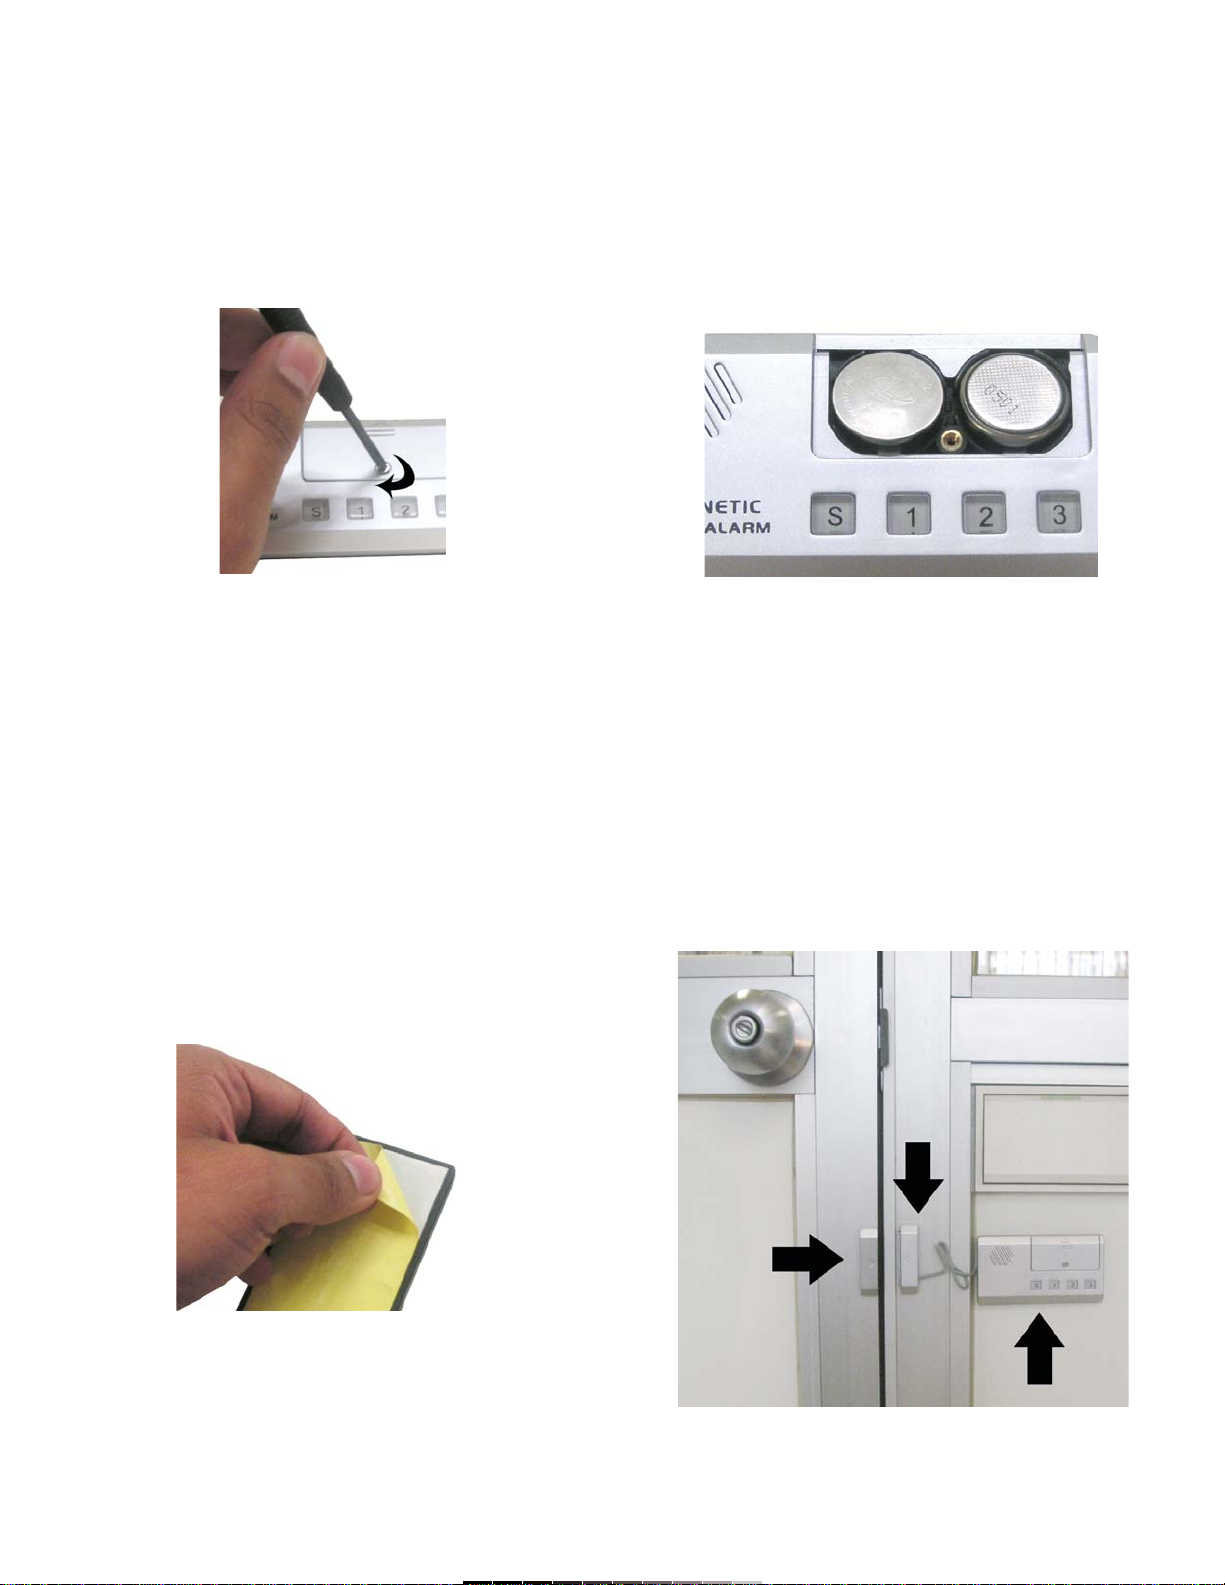
USANDO LA ALARMA
1.- Una vez que la alarma ha sido correctamente colocada y activada,
cualquier separación de los magnetos la activará.
2.- Una vez que el magneto se separa, contará con 5 segundos para
introducir su código personal, de otra forma comenzará a emitir la alarma.
3.- Consulte la sección de activación / desactivación para conocer cómo
desactivar la alarma.
Nota:
Si introduce incorrectamente el código tres veces seguidas,
automáticamente se activará la alarma.
GUÍA RÁPIDA
Configurar un nuevo código: S + 4 dígitos del código
Activar alarma: S + S
Desactivar la alarma: S + 4 dígitos del código
Indicador de batería baja: un bip cada 20 segundos
ESPECIFICACIONES
Entrada: 6V
Dimensiones: 90 x 48 x 10mm
Peso: 47,4g
Nota:
El diseño del producto y las especificaciones pueden cambiar sin previo
aviso.
PERSONAL CODE SET
1.- After installing batteries, buttons flashes.
2.- Enter a 4-digit code, using 1,2, 3 buttons.
3.- Once you have entered the code, you’ll hear 4 beeps and the buttons
lights off.
4.- The personal code was configured correctly.
CHANGING PERSONAL CODE
1.- Make sure the alarm is deactivated.
2.- Press “S” button and type the 4-digit code.
3.- Buttons will flash and you can hear 4 beeps.
4.- Type your new security code.
5.- After enter 4-digit code, you can hear a beep indicating that the new
code was correctly configured.
Note:
If you don’t press any button for 5 seconds, or while the buttons are
flashing, the equipment automatically exit from this mode and you must
start again the process.
HOW TO ARM / DISARM THE ALARM
1.- Press “S” button twice, continuously, to arm the alarm. The buttons
flashes for 5 seconds and you can hear a beep.
2.- To disarm the alarm, press “S” button and type the 4-digit code.
3.- If you hear 3 beeps, then the alarm was disarmed correctly.
Otherwise, if you hear two short beeps, it means the personal code was
wrong. Repeat step 2.
HOW TO USE THE ALARM
1.- Once the alarm was correctly installed and armed, any separation of
the magnets will trigger the alarm.
2.- Once the magnet is out of the place, you’ll have 5 seconds to type the
4-digit code, otherwise, the device will emits a high tone alarm.
3.- Please, refers to Arm / Disarm the alarm, to know how to
deactivate it.
Note:
If you enter a wrong code, three times, automatically will trigger the
alarm.
QUICK GUIDE
Setting a new code: S + 4-digit code
Arm the alarm: S + S
Disarm the alarm: S + 4-digit code
Low battery indicator: one beep each 20 seconds
SPECIFICATIONS
Input: 6V
Dimensions: 90 x 48 x 10mm
Weight: 47,4g
Note:
Product design and specifications are subject to change, without notice.
Other Steren Security System manuals

Steren
Steren ALA-110 User manual

Steren
Steren ALA-010 User manual

Steren
Steren ALA-080 User manual

Steren
Steren TRS-400 User manual

Steren
Steren ALA-010 User manual

Steren
Steren CCTV-095 User manual

Steren
Steren ALA-005 User manual

Steren
Steren ALA-2000 User manual

Steren
Steren CCTV-972 User manual

Steren
Steren CCTV-500 User manual