TCS Carus Origo User manual

a brand of TCS AG
Design Manufaktur Adelheid
Adelheid 41
78098 Triberg
Germany
www.carus-concepts.com
Tel: +49 7722 91770
Fax: +49 7722 917718
- Art. no. 0035783 Version 1 A -
3 years warranty

Instruction manual
Carus Origo

Design
„A simple form, a classic layout and high-end mate-
rials guarantee timeless aesthetics. The Carus edition
refl ects the reliability and sustainability of the pro-
ducts in perfect form and sophisticated design. Our
emphasis on traditional crafts that we utilise to ma-
nufacture the high-quality surfaces, make the Carus
products unique items. The harmony between the
traditional and the modern element of our products
enable us to design customised and fi rst-class pro-
ducts which refl ect the user and inspire emotions.“

Table of contents
02
02
03
04-05
06
07
08-09
10
11
12
13
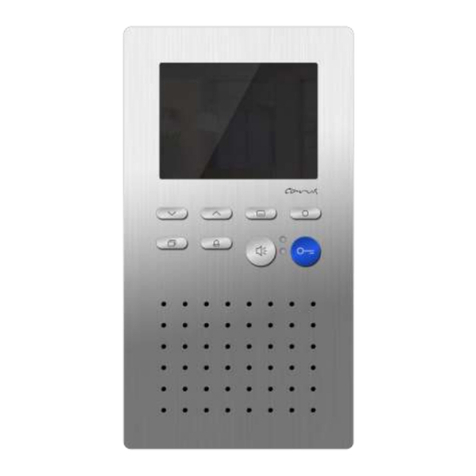
Device overview
LED indication
Operating elements
Setting the video image
Settings in the OSD menu
External image buffer
Confi gurable functions
Store images
View and delete images
Cleaning
Notes

2
Loudspeaker
Microphone
Your brandnew video indoor station!
Call OFF-button
2 navigation
buttons
Image button
Door release
button
Speech button
Menu button
Function key
Display
Red LED
Green LED
• Green LED is on
• incoming door or
internal call
• active voice
connection
• additional function
is activated
See page 10 and 11.
• Red LED is on
• ring tone is switched
off, an incoming
call is not signalled
acoustically
• Red LED blinks
• busy speech channel
LED indication
CAI2000
•
•
•

3
A ring tone signals an
incoming call.
The green LED is on.
Speaking
Shortly press the speech
button to accept the call
or longer than 1 second
to switch-over to simplex
communication during an
active voice connection.
The green LED is on.
Shortly press the speech
button again or the door
release button to end
the conversation (the call
is terminated after four
seconds).
Automatic call cut-off after 2 minutes.
Door release
Shortly press the blue
door release button.
WE = factory setting.
Switching lights /
Internal calls / Activate
additional functions
Shortly press the function
key to switch the lights,
to call another indoor
station or to (de-)activate
the call diversion resp. the
door release automatic.
Confi guration necessary, see additional
functions, page 10.
Ring tone mute
Press the call OFF-button.
An incoming call is not
signalled acoustically.
The red LED is on.
Image activation
Shortly press the image
button to display the
image of the front-door
station.
See also additional functions, page 5.
Menu
This button is used to set
the image and ring tone
parameter, to display
indications and calls from
internal call destinations
as well as for displaying
and triggering control
functions.
See page 5 till 9.
Navigation buttons
These buttons are used to
set image and ring tone
parameter.
See page 5 till 9.
Operating elements
4
Setting the video image
The display
Fading-in the video image is realised immediately after
pressing the image button or after receiving a
door call. The symbols are faded-in automatically.
Optionally, the speech button can be pressed to receive video images and noises when in
standby mode (speaking and video must be deactivated).
Fading in the symbols
in the video image is
realised automatically. If
the speech button was
pressed, the fading in of
the symbols ends after 3
seconds.
Image from camera
No. 05
Image buffer
is activated
Ring tone mute
Call diversion
is activated
Door release auto-
matic is activated
05

5
Settings via display
Setting image contrast, brightness, color saturation and
conversation volume is realised quick and easily at the
displayed video image.
1. Shortly press the image
button . The image
of the video front-door
station is displayed.
2. Shortly press the menu
button . The menu
for settings is displayed.
3. Press the navigation
buttons UP or DOWN to
switch to the next para-
meter.
4. Press the navigation
buttons UP or DOWN
to adjust the parameter
value. The change is dis-
played immediately in the
bar diagram and can be
seen on the video image.
The menu is deactivated
automatically after 10
seconds if no button is
pressed. Shortly press
the function key
to deactivate the menu
immediately.
Contrast
Brightness
Color saturation
Conversation
volume*
*can only be adju-
sted while speaking
Setting the video image

6
Setting ring tone volume and ring tones
The setting of ring tone volume and the selection of
your required ring tone can be realised quick and easily
in the OSD menu of the display when in standby mode
(speaking and video must be deactivated).
Settings in the OSD menu
1. Shortly press the menu
button . The main
menu is displayed.
2. With the navigation
buttons UP or
DOWN the menu
ring tone parameter can
be selected. Confi rm the
selection by pressing the
menu button again.
3. You are now in the
menu ring tone parame-
ter. With the navigation
buttons UP or
DOWN the required
ring tone can be selected.
When selecting a ring
tone, the ring tone
sounds immediately.
When selecting the ring
tone volume, the current
ring tone sounds in the
selected volume after the
setting.
The menu is deactivated
automatically after ten
seconds if no button is
pressed or shortly press
the function key .
Control function*
Internal call*
External image
buffer
Ring tone para-
meter
Date/time
external image
buffer
Delete external
image buffer
Ring tone volume
Ring tone selection
for door calls
Ring tone selection
for fl oor calls
Ring tone selection
for internal calls
Ring tone selection
for sub tones 1,2,3,4
*Symbol is displayed only after the confi gu-
ration, not in factory setting
Main menu
selected
parameter menu
toolbar for parameter menu
Menu ring tone
value of the parameter
0,1,2, ..
toolbar for parameter menu

7
Setting date and time
The setting of date / time for stored images is realised
quick and easily in the OSD menu of the display when
in standby mode (speaking and video must be deacti-
vated).
External image buffer*
1. Shortly press the menu
button . The main
menu is displayed.
2. Select the symbol
image buffer setting
with the navigation but-
tons UP or DOWN
. Confi rm the selec-
tion by pressing the menu
button again.
3. The image buffer
menu is displayed. The
white backlit digit can be
adjusted with the naviga-
tion buttons UP or
DOWN . With the
menu button you
can forward to the next
position.
4. If setting the date is
fi nished, pressing the
menu button again
calls up the time setting.
Proceed as described in
setting the date.
5. By pressing the menu
button again, the
menu is deactivated and
the settings are stored in
the external image buffer.
Main menu
selected
parameter menu
toolbar for parameter menu
menu date /time/image buffer
* only in combination with FVM1000-0400 (not enclosed in the delivery)

8
Receive internal calls
Press the speech button
, a voice communica-
tion is established.
The green LED is on.
If your video indoor sta-
tion receives an internal
call from a known indoor
station, the name of this
indoor station is displa-
yed*.
* Confi guration by a qualifi ed electrician
necessary.
Send internal calls via the menu internal
call.
The internal caller is indicated in the menu
internal call.
The menu indication is
deactivated automatically
after 5 seconds.
Confi gurable functions
Call indoor station(s)
and receive internal
calls
To call another indoor
station, press the func-
tion key . A short
acknowledgement tone
sounds if the call has re-
ached its call destination.
When the called device
accepts the call a voice
connection is established.
More than one further
indoor station
In case of more than one
further indoor station*
(max. 10) the call destina-
tion is selected over the
main menu and called by
pressing the menu button
. An acknowledge-
ment tone sounds.
When the call is accepted
at the called device, ano-
ther acknowledgement
tone sounds and the
voice communication will
be estabished.
The following functions can be confi gured on your
video indoor station and for the use of further in-
door stations. Please contact your qualifi ed electri-
cian.
Switching lights, call diversion, internal call and door release auomatic can be
used only alternatively with the function key. The indoor station can be con
fi gured to callup the menu internal call or control functions by using the
function key.
Menu internal call
selected
internal call
Menu internal call

9
Confi gurable functions
Door release automatic
An incoming door call
directly effects opeing the
door when this function is
activated.
Shortly press the function
key activated,
The red LED blinks.
Shortly press the function
key again deac-
tivated.
Switching lights with
the door release button
if no voice connection is
established
Parallel call
A second indoor station
sounds together with the
fi rst one in case of an
incoming door, fl oor or
internal call. The ring tone
sounds at both indoor
stations.
Monitoring
Shortly press the image
button to display
the video image of the
front-door station. By re-
peatedly pressing further
cameras can be selected.
Error indication
If both LEDs fl ash
continously short and
if there are beep tones
when pressing the but-
tons, there is an error at
the device or within the
system.
Please inform your quali-
fi ed electrician.
Send control function
When control functions
(max. 10) are program-
med, those can be (de-)
activated in the menu
control function. The
switching modes of the
control functions
(ON/OFF) are indicated
by colored points (red/
green).
(De-)activate control functions in the menu
control function
Call diversion
The incoming call is di-
verted to a second indoor
station. Shortly press the
function key
activated,
The red LED blinks.
Shortly press the function
key again deac-
tivated.
A call cannot be diverted to all TCS indoor
stations. The diverting indoor station is not
signalling the diverted call.
Floor door release
If the fl oor push-button
at the fl oor door is
pressed, the fl oor door
can be opended with the
blue door release button
(instead of the front-door)
within 30 seconds.
Control function
selected
control function

10
Store images automatically and manually
In combination with an external image buffer
FVM1000-0400 up to 64 images can be stored.
Store images*
Store an image
autmatically
In case of an incoming
door call an image can be
stored automatically.
1. Activate the automatic
recording by pressing the
menu button . The
main menu is called up.
2. Select the image buffer
menu by pressing the na-
vigation buttons UP
or DOWN .
3. By pressing the menu
button longer than
four seconds, the change-
over from manual (symbol
image buffer red) to au-
tomatic image recording
(symbol image buffer
green) is realised. The
symbol activated image
buffer apperas in case of
an activated image.
If images were stored du-
ring a door call that have
not been seen, the green
LED blinks.
To deactivate the auto-
matic image recording
press the menu button
until an acknow-
ledgement tone sounds
and the symbol activated
image buffer expires.
Store an image
manually
Press the navigation but-
ton UP when the
camera image is activa-
ted. A snapshot of the
camera image is taken
and the image is stored
in the image buffer. To
confi rm the process the
symbol camera with
green checkmark appears.
The image is stored in the
image buffer.
If images were stored that
have not been seen, the
green LED blinks.
* only in combination with FVM1000-0400 (not enclosed in the delivery)

11
View and delete stored images
In combination with an external image buffer
FVM1000-0400 up to 64 images can be stored.
View and delete images*
View stored images
If the image buffer indi-
cation blinks green, new
images were stored at an
incoming call.
1. Press the menu button
to display the image
from the image buffer.
2. Browse through all new
stored images with the na-
vigation buttons UP
and DOWN .
Alternatively, select the image buffer via
the menu (when image have been already
seen).
3. Press the navigation
button DOWN for
four seconds to delete the
image. A short acknow-
ledgement tone sounds.
The image is deleted. The
image stored before is
shown.
Delete all images
All images can be deleted
in the OSD menu when in
standby mode (speaking /
video off).
1. Press the menu button
. The main menu is
called up.
2. Select the symbol
delete image buffer by
pressing the navigati-
on button UP or
DOWN . Confi rm
the selection by pressing
the menu button .
3. The menu delete image
buffer appears. Select the
checkmark with the navi-
gation buttons UP
or DOWN .
4. Confi rm the selection
by pressing the menu
button . The image
buffer is deleted com-
pletely now.
* only in combination with FVM1000-0400 (not enclosed in the delivery)

12
Cleaning
Clean the indoor station with a dry or slightly wet
cloth. Remove stronger stains with a PH-neutral
detergent.
Avoid water from entering the device! Do not use
any abrasive detergents!

13
Notes
This manual suits for next models
1
Table of contents
Other TCS Intercom System manuals

TCS
TCS IVW2211-0218 User manual

TCS
TCS Carus Origo CAI2010 User manual

TCS
TCS SKYLINE:TEN BASIC User manual

TCS
TCS PSC2120-0000 User manual

TCS
TCS ISH3030 User manual

TCS
TCS ISH3230-0140 User manual

TCS
TCS AMI Series User manual

TCS
TCS AMI Series User manual

TCS
TCS IVH4222-0140 User manual

TCS
TCS CAI2002-0140 User manual

TCS
TCS IMM2300 User manual

TCS
TCS ISW3330 User manual

TCS
TCS K30001 User manual

TCS
TCS AMI1090 Series User manual

TCS
TCS PVE14 0-0010 Series User manual

TCS
TCS Carus Adapto User manual

TCS
TCS ISW3230-0140 User manual

TCS
TCS Carus Adapto User manual

TCS
TCS PUK Series User manual

TCS
TCS IVX9001-0140 User manual