manuals.online logo
Brands
  1. Home
  2. •
  3. Brands
  4. •
  5. TFA
  6. •
  7. Thermometer
  8. •
  9. TFA 30.1034 User manual

TFA 30.1034 User manual

Kat. Nr. 30.1034
Bedienungsanleitung
Operating Instructions
Mode d’emploi
Istruzioni
Gebruiksaanwijzing
Instrucciones para el manejo
LCD
➄
➃
➂
➀
➁
Digitales Kontroll-Thermometer

1. Eigenschaften
• Hohe Präzision
• Aktuelle Temperatur, MAX/MIN/HOLD
• Temperaturalarm
• Temperaturfühler mit 3 m Kabel
• Ständer und Magnet
• IP65 staubdicht und strahlwassergeschützt
• Auch für Lebensmittel gemäß HACCP
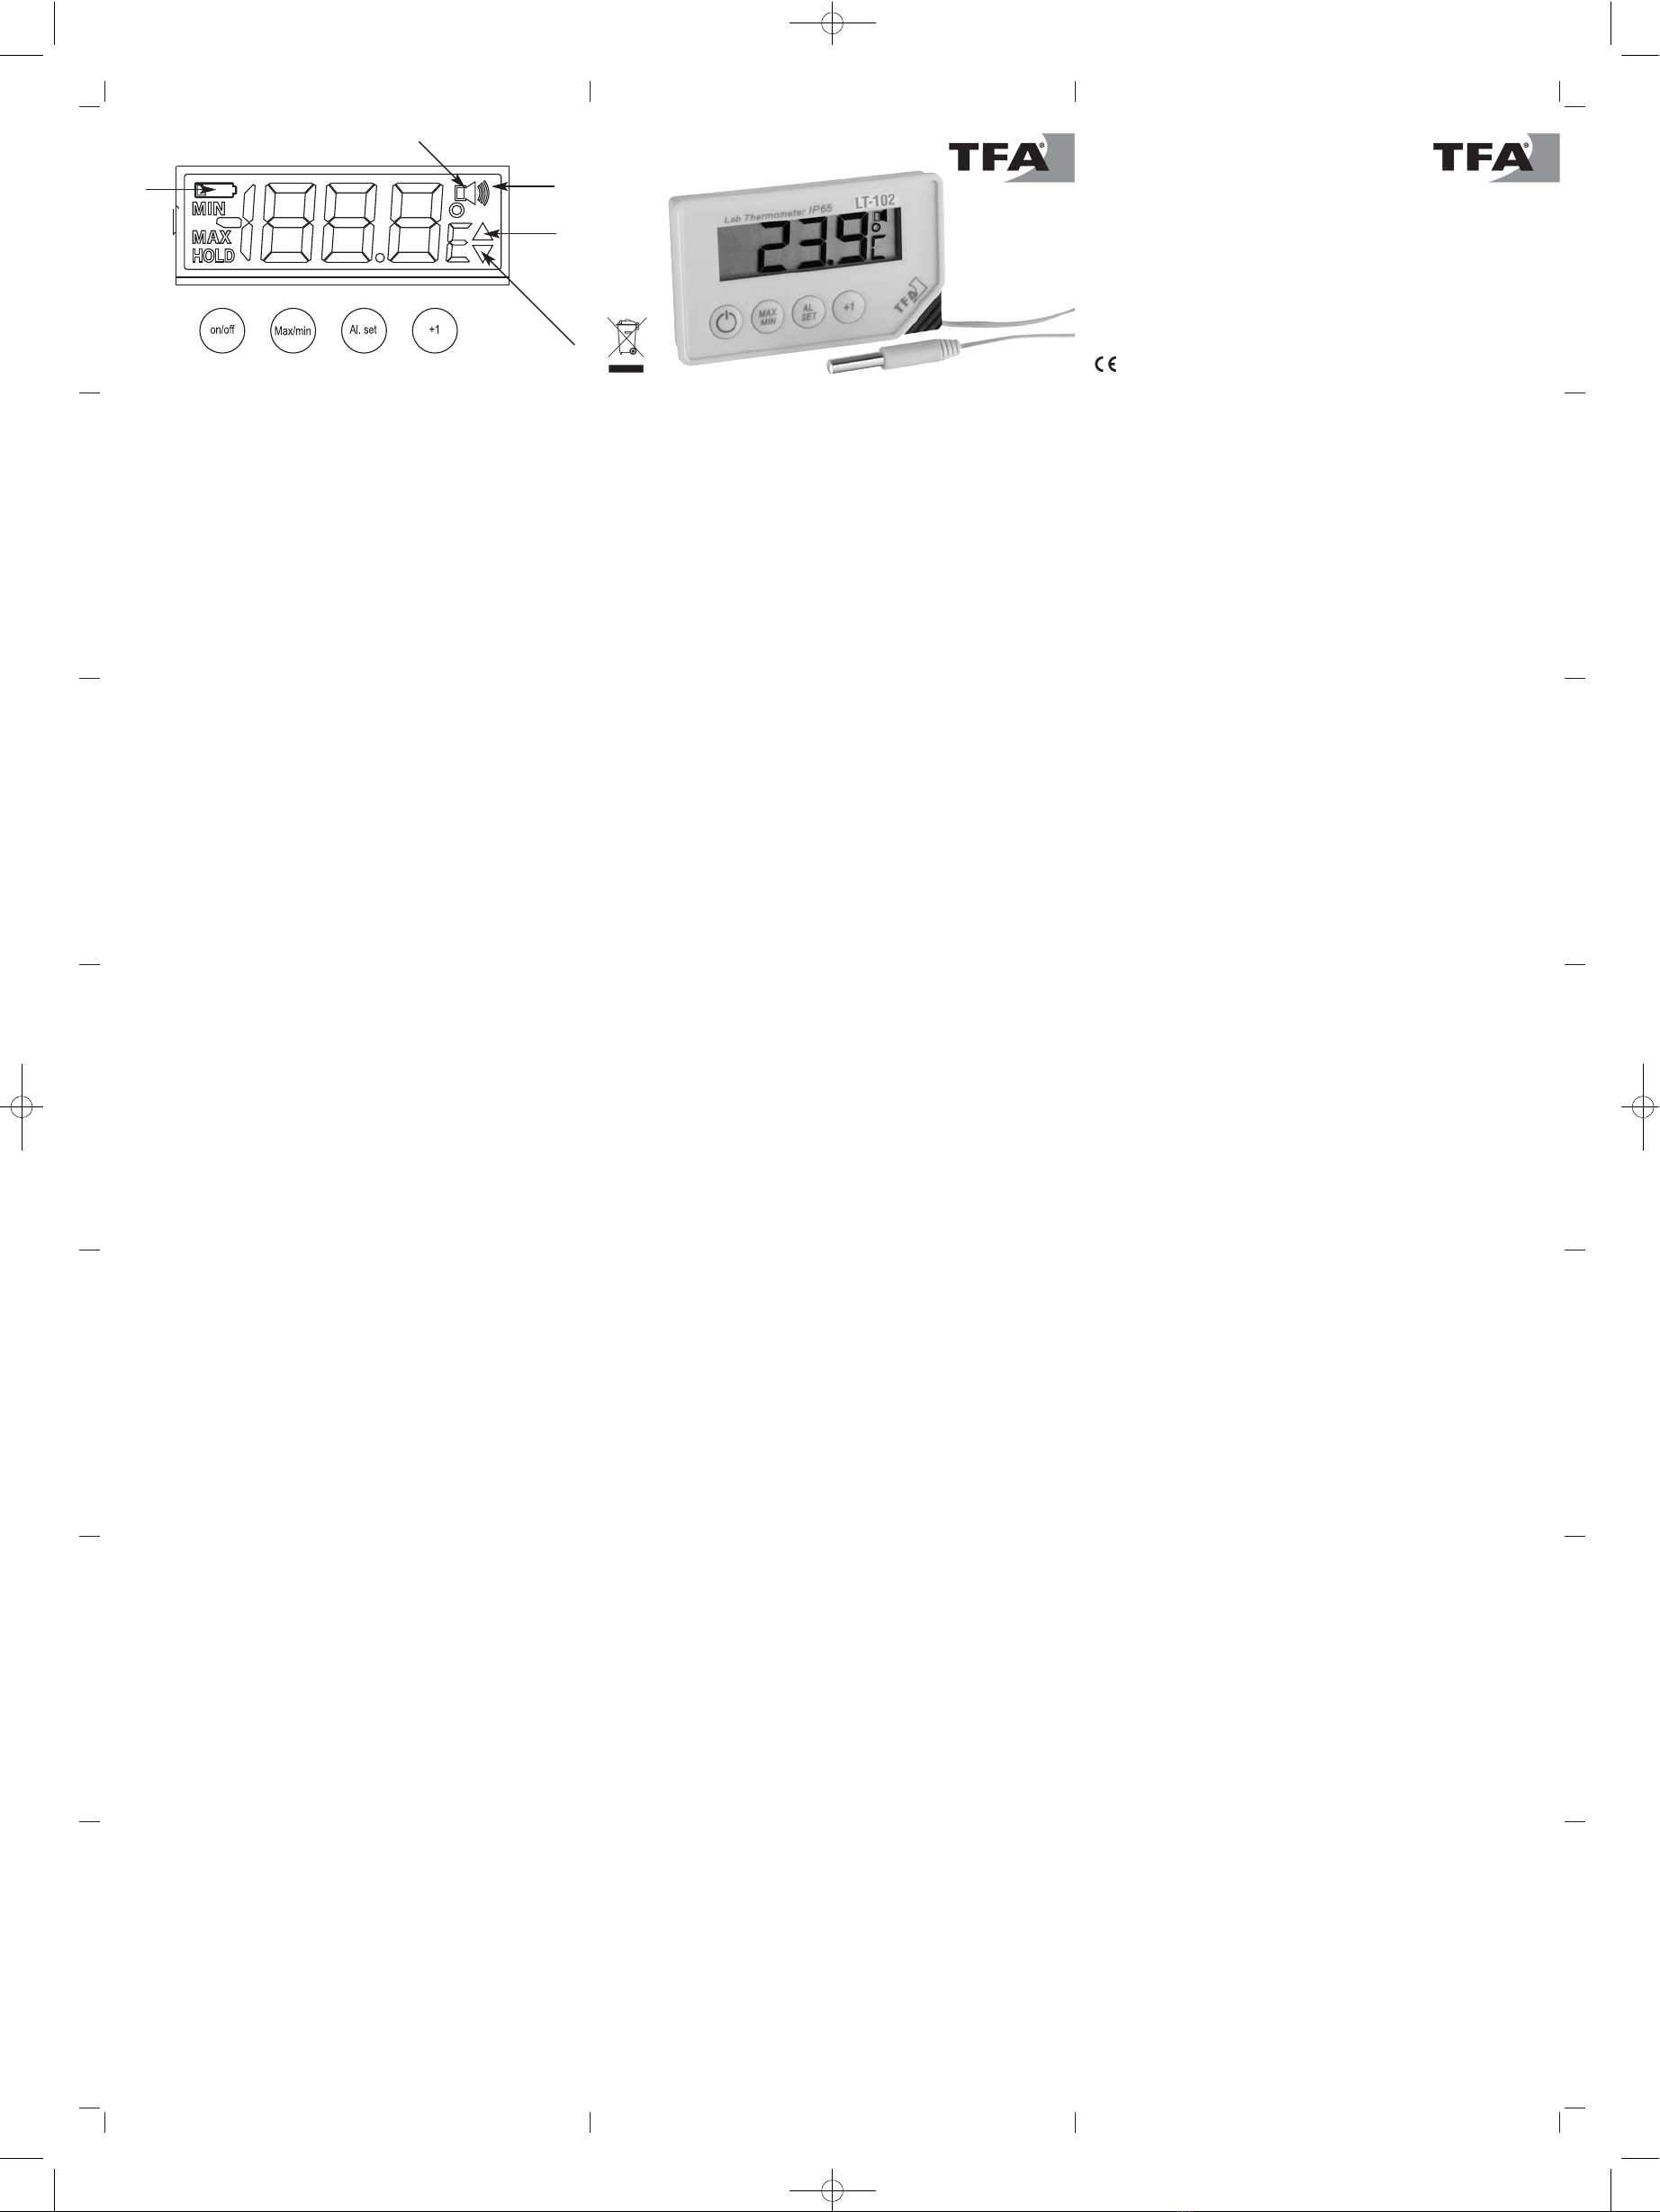
2. Display (LCD)
➀
Batteriewechselsymbol
➃
oberer Grenzwertalarm
➁
Alarmsymbol
➄
unterer Grenzwertalarm
➂
optisches Alarmsignal (blinkt)
3. Inbetriebnahme
• Entfernen Sie gegebenenfalls die Schutzfolie vom Display. Öffnen Sie
das Batteriefach auf der Rückseite des Gerätes, indem Sie die 2
Schrauben neben dem Magneten mit einem kleinen Schraubenzie-
her entfernen. Legen Sie die Batterie CR2032 3V Lithium polrichtig
ein und schließen Sie den Deckel wieder. Das Gerät ist betriebsbereit.
4. Bedienung
4.1 Temperaturanzeige
• Die aktuell am Kabelfühler gemessene Temperatur wird im Display
angezeigt. Mit der +1-Taste können Sie die Anzeige von °C auf °F
umschalten.
4.2 Taste ON/OFF
• Mit der “ON/OFF”-Taste können Sie das Gerät an- und ausschalten.
Einstellungen bleiben erhalten, Messungen und Alarmierungen
erfolgen nur im eingeschalteten Zustand.
4.3 Hold/Max/Min-Funktion
• Durch Drücken der “MAX/MIN”-Taste wird die momentane Anzeige
festgehalten (Anzeige HOLD).
• Durch weiteres Drücken der “MAX/MIN”-Taste erscheint die maximale
Temperatur seit der letzten Rückstellung (Anzeige MAX).
• Drücken Sie noch einmal die “MAX/MIN”-Taste, erscheint die mini-
male Temperatur seit der letzten Rückstellung (Anzeige MIN).
• Mit einem weiteren Tastendruck kehren Sie zurück zur aktuellen
Temperatur.
• Zur Löschung der gespeicherten maximalen und minimalen Werte
halten Sie die “MAX/ MIN”-Taste 3 Sekunden gedrückt, während
MAX bzw. MIN angezeigt wird (Anzeige ---).
4.4 Obergrenze und Untergrenze für Temperatur-Alarm
• Zum Einstellen einer Temperatur-Obergrenze, bei deren Überschrei-
ten ein Alarm ertönt, drücken Sie die “AL SET”-Taste im Normalm-
odus. Das obere Grenzwert-Symbol ▲wird angezeigt und beginnt
zu blinken. Geben Sie mit der +1-Taste die gewünschte Temperatur
ein. Für einen Schnelldurchlauf halten Sie den Knopf gedrückt. Nun
können Sie den Alarm mit der “MAX/MIN”-Taste aktivieren (Alarm-
symbol erscheint) oder deaktivieren (Alarmsymbol verschwindet).
Bestätigen Sie mit der “AL SET”-Taste.
• Das untere Grenzwert-Symbol ▼wird angezeigt und beginnt zu
blinken. Geben Sie gegebenenfalls mit der +1-Taste die gewünschte
Temperatur-Untergrenze ein, bei deren Unterschreiten ein Alarm
ertönt. Für einen Schnelldurchlauf halten Sie den Knopf gedrückt.
Aktivieren oder deaktivieren Sie den Alarm mit der “MAX/MIN”-
Taste. Bestätigen Sie mit der “AL SET”-Taste.
• Nach dem Einstellen des Temperatur-Alarms zeigen die Symbole ▲▼,
ob ein oberer und/oder unterer Grenzwert aktiviert ist.
• Bei Über- bzw. Unterschreiten der eingestellten Temperaturgrenzen
ertönt für eine Minute ein Alarmton, das optische Alarmsignal und
der entsprechende Pfeil ▲ oder ▼beginnt zu blinken. Der Alarmton
und das optische Alarmsignal können mit einer beliebigen Taste
manuell ausgeschaltet werden.
• Liegt die Temperatur wieder innerhalb der eingestellten Alarmgren-
zen, hört der Alarmton auf (innerhalb 1 min.) und das optische
Alarmsignal verschwindet. Der Pfeil blinkt weiter und zeigt an, dass
der eingestellte Grenzwert in der Vergangenheit mindestens einmal
über- oder unterschritten wurde. Drücken Sie die +1-Taste, und der
Pfeil hört auf zu blinken.
5. Batteriewechsel
• Um die Batterielebensdauer zu verlängern, empfehlen wir, das Gerät
nach der Messung sofort mit der “ON/OFF” Taste auszuschalten.
• Wenn die Spannung der Batterie zu niedrig ist, erscheint das Batte-
riewechselsymbol.
• Öffnen Sie das Batteriefach auf der Rückseite des Gerätes, legen Sie
eine neue Batterie CR2032 3V Lithium ein, und schließen Sie den
Deckel wieder.
Achtung: Bitte entsorgen Sie Altgeräte und leere Batterien nicht
über den Hausmüll. Geben Sie diese bitte zur umweltgerechten Ent-
sorgung beim Handel oder entsprechenden Sammelstellen gemäß
nationaler oder lokaler Bestimmungen ab.
6. Technische Daten
Messbereich: -40 °C bis +70°C (umschaltbar °C/°F)
Genauigkeit: ±0,5 °C bei -20 bis 25°C, ±1 °C ansonsten
Kabel: ca. 3 m
Auflösung: 0,1°C
Spannungsversorg.: CR2032 3V Lithium Knopfbatterie
Gehäusemaße: ca. 86 x 57 x 30 mm
7. Hinweise
• Setzen Sie das Anzeigegerät nicht hohen Temperaturen aus. Nur der
Fühler ist hitzebeständig.
• Tauchen Sie das Anzeigegerät nicht ins Wasser, sonst kann Feuchtig-
keit eindringen und zu Fehlfunktionen führen.
• Bitte unternehmen Sie keine eigenen Reparaturversuche. Bei Rekla-
mationen wenden Sie sich an Ihren Händler. Vor der Reklamation
bitte Batterie austauschen. Bei Öffnung oder unsachgemäßer
Behandlung erlischt die Garantie.
Dieses Produkt erfüllt die Richtlinien gemäß der Norm EN 13485.
Eignung: S, T (Lagerung, Transport)
Umgebung: A
Genauigkeitsklasse: 1
Messbereich: -40°C…+70C
Nach EN 13485 ist eine regelmäßige Überprüfung und Kalibrierung des
Messgeräts gemäß EN 13486 durchzuführen (Empfehlung: jährlich).
Digital control thermometer

1. Features
• High precision
• Current temperature, MAX/MIN/HOLD
• Temperature alarm
• Temperature sensor with 3 m cable
• Table stand and magnet
• IP65 dust and hose-water proof
• Also for food checks (according to HACCP)
2. Display (LCD)
➀
Battery low
➃
Higher Alarm
➁
Alarm enable / disable
➄
Lower Alarm
➂
Buzzer Alarm Flashing Icon
3. Installation
• Pull off the protection foil on the display, if necessary. Open the bat-
tery cover on the backside of the instrument by opening the two little
screws next to the magnet by a screw driver, insert the battery
CR2032 3V Lithium and close the cover. The unit is now ready for use.
4. Operation
4.1 Temperature indication
• The present temperature in °C or °F measured by the cable sensor is
indicated on the display. Press the +1-switch to change from °C to °F
readout.
4.2 Button ON/OFF
• Press “ON/OFF”-button to switch the instrument on and off. Settings
are preserved, for measurements and alerting the instrument must
be switched on.
4.3 Hold/max-min-function
• When pressing the “MAX/MIN”-button, the present display is held
(HOLD).
• Pressing again the “MAX/MIN”-button, the display shows the maxi-
mum temperature since the last reset (MAX).
• When pressing the “MAX/MIN”-button again, the display shows the
minimum temperature since the last reset (MIN).
• To go back to the present temperature display, press the
“MAX/MIN”-button once more.
• To reset the maximum and minimum values, hold the “MAX/MIN”-
button for 3 seconds, while MAX or MIN is indicated ( ---).
4.4 Upper limit and lower limit temperature alert
• To set an upper temperature limit, that means when passing the tem-
perature an alarm is beeping, press the “AL SET”-button in normal
mode. The upper temperature limit ▲is shown and it is flashing. Set
the desired temperature by pressing the +1-button. Hold and press the
button for a fast count. Now you can activate (alarm symbol appears)
or deactivate (alarm symbol disappears) the alarm pressing
“MAX/MIN”- button. Confirm by pressing the “AL SET”-button.
• The lower temperature limit ▼is shown and it is flashing. To set a
lower temperature limit, that means when falling below the temper-
ature an alarm is beeping, press +1-button. Hold and press the but-
ton for a fast count. Now you can activate or deactivate the alarm
pressing “MAX/MIN-button”. Confirm by pressing the “AL SET”-but-
ton.
• After setting temperature alarm the symbols ▲▼ show, if an upper
or lower temperature alarm is activated.
• When passing or falling below the selected temperature limit an
alarm signal will sound for 1 minute, the buzzer alarm icon and the
corresponding arrow ▲or ▼will flash. The alarm and the buzzer
alarm icon can be turned off manually by pressing any button.
• When temperature is again within the selected limits the alarm sig-
nal will stop (within 1 min.) and the buzzer alarm flashing icon dis-
appears. The arrow keeps on flashing showing that the temperature
was higher/lower than the preset value at least once in the past.
Press +1- button and the arrow will stop flashing.
5. Battery change
• For a long battery life, it is recommend to press the “ON/OFF” but-
ton to switch the instrument off by not using.
• When the battery is used up, low battery icon appears.
• Open the battery cover on the backside of the instrument, insert a
new battery CR2032 3V Lithium and close the cover.
Attention: Please do not dispose of old electronic devices and used
batteries in household waste. To protect the environment, take them
to your retail store or to nearest civic amenity site to be disposed of
according to national or local regulations.
6. Technical data
Measuring range: -40 °C to +70°C (reversible °C/°F)
Precision: ±0,5 °C from -20 to 25°C
±1 °C besides
Cable: approx. 3m
Resolution: 0,1°C
Battery: CR2032 3V Lithium button cell battery
Measurements: approx. 86 x 57 x 30 mm
7. Attention
• Do not place the display unit near extreme temperatures. Only the
sensor is heat resistant.
• Do not immerse the display unit into water, water can penetrate and
cause malfunction.
• Please do not try to repair the unit. Contact the original point of
purchase. Please change the battery before complaining. No guaran-
tee if the instrument is handled or opened improperly.
This product fulfills the guidelines according to EN 13485.
Suitability: S, T (Stockage, Transport)
Location: A
Accuracy class: 1
Measuring range: -40°C…+70C
In accordance with EN 13485, this instrument is subject to regular in-
spections as per EN 13486 (recommendation: yearly).
Thermomètre de contrôle digital

1. Qualités
• Grande précision
• Température momentanée, MAX/MIN/HOLD
• Alarme de température
• Palpeur avec câble de 3 m
• Support et aimant
• IP65 antipoussière et résistant au jet d’eau
• Aussi pour des aliments (selon HACCP)
2. Display (LCD)
➀
Indicateur de batterie
➃
Limite supérieure
➁
Symbole d’alarme
➄
Limite inférieure
➂
Signal optique (clignote)
3. Mise en service
• Enlever la feuille de protection de l´affichage. Ouvrir les deux petits
vis au dos de l’appareil à l’aide d’un tournevis et enlevez le cou-
vercle. Insérer la pile bouton CR2032 3V de lithium. Fermer le com-
partiment de la pile. L´instrument est maintenant prêt à fonctionner.
4. Opération
4.1 Affichage de température
• La température actuelle mesurée avec le palpeur est indiquée. En
pressant la touche +1 l´affichage de la température peut être renversé
de °C en °F.
4.2 Touche ON /OFF
• Appuyer sur cette touche pour mettre l´appareil de mesure en circuit
ou hors circuit. Les ajustages sont subsistés, les mesures et les alarmes
s'effectuent seulement si l'instrument est en circuit.
4.3 Fonction hold/max/min
• En pressant la touche «MAX/MIN» la température momentanée est
fixée (affichage HOLD).
• En pressant encore une fois la touche «MAX/MIN» la température
maximale depuis la dernière réactualisation apparaît (affichage MAX).
• En pressant une troisième fois la touche «MAX/MIN» la température
minimale depuis la dernière réactualisation apparaît (affichage MIN).
• En pressant encore la touche «MAX/MIN» la température momen-
tanée apparaît.
• En pressant la touche «MAX/MIN» pour 3 secondes en même temps
la température maximale et minimale est affichée, la mémoire
MAX/MIN est remise à la température actuelle (affichage ---).
4.4 Limite supérieure et inférieure pour l’ alarme de température
• Pour régler une limite supérieure, en dépassant un alarme sonne,
appuyer sur la touche «AL SET» en mode normal. La valeur de limite
supérieure ▲ est indiquée et clignote. Régler la température sou-
haitée par la touche +1. Si vous maintenez la touche appuyée, la
valeur augmentera plus vite. On peut alors activer (symbole d’alarme
apparaît) ou désactiver (symbole d’alarme disparaît) l'alarme à l'aide
de la touche «MAX/MIN». Confirmer avec la touche «AL SET».
• La valeur de limite inférieure ▼ est indiquée et clignote. Régler une
limite inférieure, en dépassant un alarme sonne, avec la touche +1.
Si vous maintenez la touche appuyée, la valeur augmentera plus
vite. Activer ou désactiver l'alarme à l'aide de la touche «MAX/MIN».
• Apres régler l’ alarme de température les symboles ▲▼ montrent , si
une limite supérieure ou/et inférieure est activée.
• Si les limites de température sont inférieures ou supérieures aux
valeurs réglées en avant un signal d'alarme sonne pour une minute,
le signal optique et la flèche correspondante ▲ ou ▼commencent à
clignoter. Le signal acoustique et optique peuvent être arrêtés
manuellement par aucune touche.
• Si la température régresse dedans les limites d'alarme réglées le
signal acoustique arrête (dans 1 minute) et le signal optique dispa-
rait. La flèche commence à clignoter et indique que la température a
dépassé la valeur ajustée une fois au minimum au passé. En pressant
la touche+1, la flèche arrête à clignoter.
5. Changement de la batterie
• Vous pouvez éteindre l'appareil avec la touche «ON/OFF» si vous sou-
haitez économiser de l’énergie.
• Quand la batterie est trop faible, l’indicateur de batterie apparaît
sur l'affichage.
• Ouvrir le compartiment de la pile au dos de l´appareil, et insérer une
nouvelle pile bouton CR2032 3V de lithium.
Attention: Les vieux appareils électroniques et piles usagées ne
doivent pas être jetées avec les ordures ménagères. Dans le souci de
protéger l'environnement veuillez les emmener dans un site appro-
prié de récupération ou chez votre revendeur selon les spécifica-
tions nationales et locales.
6. Spécifications
Plage de mesure: -40 °C à +70°C (réversible °C/°F)
Précision: ±0,5 °C de -20 à 25°C
±1 °C en outre
Câble: environ 3m
Résolution: 0,1°C
Batterie: pile bouton CR2032 3V de lithium
Mesurage: environ 86 x 57 x 30 mm
7. Indication
• Evitez d’exposer l’appareil indicateur à des températures extrêmes.
Seulement le palpeur est résistant à la chaleur.
• N’ immergez pas l’appareil indicateur dans l’eau, sinon l’humidité
peut pénétrer et causer une mauvaise fonction.
• N’effectuez en aucun cas des réparations par vos propres moyens.
Rapportez l’appareil au point de vente. Avant tout réclamation,
veuillez faire échanger la pile. Nous déclinons toute responsabilité
en cas de manipulation incompétente ou d´ouverture de l´appareil.
Ce produit accomplit les directives selon la norme EN 13485.
Aptitude: S, T (Stockage, Transport)
Environs: A
Catégorie de précision: 1
Plage de mesure: -40°C…+70C
Selon EN 13485 un contrôle régulier et une calibration de l’instrument
de mesure est nécessaire selon EN 13486 (recommandation: par an).
TFA Anl. No. 30.1034_11/10 30.11.2010 16:08 Uhr Seite 1
Kat. Nr. 30.1034
Bedienungsanleitung
Operating Instructions
Mode d’emploi
Istruzioni
Gebruiksaanwijzing
Instrucciones para el manejo
LCD
➄
➃
➂
➀
➁
Termometro di controllo digitale

1. Attributi
• Grande precisione
• Temperatura attuale, MAX/MIN/HOLD
• Allarme della temperatura
• Sensore cavo di 3 m
• Sostegno da tavolo e calamita
• IP65 antipolvere e protetto contro i getti di acqua
• Anche per alimenti (in conformità HACCP)
2. Display (LCD)
➀
Indicatore batteria scarica
➃
Limite superiore
➁
Simblo di allarme
➄
Limite inferiore
➂
Segnale ottico (lampeggia)
3. Messa in funzione
• Rimuovere eventualmente la pellicola di protezione del display. Aprire
il vano per la batteria sul lato posteriore dell’apparecchio. Svitare
con un cacciavite le due viti piccole situate vicino a la calamita sul
retro dell'apparecchiatura e rimuovere il coperchio. Inserire la batteria
CR2032 3V tipo bottone al litio e richiudere il coperchio. L’apparecchio
è pronto per il funzionamento.
4. Utilizzo
4.1 Visualizzazione della temperatura
• La temperatura realmente misurata nella sonda del cavo viene visua-
lizzata sul display. Con il tasto +1 è possibile commutare la visualizza-
zione da °C a °F.
4.2 Tasto ON/OFF
• Con il tasto “ON/OFF” è possibile accendere/spegnere l'apparecchia-
tura. Le impostazioni restano memorizzate, mentre le misurazioni e
le emissioni di allarme hanno luogo solo nello stato di inserito.
4.3 Funzione HOLD/Max/Min.
• Premendo il tasto “MAX/MIN” la visualizzazione momentanea viene
mantenuta (visualizzazione HOLD).
• Premendo ancora una volta il tasto “MAX/MIN” compare la tempera-
tura massima dall’ultimo azzeramento (visualizzazione MAX).
• Premere il tasto “MAX/MIN” compare la temperatura minima dall’ul-
timo azzeramento (visualizzazione MIN).
• Premendo un’altra volta il tasto si ritorna alla temperatura attual-
mente impostata.
• Per cancellare i valori minimi e massimi impostati tenere premuto il
tasto “MAX/MIN” per 3 secondi, mentre vengono visualizzati MAX
e/o MIN (visualizzazione ---).
4.4 Impostazione dell'allarme di temperatura
• Per l'impostazione di un limite superiore di temperatura, al supera-
mento del quale viene emesso un allarme, premere il tasto “AL SET”
en modo normale. Il valore limite superiore ▲ viene visualizzato e
lampeggia. Inserire con il tasto +1 la temperatura desiderata. Se si
tiene premuto il tasto, il valore incrementa più velocemente. Ora con
il tasto “MAX/MIN” è possibile attivare l'allarme (appare un simbolo
di allarme) oppure disattivare (il simbolo di allarme scompare). Con-
fermare con il tasto “AL SET”.
• Il valore limite inferiore ▼ viene visualizzato e lampeggia. Inserire con
il tasto +1 il limite inferiore di temperatura desiderato, al cui mancato
raggiungimento viene emesso un allarme. Se si tiene premuto il tasto,
il valore incrementa più velocemente. Attivare o disattivare l'allarme
con il tasto “MAX/MIN”. Confermare con il tasto “AL SET”.
• Dopo l'impostazione dell'allarme di temperatura, i simboli ▲▼
mostrano se è attivo un valore limite superiore e/p inferiore.
• In caso di superamento oppure di mancato raggiungimento dei limiti
di temperatura impostati viene emesso per un minuto un tono di
allarme e la freccia corrispondente (▲ oppure ▼) e il segnale ottico
di allarme iniziano a lampeggiare. Il segnale di allarme e il segnale
ottico può essere disinserito con un tasto a piacere manualmente.
• Quando la temperatura si trova di nuovo all'interno dei limiti di
allarme impostati, il tono di allarme smette di suonare (dentro un
minuto) ed il segnale ottico di allarme smette di lampeggiare. La
freccia continua a lampeggiare e mostra che in passato il valore limite
impostato è stato superato o non raggiunto almeno per una volta.
Premere il tasto +1: la freccia smette di lampeggiare.
5. Sostituzione delle batterie
• Per risparmiare energia è possibile spegnere l'apparecchio con il
tasto “ON/OFF”.
• Se invece è scarica la batteria, il indicatore batteria scarica appare sul
display.
• Aprire il vano per la batteria sul lato posteriore dell’apparecchio. In-
serire una nuova batteria CR2032 3V al litio e richiudere il coperchio.
Attenzione: Le batterie scariche e apparecchi elettrici smessi non
devono essere smaltiti insieme all'immondizia domestica, bensì
dovranno essere riconsegnate al negoziante o ad altri enti preposti
per il riciclo in conformità alle vigenti disposizioni nazionali o locali.
6. Caratteristiche tecniche
Ambito di misurazione: da -40 °C a +70°C(reversibile °C/°F)
Precisione: ±0,5 °C da -20 a 25°C
±1 °C altrimenti
Cavo: ca. 3m
Risoluzione: 0,1°C
Alimentazione di tensione: CR2032 3V al litio tipo bottone
Misure alloggiamento: ca. 86 x 57 x 30 mm
7. Avvertenze
• Non esporre l’apparecchio indicatore a temperature elevate. Solo il
sensore è resistente alle alte temperature.
• Non immergere l’apparecchio indicatore in acqua: l’umidità può
penetrare e causare errori di funzionamento.
• Non effettuare riparazioni sugli apparecchi. Per favore riportarli al
punto vendita originale. Prima del reclamo, cambiare le batterie. Nel
caso di uso scorretto o di apertura dell'apparecchio non assumiamo
alcuna garanzia.
Questo prodotto soddisfa le linee guida previste dalla norma EN 13485.
Idoneità: S, T (Stoccaggio, Trasporto)
Ambiente: A
Classe di precisione: 1
Campo di misurazione: -40°C…+70C
Conformemente alla normativa EN 13485, il controllo e la taratura dello
strumento di misura dovrebbero essere effettuati regolarmente secondo i
termini della EN 13486 (Raccomandato: annualmente).
Digitaal controlethermometer

1. Eigenschappen
• Grote precisie
• Actuele temperatuur, MAX/MIN/HOLD
• Temperatuuralarm
• Sensor met 3 m kabel
• Stander en magneet
• IP65 stofdicht en spuitwaterdicht
• Ook voor levensmiddel (volgens HACCP) )
2. Display (LCD)
➀
Batterij-teken
➃
Bovengrens
➁
Alarmsymbool
➄
Ondergrens
➂
Optisch alarmsignaal (knippert)
3. Ingebruikname
• Verwijder eventueel de beschermende folie van het display. Maak
het batterijvak aan de achterkant van het apparaat open door de
twee kleine schroeven naast de magneet met een schroevendraaier
los te draaien. Plaats de batterij CR2032 3V lithium erin en maak het
deksel weer dicht. Het apparaat is bedrijfsgereed.
4. Bediening
4.1 Temperatuurweergave
• De aan de kabelsensor gemeten actuele temperatuur verschijnt op
het display. Met de +1-toets kunt u de displayweergave van °C op °F
omschakelen.
4.2 Toets ON/OFF
• Met de “ON/OFF”-toets kunt u het toestel aan- en afzetten. Instell-
ingen blijven bewaard, metingen en alarmeringen vinden enkel in
ingeschakelde toestand plaats.
4.3 Hold/Max/Min-functie
• Druk op de “MAX/MIN”-toets om de momentele weergave op te
slaan (weergave HOLD).
• Drukt u nogmaals op de “MAX/MIN”-toets verschijnt de maximale
temperatuur sinds de vorige keer dat deze werd teruggezet (weer-
gave MAX).
• Drukt u nogmaals op de “MAX/MIN”-toets, dan verschijnt de mini-
male temperatuur sinds de vorige keer dat deze werd teruggezet
(weergave MIN).
• Door nogmaals op de toets te drukken keert u terug naar de actuele
temperatuur.
• Om de opgeslagen maximale en minimale waarden te wissen, houdt u
de “MAX/MIN”-toets 3 seconden lang ingedrukt terwijl MAX resp.
MIN wordt weergegeven (weergave ---).
4.4 Bovengrens en ondergrens voor temperatuur-alarm
• Druk op de “AL SET”-toets in de normaal-modus om een tempera-
tuurbovengrens in te stellen die bij overschrijding een akoestisch
alarm geeft. De bovenste grenswaarde ▲ verschijnt en knippert. Stel
de gewenste temperatuur met de +1-toets in. Houdt u de toets inge-
drukt, verhoogt de waarde sneller. Nu kunt u het alarm met de
“MAX/MIN”-toets activeren (alarmsymbool verschijnt) of deactiveren
(alarmsymbool verdwijnt). Bevestig met de “AL SET”-toets.
• De onderste grenswaarde ▼ verschijnt en knippert. Stel de gewenste
temperatuurondergrens indien nodig met de +1-toets in zodat bij
onderschrijden een alarm weerklinkt. Houdt u de toets ingedrukt,
verhoogt de waarde sneller. Activeer of deactiveer het alarm met de
“MAX/MIN”-toets. Bevestig met de “AL SET”-toets.
• Na het instellen van het temperatuuralarm tonen de symbolen ▲▼
of een bovenste en/of onderste grenswaarde actief is.
• Worden de ingestelde temperatuurgrenzen onder- of overschreden,
weerklinkt gedurende één minuut een alarmtoon; de overeenkomstige
pijl ▲ of ▼en het optisch alarmsignaal beginnen te knipperen. U
kunt de alarmtoon en het optisch alarmsignaal met een willekeurige
toets afzetten.
• Ligt de temperatuur weer binnen de ingestelde alarmgrenzen, stopt
de alarmtoon (binnen één minuut) en het optisch alarmsignaal stopt
met knipperen. De pijl knippert verder en signaleert dat de ingestelde
grenswaarde in het verleden minstens één keer over- of onderschre-
den werd. Druk op +1-toets en de pijl stopt met knipperen.
5. Batterijen vervangen
• U kunt het apparaat met de ON/OFF toets uitschakelen en zo energie
sparen.
• Wanneer de batterij zwak is, verschijnt het batterij-teken in de dis-
play.
• Maak het batterijvak aan de achterkant van het apparaat open. Plaats
een nieuwe batterij CR2032 3V lithium erin en sluit het deksel weer.
Opgepast: Batterijen en technische apparaten mogen niet met het
huisvuil worden weggegooid. Breng ze naar de inzamelplaatsen of bij
uw detaillist naar de daarvoor bestemde containers volgens de natio-
nale of lokale bepalingen.
6. Technische gegevens
Meetbereik: -40 °C tot +70°C
(C°/F°- overschakelbaar)
Precisie: ±0,5 °C voor -20 tot 25°C
±1 °C voor de rest
Kabel: ca. 3 m
Resolutie 0,1°C
Spanningsvoorziening: CR2032 3V Lithium
Afmetingen behuizing: ca. 86 x 57 x 30 mm
7. Opmerkingen
• Stel het display apparaat niet aan hoge temperaturen bloot. Alleen
de voeler is hittebestendig.
• Dompel het display apparaat niet in water, anders kan er vocht bin-
nendringen en tot functiestoringen leiden.
• Voer geen eigen reparatiepogingen uit. Bij reclamaties dient u zich
tot uw dealer te richten. Alvorens te reclameren a.u.b. de batterij
laten vervangen. Bij het openen of onvakkundige behandeling ver-
valt de garantie.
Dit product voldoet aan de richtlijnen overeenkomstig de norm EN 13485.
Geschiktheid: S, T (Opslag, Vervoer)
Omgeving: A
Nauwkeurigheidsklasse: 1
Meetbereik: -40°C…+70C
Volgens EN 13485 moet het meettoestel regelmatig worden gecontro-
leerd en gekalibreerd overeenkomstig EN 13486 (aanbeveling: jaarlijks).
Termómetro de control digital

1. Características
• Grande precisión
• Temperatura actual, MAX/MIN/HOLD
• Alarma de temperatura
• Sensor con cavo di 3 m
• Soporte y magneto
• IP65 estanco al polvo y protección contra los chorros de agua
• También para alimentos (según HACCP)
2. Display (LCD)
➀
Símbolo de pila gastada
➃
Límite superior
➁
Símbolo de alarma
➄
Límite inferior
➂
Señal de alarma óptica (parpadea)
3. Puesta en marcha
•
Dado el caso, retire la lámina de protección del display. Abra los dos tor-
nillos pequeños en la parte posterior del aparato (junto al magneto)
mediante destornillador. Coloque la pila CR2032 3V de litio con la pola-
ridad tal como viene representada. El aparato está listo para el servicio.
4. Manejo
4.1 Indicación de temperatura
• La temperatura actual medida con la sonda se indica en el display.
Con la tecla +1 podrá conmutar la indicación de °C a °F.
4.2 Tecla ON/OFF
• Encendido/apagado del aparato mediante la tecla “ON/OFF”. Los
ajustes permanecen memorizados. Las mediciones y las alarmas sólo
son activas si el aparato está encendido.
4.3 Función HOLD/MAX/MIN
• Pulsando la tecla “MAX/MIN” se mantiene representada la indicación
actual en el display (Display HOLD).
• Pulse aún una vez la tecla “MAX/MIN” aparece la temperatura,
desde la última reposición (indicación MAX).
• Pulse aún una vez la tecla “MAX/MIN”, aparece la temperatura míni-
ma desde la última reposición (indicación MIN).
• Con otra pulsación de tecla vuelve usted a la temperatura actual.
• Para el borrado de los valores máximos y mínimos memorizados
mantenga pulsada la tecla “MAX/MIN” durante 3 segundos, mien-
tras que se indica MAX, si bien, MIN (indicación ---).
4.4 Límite superior y límite inferior para alarma de temperatura
• Para determinar el límite superior de temperatura, que de ser sobre-
pasado disparará una alarma, pulse la tecla “AL SET”en el modo nor-
mal. El límite superior ▲ aparece y parpadea. Introduzca la temperatu-
ra deseada mediante la tecla +1. Si mantiene pulsada la tecla se
modificará rápidamente.
• Seguidamente puede activar la alarma (el símbolo de la alarma apa-
rece indicado) o desactivarla (el símbolo de la alarma desaparece)
mediante la tecla “MAX/MIN”. Confirme la introducción mediante la
tecla “AL SET”.
• El valor límite inferior ▼ aparece y parpadea. Introduzca de igual
modo el límite inferior de temperatura, que de ser sobrepasado dispa-
rará una alarma, mediante la tecla +1. Si mantiene pulsada la tecla se
modificará rápidamente. Active o desactive la alarma mediante la
tecla “MAX/MIN”. Confirme la introducción mediante la tecla “AL
SET”.
• Tras haber ajustado la alarma de temperatura, los símbolos indica-
rán si ha sido activado un límite superior y/o inferior.
• Si se sobrepasan los límites inferior o superior de temperatura sonará
una alarma durante 1 minuto y la flecha correspondiente ▲ ó ▼y la
señal de alarma óptica comenzarán a parpadear. La alarma y la señal
de alarma óptica puede ser desconectada pulsando cualquier tecla .
• Cuando la temperatura vuelva a estar dentro de los límites de alarma
ajustados la alarma está desconectada (durante 1 minuto) y dejará
de parpadear la señal óptica. La flecha seguirá parpadeando indican-
do que los valores límite ajustados han sido sobrepasados anterior-
mente al menos una vez. Pulse la tecla +1 y la flecha dejará de parpa-
dear.
5. Cambio de pila
• Con el fin de ahorrar energía existe la posibilidad de desconectar el
aparato con la tecla “ON/OFF”.
• Si la pila está descargada, aparece el símbolo de pila gastada en la
pantalla.
• Abra el compartimiento de pila al lado posterior del aparato, colo-
que la nueva pila CR2032 3V de litio, y vuelva a cerrar la tapa.
¡Atención! El aparato y las baterías usadas no deben ser depositadas
con los residuos normales de la casa. Por favor deposítelas en el
comercio especializado o bien en los centros de recogida y reciclaje
previstos para ello según el reglamento nacional o local.
6. Datos técnicos
Campo de medición: -40 °C hasta +70°C (reversible °C/°F)
Precisión: ±0,5 °C de -20 a 25°C,
±1 °C por lo demás
Cable: aproximadamente 3m
Resolución: 0,1°C
Alimentación de tensión: pila CR2032 3V de litio
Dimensión de carcasa: aproximadamente 86 x 57 x 30 mm
7. Advertencias
• No exponga el aparato indicador a altas temperaturas. Solamente el
sensor esta a prueba de calor.
• No sumerja el aparato indicador en agua, pues podría introducirse
humedad e inducir a funciones erróneas.
• Por favor, no emprenda ningún intento propio de reparaciones. En
caso de reclamaciones diríjase a su comerciante. Antes de la reclama-
ción, por favor, cambiar la pila. En caso de abertura o trato inade-
cuado anulará la garantía.
Este producto cumple las directivas conforme a la norma EN 13485.
Aptitud: S, T (Almacenamiento, Transporte)
Ambiente: A
Categoría de exactitud: 1
Ámbito de medida: -40°C…+70C
Según la norma EN 13485, debe efectuarse regularmente una compro-
bación y calibración del instrumento de medida conforme a la norma
EN 13486 (recomendación: anualmente).
TFA Anl. No. 30.1034_11/10 30.11.2010 16:08 Uhr Seite 2

Other TFA Thermometer manuals

TFA RAY 31.1136 User manual

TFA

TFA RAY 31.1136 User manual

TFA VET 112 User manual

TFA

TFA VET 112 User manual

TFA MALIBU WIRELESS POOL THERMOMETER User manual

TFA

TFA MALIBU WIRELESS POOL THERMOMETER User manual

TFA 30.5011 User manual

TFA

TFA 30.5011 User manual

TFA FLASH III User manual

TFA

TFA FLASH III User manual

TFA VET 12 User manual

TFA

TFA VET 12 User manual

TFA POCO User manual

TFA

TFA POCO User manual

TFA THD2FE User manual

TFA

TFA THD2FE User manual

TFA 30.1061 User manual

TFA

TFA 30.1061 User manual

TFA 30.5028 User manual

TFA

TFA 30.5028 User manual

TFA DUCKY User manual

TFA

TFA DUCKY User manual

TFA 30.5024 User manual

TFA

TFA 30.5024 User manual

TFA 30.2018 User manual

TFA

TFA 30.2018 User manual

TFA Mini Flash 31.1108 User manual

TFA

TFA Mini Flash 31.1108 User manual

TFA 30.1064.02. K User manual

TFA

TFA 30.1064.02. K User manual

TFA 30.3034 User manual

TFA

TFA 30.3034 User manual

TFA 30.1027 User manual

TFA

TFA 30.1027 User manual

TFA 30.5005 User manual

TFA

TFA 30.5005 User manual

TFA TRINITY 30.3058 User manual

TFA

TFA TRINITY 30.3058 User manual

TFA 30.3061 User manual

TFA

TFA 30.3061 User manual

TFA 30.1066 User manual

TFA

TFA 30.1066 User manual

TFA 30.136 User manual

TFA

TFA 30.136 User manual

TFA 30.1039 User manual

TFA

TFA 30.1039 User manual

TFA JOKER User manual

TFA

TFA JOKER User manual

Popular Thermometer manuals by other brands

Radio Shack 63-1028 owner's manual

Radio Shack

Radio Shack 63-1028 owner's manual

CDN TCTW572 manual

CDN

CDN TCTW572 manual

Fudakang FT-F31-BT Instruction for use, installation and assembly

Fudakang

Fudakang FT-F31-BT Instruction for use, installation and assembly

SATO SK-270WP instruction manual

SATO

SATO SK-270WP instruction manual

Braun NTF 3000 manual

Braun

Braun NTF 3000 manual

CHY 804R operating instructions

CHY

CHY 804R operating instructions

IROX ETG38 manual

IROX

IROX ETG38 manual

Lanaform IRT-100 manual

Lanaform

Lanaform IRT-100 manual

B+B Sensors HM 1150 instruction manual

B+B Sensors

B+B Sensors HM 1150 instruction manual

TALKJOY 1017636461 quick start guide

TALKJOY

TALKJOY 1017636461 quick start guide

BASETech IRT-350 operating instructions

BASETech

BASETech IRT-350 operating instructions

Maverick OvenChek ST-01 Specification sheet

Maverick

Maverick OvenChek ST-01 Specification sheet

Mobi Technologies DualScan Prime 3 user manual

Mobi Technologies

Mobi Technologies DualScan Prime 3 user manual

i-Quip I5771 user manual

i-Quip

i-Quip I5771 user manual

Life Sourse UT-302 Instruction guide

Life Sourse

Life Sourse UT-302 Instruction guide

Amprobe TPP1-F1 user manual

Amprobe

Amprobe TPP1-F1 user manual

Geisinger GBTP-01 operating instructions

Geisinger

Geisinger GBTP-01 operating instructions

Sanitas SFT 53 Instructions for use

Sanitas

Sanitas SFT 53 Instructions for use

manuals.online logo
manuals.online logoBrands
  • About & Mission
  • Contact us
  • Privacy Policy
  • Terms and Conditions

Copyright 2025 Manuals.Online. All Rights Reserved.