manuals.online logo
Brands
  1. Home
  2. •
  3. Brands
  4. •
  5. TFA
  6. •
  7. Thermometer
  8. •
  9. TFA 30.1064.02. K User manual

TFA 30.1064.02. K User manual

Vielen Dank, dass Sie sich für dieses Gerät aus dem Hause TFA
entschieden haben.
1. Bevor Sie mit dem Gerät arbeiten
•Lesen Sie sich bitte die Bedienungsanleitung genau
durch.
•Durch die Beachtung der Bedienungsanleitung vermeiden
Sie auch Beschädigungen des Gerätes und die Gefährdung
Ihrer gesetzlichen Mängelrechte durch Fehlgebrauch. Für
Schäden, die aus Nichtbeachtung dieser Bedienungsanlei-
tung verursacht werden, übernehmen wir keine Haftung.
Ebenso haften wir nicht für inkorrekte Messwerte und Fol-
gen, die sich aus solchen ergeben können.
•Beachten Sie besonders die Sicherheitshinweise!
•Bewahren Sie diese Bedienungsanleitung gut auf!
2. Zu Ihrer Sicherheit
• Verwenden Sie das Produkt nicht anders, als in dieser Anlei-
tung beschrieben wird.
• Das eigenmächtige Reparieren, Umbauen oder Verändern
des Gerätes ist nicht gestattet.
• Dieses Gerät ist nicht für medizinische Zwecke bestimmt.
Vorsicht!
Verletzungsgefahr:
• Vorsicht beim Umgang mit dem spitzen Einstechfühler.
Immer mit der Schutzkappe aufbewahren!
• Bewahren Sie das Gerät und die Batterie außerhalb der
Reichweite von Kindern auf.
• Batterien enthalten gesundheitsschädliche Säuren und kön-
nen bei Verschlucken lebensgefährlich sein. Wurde eine Bat-
terie verschluckt, kann dies innerhalb von 2 Stunden zu
schweren inneren Verätzungen und zum Tode führen. Wenn
Sie vermuten, eine Batterie könnte verschluckt oder ander-
weitig in den Körper gelangt sein, nehmen Sie sofort medi-
zinische Hilfe in Anspruch.
• Batterien nicht ins Feuer werfen, kurzschließen, auseinan-
dernehmen oder aufladen. Explosionsgefahr!
• Um ein Auslaufen der Batterien zu vermeiden, sollten
schwache Batterien möglichst schnell ausgetauscht werden.
• Beim Hantieren mit ausgelaufenen Batterien chemikalienbe-
ständige Schutzhandschuhe und Schutzbrille tragen!
Wichtige Hinweise
zur Produktsicherheit!
• Setzen Sie das Gerät nicht extremen Temperaturen, Vibratio-
nen und Erschütterungen aus.
• Nur der Fühler ist hitzebeständig bis 250°C.
• Halten Sie niemals den Fühler direkt über Feuer.
• Benutzen Sie das Gerät nicht in der Mikrowelle, im Backofen
oder Grill.
• Das Gerät entspricht dem Schutzgrad IP 67 und ist gegen
Strahlwasser und zeitweiliges Untertauchen geschützt. Nicht
in der Spülmaschine reinigen.
3. Bestandteile
3.1 Display (Fig. 1)
A 1: MAX A 2: MIN
A 3: Aktuelle Temperatur
A 4: Symbol „Abschaltautomatik aus”
3.2 Tasten (Fig. 2)
B 1: ON/OFF Taste B 2: FLIP Taste
B 3: AUTO OFF Schiebeschalter
3.3 Gehäuse (Fig. 2)
C 1: Einstechfühler C 2: Batteriefach
C 3: Display (drehbar um 180°) C 4: Schutzhülle
4. Inbetriebnahme und Bedienung
• Nehmen Sie die Schutzhülle von der Einstichsonde.
• Drücken Sie die ON/OFF Taste.
• Das Display zeigt die momentan gemessene Temperatur an.
• Der Sensor befindet sich in der Sondenspitze.
• Um die Temperatur zu messen, stecken Sie den Einstichfüh-
ler mindestens 2,5 cm tief in das Messobjekt.
• Drehen Sie die Anzeige bei Bedarf mit der FLIP Taste um
180°.
• Zum kurzzeitigen Aktivieren der Hintergrundbeleuchtung
drücken Sie die ON/OFF Taste im Normalmodus.
• Halten Sie die ON/OFF Taste im Normalmodus gedrückt,
schaltet sich das Gerät aus. OFF erscheint auf dem Display.
• Das Gerät schaltet sich nach ca. 10 Minuten automatisch
aus.
4.1 Deaktivieren der Abschaltautomatik
• Die Abschaltautomatik lässt sich deaktivieren. Öffnen sie das
Batteriefach und entnehmen Sie die Batterie.
• Betätigen Sie mit einem spitzen Gegenstand den versteckten
AUTO OFF Schiebeschalter im Batteriefach, um die automa-
tische Abschaltfunktion zu deaktivieren oder wieder zu akti-
vieren (Voreinstellung: Abschaltautomatik aktiviert = Schal-
ter steht links).
• Das Symbol „Abschaltautomatik aus” erscheint oder ver-
schwindet im Display.
5. MAX/MIN-Funktion
• Drücken Sie 2 x kurz die ON/OFF Taste. Das Gerät befindet
sich im MAX/MIN-Modus.
• Im Display erscheint MAX. Es wird der höchste Temperatur-
wert angezeigt seit dem Einschalten des Gerätes.
• Drücken Sie die ON/OFF Taste noch einmal. Im Display
erscheint MIN. Es wird der tiefste Temperaturwert angezeigt
seit dem Einschalten des Gerätes.
• Um die MAX/MIN-Werte zurückzusetzen, halten Sie die
ON/OFF Taste im MAX/MIN-Modus gedrückt.
• Drücken Sie noch einmal die ON/OFF Taste, um den
MAX/MIN Modus zu verlassen.
• Das Gerät verlässt automatisch den MAX/MIN-Modus, wenn
länger als 5 Sekunden keine Taste gedrückt wird.
6. Pflege und Wartung
• Reinigen Sie das Gerät mit einem weichen, leicht feuchten
Tuch. Keine Scheuer- oder Lösungsmittel verwenden! Das
Gerät ist abwaschbar unter fließendem Wasser.
• Entfernen Sie die Batterie, wenn Sie das Gerät längere Zeit
nicht verwenden.
• Bewahren Sie Ihr Gerät an einem trockenen Platz auf.
6.1 Batteriewechsel
• Tauschen Sie die Batterie aus, wenn die Anzeige für schwa-
che Batterie „LoB” auf dem Display erscheint.
• Öffnen Sie das Batteriefach, indem Sie den Deckel mit Hilfe
einer Münze in Pfeilrichtung (OPEN) drehen.
• Legen Sie eine neue 3 V CR2032 Knopfzell-Batterie ein (+
Pol nach oben).
• Schließen Sie das Batteriefach wieder.
7. Entsorgung
Batterien und Akkus dürfen keinesfalls in den
Hausmüll!
Als Verbraucher sind Sie gesetzlich verpflichtet,
gebrauchte Batterien und Akkus zur umweltge-
rechten Entsorgung beim Handel oder entspre-
chenden Sammelstellen gemäß nationalen oder
lokalen Bestimmungen abzugeben.
Die Bezeichnungen für enthaltene Schwermetalle
sind: Cd=Cadmium, Hg=Quecksilber, Pb=Blei
Dieses Gerät ist entsprechend der EU-Richtlinie
über die Entsorgung von Elektro- und Elektronik-
Altgeräten (WEEE) gekennzeichnet.
Dieses Produkt darf nicht mit dem Hausmüll ent-
sorgt werden. Der Nutzer ist verpflichtet, das Alt-
gerät zur umweltgerechten Entsorgung bei einer
ausgewiesenen Annahmestelle für die Entsorgung
von Elektro- und Elektronikgeräten abzugeben.
8
. Technische Daten
Messbereich Temperatur -40°C…+250°C
Auflösung 0,1°C
Genauigkeit ±0,5°C von -20…+150°C
ansonsten ±1°C
Ansprechzeit 4-5 Sekunden
IP-Schutzklasse IP 67
Spannungsversorgung CR2032 Knopfzell-Batterie
(inklusive)
Größe 206 x 31 x 18 mm
Gewicht 43 g (nur das Gerät)
Diese Anleitung oder Auszüge daraus dürfen nur mit Zustimmung von TFA
Dostmann veröffentlicht werden. Die technischen Daten entsprechen dem
Stand bei Drucklegung und können ohne vorherige Benachrichtigung
geändert werden. Die neuesten technischen Daten und Informationen zu
Ihrem Produkt finden Sie auf unserer Homepage unter Eingabe der Arti-
kel-Nummer in das Suchfeld.
www.tfa-dostmann.de
E-Mail: [email protected]
TFA Dostmann GmbH & Co.KG
Zum Ottersberg 12, D-97877 Wertheim, Deutschland 07/20
Thank you for choosing this instrument from TFA.
1. Before you use this product
•Please make sure you read the instruction manual care-
fully.
•Following and respecting the instructions in your manual
will prevent damage to your instrument and loss of your
statutory rights arising from defects due to incorrect use.
We shall not be liable for any damage occurring as a
result of non-following of these instructions. Likewise, we
take no responsibility for any incorrect readings or for any
consequences resulting from them.
•Please take particular note of the safety advice!
•Please keep this instruction manual safe for future refe-
rence.
2. For your safety
• This product should only be used as described within these
instructions.
• Unauthorized repairs, alterations or changes to the product
are prohibited.
• This product is not be used for medical purpose.
Caution!
Risk of injury!
• Be careful when handling the sharp probe. Store the probe
with its protective cap.
• Keep this device and the battery out of reach of children.
• Batteries contain harmful acids and may be hazardous if
swallowed. If a battery is swallowed, this can lead to serious
internal burns and death within two hours. If you suspect a
battery could have been swallowed or otherwise caught in
the body, seek medical help immediately.
• Batteries must not be thrown into a fire, short-circuited,
taken apart or recharged. Risk of explosion!
• Low batteries should be changed as soon as possible to
prevent damage caused by leaking.
• Wear chemical-resistant protective gloves and safety glass-
es when handling leaking batteries.
Important information on product safety!
• Do not expose the device to extreme temperatures, vibra-
tions or shocks.
• Only the probe is heat resistant up to 250 °C.
• Never hold the probe directly over a fire.
• Do not use the instrument in the microwave, oven or grill.
• The device corresponds to the protection degree IP 67, and
is protected against jet water and short submersion. Not
suitable for dishwasher.
3. Elements
3.1 Display (Fig. 1)
A 1: MAX A 2: MIN
A 3: Actual temperature
A 4: Symbol “auto-off disabled”
3.2 Buttons (Fig. 2)
B 1: ON/OFF button B 2: FLIP button
B 3: AUTO OFF switch
3.3 Housing (Fig. 2)
C 1: Probe C 2: Battery compartment
C 3: Display (rotatable 180°) C 4: Protective cap
4. Getting started/Operation
• Remove the protective cap from the probe.
• Press the ON/OFF button.
• The actual temperature is shown on the display.
• The sensor is located at the probe tip.
• To measure the temperature, insert the probe at least 2.5 cm
into the object.
• If necessary, turn the display with the FLIP button by 180°.
• To temporarily activate the backlight, press the ON/OFF but-
ton in normal mode.
• Press and hold the ON/OFF button in normal mode and the
instrument turns off. OFF appears on the display.
• The device will turn off automatically after approx. 10 minu-
tes.
4.1 Deactivate the auto power off function
• The auto power off function can be deactivated. Open the
battery compartment and remove the battery.
Bedienungsanleitung
Instruction manual
Mode d'emploi
Kat.-Nr. 30.1064.02.K
A 3
Fig. 1
A 1
A 4
A 2
Digitales Einstichthermometer Digitales Einstichthermometer Digital probe thermometer 
TFA_No. 30.1064_Anleitung 07.07.2020 10:01 Uhr Seite 1
Bedienungsanleitung
Instruction manual
Mode d'emploi
Kat.-Nr. 30.1064.02.K
Fig. 2
C 3B 1C 4
C 1 C 2 B 2
B 3
• Use a pointed object to operate the hidden AUTO OFF slide
switch in the battery compartment to disable or re-enable
the auto power off function (default setting: auto power off
enabled = switch is on the left).
• The symbol “auto-off disabled” will appear or disappear on
the display.
5. MAX/MIN function
• Double click the ON/OFF button. The instrument is now in
the MAX/MIN mode.
• MAX appears on the display. The highest temperature is dis-
played since the instrument is switched on.
• Press the ON/OFF button again. MIN appears on the display.
The lowest temperature is displayed since the instrument is
switched on.
• Press and hold the ON/OFF button in the MAX/MIN mode to
clear the recorded reading.
• Press the ON/OFF button again to exit the MAX/MIN mode.
• The device will automatically quit the MAX/MIN mode if no
button is pressed for 5 seconds.
6. Care and maintenance
• Clean the instrument with a soft damp cloth. Do not use sol-
vents or scouring agents. The device is washable under run-
ning water.
• Remove the battery if you do not use the device for a long
period of time.
• Store the device in a dry place.
6.1 Battery replacement
• Change the battery when the low battery indication “LoB”
appears on the display.
• Open the battery compartment by turning the lid in direction
of the arrow (OPEN) using a coin.
• Insert a new button cell battery 3 V CR2032 (+ pole up-
wards).
• Close the battery compartment.
7. Waste disposal
Never dispose of empty batteries and recharge-
able batteries with ordinary household waste.
As a consumer, you are required by law to take
them to your retail store or to an appropriate
collection site depending on national or local
regulations in order to protect the environment.
The symbols for the contained heavy metals are:
Cd=cadmium, Hg=mercury, Pb=lead
This product is labelled in accordance with the
EU Waste Electrical and Electronic Equipment
Directive (WEEE).
Please do not dispose of this product in ordinary
household waste. As a consumer, you are
required to take end-of-life devices to a desig-
nated collection point for the disposal of electri-
cal and electronic equipment, in order to ensure
environmentally-compatible disposal.
8
. Specifications
Measuring range
temperature -40°C…+250°C
Resolution 0.1°C
Accuracy ±0.5°C from -20…+150°C
±1°C otherwise
Response time 4-5 seconds
IP protection class IP 67
Power consumption Button cell battery CR2032
(included)
Dimensions 206 x 31 x 18 mm
Weight 43 g (device only)
No part of this manual may be reproduced without written consent of TFA
Dostmann. The technical data are correct at the time of going to print and
may change without prior notice. The latest technical data and information
about this product can be found in our homepage by simply entering the
product number in the search box.
www.tfa-dostmann.de
E-Mail: [email protected]
TFA Dostmann GmbH & Co.KG
Zum Ottersberg 12, D-97877 Wertheim, Germany 07/20
Nous vous remercions d'avoir choisi l'appareil de la société
TFA.
1. Avant d'utiliser votre appareil
•Veuillez lire attentivement le mode d'emploi.
•En respectant ce mode d'emploi, vous éviterez d'endom-
mager votre appareil et de perdre vos droits légaux en cas
de défaut si celui-ci résulte d’une utilisation non-confor-
me. Nous n'assumons aucune responsabilité pour des
dommages qui auraient été causés par le non-respect du
présent mode d'emploi. De même, nous n’assumons
aucune responsabilité pour des relevés incorrects et les
conséquences qu’ils pourraient engendrer.
•Suivez bien toutes les consignes de sécurité !
•Conservez soigneusement le mode d'emploi !
2. Pour votre sécurité
• N'utilisez jamais l’appareil à d'autres fins que celles décrites
dans le présent mode d'emploi.
• Vous ne devez en aucun cas réparer, démonter ou modifier
l'appareil par vous-même.
• Cet appareil ne convient pas à une utilisation médicale.
Attention !
Danger de blessure :
• Faites attention en utilisant la sonde pointue. Pour garder
l'appareil, remettre le capuchon de protection en place.
• Gardez votre appareil et la pile hors de la portée des enfants.
• Les piles contiennent des acides nocifs pour la santé et peu-
vent être mortelles dans le cas d’une ingestion. Si une pile a
été avalée, elle peut entraîner des brûlures internes graves
ainsi que la mort dans l’espace de 2 heures. Si vous craignez
qu’une pile ait pu être avalée ou ingérée d’une autre manière,
quelle qu’elle soit, contactez immédiatement un médecin
d’urgence.
• Ne jetez jamais de piles dans le feu, ne les court-circuitez
pas, ne les démontez pas et ne les rechargez pas. Risque
d'explosion !
• Une pile faible doit être remplacée le plus rapidement possi-
ble afin d'éviter toute fuite.
• Pour manipuler des piles qui ont coulé, utilisez des gants de
protection chimique spécialement adaptés et portez des
lunettes de protection !
Conseils importants de sécurité du produit !
• Évitez d’exposer l’appareil à des températures extrêmes, à
des vibrations ou à des chocs.
• Seul la sonde est résistante à une chaleur de 250 °C.
• Ne placez jamais la sonde directement sur le feu.
• N'utilisez jamais votre appareil dans un four à micro-ondes,
un four ou un grill.
• L'appareil est conforme à la classe de protection IP 67 et est
protégé contre les jets d'eau et l'immersion temporaire.
Votre instrument ne peut pas être lavé au lave-vaisselle.
3. Composants
3.1 Affichage (Fig. 1)
A 1 : MAX A 2 : MIN
A 3: Température actuelle
A 4 : Symbole de « mise hors tension automatique désactivée »
3.2 Touches (Fig. 2)
B 1 : Touche ON/OFF B 2 : Touche FLIP
B 3 : Interrupteur AUTO OFF
3.3 Boîtier (Fig. 2)
C 1 : Sonde C 2 : Compartiment à pile
C 3 : Affichage (tournant 180°)
C 4 : Capuchon de protection
4. Mise en service/Utilisation
• Enlevez le capuchon de protection.
• Appuyez sur la touche ON/OFF.
• L´affichage vous indique la température actuelle.
• Le palpeur se trouve à la pointe de la sonde.
• Pour mesurer la température, insérez la sonde à au moins
2,5 cm de profondeur dans l'objet.
• Tournez l'écran par 180° avec la touche FLIP si nécessaire.
• Pour activer temporairement l'éclairage de fond, appuyez
sur la touche ON/OFF en mode normal.
• Maintenez la touche ON/OFF appuyée en mode normal, l'ap-
pareil s'éteint. OFF apparaît sur l'écran.
• L'appareil s'arrête automatiquement après 10 minutes.
4.1 Désactiver la fonction de mise hors service automatique
• La fonction de mise hors service automatique peut être dés-
activée. Ouvrez le compartiment à pile et retirez la pile.
• Utilisez un objet pointu pour actionner l'interrupteur caché
AUTO OFF dans le compartiment à pile afin de désactiver ou
de réactiver la fonction de mise hors tension automatique.
(Réglage par défaut : Mise hors tension automatique activée =
l'interrupteur est à gauche).
• Le symbole de « mise hors tension automatique désactivée »
apparaît ou disparaît sur l'écran.
5. Fonction MAX/MIN
• Appuyez deux fois brièvement sur la touche ON/OFF. L'ap-
pareil passe en mode MAX/MIN.
• MAX apparaît sur l'écran. La température maximale apparaît
sur l'écran dès l'allumage de l'appareil.
• Appuyez une nouvelle fois sur la touche ON/OFF. MIN appa-
raît sur l'écran. La température minimale apparaît sur
l'écran dès l'allumage de l'appareil.
• Maintenez la touche ON/OFF appuyée en mode MAX/MIN
pour effacer les valeurs MAX/MIN.
• Appuyez une nouvelle fois sur la touche ON/OFF pour quitter
le mode MAX/MIN.
• L'appareil quitte automatiquement le mode MAX/MIN si
aucune touche n’est pressée pendant 5 secondes.
6. Entretien et maintenance
• Pour le nettoyage de votre appareil, utilisez un chiffon doux
et humide. N’utilisez pas de solvants ou d'agents abrasifs !
L'appareil doit être lavé à l'eau courante.
• Retirez la pile si vous n'utilisez pas votre appareil pendant
une durée prolongée.
• Conservez votre appareil dans un endroit sec.
6.1 Remplacement de la pile
• Remplacez la pile si l’affichage de pile faible « LoB » appa-
raît sur l'écran.
• Ouvrez le compartiment à pile en tournant le couvercle en
direction de la flèche (aidez-vous d’une pièce de monnaie).
• Insérez une nouvelle pile de type 3 V CR2032, polarité +
vers le haut.
• Refermez le compartiment à pile.
7. Traitement des déchets
Les piles usagées ne doivent pas être jetées dans
les détritus ménagers. En tant qu'utilisateur,
vous avez l'obligation légale de rapporter les
piles et piles rechargeables usagées à votre
revendeur ou de les déposer dans une déchette-
rie proche de votre domicile conformément à la
réglementation nationale et locale.
Les métaux lourds sont désignés comme suit :
Cd = cadmium, Hg = mercure, Pb = plomb
Cet appareil est conforme aux normes de l'UE
relatives au traitement des déchets électriques et
électroniques (WEEE).
L'appareil usagé ne doit pas être jeté dans les
ordures ménagères. L’utilisateur s’engage, pour le
respect de l’environnement, à déposer l’appareil
usagé dans un centre de traitement agréé pour les
déchets électriques et électroniques.
8
. Caractéristiques techniques
Plage de mesure
température -40°C…+250°C
Résolution 0,1°C
Précision ±0,5°C de -20…+150°C
±1°C au-delà
Temps de réaction 4 - 5 secondes
Classe de protection IP IP 67
Alimentation Pile bouton 1 x CR2032 (inclue)
Dimensions du boîtier 206 x 31 x 18 mm
Poids 43 g (appareil seulement)
La reproduction, même partielle, du présent mode d'emploi est stricte-
ment interdite sans l'accord explicite de TFA Dostmann. Les caractéristi-
ques techniques de ce produit ont été actualisées au moment de l'impres-
sion et peuvent être modifiées sans avis préalable. Les dernières données
techniques et les informations concernant votre produit peuvent être
consultées en entrant le numéro de l'article sur notre site Internet :
www.tfa-dostmann.de
E-Mail : [email protected]
TFA Dostmann GmbH & Co.KG
Zum Ottersberg 12, D-97877 Wertheim, Allemagne 07/20
Digital probe thermometer Thermomètre digital à sonde Thermomètre digital à sonde 
TFA_No. 30.1064_Anleitung 07.07.2020 10:01 Uhr Seite 2
Vi ringraziamo per aver scelto l'apparecchio della TFA.
1. Prima di utilizzare l'apparecchio
•Leggete attentamente le istruzioni per l'uso.
•Seguendo le istruzioni per l'uso, eviterete anche di dan-
neggiare il prodotto e di pregiudicare, a causa di un uti-
lizzo scorretto, i diritti del consumatore che vi spettano
per legge. Decliniamo ogni responsabilità per i danni
derivanti dal mancato rispetto delle presenti istruzioni per
l'uso. Allo stesso modo, non siamo responsabili per even-
tuali misurazioni errate e per le conseguenze che ne pos-
sono derivare.
•Prestate particolare attenzione alle misure di sicurezza!
•Conservate con cura queste istruzioni per l'uso.
2. Per la vostra sicurezza
• Non utilizzate il prodotto in maniera diversa da quanto
descritto in queste istruzioni.
• Non sono consentite riparazioni, alterazioni o modifiche non
autorizzate del dispositivo.
• Questo apparecchio non è adatto a scopi medici.
Attenzione!
Pericolo di lesioni:
• Maneggiare con attenzione la sonda appuntita. Tenete sem-
pre la sonda ago nel cappuccio protettivo.
• Tenete il dispositivo e la batteria lontano dalla portata dei
bambini.
• Le batterie contengono acidi nocivi per la salute. Se ingerite,
le batterie possono essere mortali. Se una batteria venisse
ingerita, potrebbe causare gravi ustioni e portare alla morte
nel giro di due ore. Se si sospetta che una batteria sia stata
ingerita o inserita nel corpo in altra maniera, consultare
immediatamente un medico.
• Non gettare le batterie nel fuoco, non polarizzarle in maniera
scorretta, non smontarle e non cercare di ricaricarle. Peri-
colo di esplosione!
• Sostituite quanto prima le batterie quasi scariche, in modo
da evitare che si scarichino completamente.
• Quando si maneggiano batterie esaurite indossare sempre
guanti resistenti alle sostanze chimiche e occhiali di prote-
zione.
Avvertenze sulla sicurezza del prodotto!
• Non esporre l'apparecchio a temperature estreme, vibra-
zioni e urti.
• Solo il sensore è resistente alle alte temperature fino a
250 °C.
• Non tenere mai il sensore direttamente sopra la fiamma.
• Non utilizzare il dispositivo nel forno a microonde, nel forno
o nella griglia.
• Il dispositivo è conforme alla classe di protezione IP 67 ed è
protetto contro i getti d'acqua e l'immersione temporanea.
Non adatto per lavastoviglie.
3. Componenti
3.1 Display (Fig. 1)
A 1: MAX A 2: MIN
A 3: Temperatura attuale
A 4: Simbolo “spegnimento automatico disattivato”
3.2 Tasti (Fig. 2)
B 1: Tasto ON/OFF B 2: Tasto FLIP
B 3: Commutatore AUTO OFF
3.3 Struttura esterna (Fig. 2)
C 1: Sonda C 2: Vano batteria
C 3: Display (girevole 180°) C 4: Cappuccio protettivo
4. Messa in funzione/Uso
• Rimuovere il cappuccio protettivo.
• Premere il tasto ON/OFF.
• Su display vengono visualizzate la temperatura attuale.
• Il sensore si trova nella punta della sonda.
• Inserire la sonda ad almeno 2,5 mm di profondità nel cibo.
• Se necessario, ruotare il display con il tasto FLIP di 180°.
• Per attivare temporaneamente la retroilluminazione, preme-
re il tasto ON/OFF nella modalità normale.
• Se si tiene premuto il tasto ON/OFF in modalità normale,
l'apparecchio si spegne. Sul display appare OFF.
• L'apparecchio si spegne automaticamente dopo 10 minuti.
4.1 Disattivare la funzione di spegnimento automatico
• La funzione di spegnimento automatico può essere disatti-
vata. Aprire il vano batteria e rimuovere la batteria.
• Utilizzare un oggetto appuntito per azionare l'interruttore
invisibile AUTO OFF nel vano batteria per disattivare o riatti-
vare la funzione di spegnimento automatico (impostazione
predefinita: spegnimento automatico attivato = l'interruttore
è a sinistra).
• Sul display appare o scompare il simbolo di “spegnimento
automatico disattivato”.
5. Funzione MAX/MIN
• Premere brevemente due volte il tasto ON/OFF. Il dispositivo
si trova in modalità MAX/MIN.
• MAX appare sul display. Viene visualizzata la temperatura
massima registrata a partire dall'accensione del dispositivo.
• Premere nuovamente il tasto ON/OFF. MIN appare sul
display. Viene visualizzato la temperatura minima registrata
a partire dall'accensione del dispositivo.
• Tenere premuto il tasto ON/OFF in modalità MAX/MIN per
riportare la visualizzazione ai valori attuali.
• Premere nuovamente il tasto ON/OFF per uscire dalla moda-
lità MAX/MIN.
• L'apparecchio esce automaticamente dalla modalità
MAX/MIN se non si preme alcun tasto per più di 5 secondi.
6. Cura e manutenzione
• Per pulire l'apparecchio utilizzare solo un panno morbido
leggermente inumidito. Non usare solventi o abrasivi. L'appa-
recchio è lavabile in acqua corrente.
• Rimuovere la batteria, se non si utilizza l'apparecchio per un
periodo prolungato.
• Collocare il dispositivo in un luogo asciutto.
6.1 Sostituzione della batteria
• Sostituire la batteria quando sul display appare l'indicatore
di batteria scarica “LoB”.
• Aprire il vano batteria ruotando il coperchio con una moneta
in direzione della freccia (OPEN).
• Inserire la nuova batteria CR2032 3 V, polo + verso l'alto.
• Richiudere il vano batteria.
7. Smaltimento
È assolutamente vietato gettate le batterie tra i
rifiuti domestici.
In qualità di consumatori, siete tenuti per legge a
consegnare le batterie usate al negoziante o ad
altri enti preposti al riciclaggio in conformità alle
vigenti disposizioni nazionali o locali, ai fini di
uno smaltimento ecologico.
Le sigle dei metalli pesanti contenuti sono:
Cd=cadmio, Hg=mercurio, Pb=piombo
Questo apparecchio è etichettato in conformità
alla Direttiva UE sullo smaltimento delle appa-
recchiature elettriche ed elettroniche (WEEE).
Questo prodotto non deve essere smaltito insieme
ai rifiuti domestici. Il consumatore è tenuto a con-
segnare il vecchio apparecchio presso un punto di
raccolta per lo smaltimento di apparecchiature
elettriche ed elettroniche ai fini di uno smaltimen-
to ecologico.
8
. Dati tecnici
Campo di misura
temperatura -40°C…+250°C
Risoluzione 0,1 °C
Precisione ±0,5°C di -20…+150°C
±1°C altrimenti
Tempo di risposta 4-5 secondi
Classe di protezione IP 67
Alimentazione Pila a bottone CR2032 (fornita)
Dimensioni esterne 206 x 31 x 18 mm
Peso 43 g (solo apparecchio)
È vietata la pubblicazione delle presenti istruzioni o di parti di esse senza
una precedente autorizzazione della TFA Dostmann. I dati tecnici corrispon-
dono allo stato del prodotto al momento della stampa e possono cambiare
senza preavviso. È possibile trovare dati tecnici e informazioni aggiornate
sul prodotto inserendo il numero di articolo sul nostro sito.
www.tfa-dostmann.de
E-Mail: [email protected]
TFA Dostmann GmbH & Co.KG
Zum Ottersberg 12, D-97877 Wertheim, Germania 07/20
Hartelijk dank dat u voor dit apparaat van de firma TFA hebt
gekozen.
1. Voordat u met het apparaat gaat werken
•Leest u a.u.b. de gebruiksaanwijzing aandachtig door.
•Door rekening te houden met wat er in de handleiding
staat, vermijdt u ook beschadigingen van het product en
riskeert u niet dat uw wettelijke rechten door verkeerd
gebruik niet meer gelden. Voor schade die wordt veroor-
zaakt doordat u geen rekening houdt met de handleiding
aanvaarden wij geen aansprakelijkheid. Ook zijn wij niet
verantwoordelijk voor verkeerde metingen en de mogelij-
ke gevolgen die daaruit voortvloeien.
•Volg in elk geval de veiligheidsinstructies op!
•Deze gebruiksaanwijzing goed bewaren a.u.b.!
2. Voor uw veiligheid
• Gebruik het product niet anders dan in deze handleiding is
aangegeven.
• Het eigenmachtig repareren, verbouwen of veranderen van
het apparaat is niet toegestaan.
• Het apparaat is niet geschikt voor medische doeleinden.
Voorzichtig!
Kans op letsel!
• Wees erg voorzichtig met de scherpe meetsonde om onge-
lukken te voorkomen. Bewaar de sonde altijd in de
beschermkap.
• Bewaar het apparaat en de batterij buiten de reikwijdte van
kinderen.
• Batterijen bevatten zuren die de gezondheid schaden. Het
inslikken van batterijen kan levensgevaarlijk zijn. Als een
batterij wordt ingeslikt, kan dit binnen 2 uur tot ernstige
interne brandwonden en tot fataal letsel leiden. Als u denkt
dat de batterijen zijn ingeslikt of in een willekeurig lichaams-
deel terecht zijn gekomen, dient u onmiddellijk medische
hulp te zoeken.
• Batterijen niet in het vuur gooien, niet kortsluiten, niet uit
elkaar halen of opladen. Kans op explosie!
• Zwakke batterijen moeten zo snel mogelijk worden vervan-
gen om lekkage van de batterijen te voorkomen.
•
Draag handschoenen die bestand zijn tegen chemicaliën en een
beschermbril wanneer u met uitgelopen batterijen hanteert!
Belangrijke informatie
voor de productveiligheid!
• Stel het apparaat niet bloot aan extreme temperaturen, tril-
lingen en schokken.
• Alleen de voeler is hittebestendig tot 250 °C.
• Houdt de voeler nooit vlak boven het vuur.
• Gebruik het apparaat niet in de magnetron, bakoven of grill.
• Het apparaat is in overeenstemming met de beschermings-
klasse IP 67 en is beschermd tegen waterstralen en tijdelijke
onderdompeling. Niet geschikt voor de vaatwasser.
3. Onderdelen
3.1 Display (Fig. 1)
A 1: MAX A 2: MIN
A 3: Momentane temperatuur
A 4: Symbool „automatische uitschakeling uit”
3.2 Toetsen (Fig. 2)
B 1: ON/OFF toets B 2: FLIP toets
B 3: AUTO OFF schuifschakelaar
3.3 Behuizing (Fig. 2)
C 1: Sonde C 2: Batterijvak
C 3: Display (draaibaar 180°) C 4: Beschermkap
4. Inbedrijfstelling/Bediening
• Verwijder de beschermkap van de sonde.
• Druk op de ON/OFF toets.
• Het display toont u de momenteel gemeten temperatuur.
• De sensor bevindt zich in het sondepunt.
• Voor het meten van de temperatuur steekt u nu de sonde
minstens 2,5 cm diep in het object.
• Draai het display met de FLIP toets 180° indien nodig.
• Om de achtergrondverlichting kort te activeren, drukt u in de
normaalmodus op de ON/OFF toets.
• Als u in de normaalmodus de ON/OFF toets ingedrukt houdt,
wordt het apparaat uitgeschakeld. OFF verschijnt op het dis-
play.
• Het apparaat schakelt zich automatisch na 10 minuten uit.
Istruzioni per l'uso
Gebruiksaanwijzing
Instrucciones de uso
Kat.-Nr. 30.1064.02.K
A 3
Fig. 1
A 1
A 4
A 2
Termometro digitale ad inserimento Termometro digitale ad inserimento Digitale Insteekthermometer 
TFA_No. 30.1064_Anleitung 07.07.2020 10:02 Uhr Seite 3
Istruzioni per l'uso
Gebruiksaanwijzing
Instrucciones de uso
Kat.-Nr. 30.1064.02.K
Fig. 2
C 3B 1
C 1 C 2 B 2
B 3
4.1 Deactiveren van de automatische uitschakeling
• De automatische uitschakeling kan worden gedeactiveerd.
Open het batterijvak en verwijder de batterij.
• Gebruik een puntig voorwerp om de verborgen AUTO OFF
schuifschakelaar in het batterijvak te bedienen om de auto-
matische uitschakeling te deactiveren of opnieuw te active-
ren. (Standaardinstelling: automatische uitschakeling geac-
tiveerd = schakelaar zit links).
• Het symbool „automatische uitschakeling uit” verdwijnt of
verschijnt van het display.
5. MAX/MIN functie
• Druk twee keer kort op de ON/OFF toets. Het apparaat is in
de MAX/MIN-modus.
• MAX verschijnt op het display. De hoogste temperatuur
wordt weergegeven sinds het apparaat is ingeschakeld.
• Druk nog eens op de ON/OFF toets. MIN verschijnt op het
display. De laagste temperatuur wordt weergegeven sinds
het apparaat is ingeschakeld.
• Houdt de ON/OFF toets in de MAX/MIN-modus ingedrukt om
de MAX/MIN waarden te resetten.
• Druk nog eens op de ON/OFF toets, om de MAX/MIN-modus
te verlaten.
• Het apparaat verlaat automatisch de MAX/MIN modus, als
er langer dan 5 seconden geen toets wordt ingedrukt.
6. Schoonmaken en onderhoud
• Maak het apparaat met een zachte, enigszins vochtige doek
schoon. Geen schuur- of oplosmiddelen gebruiken! Het
apparaat is onder stromend water afwasbaar.
• Verwijder de batterij, als u het apparaat langere tijd niet
gebruikt.
• Bewaar het apparaat op een droge plaats.
6.1 Batterijwissel
• Vervang de batterij wanneer de batterij-indicator „LoB” op
het display verschijnt.
• Open het batterijvak met behulp van een muntstuk en draai
in de richting van de pijl.
• Plaats er een nieuwe batterij 3V CR2032 in, + pool naar
boven.
• Sluit het batterijvak weer.
7. Verwijderen
Batterijen en accu's mogen niet met het huisvuil
worden weggegooid. Als consument bent u wet-
telijk verplicht om gebruikte batterijen en accu's
bij uw dealer af te geven of naar de daarvoor
bestemde containers volgens de nationale of
lokale bepalingen te brengen om een milieuvrien-
delijk verwijderen te garanderen.
De benamingen van de zware metalen zijn:
Cd=cadmium, Hg=kwikzilver, Pb=lood
Dit apparaat is gemarkeerd in overeenstemming
met de EU-richtlijn (WEEE) over het verwijderen
van elektrisch en elektronisch afval.
Dit product mag niet met het huisvuil worden
weggegooid. De gebruiker is verplicht om de
apparatuur af te geven bij een als zodanig erkende
plek van afgifte voor het verwijderen van elektri-
sche en elektronische apparatuur om een milieu-
vriendelijk verwijderen te garanderen.
8
. Technische gegevens
Meetbereik Temperatuur -40°C…+250°C
Resolutie 0,1°C
Precisie ±0,5°C van -20…+150°C
±1°C anders
Aanspreektijd 4 – 5 seconden
IP beschermingsklasse IP 67
Spanningsvoorziening Knoopcelbatterij CR 2032 (inclusief)
Afmetingen 206 x 31 x 18 mm
Gewicht 43 g (alleen het apparaat)
Deze gebruiksaanwijzing of gedeelten eruit mogen alleen met toestem-
ming van TFA Dostmann worden gepubliceerd. De technische gegevens
van dit apparaat zijn actueel bij het ter perse gaan en kunnen zonder voor-
afgaande informatie worden gewijzigd. De nieuwste technische gegevens
en informatie over uw product kunt u vinden door het invoeren van het
artikelnummer op onze homepage.
www.tfa-dostmann.de
E-Mail: [email protected]
TFA Dostmann GmbH & Co.KG
Zum Ottersberg 12, D-97877 Wertheim, Duitsland 07/20
Muchas gracias por haber adquirido este dispositivo de TFA.
1. Antes de utilizar el dispositivo
•Lea detenidamente las instrucciones de uso.
•Si sigue las instrucciones de uso, evitará que se produz-
can daños en el dispositivo y no comprometerá a sus
derechos por vicios, previstos legalmente debido a un uso
incorrecto. No asumimos responsabilidad alguna por los
daños originados por el incumplimiento de estas instruc-
ciones de uso. Del mismo modo, no nos hacemos respon-
sables por cualquier lectura incorrecta y de las conse-
cuencias que pueden derivarse de tales.
•Tenga en cuenta ante todo las advertencias de seguridad.
•Guarde estas instrucciones de uso en un sitio seguro.
2. Para su seguridad
• No emplee el dispositivo de modo distinto al especificado en
estas instrucciones.
• No está permitido realizar reparaciones, transformaciones o
modificaciones por cuenta propia en el dispositivo.
• Este dispositivo no está indicado para fines médicos.
¡Precaución!
¡Riesgo de lesiones!
• Tenga cuidado al utilizar la sonda de inserción. Mantenga
siempre la sonda de aguja en la caperuza de protección.
• Mantenga el dispositivo y la pila fuera del alcance de los
niños.
• Las pilas contienen ácidos nocivos para la salud y pueden
ser peligrosas si se ingieren. Si se ingiere una pila le puede
causar dentro de 2 horas, quemaduras internas y llegar a la
muerte. Si sospecha que se ha ingerido una pila o ha entra-
do en el cuerpo de otro modo, busque inmediatamente
ayuda médica.
• No tire las pilas al fuego, no las cortocircuite, desmonte ni
recargue. ¡Riesgo de explosión!
• Las pilas con un estado de carga bajo deben cambiarse lo
antes posible para evitar fugas.
• ¡Utilice guantes protectores resistentes a productos químicos
y gafas protectoras si manipula pilas con fugas de líquido!
¡Advertencias importantes
sobre la seguridad del producto!
• No exponga el dispositivo a temperaturas extremas, vibra-
ciones ni sacudidas extremas.
• Solamente la sonda es resistente al calor hasta 250 °C.
• Nunca mantenga la sonda directamente sobre el fuego.
• No utilice el dispositivo en el microondas, horno o parrilla.
• El dispositivo corresponde a la clase de protección IP 67 y
está protegido contra los chorros de agua y la inmersión
temporal. No limpiar en el lavavajillas.
3. Componentes
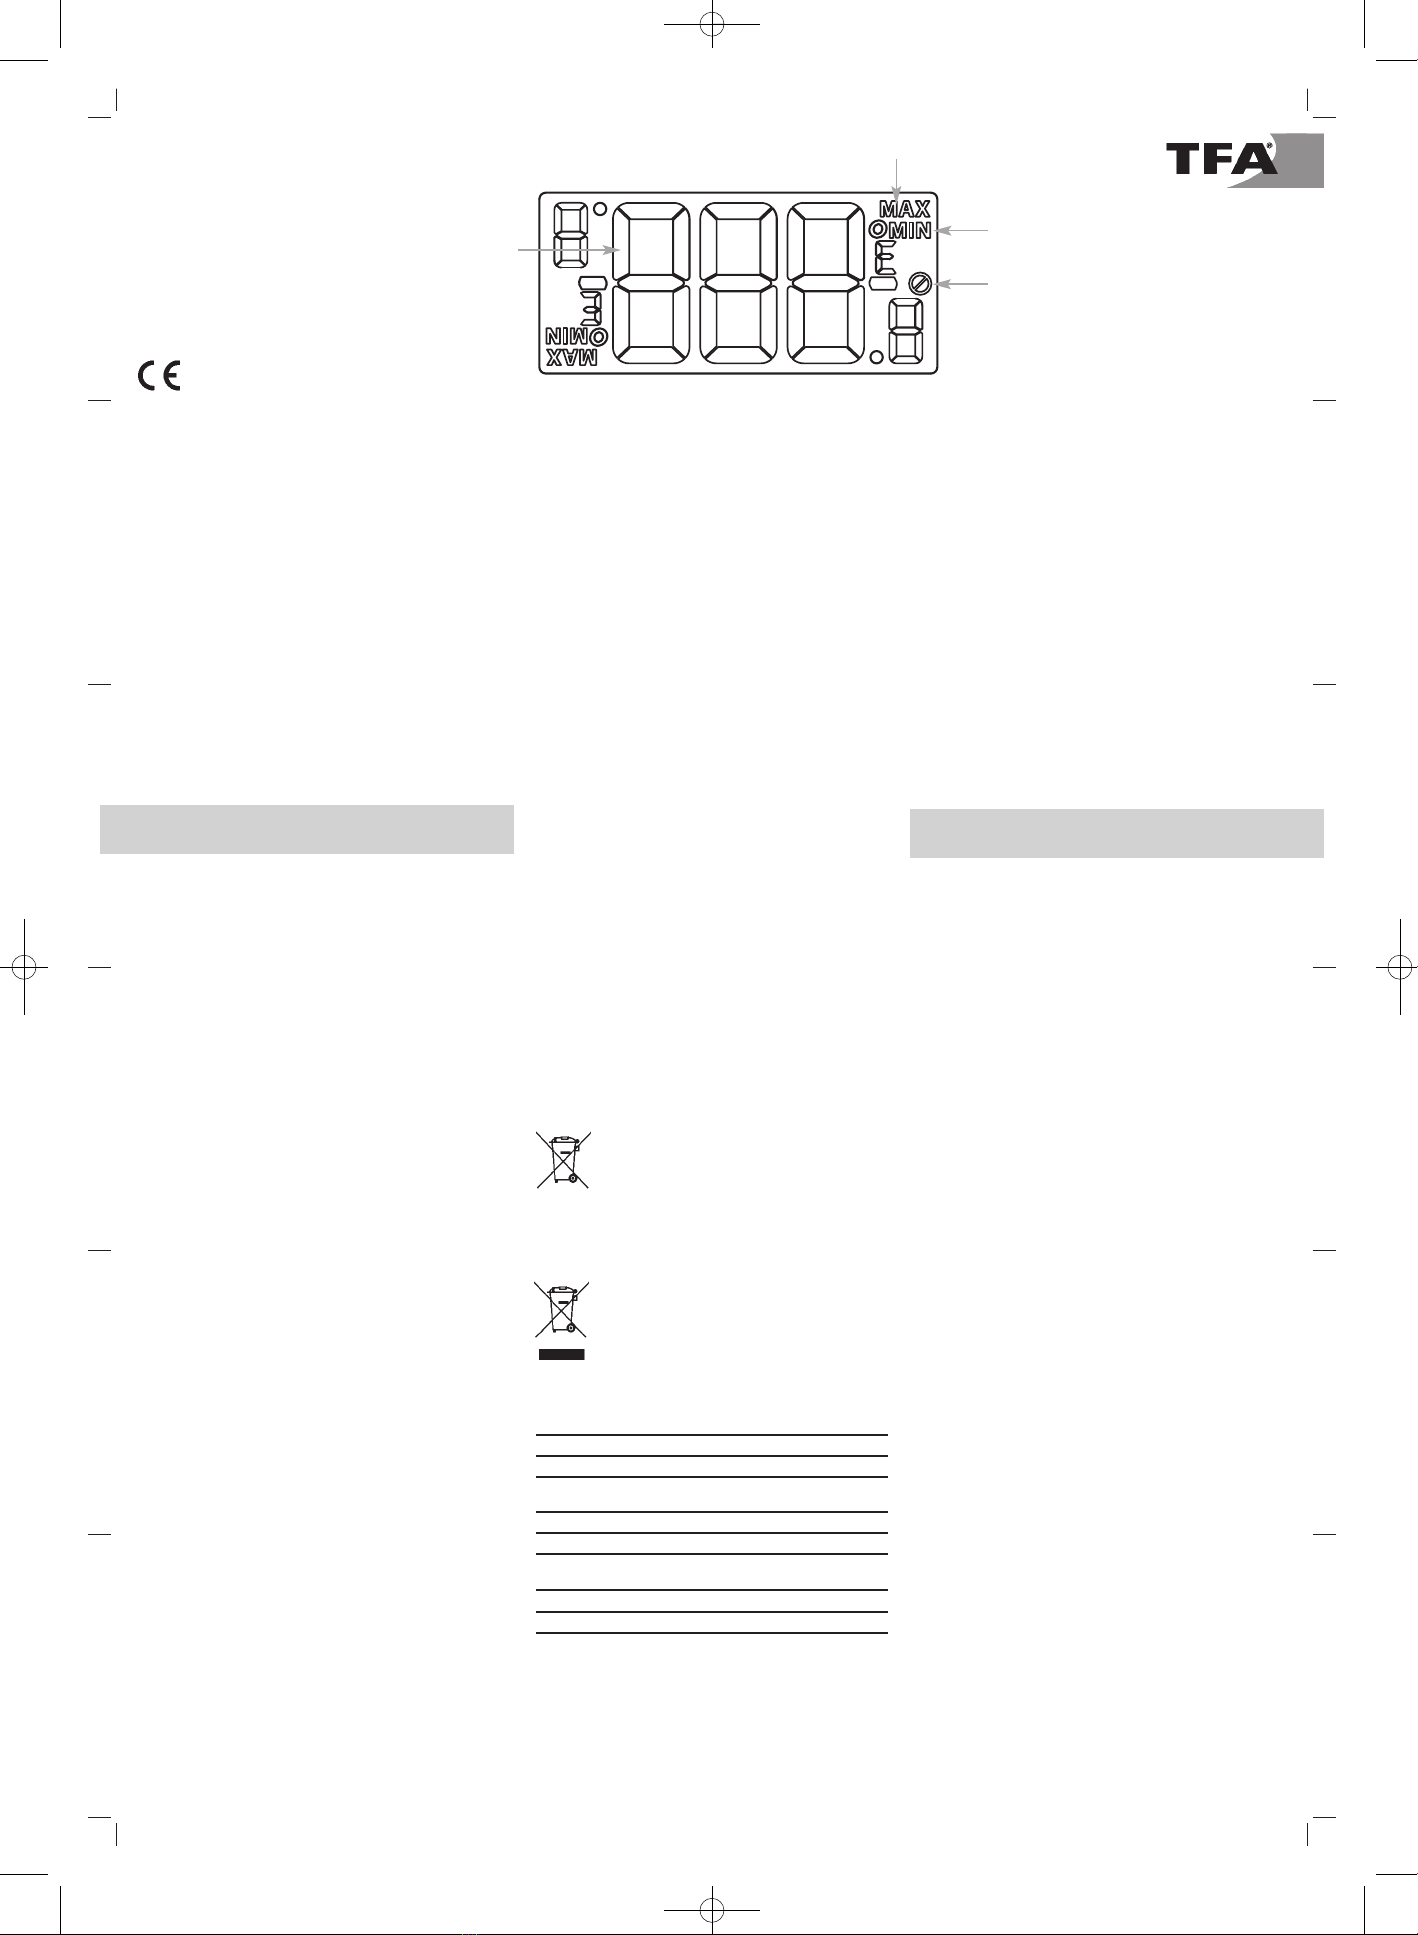
3.1 Pantalla (Fig. 1)
A 1: MAX A 2: MIN
A 3: Temperatura actual
A 4: Símbolo “desconexión automática desactivada”
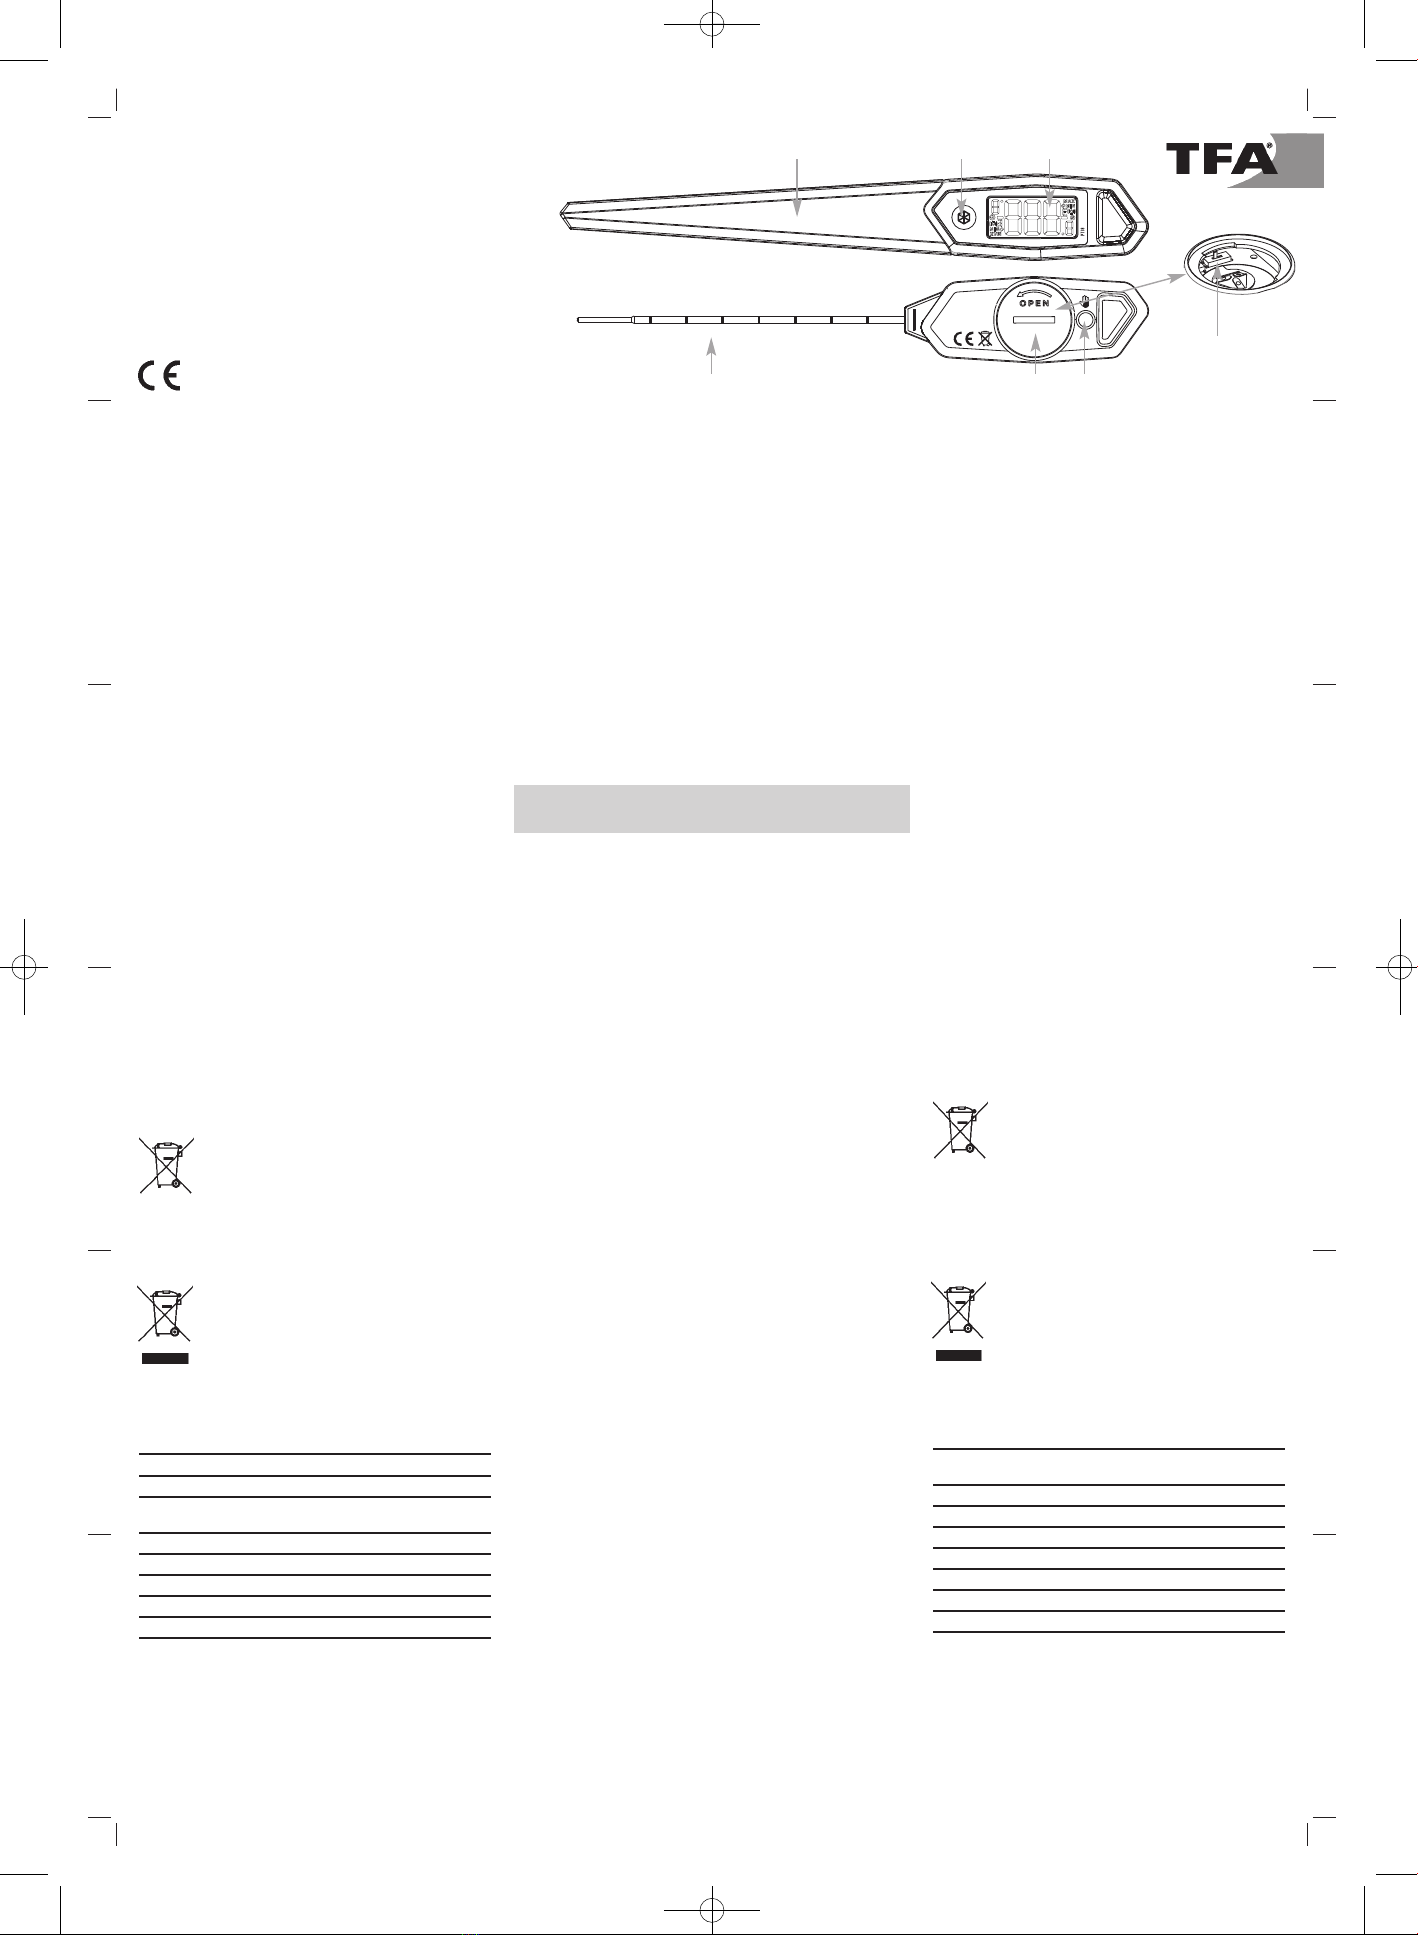
3.2 Teclas (Fig. 2)
B 1: Tecla ON/OFF B 2: Tecla FLIP
B 3: Interruptor deslizante AUTO OFF
3.3 Cuerpo (Fig. 2)
C 1: Sonda
C 2: Compartimento de la pila
C 3: Pantalla (giratoria 180°)
C 4: Caperuza de protección
4. Puesta en marcha/Manejo
• Retire la caperuza de protección.
• Pulse la tecla ON/OFF.
• La pantalla le indicará la temperatura medida actual.
• El sensor se encuentra en la punta de la sonda.
• Para medir la temperatura, introduzca la sonda por lo
menos 2,5 cm en el objeto de medición.
• Gire la pantalla con la tecla FLIP en 180° si es necesario.
• Para activar brevemente la iluminación de fondo pulse la
tecla ON/OFF en el modo normal.
• Mantenga pulsada la tecla ON/OFF en el modo normal, el
dispositivo se desconecta. En la pantalla aparece OFF.
• El dispositivo se desconecta automáticamente después de
10 minutos.
4.1 Desactivar la desconexión automática
• La función de desconexión automática puede ser desactiva-
da. Abra el compartimento de la pila y retire la pila.
• Utilice un objeto puntiagudo para accionar el interruptor
encubierto AUTO OFF en el compartimento de la pila para
desactivar o reactivar la función de desconexión automática
(ajuste predeterminado: desconexión automática activada =
interruptor a la izquierda).
• El símbolo “desconexión automática desactivada” aparece o
desaparece en la pantalla.
5. Función MAX/MIN
• Pulse dos veces brevemente la tecla ON/OFF. El dispositivo
se encuentra en modo de MAX/MIN.
• En la pantalla aparece MAX. El valor máximo de la tempera-
tura se indica en la pantalla desde que el dispositivo está
encendido.
• Pulse otra vez la tecla ON/OFF. En la pantalla aparece MIN.
El valor mínimo de la temperatura se indica en la pantalla
desde que el dispositivo está encendido.
• Mantenga pulsada la tecla ON/OFF en el modo de MAX/MIN
para borrar los valores correspondientes.
• Pulse otra vez la tecla ON/OFF, para así abandonar el modo
de MAX/MIN.
• El dispositivo sale automáticamente del modo de MAX/MIN
si no se presiona ninguna tecla durante 5 segundos.
6. Cuidado y mantenimiento
• Limpie el dispositivo con un paño suave, ligeramente hume-
decido. ¡No utilice productos abrasivos o disolventes! El
dispositivo es lavable con agua corriente.
• Extraiga la pila si no va a usar el dispositivo por un largo
período de tiempo.
• Mantenga el dispositivo en un lugar seco.
6.1 Cambio de la pila
• Cambie la pila cuando aparezca la indicación de pila baja
“LoB” en la pantalla.
• Abra el compartimento de la pila y gire la tapa con la ayuda
de una moneda en dirección de la flecha.
• Coloque una pila nueva 3 V CR2032 con el polo “+” hacia
arriba.
• Cierre de nuevo el compartimento de la pila.
7. Eliminación
Las pilas y baterías no pueden desecharse en
ningún caso junto con la basura doméstica.
Como consumidor, está obligado legalmente a
depositar las pilas y baterías usadas de manera
respetuosa con el medio ambiente en el comer-
cio especializado o bien en los centros de reco-
gida y reciclaje previstos para ello según el
reglamento nacional o local.
Las denominaciones de los metales pesados que
contienen son: Cd=cadmio, Hg=mercurio,
Pb=plomo.
Este dispositivo está identificado conforme a la
Directiva de la UE sobre residuos de aparatos
eléctricos y electrónicos (WEEE).
No deseche este producto junto con la basura
doméstica. El usuario está obligado a llevar el
dispositivo usado a un punto de recogida de
aparatos eléctricos y electrónicos acreditado
para que sea eliminado de manera respetuosa
con el medio ambiente.
8
. Datos técnicos
Gama de medición
temperatura -40°C…+250°C
Resolución 0,1°C
Precisión ±0,5°C a -20…+150°C, si no ±1°C
Tiempo de reacción 4-5 segundos
Clase de protección IP IP 67
Alimentación de tensión Pila de botón CR 2032 (incluida)
Dimensiones del cuerpo 206 x 31 x 18 mm
Peso 43 g (solo dispositivo)
Estas instrucciones o extractos de las mismas no pueden ser publicados
sin la autorización de la TFA Dostmann. Los datos técnicos de este pro-
ducto corresponden al estado en el momento de la impresión y pueden
ser modificados sin previo aviso. Los actuales datos técnicos e informa-
ciones sobre su producto los puede encontrar bajo el número de artículo
en nuestra página web.
www.tfa-dostmann.de
E-Mail: [email protected]
TFA Dostmann GmbH & Co.KG
Zum Ottersberg 12, D-97877 Wertheim, Alemania 07/20
Digitale Insteekthermometer Termómetro digital de sonda Termómetro digital de sonda 
C 4
TFA_No. 30.1064_Anleitung 07.07.2020 10:02 Uhr Seite 4

Other TFA Thermometer manuals

TFA 30.1040 User manual

TFA

TFA 30.1040 User manual

TFA 14.1509 User manual

TFA

TFA 14.1509 User manual

TFA 14.1512 User manual

TFA

TFA 14.1512 User manual

TFA 30.5026 User manual

TFA

TFA 30.5026 User manual

TFA 30.1043 User manual

TFA

TFA 30.1043 User manual

TFA VISION 30.5020 User manual

TFA

TFA VISION 30.5020 User manual

TFA 30.5005 User manual

TFA

TFA 30.5005 User manual

TFA 30.1061 User manual

TFA

TFA 30.1061 User manual

TFA 30.3040.IT User manual

TFA

TFA 30.3040.IT User manual

TFA digital wine thermometer User manual

TFA

TFA digital wine thermometer User manual

TFA 14.1552 User manual

TFA

TFA 14.1552 User manual

TFA 31.1128 Manual

TFA

TFA 31.1128 Manual

TFA 14.1504 Manual

TFA

TFA 14.1504 Manual

TFA 30.2026 User manual

TFA

TFA 30.2026 User manual

TFA 14.1500 User manual

TFA

TFA 14.1500 User manual

TFA AVENUE PLUS User manual

TFA

TFA AVENUE PLUS User manual

TFA EasyFlash User manual

TFA

TFA EasyFlash User manual

TFA 30.5013 User manual

TFA

TFA 30.5013 User manual

TFA 30.3034.01 User manual

TFA

TFA 30.3034.01 User manual

TFA 30.3051 User manual

TFA

TFA 30.3051 User manual

TFA RAY 31.1136 User manual

TFA

TFA RAY 31.1136 User manual

TFA JOKER 30.3055 User manual

TFA

TFA JOKER 30.3055 User manual

TFA 30.1009 User manual

TFA

TFA 30.1009 User manual

TFA 4009816011909 User manual

TFA

TFA 4009816011909 User manual

Popular Thermometer manuals by other brands

Ecco Pacific 111 operating instructions

Ecco Pacific

Ecco Pacific 111 operating instructions

Microlife NC300 manual

Microlife

Microlife NC300 manual

Apption Labs MEATER Block Safety Leaflet

Apption Labs

Apption Labs MEATER Block Safety Leaflet

industrie technik Evolution FH-xxSH1 series user manual

industrie technik

industrie technik Evolution FH-xxSH1 series user manual

Fluke 2180A manual

Fluke

Fluke 2180A manual

Microlife VT 1831 manual

Microlife

Microlife VT 1831 manual

Safety 1st Accu-Touch 49529 user guide

Safety 1st

Safety 1st Accu-Touch 49529 user guide

BROWIN 145709 Operation manual

BROWIN

BROWIN 145709 Operation manual

B&B Electronics 232DTT manual

B&B Electronics

B&B Electronics 232DTT manual

Fluke 1551A Ex user manual

Fluke

Fluke 1551A Ex user manual

Extech Instruments RH490 user guide

Extech Instruments

Extech Instruments RH490 user guide

TPI 383a manual

TPI

TPI 383a manual

NIMO HNK-TB-01 user manual

NIMO

NIMO HNK-TB-01 user manual

PANCONTROL PAN IR-T650 manual

PANCONTROL

PANCONTROL PAN IR-T650 manual

BIOS 132HC Pre-Programmed user guide

BIOS

BIOS 132HC Pre-Programmed user guide

Amprobe IR-450 user manual

Amprobe

Amprobe IR-450 user manual

weewell WTE220 user manual

weewell

weewell WTE220 user manual

Carrera 2432.8 Instructions for use and guarantee

Carrera

Carrera 2432.8 Instructions for use and guarantee

manuals.online logo
manuals.online logoBrands
  • About & Mission
  • Contact us
  • Privacy Policy
  • Terms and Conditions

Copyright 2025 Manuals.Online. All Rights Reserved.