BEGA Gantenbrink-Leuchten KG · Postfach 31 60 · 58689 Menden · info@bega.com · www.bega.com
6/6
Anlage spannungsfrei schalten.
Schlüsselöffnungen im Kopf der Schrauben von
Schmutz und Ablagerungen säubern.
Dafür keinen Hochdruckreiniger verwenden.
Zum Reinigen der Leuchte nur
lösungsmittelfreie Reinigungsmittel verwenden.
Senkschrauben lösen und Edelstahlring
abheben.
Leuchte aus dem Einbaugehäuse ausbauen.
Dazu die 2 Innensechskantschrauben (SW5)
im Leuchtengehäuse bis zum Anschlag lösen.
Leuchte linksherum bis zum Anschlag drehen,
Schrauben hochziehen und Leuchte aus dem
Einbaugehäuse heben.
Zur Demontage von Glas und Dichtung muss
zunächst der Kunststoffring kräftig nach unten
gedrückt werden. Nehmen Sie das Glas und
die Dichtung heraus.
Lösen Sie die beiden Innensechskantschrauben
(SW3) und heben Sie die Schwenkeinheit aus
der Leuchte. Steckvorrichtung trennen.
Haltefeder demontieren und Glas und Reektor
herausnehmen.
LED-Modul austauschen. Hierbei die Montage-
hinweise des LED-Moduls beachten.
Reektor so in das Gehäuse einlegen, dass
die Öffnungen im Reektor mit der LED
deckungsgleich liegen.
Streuscheibe einlegen und mit der unter
Vorspannung eingesetzten Haltefeder sichern.
Zum Austausch des Netzteils die 3
Innensechskantschrauben (SW5) lösen und
Gehäuseoberteil abheben.
LED-Netzteil austauschen. Gehäuseteile
gleichmäßig fest verschrauben. Dabei auf
richtigen Sitz der Gehäusedichtung achten.
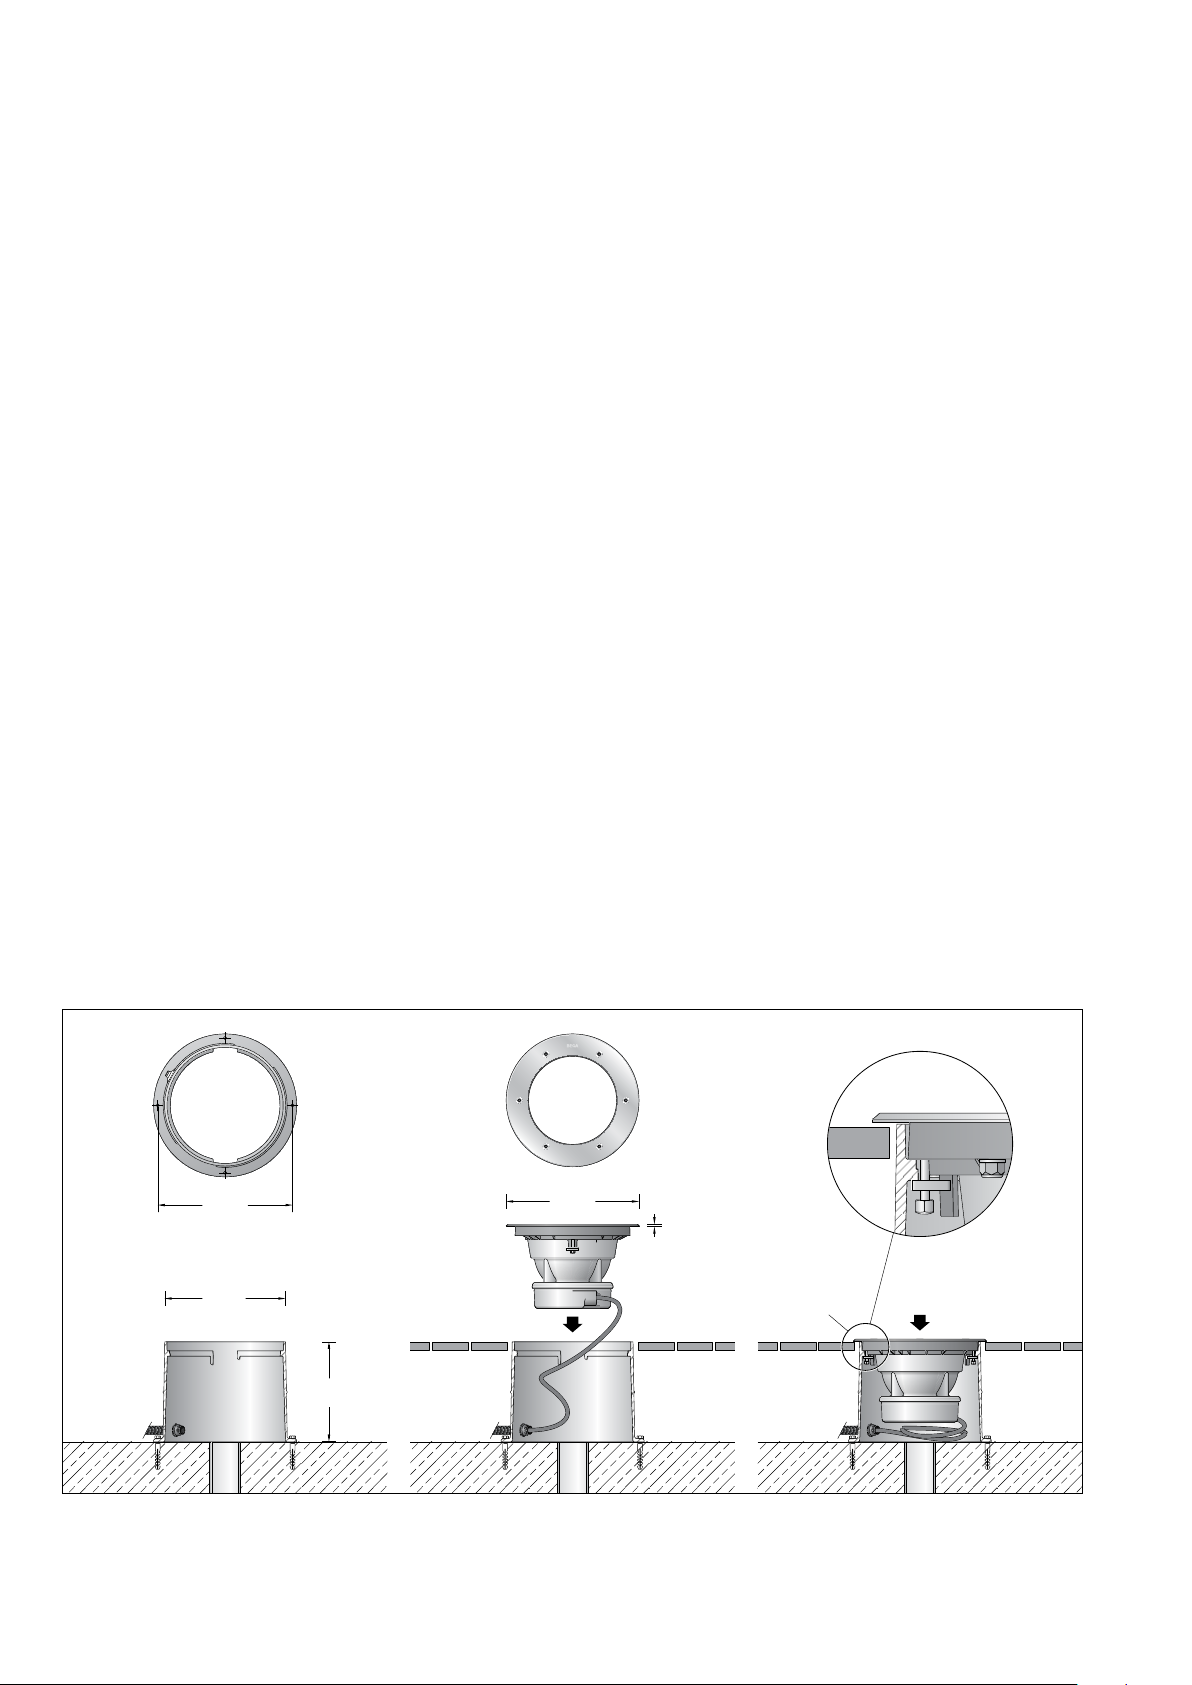
Leuchtengehäuse in Einbaugehäuse setzen
und rechtsherum bis zum Anschlag drehen.
Schrauben fest anziehen.
Setzen Sie die Schwenkeinrichtung wieder
in die Leuchte und drehen Sie die beiden
Innensechskantschrauben leicht an.
Nehmen Sie nun die Einstellung vor und ziehen
Sie dann die Innensechskantschrauben fest an.
Glasdichtung wie in der Abbildung dargestellt,
mit der breiten Seite nach oben um das Glas
legen. Glas (abgestufte Seite nach oben)
in das Leuchtengeäuse einsetzen und fest
eindrücken. Achten Sie dabei auf den richtigen
Sitz der Dichtung.
Edelstahlring auf Glasstufe und Kunststoffring
auegen und die Schrauben über Kreuz
gleichmäßig fest anziehen.
Anzugsdrehmoment = 12 Nm.
Disconnect the electrical installation.
Remove any dirt or residue from the key
opening in the bolt head. Do not use high
pressure cleaners. Only use solvent-free
cleaning agents to clean the luminaire.
Remove the countersunk screws and lift out
the stainless steel ring.
Remove the luminaire from the installation
housing.
To do so, loosen the 2 hexagon socket screws
(wrench size5) in the luminaire housing as far
as they will go. Twist the luminaire counter-
clockwise to the stop, pull up the screws and
lift the luminaire from the installation housing.
First push down the ring made of synthetic
material rmly to remove the glass and gasket.
Remove the glass and gasket.
Remove the two hexagon socket screws
(wrench size3) and lift the swivel unit from the
luminaire. Disconnect the plug-in device.
Remove the retention spring and remove the
glass and reector.
Replace LED module. Follow the installation
instructions for the LED module.
Place the reector into the housing so that the
openings in the reector are aligned with the
LED.
Insert diffuser lens and secure it with the
pretensioned retention spring.
Remove the 3hexagon socket screws (wrench
size5) and lift off the top of the housing to
replace the power supply unit. Replace the LED
power supply unit. Screw down all parts of the
housing evenly. Ensure the correct seating of
the housing gasket.
Insert the luminaire housing into the installation
housing and turn it clockwise until it stops.
Tighten the screws securely.
Reinsert the swivel unit into the luminaire and
tighten the two hexagon socket screws slightly.
Now make the desired adjustments and then
tighten the hexagon socket screws rmly.
Place the glass gasket around the glass with
the wider side facing up as shown in the
illustration. Insert the glass (with the stepped
side facing up) into the luminaire housing and
press down hard.
Make sure the gasket is properly positioned.
Place the stainless steel ring onto the glass
step and plastic ring and tighten the screws
uniformly in crosswise fashion.
Torque = 12 Nm.
Débrancher l’alimentation électrique.
Retirer la poussière et les éventuels dépôts
accumulés dans les têtes de vis. Ne pas utiliser
de nettoyeur haute pression. Pour nettoyer le
luminaire, n’utiliser que des détergents sans
solvant.
Desserrer les vis à tête fraisée et retirer l’anneau
en acier inoxydable.
Retirer le luminaire du boîtier d’encastrement.
Pour ce faire, desserrer les 2vis à six pans
creux (SW5) de l’armature jusqu’à la butée.
Tourner le luminaire vers la gauche jusqu’à
la butée, tirer les vis vers le haut et extraire le
luminaire du boîtier d’encastrement.
Pour démonter le verre et le joint, il faut
d’abord fortement presser la bague en matière
synthétique vers le bas. Retirez le verre et le
joint.
Desserrez les deux vis à six pans creux (SW3)
et soulevez le module pivotant du luminaire.
Débrancher le connecteur.
Démonter le ressort de retenue et retirer le
verre et le réecteur.
Remplacer le module LED. Il convient ici
de respecter les consignes d’installation du
module LED.
Placer le réecteur dans l’armature de manière
à ce que les ouvertures du réecteur se
trouvent en face de la LED.
Placer la lentille et sécuriser avec le ressort de
retenue sous tension.
Pour remplacer le bloc d’alimentation,
desserrer les 3vis à six pans creux (SW5) et
retirer le dessus du boîtier. Remplacer le bloc
d’alimentation LED. Visser ensemble et de
façon uniforme les parties du boîtier. Ce faisant,
veiller à ce que le joint du boîtier soit bien placé.
Placer l’armature dans le boîtier d’encastrement
et tourner vers la droite jusqu’à la butée. Serrez
fermement les vis.
Replacez le module pivotant dans le luminaire
et serrez légèrement les deux vis à six pans
creux. Procédez maintenant au réglage, puis
serrez fermement les vis à six pans creux.
Comme illustré, placer le joint du verre autour
du verre, avec le côté le plus large vers le haut.
Placer le verre dans le boîtier du luminaire (côté
étagé vers le haut,) et presser fermement.
Veillez à bien positionner le joint.
Positionner l’anneau en acier inoxydable
sur le rebord étagé du verre et l’anneau en
matière synthétique, et serrer les vis en croix et
uniformément.
Moment de serrage = 12 Nm.
Ergänzungsteile
14001415R Rutschhemmendes Glas
nach EN ISO 51130 R13
Oberächenverschleiß nach EN ISO 10545-7:
Kategorie II
Rutschsicherheit nach DIN 51097 Klasse C
Accessories
14001415R Skid-blocking glass
in accordance with EN ISO 51130 R13
Surface abrasion in accordance with
ENISO10545-7: Category II
Anti-slip protection in accordance with
DIN51097 ClassC
Accessoires
14001415R Verre antidérapant
selon EN ISO 51130 R13
Usure de surface selon EN ISO 10545-7:
Catégorie II
Protection antidérapante selon DIN 51097
classe C
Verteilerdose für den Einbau ins Erdreich
70 730 Verteilerdose mit 7 Leitungs-
einführungen · Klemme 5 x 4@
71 053 Verteilerdose mit 10 Leitungs-
einführungen · Klemme 6 x 16@
Distribution box for installation in soil
70 730 Distribution box with 7 cable entries
Connection terminals 5 x 4@
71 053 Distribution box with 10 cable entries
Connection terminals 6 x 16@
Boîte de dérivation pour encastrement
dans le sol
70 730 Boîte de dérivation avec
7 entrées de câble · borniers 5 x 4@
71 053 Boîte de dérivation avec
10 entrées de câble · borniers 6 x 16@
Ersatzteile
Ersatzglas innen innen 14 001 052
Ersatzglas 14 001 415
Ersatzglas rutschhemmend 14 001 415 R
LED-Netzteil DEV-0356/900
LED-Modul 3000 K LED-1015/830
LED-Modul 4000 K LED-1015/840
Reektor 76001313G
DichtungGlas 83001924
DichtungGehäuse 83001949
Trockenmittelbeutel 84000439
Spares
Inner spare glass internal 14 001052
Spare glass 14 001 415
Spareglassskidblocking 14001415R
LED power supply unit DEV-0356/900
LED module 3000 K LED-1015/830
LED module 4000 K LED-1015/840
Reector 76001313G
Gasketglass 83001924
Gaskethousing 83001949
Desiccant pouch 84 000 439
Pièces de rechange
Verre de rechange à l'intérieur à l’intérieur 14 001 052
Verre de rechange 14 001 415
Verre de rechange antidérapant 14 001 415 R
Bloc d’alimentation LED DEV-0356/900
Module LED 3000 K LED-1015/830
Module LED 4000 K LED-1015/840
Réecteur 76001313G
Joint du verre 83 001 924
Jointduboîtier 83001949
Sachet de dessicant 84 000 439