Coccolle Saliara User manual

RO Cărucior 2 in 1
EN Stroller 2 in 1
Manual de instructiuni / User’s manual /
Hasznalati utmutato
R
HU Babakocsi 2:1

RO: imaginile din acest manual au scop ilustrativ. Produsul achizitionat
de dvs poate sa difere. / Functionarea in parametri normali a acestui
produs depinde de mentinerea acestuia in conditii de igiena propice.
EN: the images shown in this instructions manual have illustrative
purpose. The product purchased by you may look different. / The proper
functioning of this product is strictly dependent on its well maintenance.
HU: Az útmutatóban bemutatott képek szemléletes célt szolgálnak. Az Ön
által megvásárolt termék eltérő lehet. / A termék helyese müködéséhez
kötelezö hogy a tisztitási és karbantartási utasitást is betartsa.

1
27
3
5
10
9
8
6
4

I .
1 2
6
7
3
45
1
2

II.
1 2 3
7
9
8
4
11 12
910
7 8
56

19
22
24
27


Deteriorările cauzate de nerespectarea condiţiilor de întreţinere de exemplu:
coroziune, modificarea culorii materialului textil sau a elementelor din plastic ca
Uzura normală a pieselor de schimb, cum ar fi: anvelope, camere de aer, banda
de rulare, materialele utilizate pe mânere, structura şi culoarea ţesăturilor şi
materialelor expuse la frecare, bucşele din roţi, axe, elementele imprimate.
1. Garanţia nu acoperă:
Deteriorările apărute din vina utilizatorului.
Deteriorările apărute din cauza nerespectării recomandărilor, avertizărilor şi
restricţiilor incluse în instrucţiunile de utilizare, precum şi pe elementele
produsului.
Nu lasati copilul sa se joace cu caruciorul si nu lasati copilul sa stea in picioare
in carucior.
Cititi cu atentie instructiunile inainte de folosirea produsului si pastrati-le pentru
consultari ulterioare. Acest produs este conform cu standardul EN 1888-2:2018.
Caruciorul este conceput pentru un copil cu varsta de 4 ani sau 22 kg (la oricare
dintre cele doua caracteristici copilul ajunge mai repede). Este prevazut pentru a
fi utilizat doar de catre un singur copil.
9. Orice greutate pozitionata pe manerul caruciorului, in spatele acestuia sau pe
laterale poate afecta stabilitatea produsului.
Atentionari generale importante
Tineti copilul la distanta in momentul in care realizati ajustari sau pliati/depliati
produsul.
Conditii de pastrare a garantiei
5. Nu lasati copilul sa se joace cu caruciorul.
7. Acest produs nu este recomandat pentru alergare sau patinaj.
2. Este interzis sa lasati copilul nesupravegheat in carucior!
6. Verificati componentele caruciorului inainte de fiecare utilizare si asigurati-va
ca landoul, unitatea sport sau scoica auto se pot monta corect.
In cazul in care se foloseste pentru un copil nou-nascut, recomandam fie
folosirea landoului, fie utilizarea produsului cu spatarul caruciorului fixat la cea
mai joasa pozitie.
In momentul in care se pune sau se scoate copilul din carucior, trebuie activata
frana.
Coccolle Saliara sistem modular 2in1 cu landou separat si unitate sport
multifunctionala
Supraincarcarea caruciorului, plierea incorecta si folosirea unor accesorii care
nu ii apartin pot rupe sau deteriora produsul.
Atentionari de siguranta
1. Va rugam folositi intotdeauna centura de siguranta.
3. Toate sistemele de inchidere si fixare trebuie verificate inainte de fiecare
utilizare pentru a va asigura ca acestea functioneaza in parametri optimi.
4. Pentru a evita ranirea copilului, tineti-l departe de carucior la momentul
plierii/deplierii.
8. Capacitatea cosului de cumparaturi este de maximum 2,5 kg.
Este interzisa folosirea accesoriilor care nu sunt aprobate de catre producator.
RO

RO
- Deplierea cadrului: apasati butonul 1 si 2 in acelasi timp(vezi fig. 5), trageti
manerul caruciorului in sus, dupa ce butonul de blocare este eliberat si al doilea
buton de blocare se poate elibera tragand de maner in sus pana auziti sunetul
„click”. Cadrul este acum depliat si blocat. Ridicati spatarul pana auziti sunetul
„click” pentru a va asigura ca este fixat(vezi fig. 6). Deschideti copertina
caruciorului(vezi fig. 7).
10. Cos de cumparaturi
- Asamblarea rotilor: scoateti cadrul din ambalaj(vezi fig. 1), introduceti rotile din
spate in locul prevazut acestora pana auziti sunetul „click”(vezi fig. 2),
introduceti rotile din fata in locul prevazut acestora pana auziti sunetul „click” dar
respectati marcajele stanga „L” si dreapta „R”(vezi fig.3).
I.Depliere si asamblare (I.1-5):
- Fixarea sezutului: introduceti suportii de pe lateralele sezutului in orificiile
prevazute din cadru si impingeti pana se fixeaza complet(vezi fig.4).
urmare a expunerii îndelungate la soare, deteriorarea elementelor din plastic
sau a componetelor textile ca urmare a expunerii îndelungate la soare sau la
temperaturile ridicate, jocuri, zgomote cum ar fi scârţâit/ piuit, deteriorările
mecanismelor din cauza murdăriei.
Deteriorările cauzate de reparaţii efectuate de către persoane neautorizate.
3. Centuri de siguranta
5. Roti fata
7. Bara de protectie
Lista piese:
4. Garanţia pentru bunuri de consum vândute nu exclude şi nu suspendă
drepturile cumpărătorului rezultând din lipsa de conformitate a bunurilor de uz
îndelungat.
8. Buton pt inversarea sezutului
3. Produsul trimis in service pentru reparatie trebuie sa fie expediat curat.
6. Maner
9. Roti spate
Devierea verticală a roţilor sub sarcină (aceasta este o caracteristică normală
pentru acest tip de construcţie).
1. Copertina
4. Suport de picioare
Deteriorări şi murdăriri cauzate de ambalarea necorespunzătoare a produsului
pe timpul trimiterii acestuia prin serviciul de curierat.
2. Modul de reparaţie va fi stabilit de către producător/firma care realizează
rezolvarea solicitărilor privind garanția.
2. Unitate sport

RO
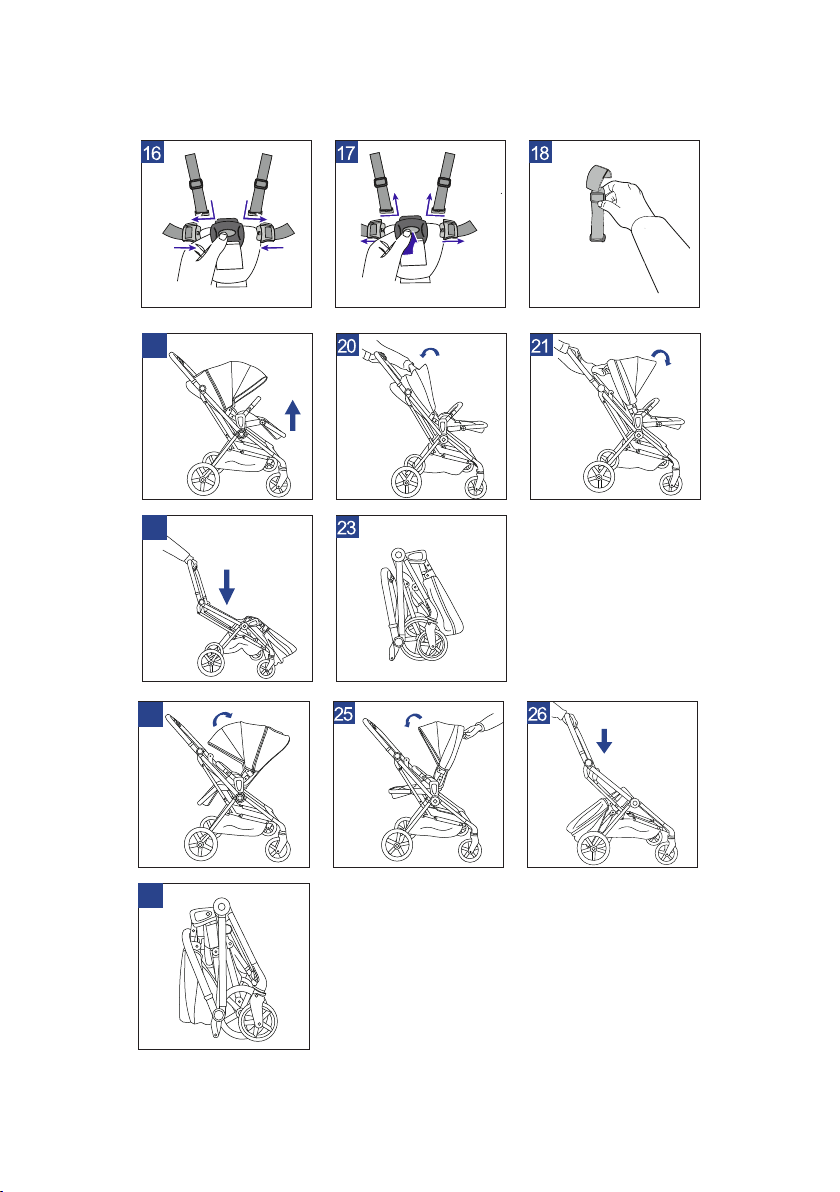
Plierea caruciorului
- plierea caruciorului cu sezutul spre parinte: apasati butonul spatarului pentru a-
l plia (vezi fig. II.24,25). Apasati ambele butoane de pe maner (vezi fig. II. 26) si
pliati cadrul pana cand este complet pliat (vezi fig. II.27).
- plierea caruciorului cu unitatea sport spre sensul de mers: ridicati suportul de
picioare in pozitia initiala apoi apasati butonul spatarului pentru a-l plia in
fata(vezi fig. II. 19- 21).Apasati ambele butoane de pe maner (vezi fig. II.22) si
pliati cadrul pana jos cand este complet pliat(vezi fig. II.23).
Cadrul caruciorului se poate plia cu unitatea sport pe el, in ambele directii.
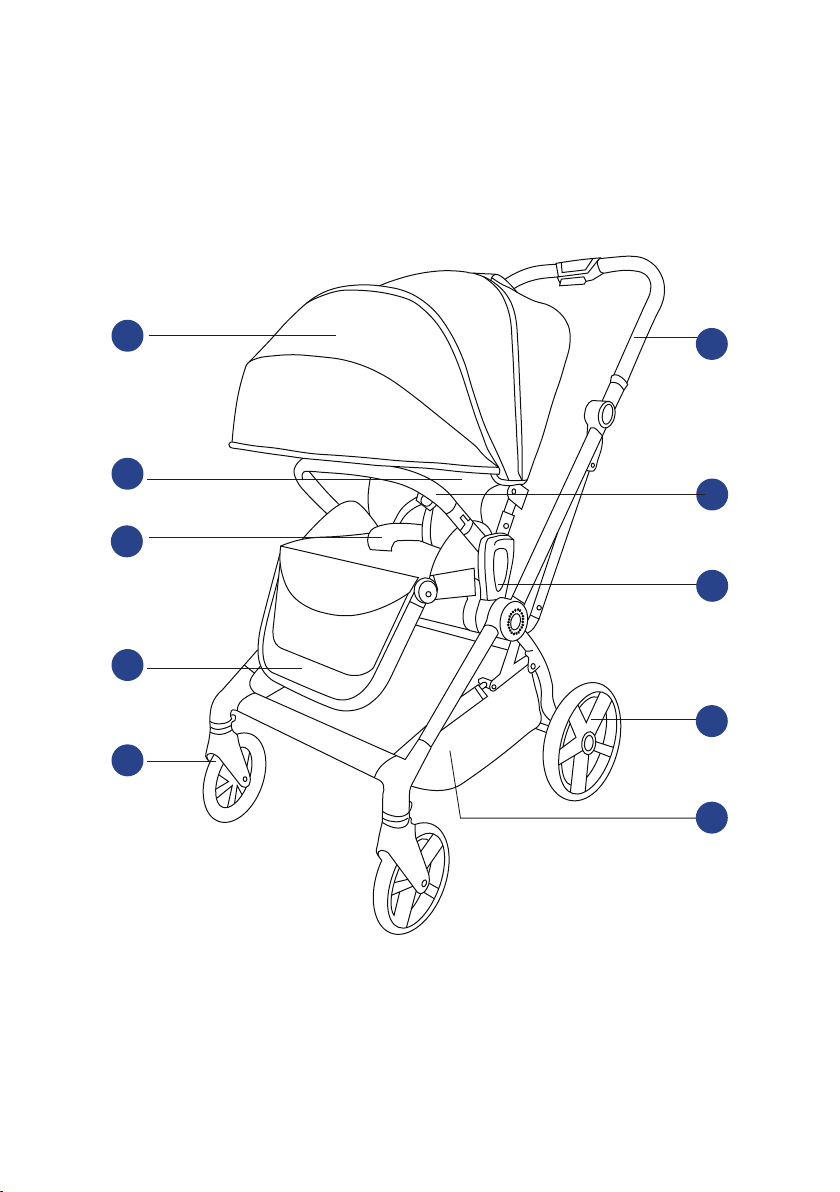
Folosirea unitatii sport a caruciorului:
II.Instructiuni de utilizare:
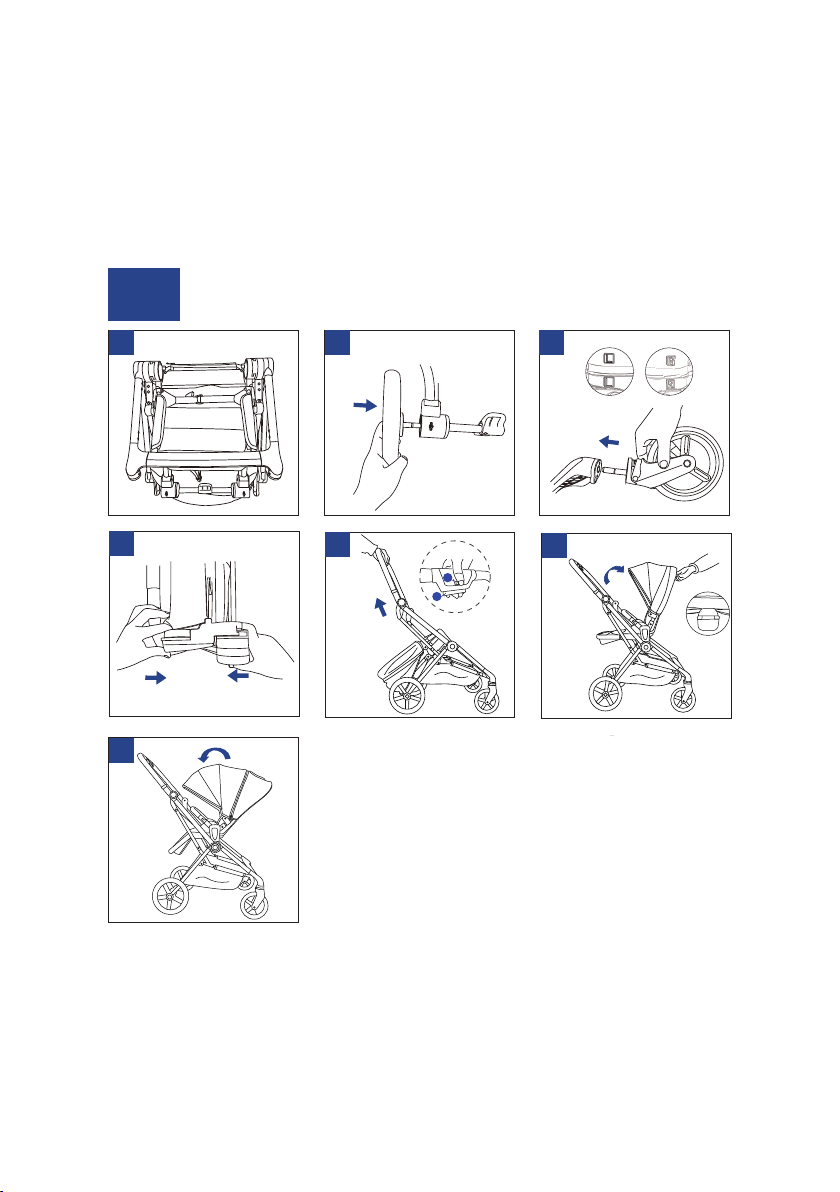
- pentru a scoate unitatea sport a caruciorului de pe cadru, apasati in acelasi
timp ambele butoane de pe partile laterale ale cadrului (vezi fig. II.1). Pentru a
monta unitatea sport pe cadrul caruciorului, fixati adaptorii pe cadru in locurile
prevazute si apasati pana auziti sunetul „click”(vezi fig.II.2).
- unitatea sport se poate monta atat cu fata spre parinte cat si cu fata spre
sensul de mers (vezi fig. II.3).
- folosirea franelor: apasati in jos frana si cand se va auzi sunetul „click”
caruciorul va fi blocat (vezi fig. II. 11). Conform imaginii II.10, apasati in sus
frana, cand se va auzi sunetul „click” caruciorul este deblocat si poate fi
folosit(vezi fig. II.12).
- pentru a ajusta suportul de picioare, apasati butoanele de pe laterale pentru a
lasa in jos suportul de picioare (vezi fig. II.5,6). Apasand din nou butoanele
puteti ridica suportul de picioare pana la pozitia initiala.
- indepartarea rotilor din spate: apasati butonul din spate al rotilor si scoateti
roata(vezi fig. II.13).
- utilizarea barii de protectie: introduceti ambele capete ale barei de protectie in
locurile prevazute pana auziti sunetul „click”(vezi fig. II.7). Pentru a scoate bara
de protectie, apasati ambele butoane laterale ale acesteia si scoateti din
suport(vezi fig. II.8).
- indepartarea rotilor din fata: apasati butonul pozitionat deasupra rotilor si
trageti in jos roata(vezi fig.II. 14).
- pentru a ajusta pozitia spatarului: trageti butonul spatarului(vezi fig.II.4) pentru
a-l fixa intr-una din cele trei pozitii. Va fi fixat cand auziti sunetul „click”.
- folosirea copertinei: puteti impinge usor copertina pana auziti sunetul „click”
insemnand ca este complet pliata(vezi fig. II.9). Trageti copertina pas cu pas
pana auziti sunetul „click” ceea ce inseamna ca este complet deschisa(vezi fig.
II.10).
10. Folosirea centurilor/hamului de siguranta: apasati butonul central pentru a
debloca centurile/hamul de siguranta(vezi fig. II. 16). Pentru a bloca
centurile/hamul, glisati clemele din ambele parti in catarama centrala pana auziti
sunetul „click”(vezi fig. II. 17). Ajustati lungimea centurilor din siguranta dupa
cum se poate observa in imaginea II.18.
IMPORTANT! Folositi corect si intotdeauna centurile de siguranta.
- Fixarea directiei rotilor din fata (functia pivot): rotiti butonul in fata si roata va fi
blocata. Rotiti butonul in directia opusa si deblocati pozitia rotilor(vezi fig. II. 15).

RO
Asamblarea si utilizarea landoului
Deschideti fermoarul din husa interioara a landoului. Trageti de tijele metalice
din fata si spate pana sunt ferm fixate pe baza landoului. Inchideti husa
landoului si asezati salteluta.
Landoul se poate monta pe cadru in locul special conceput cu ajutorul celor doi
adaptori ai landoului. Montati adaptorii pe landou, iar ultierior inserati adaptorii
pe locul relevant de pe cadrul caruciorului. Cand auziti sunetul „click” inseamna
ca landoul este fixat corect. Cand doriti sa indepartati landoul, apasati cele doua
butoane laterale in acelasi timp si ridicati. Pentru a inlatura adaptorii de pe
cadru, apasati butoanele de pe ei si trageti.
Atentie!
1. Landoul este conceput pentru copiii care nu pot sta singuri in sezut.
2. Pentru o functionare propice, este recomandat sa utilizati produsul doar pe
suprafete orizontale plane, uscate si netede.
Landoul trebuie folosit impreuna cu adaptorii.
4. Asigurati-va ca manerul este in pozitie corecta in momentul folosirii
caruciorului.
3. In carucior, capul copilului dvs ar trebui sa stea mai sus decat corpul.
Apasati butoanele laterale ale copertinei pentru a o deschide complet sau
pentru a o inchide.
Atentionari de utilizare
Nu lasati copilul sa sara peste bara de protectie sau sa stea in picioare in
carucior.
Verificati periodic ca toate suruburile, niturile, saibele si sistemele de fixare sunt
bine stranse inainte de folosirea caruciorului.
Nu depozitati caruciorul in spatii umede sau foarte friguroase.
Intretinere si curatare
Curatati componentele textile ale caruciorului cu o perie sau un burete. Cadrul si
componentele de plastic se vor curata folosind o laveta moale umezita si un
detergent neutru.
Orice greutate pozitionata pe manerul caruciorului, in spatele acestuia sau pe
laterale poate afecta stabilitatea produsului.
Verificati daca sunt suruburi slabite, parti deteriorate sau rupte si inlocuiti daca
este necesar, urmand intocmai instructiunile producatorului.
Pentru a evita ranirea copilului dvs, verificati periodic caruciorul.
Nu folositi caruciorul pe suprafete denivelate, in strada sau in apropierea
surselor de caldura.
Urmati intocmai instructiunile de utilizare.
Este interzisa folosirea accesoriilor care nu sunt aprobate de catre producator.
Caruciorul este prevazut a fi utilizat doar de catre un singur copil.

EN
Coccolle Saliara multifunctional 2in1 travel system with separate carrycot
and seat unit
Always use the brake whenever you're putting in or removing the child from the
baby stroller.
Safety warnings
1. Always use the restraining system.
Keep the child away at a safe distance when adjusting or folding/unfolding the
product.
Overloading the baby stroller, the incorrect folding or using unauthorized
accessories that do not belong to the product can break or deteriorate it.
5. It's forbidden to let your child play with the baby stroller.
6. Always check the parts of the stroller, making sure that the carrycot, the seat
unit and/or the car seat can be properly installed on the frame.
It is forbidden to use accessories that have not been approved by the
manufacturer.
Please read carefully these instructions before using the product and store them
well for future reference. This product has been manufactured according to the
EN 1888:2018 safety standard and it's suitable for children age 4 or 22 kg
(whichever comes sooner). This product is designed to transport a single child
at once.
1. The warranty does not cover:
Damage occurred for reasons attributable to the user.
3. All locking devices and safety systems should be checked before usage in
order to make sure they are functional and running well.
Damage occurred as a result of failure to use the product according to
recommendations, warnings and restrictions found in the user manual and on
product elements.
4. To avoid any kind of injury, please keep your child away from the product
during the folding and unfolding processes.
Never let your child play with the stroller and never let him stand in the stroller.
2. Never leave the child unattended in the baby stroller!
Warranty conditions
Important general warnings
Consumables subject to natural wear and tear during normal usage such as:
tyres, inner tubes, tread, materials used on handles, structure and colour of
fabrics and materials subject to friction, sleeves in wheels, axels, prints.
8. The maximum load of the shopping basket is 2.5 kg.
9. Any weight hanging from the handlebar of stroller, its rear or lateral side may
affect the stability of the product.
7. This product is not suitable for running or ice skating.
In case you are using the product for a newborn, we recommend using either
the carrycot or the most reclined backrest (lie-flat position) position of the seat
unit.
Damage occurred as a result of failure to observe maintenance guidelines such
as: corrosion, changed upholstery or plastic elements colour as a result of
prolonged exposure to sunlight, damage to plastic elements of upholstery as a

EN
Single wheels being pushed into a vertical position as a result of loading (this is
normal).
4. The consumer goods warranty does not exclude or suspend the purchaser's
rights stemming from goods noncompliance with the agreement.
Spare parts list
1. Canopy
2. The repair method is determined by the manufacturer/warranty service
provider.
2. Seat unit
result of prolonged exposure to sunlight or excessive temperatures, excessive
play, squeaking / creaking noises, damage to mechanism due to over-load.
3. The product subject to a complaint should be provided clean.
4. Footrest
Damage occurred due to repairs being carried out by unauthorised personnel.
6. Pushbar
5. Front wheels
7. Bumper bar
3. Seat belt system
Damage and soiling occurred due to the product being incorrectly packaged for
shipping (courier online purchases).
I.Unfolding and assembly (I.1-5):
8. Seat reversing button
- wheel assembly: remove the frame from the packaging (see pict. 1), insert the
rear wheels in the space meant for them until your hear the click sound (see
pict. 2), then continue by inserting the front wheels in the space meant for them
until you hear the click sound, minding the fact that that the Left and Right
direction must be corresponding (see pict.3).
- unfolding the frame: press buttons 1 and 2 at the same time (see pict. 5), then
pull the pushbar upwards and after the blocking device isn't engaged anymore
just pull out the pushbar until you hear the click sound. The frame is npt
unfolded. Then lift the backrest until you hear the click sound. (see pict. 6).
Open the seat unit's canopy (see pict.7).
- fix the seat: insert the two sockets in the lateral side of the frame, then push
gently in order to make sure they lock in (see pict.4).
9. Rear wheels
10. Shopping basket

EN
- to remove the seat unit from the frame, press at the same time both buttons on
the lateral side of the frame and lift it up (see pict. II.1). In order to install the
seat unit on the frame of the stroller, insert the seat's adapters into the proper
hole on the frame and press in gently until you hear the click sound (see
pict.II.2).
- adjusting the backrest angle: pull the button on the backrest's rear side (see
pict.II.4) in order to bring it to one of the 3 positions. The backrest is well fixed
when you hear the click sound.
Seat unit user instructions:
- the seat unit can be installed in both directions: facing the parent or facing the
world (see pict. II.3).
- in order to adjust the legrest, push the buttons on the lateral and lower the
footrest (see pict. II.5,6). Push the buttons again and lift the legrest if you want
to bring it back to it's initial upper position.
- canopy use: please push gently the canopy backwards until you hear the click
sound which means that the canopy has been folded (see pict. II.9). Pull the
canopy towards the front of the stroller until you hear the click sound in which
case the canopy has been completely unfolded (see pict. II.10).
- using the brakes: press down the break and once you hear the click sound the
braking system has been engaged (see pict. II. 11). According to image II.10, lift
the brake and once you hear the click sound the stroller's brake has been
released and the stroller can be pushed (see pict. II.12).
- removing the rear wheels: press the rear wheels button and remove the wheel
(see pict. II.13).
- removing the front wheels: press the button above the front wheel and pull
down the wheel in order to remove it (see pict.II. 14).
- the bumper bar use: insert both ends of the bumper bar in the proper place on
the frame until you hear the click sound (see pict. II.7). In order to remove the
bumper, press both buttons and pull out (see pict. II.8).
II. User instructions
- folding the stroller with the seat rear facin: push the button on the backrest and
fold it (see pict. II.24,25). Then press down both buttons on the pushbar (see
pict. II. 26) and fold the frame until the locking device engages (see pict. II.27).
IMPORTANT! Always use and engage correctly the safety harness system.
Folding method
- the direction of the front wheels: turn the button to pedal direction to lock the
direction of the front wheel; rotate the button in the opposite direction in order to
allow the front wheels to pivot (see pict. II. 15).
The frame can be folded with the seat unit on, in both directions.
- using the safety harness: press the central button in order to unlock the
harnesses(see pict. II. 16). To engage the harness system, insert the side belts
into the central button until you hear the click sound (see pict. II. 17). Adjust the
length of the safety harnesses as you can see in image II.18.
- folding the stroller with the seat unit forward facing: lift the legrest to the
upward position, press down the backrest adjustment button in order to fold the
backrest front (see pict. II. 19- 21). Press down both buttons on the pushbar
(see pict. II.22) and fold the frame down until the locking device engages (see
pict. II.23).

EN
This stroller has been designed for the use of a single child at once.
It's forbidden to use accessories that haven't been approved by the
manufacturer.
In order to avoid your child getting injuries, regularly check the stroller.
Assembly and use of the carrycot
Unzip the zipper on the inside cover of the carrycot. You will uncover the
carrycot support rods that need to be firmly opened in order to give the carrycot
a solid base. Then close the zipper on the carrycot lining, put the mattress back
in and start using the carrycot.
Usage instructions
Don't allow the child to lean over the bumper bar or stand in the stroller.
It's wise not to use the stroller on dangerous areas such as high and low
ground, near stove or open fire.
5. The carrycot must be used only with the adapters.
Check regularly all screws, rivets, bolts and locking devices in order to make
sure they are not broken and functioning properly before each usage.
Cleaning and maintenance
Clean the textile parts with a wet bruch or a sponge. The frame and the plastic
spare parts can be cleaned with a moist cloth and mild detergent.
Do not store the product in damp and cold areas.
Always follow the instructions in this manual.
Any weight put on the stroller's pushbar, on the backside or lateral side may
affect the product's stability.
Check if there are any loose screws, broken or torn parts and replace them,
following the steps indicated by your warranty provider.
Attention!
1. This carrycot has been designed for children that cannot sit up yet.
2. For a proper functioning, we recommend using teh product only on smooth,
dry and horizontal surfaces.
3. In the carrycot, the head of the baby should up at a slightly upper level than
the body.
4. Make sure the carrycot handle is in a correct position when carrying the
product.
Press the buttons on the side of the carrycot's canopy in order to open or close
it.
You can install the carrycot on the frame with the help of the adapters. Put on
the adapters on the carrycot and then insert the adapters on the frame, making
sure the locking devices are engaged. Once you hear the click sound, the
installation of the carrycot on the frame in well done. When you want to remove
the carrycot from the frame, push the two lateral buttons at the same time, then
lift the carrycot. In order to remove the adapters from the frame, push the button
on them and lift the adapter from the frame.

HU
3. Használat előtt győződjön meg arról, hogy az összes záróeszköz be van
kapcsolva!
Tilos a gyerekeknek a lábtartó álni.
Biztonsági figyelmeztetések
2. Tilos a gyereket felügyelet nélkül hagyni!
4. A sérülések megkerülése érdekében kérjük tartsa távol a gyereket a termék
összecsukása és kinyitása során.
7. A babakocsi nem ajánlott futáshoz vagy korcsolyázáshoz.
8. A vásárló kosár maximális teherbirása: 2.5 kg.
1. Kérjük használja minding a biztonsági övet!
6. Minden használás előtt ellenörizze hogy a termék alkatrészei jól vannak
csatlakozva a vázhoz.
5. Ne engedje meg a gyereknek játszódjon a termékkel!
Felhasználó hibájából keletkezett sérülések,
9. Bármilyen súly amely a tolokarra vagy a babakocsira van akasztva
befolyásolya a termék stabilitását.
1. A garancia nem terjed ki az alábbiakra:
Üzemeltetés során természetes módon elhasználódó alkatrészek, mint pl.:
gumik, tömlők, gumiprofilok, fogantyúkon használt anyagok, dörzsölésnek kitett
textil részeken és változtatások a műanyagok struktúrájában és színében,
perselyek a kerekekben, tengelyek, feliratok.
Garancia feltételek
Tilos olyan tartozékokat használni amelyeket a gyártó nem jováhagyott.
A használati útmutatóban és a termék alkatrészein szereplő ajánlások,
figyelmeztetések és korlátozások be nem tartása következtében keletkezett
sérülések,
Karbantartási feltételek be nem tartásából adódó sérülések, pl.: korrózió, textil
és műanyag alkatrészek elszíneződése a napsütés miatt vagy magas
Kérjük tartsa a gyermeket távol a babakocsitol amikor a felszerelést,
beállitásokat vagy cseréket csinál rajta mivel véletlenségböl sérülést okozhat a
gyereknek.
Kötelezö mindig használni a fékezési eszközt amikor a babakocsi nincs tolva.
Tilos a gyerekeket engedni játszódjanak ezzel a termékkel. A babakocsi nem
egy játék!
Általános figyelmeztetések
Kérjük olvassa el figyelmesen ezt az utmutatot és tartsa meg késöbbi
hivatkozásra. Ez a termék az EN 1888-2:2018 biztonsági szabvány szerint lett
gyártva és jováhagyott 22 kg súlyig vagy 4 éves korig (bármelyk jön előbb).
Csak egy gyerek részére használható egyszerre.
Ajánljuk a mozeskosár vagy a sport ülés leg hátradöntési pozició használatát
újszülött korban.
A túlterhelés, helytelen összecsukás vagy a nem ajánlott tartozékok használása
károsithatják vagy befolyásolják a termék biztonságát.
Coccolle Saliara multifunkcios újszülött babakocsi (mozeskosár és sport
ülés, használható márkás autóshordozóval)

HU
hőmérséklet miatt, holtjátékok, szokatlan hangok mint nyikorgás/csikorgás,
mechanizmusok sérülése a szennyeződések következtében.
9. Hátsó kerekek
4. Az értékesített fogyasztói cikkre nyújtott garancia nem zárja ki és nem
függeszti fel a vevő a szerződésnek nem megfelelő termékből adódó jogait.
Illetéktelen személyek által végzett javításokból adódó sérülések.
A tulságos terhelés egy helytelen használás mint pl. a tolás csak egy részen
levö kerekeken, a huzás lépcsöken vagy mozgó lépcsöken stb.
A termék futárpostával való szállításának idejére nem megfelelő
becsomagolásából adódó sérülések és szennyeződések.
2. A gyartó/szakszerviz javitó cég dönthet a javitási módszerben.
Alkatrész lista
1. Kupola
3. A reklamált terméket tiszta állapotban kell átadni javitásra.
2. Sport ülés
3. Biztonsági öv csat
4. Lábtartó
5. Első kerekek
6. Tolokar
7. Lökháritó
8. Sport ülés kioldású és megforditási gomb
10. Vásárló kosár
I. Kinyitás és felszerelés (I.1-5)
- A sport ülés illesztése a vázra: tegye a sport ülést a két adapterre amelyek a
váz jobb és bal oldalán találhatoak.
- A váz kinyitása: az 5-os kép szerint, nyomja meg a képen kimutatott 1-es és 2-
es gombokat egyidejűleg. Ezutan, a záró eszköz kinyitva lett és tolokart emelni
lehet ameddig a klick hang halható
- A kerekek felszerelése: illessze be a vázban hátsó részében a hátsó kereket
ameddig a klik hang halható, majd tegye ugyan ezt a lépést az első kerekekkel
(kövesse a lépéseket az I.1-3 képek szerint). Kérjük ellenőrizze a helyes
beillesztést (jobb-bal oldalakot szamba kell venni).
- Az ülés beállitása: mint a 6 képen látható, huzza fel az ülést ameddig a klick
hang halható hogy biztositsa hogy az ülés beállitása helyes volt.
A kupola kinyitása: amenyiben a kupola összecsukva van az összecsukott
vázon, huzza az első részét Önfelé hogy a kupola a teljes méretében kinyitva
legyen (7 kép).

HU
- A kupola használása: amielött összecsukhassa a babakocsit huzza össze a
kupolát előtöl hátra. Amikor a klick hang halható akkor a kupola teljesen össze
lett csukva. A II.10 kép szerint huzza előre a kupolát amikor kinyitani akarja.
- A fék használása: a II.11 kép szerint, nyomja le a féket bármikor a termék
nincs mozgásban. A klick hang halható amikor a fék aktiv. A II.12 kép szerint
emelje a féket amikor akarja tovább tolni a babakocsit.
- A hátsó kerekek kivétele: a II.13 kép szerint, nyomja meg a hátsó kerekeken
található gombot majd huzza ki a kereket.
II. Használati utmutató
- Az ülés hátradöntési szög beállitása: a sport ülés háttámlája 3 hátra döntési
pozicioval rendelkezik. Huzz meg a háttámla beállitási gombot majd hajlitsa
lefele vagy felfele a kivánt pozicióban ameddig a klick hang halható (II.4).
- Az első kerekek kivétele: a II.14 kép szerint, nyomja meg az első kerekeken
található gombot majd huzza ki a kereket.
- Az első kerekek bolygósitható funkció: a kereken található pedál gombot
nyomja le ha a bolygósitható funkiót lezárni akarja. A gomb emelése az
elenkező irányban aktiválni fogja a bolygósitást (II.15 kép).
A biztonsági öv használása: a II.16 kép szerint, nyomja meg az középsö piros
gombot hogy a biztonsági öv csatja nyiljon ki. Az öv rögzitésére illessze be a
biztonsági öv mindegyik pantjait a középsö csatban ameddig a klick hang
halható (II.17 kép). A vállpántok hosszúsága beállitható a csat segitségével
(II.18 kép). Figyelem! Használja a biztonsági öves biztonságos modón!
Az sport ülés használása:
- Ha vissza akarja tenni az ülést a vázra, akkor illessze be mindkét adaptert a
vázra, nyomja le az ülést ameddig a klick hang halható (II.2. kép).
- A sport ülés 2 irányban lehet helyezni a vázra: akár a meneitrányal
megyegyezve vagy a menetirányal elentétesen (II.3 kép).
- A lábtartó használása: a II.5 és II.6 kép szerint nyomja meg egyidejűleg az
oldalsó lábtartó beállitó gombokat. Huzza felfelé a lábtartót ha egy fenebbi
pozicióban akarja beállitani vagy nyomja lefele ha egy lenti pozicióban akarja
használni.
- A sport ülést ki lehet venni a vázrol a két oldalsó gomb egyidejűleg
megnyomásáva (II.1. kép).
- A lökháritó használása: a II.7 kép szerint, illessze be a lökháritó mindkét végeit
a megfelelő résekben a vázon. Ha akarja a lökháritót eltávolitani, nyomja meg
egyidejűleg mindkét gombot és majd vegye ki (II.8).
Összecsukás a menetirányal elentétesen: csukja össze a kupolát, majd a
háttámla beállitó gomb megnyomásával nyomja egyaránt előre a háttámlát. A
II.26 kép szerint nyomja meg a tolokaron található 2 gombot és tolja előre a
tolokart ameddig a babakocsi teljesen összecsukodott.
A babakocsi összecsukása
- Összecsukás a menetirányal megegyezve: a II.19-21 képek szerint állitsa be a
lábtartót a legmagasabb pozicióban, majd a háttámla beállitó gomb
megnyomásával nyomja egyaránt előre a háttámlát. A II.22 kép szerint nyomja
meg a tolokaron található 2 gombot és tolja előre a tolokart ameddig a
babakocsi teljesen összecsukodott.
A sport ülést össze lehet csukni a vázzal egyszerre, mindkét irányban.

HU
Tilos olyan tartozékokat használni amelyeket a gyártó nem jováhagyott.
A sérülések elkerülések érdekében, rendszeresen ellenőrizze a babakocsi
álapotát.
Tisztitás és karbantartás
Nyissa ki a mozeskosár bélés cipzárát hogy a szélsö mozeskosár végeken
található fém rudakot beállithassa. Huzza a bal rudat balra és a jobb rudat
jobbra hogy a mozeskosár stabil bázist kapjon.
Tilos a babakocsit veszély helyzetben használni, példaul fövény vagy homok, a
túz melett.
A textil részek tisztitása: egy kefe vagy egy szivacs segitségével törölje a
babakocsit. A fém és műanyag alkatrészeket egy nedves törlövel lehet tisztitani.
3. A mozeskosárban, a gyerek feje fenebb kell legyen mint a teste.
Figyelem!
Bármilyen súly amely a tolokarra vagy a babakocsi vázára van téve
befolyásolhatja a termék stabilitását.
1. A mozeskosár megfelelő amikor a gyerek még újszülött és ameddig nem túd
egyedül ülni.
A mozeskosár szerelése és használása
Kérjük, ellenőrizze hogy a gyerek ne kapaszkodjon a lökháritóra és álva legyen
ülésben.
A termék megfelelő használása érdekében, olvassa el ezt az utmutatot, tartsa
be a benne megirt jelzéseket és tartsa meg az utmutatot jövöbeli referenciaként.
4. Ellenőrizze hogy a mozeskosár hordozó karja megfelelően rögzitve van
amielött felemelje és szállitsa a terméket.
Ezt a terméket egyszerre csak egy gyerek használhatja.
Bármilyen romlott vagy törött alkatrészt pótolni kell azonnal, tilos tovább
használni a terméket romlott alkatrészekkel.
Ezután, tegye rá az adaptereket amint a kép bemutassa. Ezutan a
mozeskosarat lehet a vázra tenni. A helyes rögzités akkor történt amikor a klick
hang halható. Amikor a mozeskosarat eltávolitani akarja a vázrol, akkor nyomja
meg az adaptereken található gombot és emelje fel az alkatrészt a vázrol. Ha
akarja eltávolitani az adaptert a mozeskosárrol akkor nyomja meg az adapterren
található gombot és huzza ki.
5. A mozeskosarat csak az adapterekkel lehet használni.
Rendszeresen ellenőrizze a csavarokat, szegeket, szegecseket és rögzítési
eszközöket hogy biztosan rögzítve legyenek.
2. A mozeskosarat csak száraz, tömör és vízszintes területekre lehet tenni.
A mozeskosár kupola kinyitására és összecsukására, nyomja meg egyidejűleg
az oldalso gombokat és tolja előre vagy hátra a kupolát hogy beállithassa a
kivánt pozicióban.
Tilos a babakocsit nedves, hideg vagy túlságosan meleg helyeken tárolni. Tartsa
távol a túztöl.
Table of contents
Languages:
Other Coccolle Stroller manuals

Coccolle
Coccolle Amani User manual

Coccolle
Coccolle Nessia User manual

Coccolle
Coccolle Selena User manual

Coccolle
Coccolle Perla User manual

Coccolle
Coccolle Neve User manual

Coccolle
Coccolle Cassia User manual

Coccolle
Coccolle Ambra User manual

Coccolle
Coccolle Oppa User manual

Coccolle
Coccolle Vispo User manual

Coccolle
Coccolle Gioia User manual

Coccolle
Coccolle Mino User manual

Coccolle
Coccolle Silene User manual

Coccolle
Coccolle Lemira User manual

Coccolle
Coccolle Ravello User manual

Coccolle
Coccolle Oro User manual

Coccolle
Coccolle Monara User manual

Coccolle
Coccolle Beyla User manual

Coccolle
Coccolle Siyana User manual

Coccolle
Coccolle primo User manual

Coccolle
Coccolle Juno User manual