FAAC A1000 User manual

A1000
EN16005:2012
E1SL fw.3.0
SDK EVO fw.3.0
LK EVO fw.1.2

A1000 2 53221004 - Rev.A
FAAC S.p.A. Soc. Unipersonale
Via Calari, 10 - 40069 Zola Predosa BOLOGNA - ITALY
Tel. +39 051 61724 - Fax +39 051 758518
www.faac.it - www.faacgroup.com
Translation of the original instructions ENGLISH
© Copyright FAAC SpA since 2017. All rights reserved.
No part of this manual may be reproduced, archived, distributed to
third parties nor copied in any other way, in any format and with any
means, be it electronic, mechanical or by photocopying, without prior
written authorisation by FAAC SpA
All names and trademarks mentioned are the property of their respec-
tive manufacturers.
Customers may make copies exclusively for their own use.
This manual was published in 2017.

A1000 3 53221004 - Rev.A
Translation of the original instructions ENGLISH
EC DECLARATION OF CONFORMITY OF A MACHINE
(2006/42/EC ANNEX II P.1, A)
Manufacturer and person authorised to compile the technical file
Company name: FAAC S.p.A. Soc. Unipersonale
Address: Via Calari, 10 - 40069 Zola Predosa BOLOGNA - ITALY
hereby declares that the following machine:
Description: Linear sliding door with 1 or 2 leaves
Model: A1000 CS
complies with the following applicable EU legislations:
Machinery Directive 2006/42/EC (including all applicable amendments)
and that the technical file has been compiled in compliance with part A of Annex VII.
Furthermore, the following harmonised standards have been applied:
EN 16005:2012
EN ISO 12100:2010
EN 60335-2-103:2015
EN 13849-1:2015 PL ”c”CAT. 3
EN 13849-2:2012
Bologna, Italy 10-06-2017 CEO
EC DECLARATION OF CONFORMITY
The Manufacturer
Company name: FAAC S.p.A. Soc. Unipersonale
Address: Via Calari, 10 - 40069 Zola Predosa BOLOGNA - ITALY
hereby declares that the following products:
Description: Automation for linear sliding door with 1 or 2 leaves
Model: A1000 KIT; A1000 PA;A1000 CS
comply with the following applicable EU legislations:
EMC Directive 2014/30/EU
Directive ROHS 2 2011/65/EU
Furthermore, the following harmonised standards have been applied:
EN 61000-6-2:2005
EN 61000-6-3:2007+A:2011
Bologna, Italy 10-06-2017 CEO

A1000 4 53221004 - Rev.A
Translation of the original instructions ENGLISH
DECLARATION OF INCORPORATION OF PARTLY COMPLETED MACHINERY
(2006/42/EC ANNEX II P.1, B)
Manufacturer and person authorised to prepare the relevant technical documentation
Company name: FAAC S.p.A. Soc. Unipersonale
Address: Via Calari, 10 - 40069 Zola Predosa BOLOGNA - ITALY
hereby declares that for the partly completed machinery:
Description: Linear sliding door with 1 or 2 leaves
Model: A1000 KIT
The essential requirements of the machinery directive 2006/42/EC (as amended) which have been applied and satisfied are as follows:
RESS 1.1.2, 1.1.3, 1.1.4, 1.1.5, 1.1.6, 1.2.1, 1.2.3, 1.3.4, 1.5.1, 1.5.11, 1.5.13, 1.6.3, 1.7.1, 1.7.1.2, 1.7.4
and that the relevant technical documentation has been compiled in compliance with part B of AnnexVII.
Furthermore, the following harmonised standards have been applied:
EN 16005:2012
EN ISO 12100:2010
EN 60335-2-103:2015
EN 13849-1:2015
EN 13849-2:2012
Finally, the manufacturer declares that the above-mentioned partly completed machinery must not be commissioned until the final machine in which it is to be
incorporated has been declared compliant with the requirements of the same Machinery Directive 2006/42/EC.
Bologna, Italy 10-06-2017 CEO
DECLARATION OF INCORPORATION FOR PARTLY COMPLETED MACHINERY
(2006/42/EC ANNEX II P.1, B)
Manufacturer and person authorised to prepare the relevant technical documentation
Company name: FAAC S.p.A. Soc. Unipersonale
Address: Via Calari, 10 - 40069 Zola Predosa BOLOGNA - ITALY
hereby declares that for the partly completed machinery:
Description: Linear sliding door with 1 or 2 leaves
Model: A1000 PA
The essential requirements of the machinery directive 2006/42/EC (as amended) which have been applied and satisfied are as follows:
RESS 1.1.2, 1.1.3, 1.1.5, 1.1.6, 1.2.1, 1.2.3, 1.2.6, 1.3.1, 1.3.2, 1.3.3, 1.3.4, 1.4.1, 1.4.2.1, 1.5.1, 1.5.2, 1.5.4, 1.5.11, 1.5.13, 1.6.1,
1.6.3, 1.6.4, 1.6.5, 1.7.1, 1.7.1.2, 1.7.4
and that the relevant technical documentation has been compiled in compliance with part B of AnnexVII.
Furthermore, the following harmonised standards have been applied:
EN 16005:2012
EN ISO 12100:2010
EN 60335-2-103:2015
EN 13849-1:2015
EN 13849-2:2012
Finally, the manufacturer declares that the above-mentioned partly completed machinery must not be commissioned until the final machine in which it is to be
incorporated has been declared compliant with the requirements of the same Machinery Directive 2006/42/EC.
Bologna, Italy 10-06-2017 CEO

A1000 5 53221004 - Rev.A
Translation of the original instructions ENGLISH
CONTENTS
EC Declaration of conformity of a machine.................................... 3
EC Declaration of conformity.................................................................. 3
Declaration of incorporation of partly completed machinery4
Declaration of incorporation for partly completed machinery
4
1. INTRODUCTION TO THE MANUAL........................................................ 7
1.1 Safety recommendations ........................................................................... 7
Safety of the installer/maintenance technician........................... 7
Workplace safety ........................................................................................... 7
User safety......................................................................................................... 7
1.2 Meaning of the symbols used.................................................................. 8
2. AUTOMATION A1000 .................................................................................. 10
2.1 Intended use....................................................................................................10
Limitations for use......................................................................................10
2.2 Unauthorised use..........................................................................................10
2.3 Identification plate.......................................................................................11
2.4 Technical specifications A1000..............................................................12
2.5 Types of system supplied..........................................................................13
Installation according to the type of system supplied...........13
A1000 Automation components........................................................14
ACCESSORIES ................................................................................................15
3. INSPECTION AND PREPARATION....................................................... 16
3.1 Preliminary inspection..............................................................................16
3.2 Arrangement of electrical cables........................................................16
4. TRANSPORT AND RECEIPT OF THE GOODS................................ 17
Handle packages .........................................................................................17
Unpack and Handle....................................................................................17
5. CUTTING THE PROFILES ........................................................................... 18
6. ASSEMBLING THE HEAD SECTION.................................................... 19
6.1 Assembling the components .................................................................20
Mechanical stops.........................................................................................20
Electronics module.....................................................................................21
Safety cables and spacers.......................................................................22
Motor..................................................................................................................22
Return PULLEY..............................................................................................22
Motor release monitor..............................................................................23
Internal release.............................................................................................23
XB LOCK Motor block operation test................................................23
Cover drilling..................................................................................................24
Closed door monitor sensor..................................................................24
Emergency battery kit .............................................................................24
7. ASSEMBLING THE A1000 CS FRAME................................................ 25
7.1 Entry with TK50 profiles............................................................................25
Preliminary operations.............................................................................25
Assembling the frame ..............................................................................25
Fastening the fixed leaves ......................................................................26
Fixed leaves may be: .................................................................................26
Mounting mobile leaves ........................................................................26
Glazing installation.....................................................................................26
Assembly of the head section to the upper profile..................26
7.2 Entry door with TK20 profiles.................................................................26
Preliminary operations.............................................................................26
Assembling the frame ..............................................................................27
Mounting MOBILE LEAVES ....................................................................27
Assembly of the head section to the upper profile..................27
8. INSTALLING THE HEAD SECTION.......................................................28
8.1 Preliminary operations ..............................................................................28
8.2 Fastening to the wall...................................................................................28
9. INSTALLING THE LEAVES .........................................................................29
9.1 Mounting the lower shoes.......................................................................29
Shoe with TK50 bracket ...........................................................................29
TK50 Swivel shoe.........................................................................................29
Shoe with TK20 bracket ...........................................................................29
9.2 Mount profiles on the leaves..................................................................30
9.3 Mount the lower sweeper........................................................................30
Glass leaves.....................................................................................................30
9.4 Installing the leaves.....................................................................................30
9.5 Adjusting the leaves and carriages.....................................................31
Height of the leaves...................................................................................31
Depth of the leaves....................................................................................31
Counter wheel...............................................................................................31
10. INSTALLING THE GLASS LEAVES.....................................................32
10.1 Mounting the brushes.............................................................................34
11. ASSEMBLE THE BELT, CASING AND ACCESSORIES............. 35
11.1 Mounting the belt......................................................................................35
Adjusting the belt .......................................................................................37
11.2 Belt tensioning ............................................................................................38
11.3 Adjusting the mechanical stops.........................................................39
Stops on opening........................................................................................39
Single leaf closing stops..........................................................................39
Double leaf closing stops........................................................................39
11.4 Mounting the side profiles....................................................................40
11.5 Installing the casing brackets..............................................................40
11.6 Fitting the cover..........................................................................................41
11.7 Installing the XB LOCK Motor block.................................................42
11.8 Adjusting the XB LOCK Motor block ................................................42
11.9 Mounting the cable gland guides.....................................................43
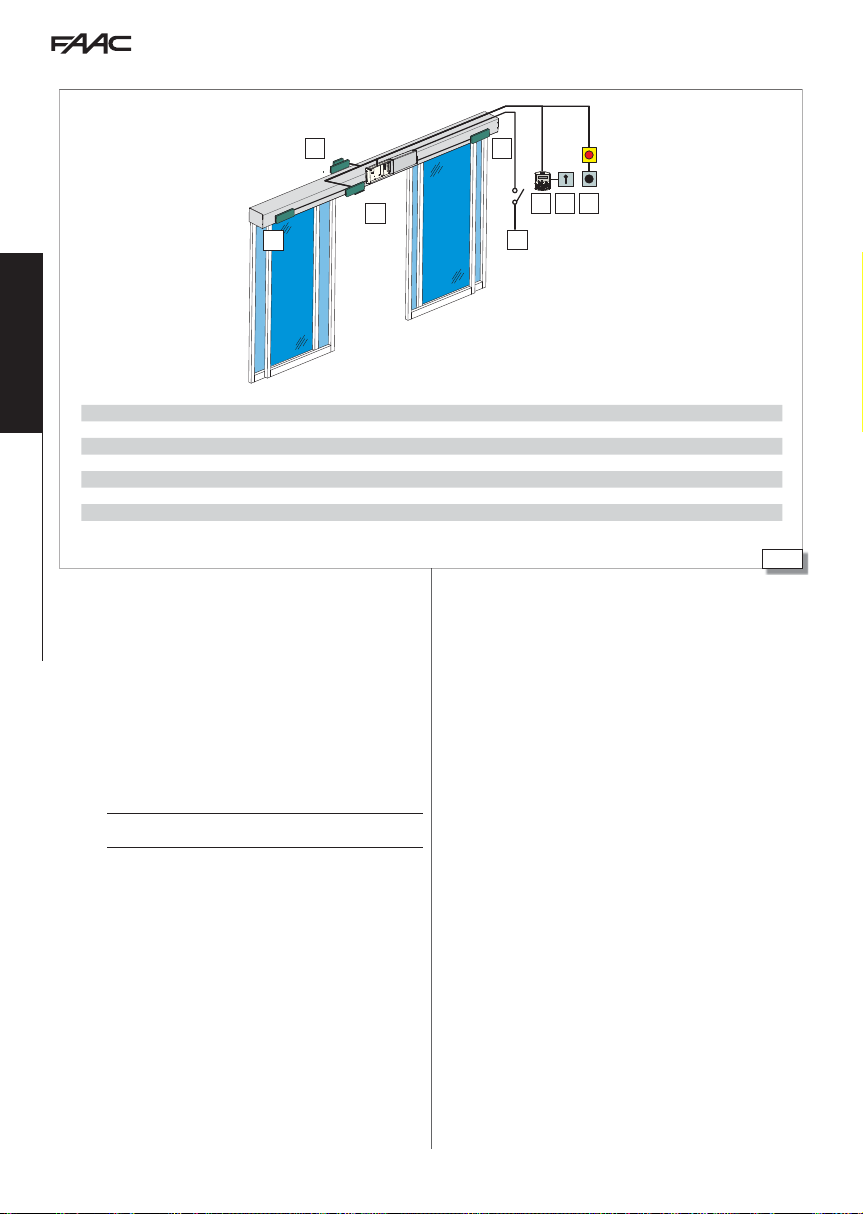
12. ELECTRONICS INSTALLATION E1SL .............................................. 44
12.1 E1SL Electronic module.........................................................................44
E1SL Electronic board ...............................................................................44
12.2 Terminal boards and connectors .......................................................46
J1 J4 - INPUTS S1-S2...................................................................................46
J7 - INPUTS E1 -E2........................................................................................46
J8 - SDK EVO - LK EVO - KS EVO............................................................46
J9 - XFA button photocells .....................................................................46
J10 - Main power supply 36V - 4A......................................................46
J11 - Motor......................................................................................................47
J12 - Motor Encoder...................................................................................47
J13 - XB XM LOCKOCK/ 47 Motor block and monitoring
(OPTIONAL).....................................................................................................47
J14 - Emergency battery .........................................................................47
J17 - USB Port ................................................................................................47
J18 - INTERCOM............................................................................................47
J21 - Inputs i1-i2-i3-i4 .............................................................................47
J22 - Configurable outputs ...................................................................47
J23 J24 J25 - Optional modules...........................................................47
12.3 Motor and encoder ...................................................................................48
12.4 XB LOCK motor block and monitoring (OPTIONAL)...............48
12.5 XV1-XDT1 EXIT and entry detectors ................................................49
12.6 2 XDT1 Exit detectors and 2 XDT1 ENTRY detectors ...............50
12.7 XBFA Detectors for safety in OPENING ..........................................51
12.8 J9 - XFA button photocells....................................................................52
12.9 J7
- INPUTS E1 -E2
- INPUTS E1 -E2
.....................................................................................
.....................................................................................
52
52
12.10 J22 - Configurable outputs.................................................................52
13. STARTUP............................................................................................................53
Preliminary checks prior to commissioning.................................53
13.1 Switching on and system SETUP .......................................................53
Checks following SETUP..........................................................................53
Saving the Configuration........................................................................53
13.2 Basic / advanced programming.........................................................54

A1000 6 53221004 - Rev.A
Translation of the original instructions ENGLISH
14. SYSTEM FUNCTIONALITY/CONFIGURATIONS ......................62
14.1 Operating mode .........................................................................................62
14.2 Inputs configuration ................................................................................63
14.3 Configuration of J22 outputs...............................................................65
14.4 Obstacle detection....................................................................................65
14.5 Anti-intrusion and PULL&GO...............................................................65
14.6 ELASTIC Kit.....................................................................................................65
14.7 Energy Saving Function ........................................................................65
Activating the Energy Saving function............................................65
14.8 Low Energy function during closing anD OPENING ...............66
Setting the Low Energy function during closing
CS CF
CS CF .....66
Setting the Low Energy function during opening
OS OF
OS OF ..66
15. DIAGNOSTICS ...............................................................................................66
15.1 System diagnostics: alerts, errors......................................................66
15.2 Troubleshooting..........................................................................................70
16. OPERATIONS ON THE BOARD............................................................ 71
16.1 Setup.................................................................................................................71
How to perform setup from board....................................................71
16.2 RESET.................................................................................................................71
When is Reset necessary .........................................................................71
How to perform a RESET from the board ......................................71
16.3 Restoring factory status..........................................................................71
When is Restore necessary.....................................................................71
How to perform restore...........................................................................71
16.4 Updating (UPLOAD)..................................................................................72
16.5 Download.......................................................................................................72
17. INTERCOM CANBUS PROGRAMMING ONLY WITH SDK
EVO.................................................................................................................................................. 74
17.1 Intermode.......................................................................................................75
17.2 Interlock...........................................................................................................75
Interlock with no memory ....................................................................75
Interlock with memory ...........................................................................76
18. LK EVO
FW VERSION 1.2 OR LATER
..............................................
..............................................
77
77
18.1 Assembly and testing ..............................................................................77
18.3 Special functions ........................................................................................78
19. KS EVO ...............................................................................................................79
19.1 Assembly and testing ..............................................................................79
20. SDK EVO
FW VERSION 3.0 OR LATER
............................................
............................................
82
82
20.1 Assembly and testing ..............................................................................82
20.2 Switching on and use...............................................................................82
20.3 Home page ....................................................................................................83
20.4 Reset - Lock/Release SDKEVO..............................................................83
20.5 PASSWORD.....................................................................................................83
20.6 selection MENU...........................................................................................84
20.7 Function MENU............................................................................................85
Menu 1 language ........................................................................................88
Menu 2 Programming...............................................................................88
Menu 3 ERRORS............................................................................................92
Menu 4 INDICATIONS ................................................................................93
Menu 5 CYCLE COUNTER.........................................................................93
Menu 6 DATE / TIME...................................................................................93
Menu 7 TIMER................................................................................................94
Menu 8 PASSWORD....................................................................................95
Menu 9 INFO ..................................................................................................95
21. MAINTENANCE ............................................................................................. 97
21.1 Calculation estimate of cycles performed....................................97
Routine maintenance................................................................................97
Periodic replacements .............................................................................97
21.2 Maintenance technician safety...........................................................98
21.3 Replacements...............................................................................................98
21.4 Cleaning .......................................................................................................100
21.5 Functional checks....................................................................................100
22. WASTE DISPOSAL.................................................................................... 100
23. ANNEXES TO A1000................................................................................ 101
23.1 Installation diagrams ............................................................................102
A1000 with 2 TK20 SLIDING LEAVES AND 2 FIXED SIDE
LEAVES............................................................................................................102
A1000 WITH ONE TK20 SLIDING LEAF AND ONE FIXED SIDE
LEAF ................................................................................................................103
A1000 WITH ONE TK20 SLIDING LEAF ........................................104
23.2 Position of components on the A1000 support profile .....105
A1000 WITH Right Opening Single Leaf.....................................105
A1000 WITH Left Opening Single Leaf..........................................106
A1000 WITH Double Leaf.....................................................................107
TABLES
1 Symbols: notes and warnings on the instructions...................................... 8
2 Symbols: tools (type and size) ....................................................................... 8
3 Symbols: safety signs and symbols (EN ISO 7010)...................................... 9
4 Symbols: markings on product...................................................................... 9
5 Symbols: Personal Protective Equipment..................................................... 9
6 Symbols: markings on packaging.................................................................. 9
7 Technical specifications.................................................................................12
8 Profile cutting measurements......................................................................18
9 A1000 belt tensioning (measurements in mm)........................................38
10 LEDs on the board..........................................................................................45
11 BASIC programming fw version 3.0 or later...............................................55
12 ADVANCED programming fw version 3.0 or later......................................58
13 Max. speed settings in Low Energy mode..................................................66
14 Status of the automation..............................................................................66
15 Errors................................................................................................................67
16 Warnings.........................................................................................................68
17 AUX Errors.......................................................................................................69
18 Troubleshooting guide ..................................................................................70
19 Updating functions (UPLOAD) from USB ....................................................72
20 Download to USB functions..........................................................................72
21 Firmware and programming file names.....................................................72
22 BOOTLOADER Errors.......................................................................................73
23 Errors ..............................................................................................................80
24 Warnings.........................................................................................................81
25 Firmware Version ...........................................................................................81
26 FUNCTIONS menu...........................................................................................86
27 Maintenance programme and periodic replacements .............................97
28 A1000 automation weights....................................................................... 101
29 Positions of components on the head section ........................................ 101

A1000 7 53221004 - Rev.A
Translation of the original instructions ENGLISH
1. INTRODUCTION TO THE MANUAL
The instructions manual provides the correct procedures and require-
ments to be complied with for installation and operation of the system
in safe conditions.
! Carefully read and comply with all the instructions before starting any
activity on the product.
Keep these instructions for future reference.
Unless otherwise specified, the measurements provided in the instruc-
tions are in mm.
In writing the instructions manual, due account was taken of the
results of the risk assessment conducted by the manufacturer on the
entire life cycle of the automation in order to implement effective
risk reduction.
The following stages of the life cycle of the automation were con-
sidered:
-Consignment reception/handling
-Assembly and installation
-Setting up and commissioning
-Operation
-Maintenance / addressing any failures
-Disposal at the end of the product’s life.
The sources of risk arising from installation and use of the automation
were taken into account:
-Risks for the installer/maintenance technician (technical person-
nel)
-Risks for the user of the automation
-Risks for the product’s integrity (damage)
1.1 SAFETY RECOMMENDATIONS
The installer/maintenance technician is responsible for the instal-
lation/testing of the system and for filling in the system’s Register.
SAFETY OF THE INSTALLER/MAINTENANCE TECHNICIAN
! Installation must be performed in compliance with Standards currently
in force.The installer’s safety is connected to environmental and opera-
tive conditions that reduce the risks of accidents and severe damage to
a minimum.
It should be remarked that most accidents occurring in the workplace
are caused by failure to comply with and monitor the most basic and
fundamental safety and prevention rules.
The installer/maintenance technician must prove or declare to possess
thetechnical-professionalproficiency to performinstallation,testingand
maintenanceactivities accordingto the requirementsof these instructions.
He or she is bound to read and comply with the instructions manual.
Incorrect installation and/or incorrect use of the product might cause
serious harm to people.
Perform installation and other activities adhering to the sequences
provided in the instructions manual.
Always comply with all the requirements contained in the instructions
and warning tables at the beginning of the paragraphs.
Do not modify the components of the automation in any way.
Only the installer and/or maintenance technician is authorised to open
the automation casing.
FAAC disclaims any liability regarding the safety and proper operation of
the automation if non-original FAAC components are used.
FAAC supplies a system register form with the A1000 CS.
WORKPLACE SAFETY
! The installer/maintenance technician must be in good psycho-physical
conditions, aware of and responsible about the hazards that may be
engendered when using a machine.
The installation activity requires special work conditions. Furthermore,
the suitable precautions must be taken to prevent risks of injury to
persons or damage.
It is recommended to always comply with the safety recommendations.
Cordon off the work site and prevent access to the area.
The work area must be kept tidy and must not be left unattended.
Do not wear clothes or accessories - such as ties or bracelets - that might
get caught in moving parts.
Always wear the personal protective equipment recommended for the
type of activity to be carried out.
Use work instruments in good conditions.
Therequired levelof workplacelighting must be equal to at least 200 lux.
Use the transport and lifting equipment recommended in the instruc-
tions manual.
Use safety-compliant portable ladders of adequate size, fitted with
anti-slip devices at the top and bottom, equipped with retainer hooks.
USER SAFETY
! The person in charge of the automation is responsible for the operation
of the system.
He or she is bound to read and comply with the instructions manual.
He/shemust be in good psycho-physical conditions, awareof and respon-
sible about the hazards that may be engendered when using a machine.
The required level of ambient lighting must be equal to at least 200 lux.
The person in charge of using the automation must prevent the control
devices being used by anyone who has not been specifically authorised
and trained to use them. He/she must not allow access to the control
devices to persons under age or with reduced psycho-physical abilities,
unless under supervision by an adult responsible for their safety.
Do not use the system in case of malfunctioning.
Underno circumstancesisthe user authorised to perform any work inside
the housing of the automation or on any of its components.
Theuser is notpermitted toperformanytype of work on the motorisation
or on components of the system.
Ifthesystemmalfunctions,the user must not attemptanykindofrepairor
take any direct action. He/she mustrequest assistance from the INSTALLER
/ MAINTENANCE TECHNICIAN.
The user must make sure that maintenance to the system is carried out
according to the instructions provided in this manual.
The installer/maintenance technician must provide the user with all the
informationrequired tooperatethe system and foremergency situations.
The installer/maintenance technician must supply the system’s Register
to the owner.

A1000 8 53221004 - Rev.A
Translation of the original instructions ENGLISH
1.2 MEANING OF THE SYMBOLS USED
! Perform the operations and steps described in compliance with safety
regulations and the instructions provided so as to prevent the risks indi-
cated by the symbols in the following tables.
2 Symbols: tools (type and size)
6-8...
HEX WRENCH of the specified size (6, 8...)
6-8...
ALLEN KEY with ROUND HEAD of the specified size (6, 8...)
CIRCLIP PLIERS
6-8...
FLAT-HEAD SCREWDRIVER of the specified size (6, 8...)
6-8...
CROSS-HEAD SCREWDRIVER of the specified size (6, 8...)
6-8...
METAL DRILL BITS of the specified size (6, 8...)
6-8...
MASONRY DRILL BITS of the specified size (6, 8...)
LEVEL
45°...
COUNTERSINK with specified angle (45°...)
M6-M8...
THREADING TAP with specified thread (M6, M8...)
ROUND SAW
GLASS SUCTION CUPS
PALLET FORKS
TOOL withTORQUE ADJUSTMENT
Itindicatesthat a tool with torqueadjustmentisrequiredwherenecessary
for safety reasons.
TIGHTENING TORQUE VALUE
The torque wrench and the tightening torque in Nm is specified in the
figures. E.g.: HEXWRENCH 6 set at 2.5 Nm
2.5
2.5
Nm
1 Symbols: notes and warnings on the instructions
!WARNING
It indicates the risk of personal injury or damage to parts. The described
operation/step must be carried out in compliance with the instructions
provided and with safety regulations.
FWARNING ELECTRIC SHOCK HAZARD
Indicates risk of electrocution. The described operation/step must be
carried out in compliance with the instructions provided and with safety
regulations.
WARNING
Details and specifications to be followed with the utmost attention, in
order to ensure correct operation of the system.
PAGE REFERENCE
It refers to the page indicated by the number for details or clarifications.
PICTURE REFERENCE
It refers to the picture indicated by the number.
TABLE REFERENCE
It refers to the table indicated by the number.
Li
WARNING
The batteries and electronic components must not be disposed of with
household waste but delivered to authorised disposal and recycling
centres.

A1000 9 53221004 - Rev.A
Translation of the original instructions ENGLISH
3 Symbols: safety signs and symbols (EN ISO 7010)
GENERIC HAZARD
It indicates the risk of personal injury or damage to parts.
ELECTROCUTION HAZARD
It indicates the risk of electrocution due to the presence of live parts.
RISK OF CRUSHING AND MUSCULOSKELETAL DISORDERS
It indicates the risk of crushing and musculo-skeletal disorders due to
lifting heavy parts.
BURNING OR SCALDING HAZARD
It indicates the risk of burning or scalding due to the presence of parts
at high temperature.
CRUSHING HAZARD
It indicates the risk of crushing hands/feet due to the presence of heavy
parts.
RISK OF CRUSHING HANDS
Itindicatesthe risk ofcrushing hands due to the presence of moving parts.
CUTTING/AMPUTATION/PIERCING HAZARD
It indicates the risk of cutting due to the presence of sharp parts or using
pointed tools (drill).
SHEARING HAZARD
It indicates the risk of shearing due to moving parts.
RISK OF IMPACT/CRUSHING
It indicates the risk of impact or crushing due to moving parts.
FALLING OBJECTS HAZARD
It indicates the risk of impact due to falling objects.
SPENT BATTERIES HAZARD
It indicates a risk for the environment and health arising from spent bat-
teries due to possible leakage of the liquid content.
COLLISION WITH FORKLIFT TRUCKS HAZARD
It indicates a risk of collision/impact with forklift trucks.
5 Symbols: Personal Protective Equipment
Personal protective equipment to be worn for protection from any
risks (e.g. crushing, cutting, shearing, etc.):
Obligation to wear head protection helmet.
Obligation to wear safety footwear.
Obligation to wear mask/goggles to protect the eyes from the risk of
fragments due to the use of drill or welder.
Obligation to wear work gloves.
Obligation to wear ear protectors.
Obligation to wear overalls. Do not wear clothes or accessories - such as
ties or bracelets - that might get caught in moving parts.
6 Symbols: markings on packaging
Important warnings for the safety of people and integrity of the load:
Handle with care. Presence of fragile parts.
Store away from water and humidity.
PROHIBITION to stack items.
2Maximum number of stackable items, e.g.: 2.
Wear work gloves.
Wear safety footwear.
Use pallet trucks.
Use forklift trucks.
20 kg is the MAX weight that 1 person can lift.
K
g
___
_
WEIGHT of the load.
4 Symbols: markings on product
Obligation to read the instructions

A1000 10 53221004 - Rev.A
1
230V~
6
1
2
543
7
7
Translation of the original instructions ENGLISH
2. AUTOMATION A1000
2.1 INTENDED USE
The FAAC series A1000 systems are designed to automatically oper-
ate, manage and control linear horizontal motion one- or two-leaf
sliding doors.
The A1000 series automations are designed to automate entry doors
that are used exclusively for pedestrian traffic.
They are compliant with standard EN 16005:2012.
They are suitable for indoor installation, for applications that meet
the specifications indicated in 7.
! No other use outside the ones set out above is allowed by the manu-
facturer.
FAAC declines all liability deriving from misuse or uses other than that
for which the automation s intended.
LIMITATIONS FOR USE
Do not use the automation in the presence of the following conditions:
-direct exposure to weathering
-exposure to direct water jets of any type or extent
-outside the technical limitations set out. Specifically, it is forbid-
den to connect to sources of energy other than those set out.
2.2 UNAUTHORISED USE
It is forbidden to:
-use the automation for uses other than THE INTENDED USE;
-use the automation for installing smoke and/or fire protection
doors (fire doors);
-use the automation with mobile and fixed guards tampered
with or removed;
-use the automation in environments in which there is a risk of
explosion and/or fire: the presence of flammable gases or fumes is
a serious safety hazard (the product is not 94/9/EC ATEX certified);
-integrate other systems and/or commercial equipment not
intended;
-use other systems and/or commercial equipment for uses not
authorised by the respective manufacturers;
-use commercial devices for purposes other than those set out by
the respective manufacturers.
external
internal
1 Internal monitored opening detector and safety in closing (XV1/XDT1) optional accessory
2 External monitored opening detector and safety in closing (XV1/XDT1) optional accessory
3 SDK EVO optional accessory
4 Key switch to lock the SDK EVO optional accessory
5 Emergency/Key/OPEN control buttons optional accessories
6 Power supply 230V~
7 Internal monitored detectors for safe opening (XBFA) optional accessory

A1000 11 53221004 - Rev.A
2
1050570000
1050570000
0114
0114
0001
0001
1
1
Translation of the original instructions ENGLISH
2.3 IDENTIFICATION PLATE
The identification plate 2-is located on the support profile.
Ifthe A1000 KIT is supplied, it is theresponsibility of the installer to attach
the identification plate in a visible position 2- .
Month and year of production (mm/yy)
Sale code
Sale code
Product name
Progressive no. of the month of
production
IDENTIFICATION NUMBER
example:

A1000 12 53221004 - Rev.A
Translation of the original instructions ENGLISH
2.4 TECHNICAL SPECIFICATIONS A1000
7 Technical specifications
MODEL A1000 single leaf A1000 double leaf
Length * [mm] from 1500 to 6100 from 1700 to 6100
Depth * [mm] 150 150
Height * [mm] 100 100
Weight** [kg] MIN. 21 - MAX 47 MIN. 24- MAX. 49
No. of leaves 1 2
MAX. leaf weight [kg] 110 70 +70
Passage opening (Vp) [mm] from 700 to 3000 from 800 to 3000
Beam length [mm] Vp x 2 +100 Vp x 2 +100
Maximum framed leaf thickness [mm] 60 60
Power supply voltage 230V~ (+6% -10%) 50Hz 230 V~(+6% -10%) 50Hz
MAX absorbed power [W] 140 140
Stand-by power without accessories [W] 3 3
Use frequency 100 % 100 %
Main motor (with encoder) powered at 36V powered at 36V
Max. accessories load (excluding SDK EVO) 1A, 24V 1A, 24V
Time/date backup battery Lithium CR2032 3V Lithium CR2032 3V
Motion backup battery NiMh 24V 1800mAh NiMh 24V 1800mAh
Traction by toothed belt by toothed belt
Opening/closing speed adjustment (empty) [cm/s] 10... 75 20... 150
Partial opening adjustment 5%... 95% of total opening 5%... 95% of total opening
Pause time adjustment [s] 0... 30 0... 30
Night pause time adjustment [s] 0... 240 0... 240
Anti-crushing safety device in opening/closing in opening/closing
Protection sensors monitoring (EN 16005:2012) can be bypassed can be bypassed
Energy Saving function can be enabled can be enabled
Low Energy movement can be enabled can be enabled
Operating ambient temperature [°C] -20... +55 -20... +55
Automation protection rating IP 23 (internal use) IP 23 (internal use)
* The dimensions and weight of the automation are specified excluding carriage and leaf overall dimensions, which are customisable
** For the specifications of weights in relation to the length of the automation, see 28.

A1000 13 53221004 - Rev.A
Translation of the original instructions ENGLISH
2.5 TYPES OF SYSTEM SUPPLIED
The FAAC A1000 series automations may be supplied as follows:
-Automation kit: A1000 KIT
-Assembled automation: A1000 PA
-Complete entry door: A1000 CS
INSTALLATION ACCORDING TO THE TYPE OF SYSTEM
SUPPLIED
! During installation, it is recommended to comply with the order of the
sections set out based on the type of purchased supply.
A1000 KIT
A
B
A. Pack containing automation components to be assembled on the
FAAC support profile.
B. Pack with FAAC profiles purchased in 4.30 m or 6.10 m long bars.
Sequence of installation phases (dedicated sections in the instructions
manual)
- Inspection and preparation (§ 3)
- Cutting the profiles (§ 5)
- Installation of the head section: assembly of the components on the
support profile (use exclusively FAAC profiles) (§ 6)
- Installation of the head section (§ 8)
- Installation of the leaves (§ 9) - for glass leaves see (§ 10)
- Electronics installation (§ 12)
- Startup (§ 13)
A1000 PA
C
C. Automation assembled on FAAC* head section.
Sequence of installation phases (dedicated sections in the instructions
manual)
- Inspection and preparation (§ 3)
- Installation of the head section (§ 8)
- Installation of the leaves (§ 9) - for glass leaves see (§ 10)
- Electronics installation (§ 12)
- Startup (§ 13)
A1000 CS
C
D
E
C. Automation assembled on FAAC* head section.
D. FAAC leaves (with TK20 or TK50 profiles)
E. Package with TK20 or TK50 profiles for installing the FAAC door
wall frame.
Sequence of installation phases (dedicated sections in the instructions
manual)
- Inspection and preparation (§ 3)
- Installation of the door wall frame (§ 8) with FAAC - TK50 or TK20
profiles.
- Installation of the head section (§ 8)
- Installation of the leaves (§ 9) - for glass leaves see (§ 10)
- Electronics installation (§ 12)
- Startup (§ 13)
* supplied with the required measurement and with pre-assembled
automation components.

A1000 14 53221004 - Rev.A
Translation of the original instructions ENGLISH
A1000 AUTOMATION COMPONENTS
Support profile
It lets you adequately fasten the automation along a load-bearing metal
or masonry wall.
FRONT CASING CLOSING PROFILE
Aluminium profile for front head section closure.
H100 version available.
Plates with screws
Accessories for installation of components.
Motor with encoder
Return pulley
Leaf Support/Sliding Carriages - (2 for each leaf)
Transmission belt
! It is compulsory to use the FAAC belt for the A1000
Control electronics module
0.0
RESET/SETUP
DL2 DL11
MAIN
F1
USB
+
-
F
ERR
BAT1
OPEN
EMERG
BAT2
SIC_OP
SIC_CL
J10
J14
J11
J12 J13
V G
S1
G
T
J1
J17
V RX TX G
J8
E1 G E2
J7
T1G
T2
R1
G R2
J9
V G 0102 02
J22
J21
V
G
I1
I2
G
I3
I4
V
J18
GCH CL G
J23J24
J25
V G
S2
G
T
J2
E1SL electronic board and power supply unit.

A1000 15 53221004 - Rev.A
Translation of the original instructions ENGLISH
ACCESSORIES
XB LOCK motor block and internal release - OPTIONAL
It acts directly on the Motor, mechanically locking it in order to maintain
the leaves in position.
Supplied with internal release device which allows emergency opening to
be performed in case of need.
Ready for installing external release.
Monitoring - OPTIONAL
The magnetic monitoring sensor detects the door status: closed/not closed
It is fitted with connector for connecting a relay (e.g. to connect an alarm
system).
The monitoring micro switch on the motor block detects any malfunction.
It is ready to remotely activate a light or sound warning.
Emergency battery - OPTIONAL
It allows the automation to operate in case of mains power failure.
SDK EVO - OPTIONAL
Programming and function selector device with display.
LK EVO - OPTIONAL
Programming and function selector device without display.
KS EVO - OPTIONAL
Device with function selector key without display.
TK50 - Sliding shoes with bracket - OPTIONAL
For fastening to wall or fixed leaf (supplied in a PAIR).
TK50 - Swivel sliding shoes - OPTIONAL
For fastening to the floor (supplied in a PAIR).
TK20 - Sliding shoes with bracket - OPTIONAL
For fastening to fixed leaf (supplied in a PAIR).
Lower guide profile - OPTIONAL
Allows the lower leaf profile to be adapted to the sliding shoe. Supplied
in 3.0 m long bars.
Upper profile for connecting the leaf - (1 for each leaf) - OPTIONAL
Accessory to adapt the upper leaf profile to the carriage connections.
Supplied in 3.0 m long bars.
Sweeper for lower guide profile (H19 or H25) - OPTIONAL
Completes the floor guide system.
Glass leaf lower shoes - OPTIONAL
For glass leaf sliding.
Glass leaf gripper - OPTIONAL

A1000 16 53221004 - Rev.A
external
internal
3
230V~
6
230V~
6
543
1
27
76
1
2
543
Translation of the original instructions ENGLISH
3. INSPECTION AND PREPARATION
3.2 ARRANGEMENT OF ELECTRICAL CABLES
! Before performing any operation on the system, disconnect the power
supply.
The electrical system must be compliant with the regulations in force in
the Country of installation (EN 60335-1...)
The power mains of the automation must be fitted with a multi-pole
power switch with a switch-contact gap of at least 3 mm. It is advisable
to use a 6A circuit breaker with a multi-pole power switch.
Ensurethere is a residual currentdevicewith a 0.03 A threshold upstream
of the system.
Ensure the earthing system is constructed in a workmanlike manner and
connect the structure’s metal parts to it.
Lay the electrical cables for connecting the accessories and the electri-
cal power supply 3.
Protect cables by means of suitable ducting.
! Place control accessories within the automation’s visual range. These
devices must always be accessible, even with the door open.
Comply with the following heights from the ground:
- control accessories = minimum 150 cm
- emergency buttons = max 120 cm
3.1 PRELIMINARY INSPECTION
! Prior to installation, check soundness of the load bearing masonry struc-
ture and door. Perform any required work to assure:
- solidity, stability and absence of any risk of detachment or collapse of
the masonry structure, fixed door frame and automation
- level flooring, without any friction/hindrance to smooth leaf sliding
- absence of sharp edges (cutting hazard)
- absence of protruding parts (hooking/entrainment hazard)
1 Internal monitored opening detector and safe closing (XV1/XDT1) included in the supply
2 External monitored opening detector and safe closing (XV1/XDT1) optional accessory
3 SDK EVO optional accessory
4 Key switch to lock the SDK EVO optional accessory
5 Emergency/Key/OPEN control buttons optional accessories
6 Power supply 230V~
7 Internal monitored detectors for safe opening (XBFA) optional accessory
230V~
external
internal

A1000 17 53221004 - Rev.A
Translation of the original instructions ENGLISH
4. TRANSPORT AND RECEIPT OF THE GOODS
HANDLE PACKAGES
! Always comply with instructions on the package.
The NETWEIGHT is indicated on the package.
PALLETISED SUPPLY
RISKS
PERSONAL PROTECTIVE EQUIPMENT
REQUIRED TOOLS
SINGLE PACKAGE
RISKS
PERSONAL PROTECTIVE EQUIPMENT
REQUIRED TOOLS
For manual lifting, there should be 1 person for every 20 kg to be lifted.
UNPACK AND HANDLE
RISKS
PERSONAL PROTECTIVE EQUIPMENT
REQUIRED TOOLS
For manual lifting, arrange for an adequate number of people for the
weight of the leaf: 1 person for every 20 kg to be lifted.
1. Open and remove all packaging elements.
2. Make sure that all components requested are present and undam-
aged ( 14).
If the goods supplied are non-compliant, proceed as indicated in the
General Conditions of Sale listed in the sales catalogue and which can be
consulted on the website www.faacgroup.com.
The unpackaged goods must be handled manually.
! Should transport be required, the products must be suitably packaged.
Discard the packaging after use in the appropriate containers in compli-
ance with waste disposal regulations.
Thepackaging materials (plastic, polystyrene,etc.) must not be left within
reach of children as they are potential sources of danger.

A1000 18 53221004 - Rev.A
Lt
50 50
Vp La
4
Translation of the original instructions ENGLISH
5. CUTTING THE PROFILES
If the A1000 KIT has been supplied, the profiles must be cut to the size
indicated.Thisoperationis performed in the shop. After cutting,assemble
the components to the support profile.
Handling instructions: 17.
RISKS
PERSONAL PROTECTIVE EQUIPMENT
REQUIRED TOOLS
Use a circular or linear saw cutting machine with blade suitable for
cutting metals.
It is forbidden to use a hand saw.
Only use equipment in good conditions and fitted with all the required
safety devices.
Always comply with the instructions provided by the equipment's
manufacturer.
Cutting operations may only be performed by personnel authorised to
use the equipment.
Cut to size according to the measurements indicated in 8.
8 Profile cutting measurements
Profile to be cut Cutting measurement [mm]
- Support profile
- Head section cover
- Self-supporting profile (OPTIONAL)
Lt = Vp x 2 + 100
The head section length (Lt) must be calculated based on the measurement of the transit space (Vp).
100 mm is the overlap between leaves (50 + 50). If the overlap is different, the Lt measurement varies accordingly.
The passage opening measurement (Vp) taken on the installation must already be known when placing the order
since the profiles can be supplied in 4300 mm or 6100 mm long bars.
If installed with side profiles, the support profile must be cut to:
Lt - 2mm
- Leaf connection profile (OPTIONAL)
- Lower guide profile (OPTIONAL)
La
The leaf width measurement (La) depends on the transit space measurement (Vp), on the number of leaves and the
planned overlap.

A1000 19 53221004 - Rev.A
5
37,5 37,5 37,5
38
Translation of the original instructions ENGLISH
6. ASSEMBLING THE HEAD SECTION
If the A1000 KIT has been supplied, the components must be installed on
thesupport profile.Thisoperation is performed in the shop.Theassembled
head section is then moved to the installation site.
For handling instructions see 17.
RISKS
PERSONAL PROTECTIVE EQUIPMENT
REQUIRED TOOLS
Ø 18 mm 6-8-10-13 5
! A torque wrench must be used to achieve the specified fastening torques
(Nm).
For manual lifting, arrange for an adequate number of people for the
weight of the leaf: 1 person for every 20 kg to be lifted.

A1000 20 53221004 - Rev.A
6
3
5
2
Nm
11
Translation of the original instructions ENGLISH
6.1 ASSEMBLING THE COMPONENTS
! Keep to the positions indicated in the relevant diagram:
105/106/107.
MECHANICAL STOPS
! SINGLE LEAF: 2 mechanical stops are required. Place them at the two
ends of the profile to begin with.
DOUBLE LEAF: 4 mechanical stops are required. Place 2 of them at the
two ends of the profile and 2 in the middle to begin with.
1. Insert the mechanical stops from the side or front 6-.
2. Make sure that they are resting in the correct position on the pro-
file - 6-and temporarily fasten each mechanical stop 6-.
After assembling the leaves, the stops’positions must be adjusted.
Table of contents
Other FAAC Door Opening System manuals

FAAC
FAAC 959 B-E User manual

FAAC
FAAC 950N User manual

FAAC
FAAC A1400 AIR RDT User manual

FAAC
FAAC SDK WIRELESS User manual

FAAC
FAAC XKPR125D User manual

FAAC
FAAC APN User manual

FAAC
FAAC A140 AIR-T Series User manual

FAAC
FAAC 950 BM User manual

FAAC
FAAC DAAB EP105 User manual

FAAC
FAAC S2500I CERNIERA User manual