(EN) OPERATING FUNCTIONS
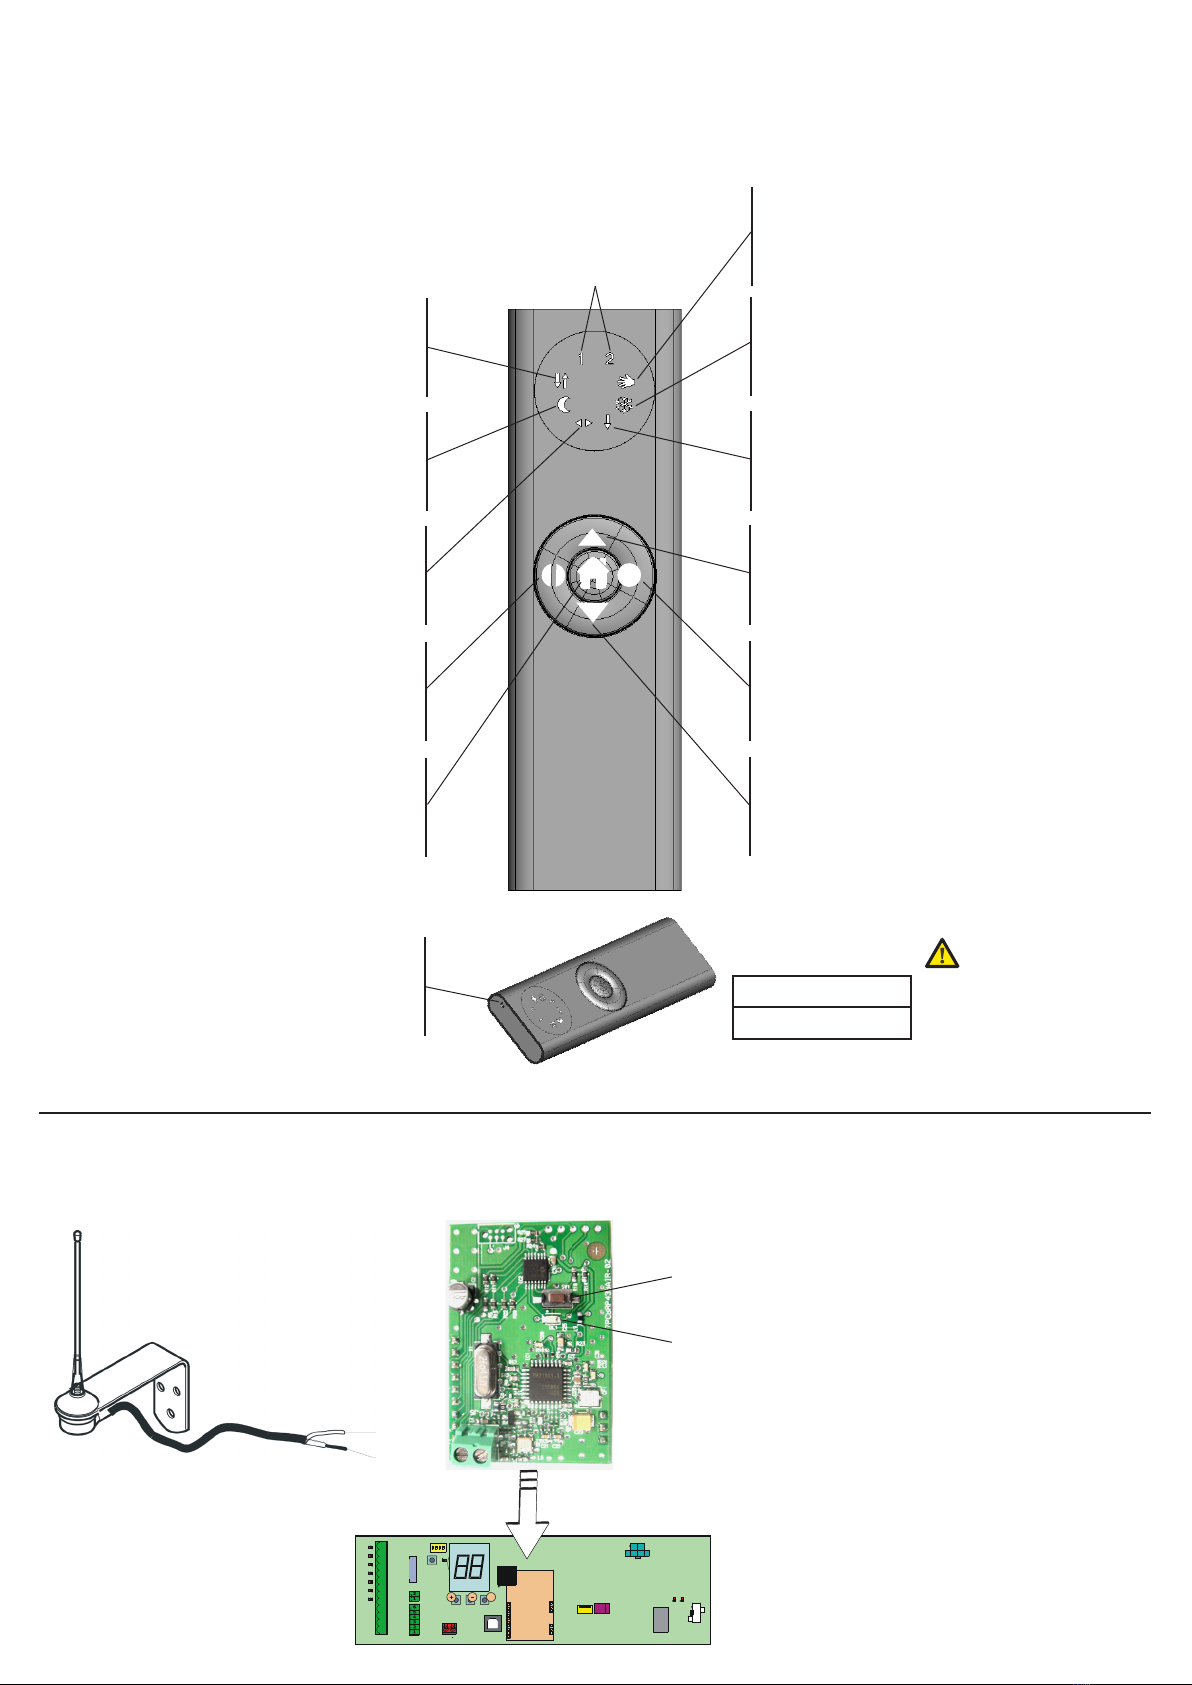
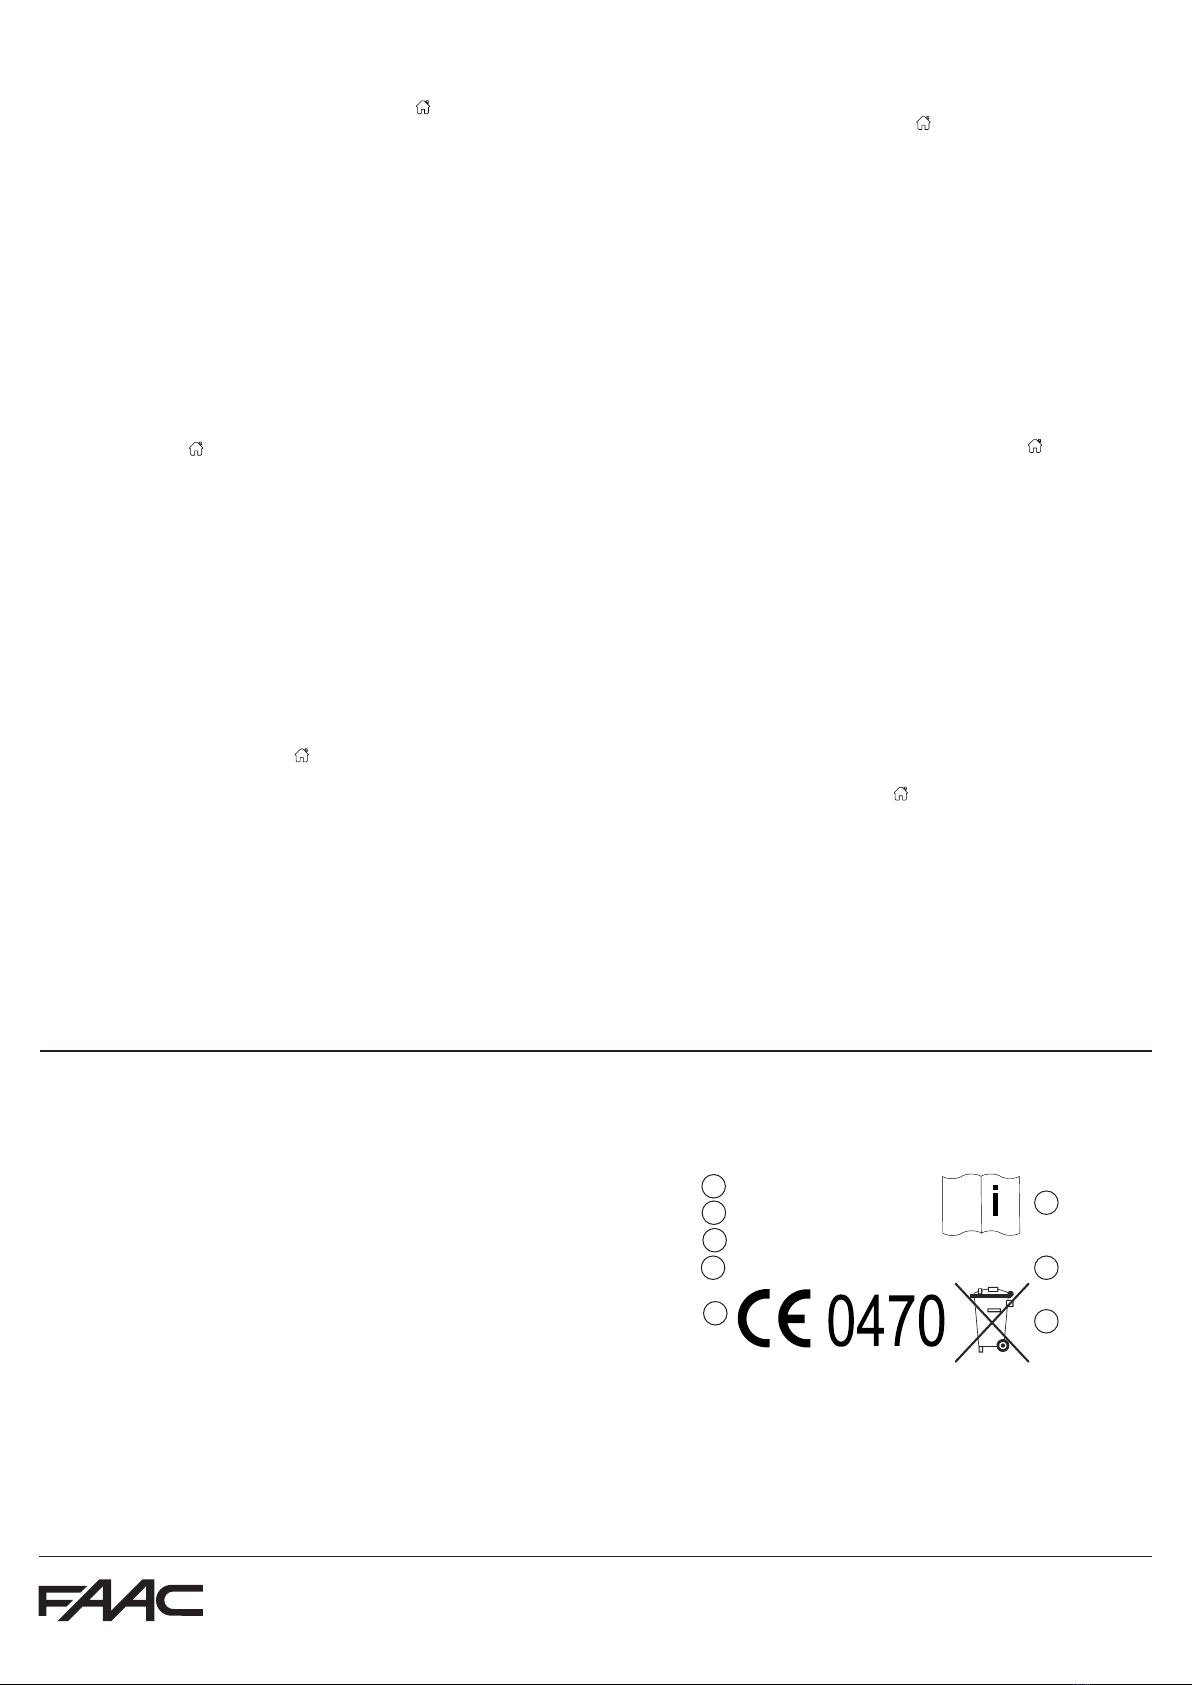
Memorising the remote control on the RP433 SDK Wireless:
Switch-off the board automaticdoorandconnect the RP433 SDKWireless Wireless radio module .
To memorise the remote control, press SW1 on the board, LED LD1 will flash.
Then press the centre key ( ) on the remote control to memorise it on the receiver.
Memorising other remote controls:
Follow the same procedure used for the previous remote control.
NB : Maximum number of remote controls is 20.
Deleting the memory of the RP433 SDK Wireless board:
To delete the RP433 SDK WirelessWireless memory, press and hold SW1 on the board.
The LED will flash slowly then rapidly and will later become solid indicating deletion is comple-
te. Release SW1.
Reset and Setup of the board automaticdoor using a memorised
remote control:
To reset the board automaticdoor, briefly press“P”and then release.
To set up the board automaticdoor, press“P”at 10 seconds until start-up begins.
The output OUT1 in board automatic door , GONG configured,can be used to indicate the change
function.
(IT) FUNZIONI OPERATIVE
Memorizzazione telecomando su RP433 SDK Wireless:
Spegnere la scheda porta automatica e inserire il modulo radio RP433 SDKWireless.
In seguito per memorizzare il telecomando, premere il pulsante SW1 sulla scheda, il Led LD1
lampeggia. In seguito premere sul telecomando il tasto centrale ( ) per memorizzarlo sulla
ricevente.
Memorizzazione altri telecomandi:
Eseguire la stessa procedura eseguita per il primo telecomando.
NB: Il numero massimo di telecomandi é 20.
Cancellazione memoria della scheda RP433 SDK Wireless:
Per effettuare la cancellazione della memoria RP433 SDKWireless , premere e tenere premuto sulla
scheda il pulsante SW1. Il led lampeggia lento poi veloce e infine diventa fisso ad indicare la
cancellazione. Rilasciare il pulsante SW1.
Reset e Setup scheda porta automatica da telecomando memoriz-
zato:
Per eseguire il reset della scheda porta automatica premere brevemente il pulsante P poi rilasciare.
Per eseguire il setup della scheda portaautomatica premere 10 secondi il pulsante P fino all’avvio
del setup.
L’uscita OUT1 su scheda porta automatica configurata in GONG , può essere utilizzata
per segnalare il cambio funzione .
(FR) FONCTIONS OPÉRATIONNELLES
Mémorisation de la télécommande sur RP433 SDK Wireless :
Couper l’alimentation sur la carte porteautomatique etmonter le module radio RP433 SDK Wireless.
Pour mémoriser la télécommande, appuyer sur le bouton SW1 sur la carte ; la Led LD1 cligno-
te. Ensuite, appuyer sur la touche centrale ( ) de la télécommande
pour la mémoriser sur le récepteur.
Mémorisation d’autres télécommandes :
La procédure est la même que pour la première télécommande.
NB: Le nombre maximum de télécommandes est 20.
Effacement de la mémoire de la carte RP433 SDK Wireless:
Pour effacer la mémoire RP433 SDKWireless , appuyer sur le bouton SW1 sur la carte et le mainte-
nir enfoncé. La Led clignote lentement puis rapidement ; enfin, elle devient fixe pour confirmer
l’effacement. Relâcher le bouton SW1.
Reset et Setup de la carte porte automatique à partir de la télécom-
mande mémorisée :
Pour exécuter le reset de la carte porteautomatique, appuyer brièvement sur le bouton P puis le
relâcher.
Pour exécuter le setup de la carte porte automatique, appuyer 10 seconds. sur le bouton P jusqu’au
démarrage du setup.
La sortie OUT1 sur platine porte automatique configuré un GONG,peut être utilisé à signaler le
changement de la fonction.
(DE) BETRIEBSARTEN
Einspeicherung der Fernbedienung auf RP433 SDK Wireless:
Steuerkarte ausschalten, stecke das Funkmodul RP433 SDKWireless auf der Steuerkarte.
Zur Speicherung der Fernbedienung die Taste SW1 auf der Steuerkarte drücken:
Die LED LD1 blinkt. DerVorstand automatischeTür ab und legte das Funkmodul
Zur Speicherung auf dem Empfänger die mittlere Taste ( ) auf der Fernbedienung drücken.
Speicherung weiterer Fernbedienungen:
Denselben Vorgang wie für die erste Fernbedienung ausführen.
NB: Maximale Anzahl der Fernbedienungen ist 20.
Speicher der Steuerkarte RP433 SDK Wireless löschen:
Zum Löschen des Speichers der Steuerkarte RP433 SDKWireless dieTaste SW1 auf der Steuerkarte
anhaltend drücken.Die LED blinkt zuerst langsam und dann schneller und leuchtet zum Schluss mit
Dauerlicht auf, wenn der Löschvorgang beendet ist.
DieTaste SW1 loslassen.
Reset und Setup der Steuerkarte automatische deur über die einge-
speicherte Fernbedienung:
Zum Zurücksetzen der Steuerkarte automatische deur dieTaste P kurz drücken.
Für das Setup der Steuerkarte automatische deur dieTaste P so 10 Sekunden drücken, bis der
Setup-Vorgang startet. Der Ausgang OUT1 Steuerkarte automatischeTür konfiguriert Gong,
verwendet werden Funktion, um die Änderung zu berichten.
(ES) FUNCIONES OPERATIVAS
Memorización telemando en RP433 SDK Wireless:
Desconectar la alimentación de la tarjeta puertaautomática monte el módulo radio RP433 SDK
Wireless.Seguidamente, para memorizar el telemando, presione el pulsador SW1
en la tarjeta, el Diodo LD1 destella.A continuación presionar la tecla central ( ) del telemando
para memorizarlo en el receptor.
Memorización de otros telemandos:
Realice el mismo procedimiento indicado para el primer telemando.
NB: Número máximo de telemando es de 20.
Borrado de la memoria de la tarjeta RP433 SDK Wireless:
Para borrar la memoria RP433 SDKWireless presione y mantenga presionado el pulsador SW1 de
la tarjeta. El diodo primero destella lento, luego rápido y, por último, pasa a luz fija para indicar
que se ha realizado el borrado. Suelte el pulsador SW1.
Reset y Setup de la tarjeta puertaautomática desde el telemando
memorizado:
Para realizar el reset de la tarjeta puertaautomática presione brevemente el pulsador P y luego
suéltelo.
Para realizar el setup de la tarjeta puertaautomáticapresione 10 seguendos el pulsador P hasta que
inicie el setup.
La salida OUT1 en la tarjeta puerta automática configurada GONG,se puede utilizar para informar
de cambio de la función .
(NL) BEDRIJFSFUNCTIES
Geheugenopslag afstandsbediening op RP433 SDK Wireless:
Schakel de printplaat uit en plaats de radiomodule RP433 SDKWireless op de printplaat . Druk om
de afstandsbediening op te slaan op de knop SW1 op de kaart, de led LD1 knippert. Druk vervol-
gens op de afstandsbediening op de centrale toets ( ) om hem op de ontvanger op te slaan.
Geheugenopslag andere afstandsbedieningen:
Voer dezelfde procedure uit als die voor de eerste afstandsbediening.
NB: Maximum aantal afstandsbedieningen is 20.
Geheugen kaart RP433 SDK Wireless wissen:
Om het geheugen van de RP433 SDKWireless te wissen moet de knop SW1 ingedrukt worden
gehouden. De led knippert eerst langzaam, dan snel en blijft tot slot branden, waarmee wordt
aangegeven dat het geheugen is gewist.
Laat de knop SW1 los. Reset en Setup kaart van opgeslagen
afstandsbediening:
Om de kaart te resetten moet de knop P kort worden ingedrukt.
Om de set-up van de kaart uit te voeren moet de knop P ingedrukt 10 seconden worden gehouden
tot de set-up start.
De uitgang OUT1 kaart automatische deur geconfigureerd GONG kan worden gebruikt de functie
veranderen melden.
DESCRIPTION OF THE LABELS
(SDK WIRELESS p/n 790849 & RP433 W p/n 787751)
A
B
C
D
E
F
H
G
FAAC spa
Made in xxxxx
Model: xxxxxx
Batch: xxxx FW: xxx
A - Manufacturer
B - Place of manufacture
C - Model identification code
D - Batch number identification
E - Notified Body reference
F - Operating instruction
G - Firmware version
H - Observe the current regolations for a correct disposal
TECHNICAL DATA
SDK WIRELESS p/n 790849
Frequency: 433.72MHz
Battery type: 1x CR2430 3V Lithium
Operating ambient temperature: from 0°C to 55°C
Application: Gate/Door opener
This product complies with Directive 99/05/EEC
RP433 W p/n 787751
Frequency: 433MHz Band
Operating Voltage: 3.3V
Operating Current: <15mA , 10mA typ.
Power: <50mW (typ. 33mW)
Operating ambient temperature: from 0°C to 55°C
Application: Automatic Opening System for gate/door
An external protective device (1 A max, 5 Vdc min) or an equivalent protection
means shall be provided in final installation
This product complies with Directive 99/05/EEC
The complete CE declarations can be downloaded from www.faacgroup.com
FAAC S.p.A.
Via Calari, 10 - 40069 Zola Predosa BOLOGNA - Italia
Tel. +39 051 61724 - Fax. +39 051 758518 www.faac.it ; www.faacgroup.com cod. 732718 Rev.B