manuals.online logo
Brands
  1. Home
  2. •
  3. Brands
  4. •
  5. Gefu
  6. •
  7. Kitchen Appliance
  8. •
  9. Gefu 13560 User manual

Gefu 13560 User manual

GEFU Küchenboss GmbH & Co. KG · Braukweg 28 · 59889 Eslohe
[email protected] · www.GEFU.com
Bedienungsanleitung
Instructions for use
Mode d´emploi
Instucciones de servicio
Istruzioni d´uso
Gebruiksaanwijzing
руководство по эксплуата
ции
Nur Schneiden oder
Just slices or the art of slicing?
Schnittkunst?
Reinigung
cleaning· nettoyage · pulitur ·tintorería · afspoelen
очищение
Nur unter ießend Wasser reinigen
VORSICHT SCHARFE KLINGEN!
Only clean under running water
CAUTION: SHARP BLADES!
Nettoyer sous l‘eau courante
ATTENTION, PIÈCES COUPANTES!
Pulire sotto l’acqua corrente
ATTENZIONE: LAME AFFILATE!
Lavar bajo el agua del grifo
¡OJO: MUY AFILADO!
Onder stromend water afspoelen
PAS OP: SCHERP!
Очистить в проточной воде
ОСТОРОЖНО, ОСТРАЯ
РЕЖУЩАЯ ПОВЕРХНОСТЬ!
· Zwengel (1) aanschroeven.
· Druk de zuignap (10) op een glad oppervlak en leg de handel (9) om,
om het apparaat te xeren.
· Zet de grendel (4) en de spiraal in uitgangspositie (2).
· Met de vleugelmoer (6) kann de gewenste snijdikte worden ingesteld.
PAS OP: SCHERP! Wanneer de appel alleen geboord en niet geschild
dient te worden, kan het mes d.m.v. de grendel vastgezet worden.
· Steek de appel op de drie zinken punten (5) (eerst de beschermkap
verwijderen) en draai aan de zwengel tot de appel volledig door de boor
gedraaid is (7).
· Draai aan de vleugelmoer (8) en verwijder het mes wanneer de appel
alleen geschild dient te worden.
Opmerking:
Appel met de bodem op de punten steken.
· Присоединить вращающуюся ручку (см. номер 1).
· Левой рукой прижать подставку (см. номер 10) к столешнице, а
правой повернуть рукоятку (см. номер 9) так, чтобы резиновое
основание плотно присосалось.
· Нажать на фиксатор (см. номер 4), чтобы привести спираль в
стартовую позицию (см. номер 2), и отпустить фиксатор
(см. номер 4).
· Повернуть крыльчатую гайку (см. номер 6), задав таким
образом толщину срезаемой кожуры. ОСТОРОЖНО, ОСТРАЯ
РЕЖУЩАЯ ПОВЕРХНОСТЬ! Если яблоко не очищается и у
него только удаляется сердцевина, то при помощи рукоятки нож
отводится назад.
· Поместить яблоко на трёхзубцовую вилку (см. номер 5) (сначала
удалить защитный колпачёк), затем вращать ручку до тех пор, пока
яблоко не пройдет через нож, вынимающий сердцевину
(см. номер 7).
· Ослабить крыльчатую гайку (см. номер 8) и убрать нож, если
необходимо только очистить яблоко.
Примечание:
Яблоко насаживать на трёхзубцовую вилку нижней частью.
NL
RU
13560_Apfelschaeler_Anleitung.indd 1 23.03.2012 08:04:11
Inbetriebnahme
Initial operation · mise en marche · messa in funzione
puesta en marcha · ingebruikname · Ввод в эксплуатацию
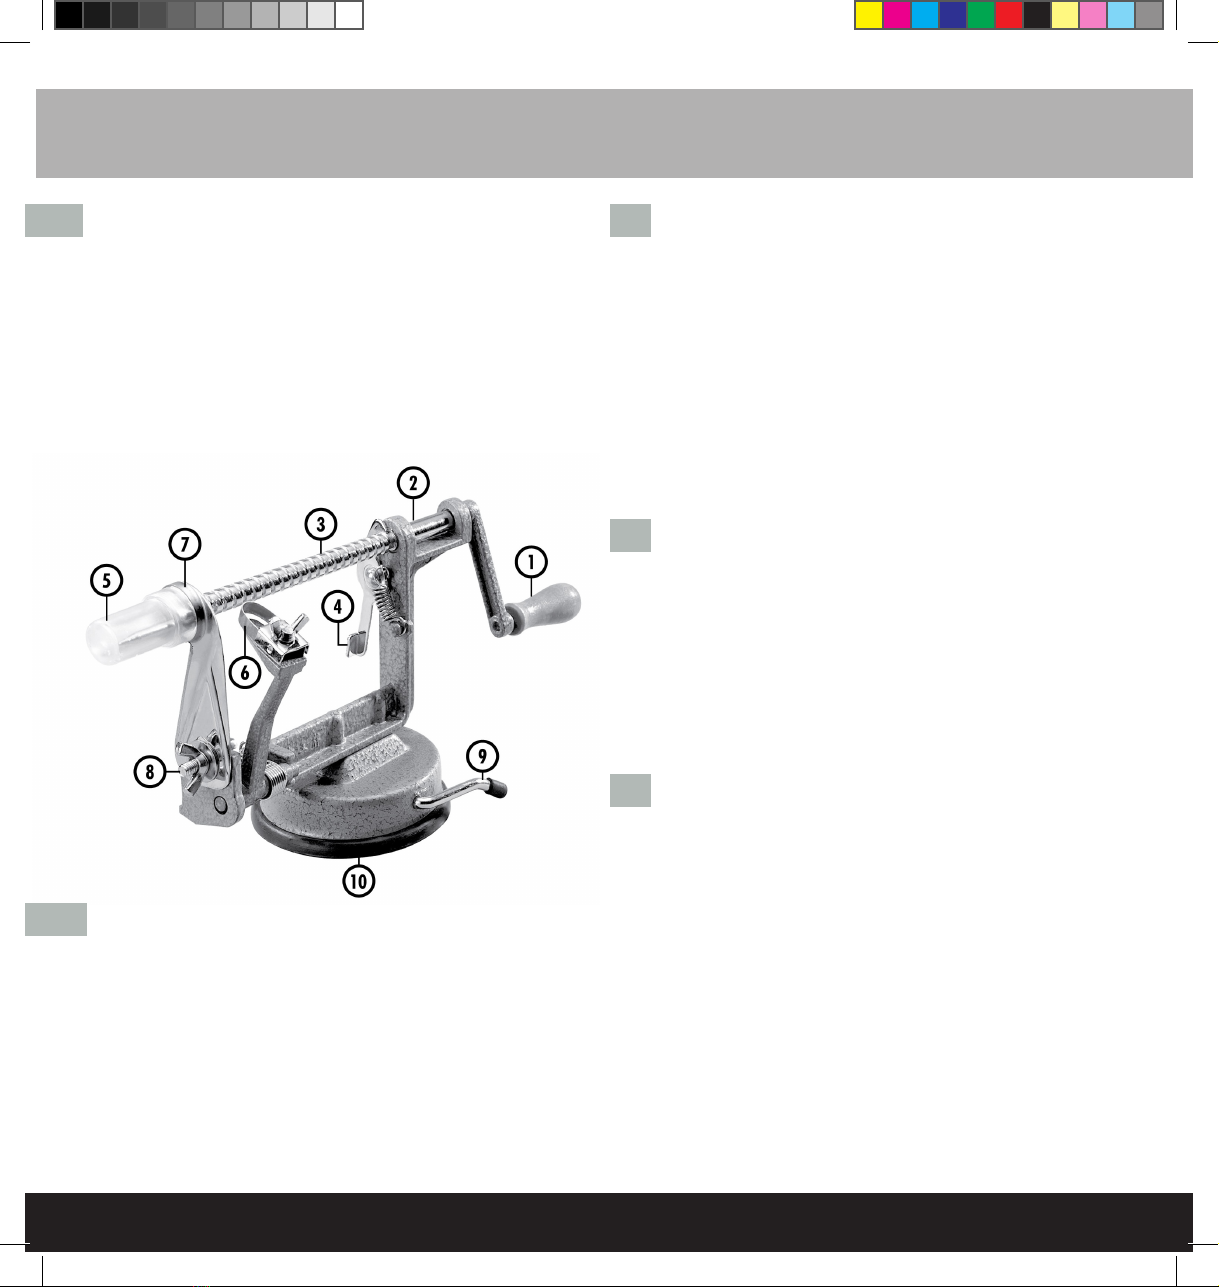
· Kurbel (1) anschrauben
· Den Saugfuß (10) auf eine glatte Arbeitsunterlage drücken (ggs. etwas
anfeuchten) und mit dem Hebel (9) für sicheres Arbeiten xieren
· Feststeller (4) drücken und die Spirale in Ausgangsstellung (2) ziehen,
den Feststeller lösen
· Durch Drehen der Flügelmutter (6) kann die gewünschte Schnittstärke
eingestellt werden. VORSICHT SCHARFE KLINGE!
Soll der Apfel nur entkernt und nicht geschält werden kann das Messer
mittels des Hebels zurückgestellt werden
· Apfel auf die drei Zinken (5) (Vorher Schutzkappe entfernen) stecken und
die Kurbel drehen, bis der Apfel den Ausstecher (7) passiert
· Flügelmutter (8) drehen und Messer entnehmen, wenn der
Apfel lediglich geschält werden soll
Anmerkung:
Apfel mit der Unterseite auf die Zinken stecken.
· Vissez la manivelle (no. 1)
· Appuyez le socle à ventouse (no. 10) sur une surface de travail lisse et
xez-le à l’aide du levier (no. 9) pour garantir un travail en toute sécurité.
· Appuyez sur l’arrêtoir (no. 4) et tirez la spirale sur la position de départ
(no. 2) ; débloquez l’arrêtoir.
· Vous pouvez déterminer la nesse d’épluchage en tournant l‘écrou à
papillon (no. 6). ATTENTION, PIÈCES COUPANTES ! Si vous souhaitez
uniquement évider la pomme, sans l’éplucher, mettre la lame hors
fonction, au moyen du levier.
· Embrochez la pomme sur les trois pointes (no. 5), dont vous aurez retiré
la protection. Tournez la manivelle jusqu‘à ce que la pomme passe par
l’évideur (no. 7).
· Tournez l’écrou à papillon (no. 8) et retirez la lame si vous souhaitez
uniquement éplucher la pomme.
Remarque :
Embrochez la partie inférieure de la pomme sur les pointes.
· Montare la manovella (1).
· Tenere premuta la ventosa (10) e ssarla ruotando la levetta (9),
per lavorare in sicurezza.
· Premere la barretta (4), tirare la spirale portandola in posizione iniziale (2),
quindi rilasciare la barretta (4).
· Ruotare il dado a farfalla (6) ATTENZIONE: LAME AFFILATE! per
regolare lo spessore di sbucciatura.
· Inserire la mela ssandola alla forcella a tre aghi (5) (prima rimuovere il
cappuccio di protezione), quindi ruotare la manovella portando la mela
alla lama affettatrice (7).
· Ruotare il dado a farfalla (8) e rimuovere la lama se si desidera solo
sbucciare la mela senza affettarla.
Nota: inserire la mela ssandone la base alla forcella a tre aghi.
· Montar la manivela (1).
· Apretar la base de ventosa (10) contra la supercie de trabajo y jarla
mediante la palanca (9), para garantizar un trabajo seguro.
· Apretar el jador (4) y tirar de la espiral para colocarla en su posición
inicial (2); después, soltar el jador.
· Girando la tuerca de mariposa (6), se puede ajustar el grosor de corte
deseado. ¡OJO: MUY AFILADO! Si sólo se desea descorazonar la
manzana sin pelarla, la cuchilla puede retraerse a través de la palanca.
· Colocar la manzana sobre los tres pinchos (5) (quitando primero el
capuchón protector) y girar la manivela hasta que la manzana pase por
el descorazonador (7). Gire la manivela (1) en la dirección contraria, para
sacar la manzana de los pinchos.
· Girar la tuerca de mariposa (8) y retirar la cuchilla, si sólo desea pelar
la manzana.
Nota:
Colocar la manzana por su parte inferior sobre los pinchos.
· Attach the crank (1)
· Press the suction base (10) on a working surface and fix the lever (9)
for safe use
· Press locking device (4) and pull the spring into the initial position (2),
loosen the locking device
· Adjust the desired cutting thickness by tightening or loosening the wing
nut (6). CAUTION: SHARP BLADE! If you wish to core the apple
without peeling you can pull back the peeling device with the handle
· Attach the apple to the three prongs (5) (first remove the protecting cap)
and turn the handle until the apple has completely passed through the
coring ring (7)
· Loosen the wing nut (8) and remove the knife if you wish to peel the apple
without slicing
Note:
Attach the apple with its bottem to the prongs.
D FR
IT
ES
GB
13560_Apfelschaeler_Anleitung.indd 2 23.03.2012 08:04:11

Other Gefu Kitchen Appliance manuals

Gefu GIVA 34619 User manual

Gefu

Gefu GIVA 34619 User manual

Gefu MOSCATA User manual

Gefu

Gefu MOSCATA User manual

Gefu TREPPO User manual

Gefu

Gefu TREPPO User manual

Gefu COOKIE User manual

Gefu

Gefu COOKIE User manual

Gefu CORER User manual

Gefu

Gefu CORER User manual

Gefu FINO User manual

Gefu

Gefu FINO User manual

Gefu SPEED WING 28150 User manual

Gefu

Gefu SPEED WING 28150 User manual

Gefu MARCELLO User manual

Gefu

Gefu MARCELLO User manual

Gefu 13110 User manual

Gefu

Gefu 13110 User manual

Gefu Pecorino User manual

Gefu

Gefu Pecorino User manual

Gefu 19080 User manual

Gefu

Gefu 19080 User manual

Gefu SPIRALFIX 13410 User manual

Gefu

Gefu SPIRALFIX 13410 User manual

Gefu LAOLA User manual

Gefu

Gefu LAOLA User manual

Gefu VOLARI User manual

Gefu

Gefu VOLARI User manual

Gefu DELICIO User manual

Gefu

Gefu DELICIO User manual

Gefu RULLARE User manual

Gefu

Gefu RULLARE User manual

Gefu STANDO User manual

Gefu

Gefu STANDO User manual

Gefu PARMIGIANO User manual

Gefu

Gefu PARMIGIANO User manual

Gefu TRICA 14700 User manual

Gefu

Gefu TRICA 14700 User manual

Popular Kitchen Appliance manuals by other brands

Clatronic PP 2914 instruction manual

Clatronic

Clatronic PP 2914 instruction manual

U-Line Wine Captain UHWC524 User guide & service manual

U-Line

U-Line Wine Captain UHWC524 User guide & service manual

LeCavist LKS140VX3Z user guide

LeCavist

LeCavist LKS140VX3Z user guide

Hamilton Beach Health Smart Sharps Bin Use & care guide

Hamilton Beach

Hamilton Beach Health Smart Sharps Bin Use & care guide

Vicko F01DV-YP2028H6.5L instruction manual

Vicko

Vicko F01DV-YP2028H6.5L instruction manual

Tupperware 101 Degrees MicroGourmet manual

Tupperware

Tupperware 101 Degrees MicroGourmet manual

Princess NICE PRICE SANDWICH MAKER Instructions for use

Princess

Princess NICE PRICE SANDWICH MAKER Instructions for use

Earlex SS200 instructions

Earlex

Earlex SS200 instructions

MWf lineo operating manual

MWf

MWf lineo operating manual

Asko ODV8127 Series Instructions for use

Asko

Asko ODV8127 Series Instructions for use

LeCavist LCCV12B instruction manual

LeCavist

LeCavist LCCV12B instruction manual

Beper P102SBA500 instruction manual

Beper

Beper P102SBA500 instruction manual

Presto PowerPop instructions

Presto

Presto PowerPop instructions

HURAKAN HKN-V300 manual

HURAKAN

HURAKAN HKN-V300 manual

Breville InFizz Fusion BCA800 Safety guide

Breville

Breville InFizz Fusion BCA800 Safety guide

Küppersbusch EEB 620.0 Instructions for use and installation instructions

Küppersbusch

Küppersbusch EEB 620.0 Instructions for use and installation instructions

Wells HTI-300AF Operation manual

Wells

Wells HTI-300AF Operation manual

Windmere SM300 Use and care book

Windmere

Windmere SM300 Use and care book

manuals.online logo
manuals.online logoBrands
  • About & Mission
  • Contact us
  • Privacy Policy
  • Terms and Conditions

Copyright 2025 Manuals.Online. All Rights Reserved.