manuals.online logo
Brands
  1. Home
  2. •
  3. Brands
  4. •
  5. Gefu
  6. •
  7. Kitchen Appliance
  8. •
  9. Gefu 19080 User manual

Gefu 19080 User manual

Bedienungsanleitung
User manual
Notice d’utilisation
Istruzioni d‘uso
Instrucciones de uso
Gebruiksaanwijzing
Инструкция по ползованию
Lust auf Kochen oder Backen?
Desire for cooking or baking?
· Leckere Rezepte · Delicious
Recipes · Délicieuses recettes
· Ricette golose · Ricas recetas
de cocina · Lekkere recepten
· Вкусные рецепты
GEFU – Entdecke Deine Kochkunst.
GEFU – Discover Culinary Artistry.
www.gefu.com
2
1. Kurbel / Crank / Manivelle / Manovella / Manivela / Kruk / ручка
2.Verschluss / Fastener / Fermeture / Chiusura / Cierre / Afsluiting / фиксация
3. Fuß / Base / Pied / Base / Pie de soporte /Voetstuk / основание корпуса
4.Tischklammer /Table clamp / Pince de table / Morsetto da tavolo / Prensa-tornillo / Tafelklem /
Помощью зажима
5.Trommelgehäuse / Drum casing / Corps de tambour / Alloggiamento dell‘inserto / Caja tambor /
Trommelbehuizing / корпус барабана
6. Pressstempel / Pusher / Poussoir/ Pressino / Empujador / Persstempel / пресс
7.Trommel / Grater drum / Tambour / Inserto / Cilindro rallador / Trommel / барабан
8. Schaber / spatula / Racloir / Raschietto / Rascador / Schraper / скребок
Trommelreibe
Rotary grater
Râpe à tambour
Grattugia a manovella
Rallador de tambor
Trommelrasp
Барабанная тёрка
1
2
3
4
5
6
7
8
Bedienungsanleitung / User manual / Notice d’utilisation / Istruzioni d‘uso /
Instrucciones de uso / Gebruiksaanwijzing / Инструкция по ползованию
Bitte lesen Sie vor derVerwendung des Produktes die Bedienungsanleitung vollständig und sorgfältig durch und beachten Sie diese. Bewahren Sie die Anleitung zum Nachschlagen auf und
geben Sie diese mit, wenn Sie das Produkt an einen anderen Benutzer weitergeben.
Before using the product, please read all the operating instructions carefully and observe them. Keep the instructions for reference and always give them with the product when passing it on
to another user.
Veuillez lire attentivement le manuel d’utilisation dans son intégralité et respectez les instructions avant d’utiliser le produit. Conservez cette notice pour vous y reporter ultérieurement et
joignez-là toujours au produit si vous le transférez à une autre personne.
Prima di utilizzare questo prodotto, leggere interamente e attentamente le istruzioni per l’uso, che dovranno essere rispettate durante l‘utilizzo. Conservare le istruzioni per consultarle anche in
seguito e consegnarle insieme al prodotto se si decide di cederlo ad altri utenti.
Por favor, lea atentamente las presentes instrucciones de uso antes de utilizar este producto, y observe las recomendaciones aquí contenidas. Conserve estas instrucciones para futuras consul-
tas. En caso de dar el producto a otro usuario, entréguele también estas instrucciones de uso.
Gelieve vóór het gebruik van het product de gebruiksaanwijzing volledig en zorgvuldig door te lezen en deze in acht te nemen. Bewaar de handleiding om deze later te raadplegen en geef
deze mee wanneer u het product aan een andere gebruiker doorgeeft.
Пожалуйста, прочтите перед использованием изделия данное руководство и особенно внимательно – указания по мерам безопасности и постарайтесь соблюдать их. Сохраните
инструкцию для дальнейшего использования, и, в случае передачи изделия другому пользователю, передайте его вместе с инструкцией.
3
DGB F I ES NL RU
ErgänzungsartikelTRANSFORMA® „Kronen-“ und„Bircherreibe“ für 19080Trommelreibe und 19030
TrommelreibenVorsatz
Supplementary grater drum setTRANSFORMA® crown and Bircher grater for 19080 grater drum and 19030
grater drum attachment
Set accessoire supplémentaire tambours de coupe
Râpe couronne et à bircherTRANSFORMA® pour râpe à tambour 19080 et râpes à tambour adaptateur 19030
Set di completamento inserto grattugia
Grattugia a coroncine e Bircher TRANSFORMA® per grattugia a manovella 19080 e accessorio grattugia a
manovella 19030
Kit complementario de cilindros ralladores
Cilindro dentellado y cilindro «Bircher»TRANSFORMA® para el rallador de tambor 19080 y el accesorio rallador de tambor 19030
Uitbreidingsset snijtrommels Kroon- en Bircher-raspTRANSFORMA® voor trommelrasp 19080 en trommelraspen voorzetstuk 19030
Дополнительный комплект режущих барабанов с отверстиями в форме корон и «березка»TRANSFORMA® для барабанной тёрки 19080 и насадок для
барабанных тёрок 19030
ErweiterungssetVorsatz „FleischwolfTRANSFORMA®“ –Vorsatz für den Standfuß der Trommelreibe
“TRANSFORMA® meat mincer”extension set to be attached to the base of the rotary grater
Set accessoire supplémentaire adaptateur « hachoirTRANSFORMA® »
Adaptateur pour le pied de la râpe à tambour
Set integrativo„tritacarne TRANSFORMA®“
Accessorio per il supporto della grattugia a manovella
Kit complementario de accesorio «picadora de carneTRANSFORMA®»
Accesorio para el pie de soporte del rallador de tambor
Uitbreidingsset voorzetstuk„Hakmachine TRANSFORMA®“
Voorzetstuk voor het voetstuk van de trommelrasp
Специальный комплект насадок «мясорубка TRANSFORMA®»
Насадки для основания барабанной терки
Art.-Nr.: 19080
Art.-Nr.: 19010
Art.-Nr.: 19020
Trommelreibe TRANSFORMA®. Inklusive 3 extra scharfen LASER CUT Trommeln: für feine Flocken, grobe
Raspeln oder dünne Scheiben
Rotary grater TRANSFORMA®. Complete with 3 extra sharp LASER CUT drums: for ne akes, coarse
chippings and thin slices
Râpe à tambour TRANSFORMA®. Avec 3 tambours LASER CUT ultra-tranchants : pour râpe ne, râpe
grosse ou nes tranches
Grattugia a manovella TRANSFORMA®. Con 3 inserti LASER CUT ultrataglienti: per occhi piccoli, scaglie
o rondelle sottili
Rallador de tambor TRANSFORMA®. Incluye 3 cilindros ralladores LASER CUT extra alados: para
ralladuras nas, gruesas o láminas delgadas
Trommelrasp TRANSFORMA®. Inclusief 3 extra
scherpe LASER CUT trommels: voor jne
vlokken, grote raspsels of dunne plakjes
Барабанная тёрка TRANSFORMA®.
Включительно 3 сменных режущих
барабана LASER CUT: для мелкой
тёрки, крупной тёрки и тонких
пластиков
4
1 2 3
Aufbau / Assembling / Montage / Montaggio / Montaje / Montage / Сборка
Trommelgehäuse aufstecken
Attach the drum casing
Enclencher le corps de tambour
Posizionare l‘alloggiamento dell‘inserto
Colocar la caja tambor
Trommelbehuizing opspelden
Собрать корпус барабана
Bajonettverschluss schließen
Tighten the fastener
Serrer la fermeture
Serrare bene la chiusura
Apretar el cierre
Afsluiting vasttrekken
Зафиксировать соединение
4 5
Kurbel aufsetzen und festschrauben
Attach and screw-fasten the crank
Monter et visser la manivelle
Posizionare e ssare la manovella
Insertar la manivela y apretar el tornillo
Kruk opzetten en vastschroeven
Насадить ручку и закрепить болтом
Die Reibe mittels Saugfuß (glatte Oberächen) ODER Tischklammer befestigen
Fasten the rotary grater by means of the suction foot (smooth surfaces) OR the table clamp
Fixer la râpe avec le pied ventouse (surfaces lisses) OU la pince de table
Fissare la grattugia mediante la ventosa (su superci piane) OPPURE con il morsetto da tavolo
Fijar el rallador mediante ventosa (supercies lisas), O BIEN, mediante prensa-tornillo
De rasp door middel van zuignap (gladde oppervlakken) OF tafelklem bevestigen
Установить терку с помощью вакуумной присоски (на гладких поверхностях) или прикрепить её с
помощью зажима к краю стола
Trommel einsetzen
Insert the drum
Introduire le tambour
Inserire l‘inserto
Introducir el cilindro rallador
Trommel aanbrengen
Вставить барабан
Bedienungsanleitung / User manual / Notice d’utilisation / Istruzioni d‘uso /
Instrucciones de uso / Gebruiksaanwijzing / Инструкция по ползованию
Achtung! Pressstempel benutzen. Wegen der scharfen Klingen nicht mit der Hand in das Gehäuse fassen. Caution! Use the pressing element. On
account of the sharp blades, do not put your hand into the casing. Attention ! Utilisez le piston. Les lames sont acérées, ne jamais mettre la main
dans le boîtier. Attenzione! Utilizzare il pressino. Le lame sono affilate, pertanto è necessario evitare di inserire le mani nel corpo dell’utensile.
¡Atención! Utilizar siempre el accesorio prensador. No introducir la mano en el cuerpo del aparato, ya que contiene cuchillas muy afiladas. Let
op! Persstempel gebruiken. Wegens de scherpe snijvlakken niet met de hand in de behuizing grijpen. Внимание! Пользуйтесь прессом. Не
производите никаких манипуляций в корпусе рукой, так как можно порезаться об острые лезвия.
5
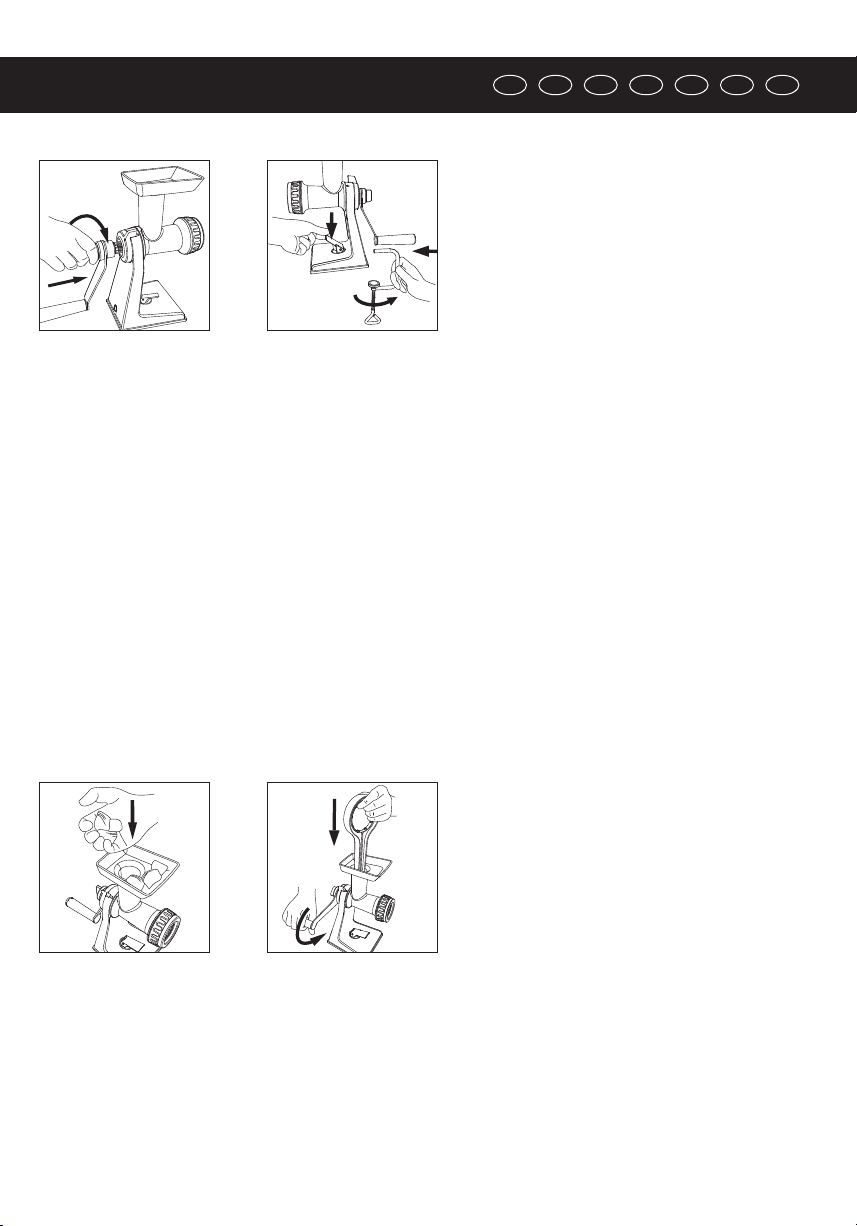
Trommel entnehmen / Removing the drum / Enlever le tambour / Rimuovere l‘inserto / Extracción del cilindro rallador
/ Trommel verwijderen / Снятие барабана и чистка
DGB F I ES NL RU
Trommel nach vorne rausnehmen
Pull the drum forward
Enlever le tambour en le tirant vers l’avant
Estrarre l‘inserto tirando in avanti
Extraer el cilindro rallador hacia adelante
Trommel langs voren uitnemen
Вынуть барабан в направлении вперёд
2
Kurbelfeststellschraube entgegen dem Uhrzeigersinn lösen
Loosen the crank fastening screw by turning counter-clockwise
Desserrer la vis de serrage de la manivelle dans le sens inverse
des aiguilles d’une montre
Svitare la vite di ssaggio della manovella in senso antiorario
Soltar el tornillo de jación de la manivela en el sentido
contrario de las agujas del reloj
Krukblokkeerschroef tegen de richting van de wijzers van de
klok in losdraaien
Ослабить крепёжный болт ручки против часовой стрелки
1
Funktion / Function / Fonction / Funzionamento / Funcionamiento / Functie / Функция
2 31
Unter leichtem Druck des Pressstempels die Kurbel im Uhrzeigersinn drehen
Press the pusher down lightly while turning the crank clockwise
En pressant légèrement le poussoir, tourner la manivelle dans le sens des aiguilles d’une montre
Girare la manovella in senso orario premendo delicatamente con il pressino
Apretando ligeramente el empujador, girar la manivela en el sentido de las agujas del reloj
Onder lichte druk van de persstempel de kruk in de richting van de wijzers van de klok draaien
Мягко надавливать прессом и одновременно вращать ручку по часовой стрелке
Trichter mit Schneidgut füllen
Place food to be grated in the funnel
Remplir l’entonnoir d’aliments à râper
Riempire l‘imbuto con il cibo da tritare
Llenar el embudo con los alimentos a rallar
Trechter met te snijden voedsel vullen
Положить продукт в воронку
Achtung! Die Trommeln müssen wegen
ihrer scharfen LASER CUT Klingen sicher
aufbewahrt werden! Caution! The
drums must be kept in a safe place be-
cause of their sharp LASER-CUT blades!
Attention ! Les tambours sont équipés
de lames acérées LASER CUT et doivent
être rangés dans un endroit sûr.
Attenzione! Gli inserti sono dotati
di lame LASER CUT particolarmente
affilate, pertanto devono essere riposti
in sicurezza!
¡Atención! ¡Debido a sus afiladas
cuchillas LASER CUT, los tambores deben
guardarse en un lugar seguro!
Let op! De trommels moeten wegens
hun scherpe LASER CUT snijvlakken
veilig opgeborgen worden!
Внимание! Из-за острых лезвий LASER
CUT барабаны необходимо надёжно
хранить!
Verwenden Sie den Schaber (8) zum optimalen Entleeren derTrommel (7).
The spatula (8) is ideal for emptying the grater drum (7).
Utilisez le racloir (8) pour vider parfaitement le tambour (7)
Utilizzare il raschietto (8) per svuotare il inserto (7) in maniera ottimale.
Utilice el rascador (8) para conseguir un óptimo vaciado del cilindro rallador (7).
Gebruik de schraper (8) voor een optimale lediging van het trommel (7).
Используйте скребок (8) для оптимального опорожнения барабан (7).
6
1. Kurbel / Crank / Manivelle / Manovella / Manivela / Kruk / ручка
2.Verschluss / Fastener / Fermeture / Chiusura / Cierre / Afsluiting / фиксация
3. Fuß / Base / Pied / Base / Pie de soporte /Voetstuk / основание корпуса
4.Tischklammer /Table clamp / Pince de table / Morsetto da tavolo / Prensa-tornillo /Tafelklem / Помощью зажима
5. Gehäuse / Casing / Corps / Alloggiamento / Caja / Behuizing / корпус
6. Stößer / Pusher / Pressoir / Pestello / Empujador / Stoter / толкатель
7. Schnecke / Conveyor screw /Vis sans n / Coclea /Tornillo sinfín / Wormschroef / винт
8. Messer / Knife / Couteau / Lama / Cuchilla / Mes / нож
9. Lochscheibe / Grinding plate / Disque perforé / Disco forato / Disco perforado / Matrijs / решётка
10. Schraubmutter / Lock nut / Ecrou de vissage / Ghiera /Tuerca / Schroefmoer / накидная гайка
1
2
3
4
5
6
7
8 9 10
Bedienungsanleitung / User manual / Notice d’utilisation / Istruzioni d‘uso /
Instrucciones de uso / Gebruiksaanwijzing / Инструкция по ползованию
Fleischwolf
Meat mincer
Hachoir à viande
Tritacarne
Picadora de carne
Hakmachine
Мясорубка
7
ErgänzungsartikelTRANSFORMA® „Kronen-“ und„Bircherreibe“ für 19080Trommelreibe und 19030
TrommelreibenVorsatz
Supplementary grater drum setTRANSFORMA® crown and Bircher grater for 19080 grater drum and 19030
grater drum attachment
Set accessoire supplémentaire tambours de coupe
Râpe couronne et à bircherTRANSFORMA® pour râpe à tambour 19080 et râpes à tambour adaptateur 19030
Set di completamento inserto grattugia
Grattugia a coroncine e Bircher TRANSFORMA® per grattugia a manovella 19080 e accessorio grattugia a
manovella 19030
Kit complementario de cilindros ralladores
Cilindro dentellado y cilindro «Bircher»TRANSFORMA® para el rallador de tambor 19080 y el accesorio rallador de tambor 19030
Uitbreidingsset snijtrommels Kroon- en Bircher-raspTRANSFORMA® voor trommelrasp 19080 en trommelraspen voorzetstuk 19030
Дополнительный комплект режущих барабанов с отверстиями в форме корон и «березка»TRANSFORMA® для барабанной тёрки 19080 и насадок для
барабанных тёрок 19030
Art.-Nr.: 19010
DGB F I ES NL RU
Art.-Nr.: 19090
FleischwolfTRANSFORMA®. Das Set beinhaltet den Fleischwolf mitWursttrichter, 2 Lochscheiben und
Spritzgebäckvorsatz
Meat mincerTRANSFORMA®.The set includes the meat mincer with sausage ller, 2 perforated discs
and spritz cookie attachment
Hachoir à viandeTRANSFORMA®. Le kit comprend le hachoir à viande avec l’entonnoir à saucisse,
2 disques perforés et l’embout spécial pâtisserie
Tritacarne TRANSFORMA®. Questo set comprende il tritacarne con l‘imbuto per insaccare, 2 dischi
forati e l‘inserto per biscotti
Picadora de carneTRANSFORMA®. El kit incluye la picadora de carne con embudo embutidor, 2 discos
perforados y accesorio portaboquillas pastelero
HakmachineTRANSFORMA®. Opzetstuk voor het voetstuk van de trommelrasp Art.-nr. 19080. De set
bevat de hakmachine met worsttrechter, 2 matrijzen en spritsvoorzetstuk
МясорубкаTRANSFORMA®. В комплект входят насадка для приготовления колбасок, 2 решётки
и насадка для приготовления фигурного печенья
ErweiterungssetVorsatz „Trommelreibe mit drei TrommelnTRANSFORMA®“ –Vorsatz für den Standfuß des Fleischwolfes
“TRANSFORMA® rotary grater with three drums”extension set to be attached to the base of the meat mincer
Set accessoire supplémentaire adaptateur « Râpe à tambour avec trois tambours «TRANSFORMA® »
Adaptateur pour le pied du hachoir
Set integrativo Inserto „Grattugia a manovella con tre inserti TRANSFORMA®“
Accessorio per il supporto del tritacarne
Kit complementario de accesorio «Rallador de tambor con tres cilindros ralladoresTRANSFORMA®»
Accesorio para el pie de soporte de la picadora de carne
Uitbreidingsset voorzetstuk „Trommelrasp met drie trommelsTRANSFORMA®“
Voorzetstuk voor het voetstuk van de hakmachine
Специальный комплект насадок «барабанная тёрка с тремя барабанами TRANSFORMA®»
Насадки для мясорубки
Art.-Nr.: 19030
8
Bedienungsanleitung / User manual / Notice d’utilisation / Istruzioni d‘uso /
Instrucciones de uso / Gebruiksaanwijzing / Инструкция по ползованию
Gehäuse aufstecken
Attach the casing
Enclencher le corps
Posizionare l‘alloggiamento
Colocar la caja
Behuizing opspelden
Собрать корпус
Bajonettverschluss schließen
Tighten the fastener
Serrer la fermeture
Serrare bene la chiusura
Apretar el cierre
Afsluiting vasttrekken
Зафиксировать соединение
Schnecke einsetzen
Insert the conveyor screw
Introduire la vis
Inserire la coclea
Introducir el tornillo sinfín
Wormschroef aanbrengen
Вставить винт
1 2
Messer einsetzen (Klinge zeigt zur Lochscheibe)
Insert the knife (edge facing the grinding plate)
Introduire le couteau (la lame est dirigé vers le
disque perforé)
Inserire la lama (deve essere rivolta verso il disco
forato)
Insertar la cuchilla (la hoja debe señalar hacia el
disco perforado)
Mes aanbrengen (lemmet wijst naar de matrijs)
Насадить нож (лезвием к решётке)
Lochscheibe einsetzen (vor erstem Gebrauch
Lochscheibe und Messer mit Speiseöl einfetten)
Insert the grinding plate (grease grinding plate
and knife with edible oil prior to rst use)
Placer le disque perforé (avant la première
utilisation, enduire le disque et le couteau d’huile
alimentaire)
Inserire il disco forato (prima del primo utilizzo,
lubricare il disco forato la lama con olio
alimentare)
Insertar el disco perforado (antes del primer uso,
engrasar el disco perforado y la cuchilla con aceite
comestible)
Matrijs aanbrengen (vóór eerste gebruik matrijs en
mes met slaolie insmeren)
Насадить решётку (перед первым
использованием решётку и нож смазать
растительным маслом)
4 5
3
Schraubmutter festdrehen
Tighten the lock nut
Serrer l’écrou de vissage
Serrare la ghiera
Apretar la tuerca
Schroefmoer vast aandraaien
Затянуть накидную гайку
6
Aufbau / Assembling / Montage / Montaggio / Montaje / Montage / Сборка
9
DGB F I ES NL RU
Kurbel aufsetzen und festschrauben
Attach and tighten the crank
Monter et visser la manivelle
Posizionare e ssare la manovella
Colocar la manivela y apretar el tornillo
Kruk opzetten en vastschroeven
Насадить ручку и закрепить болтом
Den Fleischwolf mittels Saugfuß (glatte
Oberächen) ODER Tischklammer befestigen
Fasten the meat mincer by means of the suction
foot (smooth surfaces) OR the table clamp
Fixer le hachoir avec le pied ventouse (surfaces
lisses) OU la pince de table
Fissare il tritacarne mediante la ventosa (su
superci piane) OPPURE con il morsetto da tavolo
Fijar la picadora de carne mediante ventosa
(supercies lisas), O BIEN, mediante prensa-tornillo
De hakmachine door middel van zuignap (gladde
oppervlakken) OF tafelklem bevestigen
Установить мясорубку с помощью вакуумной
присоски (на гладких поверхностях) или
прикрепить её с помощью зажима к краю стола
87
Fleisch inTrichter einfüllen
Place meat in the funnel
Remplir l’entonnoir de viande
Mettere la carne nell‘imbuto
Introducir la carne en el embudo
Vlees in de trechter doen
Положить мясо в воронку
Wenn nötig Stößer aufsetzen und Kurbel im Uhrzeigersinn drehen
Place the pusher on top and turn the crank clockwise
Placer le poussoir et tourner la manivelle dans le sens des aiguilles d’une montre
Posizionare il pestello e ruotare la manovella in senso orario
Colocar el empujador y girar la manivela en el sentido de las agujas del reloj
Stoter opzetten en kruk in de richting van de wijzers van de klok draaien
Придавливать мясо толкателем и поворачивать ручку по часовой стрелке
12
Zusammenbau Wolfen / Mincing meat / Assemblage Hacher / Assemblaggio del tritacarne / Montaje picadora /
Montage hakmachine / Рубка мяса
Achtung! Stößer benutzen. Wegen der scharfen Klingen nicht mit der Hand in
das Gehäuse fassen. Caution! Use the pusher. On account of the sharp blades,
do not put your hand into the casing. Attention ! Utilisez le pilon. Les lames
sont acérées, ne jamais mettre la main dans le boîtier. Attenzione! Utilizzare il
pestello. Le lame sono affilate, pertanto è necessario evitare di inserire le mani
nel corpo dell’utensile. ¡Atención! Utilizar siempre el empujador. No introducir
la mano en el cuerpo del aparato, ya que contiene cuchillas muy afiladas. Let
op! Stoter gebruiken. Wegens de scherpe snijvlakken niet met de hand in de
behuizing grijpen. Внимание! Используйте толкателем. Не производите
никаких манипуляций в корпусе рукой, так как можно порезаться об
острые лезвия.
10
Bedienungsanleitung / User manual / Notice d’utilisation / Istruzioni d‘uso /
Instrucciones de uso / Gebruiksaanwijzing / Инструкция по ползованию
Wurstfüllvorsatz in die Mutter einsetzen
Insert the sausage stuer into the nut
Placer l’adaptateur à farcir les saucisses dans l’écrou
Collocare l‘insaccatore nella ghiera
Insertar el accesorio embutidor en la tuerca
Voorzetstuk voor het vullen van worst in de moer
plaatsen
Вставить насадку для колбасы в накидную гайку
1
Schraubmutter festziehen (per Hand)
Tighten the lock nut (by hand)
Serrer l’écrou de vissage (à la main)
Serrare la ghiera (manualmente)
Apretar la tuerca (manualmente)
Schroefmoer vast aandraaien (met de hand)
Затянуть гайку (вручную)
Darm aufschieben.TIP: Auch zum Cannelloni befüllen
Slip intestine over the stuer. TIP: Also good for lling
cannelloni
Pousser le boyau CONSEIL : également pour farcir les
cannellonis
Inserire il budello CONSIGLIO: ideale anche per
riempire i cannelloni
Colocar la tripa. CONSEJO:También para rellenar
canelones.
Darm erop schuiven.TIP: ook voor het vullen met
cannelloni
Насадить кишку. СОВЕТ: подходит и для
фаршировки каннеллони
2 3
Prolschiene entfernen
Remove the proling bar
Enlever le rail prolé
Rimuovere il prolo guida
Retirar la barra perlada
Proelrail verwijderen
Убрать профильную направляющую
Gebäckvorsatz in Mutter einsetzen
Insert the cookie attachment into the lock nut
Placer l’adaptateur pour pâtisserie dans l’écrou
Inserire l‘inserto per biscotti nella ghiera
Introducir el accesorio pastelero en la tuerca
Gebakvoorzetstuk in moer plaatsen
Вставить насадку для печенье в накидную гайку
Schraubmutter festziehen (per Hand)
Tighten the lock nut (by hand)
Serrer l’écrou de vissage (à la main)
Serrare la ghiera (manualmente)
Apretar la tuerca (manualmente)
Schroefmoer vast aandraaien (met de hand)
Затянуть гайку (вручную)
12 3
Zusammenbau Gebäckvorsatz / Retooling cookie attachment / Assemblage Adaptateur pour pâtisserie / Assemblaggio
dell‘inserto per biscotti / Montaje accesorio pastelero / Montage gebakvoorzetstuk / Формование печенья
Zusammenbau Wurstfüllvorsatz / Retooling sausage stuer attachment / Assemblage Adaptateur à farcir les saucisses
/ Assemblaggio dell‘insaccatore / Montaje accesorio embutidor / Montage voorzetstuk voor het vullen van worst /
Сборка Фаршировка колбасы
Wichtig! Lochscheibe vor Aufsetzen der Mutter in das Gehäuse einsetzen! Important! Insert the perforated
disc into the casing before putting on the nut! Important ! Placez le disque perforé dans le boîtier avant de
mettre l’écrou ! Importante! Inserire il disco forato nel corpo dell’utensile prima di posizionare i dadi!
¡Importante! ¡Antes de colocar la tuerca, insertar el disco perforado en el cuerpo del aparato! Belangrijk!
Matrijs in de behuizing plaatsen vooraleer de moer op te zetten! Внимание! Решётку необходимо вставить
в корпус перед установкой гайки!
Achten Sie bei der Reinigung des Gebäckvorsatzes darauf, dass dieser zumTeil scharfe Kanten hat.Take care when cleaning the biscuit attachment because some of its
edges are sharp. L’embout pour pâtisserie présente en partie des angles vifs. Il est recommandé de faire attention pendant son nettoyage. Durante la pulizia dell’inserto
per biscotti, fare attenzione ai bordi in parte taglienti. Al limpiar el accesorio pastelero, proceda con cuidado, ya que presenta algunos bordes afilados. Let er bij de
reiniging van het gebakvoorzetstuk op dat dit deels scherpe kanten heeft. При чистке насадки для печенья будьте осторожны, так как она имеет острые края.
11
Kurbelfeststellschraube entgegen dem
Uhrzeigersinn lösen
Loosen the crank fastening screw by turning
counter-clockwise
Desserrer la vis de serrage de la manivelle en
tournant dans le sens inverse des aiguilles d’une
montre
Svitare la vite di ssaggio della manovella in senso
antiorario
Soltar el tornillo de jación de la manivela en el
sentido contrario de las agujas del reloj
Krukblokkeerschroef tegen de richting van de
wijzers van de klok in losdraaien
Открутить болт ручки против часовой стрелки
Schraubmutter mit Schlüssel entegegen dem
Uhrzeigersinn lösen
Loosen the lock nut by turning counter-clockwise
using the spanner
Desserrer l’écrou de vissage avec la clé en tournant
dans le sens inverse des aiguilles d’une montre
Sviare in senso antiorario la ghiera, utilizzando
l‘apposita chiave
Con ayuda de la llave, soltar la tuerca en el sentido
contrario de las agujas del reloj
Schroefmoer met sleutel tegen de richting van de
wijzers van de klok in losdraaien
Открутить накидную гайку против часовой
стрелки
Schnecke herausdrücken
Push out the conveyor screw
Retirer la vis en appuyant
Estrarre la coclea
Expulsar el tornillo sinfín
Wormschroef uitduwen
Вынуть винт
1 2 3
Abbau / Disassembly / Démontage / Smontaggio / Desmontaje / Demontage / Разборка и чистка
DGB F I ES NL RU
Prolschiene einschieben
Slide the proling bar back into place
Pousser le rail prolé
Inserire il prolo guida
Insertar la barra perlada
Proelrail inschuiven
Вставить профильную направляющую
Trichter mit Teig befüllen, Kurbel im Uhrzeigersinn
drehen, mit dem Stößer nachdrücken
Place dough in the funnel and turn the crank
clockwise. Use the pusher to get the dough down
Remplir l’entonnoir de pâte et tourner la manivelle dans le
sens des aiguilles d’une montre. Appuyer avec le poussoir.
Inserire l‘impasto nell‘imbuto e ruotare la manovella
in senso orario. Premere con il pestello.
Llenar el embudo con la masa y girar la manivela en el
sentido de las agujas del reloj. Apretar con el empujador.
Trechter met deeg vullen en kruk in de richting van
de wijzers van de klok draaien. Met de stoter achteraf
aandrukken.
Положить тесто в воронку и поворачивать
рукоятку по часовой стрелке, помогая толкателем.
Teig mit Messer auf gewünschte Länge
abschneiden
Use a knife to cut the dough to cookies of the
desired length
Couper la pâte avec un couteau à la longueur
désirée
Tagliare l‘impasto alla lunghezza desiderata
utilizzando la lama
Cortar la masa con el cuchillo a la medida deseada
Deeg met mes op gewenste lengte afsnijden
Отделять ножом отрезки теста нужной длины
4 5 6
12
Rezepte für Trommelreibe / Recipes for rotary grater
13
Zubereitung:
Zubereitungszeit ca. 40 Minuten
Möhren und Kartoeln schälen und in Stücke schneiden. Blattspinat putzen und fein hacken. Die
Trommelreibe TRANSFORMA® mit der mittleren Trommelreibe aufbauen, Kartoeln und Möhren
raspeln und gut ausdrücken. Die Masse mit dem Spinat, Eiern, Maisstärke, -grieß und Sonnenblu-
menkernen vermengen. Alles mit Salz, Pfeer und Muskat abschmecken. In einer Pfanne jeweils
etwas Öl erhitzen, esslöelweiseTeig hineingeben und etwas ach drücken. Die Puer je Seite in 3
Minuten bei mittlerer Hitze goldbraun braten.
Zucchini in Stücke schneiden, in der Trommelreibe TRANSFORMA® raspeln, in ein Sieb geben und gut
ausdrücken. Quark mit Salz und Pfeer würzen, die Knoblauchzehe dazupressen und die Zucchini
unterheben. Die Puer mit dem Zucchini-Quark-Dipp servieren.
Tipp: Fertige Puer können sie bei 80 °C im Backofen warmhalten, bis sie alle fertig gebraten haben
Preparation:
Preparation time: approx. 40 minutes
Peel the carrots and potatoes and cut them to pieces. Rinse and nely chop the spinach leaves. Mount
theTRANSFORMA® rotary grater with the medium drum, grate the potatoes and carrots and press
them well to remove the liquid. Mix the chippings with the spinach, eggs, cornour, polenta our and
sunower seeds. Season to taste with salt, pepper and nutmeg. Heat small portions of oil in a pan,
add spoonfuls of dough and atten them slightly. Fry the fritters over moderate heat for about
3 minutes either side until golden brown.
Cut the courgette into pieces and grate it in theTRANSFORMA® rotary grater, put the gratings in a
sieve and press them out well. Season the quark with salt and pepper, add the crushed garlic and fold
in the grated courgettes. Serve the fritters with the courgette-and-quark dip.
Tip: If you wish to keep the nished fritters warm while you fry the rest, place them in the oven at
80°C / 175°F.
Zutaten für 4 Portionen:
400 g Möhren
400 g Kartoffeln
200 g Blattspinat
2 Eier
1 EL Maisstärke
2 EL Maisgrieß
50 g Sonnenblumenkerne
frisch gemahlener Muskat
Öl zum Braten
1 Zucchini ca. 200 g
1 Knoblauchzehe
250 g Quark
Salz, Pfeffer
To serve 4:
400 g / 14 oz. carrots
400 g / 14 oz. potatoes
200 g / 7 oz. leaf spinach
2 eggs
1 tbsp. cornflour
2 tbsp. polenta flour
50 g / 1 ¾ oz. sunflower seeds
salt, pepper, freshly grated nutmeg
oil for frying
1 courgette of approx. 200 g / 7 oz.
1 clove of garlic
250 g / 9 oz. quark
salt, pepper
Karotten-Spinat-Puer mit Zucchini-Quark-Dipp
Carrot-and-spinach fritters with courgette-and-quark dip
D
GB
14
Zubereitung:
Zubereitungszeit ca. 40 Minuten
Die Trommelreibe TRANSFORMA® mit der groben Trommelreibe aufbauen. Kohlrabi, Karotten
und Brokkolistiele schälen und in Stücke schneiden. Alles samt Brokkolirösschen grob raspeln. Das
Gemüse in reichlich Salzwasser ca. 2 Minuten blanchieren, gut abtropfen lassen. Den TRANSFORMA®
auf die feineTrommelreibe umbauen. Parmesan undWalnüsse fein reiben und mit dem Gemüse
vermengen. Den Backofen auf 200 °C vorheizen.
Ein Strudelteigblatt auf einTuch legen und mit üssiger Butter bepinseln. Ein Viertel der Füllung
darauf verteilen, die Seiten einschlagen und die Strudel mithilfe desTuchs einrollen. Mit den
restlichen Strudelblättern genauso verfahren. Auf ein Backblech legen, mit Butter einstreichen und
in ca. 20 Minuten goldbraun backen. Rosmarin abnadeln und fein hacken, Zwiebeln und Knoblauch
schälen und fein würfeln.
Öl in einer Pfanne erhitzen Champignons darin anbraten, Rosmarin, Zwiebeln und Knoblauch
zugeben, etwas mitbraten. Mit Brühe ablöschen. Frischkäse zugeben, etwas einkochen lassen.
Inzwischen das Mehl mit der Butter verkneten. Die Sauce mit dem Aceto Balsamico, Salz und Pfeer
abschmecken und diese mit der Mehlbutter andicken. Kurz aufkochen lassen und zum Gemüsestrudel
servieren.
Tipp: Strudelteig selber machen.
150 g Mehl, 1 Ei, 1 Esslöel Öl und 1 EsslöelWasser zu einem glatten Teig verkneten, ca. 30 Minuten
kaltstellen.Teig dünn ausrollen, ausziehen, Füllung darauf verteilen. Seiten einschlagen, zu einem
Strudel aufrollen und mit Butter bestreichen. Der Strudel ist auch sehr lecker als Beilage zu Schnitzel
oder Kotelett.
Preparation:
Preparation time: approx. 40 minutes
Mount theTRANSFORMA® rotary grater with the coarse drum. Cut the peeled kohlrabi, carrots
and broccoli stems to pieces and grate them coarsely together with the broccoli orets. Blanch the
vegetables for approx. 2 minutes in a generous amount of salted water and strain well. Retool the
TRANSFORMA® with the ne grater drum, grate the Parmesan and the walnuts and mix both with
the vegetables. Preheat the oven to 200°C / 390°F.
Place a sheet of strudel dough on a cloth and brush molten butter over it. Spread one quarter of the
lling on it, fold the sides in and roll the strudel up with the help of the cloth. Proceed in the same
way with the other sheets. Place the strudels on a baking tray, brush butter on them and bake for
approx. 20 minutes until golden brown. Strip the rosemary leaves from the stems and chop them
nely, peel and nely dice the onion and garlic.
Heat oil in a pan, add the button mushrooms and give them a short fry, then add rosemary, onion
and garlic and keep frying for a short time. Add stock and then the cream cheese and allow the liquid
to reduce. In the meantime knead the our and butter together. Season the sauce to taste with
balsamic vinegar, salt and pepper, and thicken it with the our and butter. Bring it to the boil and
serve it with the vegetable strudel.
Tip: How to make your own strudel dough.
Make a smooth dough using 150 g / 5 ¼ oz. our, 1 egg, 1 tbsp. oil and 1 tbsp. water and leave it in
a cold place for approx. 30 minutes. Roll the dough out thin, stretch it and spread it with the lling.
Fold in the sides, roll it up to form a strudel, and brush butter on it.The strudel is also a very delicious
side dish for a schnitzel or cutlet.
Zutaten für 4 Portionen:
300 g Kohlrabi
300 g Karotten
300 g Brokkoli
100 g Parmesan
50 gWalnüsse
4 Strudelteigblätter aus der Kühltheke
Flüssige Butter zum Bestreichen
2 Zwiebeln
1 Knoblauchzehe
2 Zweige Rosmarin
500 g feste Champignons
300 ml Brühe
200 g Frischkäse
1 EL Aceto Balsamico
Salz und Pfeffer
1TL Butter
1TL Mehl
To serve 4:
300 g / 10 ½ oz. kohlrabi
300 g / 10 ½ oz. carrots
300 g / 10 ½ broccoli
100 g / 3 ½ oz. Parmesan
50 g / 1 ¾ oz. walnuts
4 sheets of deep-frozen strudel dough
molten butter to brush on
2 onions
1 clove of garlic
2 sprigs of rosemary
500 g / 1.1 lb. firm button mushrooms
300 ml / 10 ½ fl. oz. stock
200 g / 7 oz. cream cheese
1 tbsp. balsamic vinegar
salt and pepper
1 tsp. butter
1 tsp. flour
Gemüsestrudel mit Champignonsauce
Vegetable strudel with button mushroom sauce
D
GB
15
16
Rezepte für Fleischwolf / Recipes for meat mincer
17
Zubereitung:
Ergibt ca. 20Würstchen
Pasta nach Packungsanleitung al Dente kochen. GetrockneteTomaten in Streifen
schneiden, Kirschtomaten vierteln. Pasta abgießen, noch warm mit allen Zutaten
vermengen, kräftig mit Salz und Pfeer abschmecken und mindestens 2 Stunden
durchziehen lassen. Den Darm in Salzwasser einweichen.
Fenchelsamen, Pfeer, Piment,Wacholder und Chili in einer Pfanne anrösten, in einem
Mörser fein zerstoßen. Knoblauch abziehen. Wildschweineisch und Lardo in ca. 2 cm
Würfel schneiden, alle Gewürze und Knoblauch zugeben und gut vermengen. Die
Masse für 30 Minuten in den Gefrierschrank geben. Inzwischen die Fenchelknolle fein
würfeln. Den Fleischwolf TRANSFORMA® mit der großen Lochscheibe zusammenbauen
und Fleisch, Speck und Knoblauch einmal durchwolfen, die Hälfte der Masse ein
Zweites mal wolfen. Die Fenchelwürfel zur Masse geben und alles mit den Händen
gut vermengen. Eine Bratprobe machen und eventuell nachwürzen. Den Darm gut
durchspülen.
TRANSFORMA® zumWurst füllen umbauen. Ein etwa zwei Meter langes Stück
Naturdarm aufziehen und die Fleischmasse langsam durch dieWursttülle in den Darm
drücken und aufhören, wenn dieWursthülle gefüllt ist. Darm am Ende der Wursthülle
zuknoten.Würste je nach gewünschter Länge abdrehen, dabei die Drehrichtung nach
jederWurst ändern. Luftblasen, mit einer Nadel einstechen. Wiederholen, bis alle Masse
aufgebraucht ist. DieWürste auf dem Grill oder in der Pfanne braten, den Salat noch
mal mit Salz und Pfeer abschmecken und beides servieren.
Salat für 4 Portionen:
250 g Pasta (z.B. Penne Orchiette oder Conchiglie Rigate)
100 g getrockneteTomaten in Öl abgetropft
100 g Olivenscheiben
6 EL Pesto
3 ELWeißer Balsamessig
500 g Kirschtomaten
3 EL Fenchelsamen
1 EL schwarzer Pfeffer
1TL Pimentkörner
1TLWacholderbeeren
3 getrocknete Chilischoten
4 Knoblauchzehen
2 EL Majoran gerebelt
1 EL Salz
1 kgWildschweinnacken ohne Sehnen
400 g Lardo (marinierter Italienischer Speck)
Schweinedarm für Bratwürste (beim Metzger vorbestellen)
Salsiccia mit mediterranem Pastasalat D
Preparation:
For approx. 20 sausages
Cook the pasta al dente as described on the packing. Cut dried tomatoes into strips
and cherry tomatoes into quarters. Drain the pasta, mix with all ingredients while hot,
season generously with salt and pepper and allow to marinate for at least 2 hours.
Soak casing in salted water.
Roast the fennel seeds, pepper, allspice, juniper berries and chili in a pan and then
nely crush them with a pestle and mortar. Peel the garlic. Cut the boar meat and
lardo into cubes of approx. 2 cm, add all the spices and the garlic and mix well. Put
the mixture into the freezer for 30 minutes. In the meantime nely dice the fennel
bulb. Mount theTRANSFORMA® meat mincer with the coarse grinding plate, let the
meat, lardo and garlic through and repeat this with one half of the mixture. Now add
the diced fennel bulb and mix well with your hands. Fry a small sample and add more
seasoning if required. Rinse the casing thoroughly.
Retool theTRANSFORMA® with the sausage stuer. Slip about 2 metres of natural
casing onto the stuer and knot it up at the end. Press the meat mixture through the
stuer into the casing slowly and stop when it is full.Twist the casing to separate
sausages of the desired length, changing the direction of twisting after each sausage.
Poke a needle into any bubbles to remove air. Repeat the procedure until all the meat
is used up. Grill or pan-fry the sausages, season the salad to taste with salt and pepper
once more and serve with the sausages.
Salad serves 4:
250 g / 9 oz. pasta (e.g. penne orchiette or conchiglie rigate)
100 g / 3 ½ oz. dried tomatoes in oil, drained
100 g / 3 ½ oz. sliced olives
6 tbsp. pesto
3 tbsp. white balsamic vinegar
500 g / 1.1 lb. cherry tomatoes
3 tbsp. fennel seeds
1 tbsp. black pepper
1 tsp. allspice
1 tsp. juniper berries
3 dried chilli peppers
1 fennel bulb
4 cloves garlic
2 tbsp. crushed marjoram
1 tbsp. salt
1 kg / 2.2 lb. blade steak of boar without sinews
400 g / 14 oz. lardo (marinated Italian bacon)
pork sausage casings for frying (order from the butcher)
Salsiccia with Mediterranean pasta salad GB
18
Zubereitung:
Zubereitungszeit ca 40 Minuten
Orangen heiß abspülen, abtrocknen und die Schale abreiben. Butter, Zucker, Safran, Orangenschale
und Eier schaumig rühren. Backpulver und Mehl mischen, nach und nach zufügen und zu einem
festenTeig verkneten.Teig in Folie wickeln und mindestens 2 Stunden im Kühlschrank ruhen lassen.
Den Backofen auf 180 °C vorheizen. Den FleischwolfTRANSFORMA® mit dem Spritzgebäckvorsatz
aufbauen undTeig portionsweise durch das gewünschte Plätzchenformat drehen. In die passende
Länge schneiden und auf ein mit Backpapier ausgelegtes Backblech legen. Im Backofen hell
ausbacken. Die acheren Formate benötigen ca. 10 Minuten und die runderen Formate wie Kreis oder
Sternform benötigen ca. 12 Minuten Backzeit.
Verschiedene Variationen: Durch die Sternform gespritztenTeig zu Kreisen legen, ein Stück
Sahne-Toee in die Mitte geben und mitbacken. Durch die Lochform gespritztenTeig zu Spiralen
legen. 2Teile Kuvertüre mit einem Teil Butter vorsichtig schmelzen, die Plätzchen zumTeil eintauchen
und fest werden lassen. Flache Plätzchenformate in 1-2 cm lange Stücke schneiden und backen.
Johannisbeergelatine aufkochen, 5 Minuten köcheln und kurz etwas abkühlen lassen. Die Unterseite
der Hälfte der Plätzchen bestreichen und mit den restlichen Plätzchen abdecken. Etwas fest werden
lassen.
Tipp: Sie können auch 200 g Mehl gegen gemahlene Nüsse oder Mandeln austauschen und statt
Orangenschale Zimt oderVanillemark verwenden.
Zutaten:
Je nach Größe 30-50 Plätzchen
250 g Butter
200 g Zucker
0,1 g Safran
2 Bio Orangen
2 Eier (Größe M)
2 gestricheneTL Backpulver
500 g Mehl
Orangen-Safran-Spritzgebäck D
Preparation:
Preparation time: approx. 40 minutes
Rinse the oranges under hot water and zest.Whisk the butter, sugar, saron, orange zest and eggs
until foamy. Mix the our with the baking powder, add to the batter in small amounts and knead into
a rm dough.Wrap the dough in foil and leave it to rest in the fridge for at least 2 hours.
Pre-heat the oven to 180°C / 350 °F. Mount theTRANSFORMA® meat mincer with the spritz cookie
attachment and work the dough portion by portion through the chosen cookie nozzle. Cut to
appropriate lengths and place the cookies on a baking tray lined with baking paper. Bake in the oven
to a light golden colour. Flatter proles require about 10 minutes and the more rounded proles, such
as the circle or star shape, require about 12 minutes to bake.
Variations: Arrange the dough pressed to the star-shaped nozzle in circles, place a cream toee
in the centre and bake together. Form spirals from the dough pressed through the circular hole.
Cautiously melt 2 parts of chocolate coating and 1 part of butter, dip the baked cookies halfway into
the coating and allow it to set. Cut at cookies into 1-2 cm / ½ - ¾ inch long pieces and bake them.
Bring currant jelly to the boil, simmer for 5 minutes and allow to cool down slightly. Spread jelly on
the underside of half of the cookies and place the other half on top. Allow to set.
Tip: You may replace 200 g / 7 oz. of the our with ground nuts or almonds and use cinnamon or
vanilla seeds instead of the orange zest.
Ingredients:
30-50 cookies depending on size
250 g / 9 oz. butter
200 g / 7 oz. sugar
0.1 g / 1 ½ grains saffron
2 organic oranges
2 eggs (medium size)
2 level tsp. baking powder
500 g / 1.1 lb. flour
Orange-and-saron spritz cookies GB
19

This manual suits for next models

4

Other Gefu Kitchen Appliance manuals

Gefu CORER User manual

Gefu

Gefu CORER User manual

Gefu Pecorino User manual

Gefu

Gefu Pecorino User manual

Gefu GIVA 34619 User manual

Gefu

Gefu GIVA 34619 User manual

Gefu TREPPO User manual

Gefu

Gefu TREPPO User manual

Gefu SPEED WING 28150 User manual

Gefu

Gefu SPEED WING 28150 User manual

Gefu VOLARI User manual

Gefu

Gefu VOLARI User manual

Gefu COOKIE User manual

Gefu

Gefu COOKIE User manual

Gefu RULLARE User manual

Gefu

Gefu RULLARE User manual

Gefu FINO User manual

Gefu

Gefu FINO User manual

Gefu PARMIGIANO User manual

Gefu

Gefu PARMIGIANO User manual

Gefu 13560 User manual

Gefu

Gefu 13560 User manual

Gefu STANDO User manual

Gefu

Gefu STANDO User manual

Gefu TRICA 14700 User manual

Gefu

Gefu TRICA 14700 User manual

Gefu DELICIO User manual

Gefu

Gefu DELICIO User manual

Gefu MOSCATA User manual

Gefu

Gefu MOSCATA User manual

Gefu MARCELLO User manual

Gefu

Gefu MARCELLO User manual

Gefu 13110 User manual

Gefu

Gefu 13110 User manual

Gefu SPIRALFIX 13410 User manual

Gefu

Gefu SPIRALFIX 13410 User manual

Gefu LAOLA User manual

Gefu

Gefu LAOLA User manual

Popular Kitchen Appliance manuals by other brands

UFESA Delish SW7870 instruction manual

UFESA

UFESA Delish SW7870 instruction manual

Kisag WHIPPER CLASSIC Instructions for use

Kisag

Kisag WHIPPER CLASSIC Instructions for use

Vorwerk Thermomix BLADE COVER user manual

Vorwerk

Vorwerk Thermomix BLADE COVER user manual

Avanti Wine Cooler EWC1600M parts list

Avanti

Avanti Wine Cooler EWC1600M parts list

VacPak-It VMC20F manual

VacPak-It

VacPak-It VMC20F manual

Swann SF13030N user guide

Swann

Swann SF13030N user guide

Hendi 201633 user manual

Hendi

Hendi 201633 user manual

U-Line S-22131 quick start guide

U-Line

U-Line S-22131 quick start guide

Fissler vitaquick instruction manual

Fissler

Fissler vitaquick instruction manual

Comfee MonsterChef Series instruction manual

Comfee

Comfee MonsterChef Series instruction manual

Waring Xtreme MX1300XT/PS manual

Waring

Waring Xtreme MX1300XT/PS manual

Weston 01-0101 manual

Weston

Weston 01-0101 manual

NutriChief PKPC45 user manual

NutriChief

NutriChief PKPC45 user manual

AEG 49332I-MN user manual

AEG

AEG 49332I-MN user manual

Summit Classic Collection CLFD243WBV instruction manual

Summit Classic Collection

Summit Classic Collection CLFD243WBV instruction manual

Scarlett SC-PM229D98 instruction manual

Scarlett

Scarlett SC-PM229D98 instruction manual

Philips HR7976 user manual

Philips

Philips HR7976 user manual

Danby DWC016KA1BDB owner's manual

Danby

Danby DWC016KA1BDB owner's manual

manuals.online logo
manuals.online logoBrands
  • About & Mission
  • Contact us
  • Privacy Policy
  • Terms and Conditions

Copyright 2025 Manuals.Online. All Rights Reserved.