manuals.online logo
Brands
  1. Home
  2. •
  3. Brands
  4. •
  5. Grandview
  6. •
  7. Projection Screen
  8. •
  9. Grandview Large Stage MAIII User manual

Grandview Large Stage MAIII User manual

Model:LS-MAFIIIxxx (xGxx)
Reminders
GRANDVIEW CRYSTAL SCREEN CO.,LTD.
Large Stage MAIII Installation Manual
Thank you for purchasing Grandview products. Please read the instructions carefully
before installation and use, and collect it after reading for future use;
This product must be installed by qualified professionals who evaluate the feasibility of
the environment, electricity, structure, etc;
Do not disassemble or replace the original spare parts at will: If there is any fault,
please contact the after-sales service department.
A: No.43 S, Guomao Ave.Hualong,Panyu,Guangzhou,Guangdong,P.R.C
T: 020-84899499
Screen structure
Left hanging plate
screen center
fabric center
Middle Hanging
Right Hanging plate
Casing
Fabric
lower bar unit:mm
Accessories
Shackle(3) Warranty Card (1) Instruction manual (1)
Motor adjustment tool (1)
Concrete ceiling
suspension distance
Hook
Reserved on the left
>1000mm
Installation method and attention
Optional accessories
Screw fixed hanging
plate M8*30
Screw bolt Non-slip nut M8
Screen hidden installation location
Casing side view
205
102.5
16
38
260
222
≥80
≥80
≥200
Weight
bearing
Weight
bearing
Anti-
falling
≤200 ≤200
Screw fixed hanging plate M10screw rod
205
106
10
50
50
Note: Due to structural reasons, the position of the screen is not the center of the screen,
but is offset to the right by about 81mm. This should be taken into account when
determining the location of the mounting hole; in addition, it is recommended to keep a
distance of 1 meter from the side of the screen power cord for future maintenance.
Suspension Installation(standard configuration):
Measure the horizontal spacing of the hanging boards and the length of the product to
determine the installation position of the screen. Install a stable hook on a solid concrete
ceiling. It is recommended that the hook type be adjustable. (When the screen length is ≥
6m, 3 hangers are standard)
Hook the hooks on the shackles of the left, middle and right hanging plates respectively,
adjust the length of the hooks to the screen level, and complete the lifting;
(Note: the left and right hanging boards are the main stress points ,try to stay aside, and
the middle hanging boards are the secondary stress points)
Screw rod fixed hoisting (optional):
If the customer requires, you can purchase screw fixing hangers and accessories to fix the
screen; method: use M8 bolts and nuts to connect the screw fixing hangers to the outside
of the left and right hangers
Screw mounting: measure the distance between the four oblong holes on the left and
right hanging plates respectively, install M10 screw rods directly above the corresponding
holes to connect the left and right hanging plates, install an adjustable hook on the
middle of the screen to connect the middle hanging plate, and adjust the screws The
position of the screen to make the screen to a horizontal state, complete the installation
of the screen.
cycle key
cycle key function
power cable
Down
Up
Stop
Stop
8 7 6 5 4 3 2 1
Connection
port line
number
Features RS485-B
RS232-GND
RS485-A
RS232-TXD
1 234
UpStop
5
Down
678
Public line
Screen control function description
Intelligent electric screen has 4 control methods:
A. Manual control (cycle button)
B. Wireless control
C. Dry contact control
D. RS485 or RS232 control
Manual cycle key control
The manual cycle button is at the left end of the
screen shell (near the interface), and the function
is to cycle through up, stop and down.
Dry contact, RS485 or RS232 control:
Crystal head interface definition diagram:
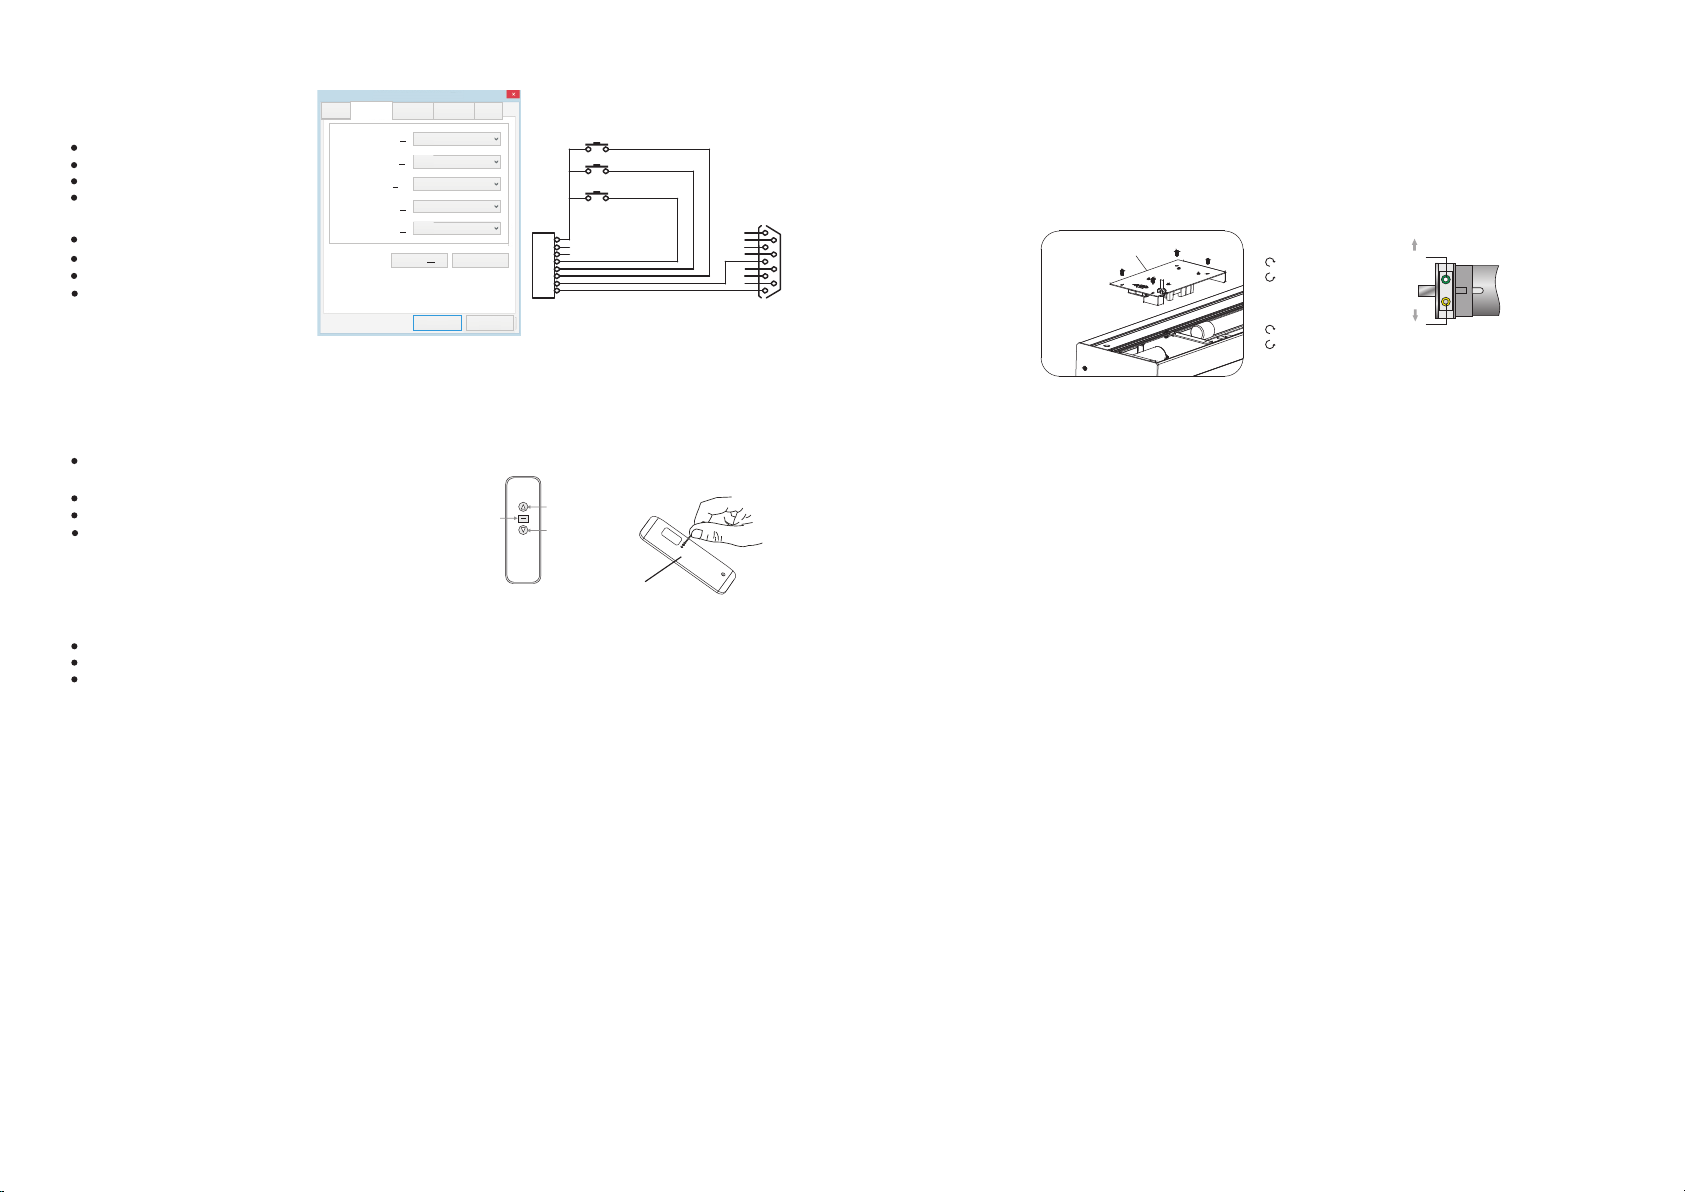
RS485/RS232 Port settings:
note:
Wireless control:
pay attention:
When connecting to RS232 or RS485, if there is any motion that cannot be controlled by the screen,
please adjust the two control lines.;
Wiring loop resistance is less than 20Ω;
Do not run in parallel with strong interference sources;
232 port setting: 2400, n, 8, 1 A data string should be
sent twice consecutively.
Code pairing / deleting (factory pairing is successful):
Long press the cycle button for 3 seconds, the screen is jogged once to enter the code-matching
state; within 10 seconds, the remote control up and stop buttons are also pressed, and the screen is
jogged again to complete the code-matching; the code deletion is the same as the code-matching
operation, odd times The operation is code pairing; even code deletion.
Intelligent electronic stroke positioning (this product can set the up and down stroke of the fabric
through the remote control)
Operation method:
Upward stroke setting: Positioning setting key (light on) → Up key → Up and down remote control
to the desired position → Stop → Positioning setting key (light off) → Upward travel record success
Downstroke setting: Positioning setting key (light on) → Down arrow key → Remote control up and
down to the desired position → Stop → Positioning setting key (light off) → Downstroke recorded
successfully
If it is really necessary to adjust the limit height due to the installation environment or site limitation,
you can use the motor positioning adjustment key to rotate the knob on the motor limiter; Just
remove the baffle at the power end to find the position of the motor
In order to ensure the accuracy and safety of the screen position, the screen must be raised and lowered
every half circle of the button to check whether the position is moved correctly! Be especially careful
when adjusting the height of the screen recovery. Excessive adjustment will cause the lower rod to jam
into the shell and cause serious consequences such as damage to the screen or falling of the lower rod!
Be careful when adjusting the unfolding height of the curtain. Always keep the curtain wrapped around
the rotating tube with 1.5 turns or more to ensure that the curtain will not fall.
Electrical parameters: voltage AC220~230V/50-60Hz, current 1.5A.
Green button
yellow button
Unfolding height (lower limit)
Retracted height (upper limit) Motor
Counterclockwise:Up
Clockwise: Down
Counterclockwise: Down
Clockwise :Up
Start Bits :1
Stop Bits : 1
Baud Rate :2400
Data Bits :8
UP: FFEEEEEEDD
STOP: FFEEEEEECC
DOW: FFEEEEEEEE
Some central controls need to
set the address code
FFEEEEEEAA
Learn address code instructions:FFXXXXXXAA
(XXXXXX is a hexadecimal character other than E and 5)
Hex Contro Code:
Press the up button, the screen will rise.
Press the stop button, the screen stop
Press the down button,the screen down.
connecting diagram
public line
S1 SW-PB
S2 SW-PB
S3 SW-PB
STOP
UP
DOWN
8P 8C R S -232
P 1
8
7
6
5
4
3
2
1
1
6
2
7
3
8
4
9
5
R 4 5
J
Disassemble
the baffle
UP
STOP
DOWN
Wireless transmitter
Positioning
Settings Key
Adjusting method of fabric retracting (upper limit) and unfolding (lower limit):
USB Serial Port (COM3)
常规 端口设置 驱动程序 详细信息 事件
2400
8
无
位/秒(B):
数据位(D):
奇偶校验(P):
A
高级( )
…还原默认值(R)
1
无
停止位(S):
流控制(F):
取消
确定
Baud Rate: 2400
Data Bits: 8
Parity: none
Stop Bits: 1
Flow Control:
Baud Rate:
Baud Rate(B):
Data Bits(D):
Parity(P):
Stop Bits(S):
A
advanced( )
…Restore default(R)
取消
确定
none
Flow Control(F):
General Port Settings Driver Details Event

Other Grandview Projection Screen manuals

Grandview CB-Pxx User manual

Grandview

Grandview CB-Pxx User manual

Grandview Large Stage MBII User manual

Grandview

Grandview Large Stage MBII User manual

Grandview Ultimate PP-G Series User manual

Grandview

Grandview Ultimate PP-G Series User manual

Grandview Fantasy Series FA-Mxx User manual

Grandview

Grandview Fantasy Series FA-Mxx User manual

Grandview Portable X-Press Series User manual

Grandview

Grandview Portable X-Press Series User manual

Grandview Cyber CB-MI Series User manual

Grandview

Grandview Cyber CB-MI Series User manual

Grandview CB-Sxx User manual

Grandview

Grandview CB-Sxx User manual

Grandview GVFA100V User manual

Grandview

Grandview GVFA100V User manual

Grandview SkyShow Series User manual

Grandview

Grandview SkyShow Series User manual

Grandview Motorised Rising Screen User manual

Grandview

Grandview Motorised Rising Screen User manual

Grandview Edge R7 User manual

Grandview

Grandview Edge R7 User manual

Grandview Elegant EL-M Series User manual

Grandview

Grandview Elegant EL-M Series User manual

Grandview Fast Fold User manual

Grandview

Grandview Fast Fold User manual

Grandview PT-L Series User manual

Grandview

Grandview PT-L Series User manual

Grandview LF-PHxx(DY) User manual

Grandview

Grandview LF-PHxx(DY) User manual

Grandview LF-Mxx User manual

Grandview

Grandview LF-Mxx User manual

Grandview GRIP084V User manual

Grandview

Grandview GRIP084V User manual

Grandview Edge R2 Series User manual

Grandview

Grandview Edge R2 Series User manual

Grandview Edge R3 PE-L Series Instruction Manual

Grandview

Grandview Edge R3 PE-L Series Instruction Manual

Grandview HideAway HH3 User manual

Grandview

Grandview HideAway HH3 User manual

Grandview Cyber Series CB-MIxx User manual

Grandview

Grandview Cyber Series CB-MIxx User manual

Grandview Large-flat Series User manual

Grandview

Grandview Large-flat Series User manual

Grandview Dynamique R3 User manual

Grandview

Grandview Dynamique R3 User manual

Grandview Fantasy FC-FHMI Series User manual

Grandview

Grandview Fantasy FC-FHMI Series User manual

Popular Projection Screen manuals by other brands

Haier PZ16E101 user manual

Haier

Haier PZ16E101 user manual

EPV Peregrine ISF Series user guide

EPV

EPV Peregrine ISF Series user guide

DMT Fast-Setup Screen Pro manual

DMT

DMT Fast-Setup Screen Pro manual

Elite Screens Vmax Series user guide

Elite Screens

Elite Screens Vmax Series user guide

Simply Elegant 220-111 Assembly and installation instructions

Simply Elegant

Simply Elegant 220-111 Assembly and installation instructions

Kingpin TAB Operation guide

Kingpin

Kingpin TAB Operation guide

EluneVision Fast Fold user manual

EluneVision

EluneVision Fast Fold user manual

Screen Excellence RM2-T installation instructions

Screen Excellence

Screen Excellence RM2-T installation instructions

Elite Screens TE100HC2 Comparison chart

Elite Screens

Elite Screens TE100HC2 Comparison chart

LUMENE ShowPlace HD Series user manual

LUMENE

LUMENE ShowPlace HD Series user manual

Elite Screens TE100HC2 supplementary guide

Elite Screens

Elite Screens TE100HC2 supplementary guide

Elite Screens FE72V user guide

Elite Screens

Elite Screens FE72V user guide

Projecta Cinema Electrol Mounting instruction

Projecta

Projecta Cinema Electrol Mounting instruction

Screen Research MS2-IT installation manual

Screen Research

Screen Research MS2-IT installation manual

Champion 3130 Owner's operating and maintenance manual

Champion

Champion 3130 Owner's operating and maintenance manual

DNP Supernova Core installation guide

DNP

DNP Supernova Core installation guide

SCREENLINE LODO instructions

SCREENLINE

SCREENLINE LODO instructions

Samo B7816 Assembly instruction

Samo

Samo B7816 Assembly instruction

manuals.online logo
manuals.online logoBrands
  • About & Mission
  • Contact us
  • Privacy Policy
  • Terms and Conditions

Copyright 2025 Manuals.Online. All Rights Reserved.