6/67
• DO NOT charge the battery pack in an air temperature below
0°C or above 45°C. This is important and will prevent serious
damage to the battery pack.
• The charger and battery pack may become warm to the
touch while charging. This is a normal condition, and does
not indicate a problem.To facilitate the cooling of the battery
pack after use, avoid placing the charger or battery pack in a
warm environment such as in a shed.
• Do not freeze or immerse charger in water or any other liquid.
READ ALL INSTRUCTIONS
• Do not incinerate the battery pack even if it is severely
damaged or is completely worn out. The battery pack can
explode in a re. Toxic fumes and materials are created when
battery packs are burned.
• Do not charge or use battery in explosive atmospheres,
such as in the presence of ammable liquids, gases or
dust. Inserting or removing the battery from the charger may
ignite the dust or fumes.
• If battery contents come in to contact with the skin, im-
mediately wash area with mild soap and water. If battery
liquid gets into the eye, rinse water over the open eye for 15 min-
utes or until irritation ceases. If medical attention is needed, the
battery electrolyte for Li-ion batteries is composed of a mixture
of liquid organic carbonates and lithium salts.
• Contents of opened battery cells may cause respiratory
irritation. Provide fresh air. If symptoms persist, seek medical
attention.
• Disposal of used batteries must be made at appropriate
points and approved for receiving such material. If there
isn’t an appropriate nearby site, please contact the CUSTOMER
SERVICE: Dr. Luiz Miranda Street, 1650 CEP 175780-000 - Pom-
peia - SP - Phone: +55 (14) 3405-2113 - email: assistencia.tecni-
07h00 am to 11h30 am and from 13h00 pm to 17h18 pm.
WARNING:
For safe operation, read this manual and
manuals originally supplied with tool
before using the charger.
When opening
the tool package for the first time, the battery
pack will not be fully charged. Before using
the battery pack and charger, read the safety
instructions below. Then follow charging
procedures outlined.
WARNING!
Burnhazard.
Batteryliquid maybeflammable
if exposed to spark or flame.
• Charge the battery packs only in JACTO
chargers.
6. Important Safety Instructions for
Battery Packs
7. Important Safety Instructions for
Sprayers
DANGER!
• DONOTsprayammableorcombustible
chemicalproducts.
Thiswillresultinserious
risk of fire and explosion.
• DO NOT spray acids or corrosive chem-
icals.
This will result in serious risk of fire,
explosion and leakage. Sprayer parts can
be permanently damaged.
• DO NOT splash or immerse in water or
other liquids.
This may cause premature
cell failure.
• Do not store or use the tool and battery
packinlocationswhere thetemperature
may reach or exceed 113°F (45 ºC).
• Never attempt to open the battery pack for
anyreason.If battery packcase is crackedor
damaged,donotconnecttocharger.Donot
crush, drop or damage battery pack. Do not
use a battery pack or charger that has been
dropped, run over or damaged in any way
(i.e., pierced with a nail, hit with a hammer,
steppedon).Damagedbatterypacksshould
be returned to service center for recycling.
• Fire hazard. Do not store or carry bat-
tery so that metal objects can contact
exposed battery terminals. For example,
do not place battery in aprons, pockets, tool
boxes, product kit boxes, drawers, etc., with
loose nails, screws, keys, etc.
Transporting
batteries can possibly cause fires if the
battery terminals inadvertently come in
contact with conductive materials such
as keys, coins, hand tools and the like.
Certain regulations prohibit transporting
batteries on airplanes (i.e., packed in suit-
cases and carry-on luggage) UNLESS they
are properly protected from short circuits.
So when transporting individual batteries,
make sure that the battery terminals are
protected and well insulated from materials
that could contact them and cause a short
circuit.
NOTE:Batteriesshould notbe put
in checked baggage.
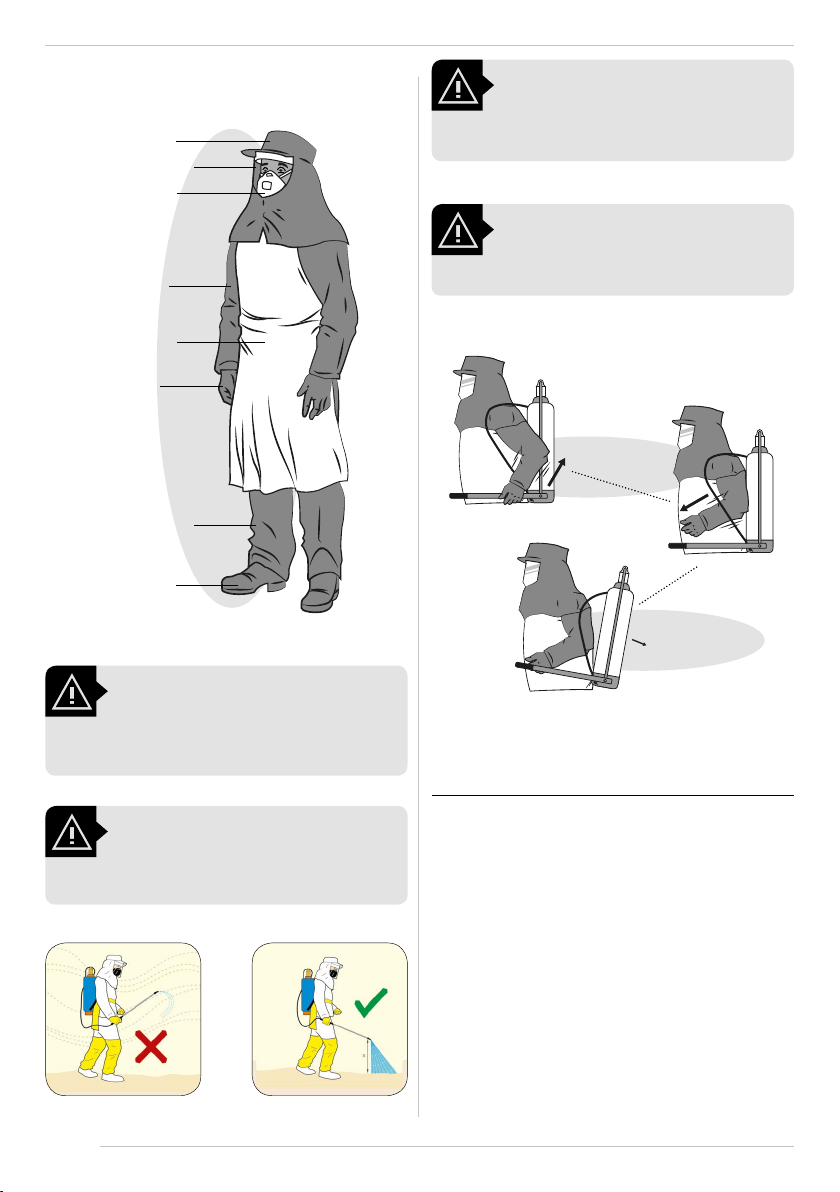
WARNING!
• DO NOT use the sprayer for purposes
other than spraying agricultural defen-
sivesapprovedbycompetentauthorities.
Always consider the following recommen-
dations:
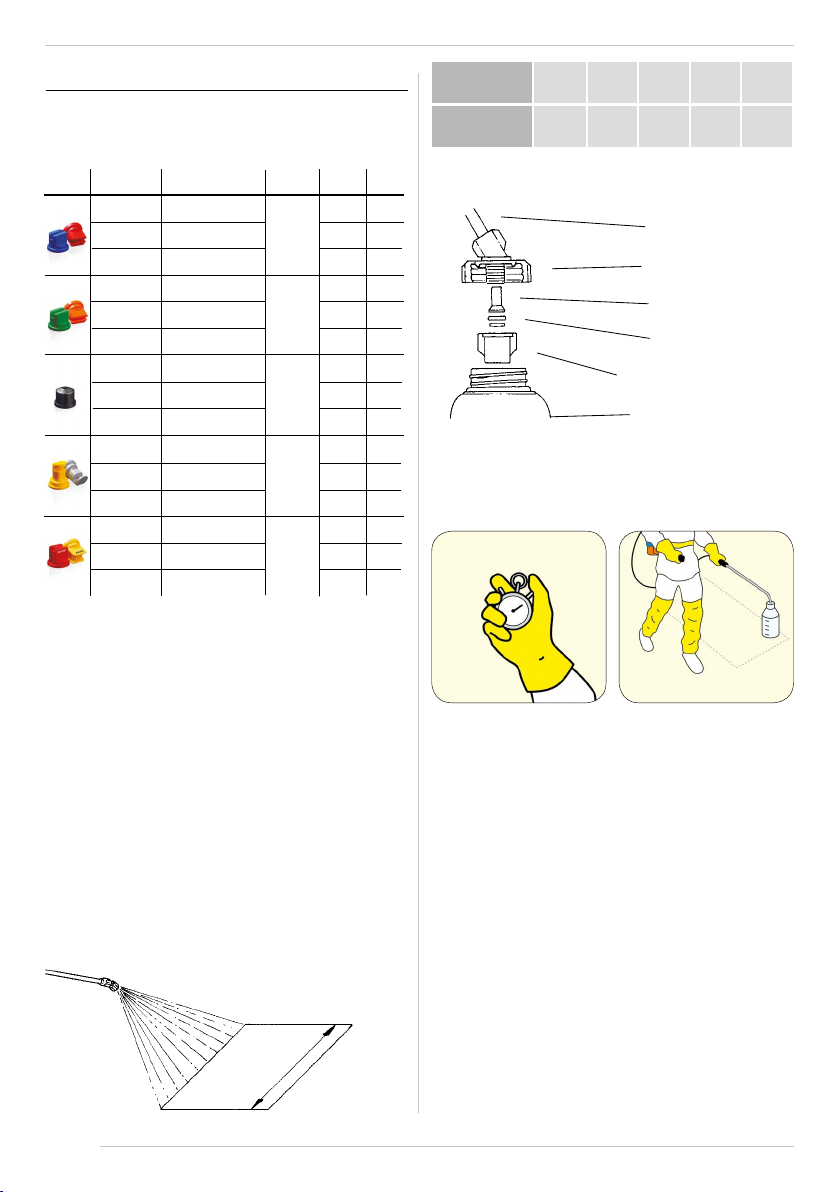
• Check sprayer before spraying.
Ensure
there is no leakage or missing parts. Do not
use sprayer if it is not in good condition.
• Donoteat,drinkorsmokewhilespraying.