Kermi C2V10 User manual

DE – Gebrauchs- und Montageanleitung Designheizkörper C2V10
EN – Instructions for installation and use, Design radiator C2V10
FR – Instructions d'utilisation et de montage des radiateurs design C2V10
IT – Istruzioni d'uso e di montaggio radiatori di design C2V10
2015/03 • 6913824
C2V10

2
DE – Montageanleitung
Der Heizkörper darf nur von einem Fachhand-
werker montiert werden.
Bei Elektro-Zusatzbetrieb dürfen folgende
Tätigkeiten nur von einer Elektrofachkraft (in
Deutschland gemäß BGV A3) durchgeführt
werden:
• Montage und Anschluss des Elektro-Sets
• Anschluss des Heizstabs an Elektro-Set
Sicherheitshinweise
►Vor der Montage/Inbetriebnahme diese Ge-
brauchs- und Montageanleitung gründlich
lesen.
►Nach der Montage die Anleitung dem End-
verbraucher überlassen.
►Sicherheitshinweise in der separaten Anlei-
tung des Elektro-Sets beachten.
GEFAHR
Lebensgefahr!
►Lage der Versorgungsleitungen (Strom,
Gas, Wasser) prüfen.
►Keine Leitungen anbohren.
WARNUNG
Verletzungsgefahr!
►Gewicht des Heizkörpers beachten (siehe
Seite 6).
►Ab 25 kg mit Hebeeinrichtung oder meh-
reren Personen arbeiten.
WARNUNG
Personen- und Sachschäden!
►Untergrund auf Tragfähigkeit prüfen.
Gewicht des befüllten Heizkörpers (siehe
Seite 6) und mögliche Zusatzlasten beach-
ten.
►Befestigungsmaterial auf Eignung prüfen
und auf die bauliche Situation abstimmen.
►Gesonderte Anforderungen, z. B. für
öffentliche Gebäude (Schulen o. Ä.), be-
rücksichtigen.
Einsatzbedingungen
►Betriebsbedingungen für Warmwasser-
Heizungsanlagen gemäß DIN 18380 "VOB
Vergabe- und Vertragsordnung für Baulei-
stungen" einhalten.
►Wasserbeschaffenheit gemäß VDI 2035
"Vermeidung von Schäden in Warmwasser-
Heizungsanlagen" einhalten.
►Einsatzgrenzen in Feuchträumen gemäß
DIN 55900 "Beschichtungen für Raumheiz-
körper" beachten.
►Heizkörper nur in geschlossenen Heizungs-
systemen einsetzen.
►Heizkörper nur in der Schutzverpackung la-
gern und transportieren.
Bei Elektro-Zusatzbetrieb:
►Wärmeleistung des Heizstabs entsprechend
dem Heizkörpertyp wählen (siehe aktuelle
Verkaufsunterlagen).
►Bei Montage in Räumen mit Bade- bzw.
Duscheinrichtungen: Schutzbereiche gemäß
nationalen Installationsnormen (in Deutsch-
land DIN VDE 0100-701) beachten. Darüber
hinaus alle örtlichen Vorschriften beachten.
Hinweis: Die Montage der Produkte im
Schutzbereich 1 ist vom Hersteller nicht zu-
gelassen.
►Empfehlung gemäß Norm IEC 60335-2-43:
Um jegliche Gefahr für Kleinkinder zu ver-
meiden, Heizkörper so montieren, dass sich
das unterste Querrohr mindestens 600 mm
über dem Boden bendet.
►Sicherstellen, dass bei geschlossenem Ven-
til im Vorlauf die Ausdehnung des Wasser-
inhalts des Heizkörpers bis zum Ausdeh-
nungsgefäß gewährleistet ist.
►Bei Einbau eines Ventils im Rücklauf sicher-
stellen, dass sich das Ventil nur mit einem
Werkzeug betätigen lässt, um unbefugtes
Absperren zu verhindern.
Reklamation
►An den Hersteller wenden.
Entsorgung
►Verpackung dem Recycling oder der ord-
nungsgemäßen Entsorgung zuführen. Die
örtlichen Vorschriften beachten.
Technische Merkmale
• Betriebsdruck: max. 8 bar
• Prüfdruck: 1,3 x Betriebsdruck
Vorlauf
• Vorlauf rechts oder links möglich, in Kombi-
nation mit x-link zwingend links
• Vorlauftemperatur:
–Heißwasser bis 110 °C (230 °F)
–bei Elektro-Zusatzbetrieb bis 80 °C
(176 °F)
–in Kombination mit x-link bis 70 °C
(158°F), max. 6 bar
Hinweise zur Montage
Anzahl der Befestigungspunkte
Die Anzahl der Befestigungspunkte wurde
für Leichthochlochziegel T14 festgelegt und
geprüft.
Bei Elektro-Zusatzbetrieb:
►Montageanleitung des Elektro-Sets beach-
ten.
►Sicherstellen, dass in Kabelreichweite eine
vorschriftsmäßig installierte Gerätean-
schlussdose bzw. Wandsteckdose (230 V,
Absicherung 16 A) vorhanden ist.
Der elektrische Anschluss aus der Wand muss
frei zugänglich sein und darf nicht in der Pro-
jektionsäche des Heizkörpers und des Regel-
geräts liegen.
Der Heizkörper darf nicht direkt unterhalb ei-
ner Wandsteckdose angebracht werden.
Bei Einbau in eine Einrohrheizung:
►Anschluss-Verschraubung mit integriertem,
einstellbaren Bypass verwenden.
Geeignete Anschluss-Verschraubungen
►Bauraum hinter der Blende beachten (siehe
Abb. 28, Seite 8).
DE – Gebrauchsanleitung
Zulässiger Gebrauch
Der Heizkörper darf nur verwendet werden
zum Heizen von Innenräumen und zum Trock-
nen von Textilien, die in Wasser gewaschen
wurden.
Jeder andere Gebrauch ist nicht bestimmungs-
gemäß und daher unzulässig.
Fehlgebrauch
Der Heizkörper ist nicht geeignet als Sitzgele-
genheit, als Kletter- oder Steighilfe.
Sicherheitshinweise
WARNUNG
Verbrennungsgefahr!
Die Oberäche des Heizkörpers kann bis zu
110 °C (230 °F) heiß werden.
►Seien Sie vorsichtig beim Berühren des
Heizkörpers.
VORSICHT
Verbrühungsgefahr beim Entlüften durch
herausspritzendes Heißwasser!
►Schützen Sie Ihre Hände.
Elektro-Zusatzbetrieb
►Beachten Sie die separate Anleitung beim
Heizstab.
►Stellen Sie sicher, dass der Heizkörper im-
mer vollständig mit Wasser gefüllt und
entlüftet ist, damit sich der Heizkörper ord-
nungsgemäß erwärmt.
►Betreiben Sie die Warmwasser-Heizung und
den Heizstab nicht gleichzeitig.
►Stellen Sie sicher, dass der Rücklauf offen
ist.
►Drehen Sie den Thermostatkopf zu.
Wartung
►Entlüften Sie den Heizkörper nach der Inbe-
triebnahme und nach längeren Betriebsun-
terbrechungen.
Reinigung
►Verwenden Sie nur milde, nicht scheuernde
Reinigungsmittel.
Reklamation
►Wenden Sie sich an Ihren Fachhandwerker.
Montage und Reparaturen
►Lassen Sie die Montage und Reparaturen
nur vom Fachhandwerker ausführen, damit
Ihre Gewährleistungsansprüche nicht erlö-
schen.
Entsorgung
►Führen Sie ausgediente Heizkörper mit Zu-
behör dem Recycling oder der ordnungs-
gemäßen Entsorgung zu. Beachten Sie die
örtlichen Vorschriften.

3
EN – Installation instructions
The radiator may only be installed by a special-
ized tradesman.
For additional electric operation, the following
activities may be performed only by an electri-
cal specialist (in Germany, according to BFVA3):
• Installation and connection of the electric
set
• Connection of the heating element to the
electric set
Safety instructions
►Read these instructions for installation and
use thoroughly prior to installation/com-
missioning.
►After installation, pass the instructions on
to the end user.
►Observe the safety directions in the sepa-
rate electric set instructions.
DANGER
Life-threatening situation!
►Check the condition of the supply lines
(electricity, gas, water).
►Do not drill into any lines.
WARNING
Risk of injury!
►Note the radiator's weight (see page6).
►At 25 kg and above, work with lifting
equipment or several persons.
WARNING
Personal injury and material damage!
►Check the base for adequate carrying ca-
pacity. Take the radiator's lled weight
(see page 6) and possible additional loads
into consideration.
►Check fasteners for applicability and tai-
lor them to the structural situation.
►Special requirements, e.g. for public
buildings (schools or the like), must be
taken into account.
Operating conditions
►Observe operating conditions for wa-
ter heating installations according to
DIN18380 "VOB German Construction Con-
tract Procedures".
►Maintain water's condition according to
VDI [Association of German Engineers] 2035
"Prevention of damage in water heating in-
stallations".
►Observe limitations of use in damp loca-
tions according to DIN55900 "Coatings for
radiators".
►Use radiator only in closed heating systems.
►Store and transport radiator only in the
protective packaging.
For electrical accessory operation:
►Select heating element heat output accord-
ing to the radiator type (see current sales
documents).
►When installing in rooms with bath
or shower facilities: take into account
protective areas according to national
installation standards (in Germany
DIN VDE 0100-701). Also follow all local
regulations. Note: The manufacturer does
not approve the installation of products in
protective area 1.
►Recommendation according to IEC stan-
dard 60335-2-43: To prevent any risk to
small children, install the radiator so that
the bottommost cross tubes are situated at
least 600mm above the oor.
►Ensure that when the valve in the supply
ow is closed, the water in the radiator can
expand up to the expansion vessel.
►When installing a valve in the return, en-
sure that the valve can only be actuated
with a tool to prevent authorized blocking.
Complaint
►Contact the manufacturer.
Disposal
►Packaging should be recycled or disposed of
properly. Observe local regulations.
Technical features
• Operating pressure: max. 8 bar
• Test pressure: 1.3 x operating pressure
Flow
• Flow available on the right or on the left,
in combination with x-link necessarily on
the left
• Flow temperature:
–Hot water up to 110 °C (230 °F)
–for additional electric operation up to
80°C (176°F)
–in combination with x-link up to 70 °C
(158°F), max. 6 bar
Directions for installation
Number of attachment points
The number of attachments points was deter-
mined and checked on vertically cored light-
weight brick T14.
For electrical accessory operation:
►Observe the electric set installation instruc-
tions.
►Ensure that a correctly installed mounting
box or wall socket (230 V, 16 A fuse) is avail-
able within the reach of the cable.
The electrical connection at the wall must be
freely accessible and must not project out to
the surface of the radiator or the control unit.
The radiator must not be attached directly be-
neath a wall socket.
For installation in a one-pipe heater:
►Use connection tting with integrated, ad-
justable bypass.
Suitable connection ttings
►Take available space behind the panel into
account (see Fig. 28, page 8).
EN – Instructions for use
Permissible use
The radiator may only be used for heating in-
terior spaces and for drying textiles washed in
water.
Any other use is contrary to the intended pur-
pose and therefore not permissible.
Misuse
The radiator is not usable as a seating accom-
modation, climbing or lifting support.
Safety instructions
WARNING
Risk of burns!
The radiator's surface can heat up to 110°C
(230°F).
►Be careful when touching the radiator.
CAUTION
Risk of burns due to squirting hot water
when evacuating air!
►Protect your hands.
Additional electric operation
►Observe separate instructions for the heat-
ing element.
►Ensure that the radiator is always complete-
ly lled with water and has been bled, so
that the radiator heats up properly.
►Do not operate the hot water heater and
the heating element simultaneously.
►Make sure that the return is open.
►Close the thermostatic head.
Maintenance
►Vent the radiator after commissioning and
following lengthy interruptions of opera-
tion.
Cleaning
►Use only mild, non-abrasive cleansing
agents.
Complaint
►Contact your local dealer.
Installation and repairs
►Have the installation and repairs performed
by a specialized tradesman so that your
claims under warranty are not forfeited.
Disposal
►Recycle or dispose of disused radiators, in-
cluding accessories, properly. Observe local
regulations.

4
FR – Instructions de montage
Le montage du radiateur doit être exécuté par
un installateur spécialisé.
En fonctionnement électrique d'appoint, les
opérations suivantes sont strictement réservées
à un électricien spécialisé (en Allemagne selon
BGV A3):
• Montage et raccordement du kit électrique
• Raccordement du thermoplongeur sur le kit
électrique
Consignes de sécurité
►Lire attentivement les instructions d'utilisa-
tion et de montage avant de procéder au
montage/à la mise en service.
►Après le montage, remettre les instructions
à l'utilisateur nal.
►Respecter les consignes de sécurité dans les
instructions séparées relatives au kit élec-
trique.
DANGER
Danger de mort!
►Contrôler la position des conduites d'ali-
mentation (électricité, gaz, eau).
►Ne pas percer de conduite.
AVERTISSEMENT
Risque de blessure!
►Tenir compte du poids du radiateur (voir
page6).
►À partir de 25kg, utiliser des dispositifs
de levage ou travailler à plusieurs.
AVERTISSEMENT
Blessures corporelles et dégâts matériels!
►Contrôler la force portante du sous-sol.
Tenir compte du poids du radiateur rem-
pli (voir page 6) et des charges supplé-
mentaires possibles.
►Contrôler l'aptitude du matériel de xa-
tion et la dénir en fonction de la situa-
tion de montage.
►Tenir compte des exigences spéciales, par
ex. pour les bâtiments publics (écoles, etc.).
Conditions d'utilisation
►Respecter les conditions d'exploitation pour
les installations de chauffage d'eau chaude sa-
nitaire conformément à la norme DIN18380
« VOB Vergabe- und Vertragsordnung für
Bauleistungen», (cahier des charges pour l'oc-
troi de travaux du bâtiment).
►Respecter les critères de qualité de l'eau
conformément à la norme VDI 2035 « Ver-
meidung von Schäden in Warmwasser-Hei-
zungsanlagen» («Prévention des dommages
dans les installations de chauffage de l'eau»).
►Respecter les limites d'utilisation dans les
locaux humides conformément à la norme
DIN 55900 « Beschichtungen für Rau-
mheizkörper» («Revêtements pour radia-
teurs de chauffage»).
►N'intégrer le radiateur que dans des circuits
de chauffage fermés.
►N'entreposer et ne transporter le radiateur
que dans son emballage de protection.
Pour le fonctionnement électrique d'appoint:
►Choisir la puissance calorique du thermo-
plongeur en fonction du type de radiateur
(voir la documentation commerciale actuelle).
►En cas de montage dans des pièces équipées de
baignoires ou de douches: respecter les zones
de protection conformément aux normes
d'installations nationales (en Allemagne
DIN VDE 0100-701). Respecter également
l'ensemble des dispositions locales en vigueur.
Remarque: le montage des produits dans la
zone de sécurité1 n'est pas autorisé par le fa-
bricant.
►Recommandation conformément à la
norme CEI 60335-2-43 : an d'éviter tout
danger pour les enfants en bas âge, il
convient de monter les radiateurs de ma-
nière à ce que le tube transversal inférieur
se trouve à une distance de 600mm mini-
mum au-dessus du sol.
►S'assurer que, lorsque la vanne est fermée,
la dilatation du contenu d'eau dans le dé-
part est garantie jusqu'au vase d'expansion.
►Lors du montage d'une vanne dans le re-
tour, s'assurer que la vanne ne peut être
actionnée qu'avec un outil an d'empêcher
la fermeture accidentelle.
Réclamation
►S'adresser au fabricant.
Traitement des déchets
►Amener l'emballage dans un centre de recy-
clage ou un centre d'élimination des déchets
réglementaire. Respecter les prescriptions
locales.
Caractéristiques techniques
• Pression de service: max. 8bars
• Pression d'essai: 1,3fois la pression de service
Départ
• Départ possible à droite ou à gauche, dans
le cas d'une association avec x-link, départ
impératif à gauche.
• Température d'entrée:
–eau chaude jusqu'à 110°C (230°F)
–en fonctionnement électrique d'appoint
jusqu'à 80°C (176°F)
–en association avec x-link jusqu'à 70°C
(158°F), max. 6 bars
Remarques relatives au montage
Nombre de points de xation
Le nombre de points de xation a été déni et
testé pour les briques légères en terre cuite à
creux verticaux T14.
Pour le fonctionnement électrique d'appoint:
►Respecter les instructions de montage du
kit électrique.
►S'assurer qu'une prise de raccordement d'ap-
pareillage ou une prise murale (230V, fusible
16A) est disponible à portée de câble.
Le raccordement électrique sortant du mur
doit être facilement accessible et ne doit pas
être situé dans la surface de projection du ra-
diateur et du régulateur.
Le radiateur ne doit pas être installé directe-
ment sous une prise murale.
Pour le montage dans un chauffage monotube:
►Utiliser des raccords vissés à dérivation ré-
glable intégrée.
Raccords à vis adaptés
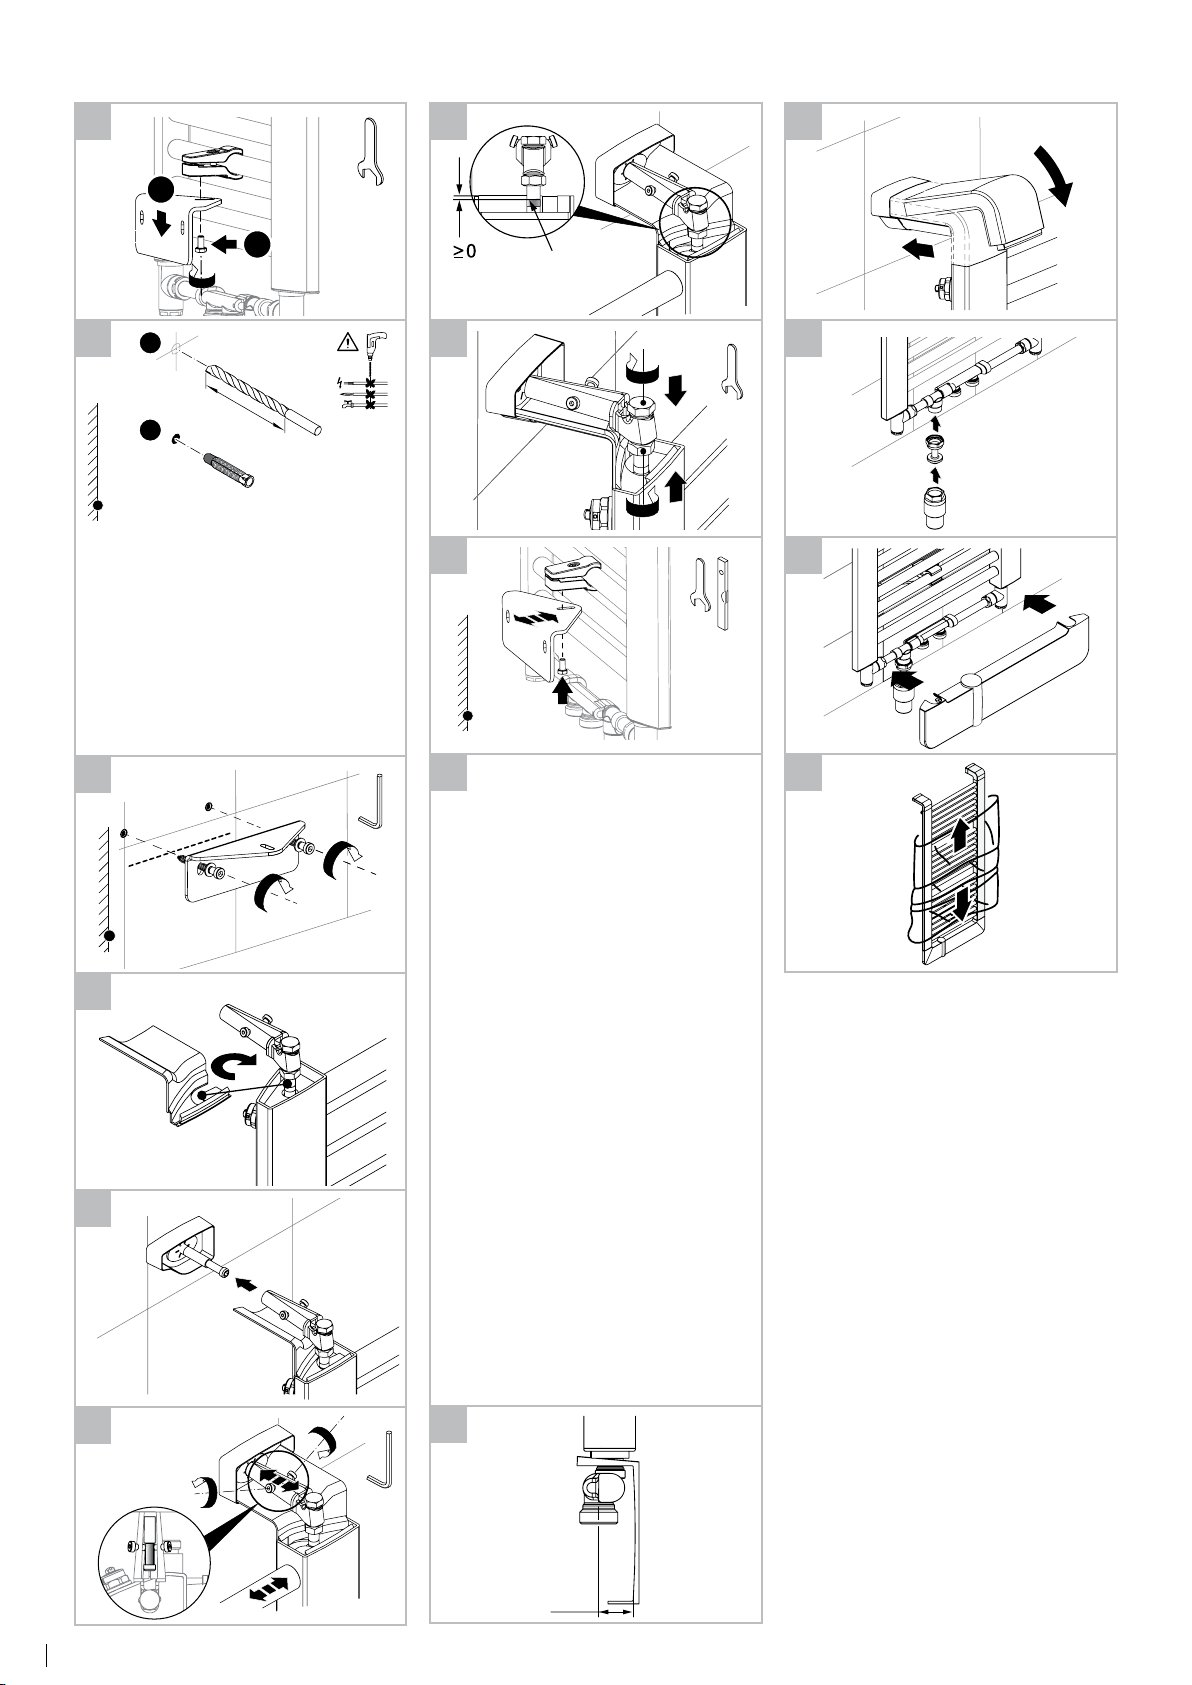
►Tenir compte de l'espace de construction
libre derrière l'habillage (voir g. 28, page
8).
FR – Instructions d'utilisation
Utilisation conforme
Le radiateur doit être utilisé exclusivement
pour le chauffage d'espaces intérieurs et le sé-
chage de textiles ayant été lavés à l'eau.
Toute autre utilisation n'est pas conforme à
l'usage prévu et est donc interdite.
Utilisation non conforme
Le radiateur ne doit pas être utilisé en tant que
siège, échelle ou escabeau.
Consignes de sécurité
AVERTISSEMENT
Risque de brûlure!
La surface du radiateur peut atteindre une
température de 110°C (230°F).
►Soyez prudent au toucher du radiateur.
PRUDENCE
Risque de brûlure par projections d'eau
chaude lors de la purge!
►Protégez vos mains.
Fonctionnement électrique d'appoint
►Respecter les instructions séparées du ther-
moplongeur.
►S'assurer que la radiateur est toujours rem-
pli complètement d'eau et purgé an qu'il
chauffe correctement.
►Ne pas exploiter le chauffage d'eau chaude
et l'élément chauffant simultanément.
►S'assurer que le retour est ouvert.
►Fermer la tête thermostatique.
Maintenance
►Purger le radiateur après la mise en service
et après des interruptions de service prolon-
gées.
Nettoyage
►N'utiliser que des détergents doux, non
agressifs.
Réclamation
►Le cas échéant, s'adresser à un installateur
spécialisé.
Montage et réparations
►Seul un installateur spécialisé est habilité à
effectuer le montage et les réparations an
de préserver les droits de garantie.
Traitement des déchets
►Amener les radiateurs usés et leurs acces-
soires au recyclage ou au traitement des
déchets. Respecter les prescriptions locales.

5
IT – Istruzioni di montaggio
Il radiatore deve essere montato solo da un in-
stallatore specializzato.
In caso di integrazione elettrica le seguenti attivi-
tà possono essere svolte soltanto da un elettrici-
sta specializzato (in Germania secondo BGV A3):
• montaggio e collegamento del set elettrico
• collegamento della barra termica al set
elettrico
Indicazioni di sicurezza
►Leggere attentamente le istruzioni d'uso e
di montaggio prima di procedere al mon-
taggio e alla messa in esercizio.
►Dopo il montaggio cedere le istruzioni
all'utente nale.
►Seguire le indicazioni di sicurezza presenti
nelle istruzioni separate del kit elettrico.
PERICOLO
Pericolo di morte!
►Vericare lo stato delle tubazioni (corren-
te, gas, acqua).
►Non forare le tubazioni.
ATTENZIONE
Pericolo di lesioni!
►Osservare il peso del radiatore (vedere
pagina 6).
►Se il peso supera i 25 kg effettuare le
operazioni con un dispositivo di solleva-
mento o con l'aiuto di altre persone.
ATTENZIONE
Danni a cose e persone!
►Controllare la portata della base di ap-
poggio. Osservare il peso del radiatore
pieno (vedere pagina 6) ed eventuali ca-
richi aggiuntivi.
►Vericare che il materiale di ssaggio sia
idoneo e sceglierlo adatto alla situazione
architettonica.
►Rispettare i requisiti particolari, ad es. per
edici pubblici (scuole o altro).
Condizioni di utilizzo
►Rispettare le condizioni di esercizio per im-
pianti di riscaldamento ad acqua calda in base
a DIN 18380 "VOB Regolamento sui contratti
e gli appalti nell'ambito delle costruzioni".
►Rispettare la qualità dell'acqua secondo
VDI 2035 "Evitare danni negli impianti di
riscaldamento ad acqua calda".
►Osservare i limiti d'impiego in locali umidi
secondo DIN55900 "Rivestimenti per radia-
tori per ambienti".
►Installare il radiatore solo in un sistema di
riscaldamento chiuso.
►Depositare e trasportare il radiatore solo
nell'imballo protettivo.
In caso di integrazione elettrica:
►scegliere la potenza termica della barra ter-
mica a seconda del tipo di radiatore (vedere
gli attuali documenti di vendita).
►Con il montaggio in locali adibiti a bagno
o doccia: osservare le zone di protezione
secondo le norma di installazione nazio-
nali (in Germania DIN VDE 0100-701). Inol-
tre osservare tutte le disposizioni locali.
Nota: il montaggio del prodotto nella zona di
protezione 1 non è consentito dal produttore.
►Consigliato in conformità alla norma
CEI60335-2-43: per evitare qualsiasi perico-
lo a bambini montare i radianti in modo che
il tubo trasversale inferiore si trova almeno
a 600 mm sopra il pavimento.
►Assicurarsi che, con valvola chiusa nella
mandata, l'espansione del contenuto d'ac-
qua del radiatore sia assicurata no al vaso
di espansione.
►In caso di montaggio di una valvola di ritor-
no, accertare che la valvola sia azionabile
con un solo utensile per evitare che si bloc-
chi accidentalmente.
Reclamo
►Rivolgersi al produttore.
Smaltimento
►Procedere al riciclaggio o al corretto smalti-
mento dell'imballo. Osservare le disposizio-
ni locali.
Caratteristiche tecniche
• Pressione d'esercizio: max. 8 bar
• Pressione di prova: 1,3 x pressione d'eserci-
zio
Mandata
• Mandata possibile a destra o a sinistra, in
combinazione con x-link obbligatoriamente
a sinistra
• Temperatura di mandata:
–acqua calda no a 110 °C (230 °F)
–in caso di integrazione elettrica no a
80 °C (176 °F)
–in combinazione con x-link no a 70 °C
(158°F), max. 6 bar
Istruzioni di montaggio
Numero dei punti di ssaggio
Il numero dei punti di ssaggio è stato deter-
minato e vericato per laterizi leggeri a fori
alti T14.
In caso di integrazione elettrica:
►osservare le istruzioni di montaggio del set
elettrico.
►Assicurarsi che alla portata del cavo sia
presente una presa a spina o una presa di
corrente (230 V, fusibile 16 A) installata a
norma.
Il collegamento elettrico alla parete deve es-
sere facilmente accessibile e non deve trovar-
si nelle superci di proiezione del radiatore e
dell'apparecchio di regolazione.
Il radiatore non può essere montato diretta-
mente al di sotto di una presa di corrente.
In caso di montaggio in un riscaldamento
monotubo:
►Utilizzare un raccordo di collegamento con
bypass integrato e regolabile.
Raccordi di collegamento appositi
►Rispettare lo spazio dietro la copertura (ve-
dere g. 28, pagina 8).
IT – Istruzioni per l'uso
Uso consentito
Il radiatore può essere utilizzato solo per il ri-
scaldamento di ambienti interni e per asciuga-
re tessuti lavati in acqua.
Ogni altro uso non è considerato conforme alle
disposizioni ed è quindi non ammesso.
Utilizzo scorretto
Il radiatore non deve essere utilizzato come se-
dia o come scaletta.
Indicazioni di sicurezza
ATTENZIONE
Pericolo di ustioni!
La supercie del radiatore può raggiungere
una temperatura di 110 °C (230 °F).
►Prestare attenzione quando si tocca il ra-
diatore.
ATTENZIONE
Pericolo di scottature durante lo sato per la
fuoriuscita di acqua calda!
►Proteggere le mani.
Integrazione elettrica
►Osservare le istruzioni separate della barra
termica.
►Assicurarsi che il radiatore sia sempre pieno
d'acqua e satato, in modo che possa riscal-
darsi correttamente.
►Non azionare contemporaneamente il ri-
scaldamento ad acqua calda e la barra ter-
mica.
►Assicurarsi che il ritorno sia aperto.
►Chiudere la testa termostatica.
Manutenzione
►Satare il radiatore dopo la messa in fun-
zione e dopo lunghe interruzioni del fun-
zionamento.
Pulizia
►Utilizzare solo detergenti delicati e non
abrasivi.
Reclamo
►Contattare l'installatore specializzato.
Montaggio e riparazioni
►Per non perdere la garanzia sul prodotto,
far eseguire il montaggio e le riparazioni
solo da un installatore specializzato.
Smaltimento
►Portare i radiatori non più utilizzabili e gli
accessori in un centro di riciclaggio o smal-
tirli correttamente. Osservare le disposizio-
ni locali.

6
DE – Maße und Gewichte EN – Dimensions and weights FR – Dimensions et poids IT – Quote e pesi
Rückansicht • View from the rear
Vue arrière • Vista posteriore
►Lage der Versorgungsleitungen prüfen.
►Untergrund auf Tragfähigkeit prüfen.
►Schrauben und Dübel auf Eignung prüfen.
►Check the location of the supply lines.
►Check the bearing surface for load-carry-
ing capacity.
►Check the suitability of the screws and
anchors.
►Contrôler la position des tuyauteries
d'alimentation.
►Vérier la capacité de charge du support.
►Contrôler l'aptitude des vis et chevilles.
►Controllare l'ubicazione delle linee di
alimentazione.
►Controllare la portata del supporto.
►Controllare l'idoneità delle viti e dei
tasselli.
Legende Legend Légende Leggenda
E Entlüftung Bleeding Purge Spurgo
G Gewicht (leer) Weight (empty) Poids (à vide) Peso (vuoto)
H Abstand Bohrloch zu Unter-
kante Anschlussmuffe
Spacing of drilled hole to lower
edge connecting sleeve
Ecart entre trou de perçage et
arête inférieure du manchon de
raccordement
Distanza foro da bordo
inferiore muffola di
allacciamento
L Abstand der Bohrlöcher Spacing of the drilled holes Ecart entre les trous de perçage Distanza dei fori
NA Nabenabstand Hub spacing Ecart entre moyeux Distanza mozzi
NR Artikel-Nr. Article No. N° d'article Codice articolo
RL Rücklauf Return line Retour Ritorno
V Wasserinhalt Water content Contenu liquide Contenuto d'acqua
VL Vorlauf Supply line Départ Mandata
1* geeignete Verschraubungen Suitable screw ttings Raccords vissés appropriés Collegamenti a vite adatti
NR H
[mm]
L
[mm]
L/2
[mm]
NA
[mm]
BH
[mm]
BL
[mm]
BT
[mm]
G
[kg]
V
[l]
C2V10100045XXX 1018 400 200 50 1091 471 35 7,6 4,6
C2V10100060XXX 1018 550 275 50 1091 621 35 9,1 5,4
C2V10100075XXX 1018 700 350 50 1091 771 35 10,6 6,2
C2V10140045XXX 1398 400 200 50 1471 471 35 10,6 6,3
C2V10140060XXX 1398 550 275 50 1471 621 35 12,7 7,5
C2V10140075XXX 1398 700 350 50 1471 771 35 14,6 8,9
C2V10180045XXX 1816 400 200 50 1889 471 35 13,9 8,6
C2V10180060XXX 1816 550 275 50 1889 621 35 16,8 10,7
C2V10180075XXX 1816 700 350 50 1889 771 35 19,9 12,3
>50
>50
L
BL
BH
BT
57-67
67-77
20
H
70
NA
RL/VL G3/4"
134 63
1*
18
E
G1/4"
132 Ø20
130
A

7
DE – Montage EN – Installation FR – Montage IT – Montaggio
1
2
3
4
5
6
2,5; 4; 6
Ø 10
10; 13; 17
17
13
90°
1
2
3
M6x16
5 Nm
104
1
2M6x14
7
►Mindestabstände und Maße siehe Abb. A,
Seite 6.
►For minimum spacing and dimensions, see
Fig. A, Page 6.
►Ecarts minimaux et dimensions, voir g. A,
page 6.
►Distanze minime e quote: vedi fig. A,
pagina 6.
8
►Keine Leitungen anbohren. Lebens-
gefahr!
►Do not drill into any of the lines.
Danger to life!
►Ne pas percer de conduites. Danger
de mort !
►Non danneggiare le linee. Pericolo di
morte!
9
10
L
H
2x
Ø 10
85
1
2
4
2x
56
2x
11
12
13
14
15
16
17
2
1
2,5
13
Markierung
marking
marquage
marcatura
1x
10
1
2
1x

8
DE – Montage EN – Installation FR – Montage IT – Montaggio
18
19
►Keine Leitungen anbohren. Lebens-
gefahr!
►Do not drill into any of the lines.
Danger to life!
►Ne pas percer de conduites. Danger
de mort !
►Non danneggiare le linee. Pericolo di
morte!
20
21
22
23
10
1
2
Ø 10
85
1
2
2x
6
1x
2,5
24
25
26
27
►Heizkörper mit handelsüblichen Ver-
schraubungen wasserseitig anschließen.
►Heizkörper befüllen und entlüften.
Verbrühungsgefahr!
►Heizkörper und Anschlüsse auf Dichtheit
prüfen.
►Connect radiator with commercially avail-
able fittings upstream.
►Fill and vent the radiator. Risk of scald-
ing!
►Check radiator and connections for leaks.
►Raccorder le radiateur côté eau avec des
raccords vissés disponibles dans le com-
merce.
►Remplir le radiateur et le purger. Risque
de brûlure !
►Vérier l'étanchéité du radiateur et des
raccords.
►Collegare il radiatore, con collegamenti
a vite disponibili in commercio, sul lato
acqua.
►Riempire e sfiatare il radiatore. Pericolo
di scottature!
►Verificare che il radiatore e i collegamenti
siano a tenuta.
28
Markierung
marking
marquage
marcatura
13
2x
10
1x
22,5
29
30
31
32
Table of contents
Other Kermi Heater manuals

Kermi
Kermi GQN1B User manual

Kermi
Kermi TBN10 Guide

Kermi
Kermi Credo-Uno-E User manual

Kermi
Kermi Tabeo–E Guide

Kermi
Kermi T.10 Technical manual

Kermi
Kermi Fedon Operating instructions

Kermi
Kermi T. 10 Technical manual

Kermi
Kermi Credo V User manual

Kermi
Kermi FT Series User manual

Kermi
Kermi x-flair User manual

Kermi
Kermi Ideos IDE10 Manual

Kermi
Kermi Credo-Uno User manual

Kermi
Kermi 6918350 User manual

Kermi
Kermi TBV10 Guide

Kermi
Kermi T. 11 Specification sheet

Kermi
Kermi T. 10 Technical manual

Kermi
Kermi T. 10 Technical manual

Kermi
Kermi AKP 2011/03 Technical manual

Kermi
Kermi BASIC 50 Series User manual

Kermi
Kermi TBE10 Guide