LAS 11805 User manual

Art.-Nr. 11805 Esch Profiboy
Der Fahrradträger dient zum Transport von zwei Fahrrädern
auf V-Deichseln von Anhängern.
DE GB F
EAL GmbH, Otto-Hausmann-Ring 107, D-42115 Wuppertal

2

3
DE
Übersicht
Bestimmungsmäßiger
Gebrauch
Lieferumfang
Spezifikationen
Sicherheitshinweise
Bedienungsanleitung
Wartung und Pflege
Kontaktinformationen
WARNUNG
Lesen Sie die Bedienungsanleitung vor Inbetriebnahme sorgfältig durch und
beachten Sie alle Sicherheitshinweise!
Bewahren Sie die Originalverpackung, den Kaufbeleg sowie diese Anleitung
zum späteren Nachschlagen auf!
Nichtbeachtung kann zu Personenschäden, Schäden am Gerät oder Ihrem
Eigentum führen!
Prüfen Sie vor Inbetriebnahme den Inhalt der Verpackung auf Unversehrtheit
und Vollständigkeit!
Bestimmungsmäßiger Gebrauch
Der Fahrradträger Esch Profiboy dient zum Transport von zwei Fahrrädern auf
V-Deichseln von Anhängern.
Lieferumfang
Spezifikationen
Dimensionen: 28 x 160 x 65 [cm]
Eigengewicht: 6 kg
Maximale Nutzlast: 40 kg
Vierkantrohr mit Knaufschrauben
Rahmenhalter
Deichselträger, vormontiert
Klammersatz Deichsel
Halter für Oversize-Rahmen
Sicherheitsgurt

4
Sicherheitshinweise
- Halten Sie Kinder fern und lassen Sie Kinder dieses Gerät nicht bedienen!
- Benutzen Sie dieses Produkt nur für die dafür vorgesehene Verwendung!
- Manipulieren oder zerlegen Sie das Gerät nicht!
Verwenden Sie zu Ihrer eigenen Sicherheit ausschließlich Zubehör oder Ersatzteile, die
in der Anleitung angegeben sind, oder deren Verwendung durch den Hersteller
empfohlen wird!
- Entfernen Sie vor Fahrtantritt alle Teile (Luftpumpen, Packtaschen, Gepäckkörbe,
Fahrradcomputer oder Akku-Pakte bei E-Bikes) von den Fahrrädern.
- Kontrollieren Sie vor jedem Fahrtantritt und zwischendurch regelmäßig den festen Sitz
des Trägers am Fahrzeug und auch die Befestigung der Räder auf dem Träger, um
etwaige Beschädigungen der Befestigungselemente frühzeitig zu erkennen und zu
beheben!
- Achten Sie auf eine ausreichende Lenkfreiheit! Auch bei engsten Kurvenfahrten ist
sicherzustellen, daß der Träger oder die Fahrräder nirgends anschlagen.
- Vergewissern Sie sich, daß der Sicherungsbolzen eingerastet und den
Abklappmechanismus blockiert ist, bevor Sie ihre Fahrt antreten!
Bedienungsanleitung
Montage des Trägers auf der Deichsel:
Rechts und links der Trägermitte sind die Haltesäulen für die Fahrräder befestigt. Stellen
Sie die Haltesäulen senkrecht auf. Schieben Sie einen Rahmenhalter auf eine Säule,
sodaß er in Fahrtrichtung nach vorn zeigt, den anderen Rahmenhalter auf die andere
Säule in Fahrtrichtung nach hinten. Verbinden Sie die Haltesäulen mit dem Vierkantrohr
und den Knaufschrauben, ziehen Sie die Knaufschrauben fest an.
Entfernen Sie die Endkappen von den unteren, geschlitzten Vierkantrohren des
vormontierten Trägers. Zur Befestigung des Trägers benutzen Sie den Klammersatz
Deichsel. Stecken Sie die Schrauben von unten durch die Bohrung in die U-förmige
Klammer. Schrauben Sie die Nutsteine wenige Umdrehungen auf die Schrauben. Führen
Sie die Nutsteine in die offenen Enden der Vierkantrohre ein. Setzen Sie die Endkappen
wieder auf.
Positionieren Sie den Fahrradträger auf der Deichsel Ihres Anhängers so, daß das
Klappscharnier und der Griff des Entriegelungsbolzens nach vorne zeigen.
Wenn Sie die Position des Trägers auf der Deichsel festgelegt haben, verschieben Sie die
Halteklammern in den Nuten von der Mitte nach außen, bis die Schrauben der Klammern
an der Deichsel anschlagen. Achte Sie darauf, daß jede Klammer die Oberkante der
Deichsel sicher erfaßt (siehe Abbildung). Ziehen Sie jetzt die Schrauben fest an.
Überprüfen Sie unbedingt am Ende der Arbeit noch einmal den sicheren Sitz des
Trägers und der Schrauben!

5
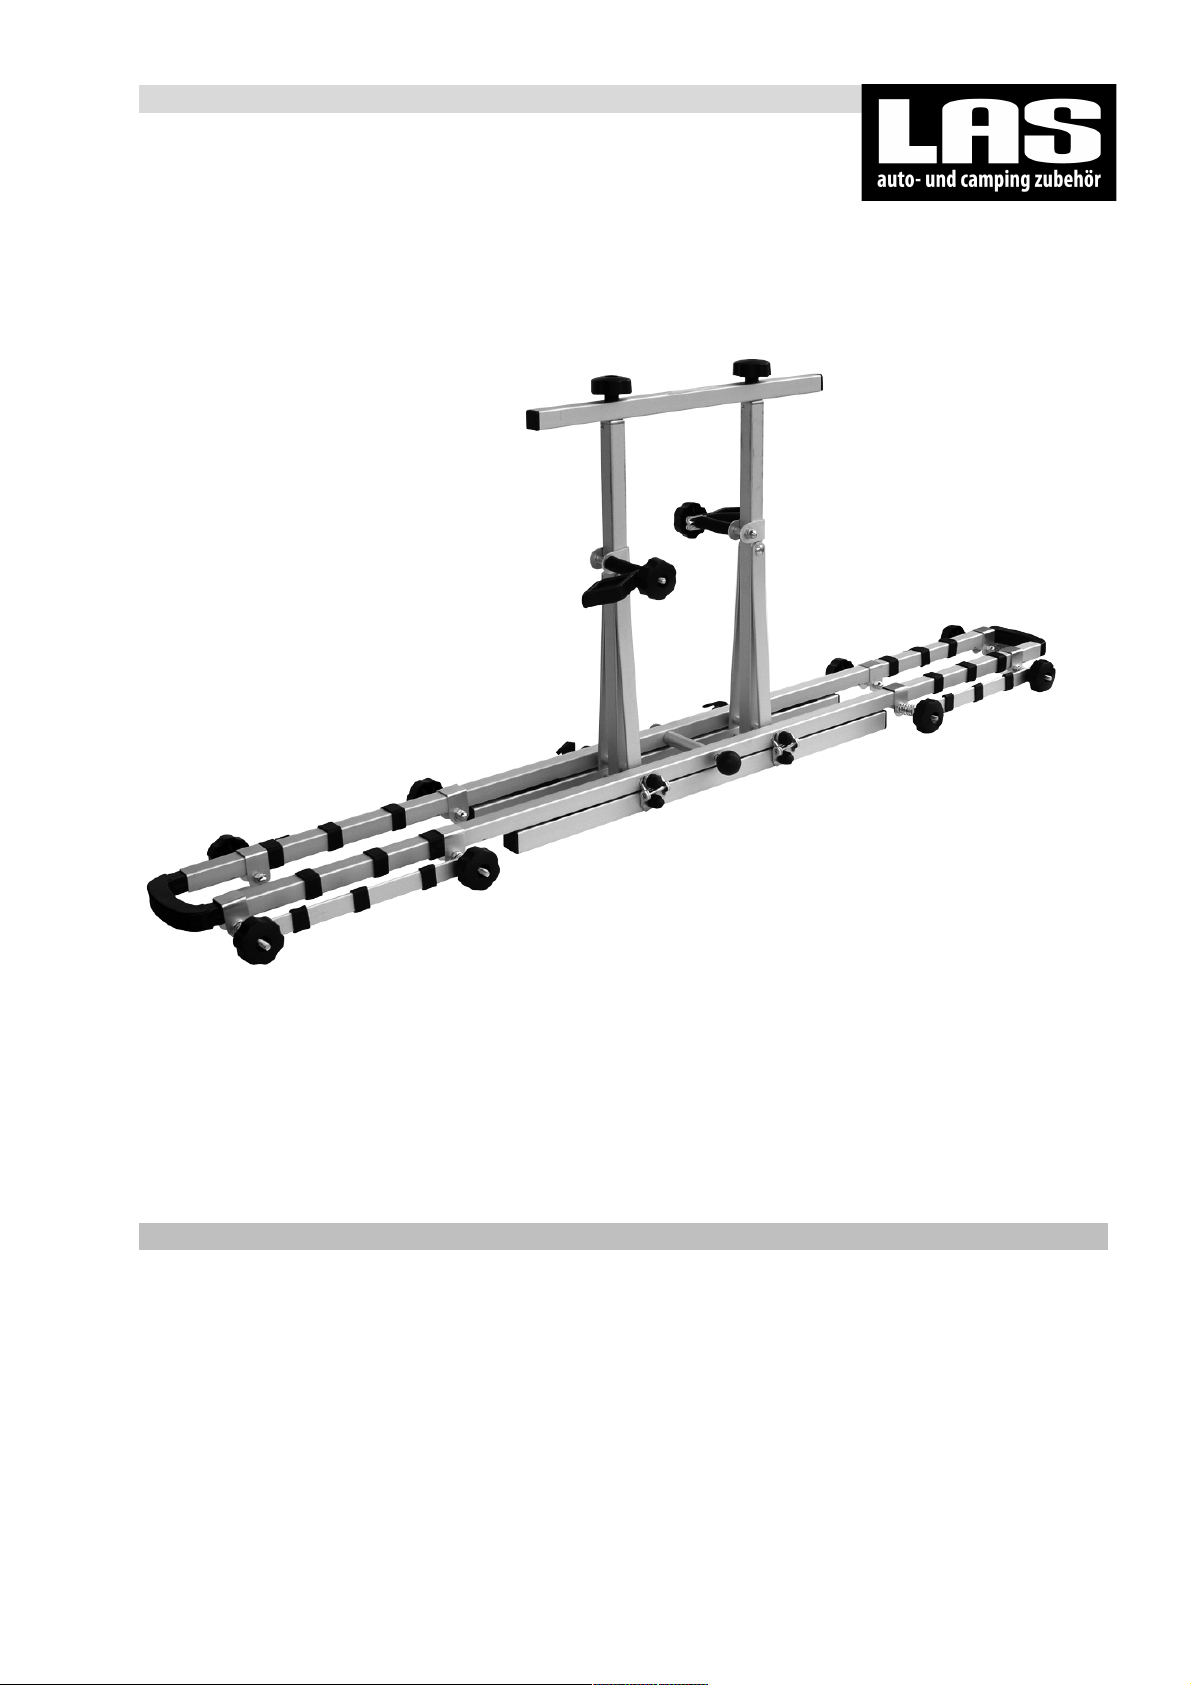
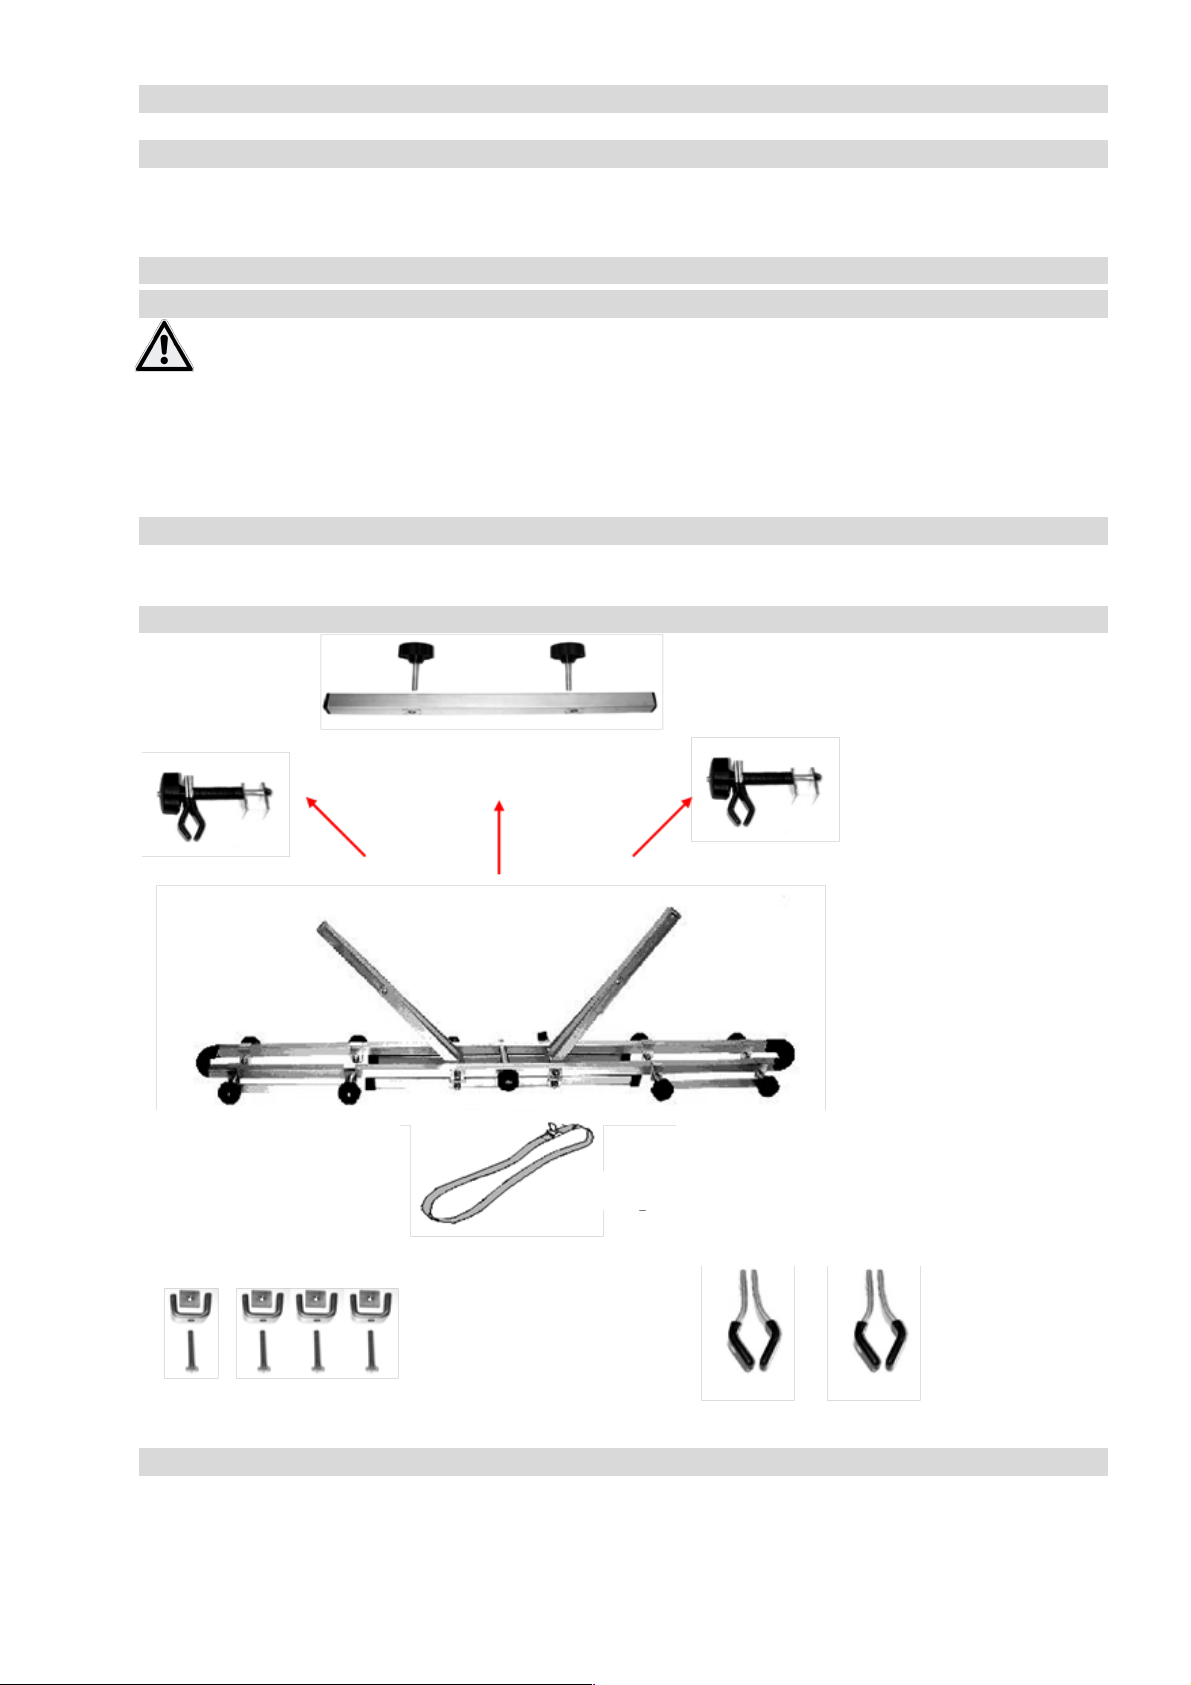
Montage der Fahrräder auf dem Fahrradträger
Das erste Fahrrad wird in die erste Fahrradaufnahme (dem Fahrzeug am nächsten)
gestellt. Die Knaufschrauben, der mit Federn versehenen Radklemmen, werden weit
aufgedreht und die Laufräder in die Klemmen gestellt. Dann werden die Knaufschrauben
der Klemmen fest angezogen, um das Rad sicher festzuklemmen. Jetzt wird die
Halteklammer des Rahmenhalters um ein Rahmenrohr des Fahrrades gelegt und die
Knaufschraube des entsprechenden Halters fest angezogen. Das zweite Fahrrad wird in
entgegengesetzter Richtung in die zweite Fahrradaufnahme gestellt und, wie beschrieben,
befestigt. Zum Lieferumfang gehören auch Rahmenhalterklammern für Y oder Oversize-
Rahmen. Gegebenenfalls müssen Sie die Rahmenhalterklammern tauschen, damit eine
sichere Befestigung der Fahrräder gewährleistet ist.
Zusätzlich müssen die Fahrräder unbedingt noch mit dem beiliegenden
Sicherheitsgurt festgezurrt werden. Legen Sie dazu den Sicherheitsgurt um die
Fahrradrahmen und um den Haltebügel herum und ziehen ihn fest an.
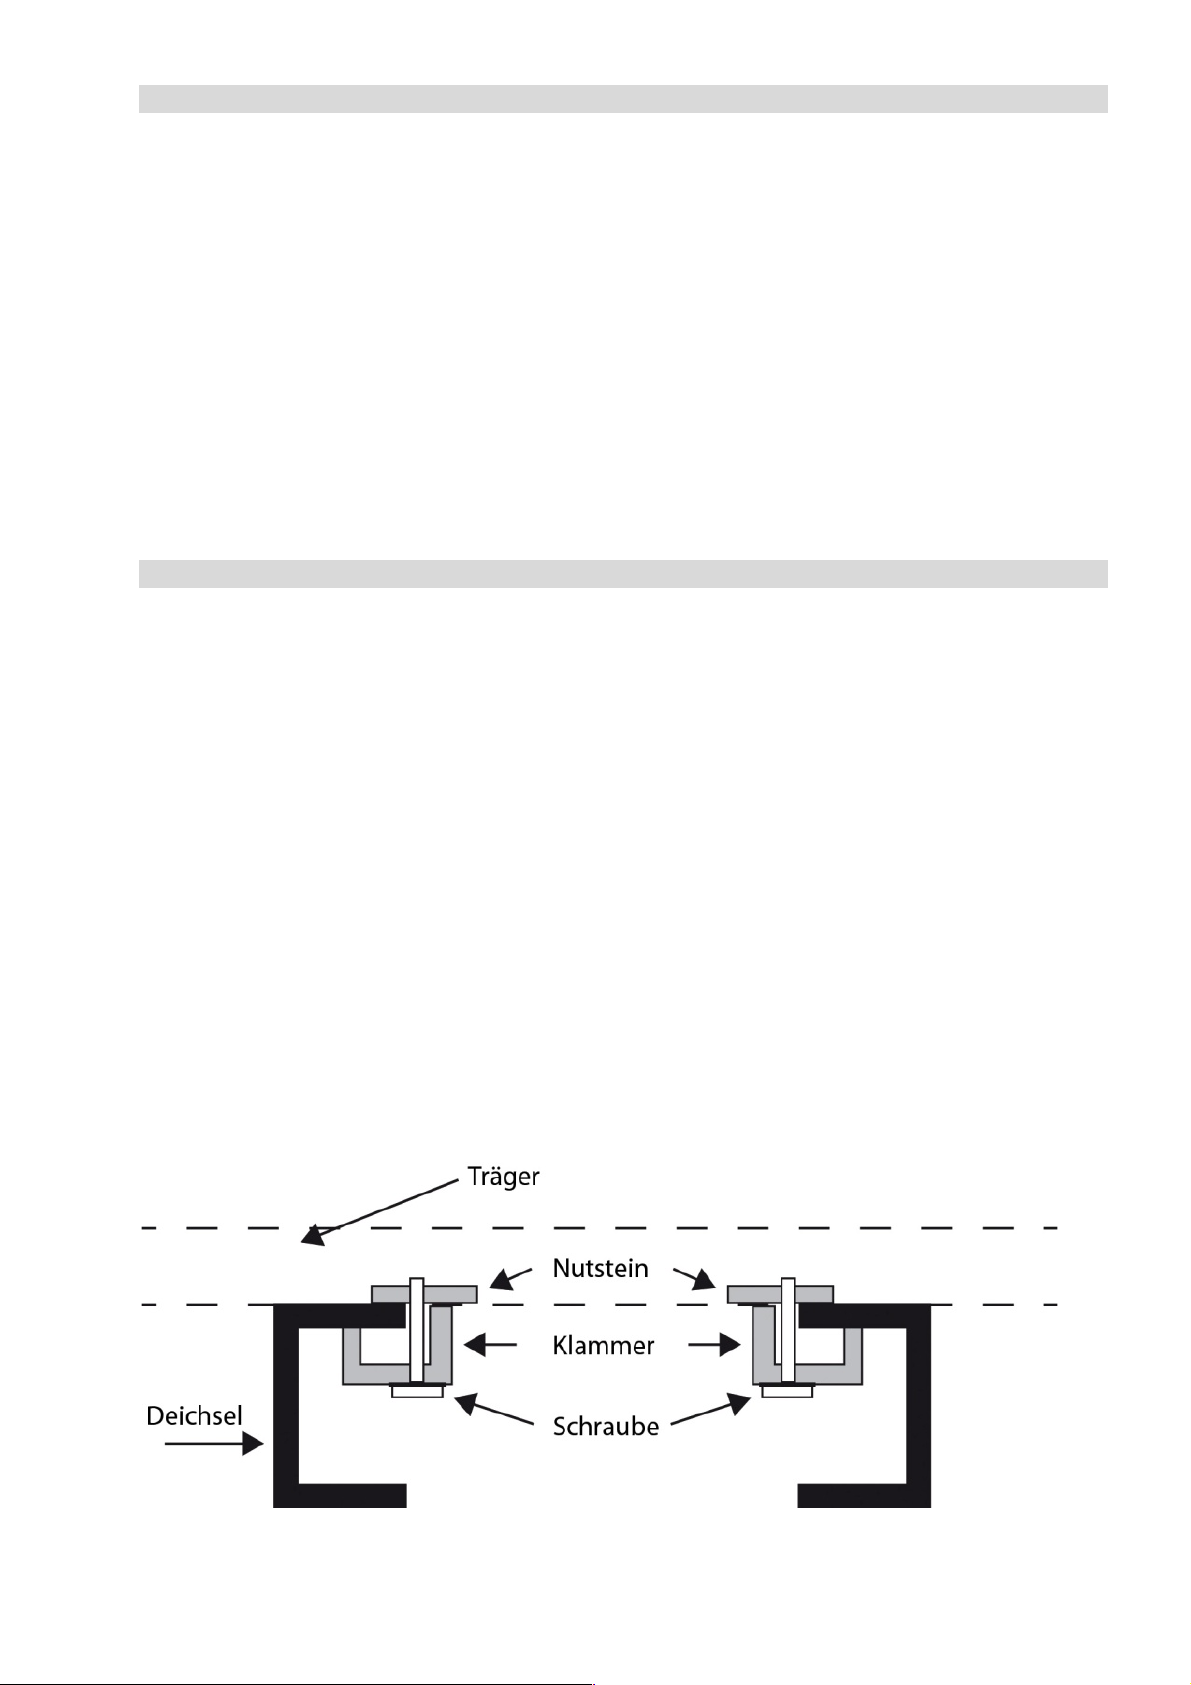
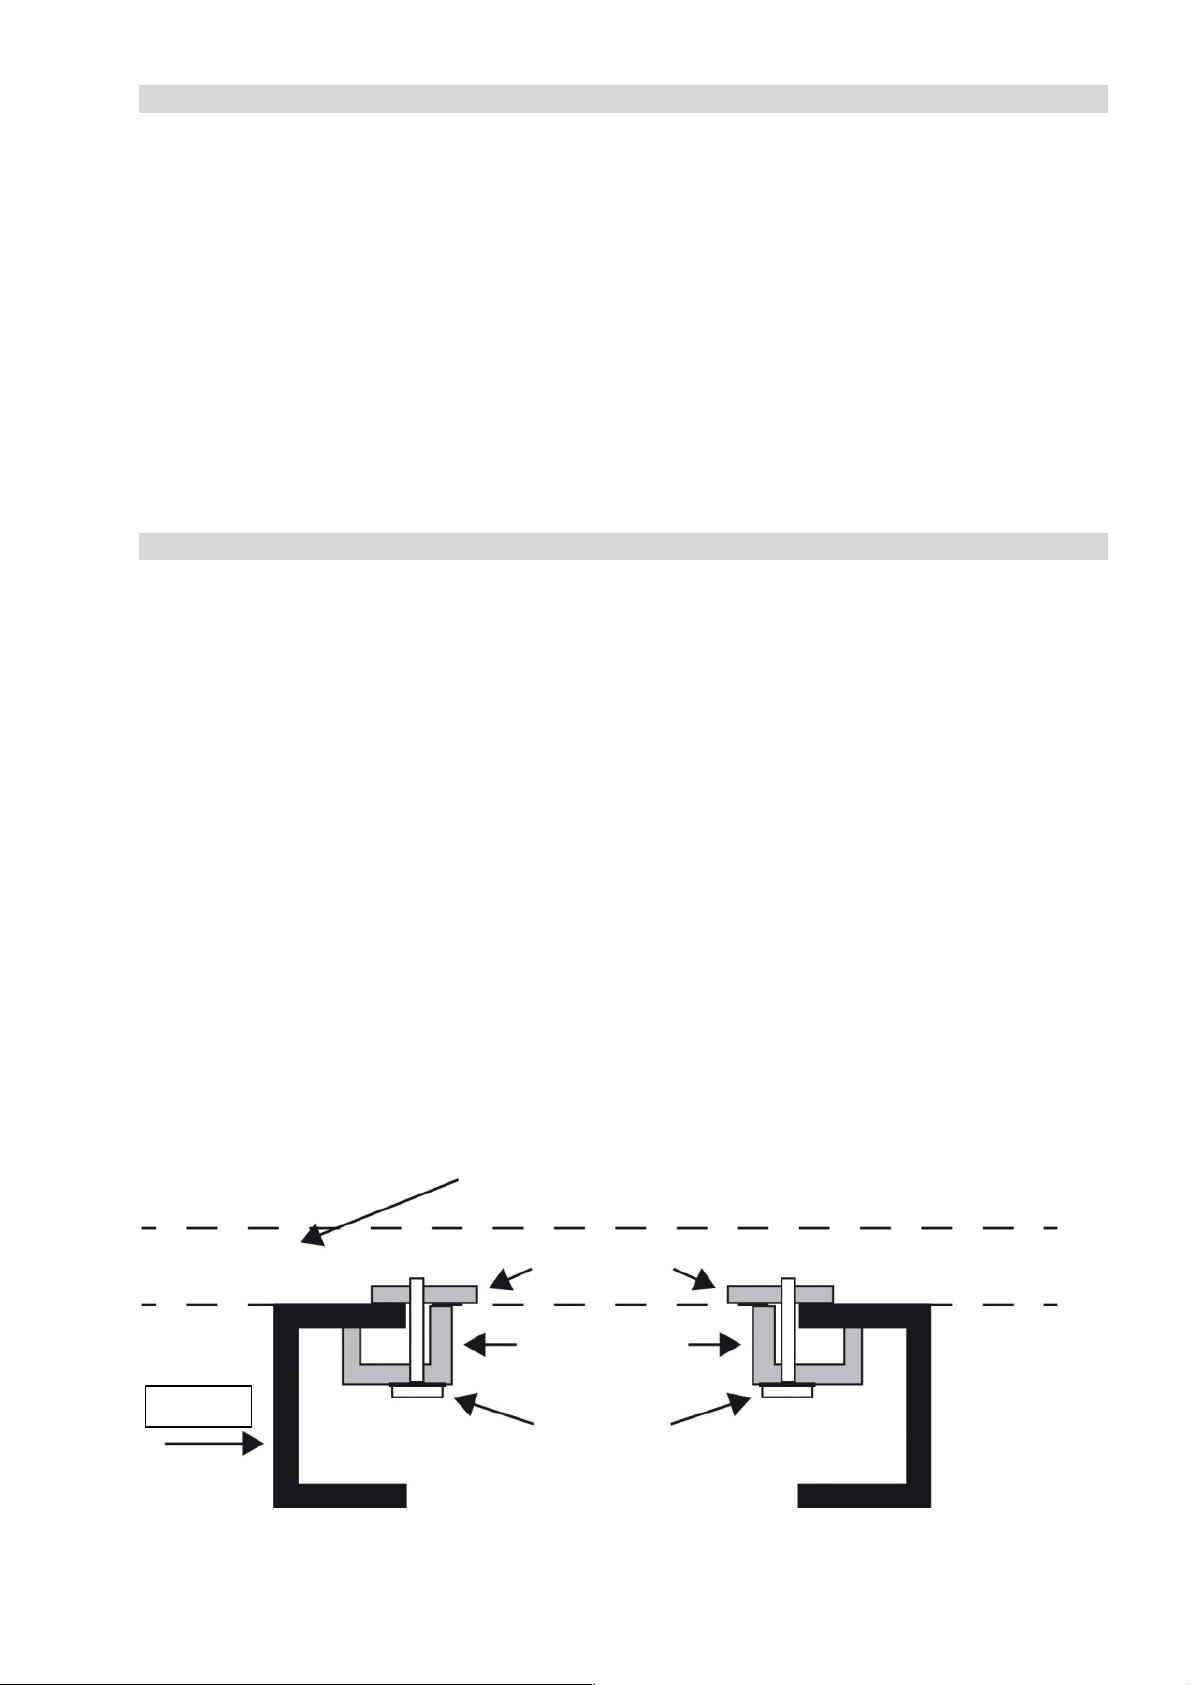
Abklappen des Fahrradträgers:
Ziehen Sie den Sicherungsbolzen, der sich in der Mitte des Fahrradträgers befindet, nach
außen und klappen den Träger nach vorn. Um Beschädigungen an Ihren Fahrrädern oder
Ihrem Fahrzeug zu vermeiden, halten Sie dabei entweder den Träger oder die Fahrräder
gut fest, und neigen Sie die Last sanft nach vorne. Durch das Anheben des Trägertisches
und der Fahrräder wird der Träger wieder in seine normale Betriebsposition gebracht. Der
Träger muß nun wieder mit dem Sicherungsbolzen gesichert werden. Dazu wird der mit
einer Feder versehene Bolzen zunächst etwas herausgezogen, der Träger klappt jetzt in
seine endgültige Position, und dann losgelassen.
Prüfen Sie unbedingt, ob der Bolzen sicher in seiner Führung eingerastet ist, und
der Klappmechanismus blockiert ist!
Wartung und Pflege
- Den Fahrradträger nach Verwendung sauber und trocken lagern. Eventuell Schlamm
und anderen Schmutz mit Wasser abwaschen.
- Kontrollieren Sie den Fahrradträger regelmäßig auf Beschädigungen. Beschädigte oder
verschlissene Teile sind sofort zu ersetzen. Es dürfen nur Originalersatzteile verwendet
werden.
- Bolzen und Muttern des Fahrradträgers regelmäßig kontrollieren und wenn notwendig
nachziehen.
- Lackschichtbeschädigungen sofort mit Farbe behandeln.
- Drehbare und bewegliche Teile regelmäßig schmieren.
Hinweise zum Umweltschutz
Bitte entsorgen Sie dieses Gerät über die Wertstofftonne oder die
öffentlichen/kommunalen Sammelstellen.
Die Materialien sind recycelbar. Durch Recycling, stoffliche Verwertung oder andere
Formen der Wiederverwendung von Altgeräten leisten Sie einen wichtigen Beitrag zum
Schutz unserer Umwelt!
Kontaktinformationen
EAL GmbH
Otto-Hausmann-Ring 107
42115 Wuppertal
Deutschland
Telefon: +49 (0)202 42 92 83 0
Telefax: +49 (0)202 2 65 57 98
Internet: www.eal-vertrieb.de
E-Mail: info@eal-vertrieb.com

6
GB Item number 11805 Esch Profiboy
Overview
Intended use
Scope of delivery
Specifications
Safety notes
Operating instructions
Care and maintenance
Contact details
WARNING
Read the operating instructions through carefully prior to initial use and observe
all of the safety notes!
Store the original packaging, the receipt and these instructions so that they
may be consulted at a later date!
Not observing such may lead to personal injury, damages to the device or your
property!
Prior to initial use check the contents of the packaging to ensure that they are
in perfect condition and complete!
Intended use
The Esch Profiboy bicycle carrier is used to transport two bicycles on the V-frame of a
trailer.
Scope of delivery
Specifications
Dimensions: 28 x 160 x 65 [cm]
Dead weight: 6 kg
Maximum payload: 40 kg
Square pipe with handle screws
Frame holder
Tow bar mount, pre-mounted
Tow bar clamp set
Holder for oversized frames
Safety strap

7
Safety notes
- Keep children away and do not permit children to use this device!
- Only use this product for the intended use!
- Do not manipulate or disassemble the device!
For your own safety, only use accessories or replacement parts specified in the
instructions or that the manufacturer has recommended!
- Remove all extra parts (pumps, bags, baskets, bicycle computers or battery packs of E-
bikes) from the bicycles before travel.
- Before starting each journey, and at intervals throughout travel, regularly check to
ensure that the carrier is securely fitted to the vehicle and that the bicycles are securely
attached to the carrier in order to recognise any potential damages to the fixtures early
and to eliminate them!
- Make sure that there is adequate steering! When travelling very bendy roads, ensure
that neither the carrier nor the bicycles come into contact with anything.
- Make sure that the locking bolts are engaged and the folding mechanism is blocked
before you start your journey.
Operating instructions
Mounting the carrier to the tow bar:
There are bicycle mounting columns to the right and left of the middle of the carrier. Raise
the mounting columns so they are vertical. Slide a frame holder onto a column so that it
faces forwards in the direction of travel, slide the other frame holder onto the other column
so that it faces backwards. Connect the mounting columns using the square pipe and the
screw handles. Tighten the screw handles.
Remove the end caps from the lower, slotted square pipes of the pre-mounted carrier. To
secure the carrier use the tow bar clamp set. Insert the screws, from below, through the
drilled hole into the U-shaped clamp. Screw the sliding blocks a few rotations onto the
screws. Guide the sliding blocks into the open ends of the square pipe. Replace the end
caps.
Position the bicycle carrier on the tow bar of your trailer in such a way that the folding
hinge and the locking bolt handle face forwards.
When you have determined the position of the carrier on the tow bar, slide the holding
clamps in the grooves from the middle outwards until the screws of the clamps meet the
tow bar. Make sure that each clamp securely grasps the upper edge of the tow bar (see
diagram). Now tighten the screws.
When you have finished, check again to ensure that the carrier and the screws are
firmly seated!
Carrier
Sliding block
Clamp
Screw
Tow bar

8
Mounting the bicycles to the carrier
The first bicycle is put into the first holder (the one closest to the vehicle). The screw
handles with the spring-loaded wheel clamps are opened up wide and the wheels are
placed in the clamps. Then the screw handles of the clamps are tightened firmly to secure
the wheel. Now, the holding clamp of the frame holder is passed around one of the tube of
the bicycle frame and the handle screw of the appropriate holder is tightened. The second
bicycle is mounted to the second holder facing the other direction and secured as
described above. The scope of delivery also includes frame holder clamps for Y-shaped or
oversized frames. If necessary, you may need to replace the frame holding clamps to
ensure safe fixture of the bicycles.
In addition, the bicycles must be secured using the supplied safety straps. Wrap the
strap around the bicycle frame and the holding bar and tighten.
Folding the bicycle carrier:
Pull the locking bolt that is located in the middle of the bicycle carrier to the outside and
fold the carrier forwards. In order to prevent damages to your bicycle or vehicle, hold the
carrier or bicycle firmly when doing so and gently tilt the load forwards. The raising of the
carrier table and the bicycles brings the carrier back to the normal operating position. The
carrier must now be secured again using the locking bolt. To do this, the spring-loaded bolt
is first pulled out slightly, the carrier is folded into the final position, and the bolt is
released.
Make sure that the bolt has engaged safely into the guide and the folding
mechanism is blocked!
Care and maintenance
- After use, store the bicycle carrier in a clean and dry place. Wash any mud or other dirt
off using water.
- Check the bicycle carrier regularly for damages. Damaged or worn parts must be
replaced immediately. Only original replacement parts may be used.
- Check the bolts and nuts of the bicycle carrier regularly and tighten when necessary.
- Immediately treat any damage to paintwork with paint.
- Regularly lubricate rotating and moving parts.
Notes for environmental protection
Please dispose of this device via the recycling facilities or public/community collection
points.
The materials can be recycled. By recycling, reuse of materials or other forms of reuse of
old devices, you make an important contribution to the protection of our environment!
Contact information
EAL GmbH
Otto-Hausmann-Ring 107
42115 Wuppertal
Germany
Telephone: +49 (0)202 42 92 83 0
Fax: +49 (0)202 2 65 57 98
Internet: www.eal-vertrieb.de
Email: info@eal-vertrieb.com

9
F Réf. 11805 Esch Profiboy
Vue d'ensemble
Utilisation conforme
Contenu de la livraison
Spécifications
Consignes de sécurité
Mode d'emploi
Entretien et maintenance
Contact
AVERTISSEMENT
Lisez attentivement le mode d'emploi avant la mise en service et respectez
toutes les consignes de sécurité !
Conservez l'emballage d'origine, la preuve d'achat ainsi que ces instructions
pour consultations ultérieures !
Le non-respect de ces consignes peut entraîner des dommages corporels,
endommager l'appareil ou vos biens !
Vérifiez l'intégrité et l'intégralité du contenu de l'emballage !
Utilisation conforme
Le porte-vélo Esch Profiboy sert au transport de deux vélos sur les timons en V de
remorques.
Contenu de la livraison
Spécifications
Dimensions : 28 x 160 x 65 [cm]
Poids propre : 6 kg
Capacité de charge maximale : 40 kg
Tube carré avec vis à pommeau
Porte-cadre
Support de timon,
prémonté
Jeu de pinces pour timons
Fixations pour cadres
surdimensionnés
Sangle de sécurité

10
Consignes de sécurité
- Tenez les enfants à distance et ne les laissez pas utiliser ou jouer avec cet appareil !
- Utilisez ce produit uniquement pour l'usage auquel il a été prévu !
- Ne manipulez ni ne démontez l'appareil !
Pour votre sécurité, utilisez exclusivement des accessoires ou pièces de rechange
indiqué(e)s dans les instructions ou dont l'usage est recommandé par le fabricant !
- Avant tout déplacement, enlevez entièrement toutes les pièces montées sur les vélos
(pompes à air, sacoches, paniers, ordinateurs pour vélos ou accumulateurs de vélos
électriques).
- Assurez-vous de temps en temps, mais régulièrement, et toujours avant le déplacement
que le support est bien fixé sur le véhicule et que les vélos sont bien fixés sur le support
pour éviter tout risque de dommage des éléments de fixation.
- Veillez à ce que la direction soit suffisamment libre ! Le support ou les vélos ne doivent
heurter nulle part, même dans les virages les plus étroits.
- Avant de vous déplacer, assurez-vous que le boulon de sécurité est enclenché et que le
mécanisme de basculement est correctement bloqué !
Mode d'emploi
Montage du support sur le timon :
Du côté droit et du côté gauche du centre du support, il y a des colonnes permettant d'y
fixer les vélos. Mettez les colonnes de maintien à la verticale. Poussez l'un des porte-
cadre sur une colonne de manière à ce qu'il soit dirigé vers l'avant, dans le sens du
déplacement, et poussez le deuxième porte-cadre sur l'autre colonne, de manière inverse
au sens de déplacement. Reliez les colonnes de maintien au tube carré et serrez les vis à
pommeau à fond.
Enlevez les embouts des tubes carrés inférieurs fendus du support prémonté. Pour la
fixation du support, veuillez utiliser le jeu de pinces pour timons. Introduisez les vis par le
bas dans l'alésage et dans la pince en forme de U. Montez les coulisseaux sur les vis en
effectuant quelques rotations. Introduisez les coulisseaux dans les extrémités ouvertes
des tubes carrés. Remontez les embouts.
Positionnez le porte-vélos sur le timon de votre remorque de manière à ce que la
charnière de basculement et que la poignée du boulon de déverrouillage soient dirigées
vers l'avant.
Après avoir déterminé la position du support sur le timon, poussez les pinces de fixation
dans les rainures se situant au milieu vers l'extérieur, jusqu'à ce que leurs vis soient à fleur
du timon. Veillez à ce que chaque pince saisisse fiablement le bord supérieur du timon
(voir illustration). Serrez ensuite les vis à fond.
À la fin du travail, contrôlez en tout cas encore une fois la bonne fixation du support
et des vis!
Timon
Pinces
Coulissea
u
Support
Vis

11
Montage des vélos sur le porte-vélos :
Le premier vélo doit être placé dans le premier logement du porte-vélo (situé à proximité
du véhicule). Ouvrez le plus possible les vis à pommeau des pinces à ressort, sans les
enlever, et placez les roues dans les pinces. Ensuite, serrez les vis à pommeau des
pinces à fond afin de fixer la roue. Posez ensuite la pince de fixation du porte-cadre autour
d'un tube de cadre du vélo et serrez la vis à pommeau du support en question à fond. Le
deuxième vélo doit être placé dans le deuxième logement du porte-vélos, dans le sens
inverse, et fixé comme décrit. Les pinces de fixation pour cadres en Y ou pour cadres
surdimensionnés sont également comprises dans la livraison. Si nécessaire, les pinces de
fixation du porte-cadre doivent être remplacées afin d'assurer une fixation fiable des vélos.
Il convient en tout cas arrimer les vélos encore par la sangle de sécurité fournie.
Pour ce faire, posez la sangle de sécurité autour des cadres des vélos et autour de
l'étrier de maintien et serrez-la à fond.
Basculement du porte-vélos :
Poussez le boulon de sécurité, qui se trouve au milieu du porte-vélos, vers l'extérieur et
basculez le support vers l'avant. Afin d'éviter tout endommagement de vos vélos ou de
votre véhicule, maintenez fermement soit le support, soit les vélos et faites incliner la
charge en la basculant soigneusement vers l'avant. En soulevant le plateau du support et
des vélos, celui-ci se remet en position de service normale. Le support doit de nouveau
être bloqué par le boulon de sécurité. Pour que le support bascule dans sa position
définitive, il convient de retirer un peu le boulon à ressort. Vous pouvez ensuite le relâcher.
Contrôlez en tout cas que le boulon s'enclenche avec fiabilité dans son guidage et
vérifiez le blocage correct du mécanisme de basculement !
Entretien et maintenance
- Après son utilisation, rangez le porte-vélos dans un endroit propre et sec. Enlevez à
l'eau d'éventuelles boues et autres souillures.
- Contrôlez régulièrement le porte-vélos pour exclure d'éventuels dommages. Les pièces
endommagées ou usées doivent être immédiatement remplacées. Seules des pièces
de rechange d'origine ont le droit d'être utilisées.
- Les boulons et les écrous du porte-vélos doivent être régulièrement contrôlés et
resserrés si nécessaire.
- Tout endommagement de la peinture doit être immédiatement réparé.
- Graissez régulièrement les pièces mobiles et rotatives.
Consignes pour la protection de l'environnement
Veuillez vous débarrasser de cet appareil dans des conteneurs pour matériaux recyclables
ou auprès des services de collecte publics/communaux.
Les matériaux sont recyclables. Grâce au recyclage, à la réutilisation des matières ou à
d'autres formes de réutilisation d'appareils usagés, vous contribuez favorablement à la
protection de notre environnement !
Contacts :
EAL GmbH
Otto-Hausmann-Ring 107
42115 Wuppertal
Allemagne
Téléphone : +49 (0)202 42 92 83 0
Fax : +49 (0)202 2 65 57 98
Internet : www.eal-vertrieb.de
E-mail : info@eal-vertrieb.com

12
© EAL GmbH, 11805, Ma15
Table of contents
Languages:
Other LAS Automobile Accessories manuals
Popular Automobile Accessories manuals by other brands

Mont Blanc
Mont Blanc Chamonix Series Fitting instructions

Havis-Shields
Havis-Shields 2004-2008 Ford Econoline Van C-VS-1800-ECO Install instructions

Voxoa
Voxoa MCU-20A(P40) user manual

Steinhof
Steinhof L-113 FITTING AND OPERATION MANUAL

Brink
Brink 5041 Fitting instructions

Cruz
Cruz 924-8 Series Assembly instructions