Lionelo Bastiaan RWF i-Size User manual

Bastiaan RWF i-Size
Baby car seat
Fotelik samochodowy
Kindersitz
Детское автокресло
Seggiolino auto
Siège auto bébé
Silla de coche
Autostoeltje
Kūdikio automobilinė kėdutė
Dětská autosedačka
Baba autósülés
Scaun auto pentru bebeluși
Bilbarnstol
Bilsete
Autostol
Auton turvaistuin
Naudojimo instrukcija
Návod k obsluze
Használa utasítás
Manual ulizare
Bruksanvisning
Bruksanvisning
Brugsvejledning
Käyöopas
User manual
Instrukcja obsługi
Bedienungsanleitung
Инструкция по эксплуатации
Manuale d’uso
Manuel de l’Ulisateur
Manual de usuario
Handleiding
www.lionelo.com

‑ 2 ‑
A
1
19
7
8
9
10
18
14
11
15
17
16
12
13
2
3
4
5
6

‑ 3 ‑
2
3
1
4
B
360° click!
click!

‑ 4 ‑
ISOFIX ISOFIX
5
6
7

‑ 5 ‑
A
BC
D
ISOFIX ISOFI X
8
9B9A
1110

‑ 6 ‑
click!
40-74 cm
1514
16
1312

‑ 7 ‑
click!
1817
19
20

‑ 8 ‑
1
2
90°
2221
2423
25

‑ 9 ‑
26
27

‑ 10 ‑EN
EN
Dear customer!
Should you have any remarks or quesons concerning the product, please do not
hesitate to contact us: [email protected]
Producer:
BrandLine Group Sp. z o. o.
A. Kręglewskiego 1, 61-248 Poznań, Poland
The product meets the requirements of the standard: R129/03.
APPLIES TO REAR-FACING INSTALLATION:
NOTICE. This is an i-Size Enhanced Child Restraint System. It is approved according
to UN Regulaon No. 129, for use in i-Size compable vehicle seang posions as
indicated by vehicle manufacturers in the vehicle users’s manual. If in doubt, consult
either the Enhanced Child Restraint System manufacturer or the retailer.
APPLIES TO FORWARD FACING INSTALLATION:
NOTICE. This is a i-Size booster seat Enhanced Child Restraint System. It is approved
according to UN Regulaon No. 129, for use primarily in “i-Size seang posions” as
indicated by vehicle manufacturers in the vehicle user’s manual. If in doubt, consult
either the Enhanced Child Restraint System manufacturer or the retailer.
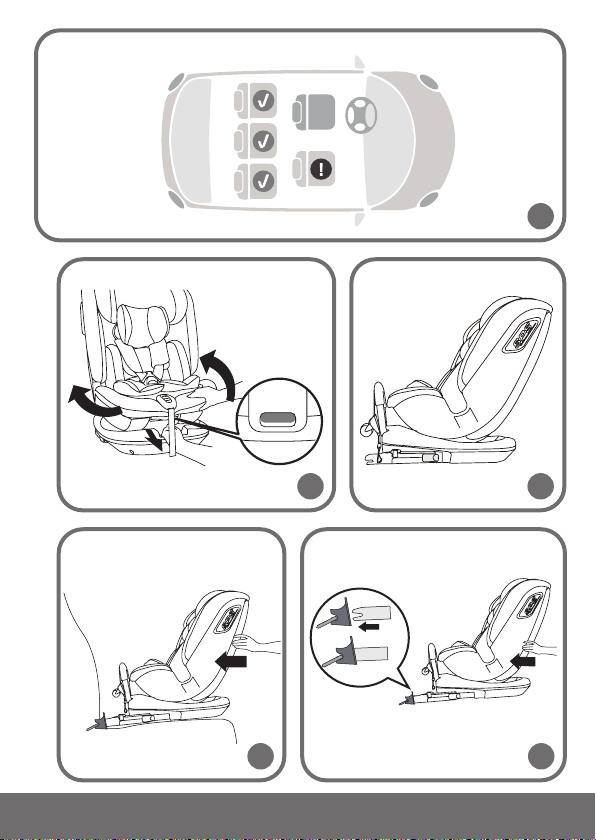
The product is only suitable for mounng on the posions shown in Fig. B, which
are equipped with ISOFIX connectors and Top Tether hooks (applies to mounng for
group 40-105 cm).
WARNINGS:
1. The product is designed for children weighing up to 36 kg and between 40 and
150 cm in height.
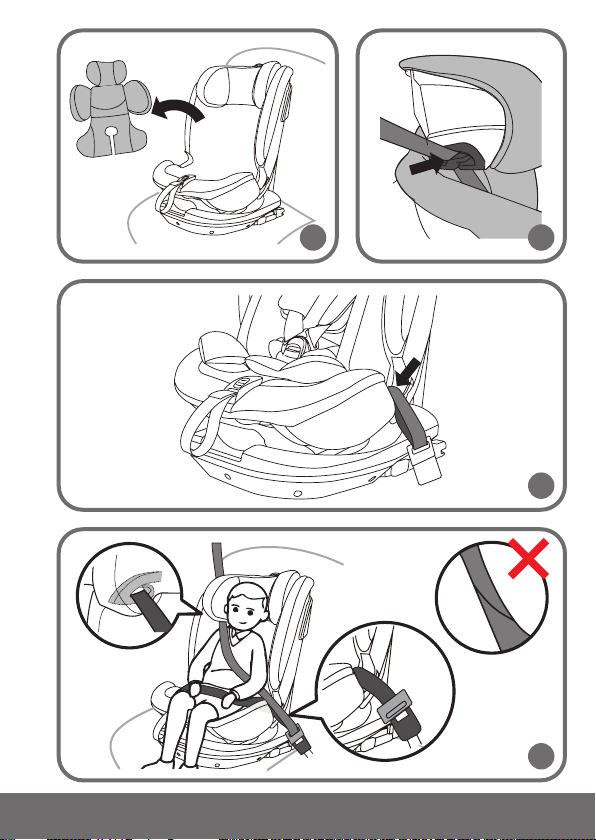
2. If your child is less than 15 months old, do not use a forward-facing seat.
3. Do not use a forward-facing seat if your child is less than 100 cm tall.
4. The hard parts and plasc parts of the child restraint system should be posioned
and installed in such a manner that they cannot be trapped by a sliding seat or
vehicle door under normal vehicle operang condions.
5. For rear-facing installaon, do not use the seat where the front airbag is acve.
6. Any seat belts holding the child must be well suited to the child’s size. The belts

‑ 11 ‑ EN
must not be twisted.
7. The straps securing the restraint to the vehicle must be tensioned.
8. Make sure the lap belts run low to adequately secure the pelvis.
9.
If the product has been exposed to strong elements (such as impact), it should
be replaced.
10. Do not make any changes to the seat or add any new components without the
approval of the approval authority. To ensure maximum safety for your child, the
equipment should be xed and used as recommended in the instrucons.
11.
The plasc parts of this seat can heat up in the sun and cause burns on the
child’s skin.
12. Protect your child and the seat from the sun (for example, by covering the seat
with a light-colored item of clothing). If the seat is not covered, try not to expose
it to the sun. Otherwise the seat may be too hot for your child’s skin.
13. Never leave a child alone in a child seat in a vehicle.
14. Luggage and other similar items should be secured so that they do not cause any
injury in a collision situaon.
15. Do not use the seat without its fabric cover.
16. The cover cannot be replaced with an item from another set. It is an integral part
of the set and aects the operaon of the restraint.
17. Always keep this instrucon manual with you.
18. Refer to the vehicle manufacturer’s manual.
PARTS DESCRIPTION (FIG. A)
1. Seat cover
2. Reducon insert
3. 5-point seat belts
4. Seat belt tension adjustment strap
5. Seat lt adjustment lever
6. Seat rotaon buon
7. Headrest adjustment lever
8. Headrest
9. Shoulder strap protecon pads
10. Seat belt adjustment buon
11. Top Tether strap
12. An-rotaon frame

‑ 12 ‑EN
13. ISOFIX arms
14. Side protecon system
15. Top Tether strap length adjuster
16. ISOFIX release buon
17. ISOFIX sliding lever
18. Storage compartment for the instrucon manual
19. Inner belt retaining magnets
INSTALLATION IN THE CAR
Seat installaon Seat
orientaon
Seat posion Child's
measurements
Installaon via ISOFIX
and Top Tether strap.
Child secured with
5-point harness
Adjust the seat to
one of the 4 available
posions (see: Seat lt
adjustment).
Rearward
facing
A
BC
D
From 40 to
105 cm
- Installaon via ISOFIX
system and car belts
Or
- Installaon via car
belts only
Adjust the seat to
one of the 4 available
posions (see: Seat lt
adjustment).
Forward
facing
From 100 to
150 cm
REARWARD FACING (40 – 105 CM)
1. Place the seat on the sofa of the car in the space provided for installaon.
2.
Press the seat rotaon buon (g. 1) and then move the seat to the rearward-
facing posion (g. 2). The correct seng will be signaled by a click.
3.
Tilt the ISOFIX sliding lever and extend the ISOFIX arms (Figure 6). Anchor the
ISOFIX arms to the hooks located in the car’s bench seat (g. 3). The arms will
interlock and you will hear a characterisc click (g. 4). Use the plasc guides

‑ 13 ‑ EN
included in the set to make installaon easier if needed (g. 5).
4. Push the baby seat downwards and then push towards the seat in order to press
the an-rotaon frame against the car seat as far as possible (g. 7). Make sure
the baby seat is pressed rmly against the backrest of the car seat.
5. Push the base using a le-right movement towards the backrest to make sure it
is pressed as rmly as possible against the car seat.
6. The green indicator on the ISOFIX buon must be visible on both sides (g. 8).
7. Aach the Top Tether strap to the anchorage points in the car (g. 9A, 9B). The
anchorage points can be in dierent locaons, depending on the vehicle.
8.
Tighten the Top Tether strap and make sure the indicator is green (g. 10). The
seat is now correctly installed in the car (g. 11).
9. Unbuckle the seat belts and then put the child in the seat.
10. To fasten the belts in the seat, connect the belt connectors and then insert the
belts into the buckle (g. 12). You will hear a characterisc click.
11.
Pull the strap to ghten the belts (g. 14). Press the buon and pull on the shoulder
belts to loosen the belts (g. 15).
Note! Make sure that the seat belts t ghtly around the child’s body and that they
are not twisted. Make sure the lap belts run low and protect the child’s pelvis. The
belts should be ght against the child’s body, but should not be too ght and cause
discomfort.
Note! Children less than 75 cm tall may only use the seat with a reducon insert (g. 16).
12. To release the 5-point seat belts, press the red buon on the buckle and loosen
the belts (g. 13).
SEAT DISMANTLING – ISOFIX
To detach the ISOFIX arms, press the ISOFIX release buons (16, g. A) on both sides.
The indicator on the ISOFIX buon will turn red. Pull the ISOFIX sliding lever (17, g.
A) to retract the ISOFIX arms.
SEAT DISMANTLING – TOP TETHER
Loosen the strap. Detach the Top Tether strap from the anchorage points in the car.
The indicator will turn red.
SEAT BELT DISMANTLING
To remove the seat belts, loosen them as much as possible (g. 15), remove them from

‑ 14 ‑EN
the rear buckle (g. 23), put them through the corresponding holes in the backrest and
then remove them from the safety cushions (9, g. A). To put the belts through the
corresponding holes in the seat, turn the buckles 90° (g. 24).
The belts and safety cushions can also be hidden under the seat cover (g. 25).
Store the lap belt buckle in the appropriate storage compartment (g. 26).
FORWARD FACING (100 – 150 CM)
1.
Remove the reducon insert from the seat (g. 17) and perform the belt dismantling
(see: Seat belt dismantling) or hide the belts under the seat cover.
2.
Press the seat rotaon buon (g. 1) and then move the seat into the forward
facing posion.
Note! For installaon without ISOFIX arms, skip the following steps (3-6).
3. Tilt the ISOFIX sliding lever and extend the ISOFIX arms (Figure 6). This anchors
the ISOFIX arms to the hooks located in the car’s bench seat (g. 3). The arms will
interlock and you will hear a characterisc click (g. 4). Use the guides to make the
installaon easier if needed (g. 5).
4. Push the baby seat downwards and then push towards the seat in order to press
the an-rotaon frame against the car seat as far as possible (g. 7). Make sure
the baby seat is pressed rmly against the backrest of the car seat.
5. Push the base using a le-right movement towards the backrest to make sure it
is pressed as rmly as possible against the car seat.
6. The green indicator on the ISOFIX buon must be visible on both sides (g. 8).
7. Place the child in the seat. Pass the shoulder belt through the shoulder belt guide,
which is located in the headrest of the seat (g. 18). Pass the lap belt through the lap
belt guide (g. 19). Fasten the seat belts (g. 20). Make sure the belt is not twisted.
HEADREST AND SHOULDER BELTS ADJUSTMENT
To change the height, pull the headrest adjustment lever (7, g. A). You may need to
press the headrest down slightly and then adjust it to the desired posion (g. 22).
The height seng of the shoulder belts is integrated into the height seng of the
headrest. By adjusng the height of the headrest, the height of the shoulder belts will
be set automacally.
Note! The headrest should be set at such a height that the shoulder belts are at the
child’s shoulder height (g. 21).

‑ 15 ‑
SEAT TILT ADJUSTMENT
To adjust the seat lt, press the lt adjustment lever (5, g. A) and move the seat to
the desired posion. The seat has 4 levels of lt adjustment in the rear-facing posion
and 4 levels in the forward-facing posion.
SEAT ROTATION
Press the seat rotaon buon (6, g. A) and then adjust the seat to the rearward or
forward facing posion. The correct seng will be signaled by a click.
CLEANING AND MAINTENANCE
Unzip the cover and slide it completely o the seat body ( g. 27).
The cover can be washed at a maximum temperature of 30°C. Do not use tumble dryers
when drying. The cover should not be exposed to sunlight for drying. The plasc parts
can be cleaned with a damp cloth and mild detergent.
Note! Do not use strong detergents or bleaching agents.
The photos are for illustrave purposes only, the actual appearance of the products may dier
from those shown in the images.
PL
Drogi Kliencie!
Jeśli masz jakiekolwiek uwagi lub pytania do zakupionego produktu, skontaktuj się z nami:
Producent:
BrandLine Group Sp. z o. o.
A. Kręglewskiego 1, 61-248 Poznań, Polska
Produkt spełnia wymagania normy: R129/03.
DOTYCZY MONTAŻU TYŁEM DO KIERUNKU JAZDY:
UWAGA. To jest ulepszone urządzenie przytrzymujące dla dzieci kategorii „i-Size”. Uzyskało
ono homologację zgodnie z regulaminem ONZ nr 129, do stosowania na miejscach
EN | PL

‑ 16 ‑PL
siedzących kategorii „i-Size” wskazanych przez producentów pojazdów w instrukcji
użytkownika pojazdu. W przypadku wątpliwości należy skonsultować się z producentem
lub sprzedawcą detalicznym ulepszonego urządzenia przytrzymującego dla dzieci.
DOTYCZY MONTAŻU PRZODEM DO KIERUNKU JAZDY:
UWAGA. To jest ulepszone urządzenie przytrzymujące dla dzieci typu „siedzenie
podwyższające kategorii i-Size”. Uzyskało ono homologację zgodnie z regulaminem ONZ
nr 129, do stosowania przede wszystkim na pozycjach siedzących dla „i-Size” wskazanych
przez producentów pojazdów w instrukcji użytkownika pojazdu. W przypadku wątpliwości
należy skonsultować się z producentem lub sprzedawcą detalicznym ulepszonego
urządzenia przytrzymującego dla dzieci.
Produkt nadaje się do montażu jedynie na miejscach oznaczonych na rys. B,
wyposażonych w złącza ISOFIX oraz zaczepy Top Tether (dotyczy montażu dla grupy
40-105 cm).
OSTRZEŻENIA:
1. Produkt przeznaczony jest dla dzieci o wadze do 36 kg oraz o wzroście pomiędzy
40 a 150 cm.
2.
Jeśli Twoje dziecko ma mniej niż 15 miesięcy, nie używaj fotelika przodem do
kierunku jazdy.
3. Nie używaj fotelika przodem do kierunku jazdy, jeśli Twoje dziecko ma mniej niż
100 cm wzrostu.
4. Twarde elementy oraz plaskowe części urządzenia przytrzymującego dla dzieci
należy umieścić i zainstalować w taki sposób, by w normalnych warunkach
eksploatacji pojazdu nie mogły zostać uwięzione przez przesuwane siedzenie
lub drzwi pojazdu.
5. W przypadku instalacji tyłem do kierunku jazdy, nie używaj fotelika w miejscach,
gdzie aktywna jest przednia poduszka powietrzna.
6.
Wszelkie pasy bezpieczeństwa przytrzymujące dziecko muszą być dobrze
dopasowane do jego rozmiaru. Pasy nie mogą być skręcone.
7. Taśmy mocujące urządzenie przytrzymujące do pojazdu muszą być napięte.
8. Upewnij się, że pasy biodrowe przebiegają nisko, aby odpowiednio zabezpieczały
miednicę.
9.
Jeśli produkt został wystawiony na działanie silnych czynników (takich jak uderzenie),
należy go wymienić.
10.
Nie należy dokonywać żadnych zmian w foteliku lub dodawać nowych elementów

‑ 17 ‑ PL
bez akceptacji organu udzielającego homologacji. Aby zapewnić dziecku maksymalne
bezpieczeństwo, sprzęt należy zamocować i użytkować zgodnie z zaleceniami w instrukcji.
11.
Plaskowe elementy tego fotelika mogą nagrzewać się w słońcu i powodować
oparzenia na skórze dziecka.
12.
Chroń swoje dziecko i fotelik przed słońcem (na przykład przykrywając fotelik
jasnym elementem odzieży). Jeśli fotelik nie jest przykryty, staraj się nie wystawiać
go na słońce. W przeciwnym przypadku fotelik może być zbyt gorący dla skóry
twojego dziecka.
13. Nigdy nie zostawiaj dziecka samego w foteliku w pojeździe.
14.
Bagaże i inne, podobne elementy powinny być zabezpieczone, aby w sytuacji kolizji
nie spowodowały żadnych obrażeń.
15. Nie należy używać fotelika bez jego materiałowego pokrycia.
16.
Poszycie nie może być zastąpione elementem pochodzącym z innego zestawu.
Stanowi ono integralny element zestawu i ma wpływ na działanie urządzenia
przytrzymującego.
17. Zawsze miej przy sobie tę instrukcję obsługi.
18. Zapoznaj się z instrukcją obsługi producenta pojazdu.
OPIS CZĘŚCI (RYS. A)
1. Poszycie fotelika
2. Wkładka redukcyjna
3. 5-punktowe pasy bezpieczeństwa
4. Taśma regulacji napięcia pasów bezpieczeństwa
5. Dźwignia regulacji pochylenia siedziska
6. Przycisk rotacji siedziska
7. Dźwignia regulacji zagłówka
8. Zagłówek
9. Poduszki ochronne pasa naramiennego
10. Przycisk do regulacji pasów bezpieczeństwa
11. Pas Top Tether
12. Rama antyrotacyjna
13. Ramiona ISOFIX
14. System ochrony bocznej
15. Regulator długości pasa Top Tether
16. Przycisk zwalniający ISOFIX

‑ 18 ‑PL
17. Dźwignia przesuwu ISOFIX
18. Schowek na instrukcję obsługi
19. Magnesy przytrzymujące pasy wewnętrzne
MONTAŻ W SAMOCHODZIE
Montaż fotelika Orientacja
fotelika
Pozycja fotelika Wymiary
dziecka
Montaż za pomocą
ISOFIX i pasa Top Tether.
Dziecko przypięte
5-punktową uprzężą
Fotelik należy ustawić
w jednej z 4 dostępnych
pozycji (patrz: Regulacja
pochylenia siedziska).
Tyłem do
kierunku
jazdy A
BC
D
Od 40 do
105 cm
- Montaż za pomocą
systemu ISOFIX i pasów
samochodowych
Lub
- Montaż tylko za pomocą
pasów samochodowych
Fotelik należy ustawić
w jednej z 4 dostępnych
pozycji (patrz: Regulacja
pochylenia siedziska).
Przodem
do kierunku
jazdy
Od 100
do 150
cm
TYŁEM DO KIERUNKU JAZDY (40 – 105 CM)
1. Umieść fotelik na kanapie samochodu w miejscu przeznaczonym do montażu.
2.
Wciśnij przycisk rotacji siedziska (rys. 1), a następnie ustaw siedzisko w pozycji
tyłem do kierunku jazdy (rys. 2). Prawidłowe ustawienie zasygnalizuje kliknięcie.
3.
Odchyl dźwignię przesuwu ISOFIX i wysuń ramiona ISOFIX (rys. 6). Zakotwicz
ramiona ISOFIX w zaczepach znajdujących się w kanapie samochodu (rys. 3).
Ramiona zazębią się i usłyszysz charakterystyczne kliknięcie (rys. 4). Użyj
plaskowych prowadnic dołączonych do zestawu w celu ułatwienia montażu,
jeżeli istnieje taka potrzeba (rys. 5).
4.
Dociśnij fotelik ku dołowi, a następnie pchnij w stronę fotela, w celu maksymalnego

‑ 19 ‑ PL
dociśnięcia ramy antyrotacyjnej do kanapy samochodu (rys. 7). Upewnij się, że
fotelik jest mocno dociśnięty do oparcia kanapy w samochodzie.
5. Pchnij bazę wykonując ruch lewo-prawo w kierunku oparcia aby mieć pewność,
że jest maksymalnie mocno przyciśnięta do kanapy samochodu.
6. Zielony wskaźnik na przycisku ISOFIX musi być widoczny po obu stronach (rys. 8).
7.
Przymocuj pas Top Tether do punków kotwiczenia w samochodzie (rys. 9A, 9B). Punkty
kotwiczenia mogą znajdować się w różnych miejscach, w zależności od pojazdu.
8.
Napnij pas Top Tether i upewnij się, że wskaźnik ma kolor zielony (rys. 10). Siedzisko
jest teraz prawidłowo zainstalowane w samochodzie (rys. 11).
9. Rozepnij pasy fotelika, a następnie włóż dziecko do fotelika.
10. Aby zapiąć pasy w foteliku, połącz złącza pasów, a następnie włóż pasy do klamry
(rys. 12). Usłyszysz charakterystyczne kliknięcie.
11. Pociągnij za taśmę, aby ścieśnić pasy (rys. 14). Wciśnij przycisk i pociągnij za pasy
naramienne, aby poluzować pasy (rys. 15).
Uwaga! Upewnij się, że pasy fotelika przylegają ściśle do ciała dziecka i że nie są
poskręcane. Upewnij się, że pasy biodrowe przebiegają nisko i chronią miednicę dziecka.
Pasy powinny być ciasne względem ciała dziecka, nie powinny jednak być zbyt ciasne
i wywoływać dyskomfortu.
Uwaga! Dzieci o wzroście poniżej 75cm mogą korzystać z siedziska wyłącznie z użyciem
wkładki redukcyjnej (rys. 16).
12.
Aby rozpiąć 5-punktowe pasy fotelika, wciśnij czerwony przycisk na klamrze i poluzuj
pasy (rys. 13).
DEMONTAŻ FOTELIKA – ISOFIX
Aby odpiąć ramiona ISOFIX, wciśnij przyciski zwalniające ISOFIX (16, rys. A) po obu
stronach. Wskaźnik na przycisku ISOFIX zmieni kolor na czerwony. Odchyl dźwignię
przesuwu ISOFIX (17, rys. A), aby schować ramiona ISOFIX.
DEMONTAŻ FOTELIKA – TOP TETHER
Poluzuj pas. Odepnij pas Top Tether od punktów kotwiczenia w samochodzie. Wskaźnik
zmieni kolor na czerwony.
DEMONTAŻ PASÓW FOTELIKA
W celu demontażu pasów fotelika, należy maksymalnie je poluzować (rys. 15), zdjąć
z tylnej klamry (rys. 23), przełożyć przez odpowiednie otwory w oparciu, a następnie

‑ 20 ‑PL
wyjąć z poduszek ochronnych (9, rys. A). Aby przełożyć pasy przez odpowiednie otwory
w siedzisku, należy obrócić klamry o 90° (rys. 24) .
Pasy oraz poduszki ochronne można również schować pod poszyciem fotelika (rys. 25).
Klamrę pasów biodrowych należy schować w odpowiednim schowku (rys. 26).
PRZODEM DO KIERUNKU JAZDY (100 – 150 CM)
1.
Wyjmij wkładkę redukcyjną z siedziska (rys. 17) i dokonaj demontażu pasów (patrz:
Demontaż pasów fotelika) lub schowaj pasy pod poszyciem fotelika.
2.
Wciśnij przycisk rotacji siedziska (rys. 1), a następnie ustaw siedzisko w pozycji
przodem do kierunku jazdy.
Uwaga! W przypadku instalacji bez użycia ramion ISOFIX należy pominąć poniższe
kroki (3-6).
3.
Odchyl dźwignię przesuwu ISOFIX i wysuń ramiona ISOFIX (rys. 6). Zakotwiczy
ramiona ISOFIX w zaczepach znajdujących się w kanapie samochodu (rys. 3).
Ramiona zazębią się i usłyszysz charakterystyczne kliknięcie (rys. 4). Użyj prowadnic
w celu ułatwienia montażu, jeżeli istnieje taka potrzeba (rys. 5).
4.
Dociśnij fotelik ku dołowi, a następnie pchnij w stronę fotela, w celu maksymalnego
dociśnięcia ramy antyrotacyjnej do kanapy samochodu (rys. 7). Upewnij się, że
fotelik jest mocno dociśnięty do oparcia kanapy w samochodzie.
5. Pchnij bazę wykonując ruch lewo-prawo w kierunku oparcia aby mieć pewność,
że jest maksymalnie mocno przyciśnięta do kanapy samochodu.
6. Zielony wskaźnik na przycisku ISOFIX musi być widoczny po obu stronach (rys. 8).
7.
Umieść dziecko w siedzisku. Przeprowadź pas ramienny przez prowadnicę pasa
ramiennego, która znajduje się w zagłówku fotelika (rys. 18). Przeprowadź pas
biodrowy przez prowadnicę pasa biodrowego (rys. 19). Zapnij pasy bezpieczeństwa
(rys. 20). Upewnij się, że pas nie jest skręcony.
REGULACJA ZAGŁÓWKA I PASÓW NARAMIENNYCH
Aby zmienić wysokość, pociągnij za dźwignię regulacji zagłówka (7, rys. A). Potrzebne
może być lekkie dociśnięcie zagłówka ku dołowi, a następnie ustawienie w wybranej
pozycji (rys. 22). Ustawienie wysokości pasów naramiennych jest zintegrowane
z ustawieniem wysokości zagłówka. Regulując wysokości zagłówka wysokość pasów
naramiennych zostanie ustawiona automatycznie.
Uwaga! Zagłówek powinien być ustawiony na takiej wysokości, aby pasy naramienne
znajdowały się na wysokości ramion dziecka (rys. 21).
Table of contents
Languages:
Other Lionelo Car Seat manuals

Lionelo
Lionelo Astrid i-Size User manual

Lionelo
Lionelo Braam i-Size User manual

Lionelo
Lionelo Lars i-Size User manual

Lionelo
Lionelo Lennart Guide

Lionelo
Lionelo Hugo User manual

Lionelo
Lionelo Luuk FIX User manual

Lionelo
Lionelo Nico User manual

Lionelo
Lionelo Lars Plus User manual

Lionelo
Lionelo Liam User manual

Lionelo
Lionelo Liam User manual

Lionelo
Lionelo jasper User manual

Lionelo
Lionelo Oliver User manual

Lionelo
Lionelo sander User manual

Lionelo
Lionelo SEM User manual

Lionelo
Lionelo sander User manual

Lionelo
Lionelo LEVI PLUS User manual

Lionelo
Lionelo Lars User manual

Lionelo
Lionelo Aart User manual

Lionelo
Lionelo Liam User manual

Lionelo
Lionelo Levi One User manual