manuals.online logo
Brands
  1. Home
  2. •
  3. Brands
  4. •
  5. Mitel
  6. •
  7. IP Phone
  8. •
  9. Mitel MiVoice 5340e User manual

Mitel MiVoice 5340e User manual

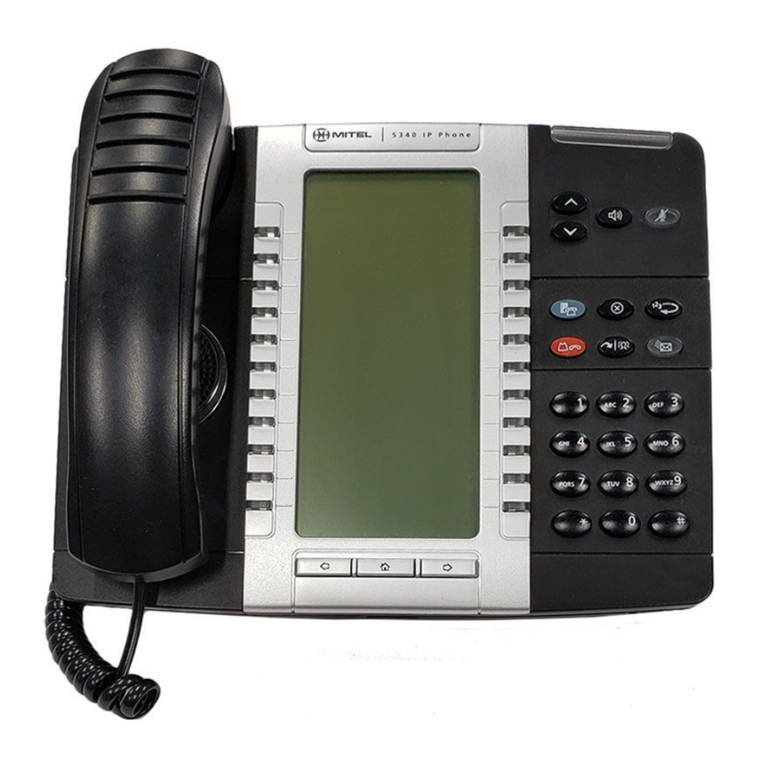
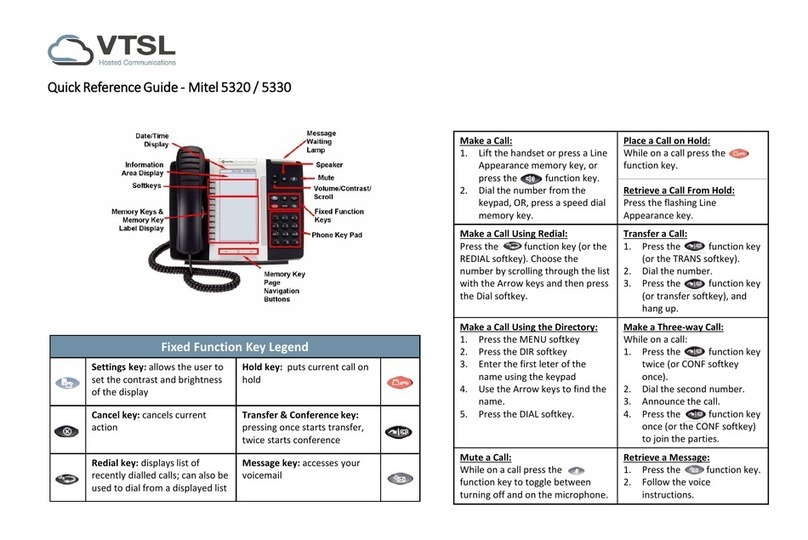
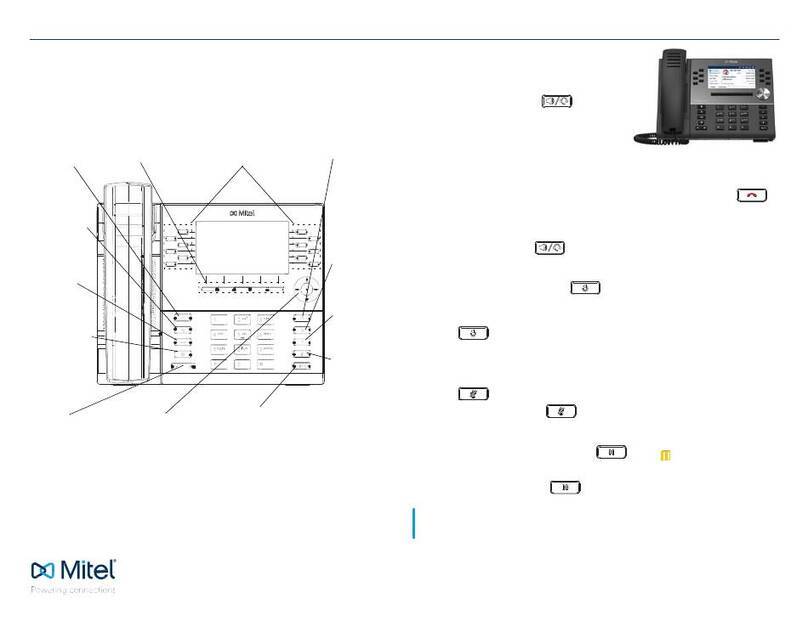
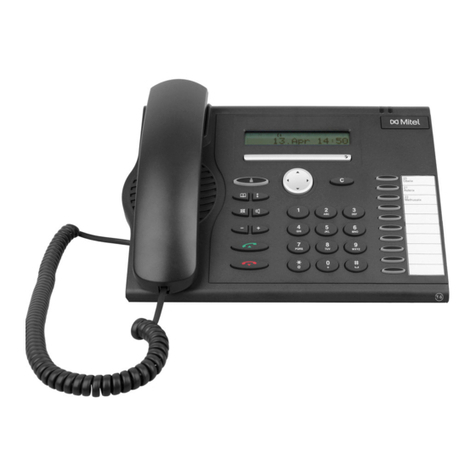
Mitel 5330E/5340E IP Phone Quick Reference (MiVoice Business)
ABOUT THE MITEL 5330E/5340E IP PHONE
Built-in Status Indicators on each key
If Line is: Status Indicator is:
Idle ............................Off
Busy..........................On
Ringing.....................Slow Flash
On Hold (your set) ....Rapid Flash
On Hold (other set)...Slow On/Fast Off Flash
Prime Line (phone number) is the key on the bottom left.
Programmable Keys 5330 (24 Keys) 5340 (48 Keys).
Softkeys, located in the top part of the display, list
features as they become available.
NAVIGATION KEYS (located immediately below the display)
help you move between the three screens:
Go Forward One Screen...........Press 
Go Backward One Screen ........Press 
7 FIXED KEYS
Speaker Hold Redial
Mute Trans/Conf Message
Cancel Menu
MAKING AND ANSWERING CALLS
1. Lift the Handset (prime line is selected for outgoing line)
SELECT DIFFERENT LINE..Press line appearance key
2. Dial the Number:
Extension ............4-Digit Number (or use Phonebook)
Speed Call ...........Press speed call key
Redial...................Press (REDIAL) key
Redials last external number dialed
Local Number......9+Area Code+Number
Long Distance .....9+1+Area Code+Number
Emergency ..........911 or 9+911
USE PHONE’S SPEAKER MODE TO MAKE/ANSWER CALL
MAKE CALL ........Dial the number (don’t lift the handset)
ANSWER CALL...Press FLASHING LINE key
USE HANDSET....Lift the handset
USE SPEAKER ...Press (SPEAKER)and hang up handset
END CALL ..........Press (CANCEL) key
Audio Controls (for handset and speaker phone):
MUTE...Press (MUTE)key (LED LIT – mic inactive)
TALK ...Press (MUTE)key (LED NOT LIT

mic active)
INCREASE HEARING VOLUME........Press (UP)key
DECREASE HEARING VOLUME ......Press (DOWN)key
FORWARD A RINGING CALL TO VOICE MAIL
To forward a ringing call to VM first you must set up a
call forwarding profile. Follow instructions to activate
then deactivate for the feature key to be programmed.
Press (APPLICATIONS Key)
Press Call Forwarding Key
Enter VM Number 1800
Press Activate Key
Press (APPLICATIONS Key)
Press Call Forwarding Key
Press Deactivate Key
Once the forwarding profile is set up a “forward
call” soft key will appear for you to press to send
the caller to VM.
HOLD FEATURE
Place Call on Hold .....Press (HOLD)key
Retrieve call on hold:
FROM YOUR PHONE...Press FLASHING LINE key
ANY OTHER PHONE ...Call Retrieve + Ext
NOTE: To Create a 3 party Conference from 2 separate calls:
1. Place the first caller on hold by selecting the 2nd line key to
answer an incoming call or make another outbound call.
2. Press the ADDHELD SOFTKEY
3. Press the FLASHING LINE KEY where your caller is on hold.
TRANSFER ACTIVE CALL
To transfer a call to another person:
1. Press (TRANS/CONF)(places call on Hold):
2. Dial Number of Third Party (can use phonebook)
Transfer Options:
Unsupervised Transfer ....Press RELEASE ME key
Supervised Transfer ........Follow these steps:
a. Consult
b. Hang Up
CANCEL Transfer..............Press (CANCEL) key
TRANSFER DIRECTLY TO A MAILBOX
To transfer a caller directly to a mailbox:
1. Press Message key (caller is on hold)
2. Enter Mailbox Number (Extension)
3. Hang Up
CONFERENCE CALL
A Conference Call can include up to 8parties and:
Anyone can add a party to the Conference Call
Originator can leave without ending Conference Call
FORM CONFERENCE CALL OR ADD TO EXISTING ONE:
1. Press (TRANS/CONF)(places call on Hold):
2. Dial Number of the Next Party
3. Wait for Answer
If Busy Signal/No Answer..Press (CANCEL)key
You will be reconnected to the conference call. To
bring another party into the call, repeat steps 1-3.
4. Press (TRANS/CONF)(all parties are on the call)
Leave Conference Call...........Hang Up





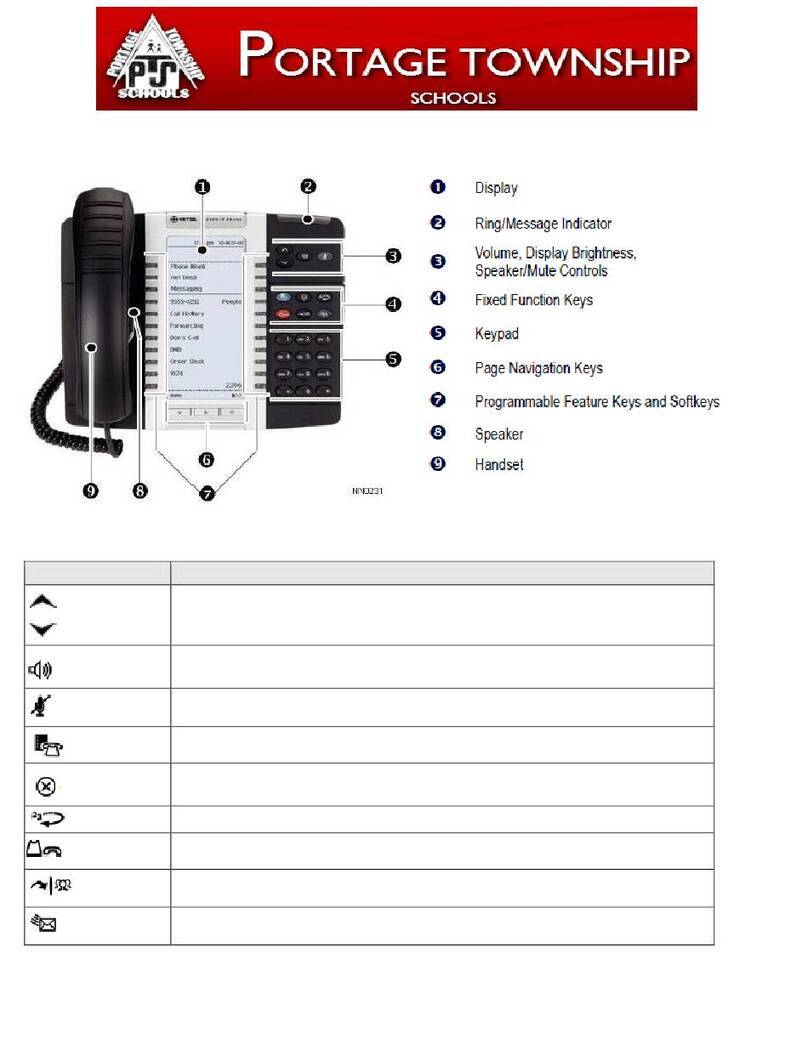
Personal Keys
Display
Ring/Message Indicator
Up/Down Control Keys
Speaker/Mute
Fixed Function Keys
Keypad
Navigation Keys
Speaker
Mitel 5330E/5340E IP Phone Quick Reference (MCD 3300)
SET UP SPEED CALL KEY
1. Press (APPLICATIONS)for phone settings menu
2. Select SETTINGS key
3. Select PROGRAMMABLE KEYS
4. Select an open key to program
5. Select SPEED CALL key
6. Press EDIT INFO
(a.) Type the label using the phone dial pad
For example:To type an upper case “S” press “7”
key 8 times. To type a lower case “s”
press “7” key 4 times
OR
Press KEYBOARD key to use the keyboard
Use the key on the left side of the row to move the
cursor to a character. The character selected
appears in the Label field above.
The keyboard characters are divided into groups
using five screens:
Lower Case Letters Lower Case Accents
Upper Case Letters Upper Case Accents
Special Characters
Go to Next Screen.......Press NEXT Key
Go to Previous ScreenPress PREVIOUS Key
Exit the Keyboard........Press HIDE KBD Key
Edit Keys (using phone dial pad or keyboard)
Backspace...............Press BACKSPACE key
Insert Space ............Press quickly two times
Move Cursor............(left) or (right)
Firm keys on base of phone
6. Press EDIT NUMBER key:
(a.) Dial the Phone Number or use LCD Keyboard:
Extension.........................Extension Number
Local Number ..................9+Area Code+Number
Long Distance Number...9+1+Area Code+Number
(b.) Press OK key to save the phone number entered
7. Press SAVE key
8. Press CLOSE key to exit the applications menu
9.Press CLOSE key to return to the main screen
MAKE CALL
1. Lift handset
2. Press SPEED CALL key
CALL HISTORY FEATURE
Call History is a comprehensive calling log located
under the (Applications Key)
Call History retains 20 call logs for each call type:
Answered, Made and Missed
Call logs are listed in order from newest to oldest
Total number of call logs is shown in the lower left
corner of the display
Use “Dial” key to call the person listed in the call log
Dial local number: Insert 9 then press DIAL
Dial long distance number: Insert 9+1 then press DIAL
When the maximum number of logs is reached, the
oldest is removed in order to store the newest one
VIEW CALL HISTORY
1. Press CALL HISTORY key
2. Press key corresponding to CALL HISTORY to view:
Answered Calls ....... Press ANSWERED key
Missed Calls............ Press MISSED key
Made Calls............... Press MADE key
3. To view a particular call log:
Press key to the left of the call log
Below are the Call History Log and Detail screens:
.
View Different Log Detail (use keys at bottom of phone):
PRESS Detail of next call log
PRESS Detail of prior call log
Call Outside Number: Modify number to include
digits needed (dial 9+1+area code+number)
EXIT CALL HISTORY
1. Press CLOSE to exit Call History Details
2. Press CLOSE to exit Call History
ADJUST PHONE TO WORK ENVIRONMENT
There are three phone settings you can adjust to
accommodate the phone for your work environment:
ADJUST RINGER PITCH
To have your phone ring at a different pitch to
differentiate it from other phones in your area,
while the phone is idle:
1. Press (APPLICATIONS)
Then Press SUPERKEY
2. Press NO key until “Ringer Adjust?” appears
3. Press RING ADJUST key
4. Press RING PITCH key
5. Use (UP)and (DOWN) to select different pitch
6. Press SUPERKEY to exit
ADJUST RINGER LOUDNESS
To have your phone ring more loudly or softly
while the phone is ringing:
Increase Ringer Loudness .....Press (UP)key
Decrease Ringer Loudness....Press (DOWN)key
ADJUST DISPLAY CONTRAST
To adjust the contrast on the display to make it easier
to read based on current lighting conditions,
while the phone is idle:
1. Press (APPLICATIONS) Key
2. Press SETTING
3. Press
BRIGHTNESS AND CONTRAST
4. Use +and -keys to adjust Brightness and
Contrast
5. Press
SAVE Softkey
6. Press
CLOSE Softkey
ADJUST TEXT SIZE
To adjust the text size from Large to Small to allow
for more information to show on each key,
while the phone is idle:
1.Press (APPLICATIONS) Key
2.Press SETTINGS
3.Press TEXT SIZE
4.Select LARGE or SMALL Text
5.Press SAVE Softkey
6.Press CLOSE Softkey
Call Histor
y
Answered Calls
Missed
Made
Delete List
Close
Frank McGee
22 Nov 1:08pm
1items 1-7


Up to seven call logs are
shown on one screen.
To view the call log list:
Go Forward.....Press 
Go Backward..Press 
Call History Details
Edit Number:
|9206873731
Dial
Delete Digit
Backspace
Close
Frank McGee
9206873731
Answered Call
Received 1:08pm
22-Nov-10
Duration 00:02:39
Delete Lo
g
Entr
y

Other manuals for MiVoice 5340e

6

This manual suits for next models

1

Other Mitel IP Phone manuals

Mitel 5207 User manual

Mitel

Mitel 5207 User manual

Mitel 5550 User manual

Mitel

Mitel 5550 User manual

Mitel 5224 User manual

Mitel

Mitel 5224 User manual

Mitel 5324 IP User manual

Mitel

Mitel 5324 IP User manual

Mitel MiVoice 5312 Service manual

Mitel

Mitel MiVoice 5312 Service manual

Mitel 5634 User manual

Mitel

Mitel 5634 User manual

Mitel 5224 User manual

Mitel

Mitel 5224 User manual

Mitel MiVoice 6940 User manual

Mitel

Mitel MiVoice 6940 User manual

Mitel 6865i User manual

Mitel

Mitel 6865i User manual

Mitel MiVoice 5312 User manual

Mitel

Mitel MiVoice 5312 User manual

Mitel SUPERSET 4 SX-50 User manual

Mitel

Mitel SUPERSET 4 SX-50 User manual

Mitel 5207 User manual

Mitel

Mitel 5207 User manual

Mitel OfficeConnect 5212 User manual

Mitel

Mitel OfficeConnect 5212 User manual

Mitel Mitel 5330 User manual

Mitel

Mitel Mitel 5330 User manual

Mitel 6768i User manual

Mitel

Mitel 6768i User manual

Mitel 6867i Premium User manual

Mitel

Mitel 6867i Premium User manual

Mitel MiVoice 5360 User manual

Mitel

Mitel MiVoice 5360 User manual

Mitel 600 User manual

Mitel

Mitel 600 User manual

Mitel NETWORKS 5010 User manual

Mitel

Mitel NETWORKS 5010 User manual

Mitel 5224 User manual

Mitel

Mitel 5224 User manual

Mitel MiVoice 6940 User manual

Mitel

Mitel MiVoice 6940 User manual

Mitel Remote User manual

Mitel

Mitel Remote User manual

Mitel MiVoice 5361 User manual

Mitel

Mitel MiVoice 5361 User manual

Mitel 5215 User manual

Mitel

Mitel 5215 User manual

Popular IP Phone manuals by other brands

Cisco 7962 quick start guide

Cisco

Cisco 7962 quick start guide

ZyXEL Communications PRESTIGE 2000W V2 user guide

ZyXEL Communications

ZyXEL Communications PRESTIGE 2000W V2 user guide

Yealink W90B user guide

Yealink

Yealink W90B user guide

GE 28320EE2 - Dect 6.0 InfoLink 2 Quick setup guide

GE

GE 28320EE2 - Dect 6.0 InfoLink 2 Quick setup guide

Freund FE-TEL-48G quick guide

Freund

Freund FE-TEL-48G quick guide

Avaya IP Office 1400 Series quick reference

Avaya

Avaya IP Office 1400 Series quick reference

Cisco 7905 serie manual

Cisco

Cisco 7905 serie manual

Gigaset DE900 IP Pro manual

Gigaset

Gigaset DE900 IP Pro manual

AUDIOLINE BigTel 165 operating instructions

AUDIOLINE

AUDIOLINE BigTel 165 operating instructions

Polycom VVX 250 Guide

Polycom

Polycom VVX 250 Guide

Polycom SoundPoint 650 Configuring

Polycom

Polycom SoundPoint 650 Configuring

Centrality PA168X user manual

Centrality

Centrality PA168X user manual

Avaya IP Office 9608 quick reference

Avaya

Avaya IP Office 9608 quick reference

Grandstream Networks GXP-280 quick start guide

Grandstream Networks

Grandstream Networks GXP-280 quick start guide

Schmooze Aastra 6753i Admin guide

Schmooze

Schmooze Aastra 6753i Admin guide

GAI-Tronics L3149B manual 

GAI-Tronics

GAI-Tronics L3149B manual 

Samsung DECT 500 Installation and programming manual

Samsung

Samsung DECT 500 Installation and programming manual

Polycom PENNNET 650 user guide

Polycom

Polycom PENNNET 650 user guide

manuals.online logo
manuals.online logoBrands
  • About & Mission
  • Contact us
  • Privacy Policy
  • Terms and Conditions

Copyright 2025 Manuals.Online. All Rights Reserved.