Oce TDS100 User manual

Océ TDS100
User manual

Copyright
© 2005, Océ-Technologies B.V. Venlo, The Netherlands
All rights reserved. No part of this work may be reproduced, copied, adapted,
or transmitted in any form or by any means without written permission from
Océ.
Océ-Technologies B.V. makes no representation or warranties with respect to
the contents hereof and specifically disclaims any implied warranties of
merchantability or fitness for any particular purpose.
Further, Océ-Technologies B.V. reserves the right to revise this publication and
to make changes from time to time in the content hereof without obligation to
notify any person of such revision or changes.
Edition 2005-02
Océ-Technologies B.V.
GB

3
Trademarks
Products in this manual are referred to by their trade names. In most, if not all
cases, these designations are claimed as trademarks or registered trademarks
of their respective companies.
Notes for the reader
Introduction
This manual helps you to use the Océ TDS100. The manual contains a
description of the Océ TDS100 and guidelines to use and operate the Océ
TDS100. There are also tips to increase your knowledge of the Océ TDS100
and to help you manage the workflow even better.
Definition
Attention Getters
Parts of this manual require your special attention. These parts provide
important, additional information or are about the prevention of damage to
your properties.
Note, Attention and Caution
The words Note, Attention and Caution indicate these important parts.
■The word Note comes before additional information about the correct
operation of the Océ TDS100 or before a hint.
■A part marked with Attention contains information to prevent damage to
items, for example the Océ TDS100 or a file.
■A part marked with Caution contains information to prevent personal
injury.
Safety information
The safety information for this product is included in a separate manual with
the title Safety manual. This manual is part of the documentation set that you
received with your product.

4 User manual

Contents 5
Contents
Notes for the reader 3
Chapter 1 Introduction to the Océ TDS100
The documentation set 8
The configurations 9
The components 10
The operator panel of the automatic 1 roll and 2 roll feed configuration 12
The operator panel of the sheet feed, multi copy configuration 17
The operator panel of the sheet feed, single copy configuration 20
Chapter 2 Use the Océ TDS100
Turn on and off the Océ TDS100 24
Turn on and off the optional dew preventer 26
Copy on a media roll (automatic roll feed) 27
Copy on cut sheet media (manual sheet feed) 29
Adjust leading and trailing strips 31
Improve the copy quality of dark and light originals 34
Check the copy quality with a test strip 35
Straighten the edge of a media roll 36
Chapter 3 Maintain the Océ TDS100
Understand message codes 38
Add toner 39
Clear an original jam 42
Clear a media jam 44
Replace a media roll 48
Clean the transparent plate 53
Appendix AOverview and tables 55
Default values 56
Product specifications 57
Supported original types and sizes 58
Supported media types and sizes 59

6 User manual
Appendix BMiscellaneous 61
Reader's comment sheet 62
Addresses of local Océ organisations 64

7
Océ TDS100
User manual
Chapter 1
Introduction to the Océ TDS100

8 User manual
The documentation set
Introduction
This manual is a part of a documentation set. The following table displays the
complete list.
Overview of the complete documentation set
Note: Visit Océ on the internet at www.oce.com for more information.
Document Publication
medium Contents
Safety
manual Paper book ■Instructions for safe use.
■Safety data sheets.
Quick
reference
guide
Paper book ■A short description on how to operate the
Océ TDS100.
User
manual CD-ROM ■A complete description on how to operate
and maintain the Océ TDS100.

Introduction to the Océ TDS100 9
The configurations
Introduction
The Océ TDS100 is a wide format copier to copy large drawings. The Océ
TDS100 is available in four different configurations. The following table
displays these configurations with their functions and options.
Functions and options per configuration
[1] The Océ TDS100 configurations
[1] The Océ TDS100 configurations
Configuration Functions Options
Sheet feed,
single copy
■Manual sheet feed
■Single copy
■Original length measuring
■Reproduction scale 1:1.
■Stand
■A1 shelves and stand.
Sheet feed,
multi copy
■Manual sheet feed
■Multi copy
■Trailing strip
■Original length measuring
■Reproduction scale 1:1.
■Stand
■A1 shelves and stand
■1-roll upgrade kit
■2-roll upgrade kit
■Dew preventer.
Automatic 1
roll feed
■Automatic 1-roll media
feed
■Multi copy
■Manual sheet feed
■Trailing strip
■Leading strip
■Test strip
■Original length measuring
■Reproduction scale 1:1.
■2-roll upgrade kit
■Dew preventer.
This configuration comes
default with a stand.
Automatic 2
roll feed
■Automatic 2-roll media
feed
■Multi copy
■Manual sheet feed
■Trailing strip
■Leading strip
■Test strip
■Original length measuring
■Reproduction scale 1:1.
■Dew preventer.
This configuration comes
default with a stand.
10 User manual
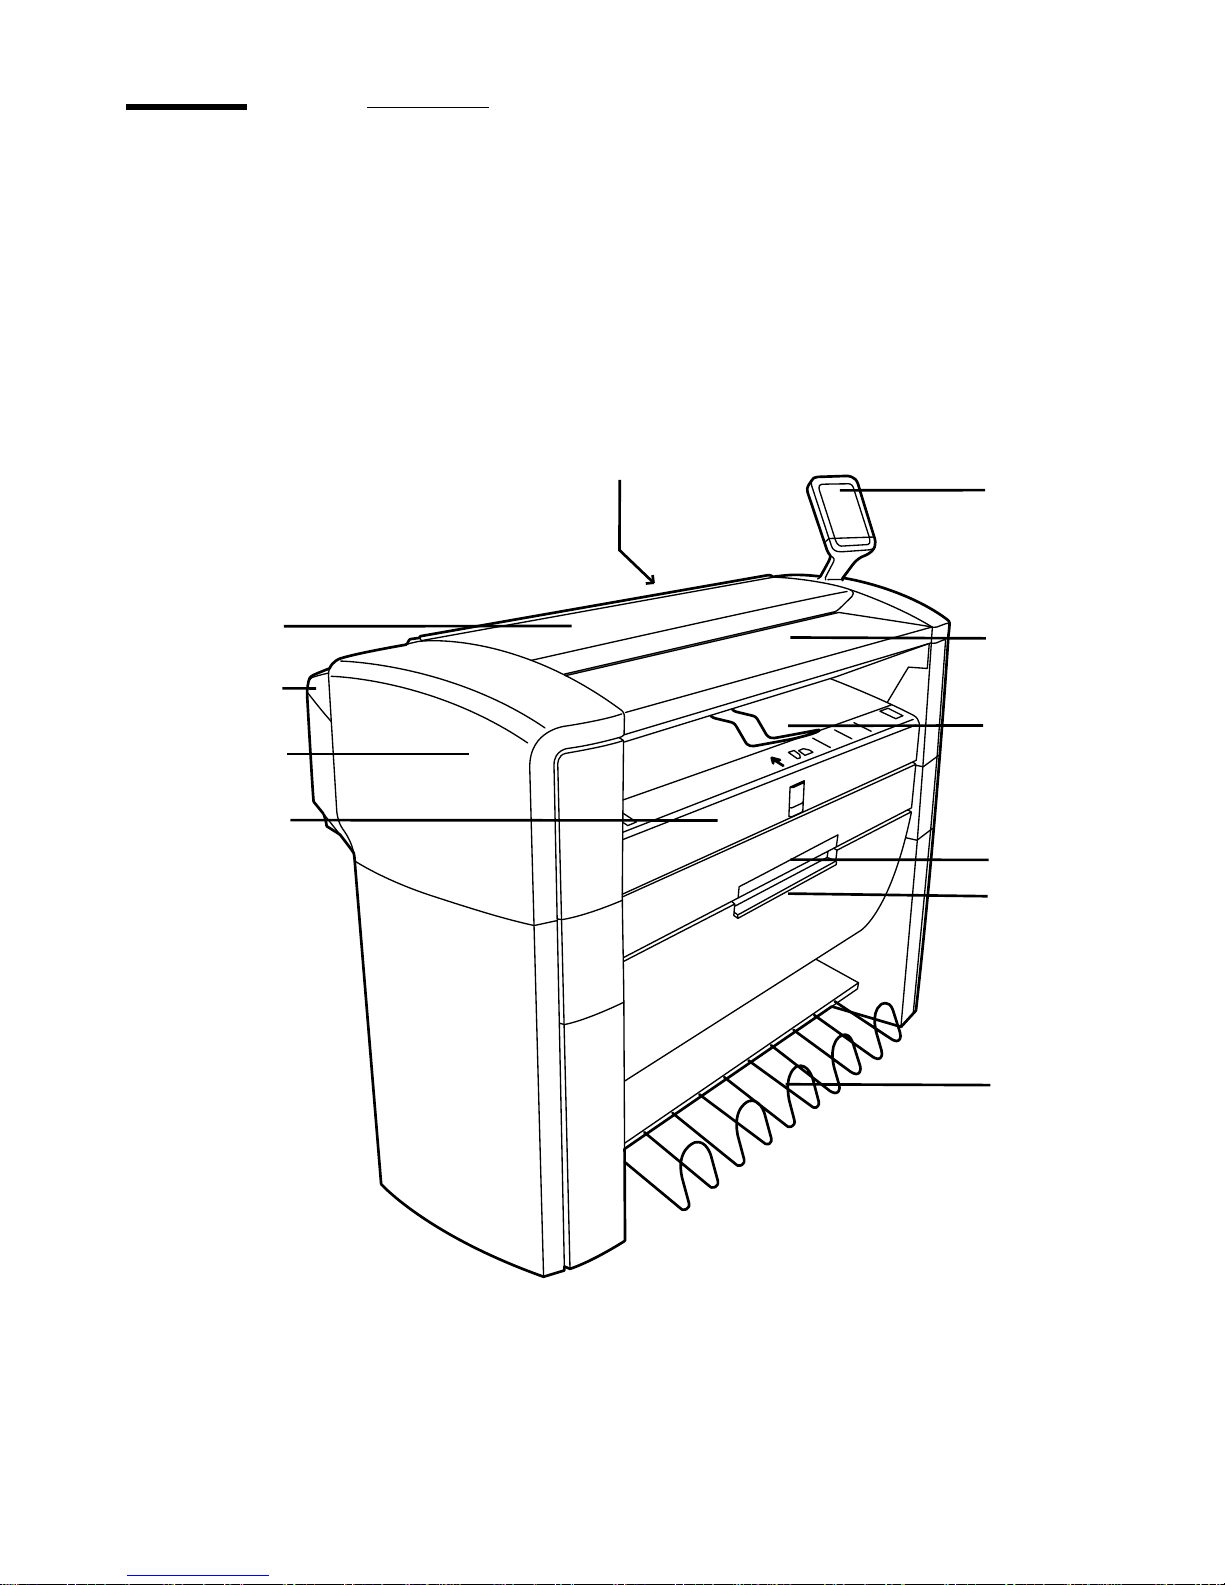
The components
Introduction
The following illustration displays the most complete configuration of the Océ
TDS100, the automatic 2 roll feed configuration. Some options may not be
available on your TDS100 due to the differences between the configurations.
Illustration
[1] The automatic 2 roll feed configuration of the Océ TDS100
[1] The automatic 2 roll feed configuration of the Océ TDS100
8
2
1
3
4
6
5
7
11
1
0
9
Other manuals for TDS100
3
Table of contents
Other Oce Printer manuals


