Opex 51 User manual

MODEL 51 OPERATOR MANUAL OPEX CORPORATION
OPEX MODEL 51 RAPID EXTRACTION DESK
OPERATOR’S MANUAL
1

MODEL 51 OPERATOR MANUAL OPEX CORPORATION
FROM THE PRESIDENT OF OPEX CORPORATION
Thank you for choosing OPEX equipment to manage your mail
extraction needs. For nearly three decades, OPEX Corporation has
been the leader in mailroom automation technology. Our Rapid
Extraction desks have been recognized as the industry standard for high
volume rapid extraction of incoming mail.
The introduction of the Model 51 Rapid Extraction Desk sets a
new standard, and marks the beginning of a new era in operator
satisfaction. You’ll appreciate the many standard and optional features
which we’ve designed to increase not only your productivity, but also
your comfort as an operator. We’ve listened to our customers, and with
our traditional attention to detail, we’ve added features you’ve
requested, and some you never expected!
Although it’s the fastest single station extractor available today, the Model 51 is extremely quiet.
The worksurface is larger. There’s a new sort bin configuration that allows you to adjust the bins to suit
your particular reach. The optional motorized Adjustable-Height Work Surface allows you to work at the
optimum level for your build, while keeping your feet on the floor. It even adjusts to accommodate
operators who must use a wheelchair.
If your particular mail operation requires you to process envelopes which are as tall as the Postal
Service allows for 1st Class mail, the Model 51 is equal to the task. Designed to provide two-sided opening
for the maximum height allowed in the United States (6 1/8” tall) and for the European C5 envelope, which
is even taller, the Model 51 is truly an international machine!
What about service? Over the years, OPEX has developed an unparalleled reputation for quick,
comprehensive, accurate service. We realize how important it is for you to maintain uptime, so we've made
it our goal to answer service calls within four hours. We’ve placed an equal emphasis on speedy repairs.
Twenty minutes, on average, is all the time it takes for an OPEX technician to complete a repair on a Rapid
Extraction Desk, thanks to comprehensive training and some of the best diagnostic software in the industry.
Welcome to the OPEX family! We wish you much success in your mail operation.
Sincerely,
OPEX Corporation
Al Stevens
President
COPYRIGHT INFORMATION
Copyright © 1997 OPEX Corporation. All rights reserved. OPEX Corporation reserves the right to make periodic
modifications to this manual without obligation to notify any person or entity of such revision.
Copying, duplicating, selling or otherwise distributing any part of this manual without the prior written consent of an
authorized representative of OPEX Corporation is prohibited.
2

MODEL 51 OPERATOR MANUAL OPEX CORPORATION
3
Table of Contents
From the President of OPEX Corporation............................................................. 2
Table of Contents................................................................................................... 3
Safety Information...............................................................................................4,5
Functional Description........................................................................................... 6
Envelope Specifications......................................................................................... 7
Desktop Height Adjustment...................................................................................8
Overview of Machine Operation ............................................................................ 8
Machine Controls...................................................................................................9
Operating Instructions..........................................................................................10
PCC (Performance Control Center) Operator Screens....................................... 11
Operating the Model 51 with PCC..................................................................12-13
Non-PCC Operation............................................................................................. 13
Troubleshooting.............................................................................................15, 16
Available Options for your Model 51...............................................................16-18
Ergonomic Chair Adjustments.............................................................................17
Certifications (Safety, Emissions, Generic Immunity) ......................................... 19
Declaration of Conformity (Europe).....................................................................20

MODEL 51 OPERATOR MANUAL OPEX CORPORATION
for safety’s sake…
The OPEX Model 51 is designed to allow you to increase your productivity while reducing much of the physical
stress normally associated with your job. Ergonomic considerations will contribute to your comfort as an OPEX
operator. These include the following improvements:
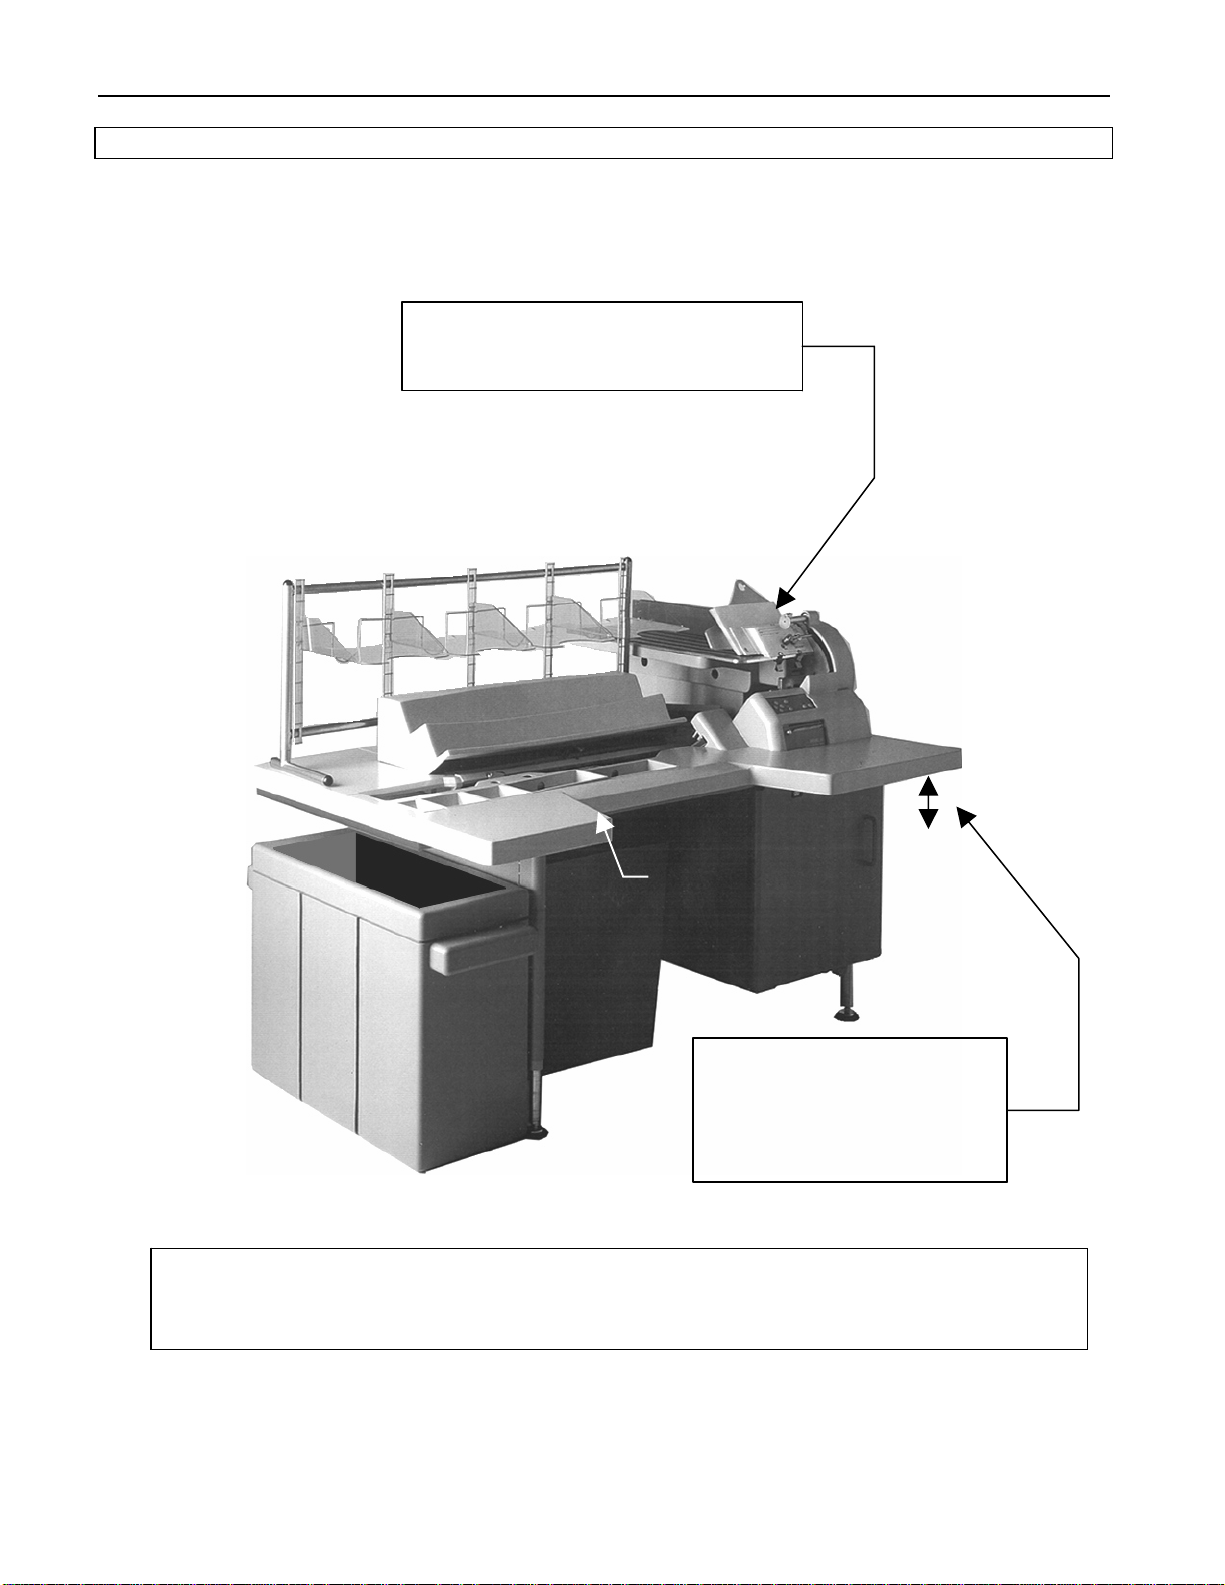
A larger wrap-around work surface gives you room to “spread out.”
Improved envelope extract heads open the envelope wider for easier access.
A vertically oriented sort area reduces arm travel and reach.
An operator-adjustable rack system simplifies large document sorting and placement.
The Performance Control Center is back-lit for easier viewing.
Optional pneumatic height adjustment provides the most comfortable setting for you.
And many other features to make your task easier.
As in any occupation which requires you to perform the same motion repeatedly during the course of
your work, it is important to consider how you perform your task. Always use proper operating
procedures when working at your Model 51 Rapid Extraction Desk. Follow the directions for using and
adjusting your chair and Desk. Using improper procedure can result in a potentially serious injury.
To reduce possible risks, we strongly urge you to follow these suggestions:
1. Maintain an upright body posture. Avoid the tendency to slump in your chair. The angle between
your torso and thigh should always be 90 degrees.
2. Adjust the seat position on your chair so that your elbow, when held at a 90 degree angle at your
side, is approximately 1½ inches below the top of the Model 51 work surface. For your comfort,
we recommend use of a specially-designed OPEX ergonomic desk chair to ensure proper
posture and seat position. The adjustment of the OPEX chair is described in the Accessories
Operation portion of this manual.
3. Occasionally change the angle of your posture.
4. If possible, avoid operating the machine for longer than a single 8 hour shift.
5. If you are under 5’ in height and your Model 51 is equipped with the optional pneumatic height
adjustment, adjust the height of the Desk so that your feet rest on the floor. If your Model 51 is
not equipped with the pneumatic adjustment, you may wish to place your feet on a footrest to
provide greater comfort while operating the machine.
6. If you are over 6’ in height, and your Model 51 is equipped with the optional hydraulic height
adjustment, adjust the height of the Desk so that you are able to work comfortably in a position
which maintains good posture. If your Model 51 is not equipped with the height adjustment,
adjust the leveling feet on the Desk to provide greater extension.
While no suggestions can guarantee completely against work-related injuries, you will certainly increase
your comfort and safety while operating the Model 51 Rapid Extraction Desk if you put these six
suggestions into practice. The Model 51 has been designed with you in mind. If it is operated correctly,
you should find your work experience comfortable and enjoyable.
4

MODEL 51 OPERATOR MANUAL OPEX CORPORATION
5
Be Safe! Don’t wear loose fitting clothing or jewelry when operating the OPEX Model 51.
Keep hands, hair, loose clothing and
jewelry away from moving parts.
Transport is
adjustable by job.
When selecting a
j
ob, keep hands out
from under the
machine.
Avoid creating pinch points
with adjustable work surface.
(Hydraulic adjustment option
only)
Please Note: The line cord is the service disconnect. To make sure that power is removed
from the machine, for servicing or to move the machine, unplug the machine from the power
source.

MODEL 51 OPERATOR MANUAL OPEX CORPORATION
FUNCTIONAL DESCRIPTION
The OPEX Model 51 is a semi-automatic workstation. Its function is to improve productivity in mail extraction by
allowing an operator to open envelopes and extract the contents in a rapid fashion.
After an extraction is complete, the Model 51 can check the envelope to make sure that all contents have been
removed. The Model 51 is typically equipped with adjustable shelves and a moveable content sort tray. Several
optional enhancements are available:
Performance Control Center (PCC): The PCC records and displays job and operator
information. It compiles and retains statistics for management purposes.
Internal Printer and printer software: The printer provides a hard copy of job and operator
statistical information.
Hydraulic Desktop Height Adjustment: Allows the operator to find his/her optimum desk level
for increased comfort and productivity. Accommodates wheelchair.
6

MODEL 51 OPERATOR MANUAL OPEX CORPORATION
7
ENVELOPE SPECIFICATIONS:
•Maximum Envelope Height: 6 3/8”
•Maximum Envelope Length: 11 ½”
•Maximum Envelope Thickness: ¼”
FEED TRAY CAPACITY
•Approximate Capacity: 22 ½”
ENVELOPE OPENING WIDTH ADJUSTABLE BY JOB
DEPTH OF SIDE-CUT OPERATOR ADJUSTABLE
•No Cut.
•Minimum Cut for normal opening of folded envelopes.
•Deep Cut to open Glue-Seam envelopes on 2 sides.
BACKSHELVES OPERATOR ADJUSTABLE
•Flexible racking system minimizes reach.
DESKTOP HEIGHT OPERATOR ADJUSTABLE
•Optional hydraulic Height
A
djustment allows the operator to find
optimum desk level for increased comfort and productivity.
Accommodates wheelchair
BUTTON KEYPAD CONTROLS
•Keypad controls are easy on the fingers.
PRINTER PAPER LOADS EASILY
•Optional Printer features pull-out door, drop-in loading of paper
roll.
INTEGRAL MAILRACK OPTION
•Holds mailtray. Pushes in to fit flush below feed shelf when
not in use.

MODEL 51 OPERATOR MANUAL OPEX CORPORATION
MODEL 51 DESKTOP HEIGHT ADJUSTMENT OPTION
The Model 51 hydraulic height adjustment option allows you to set the height of the desktop
work surface at precisely the right level for you!
To raise or lower the desk, use the toggle switch located under the desktop on your right.
Height Adj.
Toggle Switch
OVERVIEW OF THE MODEL 51
1. Operator starts the machine by pressing the On button.
(Power switch on back of machine must be turned on.)
2. Operator loads mail onto conveyor and uses keypad to select a job.
3. Operator presses “Push to Cycle” button to begin operation.
4. Envelope is fed from the conveyor to the side cutter.
5. Right side of envelope is cut; envelope is dropped into shuttle.
6. Shuttle adjusts envelope up or down for consistent top-justification.
7. Envelope moves toward operator, from the shuttle through the top cutter and into main transport.
8. Envelope stops in the staging area of the main transport.
9. Main transport moves envelope from staging area to the extractor, where it remains until
extraction.
10. When extraction is completed, envelope moves to verifier, where it is checked for contents.
11. Empty envelope moves into trash when next extraction occurs.
8

MODEL 51 OPERATOR MANUAL OPEX CORPORATION
MACHINE CONTROLS
Make sure that the machine is plugged in and turned on. The power switch is located at the back of the
machine on the panel beneath the feed conveyor.
The height of the Desk may be adjusted using the pneumatic height adjustment switch located to the right of
the seated operator, and beneath the desktop.
The Model 51 controls are located on the keypad to the right of the operator as indicated in the illustration
below.
•ENTER BUTTON
•Cancel Button
•START BUTTON
•Stop Button
CURSOR BUTTONS
•Up
•Down
•Left
•Right
The Push to Cycle button, located to the left of the seated operator, is mounted flush in the desktop (see
illustration below.) Its green lens is lighted when the machine has been turned on.
The red lens immediately to the left of the Push to Cycle button is the Candler warning light.
Candler
verifies that
envelope is
empty.
•Push to Cycle Button
•Candler Light
You have three choices when using the Candler (verifier) option:
1. Candler Off
2. Use 1st Envelope As Reference
3. Use 16 Envelope Average As Reference
9

MODEL 51 OPERATOR MANUAL OPEX CORPORATION
OPERATING INSTRUCTIONS
Loading the Model 51
Load mail on the Model 51 Feed Tray, as shown below.
10
Model 51 Feed Tray Area
Mail Pusher
Supports and advances envelopes.
Lifts, rotates and slides back to allow
additional envelopes to be loaded.
Pickup Sensor
Knows if mail is present. Controls
the advance movement of the
loaded envelopes.
Feed Tray
Capacity is approximately 22 inches.
Holds about 2/3 of a tray of mail.
Procedure to load envelopes:
1. Align the envelopes so that they all face the same direction, right side up. The bottom of
each envelope must rest on the Feed Tray. (See Model 50 / 51 difference below.)
2. Slide the Mail Pusher to its most forward position. Load a handful of mail behind the
pusher, using the angle of the pusher as your guide. Loading in this manner will ensure that
the proper loading angle is maintained, so that each envelope will feed smoothly into the
machine.
3. Lift the Mail Pusher, slide it back and drop it into place behind the envelopes. The
bottom of the first envelope should rest behind the raised lip of the Feed Tray.
4. Continue to load the mail, placing each handful behind the pusher until the Feed Tray is
full.
5. Lift the Pusher, slide it back, and place it behind the last envelope. You will find that it is
easier to load in this manner than to try to continue loading mail in front of the Pusher.
Model 50 / 51 difference: The Model 51 does not require the mail to be justified to the left edge
when loading. This feature is especially helpful when running white mail. It is still important,
however, to load the mail so that the bottom of the envelope touches the feed tray.

MODEL 51 OPERATOR MANUAL OPEX CORPORATION
PERFORMANCE CONTROL CENTER (PCC) OPERATOR SCREENS
The following screens are accessible by the Model 51 operator. An overview of these screens is listed below.
Screens are described in detail on the following pages of this manual.
Basic Screen: Main Menu
Displays selected Operator and Job.
Allows Operator and/or Job changes.
Select Operator Screen
Displays operator list.
Allows operator changes.
Select Operator Screen (List Sorted)
The operator list may be sorted
alphabetically when desired.
Select Job Screen
Displays job list.
Changes job being run.
Select Job Screen (List Sorted)
The job list may be sorted
alphabetically when desired.
Run Screen
Displays operator performance
statistics as a graph.
11

MODEL 51 OPERATOR MANUAL OPEX CORPORATION
OPERATING THE MODEL 51 (continued)
Operating the Model 51 with PCC (Performance Control Center)
Once the machine is turned on, the Operator Main Menu screen will appear:
Notice that both the operator’s name and the current job are displayed. The shadow highlight is used to select
the desired option, and may be moved left and right using the Left and Right Arrow Buttons.
To change the current operator, highlight “Select Operator” and press the Enter Button. A menu of operators
will appear as follows:
Model 50 / 51 difference: Operator names may be sorted and displayed alphabetically on the
Model 51. Up to 200 operators to be displayed on the Operator List. The same is true for Job List.
Using the Input Buttons, move the cursor to highlight the desired operator. Press Enter. The new operator’s
name will be displayed on the “Operator Main Menu” screen.
The same method will be used to select the desired job. To change the current job, highlight “Select Job” and
press the Enter Button. A menu of jobs will appear as follows:
Using the Input Buttons, move the cursor to highlight the desired job. Press Enter. The new job will be
displayed on the “Operator Main Menu” screen.
Model 50 / 51 difference: The Model 51 has no stripper tab settings to adjust, and the cutter
height setting is automatically determined. The side cutter on the Model 51 is operator adjustable. It
has 3 positions:
1. No Cut—Knob fully depressed
2. Normal Cut—Knob in mid-position
3. Deep Cut—Knob pulled out (for welded-seam envelopes)
12

MODEL 51 OPERATOR MANUAL OPEX CORPORATION
OPERATING THE MODEL 51 (continued)
Now that you have selected the operator and job to be run, the Operator Main Menu screen will display that
information. Your are ready to begin processing envelopes.
Press the Push to Cycle Button to begin the extraction process. The Run screen will be displayed on the PCC.
Count: Number of pieces processed.
Job Run Time: Number of hours and minutes the job has been active.
Rate: Number of pieces processed divided by Job Run Time.
Burst: Shows operator’s peak rate over a 6-minute span.
The total count is displayed at the top of the screen. A single vertical line is displayed for each minute the
machine is running. The lines represent your productivity rate. If you hit the Cancel button to take a 15-minute
break, and then resume running, there will be a gap where no lines are displayed for ¼ hour. Three 1-hour
periods are displayed and updated every hour.
The horizontal line indicates the level of performance expected by your management for the job being run.
This level of expectation line is supervisor-adjustable.
Model 50 / 51 difference: Hitting the Cancel button on the Model 51 keypad will not necessarily
reset the count to zero, so long as the Operator and the Job remain the same when the job is resumed.
This will allow an operator who takes a break and returns to continue the same job to view the count at
the point where the operator left off. The parameter which governs this is called “Consecutive Run
Combine Time.” The default is 60 minutes, but your supervisor may change this from a range of zero
(in which case hitting the Cancel button WILL reset the count to zero) to any number desired by your
shop management.
NON-PCC OPERATION
If your Model 51 is not equipped with the Performance Control Center, only the count will be displayed.
When a jam occurs…
If a jam occurs on your machine, the Jam Error screen will be displayed, followed by the Run screen shown
above. The two screens will alternate until the machine is restarted by pressing the Push to Cycle button.
13

MODEL 51 OPERATOR MANUAL OPEX CORPORATION
OPERATING THE MODEL 51 (continued)
Candler (Verifier)
The candler verifier detects the presence of contents mistakenly left in the envelope. If the Candler is on, and
contents are detected, the red light will flash, and the machine will not advance the envelope into the trash.
Pick up the envelope, check for contents, and continue by pressing the Push to Cycle button.
Push to Cycle
Button
Candler
Button
Model 50 / 51 difference: Heavily printed envelopes or privacy envelopes can be easily candled
on the Model 51. The Model 51 candler verifier uses an actual thickness profile of the envelope to
determine that the envelope is empty of contents. The candler on the Model 51 is supervisor adjustable
by job. It has 3 modes:
1. Candler Off: No check of the envelope will be made in this mode.
2. Use 1st Envelope As Reference: This allows the first envelope to set the standard for
each envelope that follows.
3. Use 16 Envelope Average As Reference: New with the Model 51, this mode uses a
floating average of the previous 16 envelopes as the reference. This mode allows for
minor variation in envelope thicknesses.
Emptying the Cutter Trash
As the machine is run, top cutter chips will accumulate in the trash bin directly in front of the operator’s feet.
Side cutter chips are collected in a trash bin located inside the door to the operator’s right. These bins should
be checked and emptied on a regular basis. Failure to empty trash bins will result in chips “haystacking” up
toward the cutter mechanism, preventing additional chips from falling into the trash. This may lead to the cutter
itself being jammed.
If this happens, empty the trash bin. Then clear the cutter so that no chips remain, using a pencil or similar tool
to push down chips which have collected between the cutter and surrounding frame.
Resume operation.
14

MODEL 51 OPERATOR MANUAL OPEX CORPORATION
15
TROUBLESHOOTING
When the machine stops for a reason other than the operator canceling out of a job, the PCC will display an
error message. Each error message is numbered. Note the number and find the message on the table below.
Error Message & No. Cause Solution
1. Please check mail conveyor Mail conveyor is empty. Load the mail.
2. The feed arm is stuck Object or envelope jamming arm. Carefully clear the jam.
3. Please clear the feed tray Envelope stuck in feed tray. Clear envelope.
4. Missing envelope at shuttle Envelope did not arrive at shuttle. Inspect for possible jam.
5. Envelope stuck in shuttle Envelope stuck in shuttle. Clear envelope.
6. Could not justify envelope a. Envelope is tipped on end or is
caught on something.
b. No envelope in shuttle, but the
machine believes an envelope is
there because a side-cut chip is
blocking the shuttle sensor. This
will cause the shuttle to move
upward to its limit with a bang.
Clear envelope.
Clear chip covering shuttle sensor.
7. Missing envelope at top cutter Cleat (envelope pusher) ran
beneath the envelope instead of
pushing it into the top cutter.
Clear envelope.
8. Please clear the top cutter Envelope stuck in top cutter Clear envelope.
9. Missing envelope at stage Envelope stalled coming out of top
cutter. Clear envelope.
10. Please clear staging area Envelope stalled coming out of
stager. Clear envelope.
11. Missing envelope at extract Envelope stalled coming out of
stager. Clear envelope.
12. Not used n/a n/a
13. The extract cups are stuck a. Mechanism is stuck.
b. Motor failed or disconnected.
c. Sensor faulty.
Place service call.
14. Possible dropped env. Check
Trash! a. Envelope is hung up between
stager and extract. Check and resume operation.
15. Not used n/a n/a
16. Software error Bug Place service call.
17. Cannot justify mail conveyor Occurs only on startup. Pusher
may not be sitting correctly on
conveyor belt.
Check pusher.
18. Not used n/a n/a
19. Please check the feed tray Envelope skewed in feeder. Clear envelope.

MODEL 51 OPERATOR MANUAL OPEX CORPORATION
16
20. The cleat is stuck Object is physically preventing the
belt from moving. Check, clear object.
21. The shuttle is stuck Object stuck in shuttle. Check, clear object.
22. Transport height adjust
time-out Improperly set parameter.
Malfunctioning motor. Place service call.
23. Please empty the side cut
trash Trash full. Take out the trash.
AVAILABLE ACCESSORIES FOR YOUR MODEL 51
Please Note: All of the accessories listed below may be purchased from OPEX and retrofit to Model 51s in the
field. For a current pricing proposal, please call your OPEX Sales Engineer at (609) 727-1100. Accessories
are described in detail below.
9Performance Control Center—view statistics on job and operator productivity.
9Internal Printer and Printer Software—print hard copy of PCC statistics.
9Printer Paper (Part No. P24976-01)
9ONS™ OPEX Network Solution™—view statistics from your desk PC.
9Ergonomic Desk Chair—the ultimate in ergonomic comfort for maximum productivity.
9Hydraulic Height Adjustment for Desk Worksurface
9Mail Caddy—holds four trays of mail, with additional space for cleaning supplies, etc.
9Mail Tray Holder—attaches directly to the machine, tucks away when not in use.
9Dust Cover—fitted canvas cover protects Model 51 when not in use.
;Performance Control Center
The Performance Control Center (PCC) maintains statistical information and provides reports by job
and operator. Four reports are available.
Details Report: Displays data (count, time, rate) for a single job and single operator for
the period of time beginning with the last time the Model 51 statistics were reset until
the present (e.g. from July 15, 1997 at 8:00 a.m. to August 1, 1997 at 3:30 p.m.)
Job Report: Displays data (count, time, rate) for a single job, all operators for the
period of time beginning with the last time the Model 51 statistics were reset until the
present (e.g. from July 15, 1997 at 8:00 a.m. to August 1, 1997 at 3:30 p.m.)
Operator Report: Displays data (count, time, rate) for a single operator, all jobs for the
period of time beginning with the last time the Model 51 statistics were reset until the
present (e.g. from July 15, 1997 at 8:00 a.m. to August 1, 1997 at 3:30 p.m.)
Summary Report: Displays data (count, time, rate) for all operators, all jobs for the
period of time beginning with the last time the Model 51 statistics were reset until the
present (e.g. from July 15, 1997 at 8:00 a.m. to August 1, 1997 at 3:30 p.m.)
;Internal Printer and Printer Software
Allows supervisor to print a hard copy of job / operator statistics generated by the Model 51.

MODEL 51 OPERATOR MANUAL OPEX CORPORATION
17
AVAILABLE ACCESSORIES (CONTINUED)
;Printer Paper (refill)
Package of five rolls. (Part No. P24976-01)
;ONSTM The OPEX Network Solution
ONS links your OPEX mail-handling equipment to a Novell fileserver for remote access to your data.
This Windows™-based program allows you to retrieve, consolidate, manipulate and format data.
Reports may be printed from any printer connected to your Local Area Network (LAN.)
;The Ergonomic Desk Chair
Available in two sizes, this unique chair is specifically designed to enhance the operator’s comfort and
safety by maintaining proper posture and helping to avoid fatigue.
Adjustment Instructions:
Be Safe! Keep your hands on the handles while adjusting the chair.
Seat height adjustment: Adjust the seat high enough so that your feet are just flat on the floor.
Don’t allow your feet to dangle.
To raise the seat, momentarily raise yourself off the seat and pull the Middle Lever up. The
seat will rise gently until you release the lever.
To lower the seat, take most of your weight off the seat and pull the Middle Lever up. The seat
will sink under your weight until you release the lever.
Seat tilt adjustment: Adjust the seat to tile forward to a comfortable position somewhere between
sitting and standing. This position might seem strange at first. Experiment with tilt until it feels just
right.
To tilt the seat, pull the Front Lever up. The seat will rock back and forth. Find the position
that feels most comfortable for you, then push the lever down and it will lock in place.
Backrest height adjustment: The backrest should support your lumbar area--the area between the
small of your back just above your pelvis and below the rib cage.
To adjust the backrest height, grasp the backrest on each side while sitting. Pull it up to the
desired height. There are 5 clicks. Releasing the seat at any of the first four clicks will lock
it into place for the height desired. Pulling it all the way up to the 5th click will allow it to
return to the lowest position.
Backrest tilt adjustment: Backrest tilt is correct when you just begin to feel that the backrest is
trying to push you out of the chair.
To tilt the backrest, lean forward and pull the Rear Handle up. The backrest will travel as far
forward as it can. Lean back against the backrest until you find a comfortable position.
Release the lever.

MODEL 51 OPERATOR MANUAL OPEX CORPORATION
18
AVAILABLE ACCESSORIES (CONTINUED)
;Hydraulic Worksurface Height Adjustment
See the picture on page 8 in this manual. The hydraulic height adjustment option allows the operator
to set the height of the desktop worksurface at the optimum level. To raise or lower the desk, the
operator toggles a switch located near the operator’s right hand. It can accommodate operators who
must use a wheelchair.
;Mail Caddy
Designed to solve the envelope-damage problem that occurs when incoming mail trays are stacked up
on the floor, the Mail Caddy holds four trays of mail inside a sleek, professional cabinet.
Trays are in view of the Model 51 operator, immediately available as needed. The four shelves have
the capacity to hold 5,000 pieces of mail.
For added convenience, a spring-loaded door on the back of the cabinet provides storage for other
useful items, such as cleaning or operator supplies.
;Mail Tray Holder
Fabricated from stainless steel and aluminum, the mail tray holder is both functional and good looking.
With traditional attention to detail, OPEX has designed the Model 51 mail tray holder to telescope
outward for use, and inward to a flush closed position when the day’s work is done.
See picture on page 7 of this manual.
;Dust Cover
Designed specifically for the Model 51, the canvas dust cover option protects your investment by
helping to keep your Model 51 Rapid Extraction Desk looking like new.

MODEL 51 OPERATOR MANUAL OPEX CORPORATION
19
CERTIFICATIONS:
PRODUCT SAFETY:
USA/CANADA: UL 1955, 3rd Edition / CSA C22.2 No. 950-95, "Safety of Information Technology Equipment
Including Electrical Business Equipment".
EUROPE: EN 60950-1992, "Safety of Information Technology Equipment Including Electrical Business
Equipment".
EMMISIONS:
USA: FCC Part 15, Subpart B, (Class A Equipment)
CANADA: Industry Canada Notice ICES-003, Issue 2, (Class A Equipment)
EUROPE: EC Directive 89/336/EEC, method EN 55022, (Class A Equipment)
GENERIC IMMUNITY:
EUROPE: EMC Directive 89/336/EEC, method EN 50082-1:1992

MODEL 51 OPERATOR MANUAL OPEX CORPORATION
DECLARATION OF CONFORMITY
Application of Council Directive(s):.................................................................................. 73/23/EEC; 89/336/EEC
Standard(s) to which conformity is declared:......................................................EN60950; EN55022; EN50082-1
Manufacturer’s Name:............................................................................................................... OPEX Corporation
Manufacturer’s Address:.....................................................305 Commerce Drive, Moorestown, NJ (USA) 08057
Importer’s Name: ...................................................................................................................... OPEX Corporation
Importer’s Address:........................................................................................................Carrington Business Park
Carrington, Urmston
Manchester M31 4DD
England
Type of Equipment: ........................................................................................Information Technology Equipment
Model Number:. ...............................................................................................................................RED Model 51
Serial Number:........................................................................................................................................................
Year of Manufacture: .............................................................................................................................................
I, the undersigned, hereby declare that the equipment specified above conforms to the above
Directive(s) and Standard(s).
Place:...................................................................................................................................Moorestown, NJ, USA
Date:.....................................................................................................................................................July 1, 1997
Signature:................................................................................................................................................................
Full Name:....................................................................................................................................Albert F. Stevens
Position: ..................................................................................................................................... President / Owner
20
Table of contents
Other Opex Postal Equipment manuals

Opex
Opex Envelopener Omation 2100 Specifications

Opex
Opex MPS 40 User manual

Opex
Opex Perfect Pick User manual

Opex
Opex Sure Sort User manual

Opex
Opex Envelopener Omation 306 User manual

Opex
Opex Eagle Remittance Processor User manual

Opex
Opex Falcon+ User manual

Opex
Opex Omation Envelopener 210 Series User manual

Opex
Opex Omation 206 Manual

Opex
Opex Sure Sort User manual

Opex
Opex Model 72 User manual

Opex
Opex AS7200 User manual

Opex
Opex Sure Sort User manual

Opex
Opex Perfect Pick Cortex User manual

Opex
Opex Omation Envelopener 210 Series User manual

Opex
Opex Omation 206 Manual

Opex
Opex Omation Envelopener 210 Series User manual

Opex
Opex Omation 306 User manual

Opex
Opex Pitnew Bowes Omation 2100 Manual