7/285
QUESTO PRODOTTO PUO’ ESSERE UTILIZZATO SOLO PER ESPOSIZIONI O COMPETIZIONI SPORTIVE
THE PRODUCT SHOULD BE USED ONLY FOR EXHIBITION AND COMPETITON PURPOSES
LE PRODUIT PEUT ÊTRE UTILISÉ ESSENTIELLEMENT POUR EXPOSITIONS OU COMPÉTITIONS SPORTIVES
DAS PRODUKT DARF NUR FÜR VORFÜHR- BZW. WETTKAMPFZWECKE VERWENDET WERDEN
EL PRODUCTO PUEDE SER UTILIZADO SOLO PARA EXPOSICIONES O PARA COMPETICIONES DEPORTIVAS
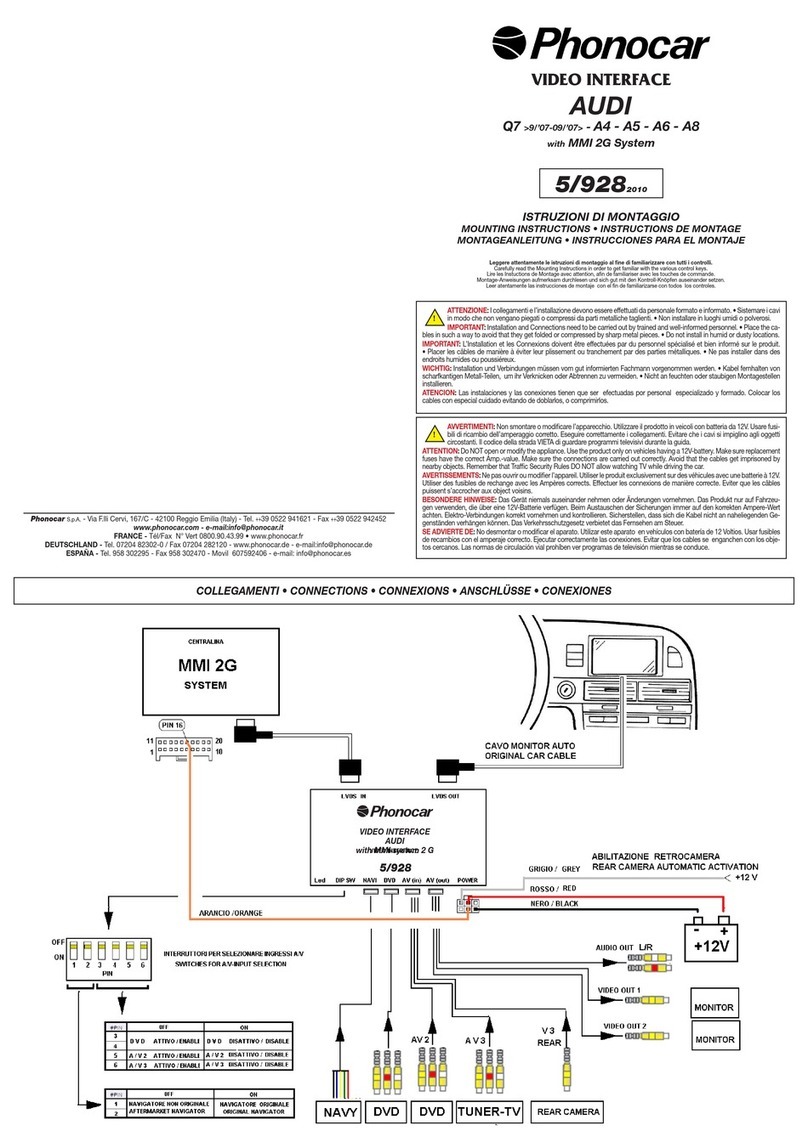
• Applicare sui cavi una guaina protettiva e fissarli, ad intervalli brevi, mediante i supporti ferma cavo e le viti 3x16 mm.
• Posizionare l’unità di connessione cavi nell’abitacolo o nel vano motore in posizione protetta da umidità lontano dal motore.
• Posizionare l’unità centrale nell’abitacolo lontano da dispositivi elettronici, in posizione visibile all’utilizzatore.
• Collegare il cavo positivo, provvisto di fusibile, al morsetto positivo della batteria e il cavo di massa direttamente sul polo negativo o al telaio.
• Apply protection sheath to the cables before fixing them at small intervals, by means of the related cable supports and the 3x16 mm-screws.
• Place the cables-connection unit within the passenger-compartment or under the bonnet, away from humidity and away from the engine.
• Place the Central Unit within the Passenger Compartment, away from electronic devices, in a position visible to the user.
• Connect the cables respecting the polarity.
• Insert the 2.5 mm connecter into the Central Unit (connect black/white cable with the positive cable; the black cable to the ground).
• Connect the fuse-fitted positive cable with the positive battery clamp; the ground-cable directly with the negative pole or to the chassis.
• Appliquer aux câbles une gaine de protection. Fixer les câbles, à petits intervalles, au moyen des supports arrêt câble et des vis 3x16 mm.
• Positionner l’unité de connexion câbles dans l’habitacle ou dans l’emplacement du moteur, à l’abris de l’humidité, loin du moteur.
• Positionner l’unité centrale dans l’habitacle, loin de dispositifs électroniques, en position bien visible à l’utilisateur.
• Brancher les câbles en respectant les polarités.
• Introduire le connecteur 2.5 mm dans l’Unité Centrale (en branchant le câble noir/blanc au câble positif ; le câble noir à la masse).
• Brancher le câble positif, doté de fusible, à la borne positive de la batterie; le câble de masse directement au pôle négatif ou au châssis.
• Kabel in Schutzhülle geben, dann, mit Hilfe der vorgesehenen Kabelhalter und 3x16 mm-Schrauben, in kleinen Abständen befestigen.
• Zentral-Einheit nahe der Batterie, vom Motor entfernt, positionieren. • Unter Berücksichtigung der Pole, Kabelverbindungen herstellen.
• 2,5 mm-DC-Verbinder in die Zentral-Einheit geben (schwarz-weisses Kabel mit dem Positiv-Kabel verbinden; das schwarze Kabel mit der Masse).
• Die Kabel-Anschluß-Einheit im Wageninnenraum, oder unter der Motorhaube, installieren. Fern vom Motor und von feuchten Stellen.
• Die Zentral-Einheit im Wageninnenraum installieren. Fern von elektronischen Geräten, jedoch gut sichtbar für den Anwender.
• Proteger los cables mediante una vaina protectora , fijar los cables con los soportes y los tornillos 3x16 mm a breve distancia entre ellos.
• Posicionar la unidad central cerca de la batería, lejos del motor. • Conectar los cables respetando la polaridad.
• Insertar el conector DC Jack de 2,5 mm en la unidad central (conectar el cable negro/blanco con el cable positivo, y el cable negro a la masa de la carrocería) • Conectar
el cable positivo, que se suministra con el fusible al borne positivo de la batería, y el cable de masa directamente al negativo o al chasis de la carrocería.
5A
FUSE
MULTI-OUTLETS
POWER CONNECTOR
INSTALLAZIONE • INSTALLATION • INSTALLATION • MONTAGEANLEITUNG • INSTALACIÒN
• Determinare una superficie di montaggio idonea per l’installazione del tubo; una flessione eccessiva dei tubi potrebbe causare la loro rottura. Mantenere un’adeguata distanza dal pneumatico per
evitare contatti accidentali. Mantenersi lontano dalla marmitta, da tubazioni, cablaggi ed organi di movimento. Stabilita la posizione, installare i supporti di fissaggio tramite le viti 3x20 mm. fornite in
dotazione. Fissare il tubo mediante le fascette fermacavo.
• Determine an even surface suitable for the tube installation. The Tubes can break, if excessively bent. Keep an adequate distance from the tyre to avoid accidental contacts. Keep away from the exhaust-
tube, other tubes, cables or movement systems. When the mounting position has been chosen, install the fixation supports by means of the enclosed 3x20mm screws. Fix the tube by means of cable-
holders.
• Trouver un plan horizontal pour l’installation du tube. Une flexion exagérée des tubes peut causer leur rupture. Maintenir une distance adéquate
du pneu, afin d’éviter des contacts accidentels. Rester loin du pot d’échappement, tubulures, câblages et organes de mouvement. A position
établie, installer les supports de fixage au moyen de vis 3x20 mm fournies et fixer le tube au moyens de porte-câbles.
• Eine flache Einbaustelle für die Neon-Röhre ausfindig machen. Die Röhre nicht zu stark biegen, sonst bricht sie. Röhre weit genug vom Reifen
entfernt halten, um Schäden zu vermeiden. Desweiteren gut Abstand halten von: Auspuff, allgemeinen Röhren, Kabeln und Bewegungsorganen.
Nach Ausfindigmachen der Montagestelle, Befestigungshalter mittels beigelegten 3x20mm-Schrauben installieren. Röhre dann, mittels Kabel-
Halter, befestigen.
• Elegir la superficie más idónea para la instalación del tubo, en cuanto una flexión excesiva de los tubos puede causar su rotura. Mantener una
adecuada distancia con los neumáticos para evitar los contactos accidentales. Mantenerse los más lejos posibles del tubo de escape, tubos en
general, cableados, y órganos en movimientos.
Una vez establecida la posición ideal, instalar los soportes de fijación a través de los tornillos 3x20 mm suministrados.Fijar el tubo a través de
las abrazaderas.
